
- Home
- Protocols

-

CUT&RUN protocol for egg chambers
Last updated date: Jan 15, 2021 Views: 1115 Forks: 0
Ovary dissections for Cut&Run
Modified by Elizabeth Knapp
1. ftz-f1::GFP.FLAG females were collected after eclosion and aged for 1-2days in 25 °C incubator with males and wet yeast before dissection.
2. Ovary pairs from 15-20 females were dissected out in 1xPBS using forceps and PYREXTM spot plates (9-well)
3. Egg chambers from the ovaries were then gently shucked out of their ovarioles with forceps.
4. Egg chambers from stage 10B to 13 were sorted based on morphology using a tungsten needle (TUNGSTEN WIRE .006" DIA) and transferred into a separate well with 1xPBS by the p20 pipette.
5. Steps 1-4 were repeated 3-4 times in the course of 45 minutes in order to collect ~150-200 egg chambers for each experiment.
Cut&Run protocol
Modified from original protocol (dx.doi.org/10.17504/protocols.io.zcpf2vn ) by Wei Li
Part A. Reagent Preparation
5% Digitonin To reconstitute enough digitonin for an experiment, weigh out 0.05 g of the powder in a
1.5 mL microcentrifuge tube, add DMSO to 1 ml, and can then be stored at -20 °C for up to 6 months. Be aware that DMSO can absorb through the skin.
CAUTION: Digitonin is toxic and care should be taken especially when weighing out the powder.
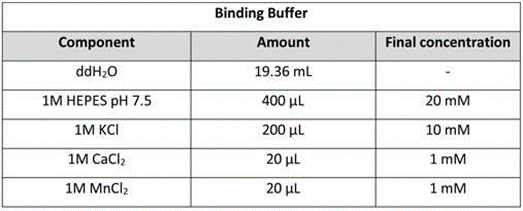
Binding buffer: Mix 20 mL of Binding Buffer in a 50 mL conical tube. Store the buffer at 4 °C for up to 6 months.
Activate Concanavalin A-coated beads in Binding Buffer: Gently resuspend and withdraw enough of the slurry such that there will be 10 μL for each final sample and/or digestion time point. Transfer into 1.5 mL Binding buffer in a 2 ml tube. Place the tube on a magnet stand to clear (30 s to 2 min). Withdraw the liquid, and remove from the magnet stand. Add 1.5 mL Binding buffer, mix by inversion or gentle pipetting, remove liquid from the cap and side with a quick pulse on a microcentrifuge. Resuspend in a volume of Binding buffer equal to the volume of bead slurry (10 μL per final sample).
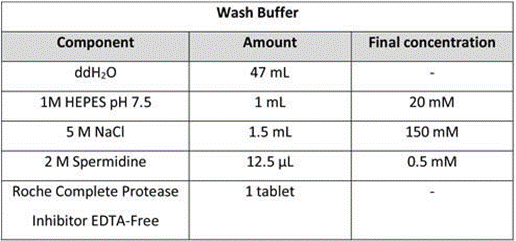
Wash buffer: Mix 50 mL of Wash Buffer. This buffer can be stored at 4 °C for up to 1 week, however, Roche Complete Protease Inhibitor tablet should be added fresh on the day of use.
NOTE: A concentration of salt that is in the physiological range avoids stress when washing the cells and mixing with beads. Spermidine in the wash buffer is intended to compensate for removal of Mg2+ during incubation in the Antibody Buffer, which might otherwise affect chromatin properties.
Dig-wash buffer: Mix 150-600 µL 5% (wt/vol) digitonin with 30 mL Wash Buffer for a final concentration of digitonin between 0.025% and 0.1% (wt/vol). Store this buffer on ice or at 4 °C for up to 1 day, and vortex before use.
NOTE: The effectiveness of digitonin varies between batches, so testing for full permeability of Trypan blue is recommended to determine the concentration to use for a cell type. We have obtained excellent results for H1 and K562 cells with 0.05% digitonin (300 µL 5% (wt/vol) digitonin in 30 mL Wash Buffer). For simplicity, we use this same buffer for all steps starting from the incubation in primary antibody until the chromatin digestion.
Antibody buffer: Mix 8 μL 0.5 M EDTA with 2 mL Dig-wash buffer and place on ice.
NOTE: The presence of EDTA during antibody treatment removes excess divalent cations used to activate the Concanavalin A-coated beads, as well as endogenous cations from the cells of interest. This serves to halt metabolic processes, stop endogenous DNAse activity, and prevent carry-over of Ca2+ from the Binding Buffer that might prematurely initiate strand cleavage after addition of pA- MNase. Washing out the EDTA before pA-MNase addition avoids inactivating the enzyme.
High Ca2+ / Low Salt specific reagents
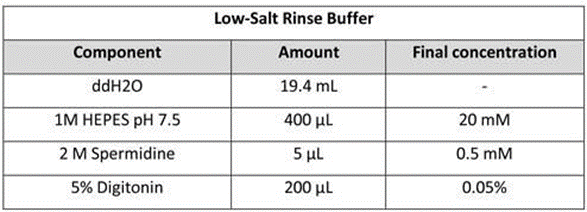
Low-Salt Rinse Buffer: Mix 20 mL of Low-Salt Rinse Buffer. Store the buffer at 4 °C for up to 1 week.
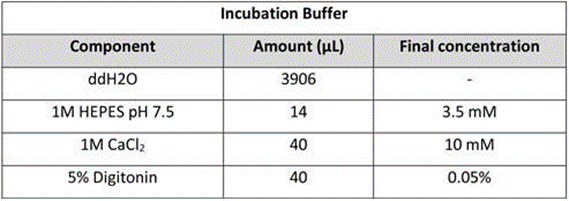
Incubation Buffer: Mix 4 mL of Incubation Buffer. Store the buffer at 4 °C for up to 1 week. Briefly chill on ice before use.
STOP Buffer: Mix 5 mL of STOP Buffer. Store the buffer at 4 °C for up to 1 week.
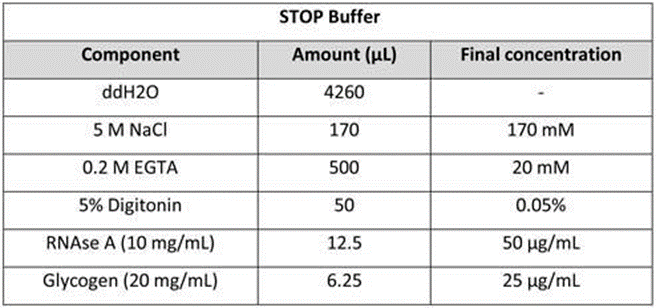
CRITICAL STEP: Adding heterologous spike-in DNA to the STOP Buffer can be useful for comparison of DNA yields between samples. For recommended concentrations see 2X STOP Buffer in Protocol Option 1 specific reagents. Alternatively, E. coli DNA that is carried-over from the production of the fusion protein can also serve as a Spike-In for sample calibrations, in which case no additional heterologous spike-in needs to be included in the STOP Buffer.
Part B. Experimental Procedure
1. Dissect ovaries from ~15 flies and collect ~200 egg chambers in 1XPBS (see Ovary dissection).
CRITICAL STEP: All steps prior to the addition of antibody are performed at room temperature to minimize stress on the cells. Because it is crucial that DNA breakage is minimized throughout the protocol, we recommend that cavitation during resuspension and vigorous vortexing be avoided.
2. Brief centrifuge at room temperature and withdraw liquid.
3. Resuspend in 1.5 mL room temperature Wash buffer by gently pipetting and transfer if necessary to a 1.5 mL tube.
4. Brief centrifuge at room temperature and withdraw liquid.
5. Repeat steps 3 and 4 two more times.
CRITICAL STEP: Thorough washing removes free sugars and other molecules that can compete for binding to the Concanavalin A coated-beads, ensuring efficient binding and recovery of the cells of interest.
6. Resuspend in 1 mL room temperature Wash Buffer by gently pipetting.
7. Add 20 µL of the ConA-coated magnetic bead slurry.
8. Rotate 10 min at room temperature.
• Permeabilize cells and bind primary antibodies (2.5 hours - overnight)
9. Mix well by vigorous inversion to ensure the bead-bound cells are in a homogenous suspension and divide into aliquots in 1.5-mL tubes, one for each antibody to be used.
NOTE: Some users have experienced issues with ConA beads sticking to the sides of the tube and coming out of solution during antibody incubation steps. In this case, 0.6-mL Lo-bind microcentrifuge tubes can be used, and subsequent Dig-wash volumes reduced to 300 µL. However, when bound to low cell numbers (e.g. <100K) the ConA beads will be extremely slippery on the sides of lo-bind tubes, and so great care must be taken while removing solutions on the magnet during wash steps etc. to avoid losing the sample.
10. Place on the magnet stand to clear and pull off the liquid.
11. Place each tube at a low angle on the vortex mixer set to low (~1100 rpm) and squirt 150 μL of the Antibody buffer per sample along the side while gently vortexing to allow the solution to dislodge most or all of the beads. Tap to dislodge the remaining beads
NOTE: Permeabilizing the cells with digitonin and chelating divalent cations with EDTA serves to quickly halt metabolic processes and prevent endogenous DNAse activity. This helps to preserve the native chromatin state and reduce background noise in the final CUT&RUN libraries. Thus, it is recommended to work quickly to get cells into Antibody Buffer.
12. Mix in the primary antibody to a final concentration of 1:100 or to the manufacturer’s recommended concentration for immunofluorescence.
CRITICAL STEP: To evaluate success of the procedure without requiring sequencing, include in parallel a positive control antibody (e.g. anti-H3K27me3) and a negative control antibody (e.g. rabbit anti-mouse IgG). Do not include a no-antibody control, as the lack of tethering may allow any unbound pA-MNase to act as a “time-bomb” and digest accessible DNA, resulting in a background of DNA-accessible sites.
13. Place on a nutator or tube rotator at room temperature at 4 °C overnight.
PAUSE POINT: Antibody incubation may proceed overnight at 4 °C.
NOTE: When using on the order of 500K cells per 10 µL beads it is normal for beads to clump or stick to the side during the incubation. First, attempt to resuspend stuck beads by inverting the tube. If beads remain stuck to the side, use a pipette tip to push beads back into solution.
• Bind Protein A/G-MNase fusion protein (1.5 hours)
14. Remove liquid from the cap and side with a quick pulse on a micro-centrifuge. Place on the magnet stand (~30 sec) to clear and pull off all of the liquid.
15. Add 1 mL Dig-Wash buffer, mix by inversion, or by gentle pipetting if clumps persist.
16. Repeat Dig-wash steps 21-22.
17. Remove liquid from the cap and side with a quick pulse on a micro-centrifuge. Place on the magnet stand to clear (~30 s) and pull off all of the liquid.
18. Place each tube at a low angle on the vortex mixer set to low (~1100 rpm). Squirt 150 μL of the Protein A/G-MNase fusion protein at 700 ng/mL (e.g., 1:800 of a 560 µg/mL glycerol stock) in Dig- wash buffer (per sample and/or digestion time point) along the side while gently vortexing to allow the solution to dislodge most or all of the beads. Tap to dislodge the remaining beads.
19. Place on the nutator or tube rotator at 4 °C for ~1 hr.
• Chromatin Digestion and Release: High Ca2+ / Low Salt (1 hour)
NOTE: The modified High Ca2+ / Low Salt CUT&RUN digestion protocol prevents premature release of the nuclease-bound complex, thereby preventing premature diffusion of the pA/G-MNase complex which has the potential to cause non-specific cleavage and increase the background signal. This option is ideal for targets that are prevalent at regions of active chromatin, as well as optimizing conditions for an antibody that appears to yield some specific signal using the standard CUT&RUN protocol but has unacceptably high levels of background signal.
20. Remove liquid from the cap and side with a quick pulse on a micro-centrifuge. Place on the magnet stand (~30 sec) to clear and pull off all of the liquid.
21. Add 1 mL Dig-wash buffer, mix by inversion, or by gentle pipetting if clumps persist.
22. Repeat Dig-wash steps 38-39.
23. Remove liquid from the cap and side with a quick pulse on a micro-centrifuge. Place on the magnet stand to clear and pull off all of the liquid. Add 1 mL Low-Salt Rinse Buffer, mix by inversion, or by gentle pipetting if clumps persist, and remove liquid from cap and side with a quick pulse on a micro- centrifuge.
CRITICAL STEP: If multiple digestion time points are desired per sample, split samples into multiple tubes for MNase digestion and STOP steps, one tube for each time point.
24. Place on the magnet stand to clear (~30 s) and pull off all of the liquid.
25. Place each tube at a low angle on the vortex mixer set to low (~1100 rpm) and add 200 μL of ice cold Incubation Buffer along the side while gently vortexing to allow the solution to dislodge most or all of the beads. Tap to dislodge the remaining beads.
26. Incubate at 0 °C for the desired digestion time (default is 5 min).
CRITICAL STEP: MNase binds DNA but only cleaves when Ca++ is present, so that digestion is a zero- order reaction that seems to be less temperature-dependent than the subsequent diffusion of released pA-MNase-bound particles that can digest accessible regions of the genome. Cleavage and release of particles in most of the cell population can be obtained at 0 °C while minimizing background cleavages attributable to diffusion. We have found that digestion at ambient temperature or higher results in unacceptable background cleavage levels.
27. Place on (cold) magnet stand and allow to clear for ≥10 s and remove liquid. Add 200 μL STOP buffer and mix by gentle vortexing.
NOTE: The 10 mM Ca++ in the Incubation Buffer will compact chromatin and prevent diffusion out of the nucleus during digestion. Thus, following the 5 min digestion, the Incubation Buffer will contain very little pA-MNase digested chromatin. However, to be safe, the Incubation Buffer can be saved for potential
future analysis. The addition of 200 μL STOP buffer will then chelate away remaining Ca++ and allow the digested chromatin fragments to freely diffuse out of the cells.
CRITICAL STEP: Heterologous spike-in DNA may be present in the STOP buffer to calibrate DNA amounts, for example to compare treatments or digestion time points. Alternatively, mapping to E. coli carry-over DNA from the pA-MNase and pA/G-MNase that gets fragmented during digestion suffices for calibration.
28. Incubate 30 min @ 37 °C to release CUT&RUN fragments from the insoluble nuclear chromatin.
29. Place on the magnet stand to clear. Cleanly transfer the supernatant containing digested chromatin to a fresh 1.5-mL microcentrifuge tube and proceed with Phenol Chloroform Extraction (Step 57).
NOTE: When performing CUT&RUN using untested antibodies, following removal of the STOP buffer w/ Chromatin it is a good idea to spin down and freeze the ConA bead-bound cells containing the insoluble nuclear chromatin that is left behind after MNase digestion. These cells may be useful for troubleshooting in cases where the user suspects chromatin solubility issues may be limiting yields. By preparing a sequencing library from the total DNA extracted from the "left-over" ConA bead-bound material as described in Skene and Henikoff (eLife, 2017), and comparing the sequencing data, the user can then determine if the majority of the cleaved DNA was in fact being retained in the nuclear fraction.
• Phenol Chloroform Extraction (~1.5 hours)
30. To each sample add 2 μL 10% SDS (to 0.1%), and 2.5 μL Proteinase K (20 mg/ml). Mix by inversion and incubate 1 hr @ 50 °C.
31. Add an equal volume of Phenol Chloroform to the sample (e.g. to 200 µL sample add 200 µL Phenol Chloroform). Mix by full-speed vortexing ~2 s.
32. Transfer to a phase-lock tube (e.g., Qiagen MaXtract), and centrifuge 5 min, room temperature @ 16,000 x g.
33. Add an equivalent volume of chloroform to the initial sample volume (e.g. for a 200 µL starting sample volume add 200 µL chloroform). Invert ~10X to mix and then centrifuge 5 min, room temperature @ 16,000 x g.
34. Remove the top liquid phase by pipetting to a fresh tube containing 2 μL 2 mg/mL glycogen (diluted 1:10 from 20 mg/mL glycogen stock).
35. Add 500 μL 100% ethanol and mix by vortexing or tube inversion.
36. Chill on ice and centrifuge 10 min, 4 °C @ 16,000 x g.
37. Pour off the liquid and drain on a paper towel.
38. Rinse the pellet in 1 ml 100% ethanol and centrifuge 1 min, 4 °C @ 16,000 x g.
39. Carefully pour off the liquid and drain on a paper towel. Air dry.
40. When the pellet is dry, dissolve in 30-50 μL 1 mM Tris-HCl pH 8 0.1 mM EDTA, then transfer to a new
0.6 mL Lo-Bind microcentrifuge tube.
• Sample Analysis Pre-Library Prep (~1 hour)
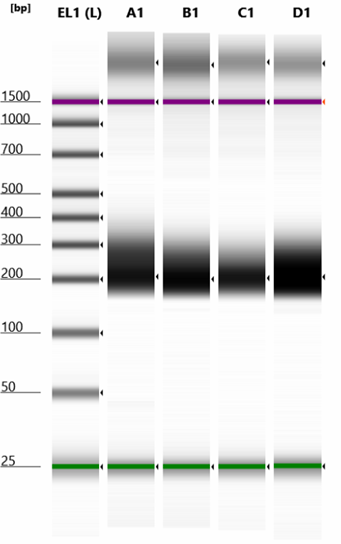
41. Optional: Evaluate the presence of cleaved fragments and the size distribution by capillary electrophoresis with fluorescence detection, for example using a Tapestation instrument.
CRITICAL STEP: Some long undigested DNA will leak through, and this is what will dominate the Qubit
fluorescence for CUT&RUN of typical transcription factors. For these, the targeted DNA recovered is too
low in amount and too small in size to be detected by gel analysis or even by Tapestation. In such cases
it may be necessary to make a PCR-amplified library to quantify by Tapestation or Bioanalyzer analysis.
• Library preparation for CUT&RUN with NEBNext® Ultra™ II DNA Library Prep Kit for Illumina® (E7645)
42. Mix components
Add the following components to a sterile nuclease-free tube:
Reagent Volume
CUT&RUN DNA (6ng) 25 μl
(green) NEBNext Ultra II End Prep Enzyme Mix 1.5 μl
(green) NEBNext Ultra II End Prep Reaction Buffer 3.5 μl
Starting Material <30 ng fragmented DNA.
NOTE: Set a 100 or 200 μl pipette to 25 μl and then pipette the entire volume up and down at least 10 times to mix thoroughly. Perform a quick spin to collect the liquid from the side of the tube. Note: it is important to mix well. The presence of a small amount of bubbles will not interfere with the performance.
43. Place in a thermocycler, with the heated lid set to ≥ 60°C, and run the following program:
Time Temperature
30 minutes 20°C
60 minutes 50°C
Hold 4°C
CRITICAL: Decreasing temperature to 50°C can significantly help saving very small fragments (25-70 bp) as seen in our sequencing data.
44. Dilute the Adaptor based on the amount you need to use. I dilute the original 15 μM adaptor to 3 μM when I work with 6 ng input DNA.
NOTE: If your input is 6 ng, its molarity is 0.2 pmol. I typically use ~4 pmol (3 μM x 1.25 μL) of Adaptor (20x). Lower amount of Adaptor can reduce the amount of final PCR dimers. If you have severe dimer contamination, you can use as low as 0.6 pmol Adaptor for 0.2 pmol of input DNA (3x).
45. Add the following components directly to the End Prep Reaction Mixture:
Reagent Volume
(red) NEBNext Ultra II Ligation Master Mix 15 μl
(red) NEBNext Ligation Enhancer 0.5 μl
(red) NEBNext Adaptor For Illumina 1.25 μl
NOTE: The NEBNext adaptor is provided in NEBNext Multiplex (NEB #E7335, #E7500) Oligos for Illumina. There is only one universal Adaptor, and the barcodes are embedded in the PCR primers.
CRITICAL: Do not add adaptor to a premix in the Adaptor Ligation Step. For best results premix adaptor and sample and then add the other ligation reagents.
NOTE: Set a 100 or 200 μl pipette to 40 μl and then pipette the entire volume up and down at least 10 times to mix thoroughly. Perform a quick spin to collect the liquid from the side of the tube. Note: it is important to mix well. The presence of a small amount of bubbles will not interfere with the performance.
46. Incubate at 20°C for 15 minutes in a thermal cycler.
47. Add 1.5 μl of USER™ enzyme to the ligation mixture.
Mix well and incubate at 37°C for 15 minutes with heated lid set to ≥ 47°C.
NOTE: USER addition and USER incubation are only required for use with NEBNext adaptors. USER is provided in the NEBNext Index Primer kits. It is also available as a separate product NEB# M5505 which can be used in NEBNext library prep workflows.
48. Vortex AMPure XP beads to resuspend. Please allow the beads to warm to room temperature for at least 30 minutes before use.
49. Add 80 μl (~1.75x) AMPure XP beads to ligation reaction. Mix well by pipetting up and down at least 10 times.
Incubate samples on bench top for at least 5 minutes at room temperature.
NOTE: Be careful to expel all of the liquid out of the tip during the last mix. Vortexing for 3-5 seconds on high can also be used. If centrifuging samples after mixing, be sure to stop the centrifugation before the beads start to settle out.
CRITICAL: Use of 80 μl AMPure XP beads is essential to purify short DNA.
50. Place the tube/plate on an appropriate magnetic stand for 5 minutes to separate the beads from the supernatant.
NOTE: If necessary, quickly spin the sample to collect the liquid from the sides of the tube or plate wells before placing on the magnetic stand.
51. After 5 minutes (or when the solution is clear), carefully remove and discard the supernatant that contains unwanted DNA. (Caution: do not discard beads).
NOTE: Be careful not to disturb the beads that contain the desired DNA targets
52. Add 200 μl of 80% freshly prepared ethanol to the tube/plate while in the magnetic stand. Incubate at room temperature for 30 seconds, and then carefully remove and discard the supernatant.
NOTE: Be careful not to disturb the beads that contain DNA targets. Beads can be left with 80% ethanol for minutes but we do not recommend to leave them too long.
53. Repeat the previous step once. Be sure to remove all visible liquid after the second wash. If necessary, briefly spin the tube/plate, place back on the magnet and remove traces of ethanol with a p10 pipette tip.
54. Air the dry beads for up to 5 minutes while the tube is on the magnetic stand with the lid open. Caution: Do not overdry the beads.
Caution: Do not overdry the beads. This may result in lower recovery of DNA target. Elute the samples when the beads are still dark brown and glossy looking, but when all visible liquid has evaporated. When the beads turn lighter brown and start to crack they are too dry.
55. Remove the tube/plate from the magnetic stand. Elute the DNA target from the beads into 15 μl of 10 mM Tris-HCl or 0.1X TE. Mix well on a vortex mixer or by pipetting up and down 10 times. Incubate for at least 2 minutes at room temperature.
NOTE: If necessary, quickly spin the sample to collect the liquid from the sides of the tube or plate wells before placing back on the magnetic stand.
56. Place the tube/plate on a magnetic stand. After 5 minutes (or when the solution is clear), transfer 13 μl to a new PCR tube for (amplification).
SAFE STOP: Samples can be stored at -20ºC
57. Mix the following components in sterile strip tubes (Total volume 30 μl):
Reagent Volume
Adaptor LigatedFragments 13 µl
(blue) NEBNext Ultra II Q5 MasterMix 15 µl
(blue) Index Primer/i7 Primer 1 µl
(blue) Universal PCR Primer/i5 Primer 1 µl
NOTE: The primers are provided in Multiplex (NEB #E7335, #E7500) Oligos for Illumina.
58. PCR using the following cycling conditions:
Cycle Step Temperature Time Cycles
Initial Denaturation 98°C 30 Seconds 1
Denaturation 98°C 10 Seconds 12*
Annealing/ Extension 65°C 10 Seconds
Final Extension 65°C 5 Minutes 1
Hold 4°C ∞
NOTE: When starting with 6 ng DNA, I’ve obtained 10-40 ng of DNA with 12-14 cycles of amplification with different samples. If you use less input, consider increasing the cycle number.
59. Vortex AMPure XP beads to resuspend. Please allow the beads to warm to room temperature for at least 30 minutes before use.
60. First round size selection: remove PCR products that are >350 bp.
Add 24 μl (0.8X) resuspended AMPure XP beads to the PCR reaction. Mix well by pipetting up and down at least 10 times. Incubate for at least 5 minutes at room temperature.
NOTE: Be careful to expel all of the liquid out of the tip during the last mix. Vortexing for 3-5 seconds on high can also be used. If centrifuging samples after mixing, be sure to stop the centrifugation before the beads start to settle out.
61. Place the tube/plate on an appropriate magnetic stand to separate the beads from the supernatant (5 min or when the solution is clear).
NOTE: If necessary, quickly spin the sample to collect the liquid from the sides of the tube or plate wells before placing on the magnetic stand.
62. After 5 minutes (or when the solution is clear), carefully transfer the supernatant containing your DNA to a new tube (Caution: do not discard the supernatant). Discard the beads that contain the unwanted large fragments.
63. Second round of size selection: remove PCR products shorter than 150 bp.
Add 12 μl (final 1.2x) resuspended AMPure XP beads to the supernatant and mix at least 10 times. Then incubate samples on the bench top for at least 5 minutes at room temperature.
NOTE: Be careful to expel all of the liquid from the tip during the last mix.
64. Place the tube/plate on an appropriate magnetic stand for 5 minutes to separate the beads from the supernatant.
NOTE: If necessary, quickly spin the sample to collect the liquid from the sides of the tube or plate wells before placing on the magnetic stand.
65. After the solution is clear (about 5 minutes), carefully remove and discard the supernatant. Be careful not to disturb the beads that contain DNA targets (Caution do not discard beads).
66. Wash #1: Add 200 μl of 80% freshly prepared ethanol to the tube/ plate while in the magnetic stand. Incubate at room temperature for 30 seconds, and then carefully remove and discard the supernatant.
NOTE: Be careful not to disturb the beads that contain DNA targets.
67. Wash #2: Repeat the previous once for a total of two washes. Be sure to remove all visible liquid after the second wash. If necessary, briefly spin the tube/plate, place back on the magnet and remove traces of ethanol with a p10 pipette tip.
68. Air dry the beads for up to 5 minutes while the tube/plate is on the magnetic stand with the lid open.
Caution: Do not over-dry the beads. This may result in lower recovery of DNA target. Elute the samples when the beads are still dark brown and glossy looking, but when all visible liquid has evaporated. When the beads turn lighter brown and start to crack they are too dry.
69. Remove the tube/plate from the magnetic stand. Elute the DNA target from the beads by adding 15 μl of 0.1X TE. Mix well by pipetting up and down 10 times, or on a vortex mixer. Incubate for at least 2 minutes at room temperature.
NOTE: If necessary, quickly spin the sample to collect the liquid from the sides of the tube or plate wells before placing back on the magnetic stand.
70. Place the tube/plate on the magnetic stand. After 5 minutes (or when the solution is clear), transfer 13 μl to a new PCR tube for and store at -20ºC.
71. Check the size distribution on an Agilent Bioanalyzer® High Sensitivity DNA chip or TAPESTATION. The sample may need to be diluted before loading.
The size should be 160-350bp.
Since the size of library is so near to the PCR dimer (128 bp), sometimes there are residual dimers. The ratio of dimers is mostly 1-20% in my experiments (please see attached screenshots of Tapestation analysis of four libraries). You can easily get rid of them by doing another round of 1.2X AMPure XP beads clean up.
If you get too many dimer contamination, I recommend doing gel based size selection using a 2-3% agarose gel. Pippin Prep is a good option to do gel based size selection. Also consider reduce the Adaptor to as low as 3X when you make libraries for similar experiments in the future.
72. Be sure to do pair end sequencing. This will give you the information of fragment size.
Fragments that are <120 bp (library size <250 bp) contain most of the protein binding information while fragments >140 bp (library size >270 bp) contain surrounding nucleosome positioning information.
73. Be aware that there will be several bases of adapter sequences in some of the reads, known as read through adaptors. For example, I sequence 42 bp each read. For all fragments that are shorter than 42bp, there will be adapter sequences at 3’ of the reads. You need to trim them.
- Knapp, E, Li, W and Sun, J(2021). CUT&RUN protocol for egg chambers. Bio-protocol Preprint. bio-protocol.org/prep749.
- Knapp, E. M., Li, W., Singh, V. and Sun, J.(2020). Nuclear receptor Ftz-f1 promotes follicle maturation and ovulation partly via bHLH/PAS transcription factor Sim. eLife. DOI: 10.7554/eLife.54568
Category
Do you have any questions about this protocol?
Post your question to gather feedback from the community. We will also invite the authors of this article to respond.