


- Protocols

- Articles and Issues
- For Authors
- About
- Become a Reviewer


Generation, Cryopreservation, and Drug Assessment of 3D Tumor Spheroids Using the Spheromatrix Platform

(*contributed equally to this work) Published: Vol 16, Iss 23, Dec 5, 2026 DOI: 10.21769/BioProtoc.5896 Views: 36
Reviewed by: Tanxi CaiAnonymous reviewer(s)
 PDF
 Ask a question

Original research article
The authors used this protocol in:

Dec 2025

Protocol Collections
Comprehensive collections of detailed, peer-reviewed protocols focusing on specific topics



Abstract
Three-dimensional (3D) tumor spheroids provide tissue-like models for preclinical oncology, yet their scalable production, long-term preservation, and on-demand use remain technically demanding. This protocol describes the Spheromatrix, a paper-based platform combining wax-patterned hydrophilic U-wells with a custom 3D-printed cell loading device (Spherobox). The protocol covers Spherobox and U-well fabrication, uniform Spherobox-assisted cell seeding into the U-wells, spheroid culture, controlled-rate freezing, liquid nitrogen storage, rapid post-thaw recovery, and drug response assessment. The demonstrated 14 × 16 format provides 224 spatially separated U-wells for parallel spheroid generation and can be scaled by expanding the wax-patterned paper array. The platform was validated for spheroid generation using six cancer cell lines (MCF7, PC3, HeLa, SKBR3, HCT15, and U87) and the noncancerous MRC5 fibroblast cell line. U87 glioblastoma spheroids served as a proof-of-concept model for the complete cryopreservation-to-drug response assessment workflow and, following recovery, retained their morphology and metabolic activity and remained responsive to cisplatin and temozolomide. The compact, stackable format supports space-efficient generation, storage, and retrieval of ready-to-use 3D tumor models for drug screening and spheroid biobanking.
Key features
• Supports uniform Spherobox-assisted cell loading and 3D cell culture, demonstrated with six cancer cell lines and noncancerous fibroblasts, and adaptable to additional cell lines.
• The 14 × 16 format provides 224 spatially separated U-wells for parallel spheroid generation and can be scaled for application-specific needs.
• Compact, stackable paper chips support space-efficient spheroid banking and reduce medium and cryoprotectant volumes, offering potential savings in consumables, cryogenic capacity, and storage-related energy.
• Supports cryopreservation, post-thaw recovery, and drug response testing in cryopreserved and non-cryopreserved spheroids, demonstrated with cisplatin and temozolomide, and extendable to other candidate therapeutics.
Keywords: Spheromatrix Paper-based platform
3D cell culture
Tumor spheroids
Cryopreservation
Drug screening
Spheroid banking
Glioblastoma
Graphical overview
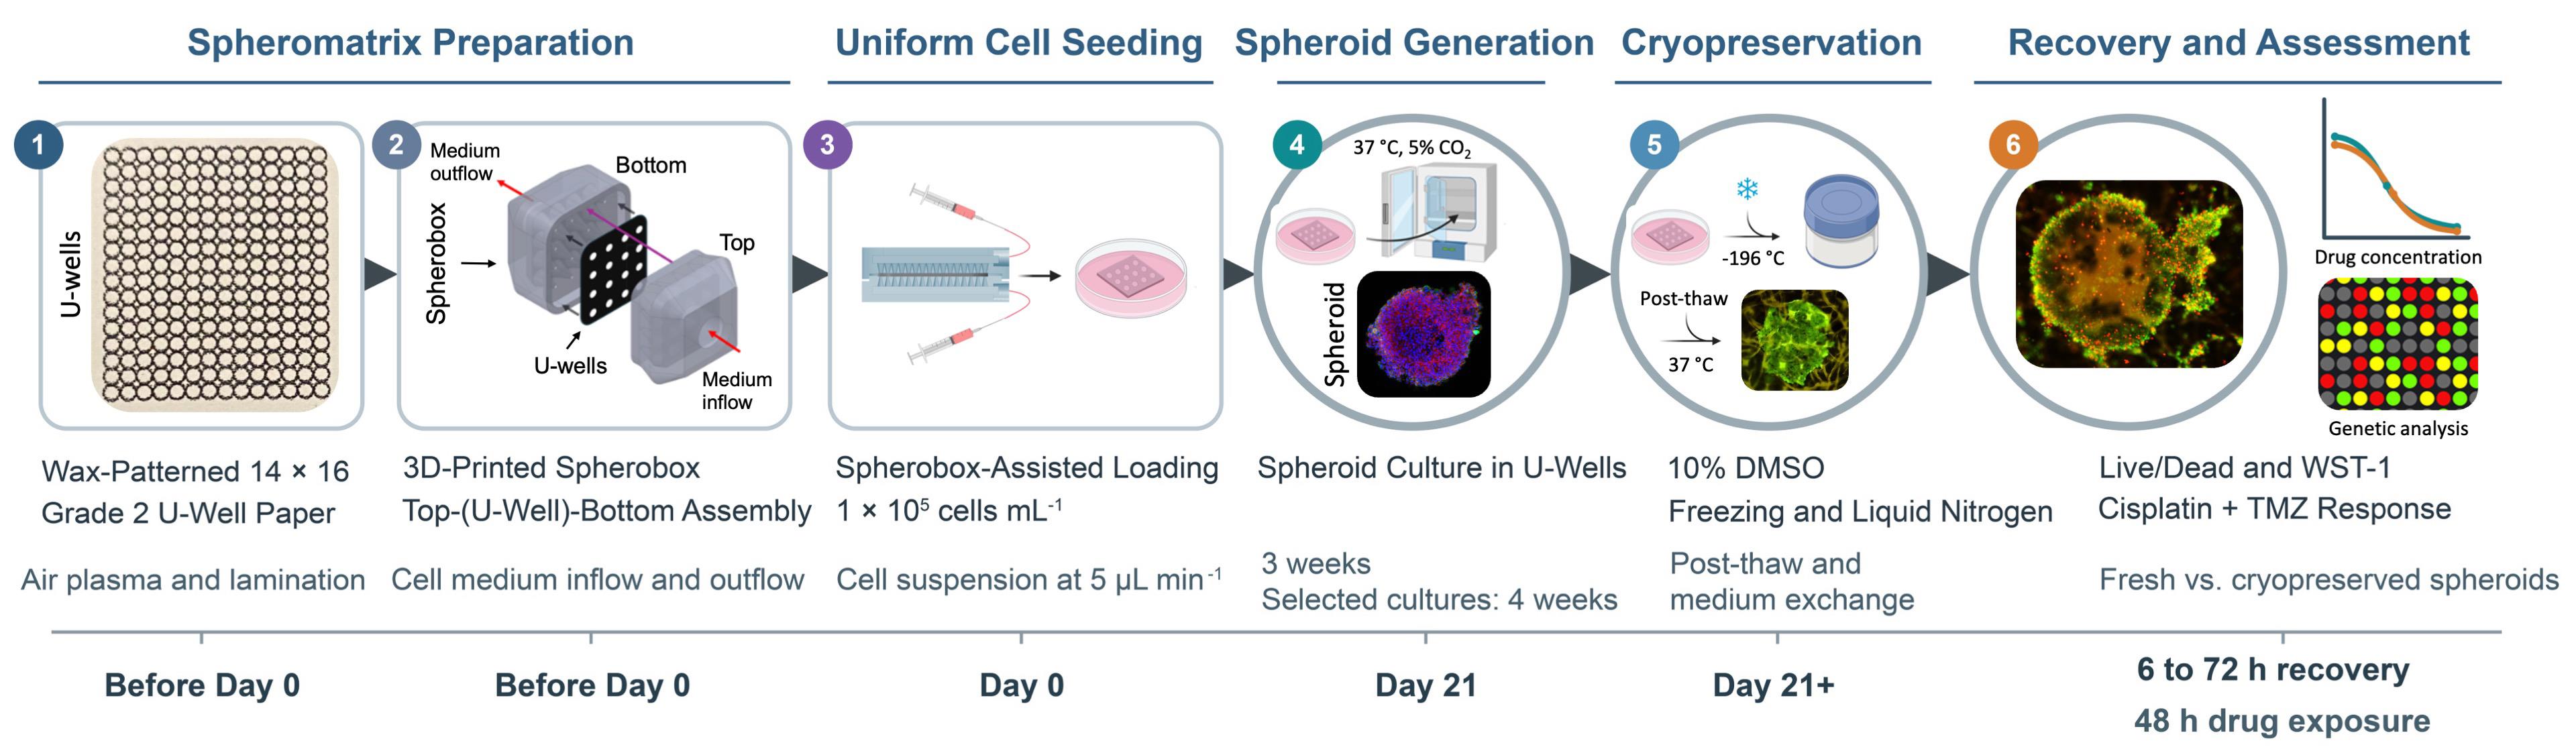
Spheromatrix workflow for scalable spheroid generation, cryopreservation, recovery, and drug response assessment. (1) Wax printing and thermal diffusion generate a 14 × 16 array of hydrophilic U-wells in Whatman Grade 2 filter paper, followed by air plasma treatment to improve liquid filling and lamination to enhance chip stability. (2) The 3D-printed Spherobox is assembled around the U-well chip to provide controlled cell medium inflow and outflow. (3) Cells are loaded through the Spherobox at 1 × 10⁵ cells/mL and a flow rate of 5 μL/min. (4) Spheroids are cultured at 37 °C and 5% CO2 for 3 weeks. Where indicated, selected cultures are maintained for 4 weeks. (5) Spheroids are cryopreserved in complete medium containing 10% (v/v) DMSO using controlled-rate freezing, stored in liquid nitrogen, rapidly thawed, and subjected to medium exchange. (6) Recovered spheroids and non-cryopreserved controls are evaluated using Live/Dead imaging, WST-1 metabolic activity measurements, cisplatin and temozolomide drug response assays, and, optionally, qPCR-based transcriptional integrity assessment. Device schematics and representative experimental images are adapted from Glia et al. [1].
Background
Three-dimensional (3D) in vitro tumor models have greater physiological relevance for preclinical oncology studies than conventional 2D cell cultures [2]. Tumor spheroids reproduce important features of solid tumors, including cell–cell and cell–matrix interactions, spatial organization, and gradients in oxygen, nutrients, metabolites, and waste [3]. These properties influence cell proliferation, drug penetration, and treatment response [4]. Common spheroid generation approaches include hanging-drop culture, low-attachment plates, scaffold-based systems, microwell arrays, and microfluidic devices [5]. Despite continued advances, these approaches involve trade-offs related to spheroid uniformity, matrix dependence, cost, operational complexity, standardization, scalability, and compatibility with downstream analysis.
Paper-based platforms offer porous, readily patterned, and comparatively inexpensive substrates for 3D cell culture [6]. Their interconnected fibrous networks provide structural support and capillary transport, while their planar geometry facilitates patterning, stacking, sectioning, imaging, and compact storage. Recent paper-based systems extended beyond basic scaffold-supported cell culture to quantitative cytotoxicity testing [7], tumor-stroma co-culture [8], rapid spheroid formation and retrieval [9], and multilayer models of immune cell migration into tumor spheroids [10]. Collectively, these studies demonstrate the versatility of paper for constructing spatially organized tumor models and integrating culture with functional assessment. However, these capabilities are generally distributed across separate platforms, and a unified workflow combining array-scale spheroid generation, uniform cell loading, mechanically robust extended culture, cryogenic storage, and post-thaw functional testing remains uncommon.
Our earlier studies established paper-based mammalian cell cryopreservation and demonstrated that the fibrous paper microenvironment could support the formation and cryopreservation of 3D tumor cultures [11,12]. This work was subsequently extended to cryopreservable arrays of paper-based 3D tumor models for drug screening [13]. Together, these studies established paper as both a culture scaffold and a compact storage substrate, while also highlighting the need for improved control over cell localization, spheroid uniformity, chip stability, and array-scale cell loading. The Spheromatrix addresses these technical needs by combining wax-patterned U-wells, lamination, and a 3D-printed Spherobox for controlled cell distribution across the array [1]. Wax patterning confines cells within defined hydrophilic U-wells, air plasma treatment improves wetting and liquid filling, and lamination enhances chip stability during extended culture and cryopreservation.
This protocol provides a step-by-step implementation of the Spheromatrix method reported by Glia et al. [1]. It expands the methodological description with explicit reagent recipes, assembly and alignment checks, handling precautions, assay guidance, and troubleshooting to support reproducibility. The platform was demonstrated for spheroid generation with six cancer cell lines (MCF7, PC3, HeLa, SKBR3, HCT15, and U87) and noncancerous MRC5 fibroblasts. U87 glioblastoma spheroids served as the proof-of-concept model for the complete cryopreservation-to-drug assessment workflow.
Several limitations should be considered when implementing this protocol. Although spheroid formation was demonstrated with six cancer cell lines and MRC5 fibroblasts, the complete cryopreservation-to-drug response assessment workflow was evaluated using U87 spheroids and two chemotherapeutic drugs. Performance with other cell types, treatments, and storage durations requires separate validation. MRC5 fibroblasts showed weaker aggregation and lower viability, indicating cell-type-dependent performance. Changes in array geometry require reassessment of cell loading and culture conditions. Paper autofluorescence, staining penetration, and aggregate recovery can also affect downstream measurements; metabolic activity should therefore be interpreted alongside morphology and an independent viability readout.
Materials and reagents
Note: The materials and reagents below support the validated cell lines described in this protocol. Use appropriate complete culture medium listed in the Procedure and Recipes sections.
Biological materials
Cell lines
1. MCF7 human breast cancer cells (ATCC, catalog number: HTB-22)
2. PC3 human prostate cancer cells (ATCC, catalog number: CRL-1435)
3. HeLa human cervical cancer cells (ATCC, catalog number: CCL-2)
4. SKBR3 human breast cancer cells (AddexBio, catalog number: C0006007)
5. MRC5 human noncancerous lung fibroblasts (AddexBio, catalog number: T0016002)
6. HCT15 human colorectal cancer cells (AddexBio, catalog number: C0009010)
7. U87 human glioblastoma cells (AddexBio, catalog number: C0005002)
8. MDA-MB-231 human breast cancer cells (ATCC, catalog number: HTB-26)
Reagents
Cell culture and cryopreservation
1. Dulbecco’s phosphate-buffered saline (DPBS) (10× stock solution) (Sigma-Aldrich, catalog number: 59331C)
2. Dulbecco’s modified Eagle’s medium (DMEM) (Gibco, catalog number: 11965092)
3. Roswell Park Memorial Institute Medium (RPMI) (Gibco, catalog number: 11875093)
4. Eagle’s minimum essential medium (EMEM) (Gibco, catalog number: 11095080)
5. Fetal bovine serum (FBS) (Sigma-Aldrich, catalog number: F7524)
6. Penicillin-streptomycin solution (Pen-Strep) (Sigma-Aldrich, catalog number: P4333)
7. TrypLE Express enzyme (Gibco, catalog number: 12604021)
8. Dimethyl sulfoxide (DMSO) (Sigma-Aldrich, catalog number: D2650)
9. Isopropyl alcohol (2-propanol), ≥99.9% (VWR Chemicals, catalog number: 84881.290)
10. Ethanol, ≥70% (v/v), TechniSolv® (VWR Chemicals, catalog number: 83801.290)
Viability and metabolic activity assessment
11. LIVE/DEAD Viability/Cytotoxicity kit for mammalian cells (Thermo Fisher, catalog number: L3224)
12. Cell proliferation reagent WST-1 (Sigma-Aldrich, catalog number: 11644807001)
13. Trypan Blue solution (Sigma-Aldrich, catalog number: T6146)
Drug response assessment
14. Cisplatin, cis-diamminedichloroplatinum(II) (Sigma-Aldrich, catalog number: P4394)
15. Temozolomide (TMZ) (Sigma-Aldrich, catalog number: T2577)
Spherobox fabrication
16. PlasCLEAR photopolymer resin (Asiga, catalog number: PN/00930)
Immunostaining (Optional)
17. Paraformaldehyde (Sigma-Aldrich, catalog number: 158127)
18. Triton X-100 (Sigma-Aldrich, catalog number: T8787)
19. Bovine serum albumin (BSA) (Sigma-Aldrich, catalog number: A9418)
20. 4′,6-diamidino-2-phenylindole (DAPI) (Invitrogen, catalog number: 62248)
21. PE mouse anti-human cytokeratin antibody (BD Biosciences, catalog number: 347204)
22. FITC Anti-CD326/EpCAM mouse monoclonal antibody (Clone 9C4) (BioLegend, catalog number: 324204)
Transcriptional integrity assessment (Optional)
23. Cells-to-CT kits (Thermo Fisher, catalog number: A25600)
24. Primers for ACTB, GAPDH, and 18S rRNA (Integrated DNA Technologies)
Solutions
1. Complete culture medium (see Recipes)
2. Freezing medium containing 10% DMSO (see Recipes)
3. LIVE/DEAD assay (see Recipes)
4. WST-1 assay (see Recipes)
5. DPBS working solution (see Recipes)
6. Cisplatin stock solution (see Recipes)
7. TMZ stock solution (see Recipes)
8. Combination (Cisplatin + TMZ) solution (see Recipes)
9. Immunostaining solutions (see Recipes)
Recipes
1. Complete culture medium
Prepare 100 mL using 89 mL of the appropriate basal medium, 10 mL of FBS, and 1 mL of Pen-Strep:
• DMEM: HeLa, MCF7, MDA-MB-231, and SKBR3
• RPMI: PC3 and HCT15
• EMEM: MRC5 and U87
Store at 4 °C. Prewarm only the required volume and avoid repeatedly warming the complete stock.
2. Freezing medium containing 10% DMSO
Prepare 10 mL immediately before use by mixing 9 mL of the appropriate complete culture medium with 1 mL of DMSO. Add DMSO slowly and mix thoroughly.
3. LIVE/DEAD assay
For 5 mL of working solution, add 2.5 μL of 4 mM calcein-AM stock and 10 μL of 2 mM ethidium homodimer-1 stock to 4,987.5 μL of sterile 1× DPBS (see Recipe 5). The final concentrations are 2 μM calcein-AM and 4 μM ethidium homodimer-1. Allow the kit components to reach room temperature before opening, mix gently, and prepare the working solution immediately before use. Protect it from light.
Note: The added stock volumes correspond to 0.05% (v/v) calcein-AM stock and 0.2% (v/v) ethidium homodimer-1 stock in the final solution. These percentages refer to stock solution volume fractions of the dyes.
4. WST-1 assay
Add WST-1 reagent to complete culture medium at a 1:10 ratio. Prepare immediately before use and protect from light. Incubate for 2–4 h at 37 °C and 5% CO2.
5. DPBS working solution
Prepare 1 L by mixing 100 mL of 10× DPBS stock solution with 900 mL of sterile deionized water. Mix thoroughly and store at room temperature.
6. Cisplatin stock solution
Prepare a 1 mM cisplatin stock in sterile DPBS (0.300 mg/mL). To prepare 10 mL of 100 μM cisplatin containing 1% (v/v) DMSO, combine 1000 μL of the stock, 100 μL of DMSO, and 8.9 mL of complete culture medium.
Note: Store cisplatin powder at room temperature, as used in this workflow. Prepare the 1 mM stock in sterile DPBS and the working solutions fresh on the day of treatment; protect solutions from light. The protocol does not use stored drug stocks, and no frozen stock shelf life is specified.
7. TMZ stock solution
Prepare a 100 mM TMZ stock in DMSO (19.4 mg/mL). To prepare 10 mL of 800 μM TMZ containing 1% (v/v) total DMSO, combine 80 μL of the stock, 20 μL of DMSO, and 9.9 mL of complete culture medium.
Note: Store TMZ powder at room temperature, as used in this workflow. Prepare the 100 mM stock in DMSO and the aqueous working solutions fresh on the day of treatment; protect solutions from light. The protocol does not use stored drug stocks, and no frozen stock shelf life is specified.
Note: Using the highest working concentration for each single-agent chemotherapeutic drug solution, prepare the lower concentrations by dilution with complete culture medium containing 1% (v/v) DMSO. From 100 μM cisplatin, prepare 10, 1, and 0.1 μM solutions. From 800 μM TMZ, prepare 400, 200, and 100 μM solutions. Prepare a final volume of 10 mL for each concentration. Count the DMSO contributed by the TMZ stock toward the final 1% DMSO concentration. Protect drug solutions from light and prepare them immediately before treatment.
8. Combination (cisplatin + TMZ) solution
Maintain 1:100 cisplatin:TMZ molar concentration ratio. For 10 mL working solutions containing 1% (v/v) total DMSO, prepare:
• 4 μM cisplatin + 400 μM TMZ: Combine 40 μL of 1 mM cisplatin stock, 40 μL of 100 mM TMZ stock, 60 μL of DMSO, and 9.860 mL of complete culture medium.
• 8 μM cisplatin + 800 μM TMZ: Combine 80 μL of 1 mM cisplatin stock, 80 μL of 100 mM TMZ stock, 20 μL of DMSO, and 9.82 mL of complete culture medium.
Critical: Include separate untreated complete medium and 1% (v/v) DMSO controls. Use the 1% DMSO control for all cisplatin, TMZ, and combination conditions.
9. Immunostaining solutions
• Fixation solution: 4% paraformaldehyde in DPBS
• Permeabilization solution: 0.1% Triton X-100 in DPBS
• Blocking solution: 5% BSA in DPBS
Prepare the solutions for fixation, permeabilization, and blocking, and store at 4 °C.
Laboratory supplies
1. Sterile 10 mL serological pipettes (Corning Costar Stripette, catalog number: 4488)
2. Sterile 15 mL centrifuge tubes (Thermo Fisher, catalog number: 339650)
3. Sterile 1–20, 20–200, and 100–1,000 μL pipette tips (Thermo Fisher, catalog numbers: 10380792, 10619331, and 10390792, respectively)
4. Sterile T75 tissue culture flasks (Thermo Fisher, catalog number: 156499)
5. Sterile 35 mm × 10 mm Petri dishes (Corning, catalog number: 430165)
6. Sterile 60 mm × 10 mm Petri dishes (Falcon, catalog number: 351007)
7. Whatman Grade 2 filter paper, 185 mm diameter (Cytiva, catalog number: 1002-185)
8. 96-well plates compatible with absorbance measurements (Thermo Fisher, catalog number: N8010560)
9. Cell counting chamber slides (Thermo Fisher, catalog number: C10228)
10. Sterile syringes (CETONI, capacity and catalog number as specified for the neMESYS syringe pump), tubing (Cole-Parmer Microbore, sized for the syringe pump and Spherobox inlet/outlet), and connectors (CETONI, compatible with the syringe and tubing)
Equipment
Spheromatrix fabrication
1. Stereolithography 3D printer (27 μm pixel resolution) (Asiga, model: MAX X27 UV)
2. Wax printer (Xerox, model: ColorQube 8570/DN)
Note: These printer models were used in the validation study. Equivalent instruments may be used if they reproduce the Spherobox geometry and continuous wax barriers at the specified dimensions.
3. Digital cutting machine (Cricut, model: Explore Air 2)
4. Autoclave (Runyes, model: SEA 18L-DIG-USB)
5. Analytical balance (Mettler Toledo, model: ME54)
6. High-precision tweezers (Dumont, catalog number: 5627)
7. Timer (Sunnex, catalog number: 360594)
8. Air plasma cleaner (Harrick Plasma, PDC series), connected to a PlasmaFlo gas flow controller (Harrick Plasma, model: PDC-FMG)
9. Digital hot plate (Thermo Fisher SuperInnova+, catalog number: HP88857195)
10. UV sterilizer cabinet (StateRiver)
11. Polyethylene terephthalate (PET) lamination film (Maxi A4)
12. Thermal pouch laminator (Monolith)
13. Microbalance (Mettler Toledo)
Cell culture, loading, and cryopreservation
14. Syringe pump (CETONI, model: neMESYS)
Note: An equivalent pump may be used provided that it is capable of stable delivery at 5 μL/min.
15. Centrifuge (Eppendorf, model: 5810)
16. Laboratory water bath (Witeg, catalog number: WITEG 20002)
17. Humidified CO2 incubator (New Brunswick, model: Galaxy 48R)
18. Water purification system (Millipore, model: Milli-Q)
19. Class II biological safety cabinet (NuAire, model: NU-437S)
20. Controlled-rate freezing container (Mr. Frosty, Thermo Fisher, catalog number: 5100-0001)
21. Custom 3D-printed cryogenic storage vessels (Cryobox; 1.5 cm × 1.5 cm × 2.5 cm; fabricated in-house from the same
resin and stereolithography approach as the Spherobox; up to 50 chips per vessel, fully immersed in 1 mL of freezing medium containing 10% DMSO; up to 18 vessels per Mr. Frosty container)
22. Freezer (-80 °C) (Haier, model: DW-86L100J)
23. Liquid nitrogen storage tank (–196 °C) (Air Liquide, model: Arpege 40, catalog number: 082102B)
Assessment and imaging
24. Multimode microplate reader (BioTek, model: Synergy H1)
25. Inverted fluorescence microscope (Nikon, model: Eclipse Ti2), equipped with a DS-Qi2 monochrome camera and FITC (MBE44727, 450–490 nm) and TRITC (MBE45607, 530–550 nm) filter cubes
26. Inverted confocal microscope (Olympus, model: FV1000/FV1000MPE FluoView)
Note: Equivalent microscopes and plate readers may be used if they provide the required optical filters, excitation/emission ranges, objectives, and absorbance wavelengths.
Optional
27. Automated cell counter (Thermo Fisher, catalog number: AMQAF1000)
28. qPCR instrument (Applied Biosystems, model: QS5)
Software and datasets
1. Fiji/ImageJ (NIH) for fluorescence image analysis
2. GraphPad Prism (Dotmatics) for graph preparation
3. OriginPro (OriginLab) for U-well size, profile, symmetry analysis
4. SPSS Statistics (IBM) for statistical analysis
5. Imaris (Oxford Instruments/Bitplane) for optional 3D confocal image reconstruction
Procedure
A. Design and fabrication of the Spherobox
1. Open the Spherobox CAD files (see Supplementary information). The device comprises a top and a bottom component that enclose the U-well paper chip (Figure 1A).
2. Confirm that the conical features in the top and bottom components are aligned with one another and with the corresponding U-well array.
Critical: Alignment between the Spherobox and the wax-patterned array determines the uniformity of medium delivery and cell deposition.
3. Export the projection of the bottom component, including the positions of the conical microwells, as a vector file without changing its dimensions. Use this file to generate the corresponding U-well array.
4. Export the top and bottom components as STL files without rescaling and import them into the printer's slicing software. Orient and support the parts to protect the sealing surfaces, ports, channels, and conical features.
5. Print the components in resin using the manufacturer’s settings. Remove supports, wash thoroughly with isopropyl alcohol, allow the parts to dry, and post-cure according to the resin manufacturer's instructions.
Caution: Uncured resin and isopropyl alcohol are hazardous, and isopropyl alcohol is flammable. Wear personal protective equipment, work in a ventilated area, and dispose of the waste appropriately.
6. Inspect the components for residual resin, blocked ports, deformation, and incomplete curing. Confirm that the inlet, outlet, and internal channels are open.
7. Expose all accessible surfaces to UV light for 30 min, turn the components over, and irradiate the opposite surfaces for an additional 30 min.
Note: Do not autoclave printed components unless the resin has been validated for the autoclave cycle. Heat can deform some stereolithography resins and compromise alignment.
Pause point: Store the clean, cured Spherobox components in a closed sterile container until the paper chips and cell suspension are ready.
B. Fabrication of wax-patterned U-well paper chips
1. Autoclave Whatman Grade 2 filter paper at 121 °C for 15 min and allow it to dry completely.
2. Secure the filter paper flat onto an A4 sheet using tape along the edges. Keep the tape outside the intended printing and cutting areas.
Critical: Ensure that the filter paper is firmly attached and free of folds or raised edges to prevent printer jamming or pattern distortion.
3. Using the vector file generated in step A3, prepare the U-well array in Microsoft PowerPoint or equivalent software such as OpenOffice. Feed the carrier sheet with the attached filter paper into the wax printer and print the array onto the filter paper.
4. Carefully detach the printed filter paper from the sheet and cut out the individual chips according to the dimensions required for the Spherobox. The demonstrated high-capacity design contains a 14 × 16 array, corresponding to 224 U-wells per chip.
Note: The array can be enlarged or reduced to meet experimental needs, provided that the Spherobox geometry, wax pattern vector, cell suspension volume, and fluidic resistance are recalibrated for the new format.
5. Use a nominal wax line thickness of 264 μm (Figure 1B). Independently select a hydrophilic U-well diameter of 0.2, 0.5, or 1.0 mm; 1.0 mm is recommended as the starting condition for robust spheroid growth.
6. Place the printed paper on a level hot plate at 120 °C for 90 s to diffuse the wax through the paper thickness and form 3D hydrophobic barriers.
Caution: The hot plate can cause burns. Use heat-resistant forceps or gloves and allow the chip to cool.
Critical: Maintain both heating temperature and duration. Insufficient heating can leave discontinuous vertical barriers, whereas excessive heating can broaden the wax features and reduce the hydrophilic U-well area.
7. Cool the chip to room temperature on a clean, level surface.
8. On a test chip from each fabrication batch, apply a dye solution to the array and visually confirm that all intended U-wells fill without lateral leakage or cross-well communication.
Critical: Do not use a dye-tested chip for cell culture. Reject a batch if barriers are discontinuous, adjacent wells communicate, or the pattern is visibly distorted.
See Troubleshooting Problems 1 and 2.
9. Place the chip on a clean glass slide or Petri dish and secure its edges outside the patterned area with tape. Treat with air plasma at 700 mTorr and low radiofrequency discharge for 30–60 s. 60 s was used for Grade 2 paper with a 264 μm wax pattern. Vent the chamber slowly before removing the chip.
Critical: Excessive plasma exposure can reduce wax barrier hydrophobicity and cause leakage. Use the shortest exposure that provides complete and reproducible wetting for the local instrument.
10. Using the vector file generated in step A3, cut openings in both PET layers with a digital cutting machine, matching the U-well positions and nominal diameters. Align the openings with the hydrophilic U-wells, enclose the chip as a pouch, and laminate at 110 °C.
Critical: Ensure PET openings align with the U-wells and remain unobstructed. Inspect both surfaces, as defective lamination may cause blockage, bypass flow, or reduced freeze/thaw stability.
Pause point: Store the dry chips in a sterile sealed container at room temperature for further use.
C. Cell culture and preparation for seeding
1. Maintain each cell line in its corresponding complete culture medium:
a. MCF7, HeLa, MDA-MB-231, and SKBR3: DMEM
b. PC3 and HCT15: RPMI
c. MRC5 and U87: EMEM
Note: MDA-MB-231 cells were used only in comparison with conventional U-shaped plates.
2. Culture cells in T75 flasks at 37 °C and 5% CO2 in a humidified incubator.
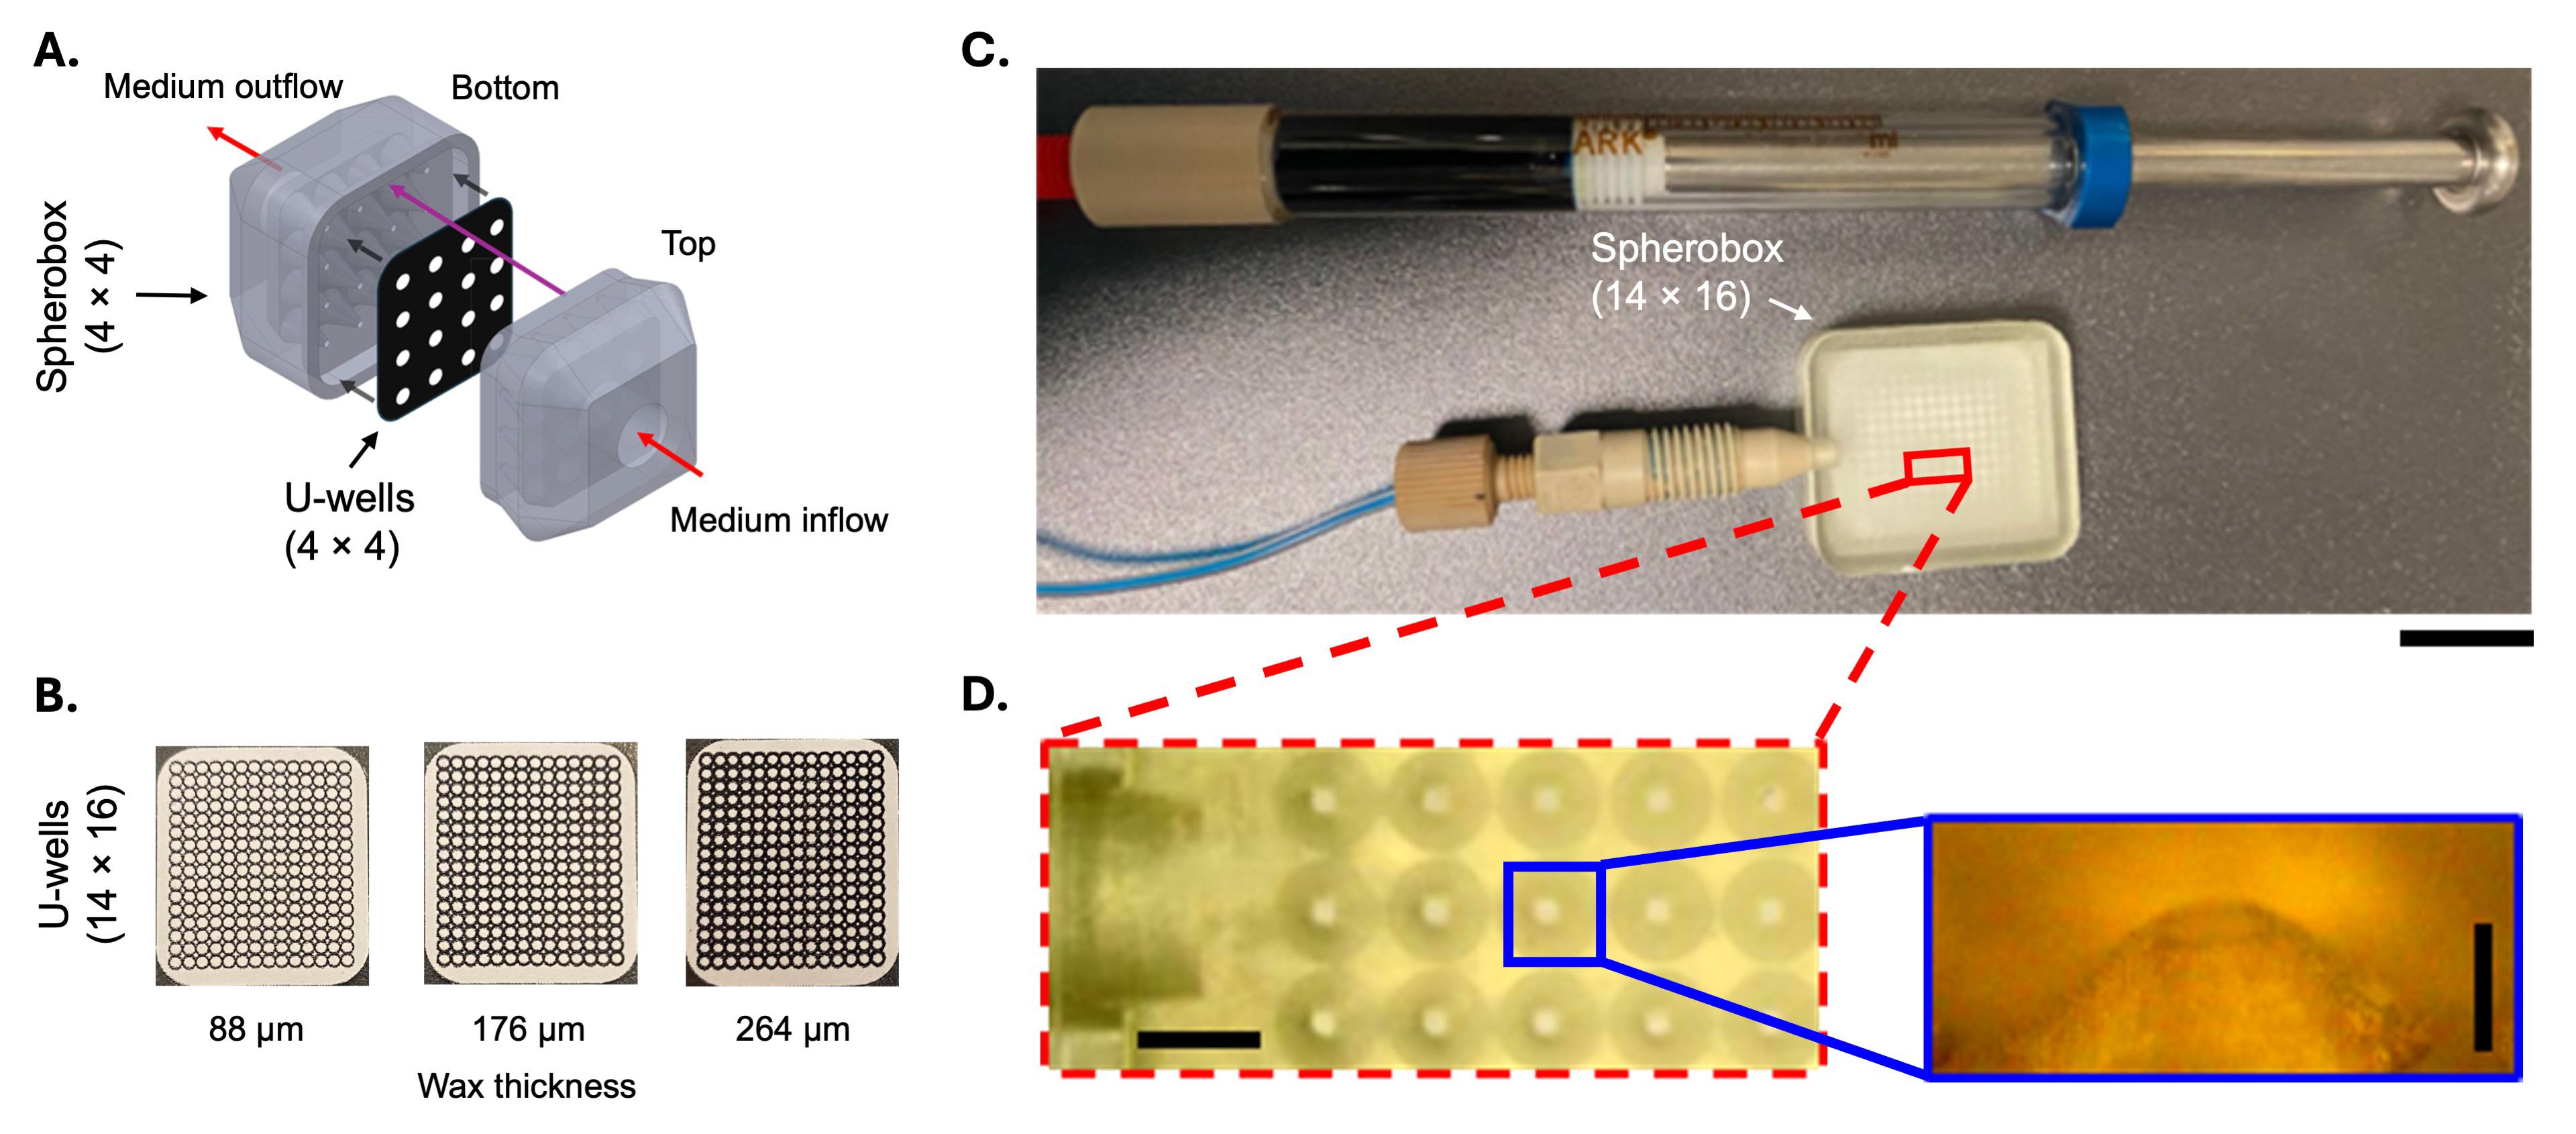
Figure 1. Design and fabrication of the Spherobox and wax-patterned U-well paper chip. (A) Representative schematic of a Spherobox showing the 3D-printed top and bottom components, interposed U-well paper chip, and medium inlet and outlet. (B) Representative 14 × 16 U-well chips printed using nominal wax pattern thicknesses of 88, 176, and 264 μm. (C) Fabricated 14 × 16 Spherobox connected to the syringe. Scale bar: 10 mm. (D) Enlarged view of the conical microwell array in the Spherobox bottom component and magnification of an individual microwell. Scale bars: 2.5 mm (array) and 200 μm (microwell). Adapted from Glia et al. [1].
Note: Cells used in the validation experiments had passage numbers >7 and ≤30. Record passage number at seeding and use comparable passage ranges across experimental groups.
3. Passage adherent cells at ~80% confluence. Aspirate the medium, add 2 mL of TrypLE Express to each T75 flask, and incubate at 37 °C for 5 min or until the cells detach.
4. Add complete medium, transfer the cell suspension to a 15 mL tube, and centrifuge at 300× g for 5 min.
5. Resuspend the pellet in 1 mL of DPBS. Determine cell concentration and viability by Trypan Blue exclusion using a counting chamber or automated cell counter.
6. Centrifuge the required number of cells at 300× g for 5 min and resuspend them in the appropriate complete medium at 1 × 10⁵ cells/mL.
Critical: Cell clumps can obstruct the Spherobox and cause unequal cell delivery across the array.
See Troubleshooting Problem 3.
7. Identical concentration and volume were used for every cell line: For one 14 × 16 chip, prepare 100 μL of cell suspension at 1 × 10⁵ cells/mL (10,000 cells total). Deliver 50 μL to the chip (5,000 cells), reserving the remaining 50 μL for priming and syringe/tubing dead volume. Increase the total prepared volume if required for the actual fluidic configuration without changing the concentration or the 50 μL delivered volume. Scale the volume proportionally for other array formats and revalidate uniform loading.
D. Spherobox-assisted cell seeding and spheroid culture
1. Place one U-well paper chip between the top and bottom components of the Spherobox. The printed assembly is shown in Figure 1C.
2. Align the conical features (Figure 1D) with the U-well array and close the top and bottom components to form a sealed flow chamber.
Critical: Visually confirm alignment before introducing cells. Misalignment is a major cause of nonuniform loading.
3. Connect the inlet to a sterile syringe mounted on a syringe pump. Connect the outlet to sterile waste tubing.
4. Fill the syringe and inlet tubing with the cell suspension, removing visible air bubbles. Gently resuspend the cells immediately before loading to minimize settling.
5. Set the pump to 5 μL/min and inject 50 μL through the top (inlet) component. Collect excess medium and cells passing through the paper from the bottom outlet in a waste container.
Critical: Maintain a flow rate of 5 μL/min when delivering 50 μL of cell suspension to the 14 × 16 chip. Delivery takes about 10 min. Faster flow can displace cells or create preferential flow paths, whereas slower flow permits cell settling in the syringe and tubing.
6. After loading is complete, leave the assembled device undisturbed for 5–10 min to permit cell retention within the U-wells.
7. Open the Spherobox carefully and transfer the loaded chip to a sterile 60 mm Petri dish containing enough prewarmed, cell line–appropriate complete medium to fully immerse the chip (typically 10–15 mL).
8. Maintain the chip fully immersed in 10–15 mL of the appropriate complete medium at 37 °C and 5% CO2 in a humidified incubator. Complete medium contains 10% (v/v) FBS and 1% (v/v) Pen-Strep (Recipe 1). Use DMEM for MCF7, HeLa, MDA-MB-231, and SKBR3; RPMI for PC3 and HCT15; and EMEM for MRC5 and U87. Replace the medium every 3 days (72 h) using medium prewarmed to 37 °C, aspirating and dispensing along the dish wall. Keep the chip wet and inspect cultures during medium changes for contamination, drying, and spheroid detachment. Maintain the same exchange across comparison groups.
Critical: Avoid directing flow onto the U-wells, which can dislodge developing spheroids.
9. Culture spheroids for 3 weeks. Where indicated, maintain selected cultures for one additional week, resulting in a total culture period of 4 weeks (Figure 2A).
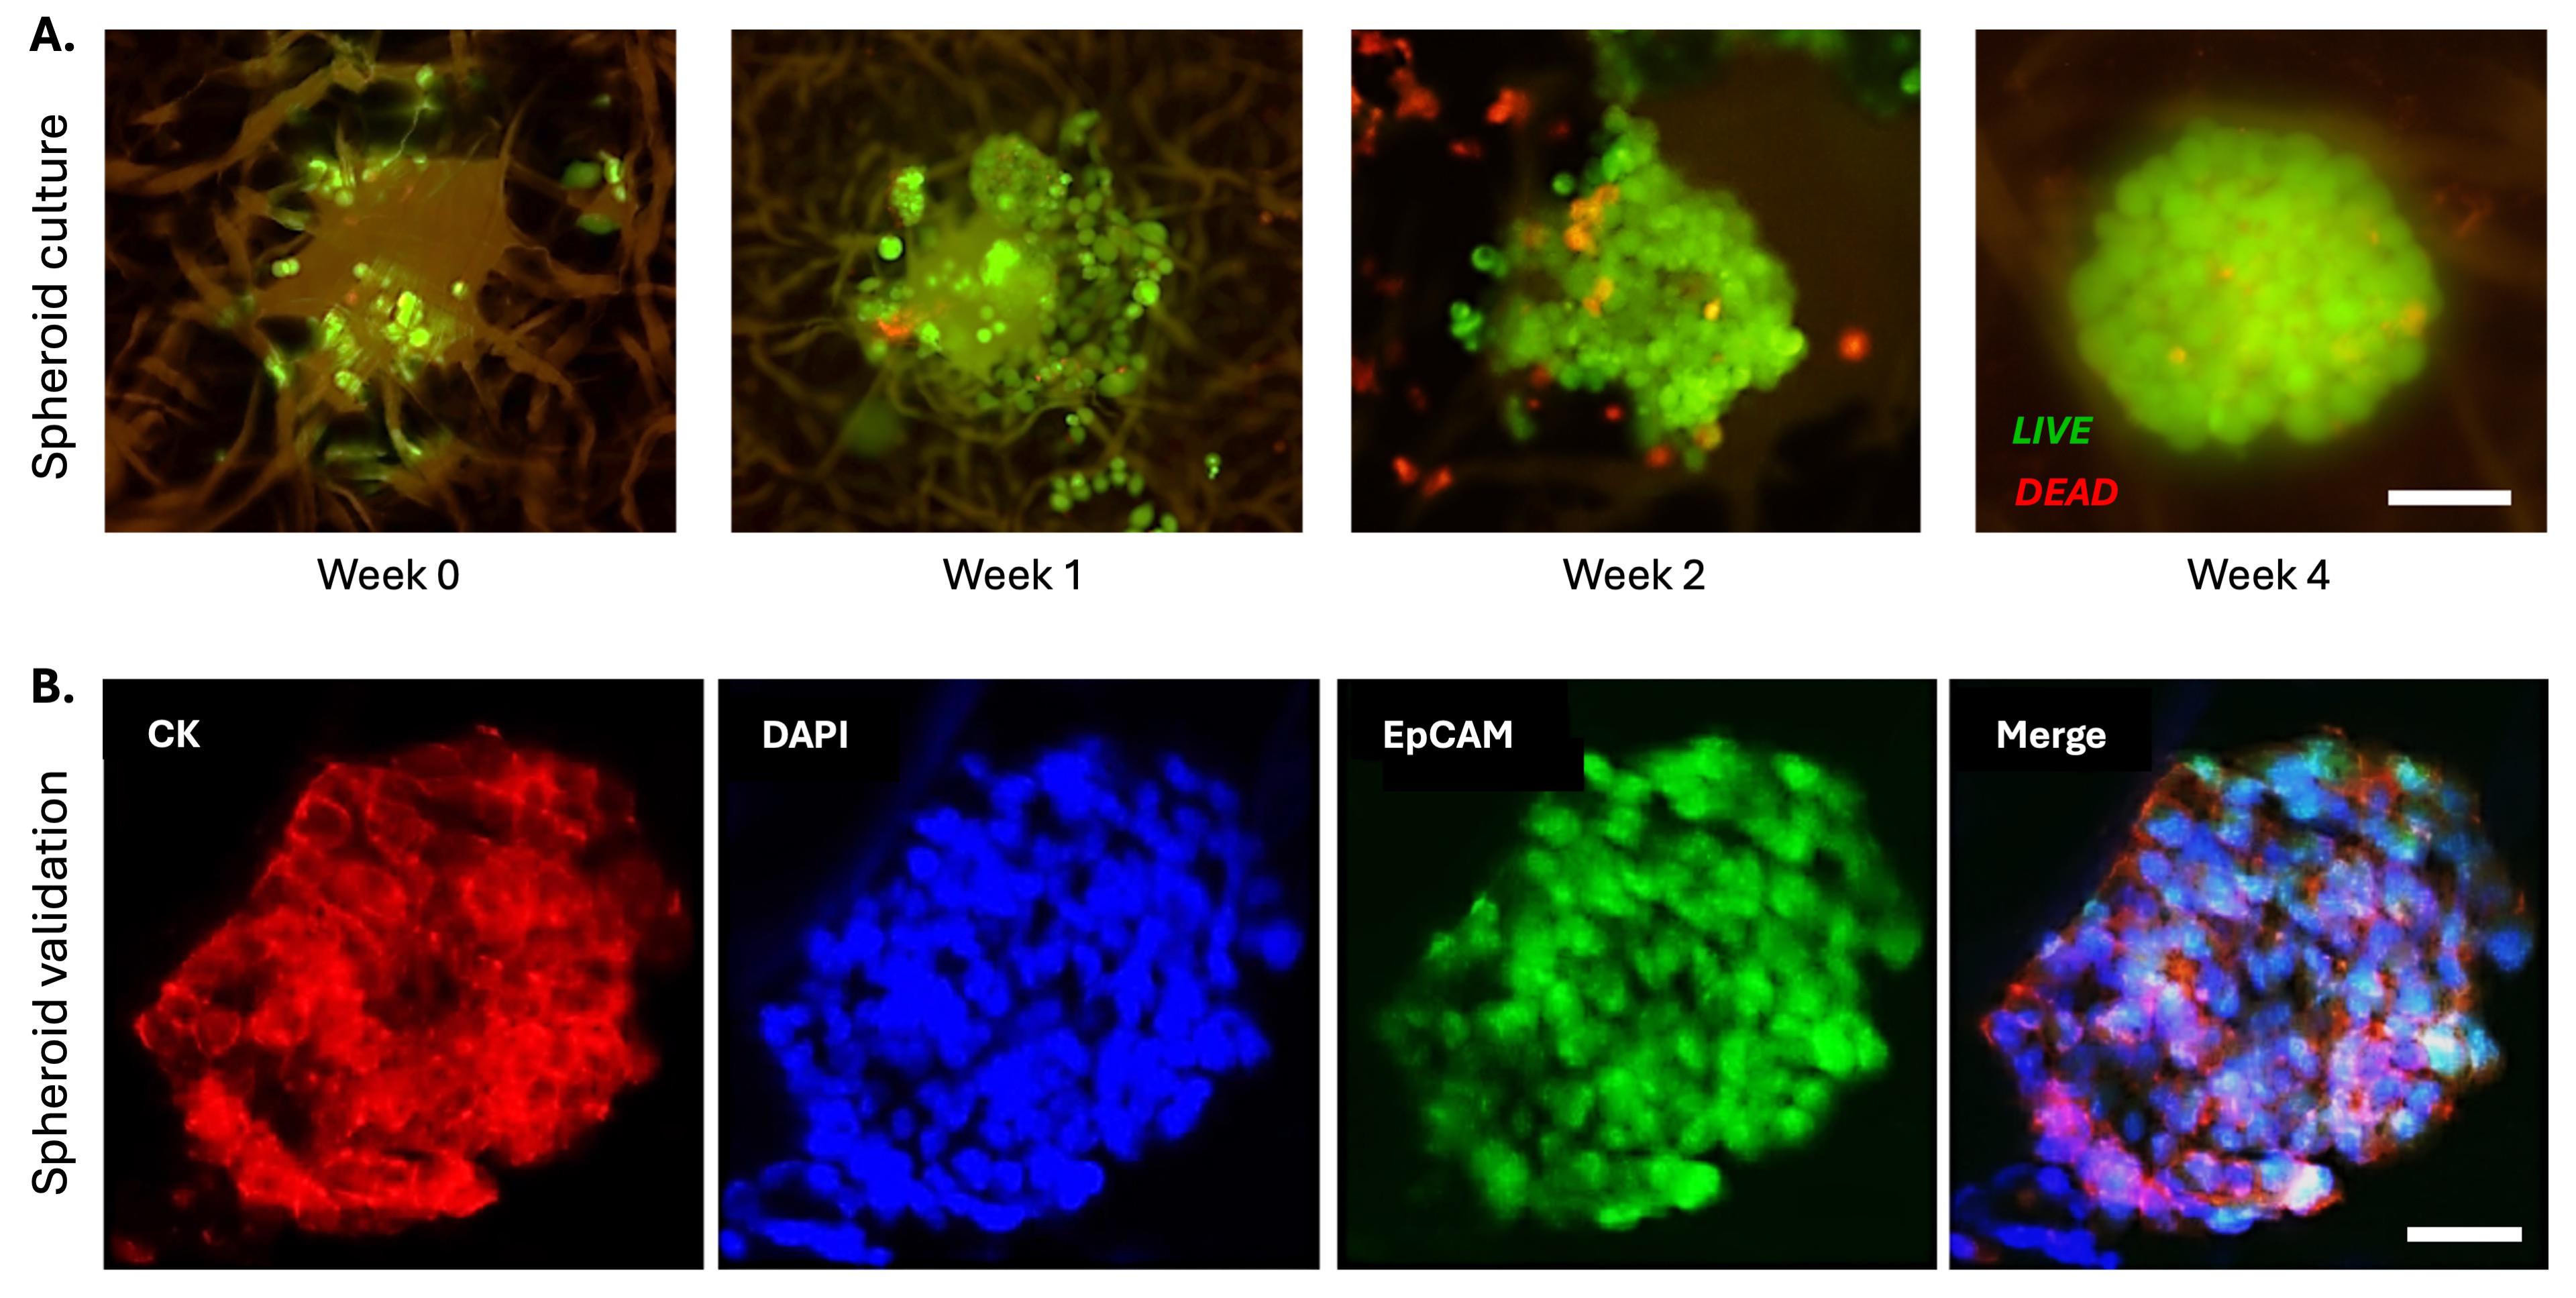
Figure 2. Formation and epithelial characterization of the MCF7 spheroids in the Spheromatrix. (A) Representative Live/Dead fluorescence images showing progressive spheroid formation from week 0 to week 4. Live and dead cells appear green and red, respectively. Scale bar: 100 μm. (B) Immunofluorescence images of a 4-week spheroid stained for cytokeratin (CK, red), EpCAM (green), and nuclei (DAPI, blue), demonstrating cohesive structure and epithelial integrity. Scale bar: 80 μm. Adapted from Glia et al. [1].
Note: Three weeks is the standard culture duration used across the cell line validation. The 4-week condition was used for selected cultures, including the U87 proof-of-concept cryopreservation comparison.
Critical: Live/Dead staining, cell recovery/counting, fixation, and endpoint WST-1 measurements should not be performed repeatedly on the same chip unless assay compatibility has been validated.
See Troubleshooting Problems 3–5.
E. Spheroid characterization
E1. Live/Dead fluorescence assay
1. Prepare the Live/Dead solution immediately before use. Protect the solution from light.
2. For the 14 × 16 chip, apply 100 μL of working solution evenly (~0.45 μL per U-well) and incubate for 30 min at room temperature in the dark.
Note: Scale the volume for other formats to wet the imaged region.
3. Image the chip immediately with a fluorescence or confocal microscope using green and red emission channels.
Critical: Paper autofluorescence and detector saturation can bias viability estimates. Acquire all images with identical exposure, gain, laser power, and z-stack settings.
See Troubleshooting Problem 6.
E2. WST-1 metabolic activity assay
1. Transfer each intact chip to a separate sterile Petri dish containing enough fresh complete medium to immerse it.
2. Add WST-1 at 1:10 (v/v) and incubate for 2–4 h at 37 °C and 5% CO2, protected from light.
3. Without releasing the spheroids from the chip, transfer 100 μL of supernatant from each sample to a 96-well plate and include cell-free WST-1 blanks.
4. Measure absorbance at 440 nm and record 640 nm as the reference wavelength. Calculate corrected absorbance, then subtract the corresponding cell-free blank (see Data analysis section).
Critical: Keep sample volume, WST-1 ratio, incubation time, and acquisition time constant across the comparison. Confirm that absorbance remains within the linear range of the plate reader.
See Troubleshooting Problem 7.
E3. Cell recovery and counting
1. Transfer one chip to a sterile 15 mL tube containing 10 mL of complete medium. Shake the tube manually for 20 s to release cells and cell aggregates from the paper.
2. Remove the paper with sterile tweezers and centrifuge the suspension at 300× g for 5 min. Resuspend the pellet in 1 mL of DPBS and determine the viable cell number by Trypan Blue exclusion.
Note: Recovery efficiency may vary with cell line, spheroid cohesion, and culture duration.
E4. Immunofluorescence staining (optional)
1. Fully immerse the chip containing spheroids in 4% paraformaldehyde in DPBS (typically 10 mL in a 60 mm dish) for 15 min at room temperature, then wash three times with DPBS.
Caution: Paraformaldehyde is toxic. Prepare and handle it in a ventilated hood while wearing personal protective equipment and properly dispose of the waste.
2. Permeabilize with 0.1% Triton X-100 in DPBS for 10 min and wash three times with DPBS. Block with 5% BSA in DPBS for 1 h at room temperature.
3. Incubate with the validated primary antibody dilutions (fluorescently labeled) for cytokeratin and epithelial cell adhesion molecule overnight at 4 °C. Wash three times with DPBS, stain nuclei with DAPI, and image by confocal microscopy (Figure 2B).
Critical: Because antibody penetration can be limited in compact spheroids, keep incubation times and z-stack acquisition parameters consistent across groups.
Pause point: After fixation and washing, samples can be stored in DPBS at 4 °C for a short time before staining. Do not allow the chips to dry.
F. Cryopreservation of spheroids
1. Culture U87 spheroids for 3 weeks. For the extended cryopreservation comparison, maintain a matched U87 group for 4 weeks before freezing.
2. Prepare fresh freezing medium containing 10% (v/v) DMSO in the complete medium appropriate for the selected cell line. Keep the medium on ice until use.
Caution: DMSO penetrates the skin and may facilitate the absorption of dissolved substances. Wear compatible gloves and eye protection and follow the safety data sheet.
3. Label the Cryobox by cell line. Prepare the Mr. Frosty container by adding isopropyl alcohol to the indicated fill line.
4. Using sterile tweezers, transfer the U-well chips into labeled custom 3D-printed cryogenic storage vessels containing 1 mL of freezing medium. The vessels are fabricated from the same resin and stereolithography approach as the Spherobox and are sized to fit within the Mr. Frosty container. Multiple chips from the same cell line and experimental condition may be stacked within each vessel. Confirm that all chips are fully immersed, remain unfolded and uncompressed, and can be retrieved individually after thawing. Securely close each vessel.
Critical: Prolonged exposure to DMSO above freezing temperature may reduce post-thaw recovery.
Note: Keep different cell lines and experimental conditions in separately labeled Cryobox vessels. Record the number of stacked chips in each Cryobox vessel.
5. Place the Cryobox vessels in the Mr. Frosty container and immediately transfer the container to a -80 °C freezer. Cool overnight at -1 °C/min.
Note: The validated approach uses controlled-rate cooling in Mr. Frosty. Do not directly shock-freeze the spheroids in liquid nitrogen.
6. On the following day, transfer the Cryobox vessels from -80 °C to a liquid nitrogen storage tank. Record the cell line, culture duration, freezing date, sample identity, and storage location.
Caution: Liquid nitrogen can cause severe cold burns and asphyxiation. Wear cryogenic gloves and face protection and follow institutional cryogenic-safety procedures.
Pause point: Samples can be stored in liquid nitrogen. In the reported Spheromatrix study [1], cryostorage was evaluated for 48 h and 7 days, while our previous paper-based cryopreservation studies demonstrated storage for up to 6 months [11].
See Troubleshooting Problem 8.
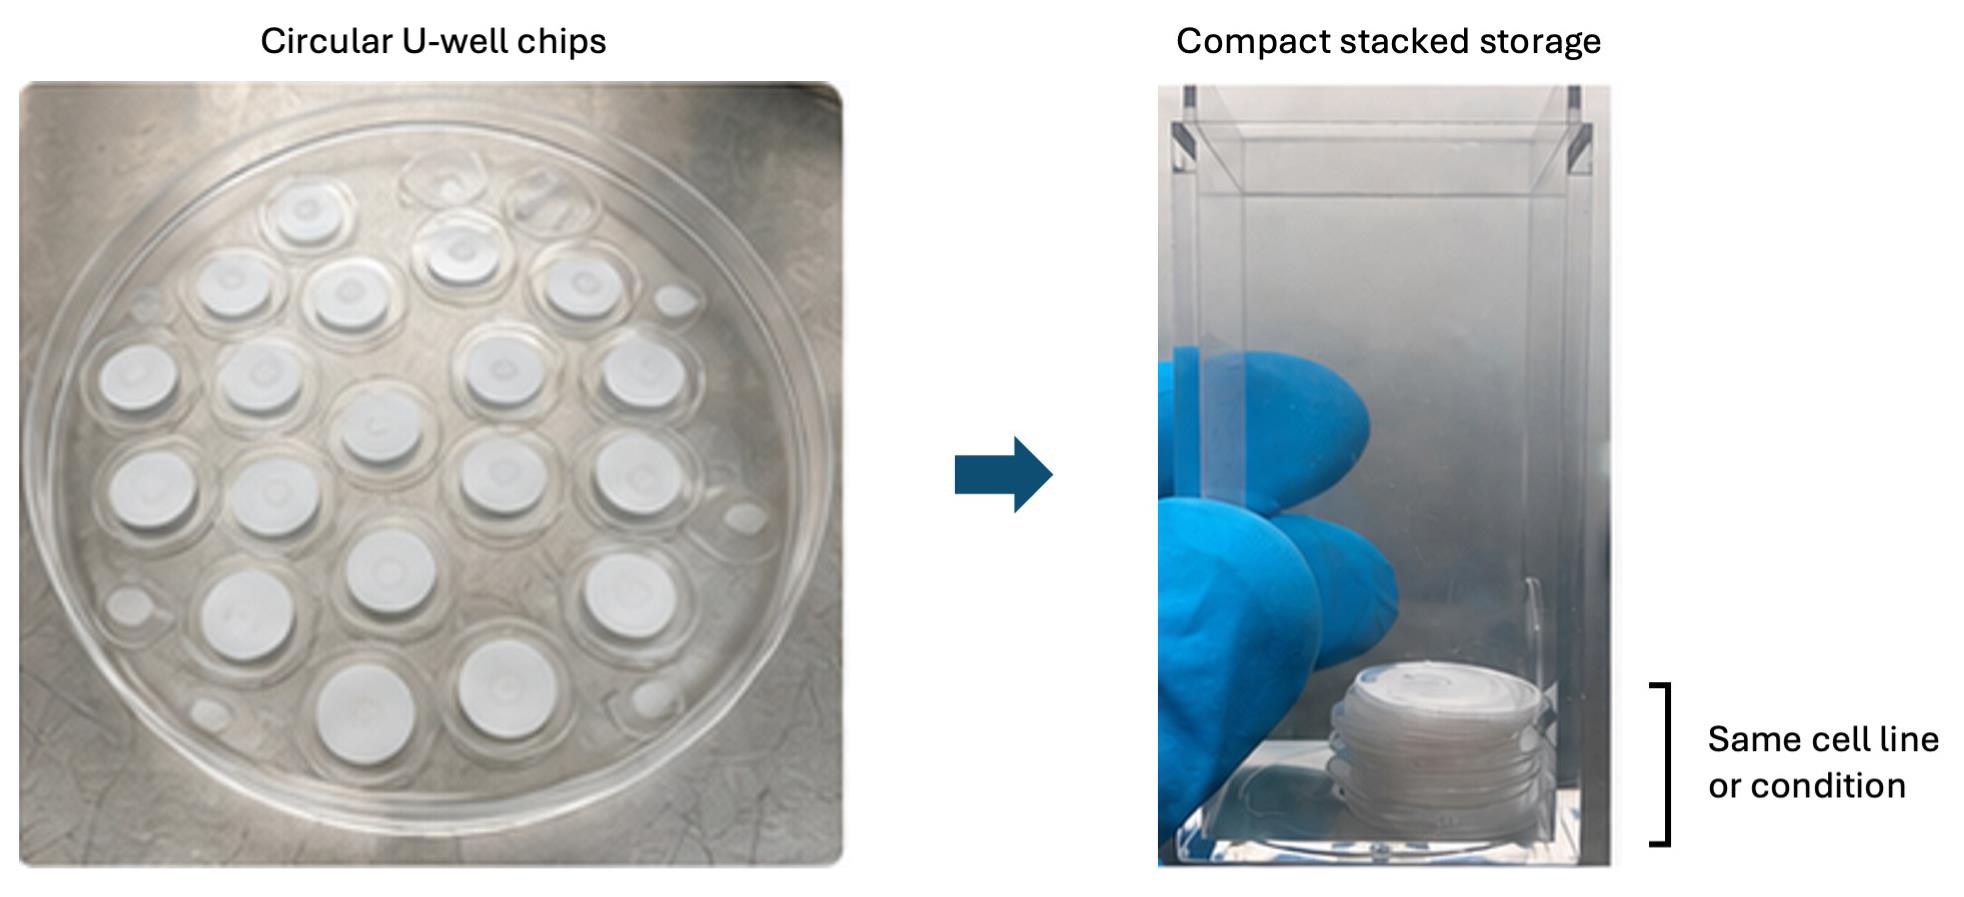
Figure 3. Compact storage of independently retrievable circular U-well chip units. Following spheroid culture, individual chip units or predefined groups from the same cell line or experimental condition are stacked in a labeled Cryobox and fully immersed in freezing medium. This arrangement reduces the cryogenic storage footprint while permitting individual chip retrieval after thawing. Adapted from Glia et al. [1].
7. For biobanking, use independently retrievable circular U-well chip units prepared after lamination (Figure 3). Place each unit or predefined group from the same cell line and condition in a labeled Cryobox vessel and apply the controlled-rate freezing procedure.
Critical: Prepare independently retrievable chips before cryopreservation. Do not cut, partially thaw, or return a previously removed sample to liquid nitrogen storage. Units that can be separated after thawing are not necessarily independently retrievable while frozen. If several units share one frozen liquid volume, removing one may expose all units in that vessel to thawing. Define the retrievable unit as the independently sealed vessel unless a validated retrieval method demonstrates otherwise.
G. Thawing and post-thaw recovery
1. Prewarm the appropriate complete culture medium and prepare a sterile culture dish before retrieving the chip from cryogenic storage.
2. Remove one Cryobox vessel from liquid nitrogen and immediately place its lower portion in a 37 °C water bath, keeping the closure above the water. Thaw rapidly for 2 min or until only a small ice crystal remains in the freezing medium.
Caution: Wear a face shield and cryogenic gloves during retrieval and initial warming.
Critical: Thaw rapidly and remove the Cryobox vessel promptly from the water bath. Prolonged exposure to DMSO above freezing temperature may reduce post-thaw cell recovery.
3. Disinfect the exterior of the Cryobox vessel with 70% ethanol and transfer it to a Class II biological safety cabinet. Carefully open the Cryobox vessel and use sterile tweezers to transfer each chip immediately into fresh, prewarmed complete culture medium. Minimize freezing medium carryover and do not allow the chips to dry.
4. Immediately transfer each recovered chip into 10–15 mL of fresh, prewarmed complete culture medium and incubate at 37 °C and 5% CO2. After 30 min, replace the medium with an equal volume of fresh medium to further reduce residual DMSO. Use identical timing and volumes for all comparison groups.
5. Allow the spheroids to recover for 6–72 h before early functional assessment or for up to 7 days when extended recovery is required. At 6, 24, 48, and 72 h after thawing, assess metabolic activity, morphology, and viability on independently allocated chips.
Critical: Allocate separate chips to each assay and time point unless serial assessment of the same chip has been independently validated.
Note: Metabolic activity may decrease transiently during early post-thaw adaptation, particularly in mature 4-week spheroids. Interpret the complete recovery trajectory together with morphology and Live/Dead imaging instead of relying on a single early measurement.
See Troubleshooting Problems 8 and 9.
H. Drug response assessment
H1. Experimental design and drug preparation
1. Assign non-cryopreserved and cryopreserved spheroids to each chemotherapeutic drug condition. For example, use 24 chip samples per condition: 12 cryopreserved and 12 non-cryopreserved, following the chip allocation reported in [1]. Report the number of independent cell culture experiments separately from the chip count. U-wells within a chip constitute spatial subsamples.
Critical: The 224 U-wells within one chip are spatial subsamples and should not automatically be treated as 224 independent biological replicates.
Note: For the cell-based assays, the biological replicate was an independently initiated culture experiment, from cell thawing and expansion through seeding, culture, and treatment. The treatment unit was one separately treated chip. U-wells within a chip and repeated plate-reader aliquots were subsamples, not independent biological experiments.
2. Prepare treatment media immediately before use from the 1 mM cisplatin and 100 mM TMZ stocks as described in Recipes. Adjust every cisplatin, TMZ, and combination treatment medium to 1% (v/v) total DMSO and prepare separate untreated and 1% (v/v) DMSO controls.
Caution: Cisplatin and TMZ are hazardous. Prepare and handle all drug solutions in a ventilated hood while wearing personal protective equipment and dispose of the waste appropriately.
Critical: Prepare the cisplatin stock in sterile DPBS. Protect drug stocks from light, avoid repeated freeze/thaw cycles, and confirm that TMZ is fully dissolved before dilution.
3. For single-drug testing, prepare the following final concentrations:
a. Cisplatin: 0.1, 1, 10, and 100 μM.
b. TMZ: 100, 200, 400, and 800 μM.
4. For combination testing, maintain a 1:100 cisplatin: TMZ molar concentration ratio and prepare:
a. 4 μM cisplatin + 400 μM TMZ
b. 8 μM cisplatin + 800 μM TMZ
Critical: For each cryopreservation state and time point, include an untreated complete medium control and a 1% (v/v) DMSO control.
See Troubleshooting Problem 10.
Notes:
1. The single-agent ranges reproduce the U87 proof-of-concept experiments in Glia et al. [1]: 0.1–100 μM cisplatin and 100–800 μM TMZ. The base combination of 1 μM cisplatin plus 100 μM TMZ produced a measurable response and was scaled fourfold and eightfold to the combinations above. The 1:100 ratio refers to final molar concentrations, not stock-solution volumes. This ratio was adopted from Rocha et al. [14]. These experiments provide a fixed-ratio comparison. They do not establish an optimal ratio.
2. A matched comparison of U87 drug responses in 2D and 3D cultures was not performed in this study. Concentrations established in 2D cultures may guide initial testing but should be reassessed in the corresponding spheroid model. Spheroid size, culture age, cell density, proliferation state, and drug penetration can alter the concentration–response relationship. Evaluate a concentration range and suitable exposure times while keeping these features and solvent conditions consistent. Assess metabolic activity alongside morphology and an independent viability readout; do not assume that every 3D model requires a higher concentration than its 2D counterpart.
H2. Drug exposure and endpoint measurements
1. Replace the culture medium with the corresponding treatment or control medium.
2. Aspirate the medium from the edge of the Petri dish without touching the chip or exposing it to air.
3. Slowly add an equal volume of treatment or control medium along the dish wall.
4. Incubate spheroids at 37 °C and 5% CO2 for up to 48 h.
5. Measure metabolic activity at 0, 6, 12, 24, and 48 h using independently allocated chips for each time point.
6. After 48 h of exposure, assess viability and spheroid morphology.
7. Analyze non-cryopreserved and cryopreserved groups separately relative to their controls. Compare their response profiles using statistical approaches.
I. Transcriptional integrity assessment by qPCR
Note: This optional assay compares reference gene amplification in paper-cryopreserved, conventionally cryopreserved, and non-cryopreserved HeLa cells.
1. Prepare the three HeLa comparison groups in parallel. After thawing the cryopreserved chip, shake it in 10 mL of complete medium for 20 s, remove the paper, and pellet the released cells at 300× g for 5 min.
2. Extract RNA using RNase-free procedures and DNase treatment as needed. Measure concentration and purity, use equal RNA input (up to 1 μg), and synthesize cDNA with a no-reverse-transcriptase control.
3. Use the primer pairs in Table 1 to screen candidate reference-gene stability. Sequences are shown 5′–3′.
Table 1. Primers for qPCR
| Target | Primer | Sequence (5′–3′) |
|---|---|---|
| ACTB | Forward | ACAGAGCCTCGCCTTTGC |
| ACTB | Reverse | CGCGGCGATATCATCATCCA |
| GAPDH | Forward | GAGAAGGCTGGGGCTCATTT |
| GAPDH | Reverse | TGATGACCCTTTTGGCTCCC |
| 18S rRNA | Forward | ATCAACTTTCGATGGTAGTCG |
| 18S rRNA | Reverse | TCCTTGGATGTGGTAGCCG |
4. Screen ACTB, GAPDH, and 18S rRNA across all groups and confirm stable amplification, melt profile, and efficiency. ACTB was the most stable candidate in the reported HeLa validation. Run replicates with no-template and no-reverse-transcriptase controls using identical reaction and threshold settings.
Data analysis
A. Image analysis
1. For confocal analysis, acquire z-stacks at 5-μm intervals and a 10× air objective. Reconstruct 3D projections in Imaris.
2. For wide-field analysis, acquire images with a monochrome camera and appropriate FITC and TRITC filter sets. Analyze images in Fiji.
3. Apply identical acquisition and analysis settings to all samples within an experiment. Define the spheroid or U-well region of interest before quantification.
4. Quantify Live/Dead results using a method appropriate to image resolution:
a. Cell-based analysis:
Viability (%) = 100 × Number of Live Cells / (Number of Live Cells + Number of Dead Cells)
b. Area- or volume-based analysis for dense spheroids:
Live-signal fraction (%) = 100 × Live Signal / (Live Signal + Dead Signal)
Critical: For U-well characterization, measure feature diameters and intensity profiles. Calculate the symmetry index and full width at half maximum using the same definition applied to all fabrication batches. A symmetry index near 1 indicates similar dimensions along orthogonal axes.
B. WST-1 analysis
1. For each sample, calculate the corrected absorbance:
Corrected WST-1 signal = (Abs440 - Abs640)Sample - mean(Abs440 - Abs640)Blank
2. Relative metabolic activity (%) = 100 × blank-corrected WST-1 signal of the treated sample / mean blank-corrected WST-1 signal of its matched vehicle control.
3. Normalize all cisplatin, TMZ, and combination (cisplatin + TMZ) data to the corresponding 1% (v/v) DMSO control. Analyze non-cryopreserved and cryopreserved datasets separately. The untreated complete medium control should be reported separately.
C. qPCR analysis
1. Exclude reactions that fail the prespecified amplification curve or melt curve.
2. Report Ct values for the ACTB, GAPDH, and 18S rRNA stability screen.
D. Statistical analysis
1. Perform at least three independent experiments. For each assay, distinguish independently initiated culture experiments, fabrication batches, independently treated samples, and within-sample measurements. Define the biological replicate as an independently initiated culture experiment, from cell thawing and expansion through seeding, culture, and treatment. Define the treatment unit as one separately treated chip. U-wells within a chip and repeated plate-reader aliquots are subsamples, not independent biological experiments.
2. Present data as mean ± SEM when summarizing independent experimental units. Use SD when describing dispersion among technical measurements or when reproducing analyses reported as mean ± SD.
3. For two-group comparisons, use a two-sided t-test. For comparisons involving more than two groups, use one-way ANOVA. Report n values, P values where possible, statistical test, and the definition of the error bars.
Validation of protocol
This protocol was developed and validated by Glia et al. [1]. Whatman Grade 2 paper with a 264-μm wax pattern provided uniform wax diffusion, minimal leakage, bead retention, and symmetrical U-wells. U-wells of 0.2–1.0 mm supported high PC3 viability, with 1.0 mm wells reaching 99.8% at Week 3 by Live/Dead imaging. Laminated MCF7 cultures recovered to 98% viability by Live/Dead imaging and exhibited greater metabolic activity than non-laminated cultures.
The platform supported 3-week culture of six cancer cell lines and MRC5 fibroblasts. Cancer cells maintained high viability with cell line–dependent growth, whereas MRC5 showed weaker aggregation and reduced viability, indicating that extracellular matrix functionalization may benefit attachment-dependent cells. U87 spheroids provided proof-of-concept validation of the complete workflow. Three- and four-week spheroids recovered metabolic activity and retained morphology after controlled-rate freezing in 10% DMSO. In parallel, MCF7 spheroids retained epithelial marker organization (Figure 2B). Cryopreserved and non-cryopreserved spheroids showed similar response profiles to cisplatin, TMZ, and combination treatments; equivalence was not established.
WST-1 measures cellular metabolic activity and does not directly quantify the proportion of viable cells. Drug-treatment measurements were normalized separately within the non-cryopreserved and cryopreserved datasets to the corresponding 1% (v/v) DMSO control and reported as relative metabolic activity. Viability was assessed independently using Live/Dead fluorescence imaging. Both spheroid groups retained metabolic activity in 5% (v/v) DMSO, whereas 10% and 20% (v/v) DMSO produced progressively greater reductions. Drug treatment was a significant determinant of relative metabolic activity (p < 0.001), whereas exposure duration was not significant (p > 0.05). Supplementary HeLa experiments confirmed post-thaw metabolic activity and comparable ACTB amplification after paper-based and conventional cryopreservation.
All experiments were conducted in triplicate and presented as mean ± SEM. Reported sample sizes were n = 3 per fabrication condition, n = 45 per microspot size distribution, n = 281 for U-well size assessment, n = 24 for lamination, n = 12 for cell line and post-thaw assessments, and n = 24 for drug response analyses. One-way ANOVA or t-tests were applied as appropriate. Non-laminated, non-cryopreserved, untreated, and conventionally cryopreserved controls were included where relevant. The demonstrated 14 × 16 Spheromatrix provides 224 spatially separated U-wells for parallel spheroid generation.
General notes and troubleshooting
General notes
1. Perform cell culture, drug handling, and cryogenic procedures under the appropriate institutional biosafety and chemical safety approvals.
2. Record passage number and apply the same to groups being compared.
3. Scaling the number of U-wells is feasible because the array is defined by wax patterning. However, flow distribution, cell suspension volume, loading time, medium volume, and assay sampling must be reoptimized for each new geometry.
4. The compact paper format can reduce culture medium volume, cryoprotectant, and cryogenic storage requirements. Use separate chips for independent assay time points.
5. MRC5 fibroblasts displayed lower viability and less cohesive aggregation than the cancer cell lines. Fibronectin, collagen, or another extracellular matrix treatment may improve performance, but any modification requires independent validation.
6. A change in WST-1 signal may reflect altered metabolic state, cell number, or both. Pair it with morphological and viability measurements.
7. For biobanking, divide the paper into independently retrievable units before freezing. Prevent returning a warmed or partially thawed sample to the liquid nitrogen storage tank.
8. The complete workflow was demonstrated with U87 spheroids as proof-of-concept. Validate cryopreservation and drug responses separately before extending conclusions to other cell lines or treatments.
9. Concentrations established in 2D cultures may guide initial testing but should be reassessed in the corresponding spheroid model.
Troubleshooting
| Problem | Possible cause | Recommended solution(s) |
|---|---|---|
| 1. Incomplete U-well filling | Insufficient plasma treatment | Confirm plasma settings; level the chip. |
| 2. Leakage between U-wells | Incomplete wax diffusion | Heat at 120 °C for 90 s; reduce plasma exposure. |
| 3. Uneven cell distribution | Spherobox misalignment | Confirm alignment; load at 5 μL/min. |
| 4. Poor spheroid formation | Insufficient cell delivery | Confirm seeding conditions; use 1.0 mm U-wells. |
| 5. Culture contamination | Non-sterile conditions | Autoclave the paper; disinfect the Spherobox. |
| 6. Variable Live/Dead images | Limited stain penetration | Standardize staining and imaging. |
| 7. Saturated WST-1 readings | Signal outside the linear range | Standardize assay conditions, shorten incubation. |
| 8. Low post-thaw viability | Incorrect cooling or thawing | Confirm controlled cooling, minimize DMSO exposure, thaw rapidly, and transfer immediately to prewarmed medium. |
| 9. Reduced post-thaw metabolic activity | Osmotic and recovery stress | Assess recovery at 6, 24, 48, and 72 h together with Live/Dead imaging. |
| 10. No drug response | Unsuitable concentration range | Prepare fresh solutions and perform a controlled drug concentration range study. |
Supplementary information
The following supporting information can be downloaded here:
1. File S1. Spherobox CAD files. The supplementary ZIP archive contains the CAD/STL files for the Spherobox components used in this protocol.
Acknowledgments
The work was financially supported by the Sandooq Al Watan Applied Research and Development Award (SWARD-F21-009) and NYU Abu Dhabi (AD129), United Arab Emirates. We acknowledge the technical support from Core Technology Platforms at NYU Abu Dhabi.
Author contributions
Protocol Development, A.G., M.A.Q.; Protocol Optimization or Validation, A.G., P.S.; Writing—Original Draft, M.D.; Writing—Review & Editing, M.D., P.S., A.G., M.A.Q.; Funding acquisition, M.A.Q.; Supervision, M.A.Q.
Competing interests
The authors declare no competing interests.
References
- Glia, A., Deliorman, M., Sukumar, P. and Qasaimeh, M. A. (2025). Spheromatrix: a paper-based platform for scalable 3D tumor model generation, cryopreservation, and high-throughput drug assessment. Microsyst Nanoeng. 11(1): 219. https://doi.org/10.1038/s41378-025-01077-0
- Gunti, S., Hoke, A. T., Vu, K. P. and London, N. R. (2021). Organoid and Spheroid Tumor Models: Techniques and Applications. Cancers. 13(4): 874. https://doi.org/10.3390/cancers13040874
- Lee, K. H. and Kim, T. H. (2021). Recent Advances in Multicellular Tumor Spheroid Generation for Drug Screening. Biosensors. 11(11): 445. https://doi.org/10.3390/bios11110445
- Nayak, P., Bentivoglio, V., Varani, M. and Signore, A. (2023). Three-Dimensional In Vitro Tumor Spheroid Models for Evaluation of Anticancer Therapy: Recent Updates. Cancers. 15(19): 4846. https://doi.org/10.3390/cancers15194846
- Rodrigues, D. B., Reis, R. L. and Pirraco, R. P. (2024). Modelling the complex nature of the tumor microenvironment: 3D tumor spheroids as an evolving tool. J Biomed Sci. 31(1): 13. https://doi.org/10.1186/s12929-024-00997-9
- Derda, R., Laromaine, A., Mammoto, A., Tang, S. K. Y., Mammoto, T., Ingber, D. E. and Whitesides, G. M. (2009). Paper-supported 3D cell culture for tissue-based bioassays. Proc Natl Acad Sci USA. 106(44): 18457–18462. https://doi.org/10.1073/pnas.0910666106
- Sitte, Z. R., Larson, T. S., McIntosh, J. C., Sinanian, M. and Lockett, M. R. (2023). Selecting the appropriate indirect viability assay for 3D paper-based cultures: a data-driven study. Analyst. 148(10): 2245–2255. https://doi.org/10.1039/d3an00283g
- Sitte, Z. R., Miranda Buzetta, A. A., Jones, S. J., Lin, Z. W., Whitman, N. A. and Lockett, M. R. (2023). Paper-Based Coculture Platform to Evaluate the Effects of Fibroblasts on Estrogen Signaling in ER+ Breast Cancers. ACS Meas Sci Au. 3(6): 479–487. https://doi.org/10.1021/acsmeasuresciau.3c00032
- Xie, Y., Pan, R., Wu, S., Yang, X., Chen, F., Sun, W. and Yu, L. (2023). Cell repelling agar@paper interface assisted probing of the tumor spheroids infiltrating natural killer cells. Biomater Adv. 153: 213507. https://doi.org/10.1016/j.bioadv.2023.213507
- Xie, Y., Yang, X., Pan, R., Gao, L. and Yu, L. (2024). Co-culture of natural killer cells and tumor spheroids on a heterogeneous multilayer paper stack. J Zhejiang Univ Sci B. 25(12): 1097–1107. https://doi.org/10.1631/jzus.b2300617
- Alnemari, R., Sukumar, P., Deliorman, M. and Qasaimeh, M. A. (2020). Paper‐Based Cell Cryopreservation. Adv Biosyst. 4(3): e1900203. https://doi.org/10.1002/adbi.201900203
- Deliorman, M., Sukumar, P., Alnemari, R. and Qasaimeh, M. (2020). A Method to Efficiently Cryopreserve Mammalian Cells on Paper Platforms. Bio Protoc. 10(18): e3764. https://doi.org/10.21769/bioprotoc.3764
- Samara, B., Deliorman, M., Sukumar, P. and Qasaimeh, M. A. (2021). Cryopreservable arrays of paper-based 3D tumor models for high throughput drug screening. Lab Chip. 21(5): 844–854. https://doi.org/10.1039/d0lc01300e
- Rocha, C. R. R., Garcia, C. C. M., Vieira, D. B., Quinet, A., de Andrade-Lima, L. C., Munford, V., Belizário, J. E. and Menck, C. F. M. (2014). Glutathione depletion sensitizes cisplatin- and temozolomide-resistant glioma cells in vitro and in vivo. Cell Death Dis. 5(10): e1505. https://doi.org/10.1038/cddis.2014.465
Article Information
Publication history
Received: Sep 5, 2026
Accepted: Oct 26, 2026
Available online: Nov 17, 2026
Published: Dec 5, 2026
Copyright
© 2026 The Author(s); This is an open access article under the CC BY-NC license (https://creativecommons.org/licenses/by-nc/4.0/).
How to cite
Deliorman, M., Sukumar, P., Glia, A. and Qasaimeh, M. A. (2026). Generation, Cryopreservation, and Drug Assessment of 3D Tumor Spheroids Using the Spheromatrix Platform. Bio-protocol 16(23): e5896. DOI: 10.21769/BioProtoc.5896.

 Download Citation in RIS Format
Do you have any questions about this protocol?
Post your question to gather feedback from the community. We will also invite the authors of this article to respond.
 Post a Question


