


- Protocols

- Articles and Issues
- For Authors
- About
- Become a Reviewer


Sample Preparation for Imaging-Based Spatial Transcriptomics in Rigid Plant Tissues (Roots, Shoots)

Published: Vol 16, Iss 15, Aug 5, 2026 DOI: 10.21769/BioProtoc.5779 Views: 338
Reviewed by: Samik BhattacharyaAnonymous reviewer(s)
 PDF
PDF  Ask a question
Original research article
The authors used this protocol in:

Jun 2025

Protocol Collections
Comprehensive collections of detailed, peer-reviewed protocols focusing on specific topics




Related protocols
Abstract
Plant roots dynamically respond to environmental changes and serve as an ideal system for studying cell development and gene regulation. Recent advances in imaging-based spatial transcriptomics have enabled high-resolution mapping of gene expression while preserving spatial context. However, existing sample preparation techniques remain inadequate for handling rigid plant tissues such as crop roots. Here, we present a detailed and practical protocol for preparing rigid plant tissue samples for imaging-based spatial transcriptomics. The workflow ensures effective tissue handling while maintaining RNA integrity and spatial organization. Within approximately eight days, samples can be processed and mounted onto commercial slides, making them ready for subsequent probe hybridization and imaging. This protocol also includes an integrated sample attachment test performed to assess slide quality. It has been optimized to produce consistent and reliable results across experiments. Overall, our method provides a robust solution for spatial transcriptomic analysis in rigid plant tissues, facilitating broader application of these technologies in plant research.
Key features
• Builds upon the method developed by Zhu et al. [1] and introduces an optimized sample preparation protocol for imaging-based spatial transcriptomics in rigid rice roots.
• Ensures effective tissue fixation and sectioning, while preserving RNA integrity and spatial organization.
• Includes an integrated sample attachment test to assess the adhesion of tissue sections to commercial slides.
• Requires approximately 8 days to complete the sample preparation, with another 6 days for the attachment test.
Keywords: Imaging-based spatial transcriptomics Rigid plant tissues
Crop roots
PFA-based fixation
Paraffin-embedded tissue sectioning
Section adhesion test
Rigid plant tissues
Crop roots
PFA-based fixation
Paraffin-embedded tissue sectioning
Section adhesion test
Graphical overview
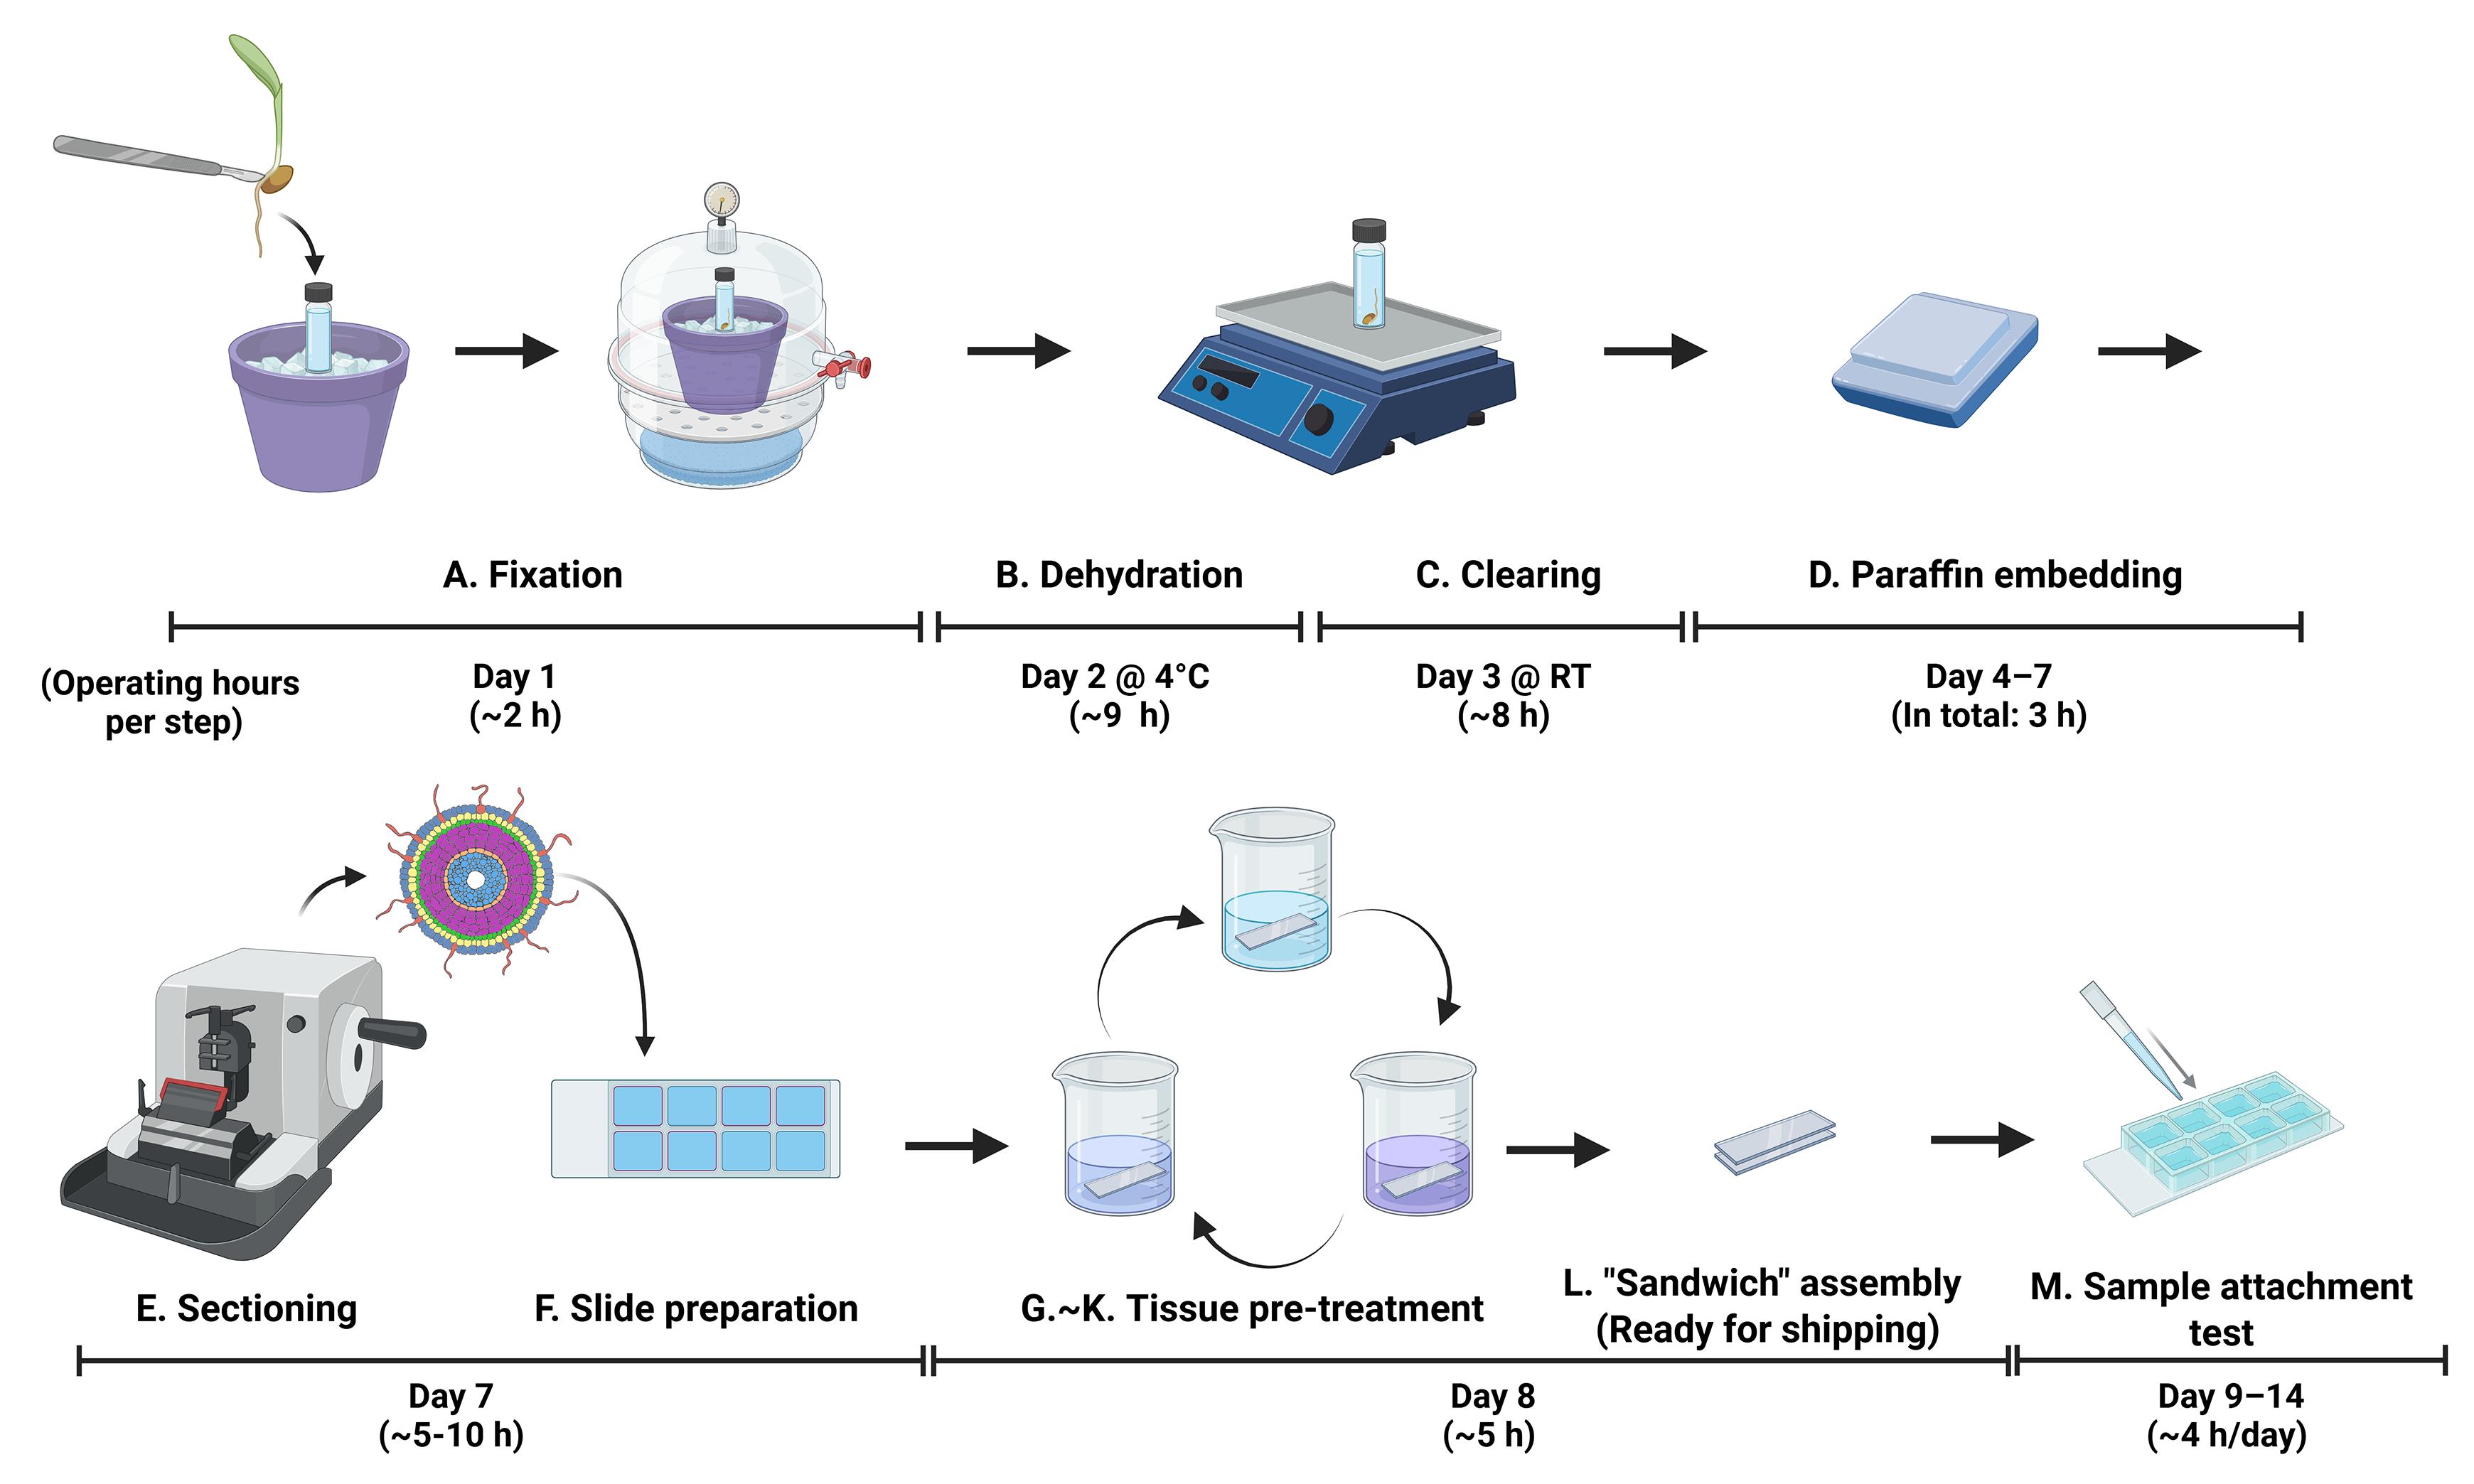
Overview of sample preparation for imaging-based spatial transcriptomics in rice roots
Background
The rapid development of single-cell and spatial transcriptomic technologies has revolutionized our understanding of gene expression at the cellular level and its spatial organization within tissues and organs [2]. In plant science research, various single cell–based approaches have been widely adopted and further developed, enabling insights into diverse biological processes, including cell differentiation trajectories, hormone signaling, and plant responses to biotic and abiotic stresses [3–6].
However, most studies rely on single-cell or single-nucleus RNA sequencing, which requires dissociation of cells from tissues and can lead to the loss of spatial information [7]. Traditional approaches, such as in situ hybridization and confocal imaging with fluorescent reporters, have been used to recover spatial context [8,9], but these methods are limited by low throughput (restricted number of detectable genes) and resolution and are not fully compatible with high-throughput single-cell technologies.
To overcome these limitations, we collaborated with Resolve Biosciences to implement a multiplexed, imaging-based spatial transcriptomics approach that enables high-throughput visualization of gene expression while preserving spatial context [1]. Our sample preparation workflow is specifically optimized for rice roots. This protocol can be readily adapted to other rigid plant tissues, such as developing maize ears [10], maize roots [11], soybean roots and mature nodules [12], and barley shoot meristem [13], facilitating robust imaging-based spatial transcriptomic analyses across diverse plant systems. With further optimization, the protocol may also be extended to support additional omics applications.
Materials and reagents
Biological materials
1. Rice primary roots, 4–6 days old
Note: Rice seeds were dehulled and surface-sterilized using 50% bleach for 30 min, followed by five rinses with sterile water. The seeds were then placed in Yoshida’s medium solidified with 0.15% gellan gum (Gelzan, Caisson), with the embryos oriented upward. Seeds were incubated at 30 °C in darkness for 2–3 days to allow germination. Germinated seedlings were either kept in a gel system or transferred to soil conditions. For soil condition, soils (Wedowee sandy loam soils, Johnston County, NC, USA) were air dried, crushed, and then passed through a sieve with a 2-mm mesh size, then lightly sprayed with sterilized water and mixed thoroughly. Non-compacted soil condition was packed up to 1.2 g/cm3, and compacted soil was pressed to make 1.6 g/cm3. Seedlings were grown in a growth chamber maintained at 28 °C under continuous light (45 μmol/m2/s) for an additional 2–3 days prior to harvesting.
Reagents
1. Paraformaldehyde (PFA) (Sigma-Aldrich, catalog number: 158127)
2. Triton X-100 (Thermo Fisher Scientific, catalog number: A16046)
3. Phosphate-buffered saline (PBS) (10×) pH 7.4, RNase-free (Thermo Fisher Scientific, Invitrogen, catalog number: AM9625)
4. Sodium hydroxide (NaOH) (Sigma-Aldrich, catalog number: S5881)
5. DEPC-treated water (Thermo Fisher Scientific, Invitrogen, catalog number: 4387937)
6. Absolute ethanol, 200 proof, molecular biology grade (Thermo Fisher Scientific, Invitrogen, catalog number: T038181000)
7. Histo-Clear®/Histo-Clear II®, Electron Microscopy Sciences (VWR, catalog number: 101412-876)
8. SurgipathTM ParaplastTM tissue embedding medium (Leica Biosystems, catalog number: 39601006)
9. Proteinase K solution (20 mg/mL), RNA grade (Thermo Fisher Scientific, Invitrogen, catalog number: 25530049)
10. Tris (1 M), pH 8.0, RNase-free (Thermo Fisher Scientific, Invitrogen, catalog number: AM9855G)
11. EDTA (0.5 M), pH 8.0, RNase-free (Thermo Fisher Scientific, Invitrogen, catalog number: AM9260G)
12. Glycine, molecular biology grade (Promega, catalog number: H5073)
13. Triethanolamine (Sigma-Aldrich, catalog number: 90279)
14. Hydrochloric acid (HCl), 36.5%–38% (MilliporeSigma, catalog number: HX06034)
15. SlowFadeTM Diamond antifade mountant (Thermo Fisher Scientific, Invitrogen, catalog number: S36967)
16. Isopropanol (Sigma-Aldrich, catalog number: I9030)
17. Wash buffer (provided by Resolve Biosciences)
18. RNaseZapTM RNase decontamination solution (Thermo Fisher Scientific, Invitrogen, catalog number: AM9780)
19. Ammonium nitrate (NH4NO3) (Thermo Fisher Scientific, catalog number: A676-500)
20. Sodium dihydrogen phosphate dihydrate (NaH2PO4·2H2O) (Thermo Fisher Scientific, catalog number: AAA1131636)
21. Potassium sulfate (K2SO4) (Thermo Fisher Scientific, catalog number: AAA139750B)
22. Calcium chloride (CaCl2) (Thermo Fisher Scientific, catalog number: AAL131910B)
23. Magnesium sulfate heptahydrate (MgSO4·7H2O) (Thermo Fisher Scientific, catalog number: M63-500)
24. Manganese(II) chloride tetrahydrate (MnCl2·4H2O) (Thermo Fisher Scientific, catalog number: AC193451000)
25. Ammonium molybdate (para) tetrahydrate [(NH4)6Mo7O24·4H2O] (Thermo Fisher Scientific, catalog number: AAA1376618)
26. Boric acid (H3BO3) (Thermo Fisher Scientific, catalog number: A74-500)
27. Iron(III) chloride hexahydrate (FeCl3·6H2O) (Thermo Fisher Scientific, catalog number: AC217091000)
28. Citric acid monohydrate (Thermo Fisher Scientific, catalog number: A104-500)
29. Zinc sulfate heptahydrate (ZnSO4·7H2O) (Thermo Fisher Scientific, catalog number: Z68-500)
30. Copper(II) sulfate pentahydrate (CuSO4·5H2O) (Thermo Fisher Scientific, catalog number: AAA112620B)
31. Sulfuric acid (H2SO4) (Thermo Fisher Scientific, catalog number: MSX12446)
32. Gelzan™ (Cassion Labs, catalog number: G024)
33. Acetic anhydride (Sigma-Aldrich, catalog number: 320102)
Solutions
1. 1× PBS (see Recipes)
2. 30% Triton X-100 solution (see Recipes)
3. Ethanol gradient solutions (see Recipes)
4. Fixative (see Recipes)
5. Histo-Clear/ethanol gradient solutions (see Recipes)
6. Proteinase K buffer (see Recipes)
7. 0.2% (w/v) glycine solution (see Recipes)
8. Fixative without Triton (see Recipes)
9. 0.1 M triethanolamine (see Recipes)
10. Yoshida’s medium (see Recipes)
Recipes
1. 1× PBS
| Reagent | Final concentration | Quantity or volume |
| 10× PBS | 1× | 40 mL |
| DEPC-treated water | n/a | 360 mL |
| Total | n/a | 400 mL |
2. 30% Triton X-100 solution
| Reagent | Final concentration | Quantity or volume |
| Triton X-100 | 30% (v/v) | 3 mL |
| 1× PBS | n/a | 7 mL |
| Total | n/a | 10 mL |
3. Ethanol gradient solutions
| Reagent | Final concentration | Quantity or volume |
| Ethanol (absolute) | X% (v/v) | (X/10) mL |
| DEPC-treated water | n/a | 10 - (X/10) mL |
| Total | n/a | 10 mL |
Make fresh.
4. Fixative
| Reagent | Final concentration | Quantity or volume |
| PFA | 4% (w/v) | 0.8 g |
| 30% Triton X-100 solution | 0.03% | 20 μL |
| NaOH | n/a | 0.15 g |
| HCl | n/a | Adjust pH to 7.0 |
| 1× PBS | 1× | Make up to 20 mL |
| Total | n/a | 20 mL |
Add 0.15 g of NaOH pellets to dissolve PFA in 15 mL of 1× PBS, then adjust pH to 7.0 with HCl. Top up with 1× PBS to 20 mL. Always use freshly made fixative.
5. Histo-Clear/ethanol gradient solutions
| Reagent | Final concentration | Quantity or volume |
| Histo-Clear | Y% | (Y/2) mL |
| Ethanol (absolute) | (100 - Y)% | 50 - (Y/2) mL |
| Total | n/a | 50 mL |
Solutions cannot be stored for a long time.
6. Proteinase K buffer
| Reagent | Final concentration | Quantity or volume |
| 1 M Tris-HCl, pH 8.0 | 100 mM | 20 mL |
| 0.5 M EDTA, pH 8.0 | 50 mM | 10 mL |
| DEPC-treated water | n/a | 170 mL |
| Total | n/a | 200 mL |
7. 0.2% (w/v) glycine solution
| Reagent | Final concentration | Quantity or volume |
| Glycine | 0.2% (w/v) | 0.4 g |
| 1× PBS | n/a | 200 mL |
| Total | n/a | 200 mL |
Make fresh.
8. Fixative without Triton
| Reagent | Final concentration | Quantity or volume |
| PFA | 4% (w/v) | 8 g |
| NaOH | n/a | 1.5 g |
| HCl | n/a | Adjust pH to 7.0 |
| 1× PBS | 1× | Make up to 200 mL |
| Total | n/a | 200 mL |
Add 1.5 g of NaOH pellets to dissolve PFA in 150 mL of 1× PBS, then adjust pH to 7.0 with HCl. Top up with 1× PBS to 200 mL. Always use freshly made fixative.
9. 0.1 M triethanolamine
| Reagent | Final concentration | Quantity or volume |
| Triethanolamine | 0.1 M | 2.68 mL |
| HCl | 0.15% (v/v) | 0.8 mL |
| 1× PBS | n/a | 197 mL |
| Total | n/a | 200 mL |
10. Yoshida’s medium
| Reagent | Final concentration | Quantity or volume |
| NH4NO3 (800×) | 1.43 mM | 1.25 mL |
| NaH2PO4·2H2O (800×) | 0.32 mM | 1.25 mL |
| K2SO4 (800×) | 0.51 mM | 1.25 mL |
| CaCl2 (800×) | 1 mM | 1.25 mL |
| MgSO4·7H2O (800×) | 1.64 mM | 1.25 mL |
| Yoshida’s microstock (800×) | 1× | 1.25 mL |
| MES hydrate | 2.8 mM | 0.546 g |
| dH2O | n/a | Make up to 1 L |
| Total | n/a | 1 L |
Prepare 800× stock solution of NH4NO3 (1.14 M), NaH2PO4·2H2O (0.25 M), K2SO4 (0.41 M), CaCl2 (0.80 M), and MgSO4·7H2O (1.31 M).
Then, prepare Yoshida’s microstock (800×). Dissolve 1.5 g of MnCl2·4H2O in 50 mL of ddH2O. Dissolve 0.074 g of (NH4)6Mo7O24·4H2O in 50 mL of ddH2O. Dissolve 0.934 g of H3BO3 in 50 mL of ddH2O. Dissolve 7.7 g of FeCl3·6H2O in 50 mL of ddH2O. Dissolve 11.9 g of citric acid monohydrate in 50 mL of ddH2O. Also, prepare 50 mM ZnSO4·7H2O and 50 mM CuSO4·5H2O solutions. In a fume hood, slowly add 50 mL of H2SO4 to 550 mL of ddH2O while stirring, then add 50 mL of MnCl2·4H2O, 50 mL of (NH4)6Mo7O24·4H2O, 50 mL of H3BO3, 2.435 mL of 50 mM ZnSO4·7H2O, 2.483 mL of 50 mM CuSO4·5H2O, 50 mL of FeCl3·6H2O, and 50 mL of citric acid monohydrate. Make up the volume to 1 L.
Add all components into a beaker containing 800 mL of dH2O with a magnetic stir bar. Adjust pH to 5.8 with NaOH before making up the final volume to 1 L. Add 1.5 g of Gelzan and then autoclave.
Laboratory supplies
1. DWK Life Sciences WheatonTM glass 20 mL scintillation vials: polypropylene caps (Thermo Fisher Scientific, catalog number: 03-341-25D)
2. VWR® razor blades, 0.22 mm (VWR, catalog number: 55411-050)
3. Disposable scalpel blades, sterile, IntegraTM Miltex®, carbon steel blade, #21 (VWR, catalog number: 21909-624)
4. FisherbrandTM fine precision medium tipped tweezers/forceps (Thermo Fisher Scientific, catalog number: 12-000-157)
5. Olympus conical polypropylene centrifuge tubes, 50 mL (Genesee Scientific, catalog number: 28-108)
6. Olympus conical polypropylene centrifuge tubes, 15 mL (Genesee Scientific, catalog number: 28-103)
7. Eisco alcohol lamp (VWR, catalog number: 47036-104)
8. EprediaTM ultra disposable microtome blades (Thermo Fisher Scientific, catalog number: 31-537-35)
9. Princeton Artist Brush, Neptune Series 4750, Script, synthetic squirrel, Size 1 (Princeton Artist Brush Company, catalog number: P4750SC1)
10. VWR® Premium Superfrost® Plus microscope slides (VWR, catalog number: 48311-703)
11. VWR® micro cover glasses, rectangular, No. 2, 50 × 24 mm (VWR, catalog number: 48382-136)
12. Slide (sample coverslip) for sample mounting with regions drawn (provided by Resolve Biosciences)
13. Kimberly-Clark ProfessionalTM Kimtech ScienceTM KimwipesTM delicate task wipers, 1-Ply (Thermo Fisher Scientific, catalog number: 06-666)
14. VWR® transfer pipets, sterile, bulb draw: 3.5 mL (VWR, catalog number: 78062-460)
15. CorningTM PYREXTM low form Griffin beakers, 250 mL (Thermo Fisher Scientific, catalog number: 02-540K)
16. VWR® disposable Petri dishes, 100 × 15 mm (VWR, catalog number: 89022-320)
17. EprediaTM ShandonTM slide holder, 10 slide capacity (Thermo Fisher Scientific, catalog number: 14-7)
18. Mold, Peel-A-Way embedding; truncated, T8; size: 22 × 22 sq. mm truncated to 8 × 8 mm (Thermo Fisher Scientific, catalog number: NC9991740)
19. Wooden holder for ultramicrotome (Smallest pieces in Ward's® Essentials Magic Blocks Kit)
20. Sticky slide (provided by Resolve Biosciences)
21. FisherbrandTM 5-place slide mailer, end opening (Thermo Fisher Scientific, catalog number: HS15986)
Equipment
1. Thermo ScientificTM PH111 pH/mV Bench Meter Easy-to-Clean Bio Kit (Thermo Fisher Scientific, catalog number: 15200969PM)
2. Bel ArtTM Space Saver Vacuum Desiccator (Thermo Fisher Scientific, catalog number: 08-594-16A)
3. Dual-Stage HVAC Vacuum Pump, 5.0 CFM (Amazon)
4. FisherbrandTM Multi-Platform Shaker (Thermo Fisher Scientific, catalog number: 88-861-021)
5. VWR® VWB2 Unstirred Water Baths (VWR, catalog number: 77587-158)
6. Spencer 820 Precision Rotary Microtome (Spencer Lens Company, model: 820)
7. Microscope (Leica, model: DM5500 B)
8. Covered and uncovered flat-bed slide warmers (VWR, catalog number: 470303-828)
9. Water Jacket Incubator (VWR, model: 3015)
10. Cimarec+TM Stirring Hotplates (Thermo Fisher Scientific, catalog number: SP88857100)
11. Thermal Cycler (Bio-Rad, model: C1000)
Procedure
A. Fixation (day 1, ~2 h)
1. Add 10 mL of fixative (PFA–Triton-X, see Recipe 4) into a glass scintillation vial and keep on ice. Cut 2–5 rice roots of 2–3 cm length with seeds attached (with 1–2 additional roots without seeds attached) using clean, RNase-free razor blades and place them directly into the fixative.
Note: For transverse sections, the transition zone and elongation zone were used. For longitudinal sections, approximately 2 cm from the root tip was used.
2. Place the vial on ice under a vacuum chamber and apply a vacuum (-20 inHg) for 10 min. Carefully release the vacuum and avoid spilling liquids out of the vials. Repeat this step 2–5 times until the tissues sink to the bottom of the vial.
3. Replace the solution with 10 mL of fresh fixative. Incubate for 12–14 h (overnight) at 4 °C with gentle orbital shaking at 140 rpm.
Pause point: Samples may be stored in fixative for up to one week; however, proceeding immediately to the next step is recommended for optimal results.
B. Dehydration (day 2, ~9 h)
1. Aspirate and discard fixative and rinse tissues with 10 mL of 1× fresh PBS. Incubate for 1 h on ice. Aspirate and discard 1× PBS. Rinse tissues again with 10 mL of 1× PBS and incubate for 1 h on ice.
2. Dehydrate on ice through a graded ethanol series: 15%, 30%, 50%, 70%, 80%, 90% (v/v) ethanol, 10 mL each. Incubate for 1 h on ice for each concentration. Add 10 mL of 100% ethanol, incubate at 4 °C for 15 min, and then add fresh 100% ethanol for 12–14 h (overnight), with gentle orbital shaking at 140 rpm.
Note: The tissue should gradually decolorize.
C. Clearing (day 3, ~7.5 h)
1. Aspirate and discard 100% ethanol. Add 10 mL of 100% ethanol and incubate for 2 h at room temperature (RT).
2. Aspirate and discard 100% ethanol. Add 10 mL of 25% Histo-Clear/75% ethanol and incubate for 1 h at RT.
3. Aspirate and discard 25% Histo-Clear/75% ethanol. Add 10 mL of 50% Histo-Clear/50% ethanol and incubate for 1 h at RT.
4. Aspirate and discard 50% Histo-Clear/50% ethanol. Add 10 mL of 75% Histo-Clear/25% ethanol and incubate for 1 h at RT.
5. Aspirate and discard 75% Histo-Clear/25% ethanol. Add 10 mL of 100% Histo-Clear and incubate for 1 h at RT.
6. Aspirate and discard 100% Histo-Clear. Add 10 mL of 100% Histo-Clear and incubate for 1 h at RT.
Note: Perform the clearing steps on a shaker with gentle orbital shaking at 140 rpm under a fume hood since Histo-Clear is being used.
D. Paraffin embedding (days 4–5, 0.5 h per day; day 6, 2 h)
1. (Day 3, evening) Aspirate and discard 100% Histo-Clear. Fill half of the vial with Paraplast and fill up with 100% Histo-Clear. Incubate for 12–14 h (overnight) at exactly 60 °C. In the meantime, keep a 500 mL bottle/beaker full of Paraplast in the same oven at 60 °C. Replenish Paraplast regularly as and when used.
2. (Day 4–5, morning and evening; Day 6, morning) Aspirate and discard approximately three-quarters of the vial volume, then refill the scintillation vial with fresh Paraplast. Repeat this exchange twice daily (once in the morning and once in the evening). Successful infiltration is indicated when the samples sink to the bottom of the vial.
3. (Day 6, early afternoon) The preparation of Paraplast blocks can vary depending on laboratory practices and sample types. A common approach involves placing tissues into labeled embedding cassettes, orienting them appropriately in embedding molds filled with fresh melted Paraplast, and allowing the blocks to solidify at room temperature or on a cold plate. For our experiments, which focus on obtaining transverse sections of roots, a vertical embedding strategy is preferred to ensure proper orientation. Briefly, tissues are first removed from the vial and allowed to partially solidify with the surrounding Paraplast to avoid damaging delicate root structures. The Paraplast-embedded roots are then gently attached to a piece of tape and secured with a binder clip, which allows precise control of the root tip position and height. The mounted sample is subsequently submerged into an embedding mold containing fresh molten Paraplast, with the position of the root tip marked on the side of the mold for reference. The entire assembly is then incubated at 60 °C overnight to resume the complete embedding (Figure 1).
Note: For paraffin embedding, incubation at 60 °C in a vacuum incubator can improve embedding efficiency. This step is optional, as a standard incubator was used successfully in our experiments.
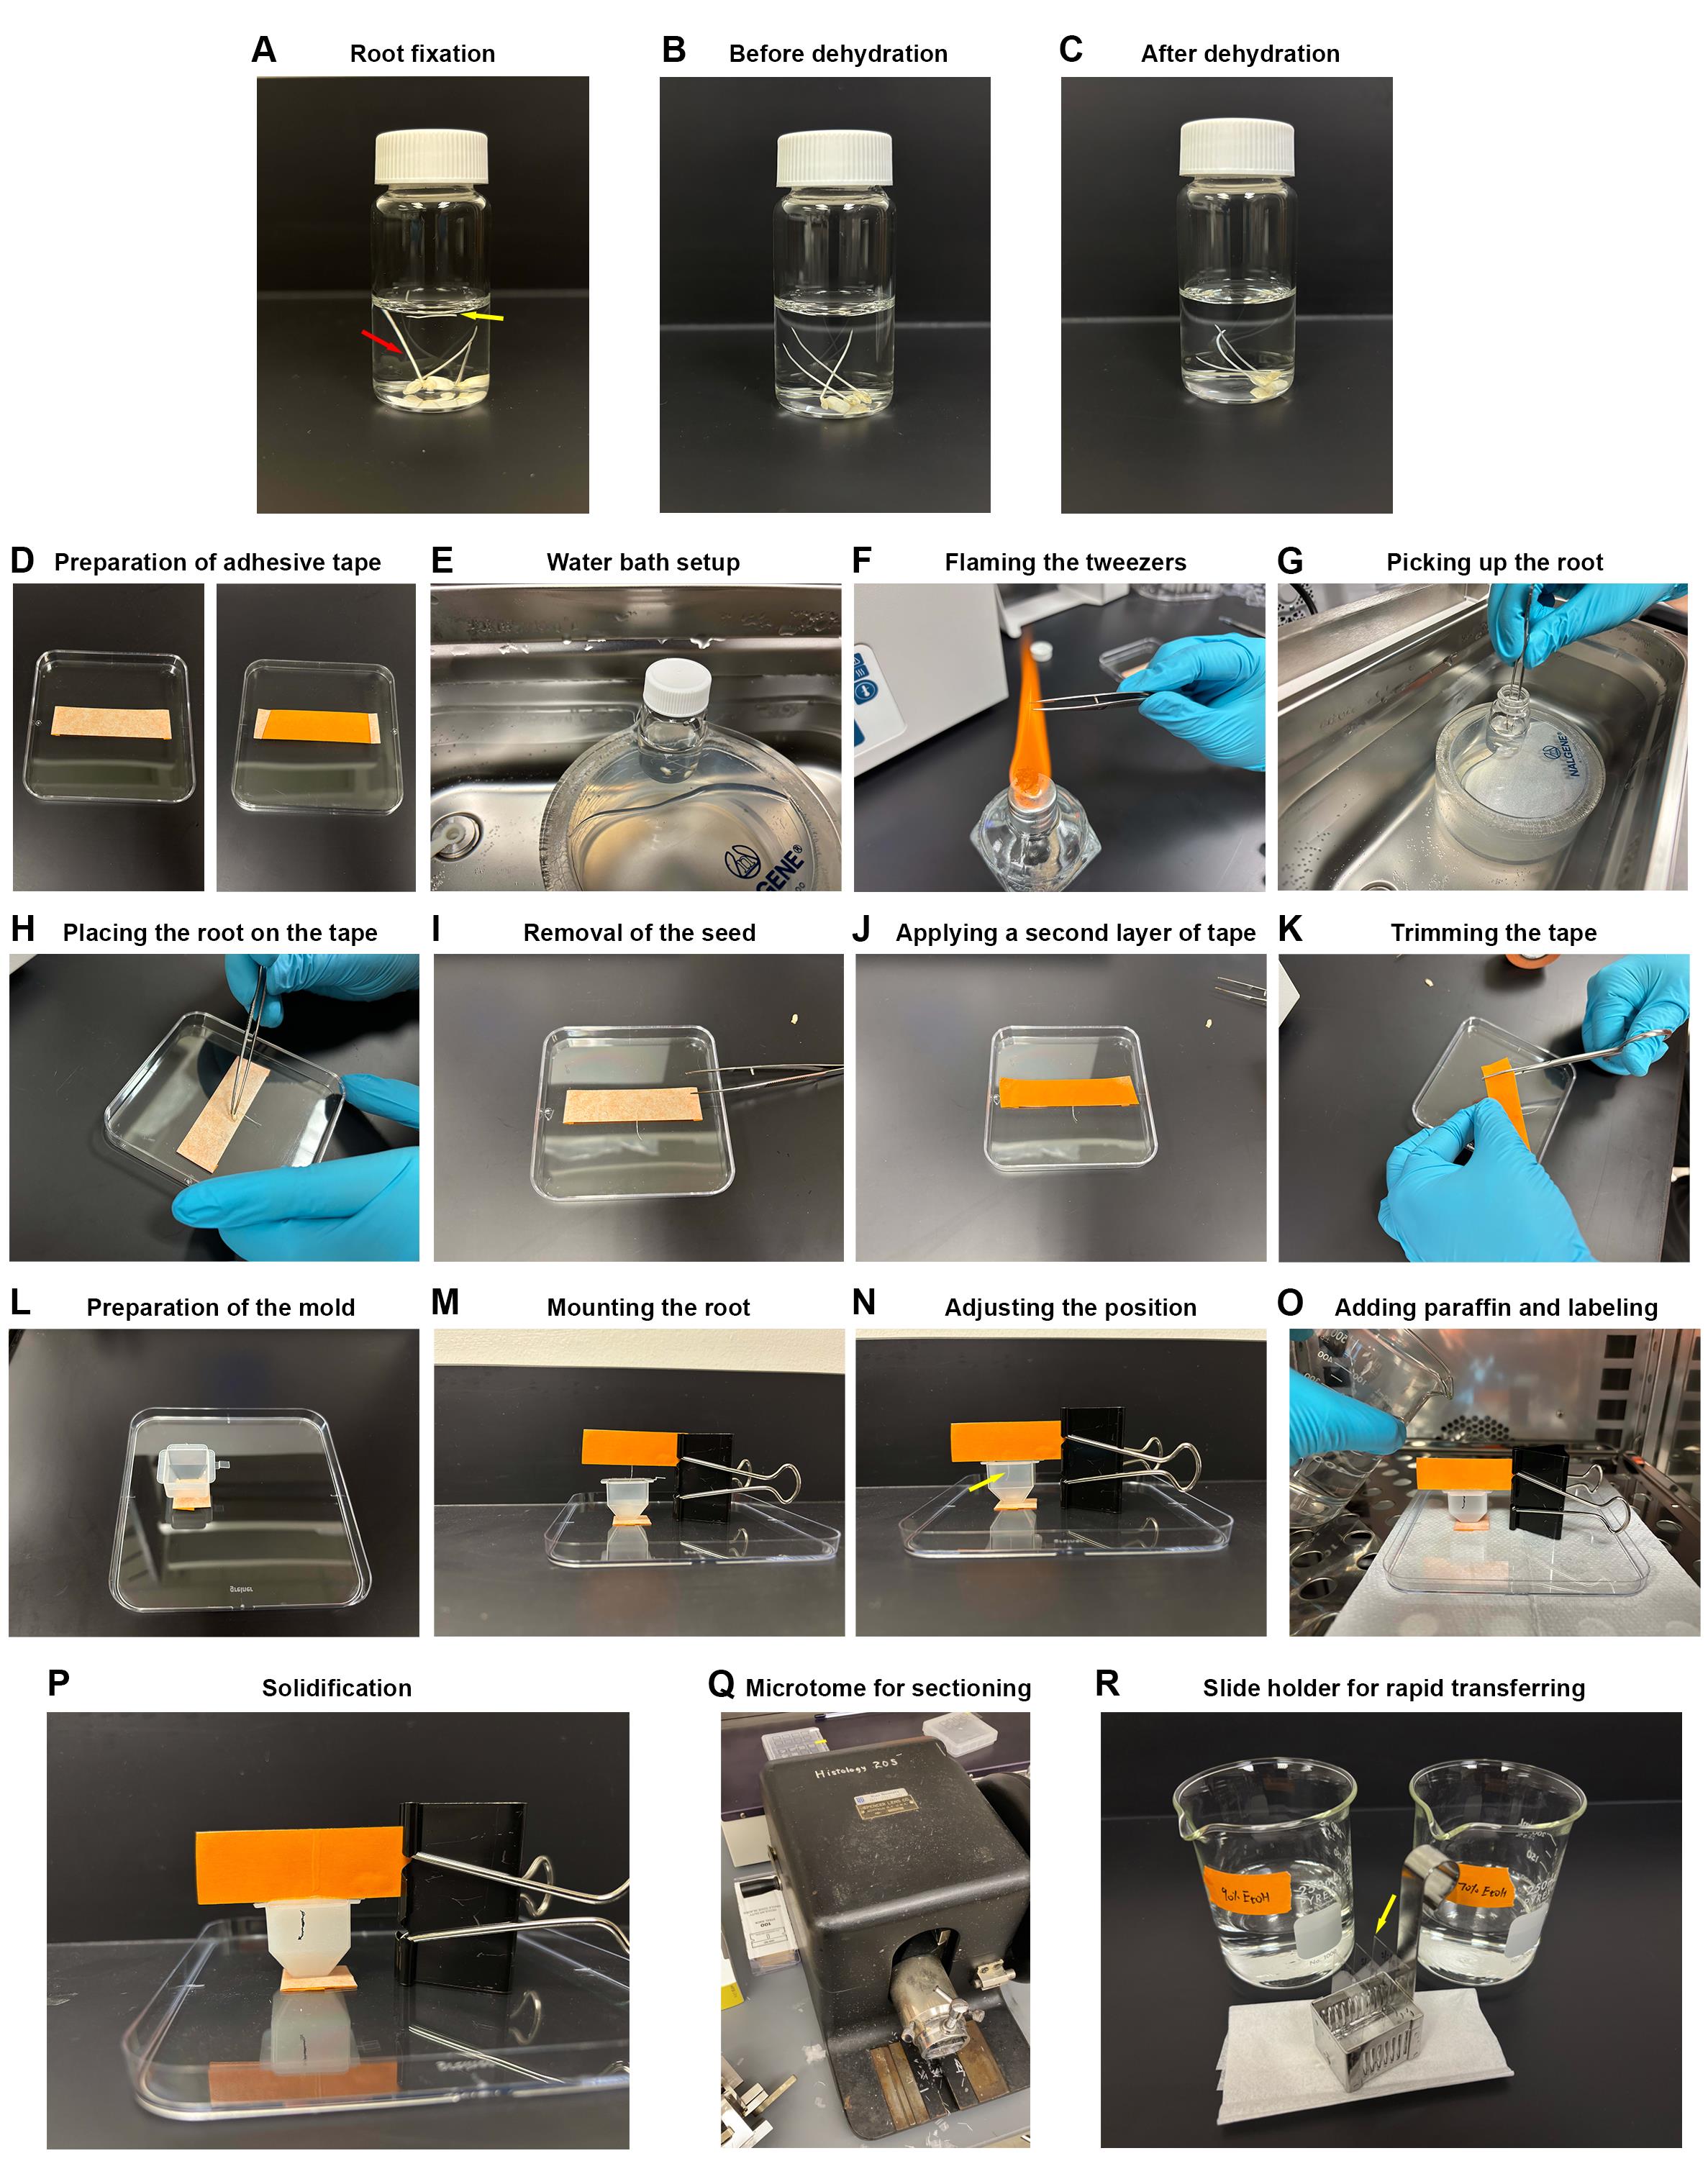
Figure 1. Critical steps in sample handling. (A) Tissue fixation, dehydration, and subsequent steps involve frequent solution exchanges. To minimize tissue loss during these processes, seeds were kept attached to the roots (red arrow). In parallel, extra root tips were included (yellow arrow) to assess the efficiency of vacuum infiltration and paraffin embedding. (B, C) Representative images of the roots before and after dehydration. (D–O) Critical steps in vertical embedding. (D) A piece of paper tape was attached to a Petri dish with the adhesive side facing upward. (E) The scintillation vial containing root samples was placed in a 65 °C water bath. (F, G) Tweezers were flamed before picking up the root from the vial. (H, I) The root was placed on the tape, and the attached seed was removed. (J–N) Tape and clip holders were used to maintain the roots in a vertical orientation, ensuring proper alignment for subsequent transverse sectioning. A second layer of tape was applied, then the excess tape was trimmed. Meanwhile, the embedding mold was stuck to a Petri dish with tape. The root was mounted using the clip, and the vertical position of the root can be adjusted by moving the tape relative to the clip. Roots (highlighted with yellow arrows) were labeled to facilitate subsequent trimming of the paraffin block. Molten paraffin was added to the mold. The entire cassette was then returned to a 60 °C incubator overnight to allow complete paraffin embedding. (P) The entire assembly was removed from the incubator and allowed to solidify at room temperature. (Q) Using a conventional microtome, trimmed tissue samples were mounted onto wooden blocks with melted Paraplast for sectioning. Detailed procedures for microtome operation and sectioning are described in Figure 2 of [14]. (R) A slide holder was used in combination with beakers to facilitate rapid and efficient solution exchange during sample processing. Individual slides/sample coverslips are highlighted with yellow arrows.
E. Sectioning (day 7, ~3–8 h, depending on the sample number)
1. Remove the entire assembly from the incubator and allow it to solidify gradually at room temperature. Once solidified, use scissors to trim away excess roots outside of the embedded region. The roots remaining and the Paraplast block constitute the final embedded “sample” for subsequent sectioning.
2. Remove the Paraplast block (sample) from the embedding mold. Trim the block using a razor blade to create a trapezoidal block face, ensuring that the region of interest is centered and properly exposed. The size of the block face should be adjusted according to the dimensions of the target tissue section. The height of the block (z-axis, perpendicular to the cutting surface) should be sufficient to accommodate the full tissue depth or multiple sectioning levels if needed. The trimmed block should have smooth, even surfaces.
3. Mount the trimmed Paraplast block onto a wooden specimen holder using melted Paraplast as an adhesive. Once secured, attach the holder to the specimen clamp of the microtome.
4. Cut sections using a sharp microtome blade at a thickness of approximately 10 μm, with a slow and steady cutting speed to ensure high-quality ribbons.
5. Carefully collect sections using a fine brush and transfer them onto clean microscope slides. Apply a small drop of water to allow the sections to flatten. Leave slides for ~5 min before examining under a microscope to select well-formed sections.
Note: The ultrathin sectioning can vary depending on laboratory practices and available equipment.
F. Slide preparation (day 7, ~0.5–2 h, depending on the sample number)
1. Add water to the marked well regions of the slides (sample coverslips). Transfer the well-formed sections into the well regions and arrange the sections properly (Figure 2A–B).
Notes:
1. Slides are stored at -20 °C. Prewarm them to RT before slide preparation.
2. Samples should be centered within a well and placed on the opposite side of the markings. Do not allow any part of the sample to touch the boundaries of the marked wells on the slide.
2. Drain off excess water with a Kimwipe from underneath the slide and place the slide on a slide warmer at 42 °C for 12–14 h (overnight).
Critical: To prevent tissue detachment in the following spatial transcriptomic imaging, place the slide in a 60 °C incubator for 10 min before proceeding to the next step. This helps the tissue sections adhere more securely to the slide.
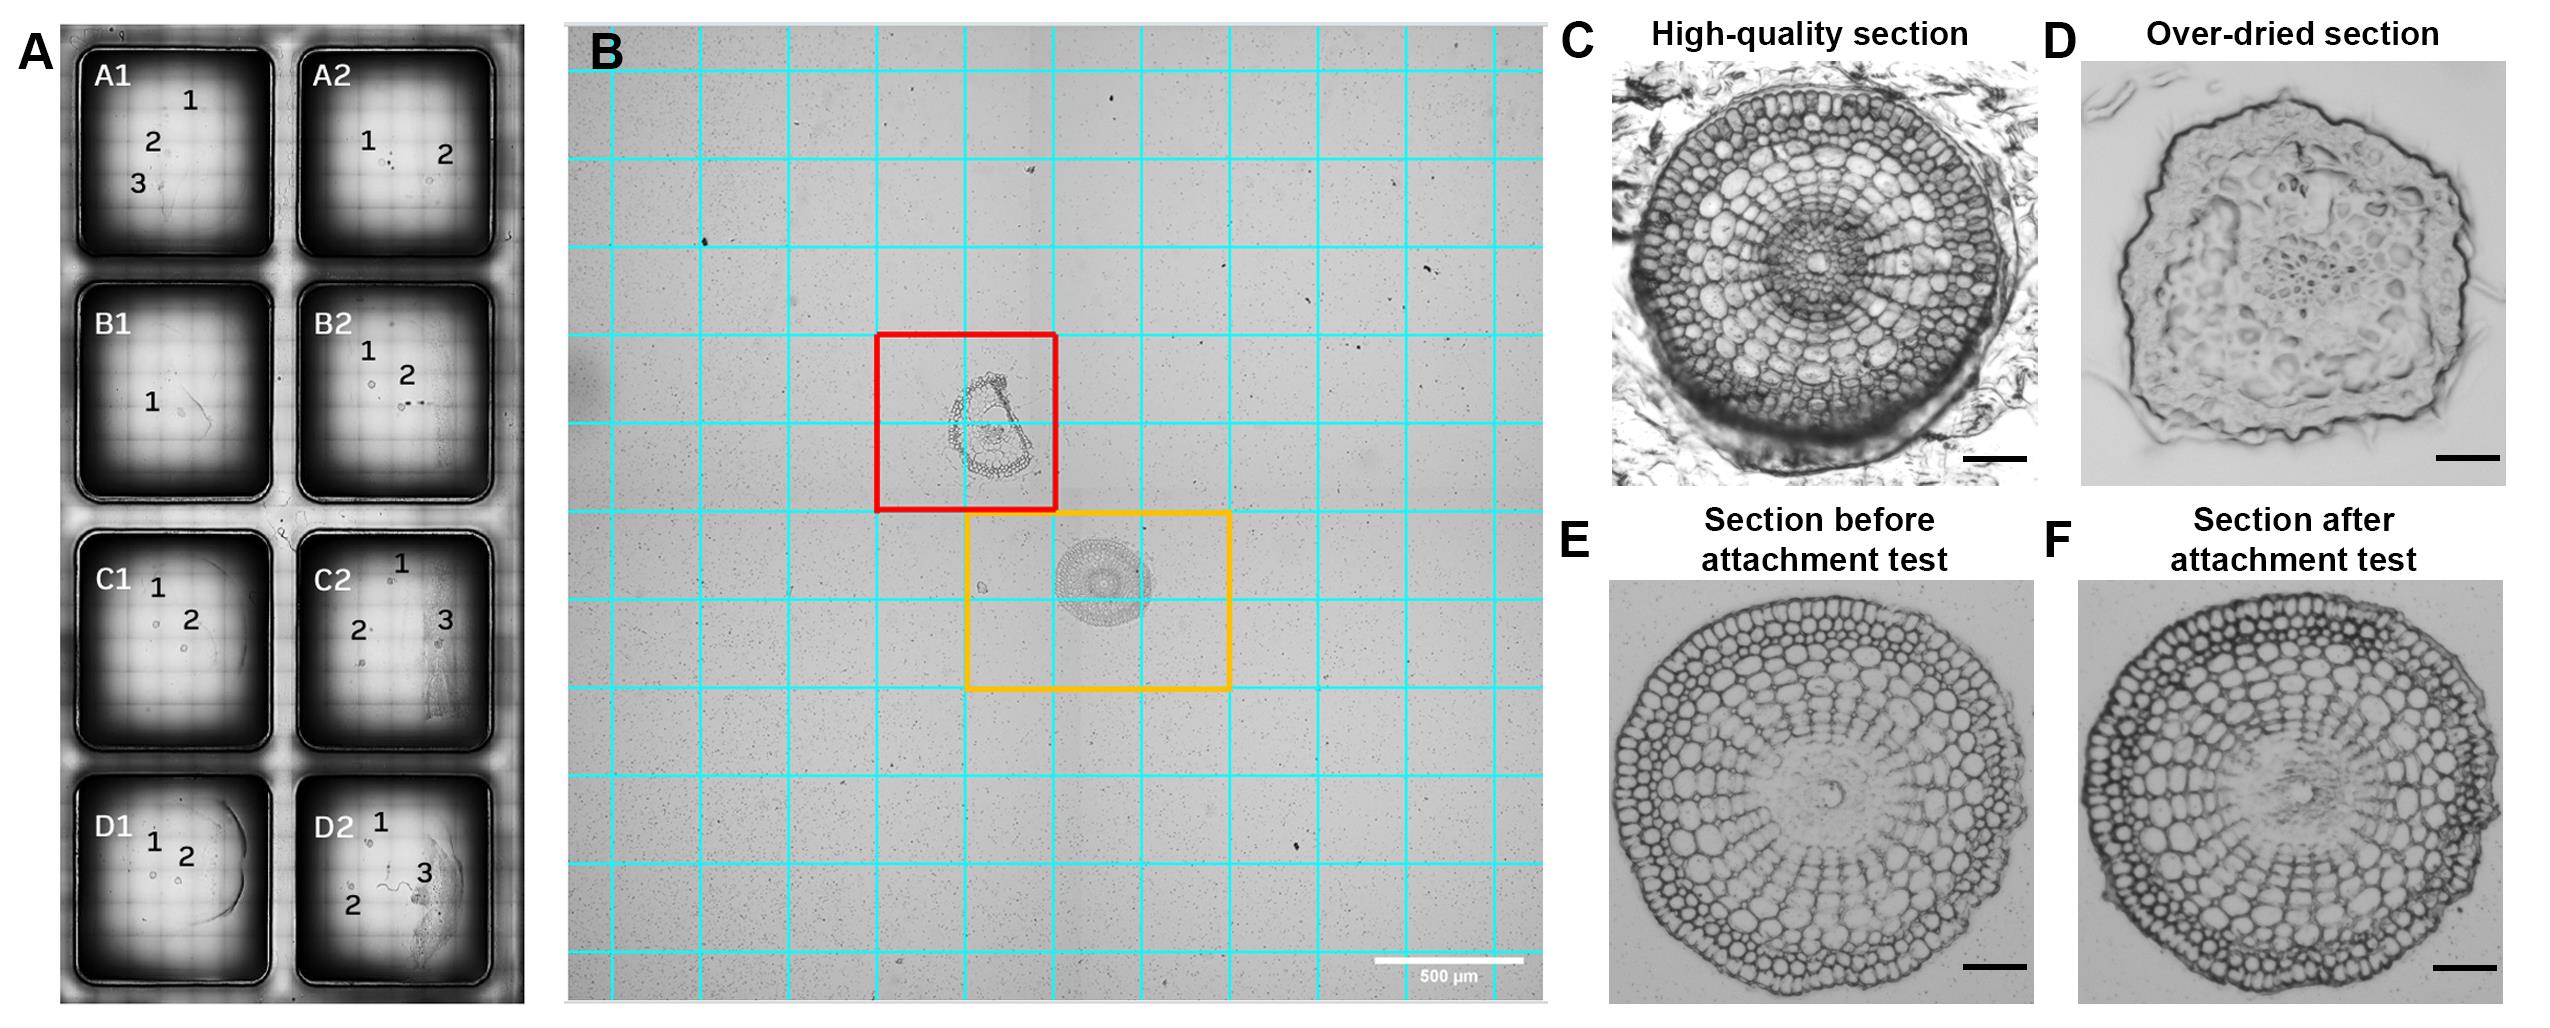
Figure 2. Section quality and mounting on slide wells for spatial transcriptomic imaging. (A) The commercial slide contains eight predefined wells. The well labels (e.g., A1, A2) are used to track the specifically mounted tissue sections. The final RNA detection results are based on the well labels. Paraffin-embedded tissue sections should be mounted at the center of each well. Numbers in each well highlight the mounted samples. (B) Representative examples at the final imaging stage. The tissue outlined in the orange box shows a high-quality sample, with the box indicating the imaging region (region of interest, ROI). The tissue outlined in the red box represents a poor-quality sample, illustrating potential detachment issues. Scale bar: 500 μm. (C) Examples of high-quality sections suitable for transfer onto slide wells for subsequent processing. (D) A section that has been over-dried and has lost its proper morphology. (E) A section with good morphology prior to the attachment test. (F) The same section after the attachment test. If the tissue morphology remains unchanged before and after the test (E vs. F), the sample passes the attachment test and is suitable for spatial transcriptomic imaging. Scale bars: 80 μm.
G. Deparaffinization and rehydration (day 8, ~ 2 h, including solution preparations)
Notes: It is highly recommended to prepare the ethanol gradient series, PBS, Proteinase K buffer, and 4% PFA solution in advance before starting slide treatment. This ensures smooth workflow and allows for quick, efficient transfer of slides between solutions without interrupting the experiment.
1. Use a slide holder to process multiple slides simultaneously. Place the slides in the rack and allow them to equilibrate to room temperature before proceeding.
2. Place the slide holder in a suitable glass container, add 200 mL of 100% Histo-Clear, and incubate at RT for 10 min. (Alternative: 5 min twice.)
3. Change to 200 mL of fresh 100% Histo-Clear and incubate at RT for 1 min.
4. Change to 200 mL of 75% Histo-Clear/25% ethanol and incubate at RT for 1 min.
5. Change to 200 mL of 50% Histo-Clear/50% ethanol and incubate at RT for 1 min.
6. Change to 200 mL of 25% Histo-Clear/75% ethanol and incubate at RT for 1 min.
7. Change to 200 mL of 100% ethanol and incubate at RT for 30 s.
8. Change to 200 mL of 100% ethanol and incubate at RT for 30 s.
9. Change to 200 mL of 90% ethanol and incubate at RT for 30 s.
10. Change to 200 mL of 80% ethanol and incubate at RT for 30 s.
11. Change to 200 mL of 70% ethanol and incubate at RT for 30 s.
12. Change to 200 mL of 50% ethanol and incubate at RT for 30 s.
13. Change to 200 mL of 30% ethanol and incubate at RT for 30 s.
14. Change to 200 mL of RNase-free water and incubate at RT for 30 s.
15. Change to 200 mL of 1× PBS and incubate at RT for 2 min.
Note: Prepare the required ethanol gradient series and PBS in advance and allocate them into separate glass containers. This would allow for quick and efficient transfer of slides between gradients.
H. Permeabilization (day 8, ~15 min)
1. Add 100 μL of Proteinase K (20 mg/mL) to 200 mL of Proteinase K buffer (preheated to 37 °C).
2. Incubate slides in 200 mL of Proteinase K-containing (final concentration: 10 μg/mL) buffer (prepared in step H1) at 37 °C for 10 min.
3. Incubate slides in 200 mL of 0.2% glycine solution at RT for 2 min.
4. Incubate slides in 200 mL of 1× PBS at RT for 2 min.
I. Refixation (day 8, ~15 min)
1. Incubate slides in 200 mL of fixative without Triton (4% PFA) at RT for 10 min.
2. Incubate in 200 mL of 1× PBS at RT for 2 min.
J. Acetylation (day 8, ~15 min)
1. Fill a glass container with 200 mL of 0.1 M triethanolamine and place it on a magnetic stirrer.
2. Place the slide holder in 0.1 M triethanolamine while dribbling 1 mL of acetic anhydride over the slides. Incubate at RT for 10 min.
3. Incubate slides in 200 mL of 1× PBS at RT for 2 min.
K. Dehydration (day 8, ~10 min)
1. Incubate slides in 200 mL of 30% ethanol at RT for 30 s.
2. Incubate slides in 200 mL of 50% ethanol at RT for 30 s.
3. Incubate slides in 200 mL of 70% ethanol at RT for 30 s.
4. Incubate slides in 200 mL of 80% ethanol at RT for 30 s.
5. Incubate slides in 200 mL of 90% ethanol at RT for 30 s.
6. Incubate slides in 200 mL of 100% ethanol at RT for 1 min.
7. Incubate slides in 200 mL of 100% ethanol at RT for 2 min.
L. “Sandwich” assembly (day 8, ~15 min)
1. Apply three drops of SlowFadeTM antifade mountant to the tissue and cover the slide with another coverslip (VWR, catalog number: 48382-136, preferably smaller than the slide/sample coverslip) to make a sandwich (Figure 3A).
2. Keep slides in the slide box. Seal the box with parafilm. Store at 4 °C before shipping (Figure 3B).
Pause point: The slides can be safely stored at 4 °C for around one week. For shipping, samples should be sent on dry ice using overnight delivery to best preserve the fixed mRNA within the tissue. For the sample attachment test, it is recommended to store the test slide for at least overnight before performing the test, to better mimic the conditions of the actual experimental samples.
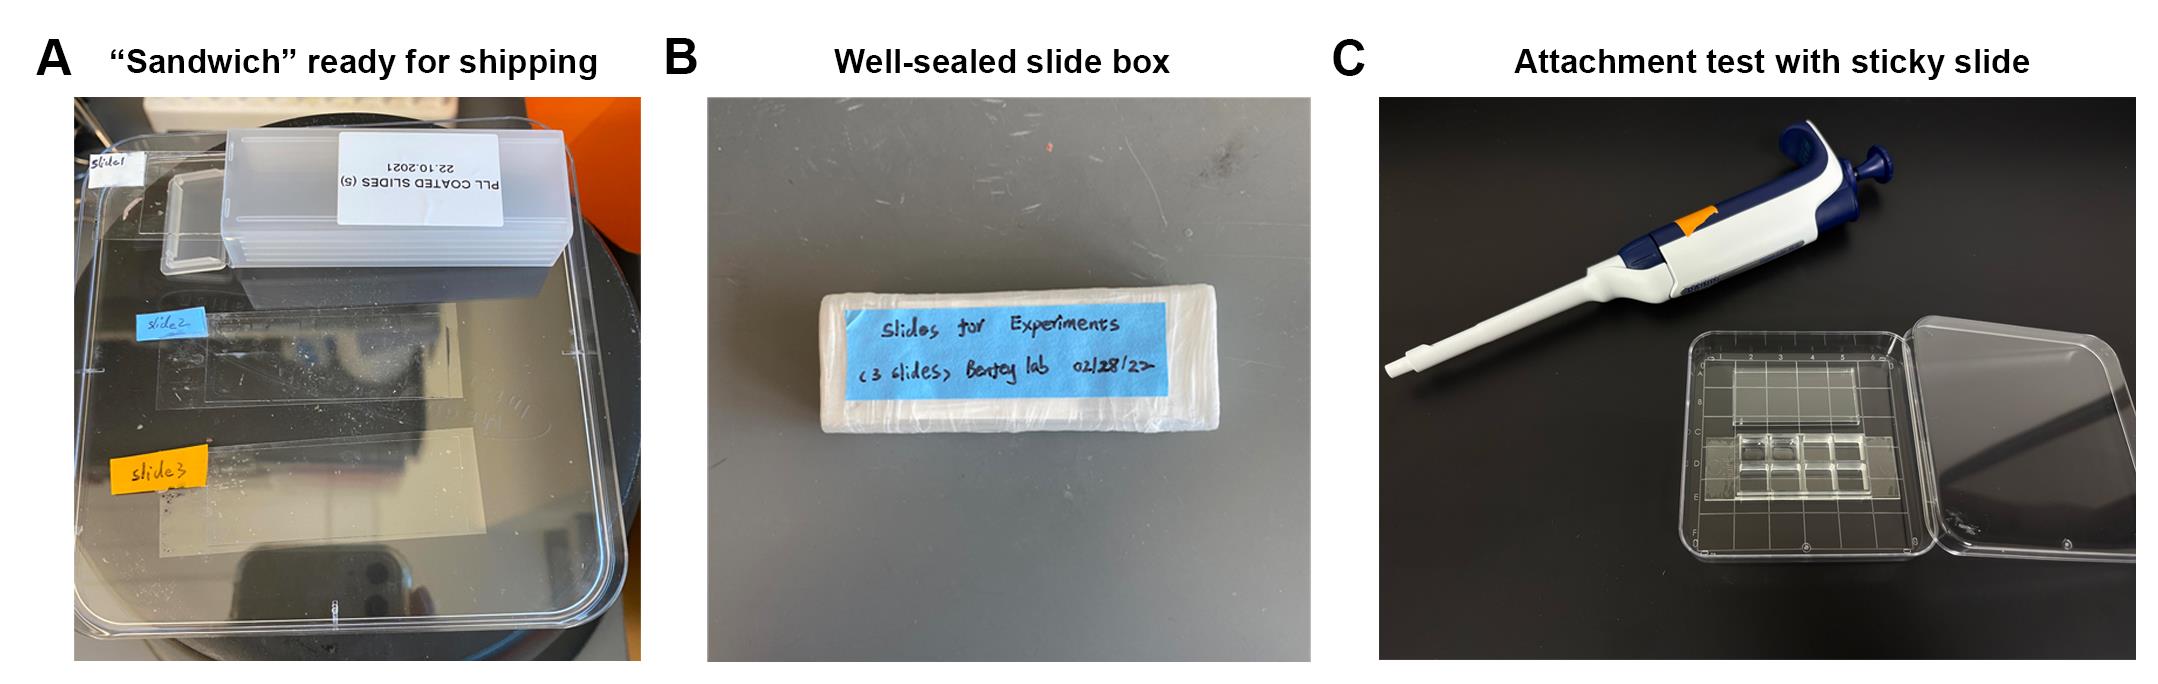
Figure 3. Setup for sample shipping and attachment testing. (A) Assembled slide “sandwich,” ready for shipping in a slide box. (B) Samples securely stored in a slide box, sealed with Parafilm and clearly labeled. (C) Simple setup for the attachment test using sticky slides. The slide with a sticky slide can also be accommodated in a thermocycler block.
M. Sample attachment test (in total: 5 days)
Critical: This step is required by Resolve Biosciences and may also be critical for other commercial spatial transcriptomics platforms. It ensures that samples are firmly attached to the slides and can withstand the imaging process. If a sample fails the attachment test, the assembled slide “sandwich” should not be shipped to the service provider for downstream experiments. Importantly, this attachment test should NOT be performed on the experimental slides intended for shipment.
M1. “Sandwich” disassembly and sticky slide attachment (day 9, ~1 h)
1. Warm up the coverslip sandwich to RT.
2. Add 25 mL of 1× PBS to a Petri dish.
3. Immerse the coverslip sandwich and incubate at RT for 30 min. Do not shake.
4. The coverslips should detach from each other. Carefully discard the smaller coverslip without disturbing the samples.
5. Immerse the slide in 25 mL of 1× PBS buffer in another Petri dish at RT for 30 s.
6. Immerse the slide in 25 mL of isopropanol in another Petri dish at RT for 30 s. Let the slide air dry for 10 min. Wipe off any debris between samples, specifically where the sticky chambers would be placed to attach.
Note: Make sure that the slide (sample coverslip) is not coated with residual condensed water.
7. Remove the protection film from the sticky slide.
8. Attach the sticky slide in the alignment tool to have samples in 8 wells. Carefully apply pressure with the thumb on the 8-well chambers to make it secure (Figure 3C).
Note: Make sure that no air is left between the sticky slide and the slide.
M2. Sample prep for imaging (day 9, ~15 min)
1. Remove the protection film from the sticky slide.
2. Add 200 μL of isopropanol per well and incubate at RT for 1 min.
3. Aspirate and discard isopropanol. Add 200 μL of 95% ethanol per well and incubate at RT for 1 min.
4. Aspirate and discard 95% ethanol. Add 200 μL of 70% ethanol per well and incubate at RT for 1 min.
5. Aspirate and discard 70% ethanol. Add 400 μL of 50% ethanol per well and incubate at RT for 1 min.
6. Aspirate and discard 50% ethanol. Add 400 μL of 50% ethanol per well and incubate at RT for 1 min.
7. Aspirate and discard 50% ethanol. Add 400 μL of wash buffer (provided by Resolve Biosciences, stored at 4 °C) per well and incubate at RT for 1 min.
8. Aspirate and discard wash buffer. Add 400 μL of 50% ethanol per well and incubate at RT for 1 min.
9. Aspirate and discard 50% ethanol. Add 200 μL of wash buffer per well and incubate at 37 °C overnight (14–18 h) on an appropriate slide thermocycler (use the heating lid adjusted to 37 °C).
M3. Mock imaging, part 1 (day 10, ~3.5 h)
Note: Prewarm the wash buffer to 25 °C before proceeding with the following steps.
1. Aspirate and discard wash buffer. Add 200 μL of prewarmed (25 °C) wash buffer and incubate at 41 °C for 10 min on a thermocycler.
2. Aspirate and discard wash buffer. Add 200 μL of prewarmed (25 °C) wash buffer per well and incubate at 41 °C for 10 min on a thermocycler. Repeat this step one more time.
3. Aspirate and discard wash buffer. Add 200 μL of prewarmed (25 °C) wash buffer and incubate at RT for 35 min.
4. Aspirate and discard wash buffer. Add 150 μL of wash buffer per well and incubate at 25 °C for 45 min on a thermocycler.
5. Aspirate and discard wash buffer. Add 200 μL of prewarmed (25 °C) wash buffer and incubate at RT for 35 min.
6. Aspirate and discard wash buffer. Add 150 μL of wash buffer per well and incubate at 25 °C for 45 min in the incubator.
7. Aspirate and discard wash buffer. Add 200 μL of prewarmed (25 °C) wash buffer and incubate at 25 °C for 3 min. Repeat this step two more times.
8. Aspirate and discard wash buffer. Add 200 μL of prewarmed (25°C) wash buffer and incubate at RT for 1 min.
9. Aspirate and discard wash buffer. Add 200 μL of prewarmed (25 °C) wash buffer and incubate at 25 °C overnight in the incubator to stimulate the imaging time.
M4. Mock imaging, part 2 (day 11, ~3.5 h)
1. Aspirate and discard wash buffer. Add 200 μL of prewarmed (25 °C) wash buffer and incubate at 41 °C for 6 min on an appropriate slide thermocycler. Use the heating lid adjusted to 41 °C. Repeat this step two more times.
2. Aspirate and discard wash buffer. Add 200 μL of prewarmed (25 °C) wash buffer and incubate at RT for 35 min.
3. Aspirate and discard wash buffer. Add 150 μL of wash buffer per well and incubate at 25 °C for 45 min on a thermocycler.
4. Aspirate and discard wash buffer. Add 200 μL of prewarmed (25 °C) wash buffer and incubate at RT for 35 min.
5. Aspirate and discard wash buffer. Add 150 μL of wash buffer per well and incubate at 25 °C for 45 min in the incubator.
6. Aspirate and discard wash buffer. Add 200 μL of prewarmed (25 °C) wash buffer and incubate at 25 °C for 3 min. Repeat this step two more times.
7. Aspirate and discard wash buffer. Add 200 μL of prewarmed (25°C) wash buffer and incubate at RT for 1 min.
8. Aspirate and discard wash buffer. Add 200 μL of prewarmed (25 °C) wash buffer and incubate at 25 °C overnight in the incubator to stimulate the imaging time.
M5. Mock imaging, part 3 (day 12, ~3.5 h)
1. Aspirate and discard wash buffer. Add 200 μL of prewarmed (25 °C) wash buffer and incubate at 41 °C for 6 min on an appropriate slide thermocycler. Use the heating lid adjusted to 41 °C. Repeat this step two more times.
2. Aspirate and discard wash buffer. Add 200 μL of prewarmed (25 °C) wash buffer and incubate at RT for 35 min.
3. Aspirate and discard wash buffer. Add 150 μL of wash buffer per well and incubate at 25 °C for 45 min on a thermocycler.
4. Aspirate and discard wash buffer. Add 200 μL of prewarmed (25 °C) wash buffer and incubate at RT for 35 min.
5. Aspirate and discard wash buffer. Add 150 μL of wash buffer per well and incubate at 25 °C for 45 min in the incubator.
6. Aspirate and discard wash buffer. Add 200 μL of prewarmed (25 °C) wash buffer and incubate at 25 °C for 3 min. Repeat this step two more times.
7. Aspirate and discard wash buffer. Add 200 μL of prewarmed (25 °C) wash buffer and incubate at RT for 1 min.
8. Aspirate and discard wash buffer. Add 200 μL of prewarmed (25 °C) wash buffer and incubate at 25 °C overnight in the incubator to stimulate the imaging time.
Note: It is recommended to perform mock imaging for four rounds; however, three rounds may also be sufficient. If only three rounds are performed, section M6 can be skipped.
M6. Mock imaging, part 4 (day 13, ~3.5 h)
1. Aspirate and discard wash buffer. Add 200 μL of prewarmed (25 °C) wash buffer and incubate at 41 °C for 6 min on an appropriate slide thermocycler. Use the heating lid adjusted to 41 °C. Repeat this step two more times.
2. Aspirate and discard wash buffer. Add 200 μL of prewarmed (25 °C) wash buffer and incubate at RT for 35 min.
3. Aspirate and discard wash buffer. Add 150 μL of wash buffer per well and incubate at 25 °C for 45 min on a thermocycler.
4. Aspirate and discard wash buffer. Add 200 μL of prewarmed (25 °C) wash buffer and incubate at RT for 35 min.
5. Aspirate and discard wash buffer. Add 150 μL of wash buffer per well and incubate at 25 °C for 45 min in the incubator.
6. Aspirate and discard wash buffer. Add 200 μL of prewarmed (25 °C) wash buffer and incubate at 25 °C for 3 min. Repeat this step two more times.
7. Aspirate and discard wash buffer. Add 200 μL of prewarmed (25°C) wash buffer and incubate at RT for 1 min.
8. Aspirate and discard wash buffer. Add 200 μL of prewarmed (25 °C) wash buffer and incubate at 25 °C overnight in the incubator to stimulate the imaging time.
M7. Mock imaging, part 5 (day 14, ~2 h)
1. Aspirate and discard wash buffer. Add 200 μL of prewarmed (25 °C) wash buffer and incubate at 41 °C for 6 min on an appropriate slide thermocycler. Use the heating lid adjusted to 41 °C. Repeat this step two more times.
2. Aspirate and discard wash buffer. Add 200 μL of prewarmed (25 °C) wash buffer and incubate at RT for 35 min.
3. Check whether the tissue sections remain attached to the slides and document them by imaging with a compound microscope.
Validation of protocol
This protocol (or parts of it) has been used and validated in the following research article (Figure 4):
• Zhu et al. [1]. Single-cell transcriptomics reveal how root tissues adapt to soil stress. Nature. 642: 721–729 (2025). https://doi.org/10.1038/s41586-025-08941-z (Figure 1i–p, r–u; Figure 2d–i; Figure 3b–c).
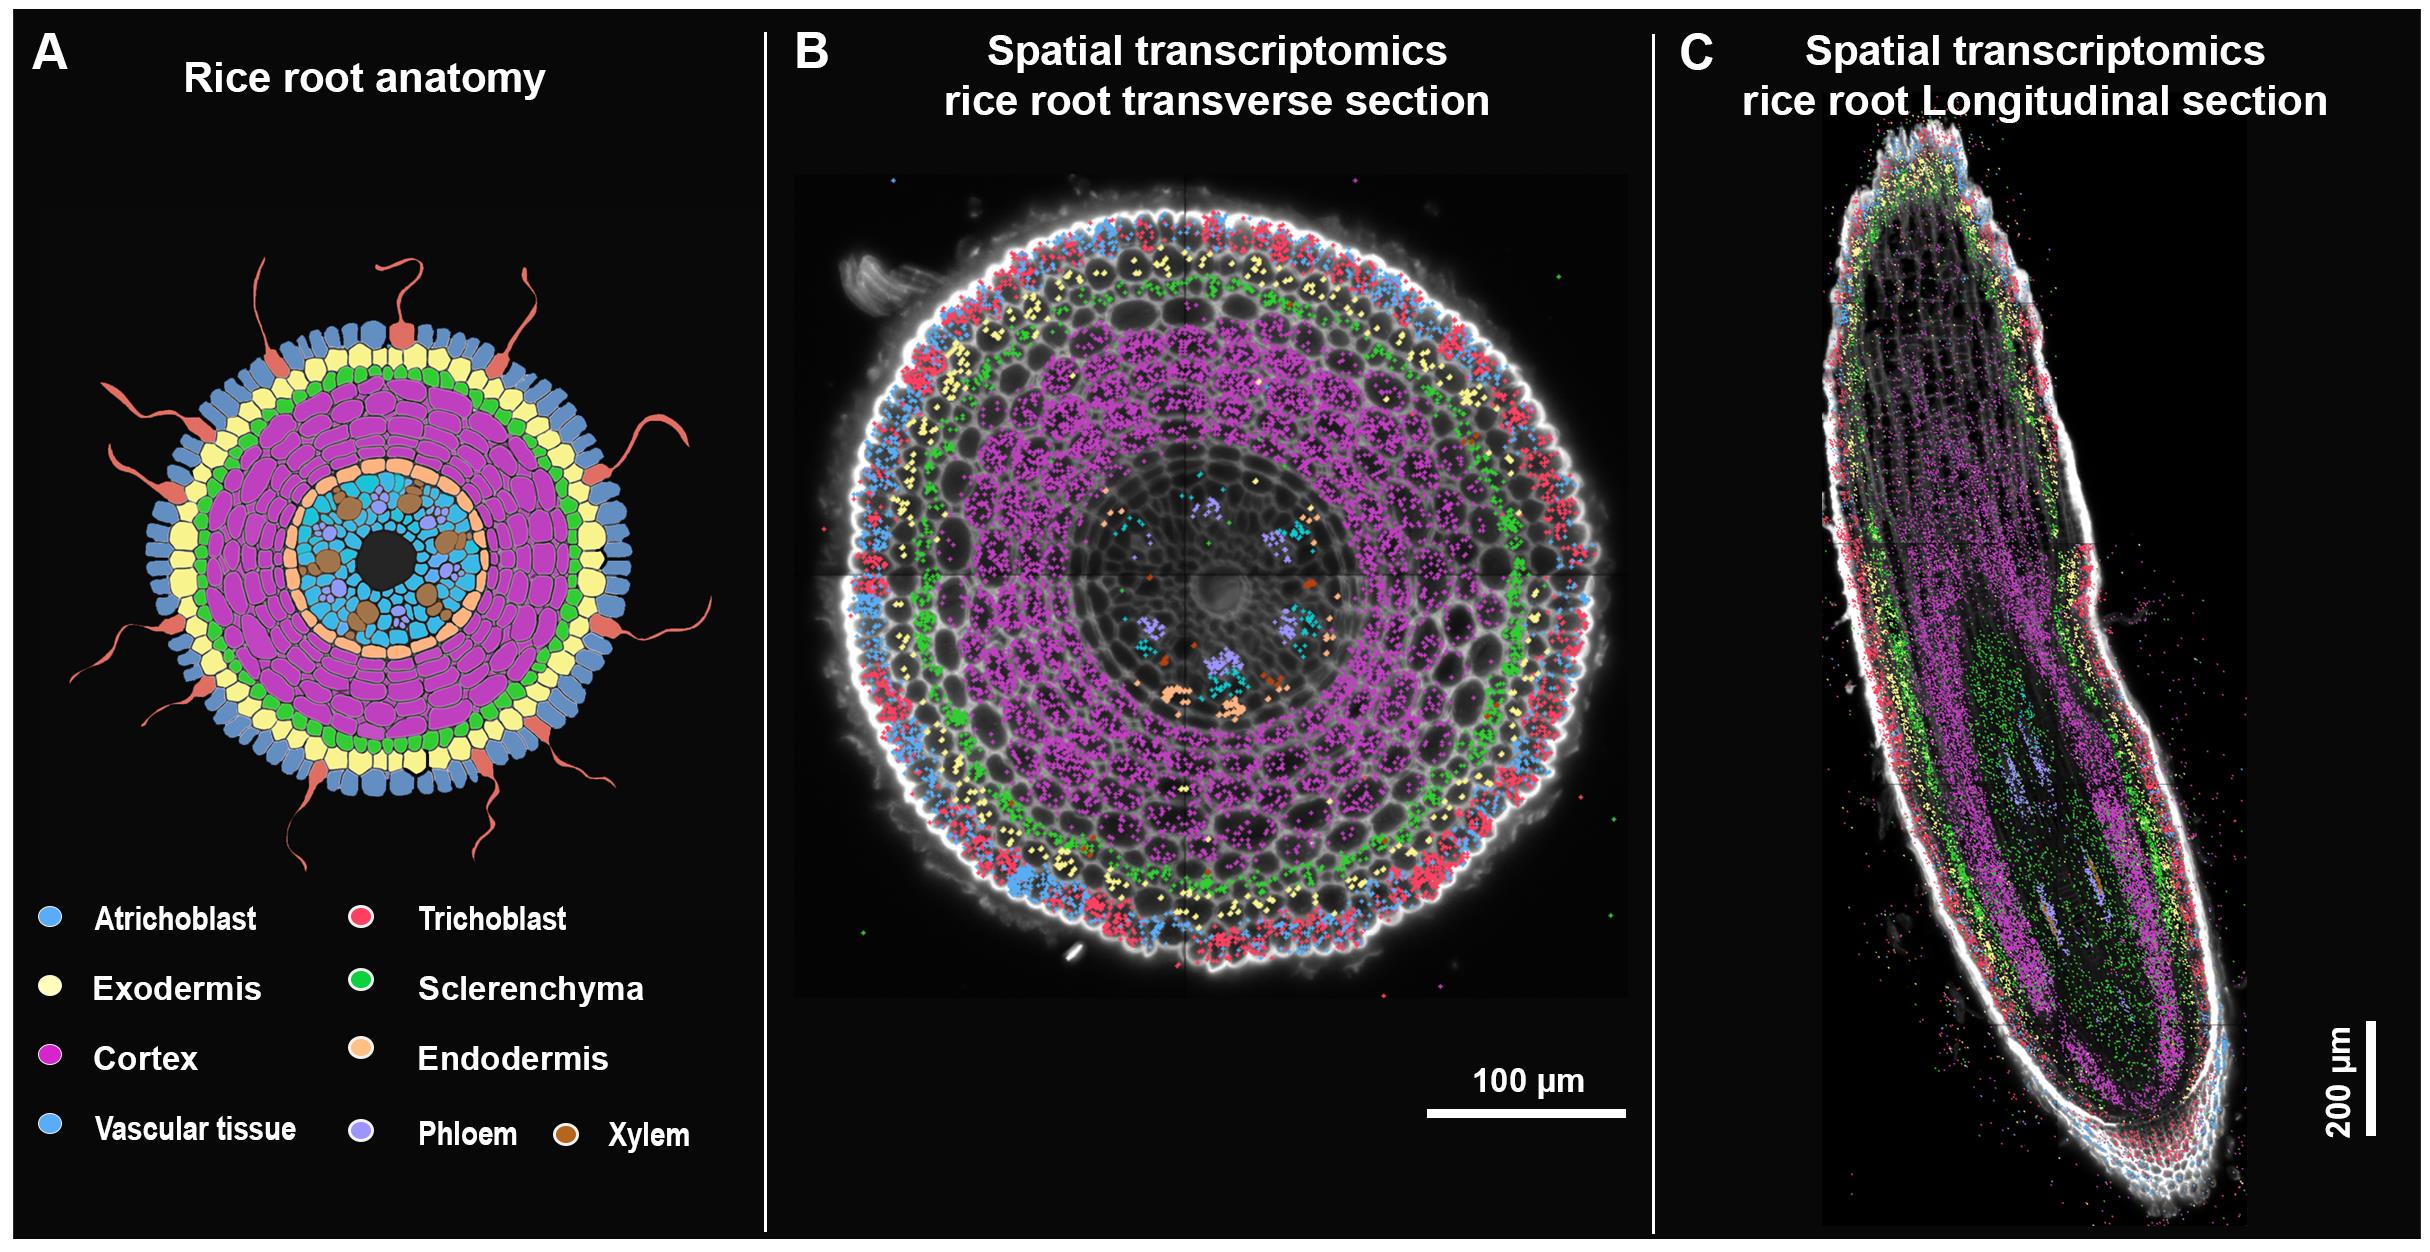
Figure 4. Spatial transcriptomics on rice roots. (A) Schematic illustrating the rice primary root transverse section. (B) Spatial expression of cell-type marker genes in 5-day-old rice roots using molecular cartography (transverse section). Scale bar: 100 μm. (C) Spatial expression of cell-type marker genes in 5-day-old rice roots using molecular cartography (longitudinal section). Scale bar: 200 μm. Adapted from Zhu et al. [1].
General notes and troubleshooting
General notes
1. Ensure that all procedures are performed in an RNase-free environment. Use RNase-free water and reagents throughout. Prior to sample processing, clean all containers, small equipment, and bench surfaces with RNaseZapTM to eliminate RNase contamination.
2. Use dedicated materials and wearables for RNase-free work. The solution used in fixation, dehydration, deparaffinization, rehydration, and permeabilization should be exclusively for RNA in situ hybridization. Always use fresh batches of 100% ethanol, PFA, Proteinase K buffer, PBS, and Histo-Clear.
3. For all aspiration and solution addition steps throughout the protocol, the use of sterile transfer pipettes is recommended to enable gentle yet efficient liquid exchange.
4. Ensure that all steps are performed at the appropriate, well-controlled temperatures. For incubations at specific temperatures, make sure the corresponding solutions are pre-equilibrated to the target temperature before use. Avoid drying samples throughout the process, especially during the sample attachment test.
Troubleshooting
Problem 1: Low overall mRNA signal in the final spatial transcriptomics output.
Possible causes: (1) Inefficient tissue fixation. (2) RNase contamination in the experimental environment.
Solutions: Use dedicated chemicals, reagents, and containers specifically for spatial transcriptomics sample preparation. Frequently and properly apply RNaseZapTM (or equivalent) to minimize RNase contamination. Optimize fixation conditions by adjusting the frequency of PFA change, as well as vacuum and incubation times, to ensure effective penetration of the fixative into the tissue.
Problem 2: Tissue sections show large air gaps or appear ruptured (Figure 2C, D).
Possible causes: (1) Tissue became over-dried during the preparation process. (2) The temperature used for slide drying (Section F) is too high.
Solutions: Prepare fresh solutions before starting each day’s experiment. Transfer slides between solutions promptly, avoiding prolonged exposure to air. During the slide drying step, place a Petri dish lid between the slide and the heating surface to reduce direct exposure to high temperatures.
Problem 3: Tissue sections fall off or partially detach from the slide after the attachment test (Figure 2B, E, F).
Possible cause: Residual water or air remains between the tissue section and the slide, preventing proper adhesion of paraffin-embedded sections.
Solutions: Carefully remove excess water with a Kimwipe before transferring the slide to the slide warmer. After overnight drying, incubate the slide at 60 °C for 10–15 min before proceeding to the next step to ensure strong adhesion of the tissue sections to the slide.
Acknowledgments
Conceptualization, M.Z.; Investigation, M.Z., H.L., J.Z.; Writing—Original Draft, H.L.; Writing—Review & Editing, M.Z., H.L., J.Z.; Funding acquisition, M.Z.; Supervision, M.Z.
We thank Dr. Samik Bhattacharya (Resolve Biosciences) for kindly sharing the commercial protocol developed by Resolve Biosciences. We also thank Dr. David Jackson (Cold Spring Harbor Laboratory) and Dr. Yan Wang (Duke University) for generously sharing their expertise in tissue sectioning and mounting sections onto slides. This work was initiated and developed in the laboratory of Dr. Philip N. Benfey at Duke University (M.Z., J.Z.) and was supported by the Howard Hughes Medical Institute. Additional support was provided with start-up funding from Texas A&M AgriLife Research (M.Z., H.L.). Graphical overview was created with BioRender (https://BioRender.com/xzmhm8j). We thank Dr. Che-Wei Hsu for contributing the cover image for this manuscript.
This protocol was used in [1].
Competing interests
The authors declare no competing interests.
Ethical considerations
This work did not use human or animal subjects and has no ethical considerations.
References
- Zhu, M., Hsu, C. W., Peralta Ogorek, L. L., Taylor, I. W., La Cavera, S., Oliveira, D. M., Verma, L., Mehra, P., Mijar, M., Sadanandom, A., et al. (2025). Single-cell transcriptomics reveal how root tissues adapt to soil stress. Nature. 642(8068): 721–729. https://doi.org/10.1038/s41586-025-08941-z
- Zhu, M., Taylor, I. W. and Benfey, P. N. (2022). Single-cell genomics revolutionizes plant development studies across scales. Development. 149(6): e200179. https://doi.org/10.1242/dev.200179
- Shahan, R., Hsu, C. W., Nolan, T. M., Cole, B. J., Taylor, I. W., Greenstreet, L., Zhang, S., Afanassiev, A., Vlot, A. H. C., Schiebinger, G., et al. (2022). A single-cell Arabidopsis root atlas reveals developmental trajectories in wild-type and cell identity mutants. Dev Cell. 57(4): 543–560.e9. https://doi.org/10.1016/j.devcel.2022.01.008
- Illouz-Eliaz, N., Yu, J., Swift, J., Lande, K., Jow, B., Partida-Garcia, L., Tuang, Z. K., Lee, T. A., Yaaran, A., Gomez-Castanon, R., et al. (2025). Drought recovery in plants triggers a cell-state-specific immune activation. Nat Commun. 16(1): 8095. https://doi.org/10.1038/s41467-025-63467-2
- Nobori, T., Monell, A., Lee, T. A., Sakata, Y., Shirahama, S., Zhou, J., Nery, J. R., Mine, A. and Ecker, J. R. (2025). A rare PRIMER cell state in plant immunity. Nature. 638(8049): 197–205. https://doi.org/10.1038/s41586-024-08383-z
- Nolan, T. M., Vukašinović, N., Hsu, C. W., Zhang, J., Vanhoutte, I., Shahan, R., Taylor, I. W., Greenstreet, L., Heitz, M., Afanassiev, A., et al. (2023). Brassinosteroid gene regulatory networks at cellular resolution in the Arabidopsis root. Science. 379(6639): eadf4721. https://doi.org/10.1126/science.adf4721
- Yin, R., Xia, K. and Xu, X. (2023). Spatial transcriptomics drives a new era in plant research. Plant J. 116(6): 1571–1581. https://doi.org/10.1111/tpj.16437
- Birnbaum, K., Shasha, D. E., Wang, J. Y., Jung, J. W., Lambert, G. M., Galbraith, D. W. and Benfey, P. N. (2003). A Gene Expression Map of the Arabidopsis Root. Science. 302(5652): 1956–1960. https://doi.org/10.1126/science.1090022
- Brady, S. M., Orlando, D. A., Lee, J. Y., Wang, J. Y., Koch, J., Dinneny, J. R., Mace, D., Ohler, U. and Benfey, P. N. (2007). A High-Resolution Root Spatiotemporal Map Reveals Dominant Expression Patterns. Science. 318(5851): 801–806. https://doi.org/10.1126/science.1146265
- Xu, X., Passalacqua, M., Rice, B., Demesa-Arevalo, E., Kojima, M., Takebayashi, Y., Yu, X., Harris, B., Liu, Y., Gallavotti, A., et al. (2025). Large-scale single-cell profiling of stem cells identifies redundant regulators of shoot development and yield trait variation. Dev Cell. 60(24): 3514–3526.e7. https://doi.org/10.1016/j.devcel.2025.07.024
- Guillotin, B., Rahni, R., Passalacqua, M., Mohammed, M. A., Xu, X., Raju, S. K., Ramírez, C. O., Jackson, D., Groen, S. C., Gillis, J., et al. (2023). A pan-grass transcriptome reveals patterns of cellular divergence in crops. Nature. 617(7962): 785–791. https://doi.org/10.1038/s41586-023-06053-0
- Cervantes-Pérez, S. A., Zogli, P., Amini, S., Thibivilliers, S., Tennant, S., Hossain, M. S., Xu, H., Meyer, I., Nooka, A., Ma, P., et al. (2024). Single-cell transcriptome atlases of soybean root and mature nodule reveal new regulatory programs that control the nodulation process. Plant Commun. 5(8): 100984. https://doi.org/10.1016/j.xplc.2024.100984
- Demesa-Arevalo, E., Dӧrpholz, H., Vardanega, I., Maika, J. E., Pineda-Valentino, I., Eggels, S., Lautwein, T., Kӧhrer, K., Schnurbusch, T., von Korff, M., et al. (2026). Imputation integrates single-cell and spatial gene expression data to resolve transcriptional networks in barley shoot meristem development. Nat Plants. 12(1): 107–124. https://doi.org/10.1038/s41477-025-02176-6
- Vitha, S., Baluška, F., Jasik, J., Volkmann, D., Barlow, P.W. (2000). Steedman’s Wax for F-Actin Visualization. In: Staiger, C.J., Baluška, F., Volkmann, D., Barlow, P.W. (Eds). Actin: A Dynamic Framework for Multiple Plant Cell Functions. Developments in Plant and Soil Sciences, vol 89. Springer, Dordrecht. https://doi.org/10.1007/978-94-015-9460-8_35
Article Information
Publication history
Received: Apr 21, 2026
Accepted: Jun 28, 2026
Available online: Jul 12, 2026
Published: Aug 5, 2026
Copyright
© 2026 The Author(s); This is an open access article under the CC BY-NC license (https://creativecommons.org/licenses/by-nc/4.0/).
How to cite
Liu, H., Zhang, J. and Zhu, M. (2026). Sample Preparation for Imaging-Based Spatial Transcriptomics in Rigid Plant Tissues (Roots, Shoots). Bio-protocol 16(15): e5779. DOI: 10.21769/BioProtoc.5779.

 Download Citation in RIS Format
Category
Plant Science > Plant molecular biology > RNA > RNA detection
Molecular Biology > RNA > Transcription
Systems Biology > Spatial transcriptomics
Do you have any questions about this protocol?
Post your question to gather feedback from the community. We will also invite the authors of this article to respond.
 Post a Question


