


- Protocols

- Articles and Issues
- For Authors
- About
- Become a Reviewer


A Novel Plate Reader–Based Protocol for Measurement of DNAJB6 Dimerization Activity

Published: Vol 16, Iss 15, Aug 5, 2026 DOI: 10.21769/BioProtoc.5776 Views: 209
Reviewed by: Elena A. OstrakhovitchManasa VL ChanduriRichard Cardoso da Silva
 PDF
PDF  Ask a question
Original research article
The authors used this protocol in:

Feb 2026

Protocol Collections
Comprehensive collections of detailed, peer-reviewed protocols focusing on specific topics




Abstract
Progressive neurodegeneration linked to the accumulation of misfolded proteins is a hallmark of several neurodegenerative disorders, including Parkinson’s disease, Huntington’s disease, and Alzheimer’s disease. Dysfunction in the protein homeostasis machinery correlates with pathology. The chaperone protein DNAJB6 is expressed in neurons and oligodendrocytes and has been shown to play a key role in preventing amyloid aggregation by binding to amyloidogenic proteins and facilitating their refolding or degradation, in cooperation with other chaperones. Here, we describe a simple and feasible assay that enables high-throughput screening for DNAJB6 activity in a plate reader format. We use genetically engineered HEK293 cells that stably express DNAJB6 fused to either CFP or YFP. These cells can be plated into multi-well plates, and the fluorescence resonance energy transfer (FRET) signal can be measured for analysis of DNAJB6 dimerization, which is linked to DNAJB6 activity. The protocol can be used for drug screening and to identify compounds that increase DNAJB6 dimerization, and can serve as a starting point for finding new medicines that act through modulating DNAJB6 activity.
Key features
• The protocol requires a plate reader capable of FRET analysis and bandwidth adjustment for CFP/YFP separation. It was developed using a CLARIOstar plate reader.
• The protocol requires access to the authors’ FRET DNAJB6 cell line or equivalent cells with stable expression of CFP/YFP-DNAJB6.
• The assay measures DNAJB6 dimerization and can potentially be adapted to other proteins whose functional state is linked to dimerization activity.
• The protocol is useful for compound screening purposes and requires pre-existing knowledge of basic cell culture.
Keywords: FRET DNAJB6
Plate reader assay
Drug screening
Cell-based assay
DNAJB6
Plate reader assay
Drug screening
Cell-based assay
Graphical overview
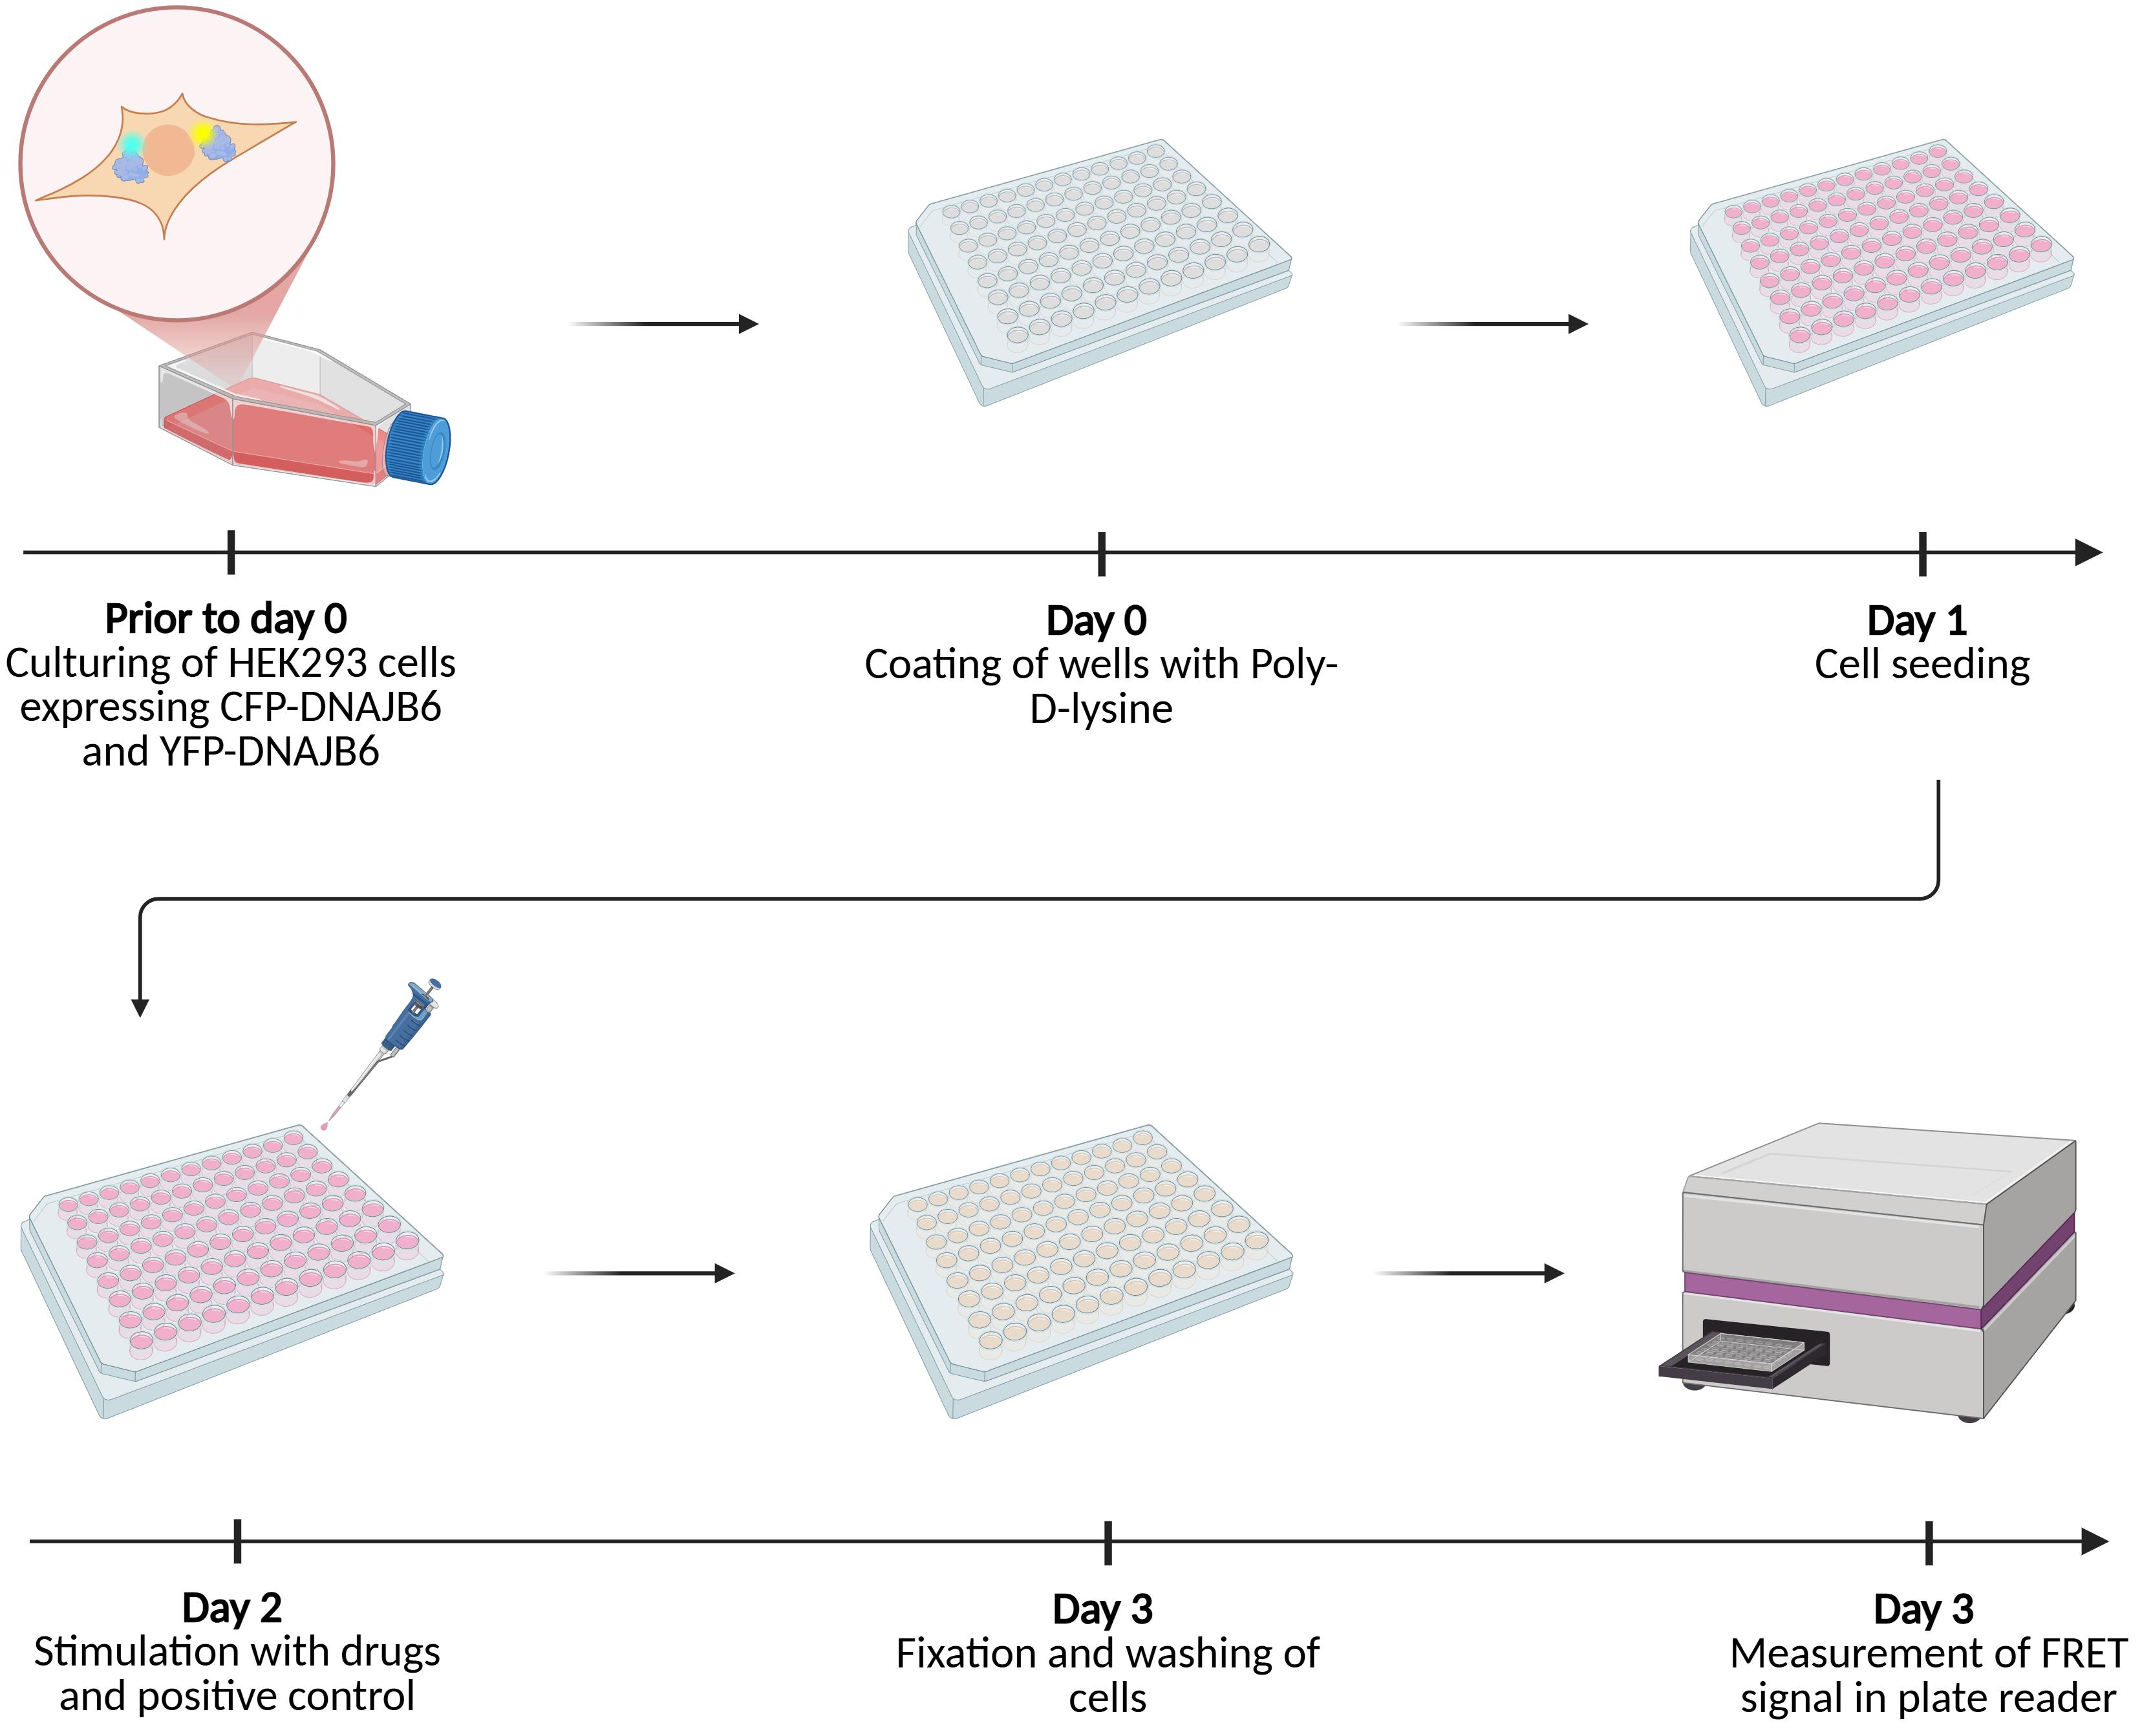
Graphical abstract of the cell-based fluorescence resonance energy transfer (FRET) assay protocol
Background
Neurodegenerative diseases, such as Alzheimer's disease (AD), Huntington’s disease (HD), and Parkinson’s disease (PD), are characterized by the accumulation of misfolded amyloid proteins, which are implicated in disease progression. There are currently no curative treatments for these diseases; consequently, there is a need to find new ways for drug targeting. Preventing misfolding and clearing out aggregates of misfolded protein are central processes in maintaining protein homeostasis in all cells. This is particularly important in post-mitotic cells, such as neurons. Chaperone proteins are key players in the process of preventing and clearing misfolded proteins.
The chaperone DNAJB6 is a member of the Heat Shock Protein 40 (HSP40) family, which is involved in maintaining protein homeostasis. DNAJB6 is highly expressed in the brain, primarily in neurons and oligodendrocytes [1]. Studies have shown that DNAJB6 suppresses aggregation of the amyloid protein alpha-synuclein (α-syn) in vitro, in cells, and in animal models [2–4]. Research also shows that DNAJB6 is dysregulated in synucleinopathies, such as PD and multiple system atrophy (MSA) [5]. Altogether, these data suggest that DNAJB6 is an important endogenous inhibitor of toxic aggregation of the amyloid protein α-syn. Moreover, accumulating data suggest that DNAJB6 may be protective across multiple neurodegenerative diseases, as it has been shown to prevent the formation of amyloid protein aggregates and pathology in animal and cellular models of HD and AD [6–8].
Structural studies suggest that the dimer of DNAJB6 is primarily the active form; an S/T-rich cleft in the DNAJB6 dimer has been identified as the main binding site for amyloid proteins [6,9–11]. While previous studies have established how DNAJB6 expression levels affect amyloid protein aggregation, no assay has previously been developed to study the activity of DNAJB6. We have generated cells that stably express DNAJB6 fused to CFP or YFP, which enables the use of fluorescence resonance energy transfer (FRET) measurements to assess the dimerization status of DNAJB6. In a previous study, we showed that upon treatment with tunicamycin (an antibiotic often used experimentally to activate the unfolded protein response in cells) or pre-formed α-syn fibrils (but not monomeric α-syn), the FRET signal in these cells is elevated, indicating that the activity of DNAJB6 correlates with an increase in misfolded proteins [12]. Here, we describe how these cells can be used in a plate reader–based study to measure fluorescent signal as a proxy for DNAJB6 activity. Tunicamycin was used as a positive control since it is a well-established inducer of the unfolded protein response and produced a robust and reproducible increase in FRET signal. This assay can be used for high-throughput screening for compounds that may alter the activity of DNAJB6. Depending on the intended screening application, assay conditions such as treatment duration and compound concentration may be further optimized to improve sensitivity for detecting weaker compound effects. The protocol is set up for one 96-well plate and can easily be scaled up to suit specific needs.
Materials and reagents
Biological materials
1. FRET DNAJB6 cells (HEK293 cells stably expressing CFP-DNAJB6 and YFP-DNAJB6, generated in-house) [12]
Note: The cell line can be obtained by contacting the corresponding author.
Reagents
1. Dulbecco's modified Eagle medium (DMEM) (Thermo Fisher Scientific, Gibco, catalog number: 61965026)
2. Penicillin/streptomycin (Pen/Strep) (Thermo Fisher Scientific, Gibco, catalog number: 15140122)
3. Amphotericin B 250 μg/mL (Thermo Fisher Scientific, Gibco, catalog number: 15290026)
Note: In the protocol, amphotericin is used directly from a stock solution, but since small quantities are used, it is recommended to aliquot it into, e.g., 2 mL Eppendorf tubes that can be stored for up to 4 weeks at 4 °C or for up to 12 months at -20 °C.
4. Fetal bovine serum (FBS) (Thermo Fisher Scientific, Gibco, catalog number: A5256701)
5. Dimethyl sulfoxide (DMSO) (Merck, Sigma-Aldrich, catalog number: D2438)
6. Phosphate buffered saline (PBS) pH 7.4 (Thermo Fisher Scientific, Gibco, catalog number: 10010015)
7. Paraformaldehyde 4% in PBS (PFA) (Thermo Fisher Scientific, catalog number: J61899)
8. Ethanol anhydrous 99.9% (KiiltoClean A/S, CAS number: 64-17-5)
9. 0.5% trypsin EDTA (Thermo Fisher Scientific, Gibco, catalog number: 15400054)
10. Poly-D-lysine 1 mg/mL (Merck, Sigma-Aldrich, catalog number: A003E)
11. Tunicamycin 1 mg (Sigma-Aldrich, catalog number: T7765-1MG)
Solutions
1. Culture medium (see Recipes)
2. Poly-D-lysine coating solution 100 μg/mL (see Recipes)
3. Trypsin working solution 0.05% (see Recipes)
4. Tunicamycin stock solution 5 mM (see Recipes)
5. Tunicamycin working solution 50 μM (see Recipes)
6. DMSO working solution 1% (see Recipes)
Recipes
Note: All solutions should be prepared aseptically in a biosafety class II cabinet.
1. Culture medium
| Reagent | Final concentration | Quantity or volume |
|---|---|---|
| DMEM | 90% | 500 mL |
| FBS | 9% | 50 mL |
| Pen/Strep | 1% | 5 mL |
| Total | n/a | 555 mL |
Thaw FBS and heat it at 65 °C for 20 min to inactivate proteins. Thaw Pen/Strep in a water bath at 37 °C. Transfer the reagents aseptically to the DMEM bottle.
2. Poly-D-lysine coating solution 100 μg/mL
| Reagent | Final concentration | Quantity or volume |
|---|---|---|
| Poly-D-Lysine 1 mg/mL | 100 μg/mL | 500 μL |
| PBS | n/a | 4.5 mL |
| Total | n/a | 5 mL |
Thaw Poly-D-lysine and dilute it 1:10 according to the table above. The solution can be saved after coating and used up to 10 times. Store at -20 °C and discard after 10 uses or freeze-thaw cycles.
3. Trypsin working solution 0.05%
| Reagent | Final concentration | Quantity or volume |
|---|---|---|
| Trypsin EDTA 0.5% | 0.05% | 100 μL |
| PBS | n/a | 900 μL |
| Total | n/a | 1 mL |
Thaw trypsin EDTA and dilute it 1:10 according to the table above. The trypsin working solution can be prepared in larger volumes and aliquoted into, e.g., 15 mL tubes. It can be stored at 4 °C for a couple of weeks or at -20 °C for long-term storage.
4. Tunicamycin stock solution 5 mM
| Reagent | Final concentration | Quantity or volume |
|---|---|---|
| Tunicamycin 1 mg (844.95 g/mol) | 5 mM | 1 mg |
| DMSO | n/a | 237 μL |
| Total | n/a | 237 μL |
Use the tunicamycin vial to prepare the solution. Pipette up and down and along the sides of the vial to ensure that all the powder is dissolved. Aliquot into PCR tubes. Store the solution at -20 °C and avoid more than five freeze-thaw cycles.
5. Tunicamycin working solution 50 μM
| Reagent | Final concentration | Quantity or volume |
|---|---|---|
| Tunicamycin stock solution (Recipe 4) | 50 μM | 1 μL |
| Culture medium (Recipe 1) | n/a | 99 μL |
| Total | n/a | 100 μL |
Prepare the working solution just before use.
6. DMSO working solution 1%
| Reagent | Final concentration | Quantity or volume |
|---|---|---|
| DMSO | 1% | 1 μL |
| Culture medium (Recipe 1) | n/a | 99 μL |
| Total | n/a | 100 μL |
Prepare the working solution just before use.
Laboratory supplies
1. Cell culture flasks Nunc EasYFlask 75 cm2 sterile (Thermo Fisher Scientific, catalog number: 156499)
2. Pipette tips 1,000 μL (Thermo Fisher Scientific, Sartorius, catalog number: 791000)
3. Pipette tips 300 μL (Thermo Fisher Scientific, Finntip Flex, catalog number: 94060513)
4. Pipette tips 10 μL (Merck, Maxymum Recovery Pipette Tips, catalog number: AXYT300LR)
5. Nunclon Delta Surface 96-well plates (Thermo Fisher Scientific, catalog number: 167008)
6. 15 mL conical tubes (MikroLab Frisenette, Nerbe Plus, catalog number: 02-502-8001)
7. Microcentrifuge tubes (Thermo Fisher Scientific, catalog number: 3404-DLBPK)
8. PCR tubes (Hounisen, Sarstedt, catalog number: 72990002)
9. Cell counting chamber (Marienfeld, Bürker, catalog number: n/a)
10. Matrix reagent reservoirs (Thermo Fisher Scientific, catalog number: 8093)
11. Serological pipette tips 5 mL (Thermo Fisher Scientific, Nunc, catalog number: 170355N)
12. Serological pipette tips 10 mL (Thermo Fisher Scientific, Nunc, catalog number: 170356N)
13. Parafilm (Merck, Sigma-Aldrich, catalog number: P7793-1EA)
Equipment
1. Biosafety cabinet class II (Thermo Scientific, model: SAFE2020)
2. Cell culture incubator (Thermo Scientific, model: Heracell Vios 160i)
3. Water bath (PolyScience, model: WB20)
4. Microscope (Carl Zeiss, model: Primovert)
5. Chemical fume hood
6. Plate reader CLARIOstar (BMG Labtech, model: CLARIOstar)
7. Centrifuge (Thermo Fisher Scientific, model: Sorvall X4RF Pro)
8. FinnPipette F2 2 μL (Thermo Fisher Scientific, catalog number: 4642010)
9. FinnPipette F2 20 μL (Thermo Fisher Scientific, catalog number: 4642060)
10. FinnPipette F2 200 μL (Thermo Fisher Scientific, catalog number: 4642080)
11. Multichannel FinnPipette F2 300 μL (Thermo Fisher Scientific, catalog number: 4662030)
12. FinnPipette F2 1,000 μL (Thermo Fisher Scientific, catalog number: 4642090)
13. Pipette controller (TH Geyer, Labsolute, catalog number: 7696030)
14. Freezer, -20 °C
15. Refrigerator, 4 °C
Software and datasets
The following software is used for initial analysis of the plate reader data, and a license is provided with the purchase of the plate reader.
1. CLARIOstar (BMG Labtech, software version 5.40.R3)
2. CLARIOstar MARS Data Analysis Software (BMG Labtech, software version 3.32)
Procedure
A. Thawing and culturing of cells
Note: All steps in this section should be performed in a biosafety cabinet class II, except thawing and centrifuging.
1. Preheat the culture medium in a water bath at 37 °C. Thaw the cells in the water bath and transfer the cryovial to the aseptic biosafety hood. In the biosafety cabinet, slowly add 1 mL of 37 °C culture medium to the vial, and wait 1 min. Next, transfer the cell solution to a 15 mL conical tube and slowly add 2 mL of culture medium. Wait another minute, and then slowly add 4 mL of culture medium to the tube, giving a total volume of 8 mL of liquid.
2. Close the tube and centrifuge at 400× g for 1 min.
3. Remove and discard the supernatant. Be careful not to disturb the cell pellet.
4. Tap/flick the bottom of the tube with a finger to dissolve the pellet in the remaining liquid. Next, add 10 mL of culture medium to the tube. Add 100 μL of amphotericin B.
5. Distribute the cells evenly in the solution by gently pipetting up and down along the walls of the tube 3–4 times. Transfer the solution to a T75 cell culture flask.
6. Gently move the flask front-to-back and side-to-side in the horizontal plane 3–4 times to distribute the solution evenly across the bottom of the flask.
7. Place the flask in the cell incubator at 37 °C and 5% CO2.
Note: Once the cells have recovered from thawing and resumed normal growth, they may be maintained and passaged according to standard HEK293 cell culture protocols. Amphotericin B should be added to the cells at a 1:100 dilution during routine cell culture.
B. Coating of 96-well plate
Note: This section is recommended to be performed 1–3 days before seeding (section C). One day is sufficient, but three days can help avoid weekend work. Step B4 is performed on the day of seeding. Before this step is performed, it is recommended to decide how many compounds will be tested to ensure coating of a relevant number of wells. A minimum of five replicates per compound is recommended, including five positive and five negative controls. The positive and negative controls are FRET B6-cells with tunicamycin stimulation and vehicle control (DMSO), respectively.
1. Thaw the Poly-D-lysine solution (see Recipes) in a water bath.
2. Add 50 μL of Poly-D-lysine solution to all wells of the 96-well plate (or to the number of wells being used).
3. Wrap the plate and lid in parafilm to reduce the risk of evaporation and let the 96-well plate incubate overnight at room temperature, or at 4 °C if incubated for more than one day. The plate can be incubated outside the biosafety cabinet, as ventilation in the cabinet may increase the risk of evaporation.
4. After incubation, just before seeding the cells, aspirate the Poly-D-lysine solution and return it to the tube (it can be reused). Wash the wells with 300 μL of PBS per well. Remove and discard the PBS and leave the plate in the biosafety cabinet to dry before adding cells.
C. Seeding of cells
Note: This section is recommended when cells in the T75 cell culture flask have reached approximately 80% confluency, usually after 4–5 days of culture.
1. Examine the cells under a microscope to make sure they are healthy and at approximately 80% confluency.
2. Preheat culture medium and trypsin working solution in the water bath to 37 °C. Alternatively, the trypsin can be used at room temperature.
3. Transfer the flask to the biosafety cabinet. Discard the culture medium.
4. Wash the cells with 10 mL of sterile PBS. Discard the PBS.
5. Add 1 mL of preheated 0.05% trypsin working solution to the cells. Incubate at room temperature for 3 min, while tapping the flask gently to detach the cells. Examine the cells under a microscope to make sure they are detached.
6. Add 7 mL of preheated culture medium to the flask. Transfer the cells to a 15 mL conical tube.
7. Centrifuge the cells at 400× g for 1 min and prepare the cell counting chamber while the cells are in the centrifuge.
8. Remove the supernatant. Gently tap the bottom of the tube to dissolve the pellet in the remaining liquid.
9. Resuspend the cells in 3 mL of culture medium. If cells are less than 80% confluent, 1 or 2 mL may be enough. Mix gently 3–4 times with a pipette to ensure a single-cell solution.
10. Aspirate 11 μL of cell solution and transfer to the cell counting chamber.
11. Count the cells under the microscope. It is recommended to count a minimum of 200 cells.
12. Calculate cell concentration and dilute the cell suspension to a concentration of 200,000 cells/mL.
13. Add 200 μL of cell solution per well, equivalent to 40,000 cells per well. Keep a minimum of five wells empty for use as PBS control in the assay.
14. Transfer the remaining cells to a new culture flask (split if necessary).
15. Incubate the cells overnight at 37 °C and 5% CO2.
D. Stimulation with tunicamycin and drugs
Note: In this section, the stimulation with tunicamycin (positive control) is described. Since the stimulation time for tunicamycin is 18 h, it is recommended to perform this step in the afternoon, allowing the plate reader measurement to be performed the following morning. Longer or shorter incubation times may result in the FRET signal change not being detectable. Drugs for screening purposes can be included in this step.
1. Examine the cells in the 96-well plate under the microscope. They should be nearly 100% confluent.
2. Prepare the working solutions for tunicamycin (positive control, see Recipe 5) and DMSO (negative control, see Recipe 6).
3. Add 1 μL of tunicamycin working solution to each well of the positive controls (a minimum of five replicates recommended).
4. Add 1 μL of DMSO working solution to each well of the negative controls (a minimum of five replicates recommended).
5. Add any drugs or other compounds for screening purposes to the remaining wells. If drugs are dissolved in DMSO, the final DMSO concentration should not exceed that of the negative control (0.005%).
6. Incubate the plate for 18 h at 37 °C and 5% CO2.
Note: If drugs are screened, their optimal incubation times may differ. However, for tunicamycin, we tested both shorter and longer incubation periods and found that 18 h produced the most robust signal.
E. Fixation and washing
Note: This section should be performed after 18 h of incubation with tunicamycin, negative control, and drugs. It may be possible to perform the assay without fixation; however, cells detach more easily, and we therefore fix them prior to measurements. Fixation may also reduce the risk of protein complexes dissociating in the time between the removal of the stimulant and the measurement.
Caution: All steps involving PFA, including the first wash after PFA removal, should be performed under a chemical fume hood.
1. Examine the cells under the microscope to ensure that they are not detached. Note any deviations in, e.g., culture medium color or cell viability.
2. Thaw 10 mL of 4% PFA in the water bath.
3. Carefully aspirate the culture medium from the cells.
Critical: The cells may be prone to detach at this and following steps if the bottom is touched or aspiration causes excessive force. Detached or lost cells may affect the plate reader assay and reduce the signal-to-noise ratio significantly.
4. Gently add 100 μL of 4% PFA to each of the wells. Do not dispense the liquid straight onto the cells but direct it to the side of the well. Let it incubate at room temperature for 20 min.
5. Gently remove the PFA after 20 min. Be careful not to touch the bottom of the wells.
6. Wash twice with 300 μL of PBS per well. Use a gentle technique to avoid disturbance of the cells. The second wash may be performed outside the fume hood.
7. Add 200 μL of PBS to all wells, including five wells without cells (blank wells used for background subtraction). The plate is now ready for FRET signal measurement.
F. Plate reader assay
1. Connect the plate reader to a computer and start the plate reader and the CLARIOstar plate reader software.
2. Insert the 96-well plate into the plate reader.
3. Start a new protocol by selecting New under Manage protocols; choose Fluorescent Intensity and Endpoint.
4. Basic parameter settings:
a. Create a name for the protocol and select the appropriate 96-well plate (Nunc 96).
b. Under Optic Settings, choose 3 multichromatics, click on the arrow next to the number display, and select the multichromatics to FRET CFP/YFP 1, FRET CFP/YFP 2, and YFP, respectively. The FRET CFP/YFP 1 channel measures the CFP emission and excitation and is referred to as the CFP signal. The FRET CFP/YFP 2 channel measures YFP emission as a result of CFP excitation and is referred to as the FRET signal. The wavelengths and bandwidths for these channels are specified in Table 1.
c. Under the Well scan section, select Spiral avg. and diameter 5 mm.
d. Under Optics, select Bottom optics.
e. Under Advanced, set the number of flashes per well to 106.
Note: This parameter was not individually optimized, and similar values (e.g., 100 flashes) are expected to provide comparable results. Very low numbers of flashes (e.g., below 20) may reduce measurement precision.
Table 1. Wavelength specifications for the FRET assay. This table shows the specific wavelengths and bandwidths used for the plate reader assay. These settings are available as predefined protocols in the CLARIOstar plate reader but may need to be adjusted if the protocol is used on another plate reader.
| Channel | Excitation wavelength (nm) | Emission wavelength (nm) | Bandwidth (nm) |
|---|---|---|---|
| FRET CFP/YFP 1 (donor channel) | 430 | 480 | 10 |
| FRET CFP/YFP 2 (acceptor channel) | 430 | 530 | 10 |
| YFP* | 497 | 530 | 15 |
* This channel is not used for the calculation of the FRET signal and can therefore be omitted. However, it is recommended to include it to detect possible deviations in the YFP signal.
5. Layout settings:
a. Under the Layout tab, set the layout of the plate by first selecting the relevant sample type (sample, positive control, negative control, or blank). Replicates can be indicated in the section Replicates.
b. Press Start measurement.
6. Focal height and gain settings: Focal height and gain need to be set before measurement. Focal height indicates the distance from the excitation light source to the cell layer in the wells and is adjusted once for each plate. Gain is a measurement of signal amplification and should be as high as possible without exceeding the top limit of the detector. This is adjusted for each multichromatic, i.e., three times for this assay.
a. Set the gain of the first multichromatic by selecting Gain adjustment and checking the box next to the “FRET CFP/YFP 1” channel. Select Full plate and target value 30%. Press Start adjustment. This will identify the well with the highest CFP signal and use this signal to set the gain for this channel. [A target value of 30% was selected empirically during assay optimization. Higher target values frequently resulted in detector saturation (signal overflow) in wells with high fluorescence intensity, whereas 30% provided a robust signal while maintaining measurements within the detector's linear range.]
b. When the scan is finished, the well with the highest signal is marked in the layout. Select this well, deselect Gain adjustment, and select Focus adjustment. Press Start adjustment.
c. When the scan is finished, the focus adjustment should ideally be set around 3 mm (between 2.7–3.5 mm). See Troubleshooting if this height is >4 mm.
d. Next, set the gain for the second multichromatic by selecting Gain adjustment, check the box next to “FRET CFP/YFP 2”, and select Full plate. Press Start adjustment.
e. Set the gain for the third multichromatic by repeating step F6d and check the box next to “YFP” instead of “FRET CFP/YFP 2.”
f. Press Start measurement. Monitor the scan by selecting Current state in the top menu. If there is an overflow/error message during the scan, please abort the scan and refer to the Troubleshooting.
7. Save and close the program when the scan is finished. Data are automatically exported to the CLARIOstar MARS software if installed on the same computer. This software can be used for initial data analysis or exported to another data analysis software.
Data analysis
After measurement, calculate the average signal for the blank wells (with PBS only), for each channel, and subtract this from the other wells. This removes any signal originating from the plate itself or the PBS. Next, calculate the FRET/CFP ratio for each well by dividing the FRET CFP/YFP 2 signal (the FRET signal) by the FRET CFP/YFP 1 signal (the CFP signal). Finally, to normalize the signal, calculate the FRET/CFP ratio average for the negative control (DMSO-stimulated cells) and use this as a normalization factor by dividing all individual wells by this number. The replicates from the different samples can now be averaged and used in statistical hypothesis testing, such as a t-test or ANOVA.
Data from different 96-well plates can be merged or compared when data are normalized, using the negative control as a normalization factor.
Before plate reader measurement, wells should be examined under a microscope to assess cell loss, which could happen during washing steps. If there is a significant loss of cells, i.e., less than 10%–20% of the well surface covered by cells, the well should be excluded from data analysis, or the experiment should be repeated.
Validation of protocol
This protocol has been used and validated in the following research article:
Gelman et al. [12]. Novel cell-based assay enables FRET-based measurements of the dimerization activity of the chaperone DNAJB6. Biology Methods and Protocols (Figure 3A).
In the above-mentioned article, five replicates were used for each sample, and data were analyzed using an F-test to assess equality of variances. Datasets were also confirmed to be normally distributed using the d’Agostino and Pearson test, followed by a Student’s t-test (Figure 1).
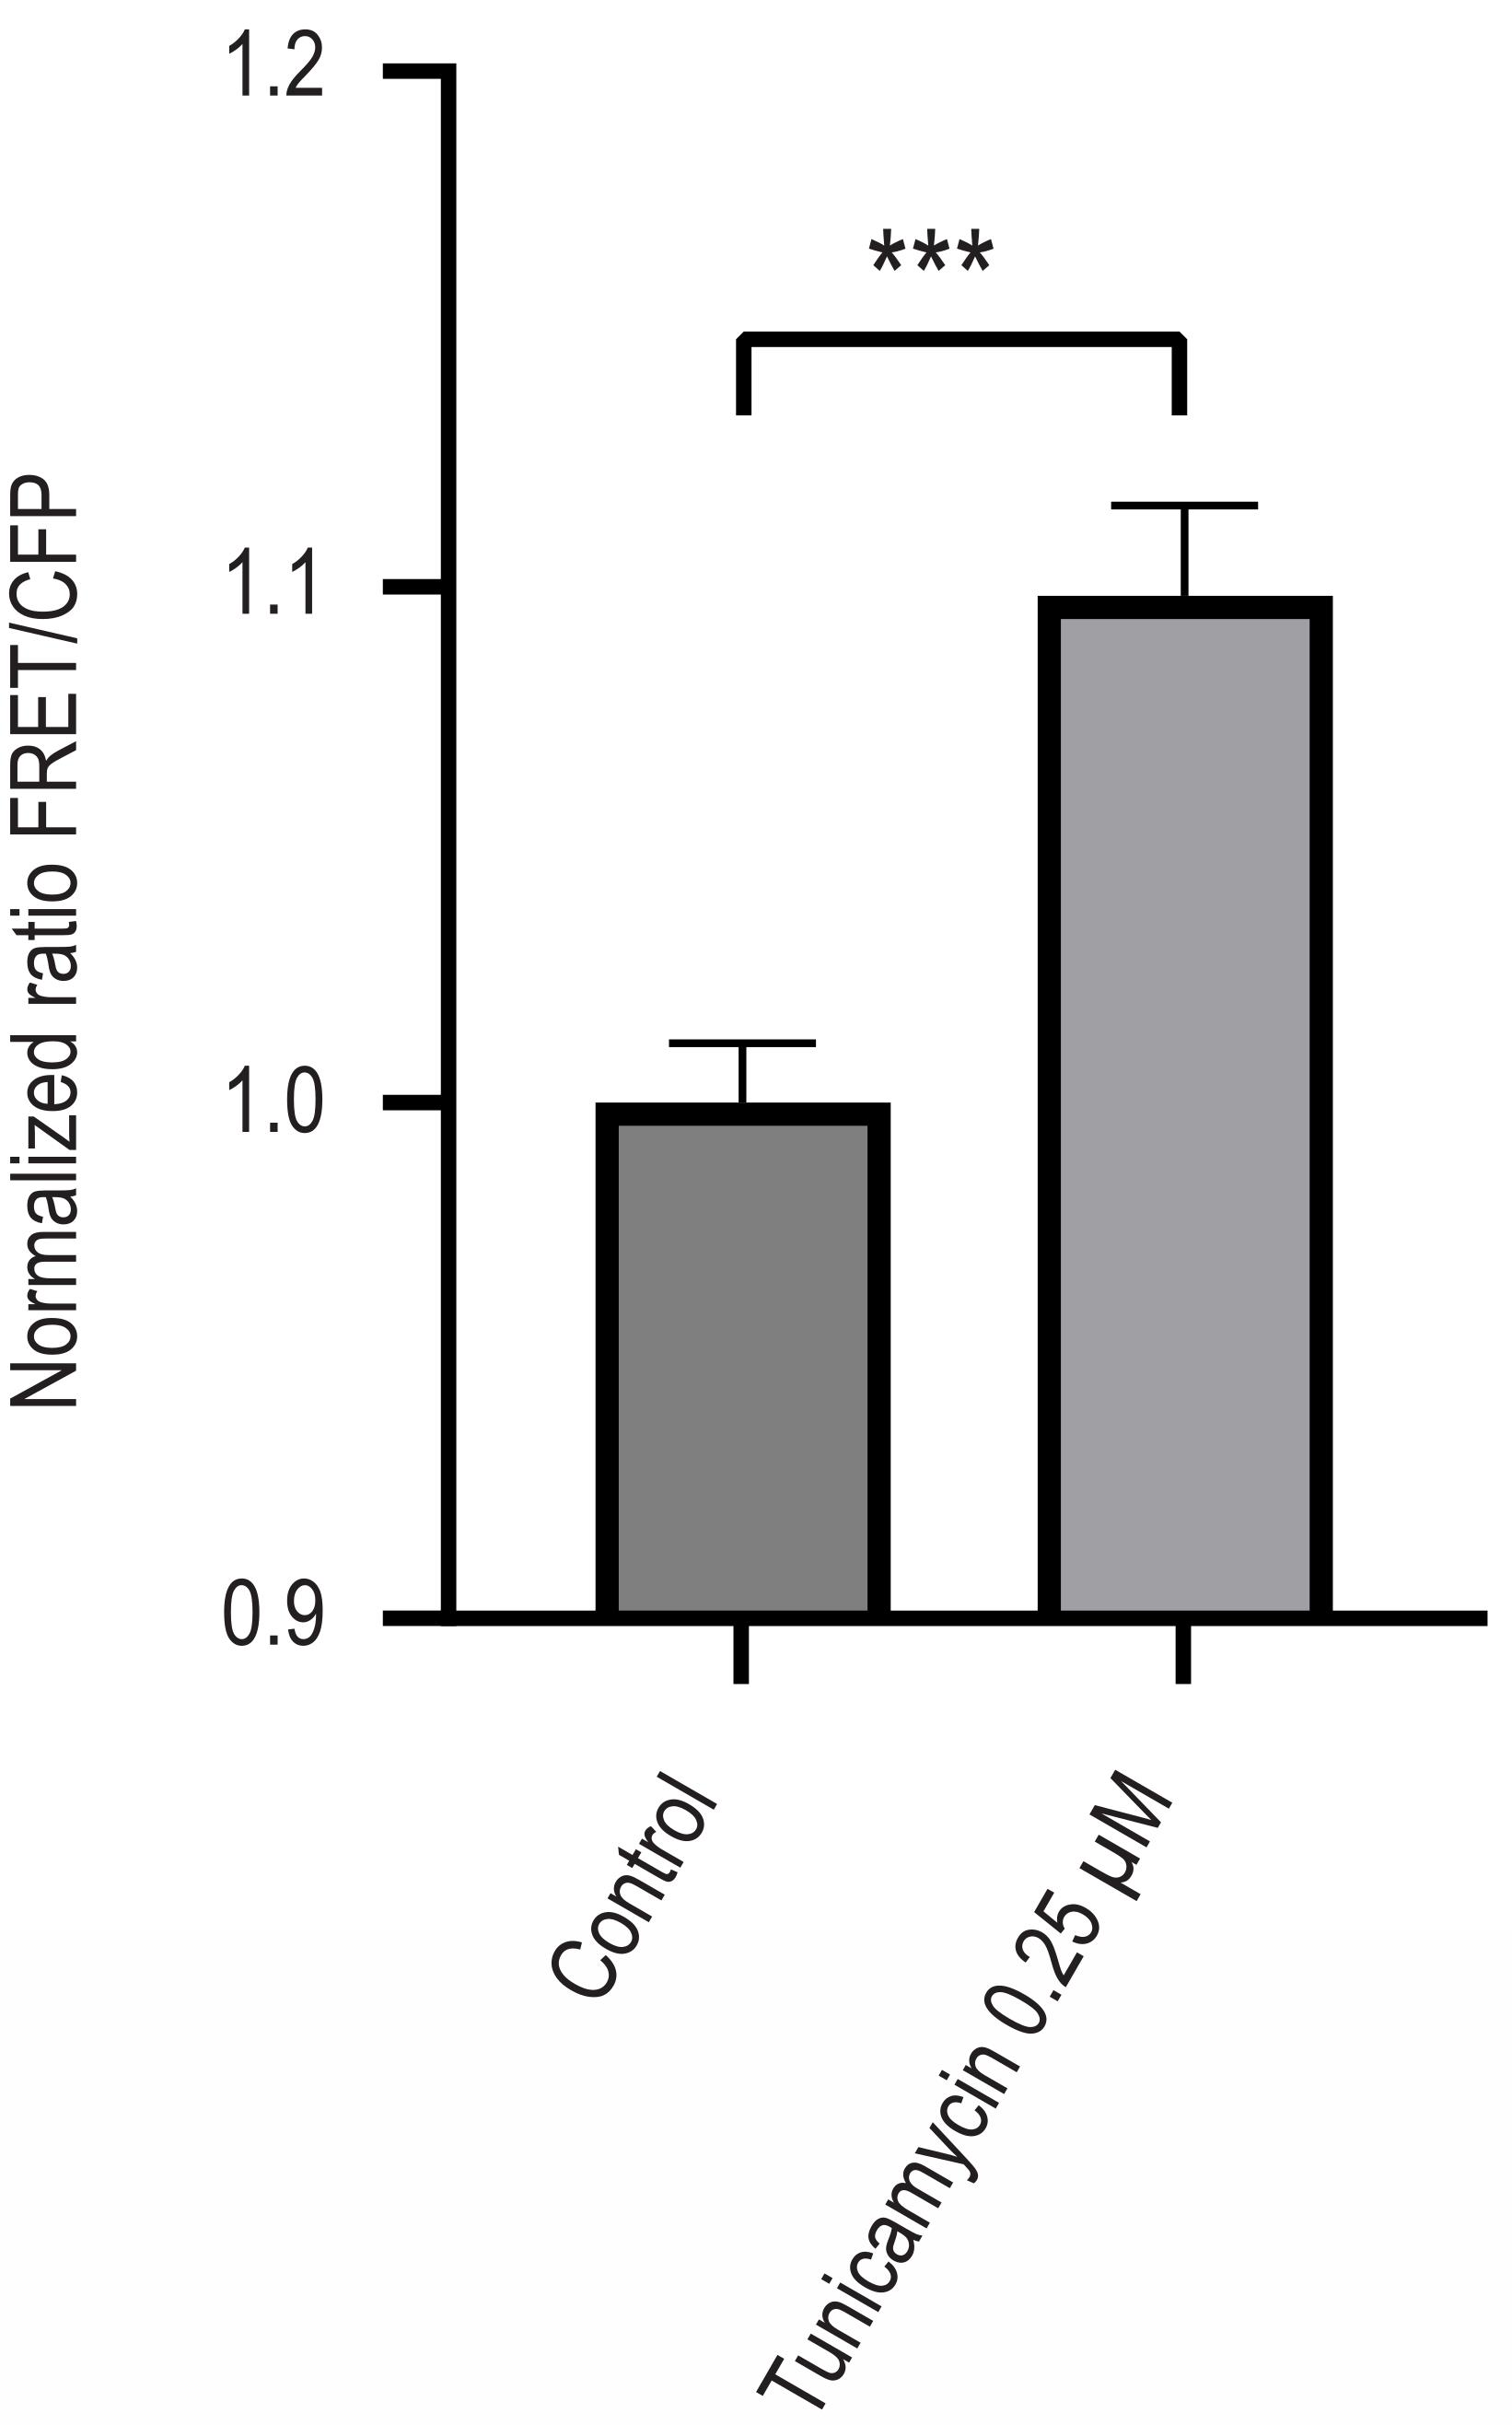
Figure 1. Validation data for the FRET signal increase upon tunicamycin stimulation. Normalized FRET/CFP ratio for FRET-B6 cells stimulated with 0.25 μM tunicamycin for 18 h. n = 15 (control) and n = 14 (tunicamycin). Control cells were treated with DMSO only. Bars represent mean ± standard error of mean (SEM). Statistical significance was assessed using an unpaired two-tailed Student's t-test, ***P < 0.0001. This figure was adapted from [12].
General notes and troubleshooting
General notes
1. All steps until fixation should be performed in a biosafety cabinet class II to ensure aseptic working conditions.
2. When preparing the cell suspension as described in C, it is crucial that the cell suspension is well mixed, as deviations may result in the wrong number of cells being seeded, which may compromise the experimental results.
Troubleshooting
Problem 1: Cells detach from the well bottom during fixation or washing.
Possible causes: Too much force in the aspiration or dispensation of liquid, or the pipette tip scratching the bottom of the well.
Solutions: Always pipette gently and slowly, both when aspirating and dispensing. During dispensation, point the pipette tip to the wall of the well to avoid direct flushing onto the cells. When aspirating, tilt the plate lightly and aspirate from the side, close to the bottom, so as not to disturb the cells.
Problem 2: Focal height is >4 mm.
Possible causes: Cells have folded during the washing step, or there may be residual material from handling on the plate.
Solutions: Examine the plate and the well indicated for measurement of focal height, under the microscope. If cells are folded (usually as a result of detachment of cells during washing steps), a uniform measurement across all wells may be difficult to obtain, and it is strongly recommended to redo the experiment. If there is debris or residual material on the plate, wipe the plate and the lid carefully with 70% ethanol and a lint-free cloth or lens paper.
Problem 3: Overflow error message during scan.
Possible cause: The gain has been set too high, causing the signal for one or more wells to exceed the limit of the detector.
Solution: Abort the scan and return to the gain settings page by selecting the protocol again and pressing Start measurement. Set the target value of gain to 20% instead of 30% for the wavelength that caused the overflow error. Press Start measurement again. If the problem persists, reduce the target value further until the gain is sufficiently low.
Acknowledgments
Author contributions: Conceptualization, C.H.; Investigation, A.G.; Writing—Original Draft, A.G.; Writing—Review & Editing, A.G., L.N., C.H.; Funding acquisition, L.N., C.H.; Supervision, L.N., C.H.
The development of this protocol was supported by Danmarks Frie Forskningsfond (Grant number 3127-00019B) and the Toyota Foundation Denmark.
This protocol was described and validated in [12].
The following figures were created using BioRender: Graphical overview, BioRender.com/cj2d6dx.
Competing interests
The authors declare no conflicts of interest.
References
- Hentze, J., Folke, J., Aznar, S., Nyeng, P., Brudek, T. and Hansen, C. (2024). DNAJB6 is expressed in neurons and oligodendrocytes of the human brain. Glia. 72(12): 2313–2326. https://doi.org/10.1002/glia.24615
- Aprile, F. A., Källstig, E., Limorenko, G., Vendruscolo, M., Ron, D. and Hansen, C. (2017). The molecular chaperones DNAJB6 and Hsp70 cooperate to suppress α-synuclein aggregation. Sci Rep. 7(1): e1038/s41598–017–08324–z. https://doi.org/10.1038/s41598-017-08324-z
- Arkan, S., Ljungberg, M., Kirik, D. and Hansen, C. (2021). DNAJB6 suppresses alpha-synuclein induced pathology in an animal model of Parkinson's disease. Neurobiol Dis. 158: 105477. https://doi.org/10.1016/j.nbd.2021.105477
- Deshayes, N., Arkan, S. and Hansen, C. (2019). The Molecular Chaperone DNAJB6, but Not DNAJB1, Suppresses the Seeded Aggregation of Alpha-Synuclein in Cells. Int J Mol Sci. 20(18): 4495. https://doi.org/10.3390/ijms20184495
- Folke, J., Arkan, S., Martinsson, I., Aznar, S., Gouras, G., Brudek, T. and Hansen, C. (2021). DNAJB6b is Downregulated in Synucleinopathies. J Parkinsons Dis. 11(4): 1791–1803. https://doi.org/10.3233/jpd-202512
- Kakkar, V., Månsson, C., de Mattos, E. P., Bergink, S., van der Zwaag, M., van Waarde, M. A., Kloosterhuis, N. J., Melki, R., van Cruchten, R. T., Al-Karadaghi, S., et al. (2016). The S/T-Rich Motif in the DNAJB6 Chaperone Delays Polyglutamine Aggregation and the Onset of Disease in a Mouse Model. Mol Cell. 62(2): 272–283. https://doi.org/10.1016/j.molcel.2016.03.017
- Rodríguez-González, C., Lin, S., Arkan, S. and Hansen, C. (2020). Co-chaperones DNAJA1 and DNAJB6 are critical for regulation of polyglutamine aggregation. Sci Rep. 10(1): 8130. https://doi.org/10.1038/s41598-020-65046-5
- Thiruvalluvan, A., de Mattos, E. P., Brunsting, J. F., Bakels, R., Serlidaki, D., Barazzuol, L., Conforti, P., Fatima, A., Koyuncu, S., Cattaneo, E., et al. (2020). DNAJB6, a Key Factor in Neuronal Sensitivity to Amyloidogenesis. Mol Cell. 78(2): 346–358.e9. https://doi.org/10.1016/j.molcel.2020.02.022
- Carlsson, A., Axell, E., Emanuelsson, C., Olsson, U. and Linse, S. (2024). The Ability of DNAJB6b to Suppress Amyloid Formation Depends on the Chaperone Aggregation State. ACS Chem Neurosci. 15(9): 1732–1737. https://doi.org/10.1021/acschemneuro.4c00120
- Månsson, C., van Cruchten, R. T. P., Weininger, U., Yang, X., Cukalevski, R., Arosio, P., Dobson, C. M., Knowles, T., Akke, M., Linse, S., et al. (2018). Conserved S/T Residues of the Human Chaperone DNAJB6 Are Required for Effective Inhibition of Aβ42 Amyloid Fibril Formation. Biochemistry. 57(32): 4891–4902. https://doi.org/10.1021/acs.biochem.8b00353
- Söderberg, C. A. G., Månsson, C., Bernfur, K., Rutsdottir, G., Härmark, J., Rajan, S., Al-Karadaghi, S., Rasmussen, M., Höjrup, P., Hebert, H., et al. (2018). Structural modelling of the DNAJB6 oligomeric chaperone shows a peptide-binding cleft lined with conserved S/T-residues at the dimer interface. Sci Rep. 8(1): e1038/s41598–018–23035–9. https://doi.org/10.1038/s41598-018-23035-9
- Gelman, A., Quintino, L., Nordberg, M., Nyeng, P., Brudek, T., Nielsen, L. K. and Hansen, C. (2026). Novel cell-based assay enables FRET-based measurements of the dimerization activity of the chaperone DNAJB6. Biol. Methods Protoc. 11(1): e1093/biomethods/bpag005. https://doi.org/10.1093/biomethods/bpag005
Article Information
Publication history
Received: May 28, 2026
Accepted: Jun 28, 2026
Available online: Jul 9, 2026
Published: Aug 5, 2026
Copyright
© 2026 The Author(s); This is an open access article under the CC BY-NC license (https://creativecommons.org/licenses/by-nc/4.0/).
How to cite
Gelman, A., Nielsen, L. K. and Hansen, C. (2026). A Novel Plate Reader–Based Protocol for Measurement of DNAJB6 Dimerization Activity. Bio-protocol 16(15): e5776. DOI: 10.21769/BioProtoc.5776.

 Download Citation in RIS Format
Category
Biochemistry > Protein > Interaction > Protein-protein interaction
Cell Biology > Cell-based analysis > Protein interaction
Neuroscience > Nervous system disorders > Neurodegeneration
Do you have any questions about this protocol?
Post your question to gather feedback from the community. We will also invite the authors of this article to respond.
 Post a Question


