


- Protocols

- Articles and Issues
- For Authors
- About
- Become a Reviewer


Mouse and Rat Oxygen-Induced Retinopathy Models to Study Vascular Features Seen in Retinopathy of Prematurity

(*contributed equally to this work) Published: Vol 16, Iss 15, Aug 5, 2026 DOI: 10.21769/BioProtoc.5771 Views: 257
Reviewed by: Sébastien GillotinSushma KalmodiaAbhishek VatsMarquis Walker
 PDF
PDF  Ask a question

Protocol Collections
Comprehensive collections of detailed, peer-reviewed protocols focusing on specific topics




Abstract
Retinopathy of prematurity (ROP), a retinovascular disease, is a leading cause of childhood blindness worldwide. Given the constraints of studying molecular mechanisms in preterm infants, reproducible animal models are important to understand ROP pathophysiology. Mouse and rat oxygen-induced retinopathy (OIR) models are the most commonly used and recapitulate key vascular features seen in ROP. However, these models are susceptible to inherent variability that limits reproducibility, including inter-litter variability, consistency of oxygen delivery across experiments, retinal dissection technique, and immunohistochemistry. Here, we describe a comprehensive protocol for performing the most common mouse and rat OIR models, and procedures such as eye enucleation, retinal dissection and flat mounting, isolectin GS-IB4 staining, whole retina stitched fluorescence imaging from Z-stacks, and quantification of vascular features. This protocol provides important materials and procedural details to increase the reproducibility of the mouse and rat OIR models.
Key features
• Rat and mouse oxygen-induced retinopathy (OIR) models.
• Eye enucleation of experimental rat and mouse pups.
• Retinal flat mounting and immunostaining for rat and mouse eyes.
• Image analysis of retinal flat mounts from rat and mouse eyes.
Keywords: Oxygen-induced retinopathy Vascular biology
Retinopathy of prematurity
Retinal dissection
Retinal flat mounting
Lectin immunostaining
Vascular biology
Retinopathy of prematurity
Retinal dissection
Retinal flat mounting
Lectin immunostaining
Graphical overview
Background
Retinopathy of prematurity (ROP), a retinovascular disease, is a leading cause of childhood blindness [1,2] and is described by a refined two-phase disease process [3,4]. Phase I involves impaired intraretinal vascular development, resulting in avascular retina and tissue hypoxia. Phase II involves pathologic intravitreal neovascularization (IVNV), which can lead to retinal detachment and permanent vision loss. Therefore, studies are warranted to understand ROP pathophysiology and identify potential therapeutic targets.
Studying molecular mechanisms of ROP in human preterm infants is not safe; as such, animal models are used to understand pathophysiology and investigate potential therapeutic targets. Oxygen-induced retinopathy (OIR) models have been used to study ROP pathophysiology [5–9], with the mouse and rat 50/10 OIR models being commonly used [9,10]. Mouse OIR recreates the vaso-obliteration of phase I and the vaso-proliferation of Phase II [3,10]. The rat 50/10 OIR model describes the refined hypothesis [4] of delayed physiological retinal vascular development, compromised vascularity (phase I), and vaso-proliferation as IVNV (phase II) [9]. However, model variability from inter-litter differences, consistency of oxygen delivery across experiments, incomplete removal of the hyaloid and vitreous affecting immunostaining, and loss of avascular peripheral retina during dissection in the rat model affect results and interpretation. While factors such as inter-litter variability are difficult to avoid and can only be controlled by including both experimental and control pups within each litter, other confounders can be minimized through reproducible experimental protocols. Here, we outline standardized protocols for (i) induction of mouse and rat OIR using a controlled OxyCycler system, (ii) retinal dissection and flat-mount preparation to ensure consistent staining, (iii) image acquisition capturing the entire retinal vasculature, and (iv) quantitative analysis of total retinal area, avascular area, and IVNV.
Materials and reagents
Biological materials
1. Mice: Timed-pregnant C57BL/6J (Jackson Laboratories, strain number: 000664) or specified transgenic model(s)
2. Rats: Timed-pregnant Sprague Dawley dams (Charles Rivers, strain number: 001)
Reagents
1. Paraformaldehyde (PFA), 4% (Electron Microscopy Sciences, catalog number: 1573520S1L)
2. Phosphate-buffered saline (PBS), 10× (Thermo Fisher Scientific, catalog number: AAJ75889)
3. Triton X-100 stock solution 20% v/v (Sigma-Aldrich, catalog number: T9284)
4. Normal horse serum (Thermo Fisher Scientific/Invitrogen, catalog number: 31874)
5. Isolectin GS-IB4 from Griffonia simplicifolia, Alexa Fluor 488 conjugate (ThermoFisher Scientific, catalog number: I21411)
6. 75% ethanol (Gold Shield Distributors, catalog number: 412811)
7. Fluoromount-G mounting medium (Invitrogen, catalog number: 50-187-88)
8. Triamcinolone acetonide (400 mg per 10 mL) (Teva Pharmaceuticals, catalog number: NDC 0703-0245-01)
Solutions
1. 1× PBS (see Recipes)
2. Blocking buffer (see Recipes)
3. Lectin staining solution (see Recipes)
Recipes
1. 1× PBS
Dilute 10× PBS to 1× PBS with distilled water. Standard room temperature storage.
2. Blocking buffer
1× PBS
10% normal horse serum
0.5% Triton X-100
We recommend preparing fresh blocking buffer; however, we found that storing at 4 °C for up to 1 week will not affect tissue quality or staining. Warm blocking buffer to room temperature and mix before use.
3. Lectin staining solution
Dilute isolectin GS-IB4, Alexa Fluor 488 in blocking buffer, 1:100. Prepare fresh (recommended) and protect from light.
Laboratory supplies
1. 96-well plates (Genesee Scientific, catalog number: 25-109) (optional)
2. 1.5 mL microcentrifuge tubes (CELLTREAT, catalog number: 229442)
3. Kimwipes (Fisher Scientific, catalog number: 06-666)
4. Transfer pipettes (Fisher Scientific, catalog number: 13-711)
5. Superfrost Plus microscope slides (Fisher Scientific, catalog number: 1255015)
6. Coverslips/micro cover glass No. 1.5 (VWR, catalog number: 48393-151)
7. Coverslip weights (Mettler Toledo, catalog number: 01-912-181)
8. Gloves (Fisher Scientific, catalog number: 19149863)
9. FalconTM standard tissue culture dishes 21.29 cm2 (Corning, catalog number: 08-772B)
Equipment
1. OxyCycler (Biospherix, model: A-84XOV) with OxyCycler software
2. Medical-grade oxygen tank, size K (Linde, catalog number: OX M-K) (or equivalent)
3. Medical-grade nitrogen tank, size K (Linde, catalog number: NI M-K) (or equivalent)
4. Portable Combustion Analyzer (Bacharach, model: 0024-8511-Fyrite InTech)
5. Stereomicroscope (Leica, model: EZ4 W)
6. Fluorescence microscope for tiled imaging and stitching (Keyence, model: BZ-X800)
7. Dumont #5 blunt straight tip forceps (FST, catalog number: 11251-30)
8. Fine grasping forceps (FST, catalog number: 11090-10)
9. Iris forceps: Bonn iris suture forceps (Titan Medical, catalog number: TMF612.50)
10. Curved tip forceps (Fisher Scientific, catalog number: 16-100-122)
11. Micro scissors: Noyes micro scissors (WPI, catalog number: 503306)
12. Platform Rocker (Corning, product number: 6702)
13. 30 G insulin needles (BD, SKU 305106)
Software and datasets
1. Fiji (ImageJ) (version: 1.54p)
2. Keyence BZ-X800 imaging software (version: 01.03.00.01)
3. Keyence BZ-X800 Analyzer software (version: 1.1.2.4)
4. Microsoft Excel (version: Microsoft Office LTSC Professional Plus 2021)
Procedure
Note: For all described procedures, use 75% ethanol as needed to sanitize tools, workstations, and any other necessary surfaces.
A. Oxygen-induced retinopathy (OIR) models
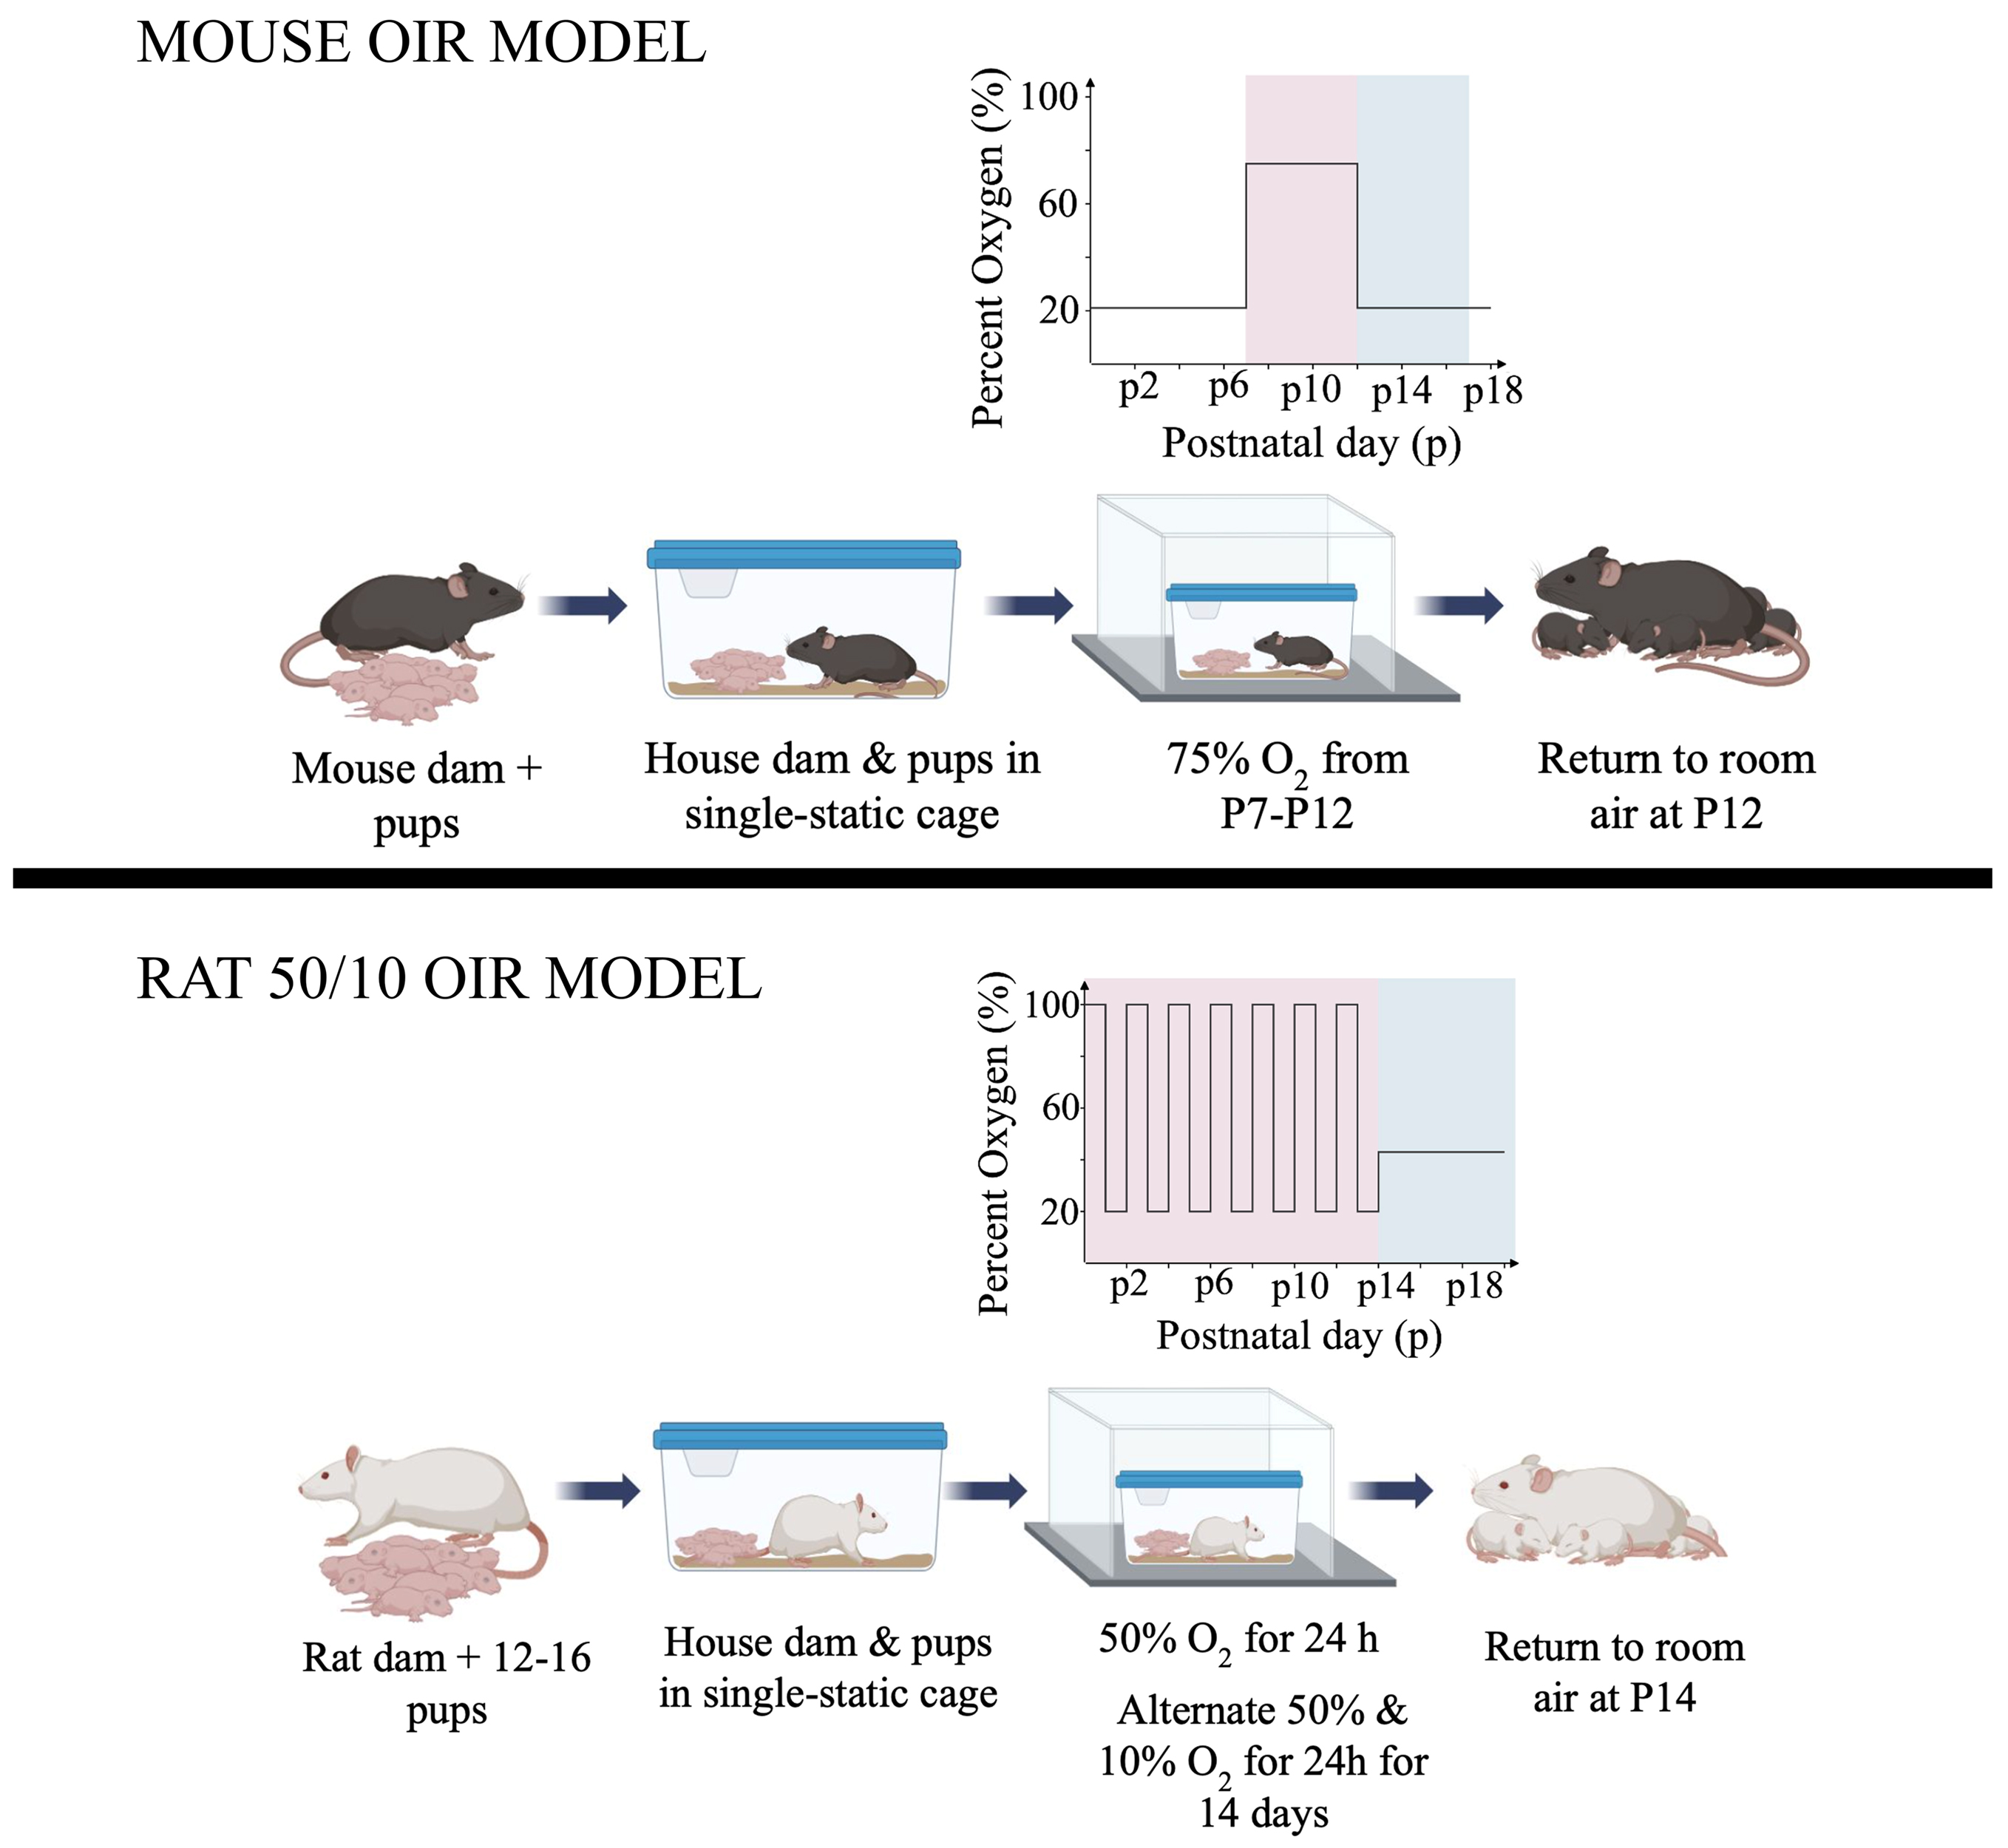
A1. Mouse OIR (75% O2 from P7 to P12)
1. Obtain timed-pregnant dams or set up breeding pairs to generate offspring of the desired genotype(s).
2. Assign P0 as the day of birth.
Note: Remove the male breeder prior to delivery to reduce the risk of pup loss.
3. House one dam with litter per cage (single-dam cage) with standard bedding, chow, and water ad libitum.
4. On P7 (7 days after birth, based on the recorded birth date/time), weigh pups and transfer the dam and litter into the OxyCycler chamber pre-equilibrated to 75% O2.
Note: We do not exclude pups from the mouse OIR model based on weight or litter size; however, we record the number of pups and their weights to assess potential effects of experimental interventions [11].
5. Maintain chamber oxygen at 75% ± 1% continuously from P7 through P12 and record oxygen logs.
6. Monitor dams and pups regularly for health and distress while minimizing chamber opening time.
Note: The OxyCycler chamber is transparent, allowing routine visual monitoring without opening the chamber. Depending on cage type and placement, checks may be performed without interrupting oxygen control.
7. In our experience, cages are not changed during P7–P12 hyperoxia. If a cage change or other intervention is required (e.g., dam/pup health concerns, experimental treatment, etc.), document the reason, timing, and duration of chamber opening.
8. On P12, remove the dam and litter from the chamber and return to room air (21% O2).
9. Record pup weights and the general health of the dam and pups.
Note: Soda lime is not used for mouse OIR in this protocol.
A2. Rat 50/10 OIR (alternating 50% and 10% O2 from P0 to P14)
1. Obtain timed-pregnant Sprague Dawley rat dams from Charles River.
CRITICAL: This model requires 12–16 pups per dam. To reliably meet this requirement, we recommend ordering additional timed-pregnant dams so pups can be supplemented, if needed (see A9).
2. Define P0 based on the observed birth time of the first pup as closely as possible and record the time.
3. Adjust each dam’s litter to 12–16 pups before initiating oxygen cycling (see A9). Tattoo supplemental pups for identification (see A9a–b).
4. House each dam with litter in a single-dam static cage with sufficient food and water.
5. Place the dam along with litter into the OxyCycler and initiate the rat 50/10 OIR model within 4–6 h of birth: 50% O2 for 24 h, alternating with 10% O2 for 24 h, for 14 days, followed by return to room air at P14. Maintain oxygen at ±0.1% throughout.
6. During oxygen cycling, perform daily monitoring.
CRITICAL: Count pups daily to ensure 12–16 pups remain in a litter. If pup mortality reduces litter size to under 12 pups, supplement litter (see A9). Briefly remove the cage from the chamber if needed for accurate counting.
CRITICAL: During the 10% O2 phase, verify accurate O2 level using an external calibrated sensor placed inside the running OxyCycler chamber and record verification results.
7. Change cages as required by institutional guidance and more frequently if condensation is observed. Minimize and document all chamber openings.
Optional: Mitigate CO2/humidity using soda lime as needed.
Note: Perform chamber openings (including cage changes and pup counting) during the 50% O2 phase when possible, as this does not measurably alter vascular features.
8. At P14, remove animals from the chamber (return to room air if not already) and record pup weights.
9. Litter size maintenance and exclusion criteria in rat 50/10 OIR:
Rationale: To promote competition for nursing and achieve postnatal growth restriction, which is an important contributor to the reproducible vascular phenotype in the rat 50/10 OIR model [12], 12–16 pups per dam are required throughout oxygen cycling.
a. Pup supplementation before starting 50/10 OIR model: If a dam delivers fewer than 12 pups, delay starting the 50/10 OIR model as long as the model can still be started within 4–6 h after the observed birth of the first pup. If a second litter is born within this window, transfer the pups from the newly born litter to bring the original litter size to 12–16 pups, and then place the supplemented litter into the OxyCycler chamber.
CRITICAL: Only pups placed into OIR within 4–6 h of birth are eligible for inclusion. Tattoo supplemental pups to allow identification during future analyses.
CRITICAL: If adequate supplementation cannot be achieved within the 4–6 h window, the litter may be excluded or used as room air supplemental pups.
b. Pup supplementation after starting 50/10 OIR model: If pup mortality reduces litter size below 12 pups after 50/10 OIR model has started, litter size may be supplemented to 12–16 pups using pups from room air litters to maintain nursing competition. Only add room air supplemental pups if close in age and size and clearly labeled as a late-added supplemental pup. Tattoo late-added supplemental pups for identification.
Note: Avoid adding substantially larger pups, as they can over-compete and alter growth restriction and phenotype severity in the littermates. In our experience, room air pups are ~2 g heavier than OIR pups by P5; therefore, we do not use room air pups for supplementation after this age.
c. If appropriate size matching is not possible, consider maintaining litter size using pups that were placed into OIR at the same time (e.g., transferring pups between concurrently run OIR litters initiated within the same birth window).
d. Analysis: Supplemental pups added before starting the 50/10 OIR model may be included in future analyses, but we recommend analyzing the data separately to ensure no confounders.
e. Grounds for litter exclusion:
i. Dams and litter are not placed into OIR within 4–6 h of the birth of the first pup.
ii. Supplemental pups added after starting the 50/10 OIR model (i.e., late-added supplemental pups) are excluded from analyses.
iii. If litter size drops below 12 pups and the laboratory cannot restore litter size with the above-mentioned approaches, consider excluding the litter from analysis and document the reason.
B. Eye enucleation and fixation
Typical collection timepoints: mouse P12 (avascular area, AVA) or P17 (AVA/IVNV); rat P14 (AVA) or P18–P20 (AVA/IVNV).
1. Euthanize animals in accordance with your lab’s and institutional IACUC protocols or local regulations.
2. Enucleate eyes using curved tip forceps, avoiding compression of the globe.
a. Gently proptose the eye by retracting the surrounding periorbital tissue.
b. Position the forceps gently beneath the sclera.
c. Slowly retract the forceps upward to free the globe, taking care not to puncture or compress it.
d. Sever the optic nerve to complete enucleation using micro scissors.
3. Puncture the cornea once with a 30G needle to facilitate fixative penetration.
4. Place one eye in a 1.5 mL microcentrifuge tube with 300–500 μL of 4% PFA.
5. Fix each eye in 4% PFA for 1 h at room temperature with gentle rocking.
6. Rinse eyes at least 3× in 1× PBS.
7. Eyes can be stored in 1× PBS at 4 °C until ready for dissection.
Note: All steps and timepoints are identical for mouse and rat enucleation and fixation.
C. Retina dissection for mouse and rat flat mounts
Note: Perform dissections under a stereomicroscope. Keep tissue submerged in 1× PBS at all times. All steps are further visualized in Videos 1 and 2.
1. Using a transfer pipette, place the fixed eye in a Petri dish containing 1× PBS (Figure 1A).
Note: We have found that the transfer pipettes are of sufficient diameter to transfer the eye without harming the tissues. However, researchers may consider cutting the pipette tip if a larger diameter is needed.
2. Using micro scissors, make a circumferential incision along the limbus and remove the cornea (Figure 1B–D).
3. Separate the retinal pigment epithelium (RPE)/choroid/sclera complex from the neural retina:
a. Place the eye with the cornea facing down. Using grasping forceps, gently hold the optic nerve head. With micro scissors, cut away the optic nerve head along with the attached choroid/sclera at the base of the eye (Figure 1E–F).
b. Insert the closed tips of blunt Dumont forceps into the incision plane just under the RPE/choroid/sclera without tearing the posterior retina (Figure 1G).
c. Advance laterally or circumferentially using sweeping motions to separate the neural retina from the underlying RPE/choroid/sclera.
d. Continue until the RPE/choroid/sclera complex is fully detached and removed (Figure 1H).
4. Inspect the isolated retina and trim away any remaining anterior segment tissue (e.g., residual iris) using grasping forceps (Figure 1I).
5. Remove the lens carefully using iris suture forceps without pulling on the retina (Figure 1J).
6. Remove hyaloid/vitreous remnants (Figure 1K):
a. Using iris suture forceps, grasp the hyaloid membrane at an attachment point.
b. Peel it away from the inner retinal surface using slow, controlled traction.
c. Avoid contacting or scraping the retina with forceps tips.
7. Store the isolated retinal eyecup in 1× PBS at 4 °C until flat mounting.
Note: The dissection procedure is identical for mouse and rat. Panels in Figure 1 (mouse) correspond directly to panels in Figure 2 (rat) (i.e., Figure 1A = Figure 2A, etc.). The rat eye is larger and easier to visualize. However, the albino rat eye lacks pigmentation, making the sclera and RPE/choroid layers difficult to distinguish from the retina visually during dissection.
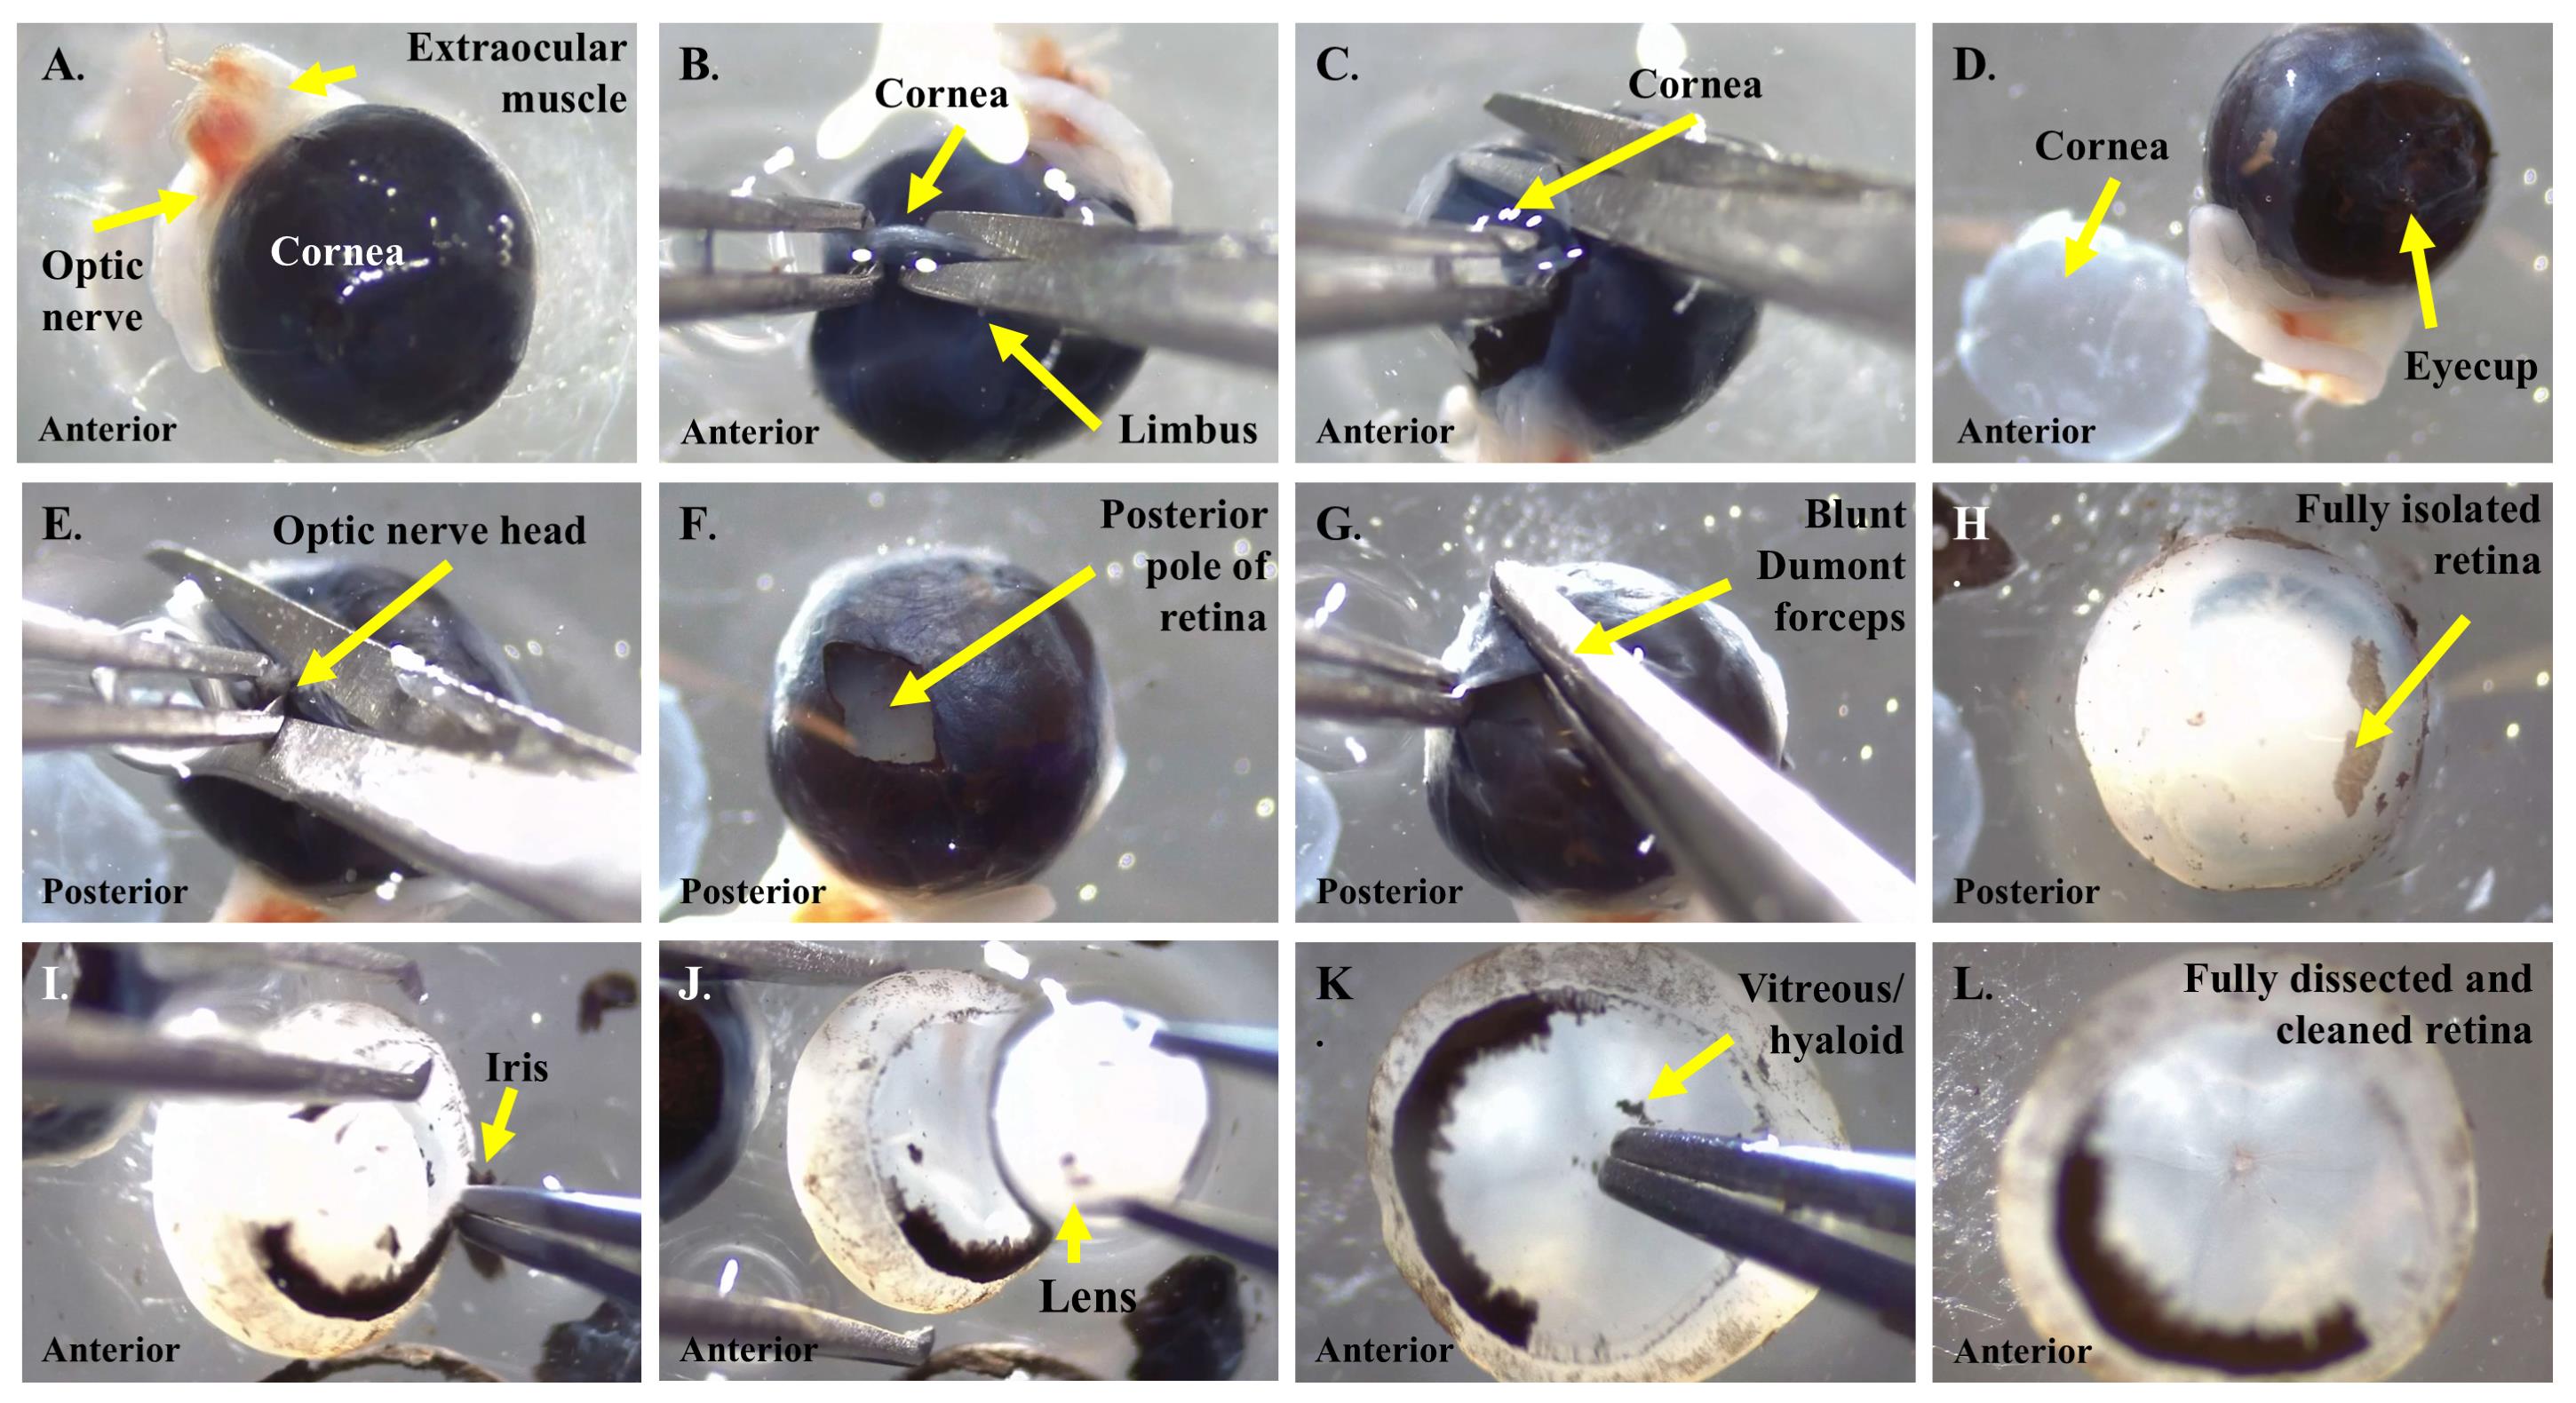
Figure 1. Mouse retinal dissection. (A) Fixed mouse eye in a Petri dish with 1× PBS. (B) Micro scissors making the initial limbal incision. (C–D) Circumferential incision above the limbus to separate the cornea from the eyecup. (E–F) Micro scissors making an incision at the optic nerve head. (G) Blunt Dumont forceps inserted into the incision plane. (H) Isolated retina with no tears/holes but expected residual retinal pigment epithelium (RPE) posteriorly. (I) Iris tissue removal from the ciliary body. (J) Iris suture forceps removing the lens. (K) Iris suture forceps removing the hyaloid and vitreous. (L) Final dissected and cleaned retina. All dissection steps are performed under a stereomicroscope (Leica EZ4 W).
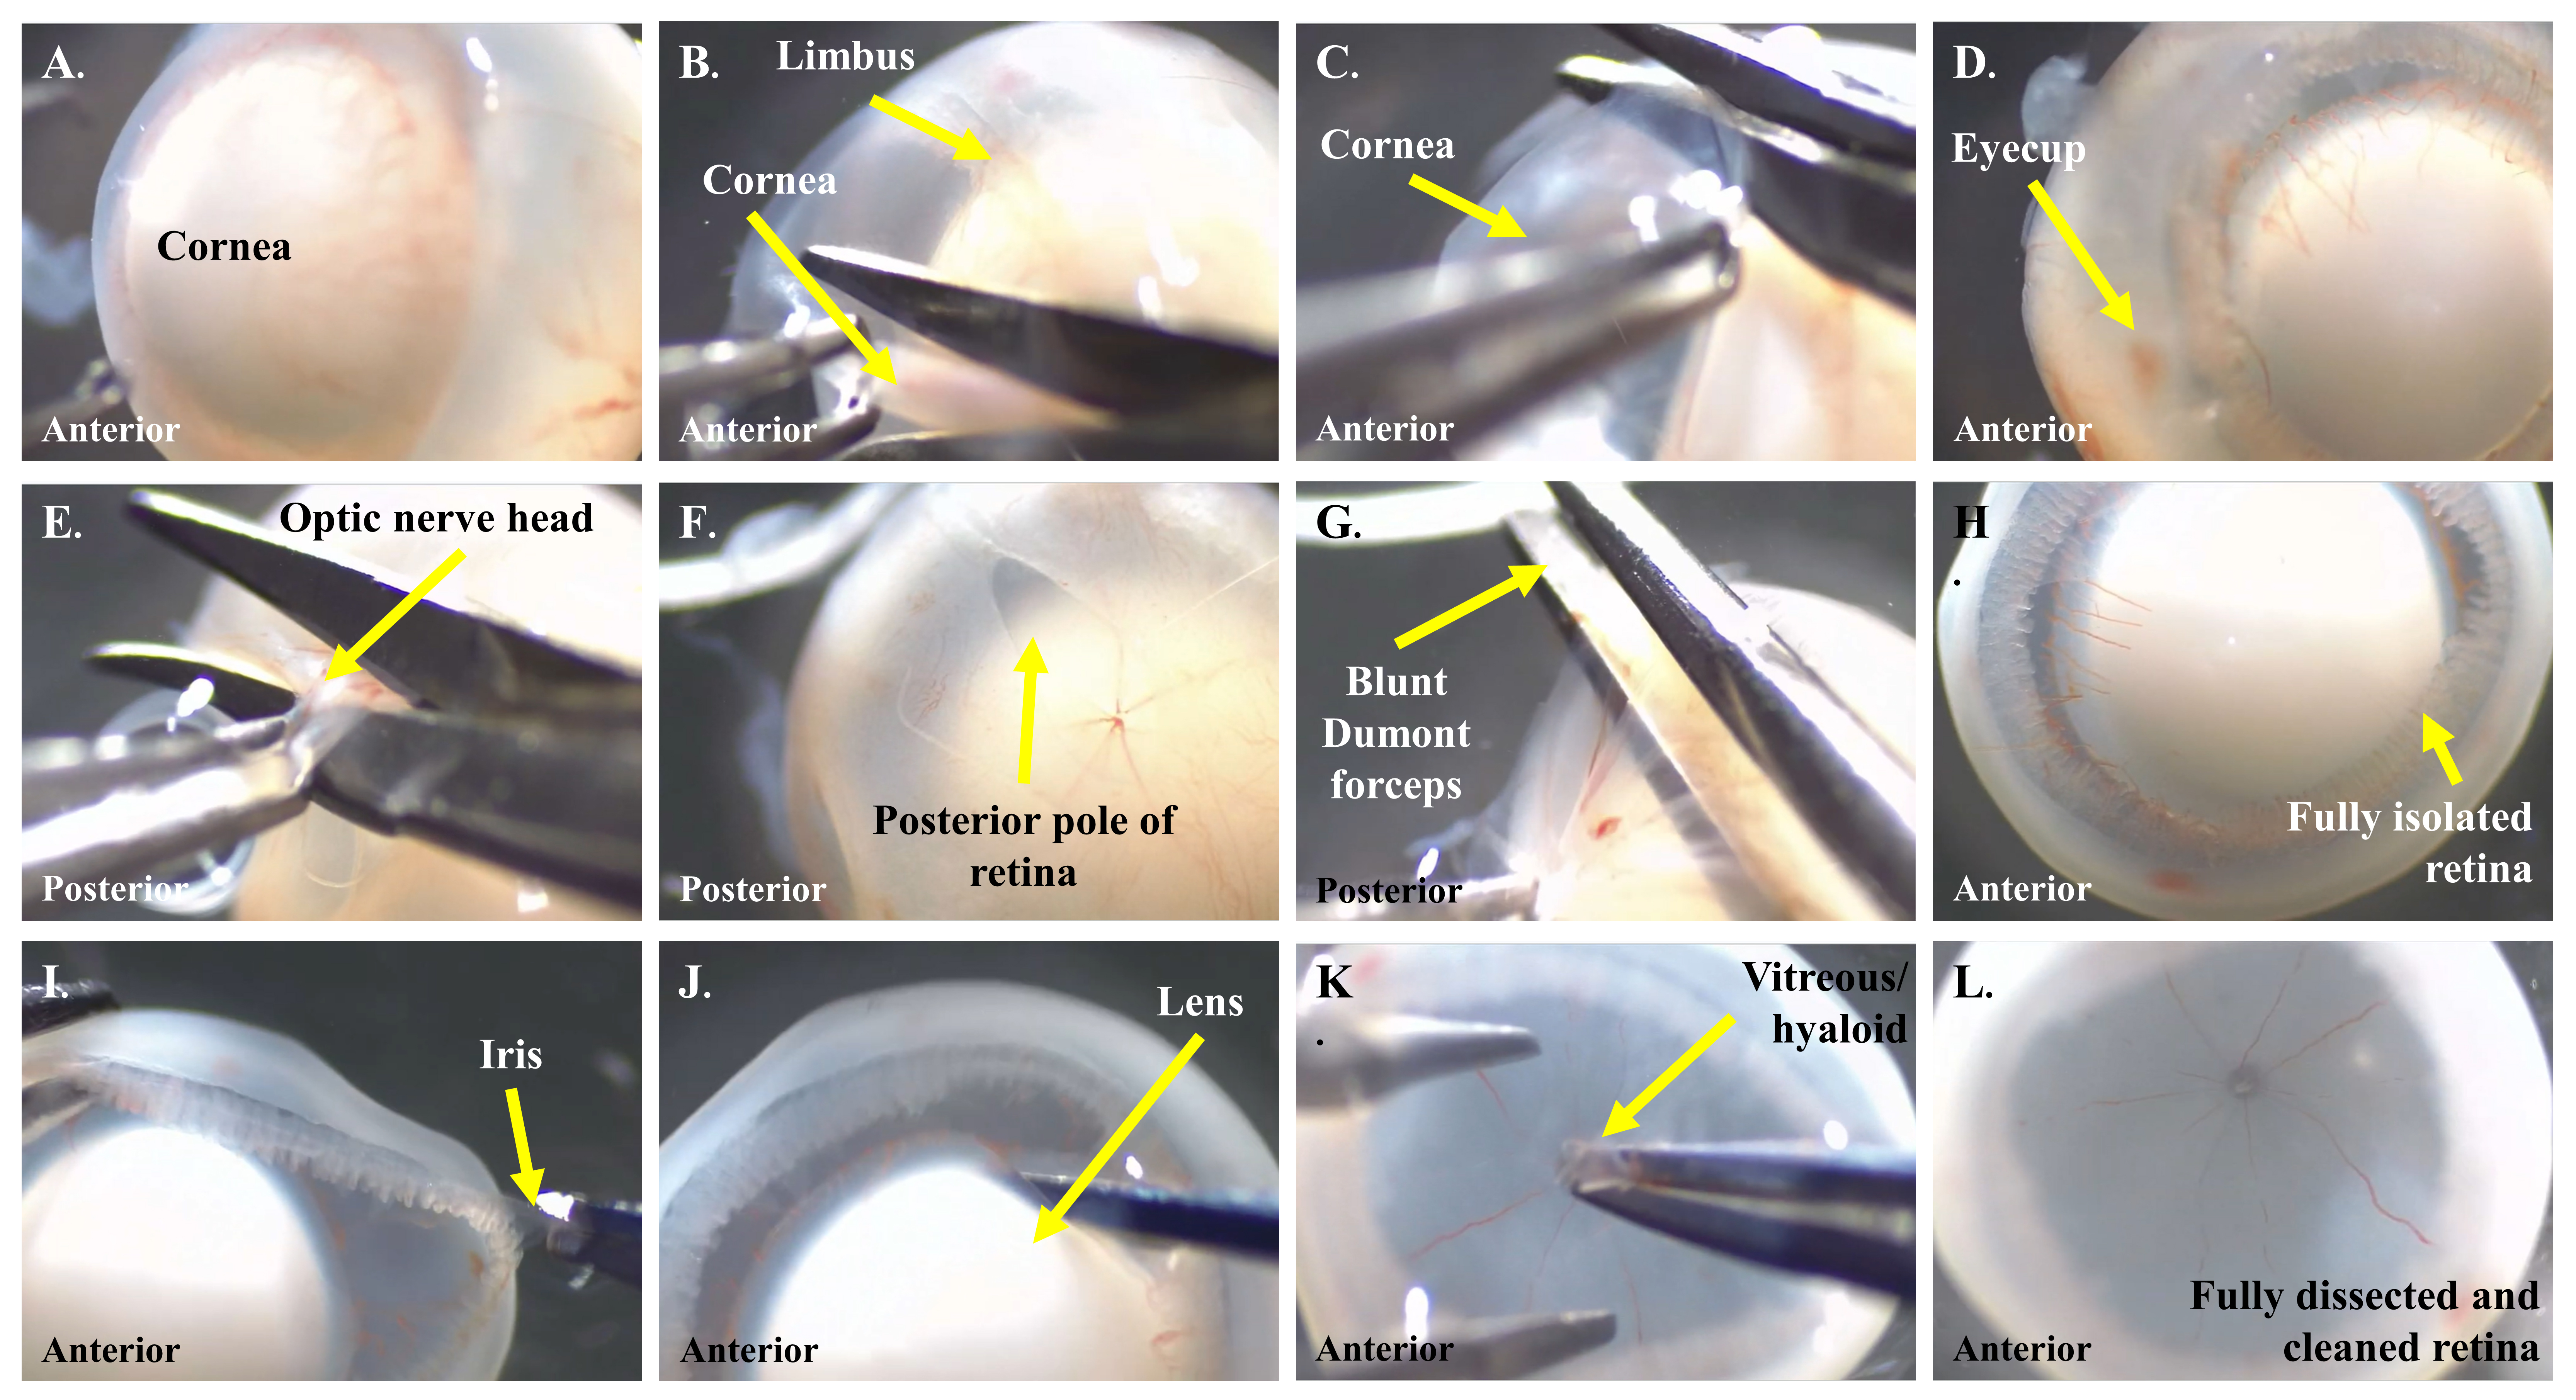
Figure 2. Rat retinal dissection. The albino rat eye lacks pigmentation; however, the dissection procedure is similar to that of mice (see Figure 1). (A) Eye in PBS. (B) Circumferential incision. (C) Cornea removal. (D) Eyecup. (E) Posterior incision. (F) Completed incision. (G) Retina separation. (H) Isolated retina. (I) Trim anterior tissue. (J) Lens removal. (K) Vitreous removal. (L) Final retina.

C1. Triamcinolone-assisted vitreous visualization (Optional)
Incomplete vitreous removal reduces antibody penetration and increases imaging artifacts due to trapped debris and precipitates that appear as nonspecific staining. Triamcinolone acetonide may be used to help visualize the transparent vitreous and facilitate complete removal (Figure 3). In our experience, triamcinolone was used to help train new laboratory members in removing the vitreous.
Note: Triamcinolone is added, and the vitreous/hyaloid is removed, before separating the neural retina from the sclera/RPE/choroid complex, as the dark pigmentation of this tissue provides contrast for visualizing the white triamcinolone crystals. However, if using albino rats, the unpigmented sclera/RPE/choroid complex is transparent, making visualization of the triamcinolone-coated vitreous difficult.
1. Apply ~50–100 μL to the retinal surface for ~30 s.
2. Rinse at least twice with 1× PBS before proceeding.
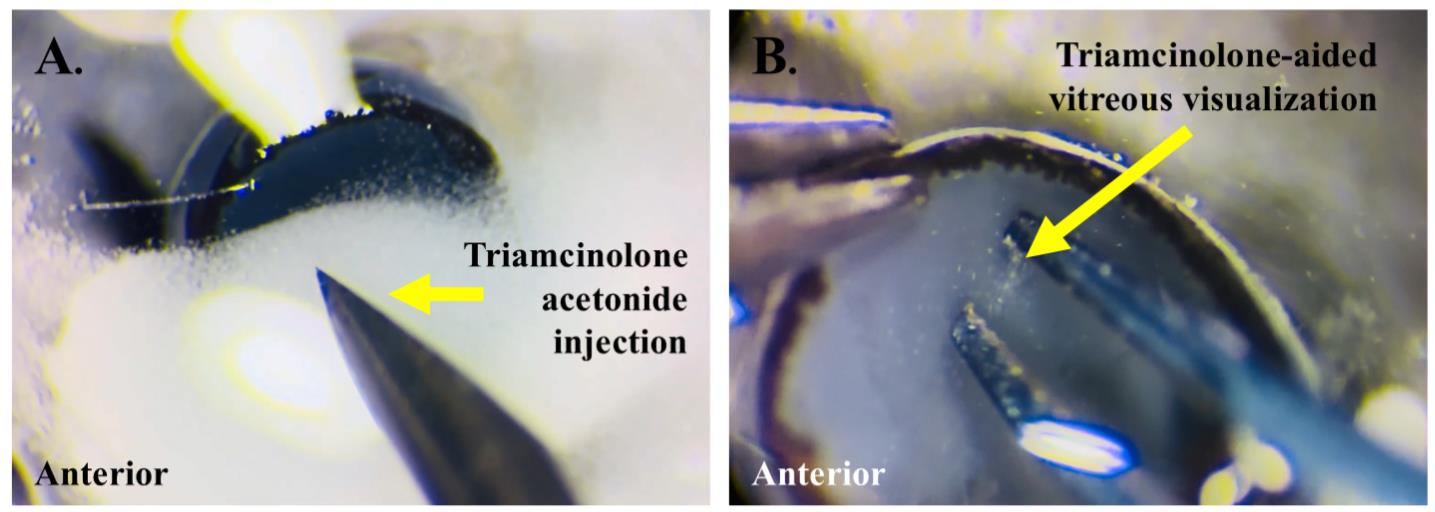
Figure 3. Enhanced vitreous removal via triamcinolone-assisted visualization. (A) Representative image depicting triamcinolone acetonide placement into the posterior eyecup. (B) Triamcinolone-stained vitreous removed by iris suture forceps.
D. Isolectin staining of retinal flat mounts
1. Staining preparation: Place each retina in an individual well (e.g., 96-well plate) containing 100–300 μL of 1× PBS.
2. Blocking/permeabilization: Remove 1× PBS and incubate retinas in 100 μL of blocking buffer for ≥1 h at room temperature with gentle rocking.
Note: Prepare fresh buffer daily to improve staining quality.
3. Isolectin incubation:
a. Prepare lectin staining solution.
b. Remove blocking buffer and incubate retinas in 100 μL of lectin staining solution overnight (12–18 h) at 4 °C with gentle rocking, protected from light.
4. The next day, wash retinas in 100–300 μL of 1× PBS at least three times for ≥10 min each at room temperature with gentle rocking, protected from light.
E. Flat mounting of retinas
1. Using a transfer pipette, transfer the stained retina, vitreous side facing upward, onto a Superfrost Plus slide with a small volume of 1× PBS.
2. Make four equidistant radial relief cuts from the periphery toward (but not through) the optic nerve head to form four petals.
3. Use a Kimwipe to gently wick away excess PBS from around (not on top of) the tissue.
4. Gently flatten each flap against the slide so the retina lies as a single layer with minimal folds. Orient the retina with the RPE side against the slide and the retinal ganglion cell (RGC) layer facing up.
Note: If needed, use a Kimwipe to wick fluid at the edge of the tissue to help the petal lay flat.
5. Add mounting medium:
a. Apply 35–60 μL of mounting medium on a coverslip (22 mm × 22 mm per retina).
b. Gently lower the coverslip so that the drop of mounting medium contacts the flat-mounted retina and spreads evenly, displacing any air bubbles.
6. Place a ~10-g weight centered on the coverslip to flatten the retina and displace bubbles away from the retina.
7. Store slides protected from light with the weight in place until the mounting media is dry.
Notes:
1. We usually wait ~30 min until the mounting media has sufficiently dried for the weight to be removed.
2. Peripheral bubbles may be acceptable; bubbles overlying vascular regions used for quantification might warrant exclusion. In our experience, using a larger volume of mounting medium (~60 μL) and ensuring it directly contacts the tissue during coverslip placement minimizes air bubble formation on the retina. Eyes/retinas with dissection errors that prevent accurate quantification (e.g., major tears, missing large retinal regions, severe folds, or artifacts obscuring AVA/IVNV) may be excluded.
F. Imaging (whole-retina stitched images)
Note: Image each retina under identical settings when possible.
1. Use a Keyence BZ-X800 fluorescence microscope (or equivalent) to acquire a whole-retina tile scan.
2. Objective: 11× (or similar magnification as configured by the microscope system being used).
3. Exposure (typical for isolectin AF488): 1/25 s (adjust only if required to avoid pixel-level saturation).
4. Z-stacking: define upper and lower imaging limits for depth by scrolling through the different vascular layers.
5. Stitching: 7 × 7 grid using Keyence stitching function.
6. Save the stitched image as a TIFF (preferably 16-bit) with a consistent naming convention, for example: Species_Model_Timepoint_LitterID_AnimalID_Eye(R/L)_Date.tif.
7. Use BZ-X800 OME-TIFF Converter software to generate standardized file types with preserved metadata, enabling downstream stitching and analysis in Fiji (ImageJ).
8. Individual tiles are automatically detected, organized into grids, and stitched using the Grid/Collection StitchingFiji (ImageJ) plugin with linear blending and subpixel alignment.
9. Stitched images are split into individual channels, assigned pseudo-colors, and subjected to maximum intensity projection.
10. Final composite images are generated by merging channels and saved for quantification.
11. Quality control:
a. Exclude images with major tears through the optic nerve head region, large folds obscuring substantial retina, widespread staining failure, or bubbles obscuring quantification regions.
b. Record exclusions and document reason.
Data analysis
A. Quantification of total retina (TR), avascular area (AVA), and IVNV in Fiji (ImageJ)
A1. File setup
1. Open the stitched TIFF image in Fiji (File → Open).
2. Confirm spatial scale metadata is present; if not, set scale using microscope calibration.
3. If needed for visualization only, adjust brightness/contrast (Ctrl+Shift+C on Windows or Command+Shift+C on Mac) as needed.
Note: Avoid over exposing pixels in vascular regions used for quantification; if exposure differs from previous experiments, record exposure time in the filename or metadata log.
A2. Total retina (TR) region of interest (ROI)
1. Using the Wand (tracing) tool or Freehand/Polygon selection:
a. Outline the entire retinal boundary (include all four petals) (Figure 4B, H).
2. Add the selection using keyboard shortcuts (t or Ctrl+t) to the Region of Interest (ROI) Manager in ImageJ and rename as total retina (TR).
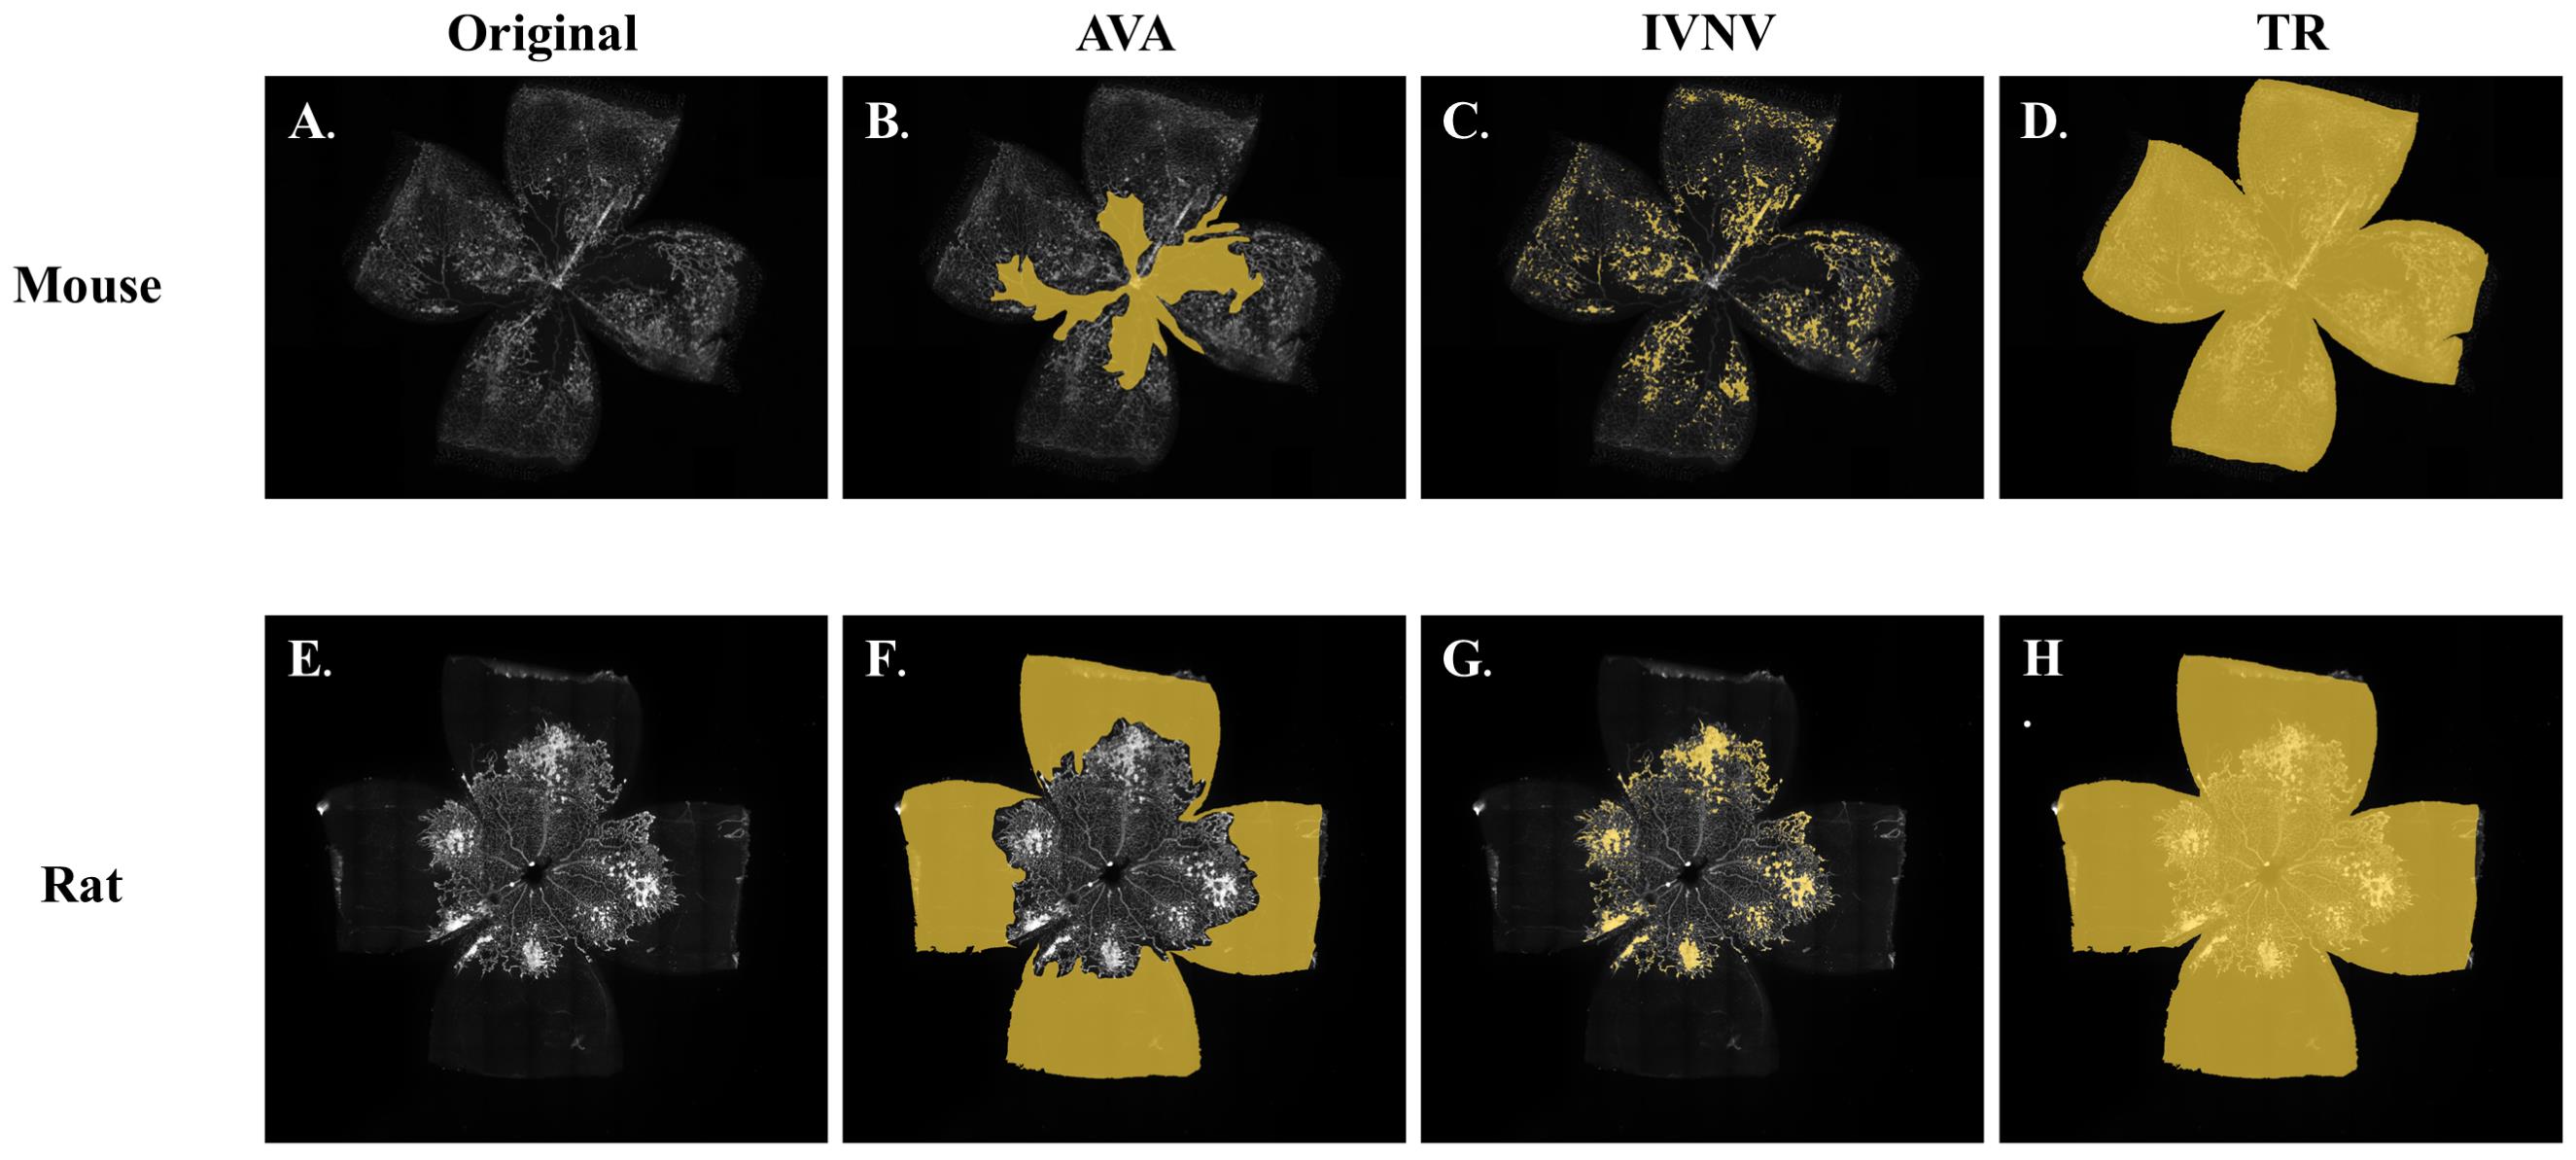
Figure 4. Representative retinal flat mount images from mouse and rat oxygen-induced retinopathy (OIR) models marked for vascular features of interest. Yellow color overlays indicate regions of interest (ROIs) used for quantitative analysis. (A–D) Mouse OIR. (A) Lectin-stained retinal flat-mount image (original). (B) Avascular area (AVA) marked within the central region of the retina. (C) Intravitreal neovascularization (IVNV) highlighted across the retina. (D) Total retinal area (TR) encompassing the entire flat mount. (E–H) Rat OIR. (E) Original flat-mount image. (F) AVA marked within the peripheral region of the retina. (G) Intravitreal neovascularization (IVNV) highlighted across the retina. (H) Total retinal area (TR) encompassing the entire flat mount.
A3. Avascular area (AVA) ROI
1. Identify the avascular retina based on the absence of lectin-positive vessels.
a. Mouse: AVA is typically central (Figure 4B).
b. Rat: AVA/delayed vascularization is often peripheral (Figure 4F).
2. Trace the avascular region(s) using the Freehand or Polygon selection tool.
3. Add to ROI Manager using keyboard shortcuts (t or Ctrl + t) in ImageJ and rename as AVA.
A4. IVNV ROIs
1. Reset brightness/contrast, then reduce the maximum until IVNV tufts are clearly distinguishable from in-plane vessels.
2. Identify IVNV based on morphology (Figure 4C, G).
Note: Exclude large in-plane vessels and obvious artifacts (e.g., fold edges, debris, hyaloid remnants).
3. Select IVNV by manually outlining each tuft using the Freehand selection tool and add each ROI to the ROI Manager (e.g., IVNV_01, IVNV_02, …) using keyboard shortcuts (t or Ctrl+t).
4. Combine IVNV ROIs (optional): In ROI Manager, select all IVNV_*ROIs and use More → Combine to create a single combined IVNV_totalROI (or keep separate and sum areas in Excel).
A5. Measure and export
1. Configure measurements in Fiji: Navigate to Analyze → Set Measurements and select Area.
2. Measure ROIs: Measure the total retina (TR), avascular area (AVA), and each IVNV ROI (IVNV_*), or the combined IVNV_total ROI if used.
3. Save ROIs: In ROI Manager, select More → Save… and save all ROIs as a .zip file using the same name as the image.
4. Export measurements (Results window) as .csv.
B. Data processing (Excel) and reported outcomes
1. Import ROI area measurements into Excel.
2. For each retina, tabulate:
a. TR_area
b. AVA_area
c. IVNV_area (sum of all IVNV_* if measured individually)
3. Calculate:
a. %AVA = (AVA_area/TR_area) × 100
b. %IVNV = (IVNV_area/TR_area) × 100
4. Recommended minimal reporting table columns:
a. Species, Model, Timepoint, LitterID, AnimalID, Eye (R/L), Biological Sex (if tracked), TR_area, AVA_area, IVNV_area, %AVA, %IVNV, Notes/QC flags.
5. For statistical analysis, we recommend using a mixed effects linear regression model to account for pups nested within the same litter. If both eyes are analyzed, include random effects for eyes nested within the same animal and animals nested within the same litter.
Validation of protocol
Original research papers in which the mouse and rat OIR models were described:
Smith et al. [10]. Oxygen-induced retinopathy in the mouse. Investigative Ophthalmology & Visual Science.
Penn et al. [13]. Oxygen-induced retinopathy in the rat: relationship of retinal nonperfusion to subsequent neovascularization. Investigative Ophthalmology & Visual Science.
General notes and troubleshooting
The mouse OIR and rat 50/10 OIR models are widely used to investigate the pathophysiology of ROP. Their respective strengths and limitations are summarized in Table 1, while common challenges encountered during the protocol and corresponding troubleshooting strategies are provided in Table 2.
Table 1. Strengths and weaknesses of the mouse and rat 50/10 OIR models. Data from both the mouse and rat OIR models provide strong mechanistic insight into ROP.
| Model | Strengths | Weaknesses |
|---|---|---|
| Mouse OIR model | Commonly used and standardized [10]. Models IVNV (phase II) and may translate features seen in aggressive ROP [10]. Used to study molecular mechanisms using transgenic mice (e.g., tamoxifen-inducible Cre-loxP knockout models). | The inner plexus is already vascularized to the peripheral retina at P7, restricting the study of delayed intraretinal vascularization to the peripheral retina. |
| Rat 50/10 OIR model | Commonly used and standardized [9]. Pups are exposed to fluctuating oxygen levels, which mimic oxygen variability observed in preterm infants with severe ROP [13]. Models delayed intraretinal vascularization toward the peripheral retina, resulting in both peripheral avascular retina (phase I) and IVNV (phase II) [9] Rat pups demonstrate reduced weight gain due to litter size restriction (12–16 pups per litter) [12], a known risk factor for severe ROP in humans [14] | Time-intensive and sensitive. Rat pups must be placed into the OIR model within 4–6 h after birth. Difficult to study molecular mechanisms, but can be addressed using cell type–specific knockdown of signaling effectors by lentivirus-mediated shRNA expression in a microRNA context [15–17]. Intravitreal pharmacologic agents are used, but affects signaling in multiple retinal cell types |
Table 2. Common problems and solutions. Troubleshooting guide for addressing issues encountered during tissue fixation, permeabilization, dissection, mounting, and imaging of retinal vasculature with lectin staining.
| Problem | Possible causes | Solutions |
|---|---|---|
| Weak lectin signal | Under-fixation, incomplete permeabilization, old lectin | Confirm 4% PFA fixation time; ensure 0.5% Triton in block; prepare fresh buffers and lectin dilution; extend incubation to 18 h |
| High background | Insufficient washes, tissue damage, possible over-fixation | Increase PBS wash number/duration; ensure gentle handling; add an additional blocking step; optimize fixation duration |
| Retina tears during dissection | Tissue dried, excessive traction | Keep submerged; use minimal force; slow separation of layers near optic nerve head |
| Folds after mounting | Incomplete relief cuts, too much fluid under tissue | Ensure four radial cuts; wick PBS thoroughly before mounting; let retina partially adhere before coverslip |
| Bubbles over tissue | Coverslip lowered too fast, insufficient mounting medium | Lower coverslip at an angle; add mounting medium at the edge and allow capillary flow; re-mount if bubbles overlay key regions |
| IVNV difficult to distinguish | Contrast settings inconsistent, hyaloid remnants | Reset brightness/contrast setting before IVNV scoring; improve vitreous removal; use triamcinolone visualization |
Acknowledgments
This work was supported by NIH/NEI R01EY015130 (to M.E.H.), Michael F. Marmor, M.D., endowment for Retinal Science and Disease (to M.E.H.), Alan Adler Pediatric Retina Fund (to M.E.H.), Research to Prevent Blindness Catalyst award (to M.E.H.), Knights Templar Eye Foundation Career Starter Research Grant (to A.R.), VitreoRetinal Surgery Foundation Research Award (to A.R.), R38EY037090 (A.R. appointed as a trainee), NIH/NEI P30EY026877 to Stanford University, and an Unrestricted Grant from Research to Prevent Blindness (to the Department of Ophthalmology and Visual Sciences at Stanford University). This protocol was validated in [17] and [18].
The following figures were created using BioRender: Graphical overview, BioRender.com/3s65ejk.
Competing interests
The authors declare no competing interests.
Ethical considerations
All animal experiments were approved and conducted in accordance with the guidelines of the Administrative Panel on Laboratory Animal Care (Protocol #34371, exp. 11/17/2028) at Stanford University and in compliance with the ARVO Statement for the Use of Animals in Ophthalmic and Vision Research.
References
- Lim, H. W., Pershing, S., Moshfeghi, D. M., Heo, H., Haque, M. E., Lambert, S. R., Pershing, S., Hyman, L., Haller, J. A., Lee, A. Y., et al. (2023). Causes of Childhood Blindness in the United States Using the IRIS® Registry (Intelligent Research in Sight). Ophthalmology. 130(9): 907–913. https://doi.org/10.1016/j.ophtha.2023.04.004
- Ludwig, C. A., Chen, T. A., Hernandez-Boussard, T., Moshfeghi, A. A. and Moshfeghi, D. M. (2017). The Epidemiology of Retinopathy of Prematurity in the United States. Ophthalmic Surgery, Lasers and Imaging Retina 48(7): 553–562. https://doi.org/10.3928/23258160-20170630-06
- Ashton, N., Ward, B. and Serpell, G. (1953). Role of Oxygen in the Genesis of Retrolental Fibroplasia: A Preliminary Report. Br J Ophthalmol. 37(9): 513–520. https://doi.org/10.1136/bjo.37.9.513
- Hartnett, M. E. and Penn, J. S. (2012). Mechanisms and Management of Retinopathy of Prematurity. N Engl J Med. 367(26): 2515–2526. https://doi.org/10.1056/nejmra1208129
- Ashton, N., Ward, B. and Serpell, G. (1954). Effect of Oxygen on Developing Retinal Vessels with Particular Reference to the Problem of Retrolental Fibroplasia. Br J Ophthalmol. 38(7): 397–432. https://doi.org/10.1136/bjo.38.7.397
- Flower, R. W. (1990). Perinatal ocular physiology and ROP in the experimental animal model. Doc Ophthalmol. 74(3): 153–162. https://doi.org/10.1007/bf02482604
- Madan, A. and Penn, J. S. (2003). Animal models of oxygen-induced retinopathy. Front Biosci. 8: d1030–1043. https://doi.org/10.2741/1056
- McLeod, D. S., Brownstein, R. and Lutty, G. A. (1996). Vaso-obliteration in the canine model of oxygen-induced retinopathy. InvestOphthalmol VisSci. 37(2): 300–311.https://pubmed.ncbi.nlm.nih.gov/8603834/
- Penn, J. S., Tolman, B. L. and Henry, M. M. (1994). Oxygen-induced retinopathy in the rat: relationship of retinal nonperfusion to subsequent neovascularization. Invest Ophthalmol Vis Sci. 35(9): 3429–3435. https://pubmed.ncbi.nlm.nih.gov/8056518/
- Smith, L. E., Wesolowski, E., McLellan, A., Kostyk, S. K., D’Amato, R., Sullivan, R. and D’Amore, P. A. (1994). Oxygen-induced retinopathy in the mouse. Invest Ophthalmol Vis Sci. 35(1): 101–111. https://pubmed.ncbi.nlm.nih.gov/7507904/
- Kim, C., D'Amore, P. and Connor, K. (2016). Revisiting the mouse model of oxygen-induced retinopathy. Eye Brain. 8: 67. https://doi.org/10.2147/eb.s94447
- Holmes, J. M. and Duffner, L. A. (1996). The effect of postnatal growth retardation on abnormal neovascularization in the oxygen exposed neonatal rat. Curr Eye Res. 15(4): 403–409. https://doi.org/10.3109/02713689608995831
- Cunningham, S., Mclntosh, N., Fleck, B. and Elton, R. (1995). Transcutaneous oxygen levels in retinopathy of prematurity. Lancet. 346(8988): 1464–1465. https://doi.org/10.1016/s0140-6736(95)92475-2
- Stahl, A., Chen, J., Sapieha, P., Seaward, M. R., Krah, N. M., Dennison, R. J., Favazza, T., Bucher, F., Löfqvist, C., Ong, H., et al. (2010). Postnatal Weight Gain Modifies Severity and Functional Outcome of Oxygen-Induced Proliferative Retinopathy. Am J Pathol. 177(6): 2715–2723. https://doi.org/10.2353/ajpath.2010.100526
- Becker, S., Wang, H., Simmons, A. B., Suwanmanee, T., Stoddard, G. J., Kafri, T. and Hartnett, M. E. (2018). Targeted Knockdown of Overexpressed VEGFA or VEGF164 in Müller cells maintains retinal function by triggering different signaling mechanisms. Sci Rep. 8(1): e1038/s41598–018–20278–4. https://doi.org/10.1038/s41598-018-20278-4
- Ramshekar, A., Asare‐Bediako, B., Nguyen, J., Suresh, A., Simmons, A., Bretz, C. A., Wang, H., Kunz, E., Zaugg, C. J., Wallace‐Carrete, C., et al. (2025). Endothelial MEMO1 Regulates Angiogenic Signaling in a Model of Retinopathy of Prematurity. FASEB Bioadv. 7(9): e2025–00146. https://doi.org/10.1096/fba.2025-00146
- Simmons, A. B., Bretz, C. A., Wang, H., Kunz, E., Hajj, K., Kennedy, C., Yang, Z., Suwanmanee, T., Kafri, T., Hartnett, M. E., et al. (2018). Gene therapy knockdown of VEGFR2 in retinal endothelial cells to treat retinopathy. Angiogenesis. 21(4): 751–764. https://doi.org/10.1007/s10456-018-9618-5
- Bretz, C. A., Ramshekar, A., Kunz, E., Wang, H. and Hartnett, M. E. (2020). Signaling Through the Erythropoietin Receptor Affects Angiogenesis in Retinovascular Disease. Invest Ophthalmol Vis Sci. 61(10): 23. https://doi.org/10.1167/iovs.61.10.23
Article Information
Publication history
Received: Mar 25, 2026
Accepted: Jun 21, 2026
Available online: Jul 7, 2026
Published: Aug 5, 2026
Copyright
© 2026 The Author(s); This is an open access article under the CC BY license (https://creativecommons.org/licenses/by/4.0/).
How to cite
Tankersley, M. P., Beri, S., Ramshekar, A., Asare-Bediako, B., Shah, N. S., Karmoker, J. R., Huang, H. and Hartnett, M. E. (2026). Mouse and Rat Oxygen-Induced Retinopathy Models to Study Vascular Features Seen in Retinopathy of Prematurity. Bio-protocol 16(15): e5771. DOI: 10.21769/BioProtoc.5771.

 Download Citation in RIS Format
Category
Neuroscience > Sensory and motor systems > Retina
Medicine > Ophthalmology
Neuroscience > Basic technology > Tissue dissection
Do you have any questions about this protocol?
Post your question to gather feedback from the community. We will also invite the authors of this article to respond.
 Post a Question


