


- Protocols

- Articles and Issues
- For Authors
- About
- Become a Reviewer


Ex Vivo Assessment of Extracellular Acidification Rate in Murine Intestinal Tissue

(§Technical contact: alexander.lesser@case.edu) Published: Vol 16, Iss 14, Jul 20, 2026 DOI: 10.21769/BioProtoc.5749 Views: 482
Reviewed by: Wendy Leanne HempstockSAPTARSHI MAJIAnonymous reviewer(s)
 PDF
PDF  Ask a question
Original research article
The authors used this protocol in:
Jan 2026
Advertisement


Protocol Collections
Comprehensive collections of detailed, peer-reviewed protocols focusing on specific topics




Abstract
Seahorse metabolic assays are now widely utilized across numerous fields for performing functional assessments of glycolysis and mitochondrial function in adherent or suspension cell culture samples. Seahorse assays measure extracellular acidification rate (ECAR) and oxygen consumption rate (OCR) as a means of assessing glycolysis and mitochondrial function, respectively. Currently, the vast majority of Seahorse metabolic assays are performed using in vitro samples due to the current established standardized method. However, a uniform approach to assess real-time functional measurements of glycolysis and mitochondrial function in ex vivo tissue samples remains elusive. In particular, this protocol was designed to assess glycolysis in ex vivo murine intestinal samples through ECAR measurements using the Agilent Seahorse XFe24 platform with corresponding Islet Capture microplates and screens. This protocol was developed to provide functional measurements of glycolytic metabolism in murine intestinal tissue samples. This protocol details a method to assess glycolysis in tissue samples and represents the next stage of ex vivo metabolic methods to complement existing standardized in vitro approaches. While this protocol was developed to assess ECAR in ex vivo murine intestinal samples, the same approach can be applied to assessing mitochondrial respiration through measurements of OCR in other tissue types. Overall, this protocol expands the purview of Seahorse metabolic assays through the inclusion of tissue samples and provides the framework to interrogate organ-level metabolism in the context of systemic nutrient metabolism and physiology.
Key features
• Protocol for applying Seahorse metabolic assays to tissue samples.
• Specifically designed to assess glycolysis through extracellular acidification rate (ECAR) in ex vivo murine intestinal samples.
• Provides functional metabolism data to complement gene and protein expression data.
• Protocol can be adapted to measure mitochondrial function through assessments of oxygen consumption rate (OCR) in other tissue types.
Keywords: Tissue Seahorse
Glycolysis
Extracellular acidification rate
Metabolism
Intestine
Murine
Oxygen
Seahorse
Glycolysis
Extracellular acidification rate
Metabolism
Intestine
Murine
Oxygen
Graphical overview
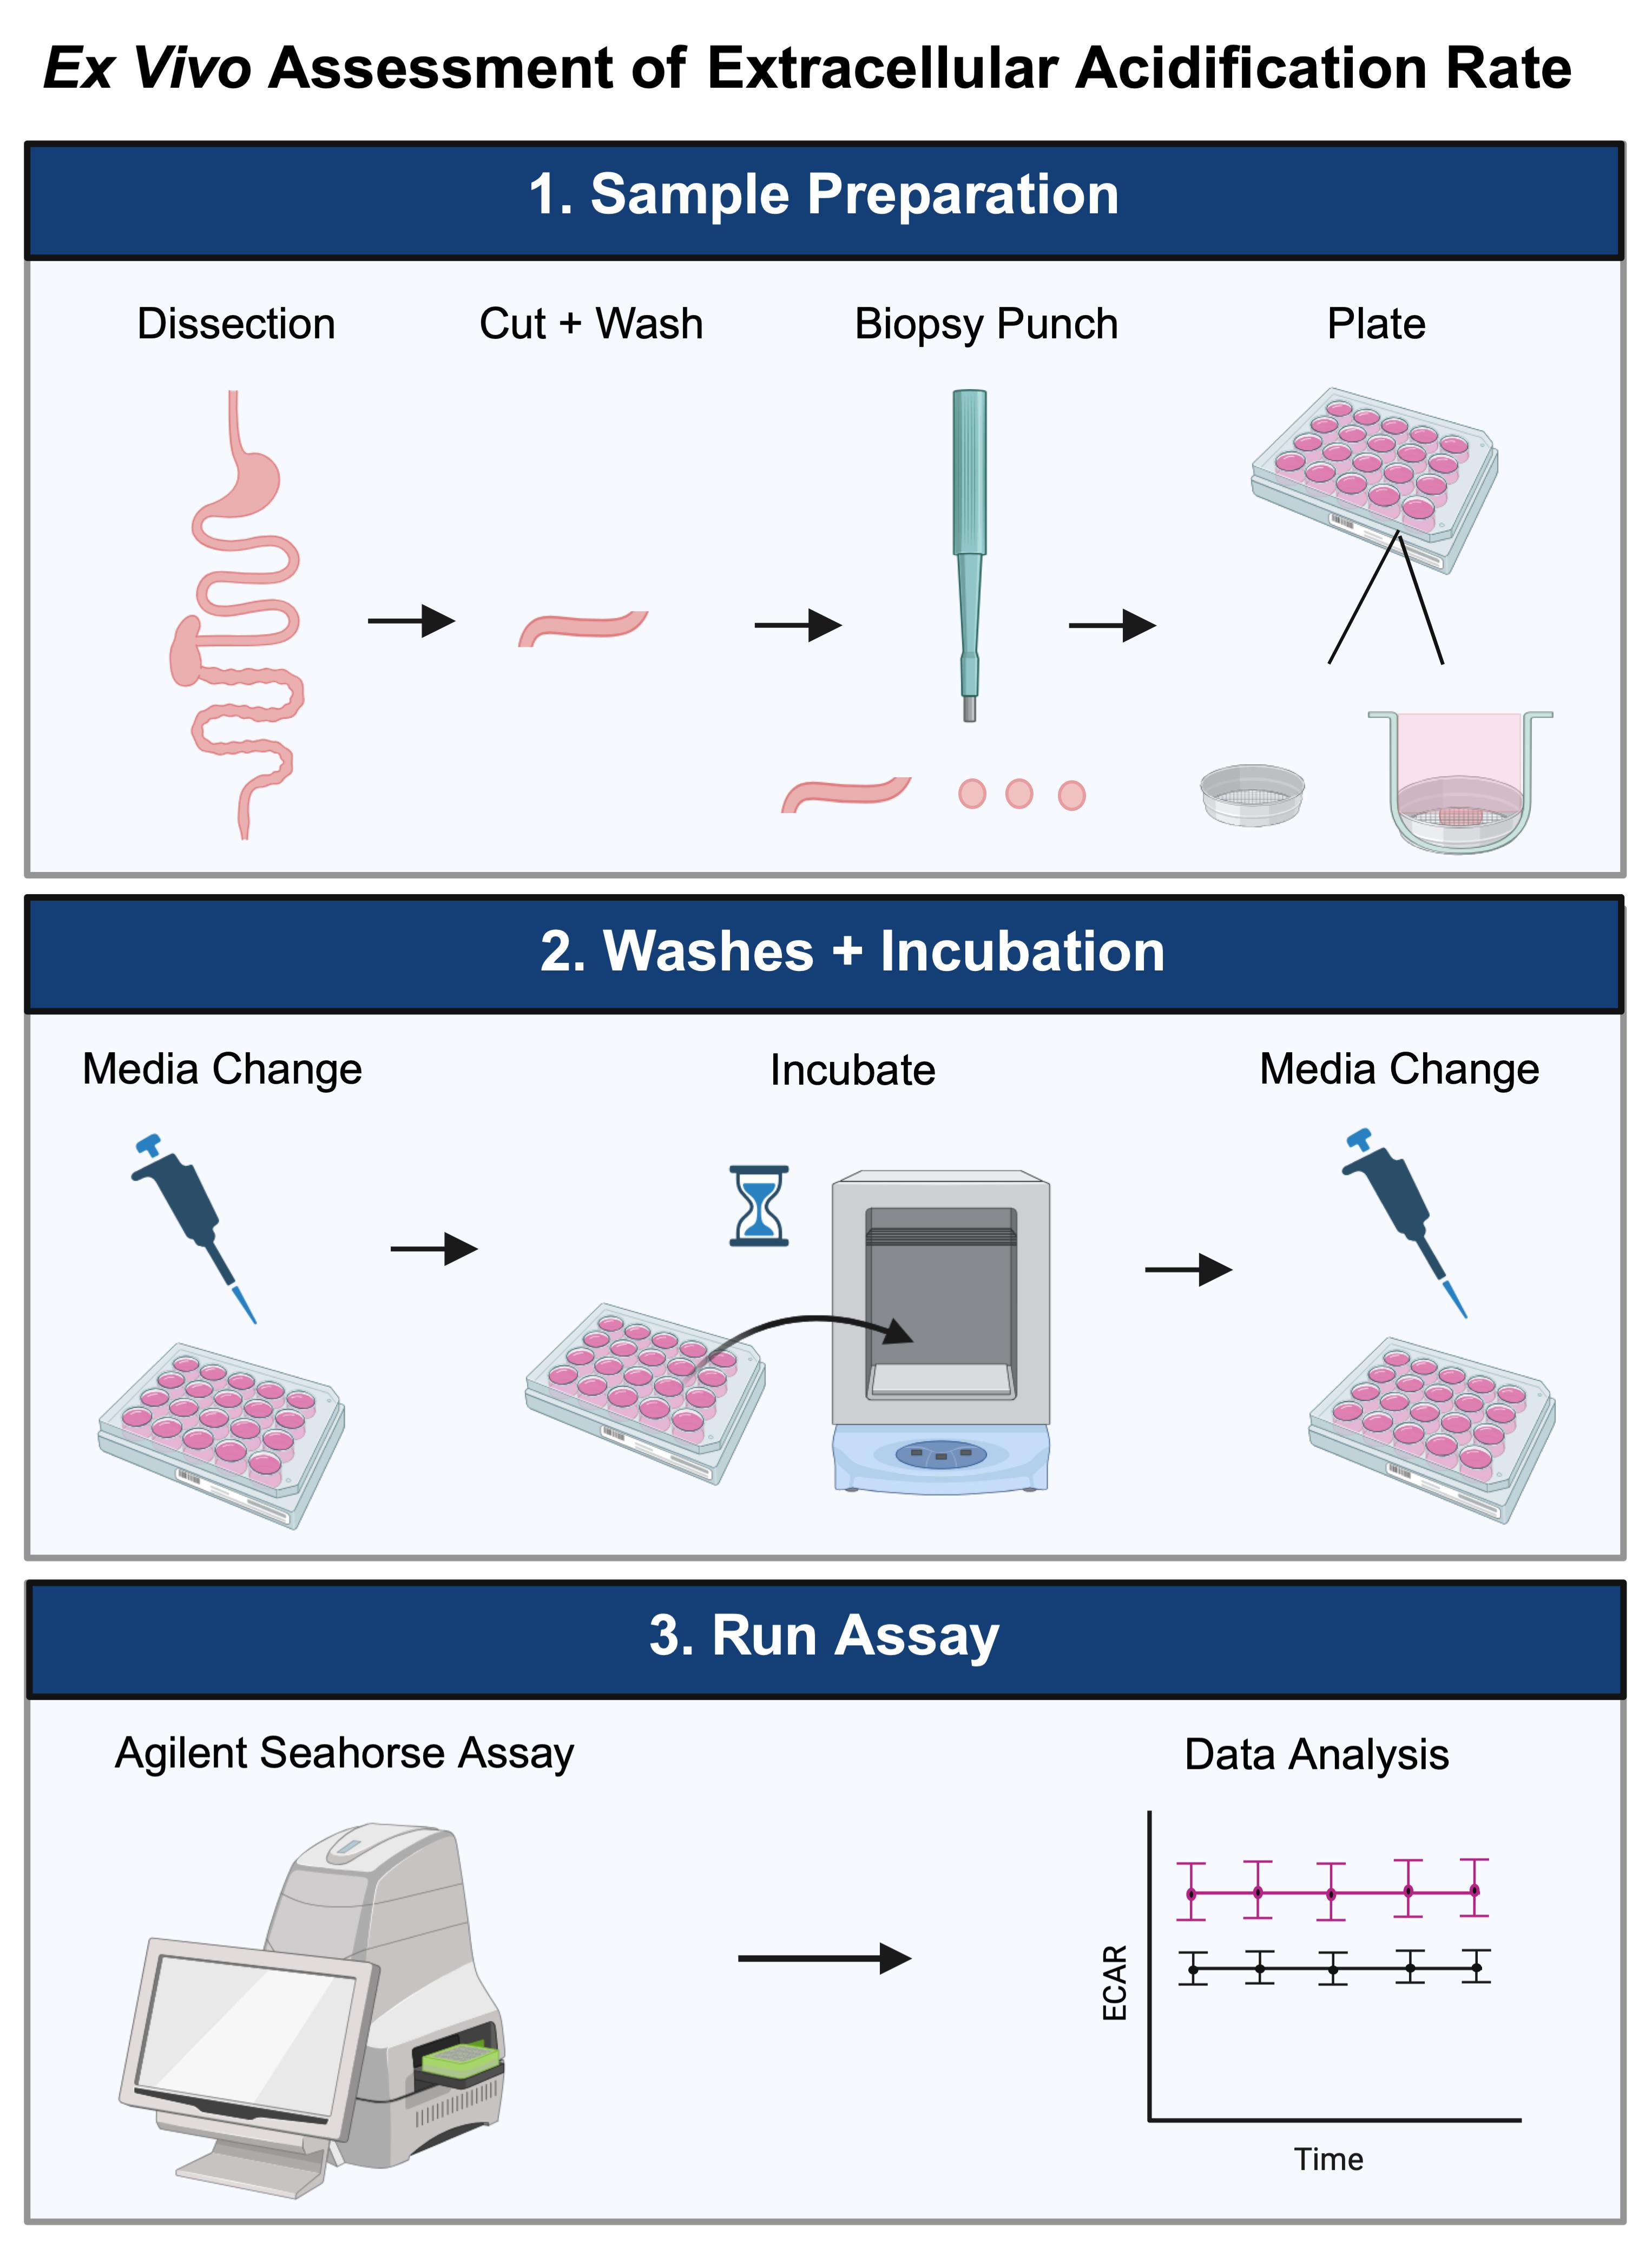
Overview of ex vivo assessment of extracellular acidification rate in murine intestinal tissue
Background
Seahorse metabolic assays have been widely adopted across numerous fields, spanning immunology, cancer, genetics, neuroscience, pharmacology, and others, to provide real-time measurements of cellular metabolism in live cells. Seahorse assays offer a standardized method to interrogate glycolysis and mitochondrial function through assessments of extracellular acidification rate (ECAR) and oxygen consumption rate (OCR), respectively. Extracellular acidification rate is calculated from changes in pH over time that reflect differences in proton efflux to act as a surrogate for glycolysis measurements. Oxygen consumption rate is determined through measurements of dissolved oxygen levels and reflects mitochondrial respiration. pH changes and oxygen levels are measured by sensor probes within the Seahorse Bioanalyzer every few seconds directly above the cell monolayer in standard assays. The vast majority of Seahorse metabolic studies are performed using in vitro samples due to existing standardized approaches for adherent or suspension cell culture samples. However, the ability to assess ECAR and OCR in ex vivo tissue samples broadens the scope of Seahorse assays to better assess organ-level metabolism, as it pertains to systemic energy utilization and physiology in a manner beyond cell culture.
Several groups have performed Seahorse assays in various tissue types, ranging from intestine to brown and white adipose tissue, the retina, and the hippocampus [1–6]. However, a uniform approach does not exist for using ex vivo tissue samples for Seahorse experiments. Various sample preparation methods have been employed, including using 200–300 µm slices and various size biopsy punches to generate uniform sample sizes with and without tissue mincing [1–6]. Current ex vivo methods have focused primarily on assessing basal oxygen consumption rate and adapting the Mito Stress assay for interrogating mitochondrial function for tissue samples [2–6]. The majority of publications utilized the Agilent XF24 well platform and the corresponding Islet Capture screens, as it provides an established existing framework to hold the tissue samples in place [1–4,6].
In particular, this protocol was designed to measure the extracellular acidification rate of ex vivo murine intestinal samples. In short, our work first identified an increased in vivo glucose uptake from the blood supply to the cystic fibrosis (CF) mouse intestine [1]. Transcriptional and protein-level evidence indicated an enrichment of glycolysis gene expression and increased protein expression of glucose transport and glycolytic enzymes in the CF intestine [1]. This protocol was designed as a functional approach to assess glycolysis in ex vivo intestinal samples. In particular, this approach utilizes the Agilent Seahorse XFe24 platform with Islet Capture microplates and corresponding Islet Capture screens to hold tissue pieces in place.
This ex vivo approach expands beyond the current in vitro methods and allows for functional assessments of metabolism in tissue samples. While this method was specifically designed for assessing extracellular acidification rate in ex vivo murine intestinal samples, the same approach can be applied to other tissue types to interrogate other metabolic processes. For instance, the current method can be modified to assess mitochondrial function through measurements of OCR in numerous tissue types. Overall, this protocol broadens the scope of Seahorse metabolic assays to include tissue samples to establish a framework for better assessing organ-level metabolism in the context of systemic nutrient metabolism and physiology.
Materials and reagents
Biological materials
1. Wildtype mice (C57BL/6J background), approximately 8–12 weeks of age
Reagents
1. DMEM low glucose, pyruvate (Gibco, catalog number: 11885-084)
2. HEPES (4-(2-hydroxyethyl)-1-piperazineethanesulfonic acid) (Sigma, catalog number: H4034)
3. D-(+)-glucose (Sigma, catalog number: G8270)
4. Glycolytic rate media (Agilent, catalog number: 103575-100)
5. D-(+)-glucose solution (Sigma, catalog number: G8769)
6. Sodium pyruvate solution (Sigma, catalog number: S8636)
7. L-glutamine solution (Sigma, catalog number: G7513)
8. XF calibrant (Agilent, catalog number: 100840-000)
9. 1× phosphate-buffered saline (PBS) (Gibco, catalog number: 20012-027)
10. 70% ethanol (prepared with Koptec, catalog number: V1101)
Solutions
1. Wash media (see Recipes)
2. Assay media (see Recipes)
Recipes
1. Wash media
| Reagent | Final concentration | Quantity or volume |
|---|---|---|
| DMEM low glucose, pyruvate | 5.56 mM glucose 1.0 mM sodium pyruvate 4.0 mM L-glutamine | 500 mL |
| HEPES | 25 mM | 2.98 g |
| D-(+)-glucose (powder) | 25 mM (total glucose) | 1.75 g |
2. Assay media
| Reagent | Final concentration | Quantity or volume |
|---|---|---|
| Glycolytic rate media (DMEM-based, pH adjusted to 7.4, with 5 mM HEPES, no phenol red) | 45 mL | |
| D-(+)-glucose solution | 17.5 mM | 316 μL |
| Sodium pyruvate solution | 1 mM | 450 μL |
| L-glutamine solution | 4.0 mM | 900 μL |
Laboratory supplies
1. Seahorse XFe24 FluxPak (Agilent, catalog number: 102340-100)
2. Seahorse XF24 Islet Capture microplates (Agilent, catalog number: 101122-100)
3. Seahorse XF Islet Capture screen insert tool (Agilent, catalog number: 101135-100)
4. 2 mm Harris Uni-Core biopsy puncher (Harris, catalog number: 7093508, included in Sigma, WHAWB100029)
5. Well tech cutting mat, small (included in Sigma, WHAWB100029)
6. Flat-headed forceps (Fine Scientific Tools, catalog number: 18025-10)
7. Dissecting scissors (Fine Scientific Tools, catalog number: 14058-09)
8. Curved forceps (Fine Scientific Tools, catalog number: 11272-40)
9. 6 cm Petri dish (Falcon, catalog number: 353002)
10. 12-well plates (Corning, catalog number: 3513)
11. Medi-Vac Guardian Canister (Cardinal Health, catalog number: 65651-395)
12. Glass Pasteur pipettes (Fisher Scientific, catalog number: 13-678-20C)
13. 50 mL conical tubes (Falcon, catalog number: 352098)
14. 1,000 μL tips (Thomas Scientific, catalog number: 1159M42 or P1126)
15. Kimwipes (KimTech, catalog number: 34120)
16. 25 mL serological pipettes (VistaLab, catalog number: 4090-0025)
17. Rectangular ice pan, Maxi 9 L (Corning, catalog number: 07210094)
Equipment
1. Seahorse XFe24 Analyzer and Controller (Agilent, catalog number: S7801A)
2. MyTemp Mini Digital Incubator (non-CO2 incubator) (Benchmark, catalog number: H2200-H)
3. Isotemp Digital Waterbath (Fisher Scientific, catalog number: 2320)
4. Gilson P1000 Pipette (Pipetman, catalog number: HA53667)
5. Pipetaid (Drummond, catalog number: 4-000-100)
6. Vacuum connection
7. Relevant institution approved murine euthanasia equipment/method (i.e., isoflurane, bell jar, gauze pads)
Software and datasets
1. Wave Desktop Software (Agilent, V2.6.4.24)
2. Prism (GraphPad, 10.3.0)
Procedure
A. Hydration of cartridge (day before the experiment)
Note: Individual sensor cartridges are included within the Seahorse XFe24 FluxPak component and depicted in Figure 1.
1. Hydrate the Agilent Seahorse XF Sensor Cartridge.
a. Remove the lid, green Sensor cartridge, and red Hydration Booster and place them upside down with the sensor probes pointing up.
b. Add 1 mL of XF calibrant to each well of the Seahorse Utility Plate.
c. Reassemble the sensor cartridge such that the sensor probes are submerged within the XF calibrant in each well.
d. Incubate at 37 °C overnight in a non-CO2 incubator.
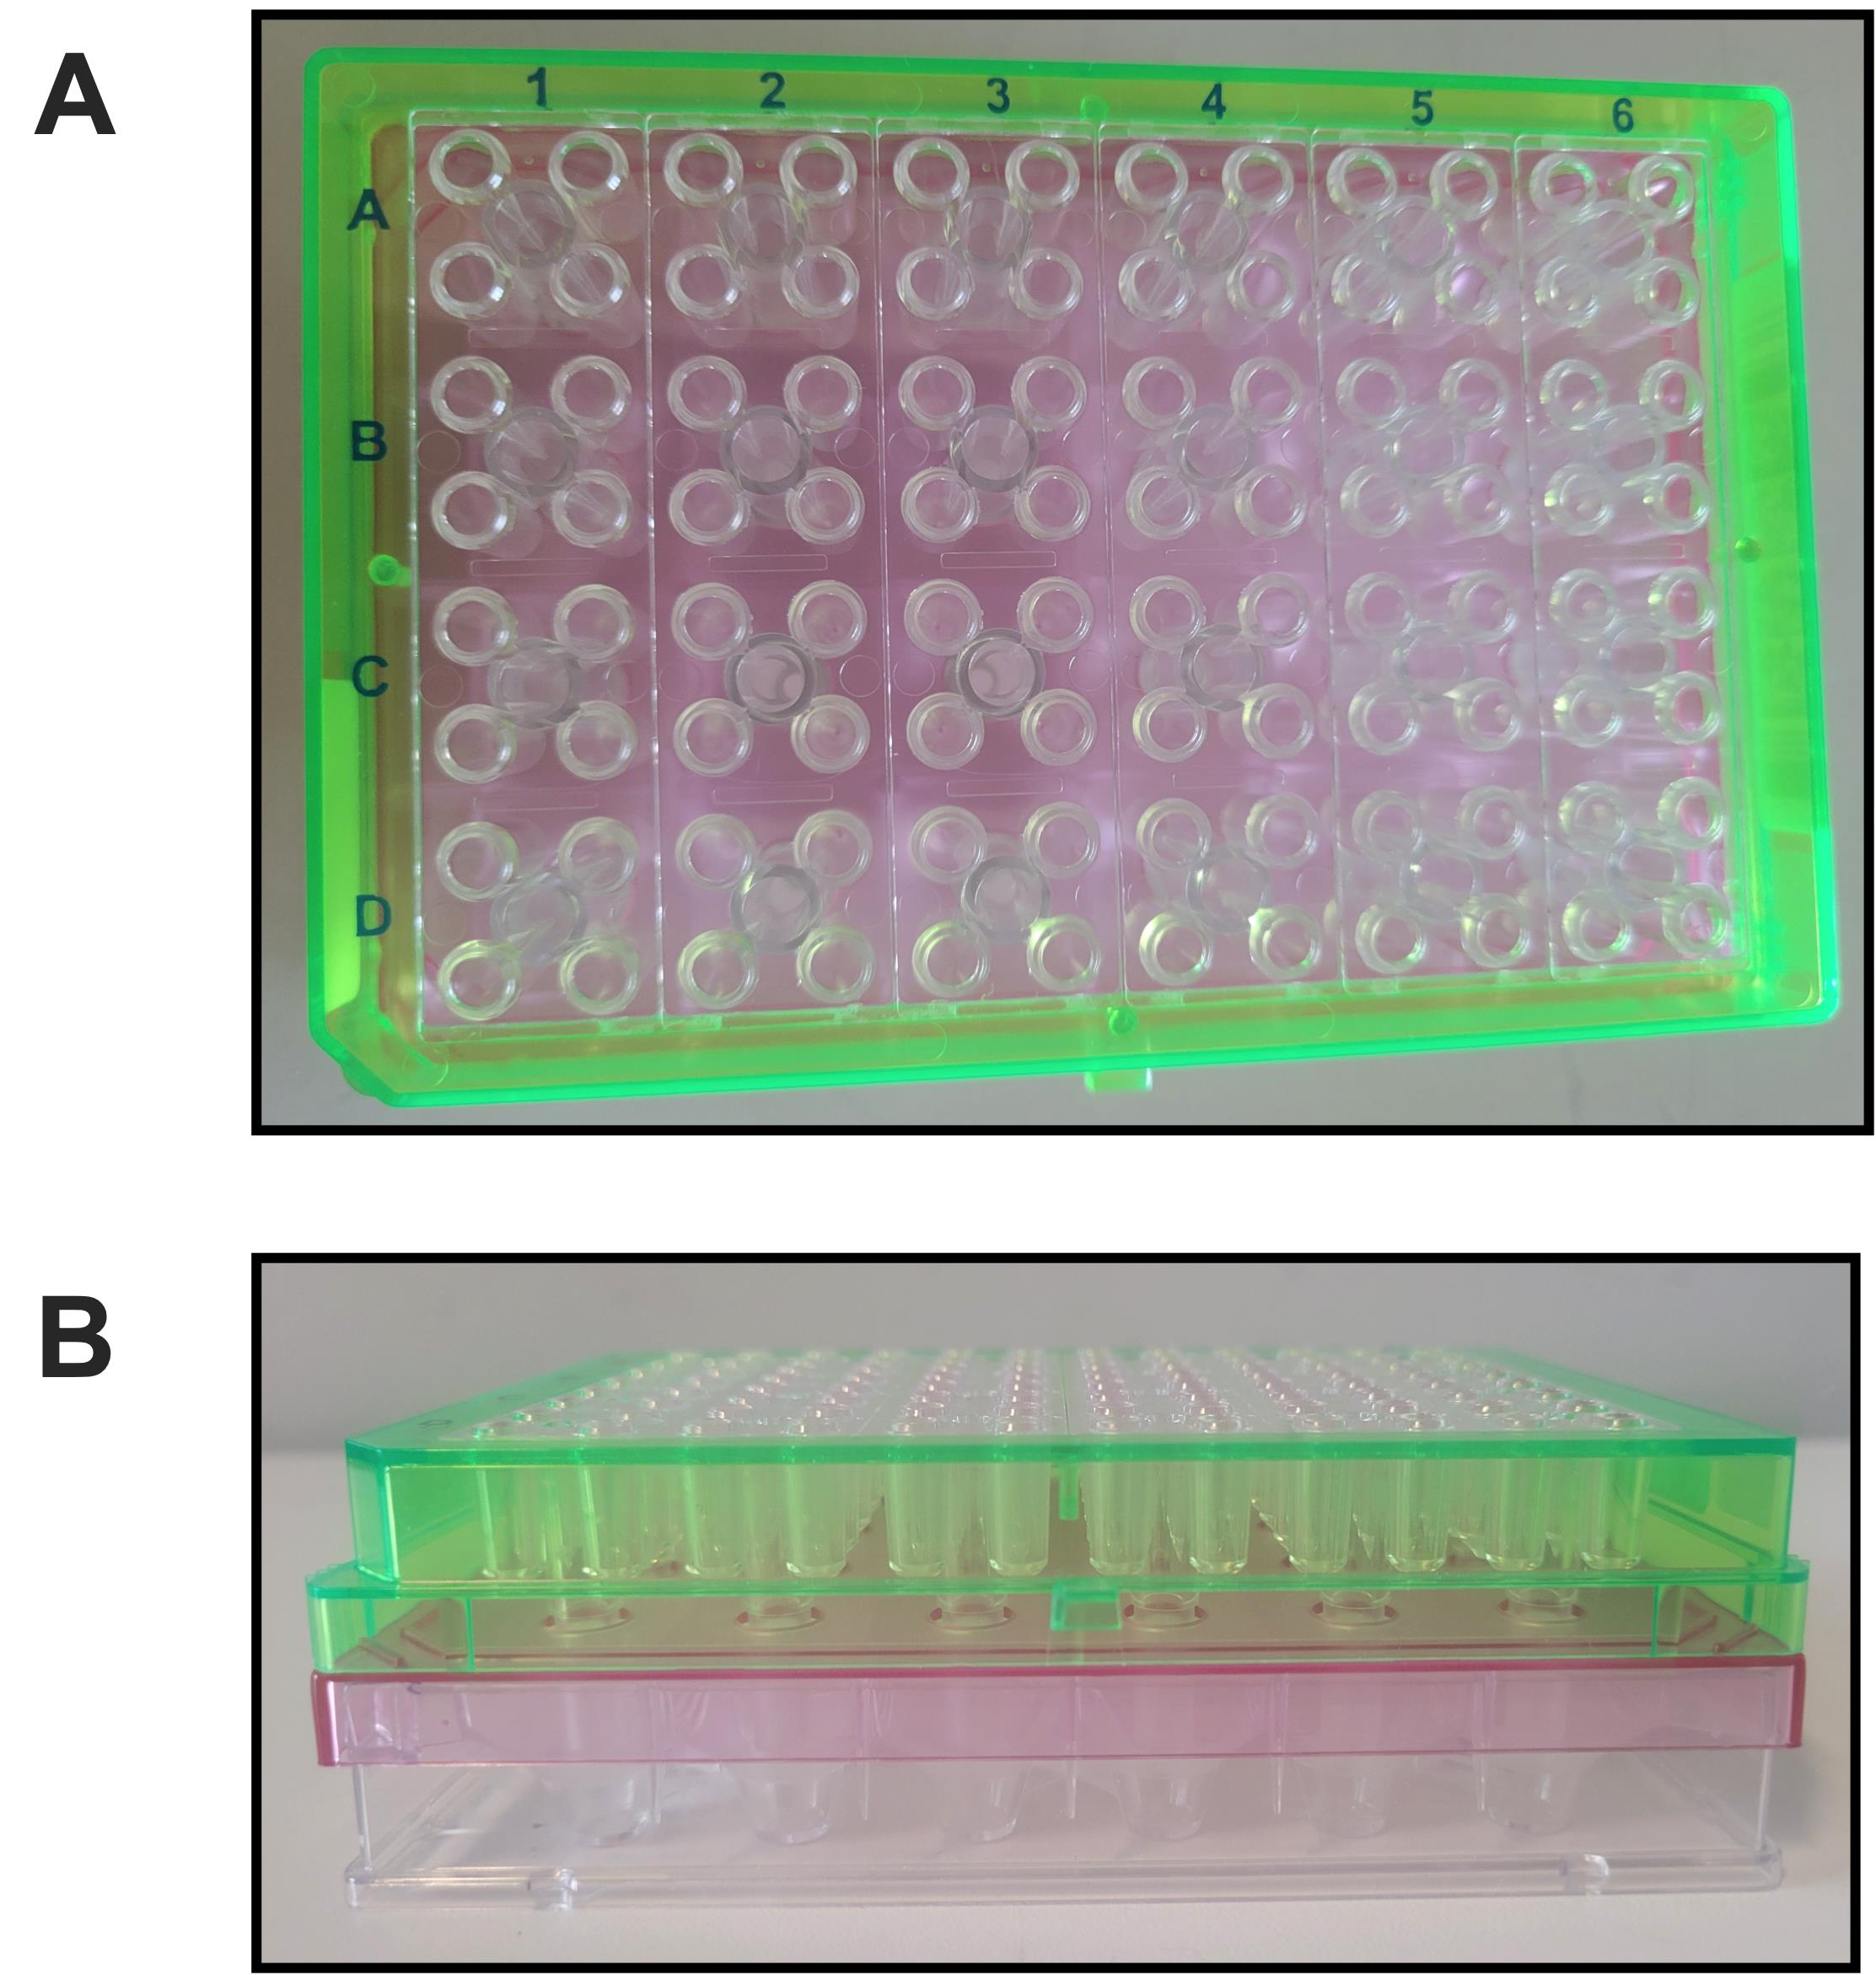
Figure 1. Agilent Seahorse Sensor Cartridge and Utility Plate. (A) Top view of Agilent 24-well Sensor Cartridge and Utility Plate. (B) Side view of Agilent Seahorse Sensor Cartridge and Utility Plate, highlighting the green Sensor Cartridge (top), red Hydration Booster (middle), and clear Seahorse Utility Plate (bottom).
2. (Optional) Prepare wash media (see Recipe 1).
a. Add 2.98 g of HEPES to a 500 mL bottle of DMEM low glucose, pyruvate media.
b Add 1.75 g of glucose to a 500 mL bottle of DMEM low glucose, pyruvate media.
c. Mix until homogeneous by inversion of the closed media bottle.
d. Store at 4 °C.
Note: Wash media can be prepared on the bench top as sterility is not necessary for this protocol, nor is it possible with the Agilent Bioanalyzer. It is recommended to use the wash media within one month of preparation.
B. Preparation prior to sample collection (day of the experiment)
Note: It is important to have the station fully set up and reagents prepared prior to starting, as timing is critical when working with tissue samples to maintain viability. Once the sample preparation part of the protocol begins, there are no pause points.
1. Turn on the Seahorse XFe24 Analyzer and allow it to warm to 37 °C.
a. Press the power switch on the Bioanalyzer.
b. Press the power button on the Controller (computer).
c. Open the Wave software and allow the machine to warm to 37 °C.
Note: The template will be set up later, immediately prior to machine calibration.
2. Prepare wash media or aliquot previously prepared wash media.
a. Prepare wash media (see Recipe 1 and step A2).
b. Add 5 mL of wash media to a 6 cm Petri dish.
Note: This will hold the Islet Capture screens. Any vessel can be used to contain the screens.
c. (Optional) Add 3 mL of wash media to one well of a 12-well tissue culture plate for each sample.
Note: These additional wells containing wash media are not required but serve as a potential backup if additional samples are needed prior to beginning the assay. If doing multiple intestinal regions per mouse, each region should have individual wells. It is recommended to leave an empty well next to the corresponding wash media well for PBS washing (see step B3).
d. Take a 50 mL aliquot of wash media.
e. Keep the 50 mL aliquot and the 12-well tissue culture plate on ice.
3. Prepare a 12-well tissue culture plate for washing.
a. Add 3 mL of PBS to one well of a 12-well tissue culture plate for each sample.
Note: There should be one well of PBS per sample from each mouse. If doing multiple intestinal regions per mouse, each region should have individual wells. If doing multiple sections from multiple mice, you may have to prepare two plates or use smaller-sized wells if also doing the optional wash media wells.
b. Keep the 12-well tissue culture plate with PBS (and wash media) on ice.
4. Wet Islet Capture screens in wash media.
a. Add each screen, ring side up, to the wash media within the 6 cm Petri dish using small, blunted forceps (see Figure 2).
b. Keep the screens in wash media until use on the benchtop (room temperature).
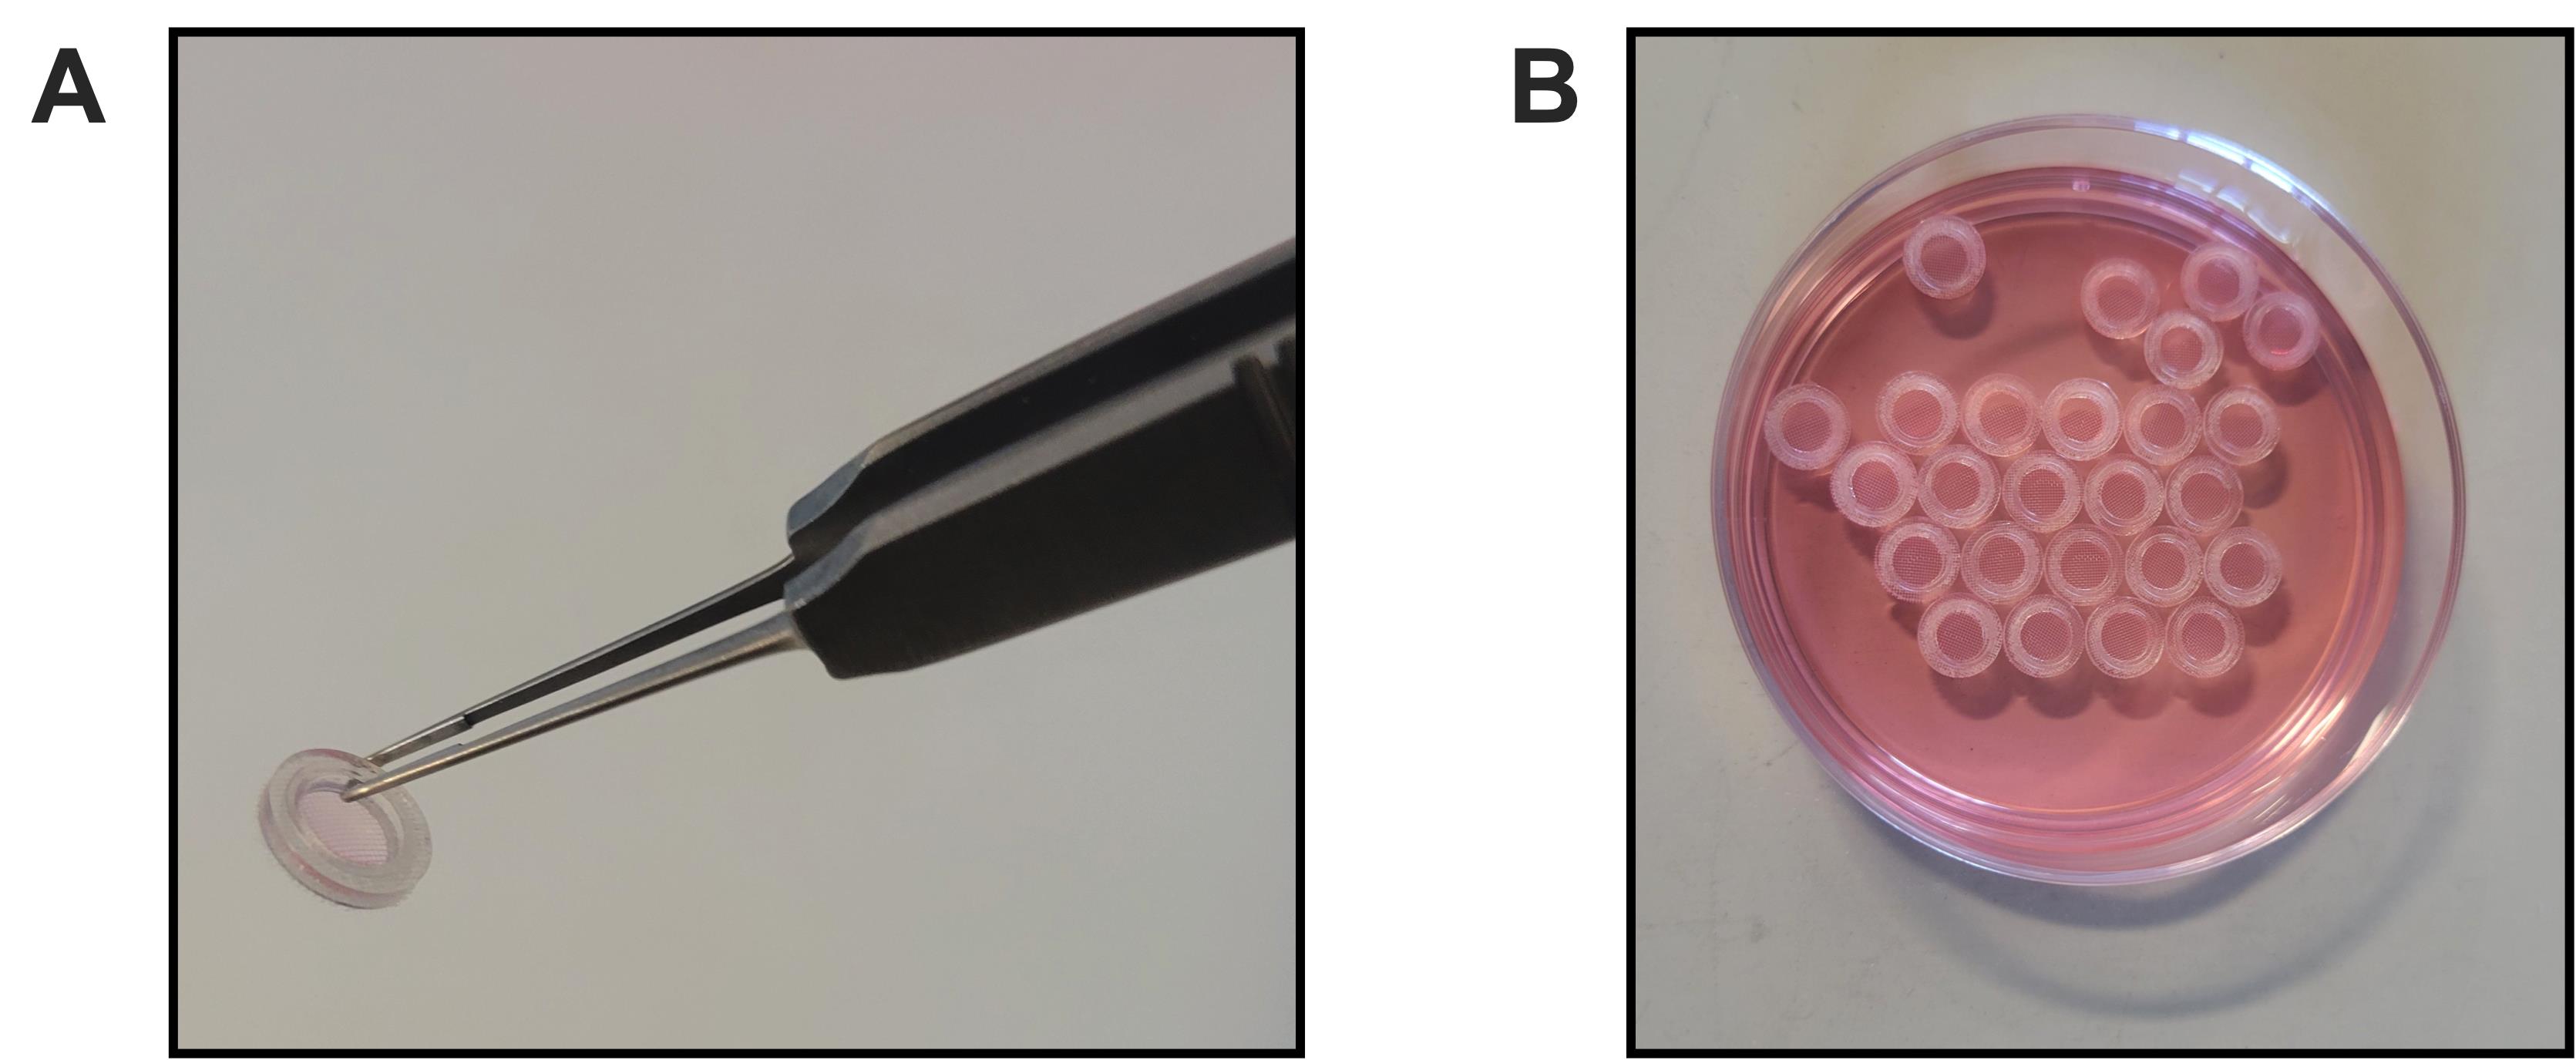
Figure 2. Islet Capture screens. (A) Individual Islet Capture screen showing proper orientation with the ring side up. (B) Islet Capture screens wet and held in wash media.
5. Prepare 45 mL of assay media (see Recipe 2).
a. Add 45 mL of glycolytic rate media to a 50 mL conical tube.
b. Add 316 μL of glucose to the glycolytic rate media aliquot.
c. Add 450 μL of pyruvate to the glycolytic rate media aliquot.
d. Add 900 μL of glutamine to the glycolytic rate media aliquot.
e. Place the cap on the conical tube and mix the assay media by inverting the tube 10 times.
f. Keep the assay media in a 37 °C water bath until needed.
Critical: Assay media must be prepared on the day of the experiment and used within 4 h of preparation.
Note: Assay media was prepared in a laminar flow (cell culture) hood. While sterility is not required for this particular protocol, as the Seahorse Bioanalyzer itself is not a sterile environment, assay media was prepared within the cell culture hood to ensure sterility of reagents for other experiments. The assay media does not need to be filter-sterilized for this protocol. The glutamine storage temperature is -20 °C. Make 1 mL aliquots when the glutamine bottle is initially received and thaw the aliquots as needed.
6. Prepare Seahorse tissue plate.
a. Place the Seahorse XF24 Islet Capture microplate on ice.
Note: It is easier to tightly pack the ice to best keep the plate from moving during use.
b. Add Islet Capture screens to the bottom of the blank wells using the Capture Screen Insert tool into the blank wells (A1, B4, C3, D6). First, firmly press the Capture Screen Insert tool onto the screen to attach. Next, add the Islet Capture screen to the corresponding well by pulling up on the T lever of the tool once pressed into place at the bottom of the desired well in the Seahorse XF24 Islet Capture microplate (see Figure 3).
Critical: Screens must be placed in every well for proper Bioanalyzer function, even if no tissue sample is present.
Note: It is easiest to pick up the screens with forceps and add them to the empty, dry top of the 6 cm Petri dish. If unable to easily pick up the Islet screen with the Capture Screen Insert tool, the screen is likely upside down. Flip the screen with forceps and try again. Additionally, once the screen on the Screen Capture Insert tool is placed within the desired well and the T lever pulled, there will be a snapping sound indicating that the screen has been successfully placed. Four blanks, one within each row, are recommended for all Seahorse Assays using this platform. A1, B4, C3, and D6 are the standard preset blanks within the machine but may be changed if desired.
c. Add 500 μL of wash media to each blank (A1, B4, C3, D6) of the Seahorse XF24 Islet Capture microplate.
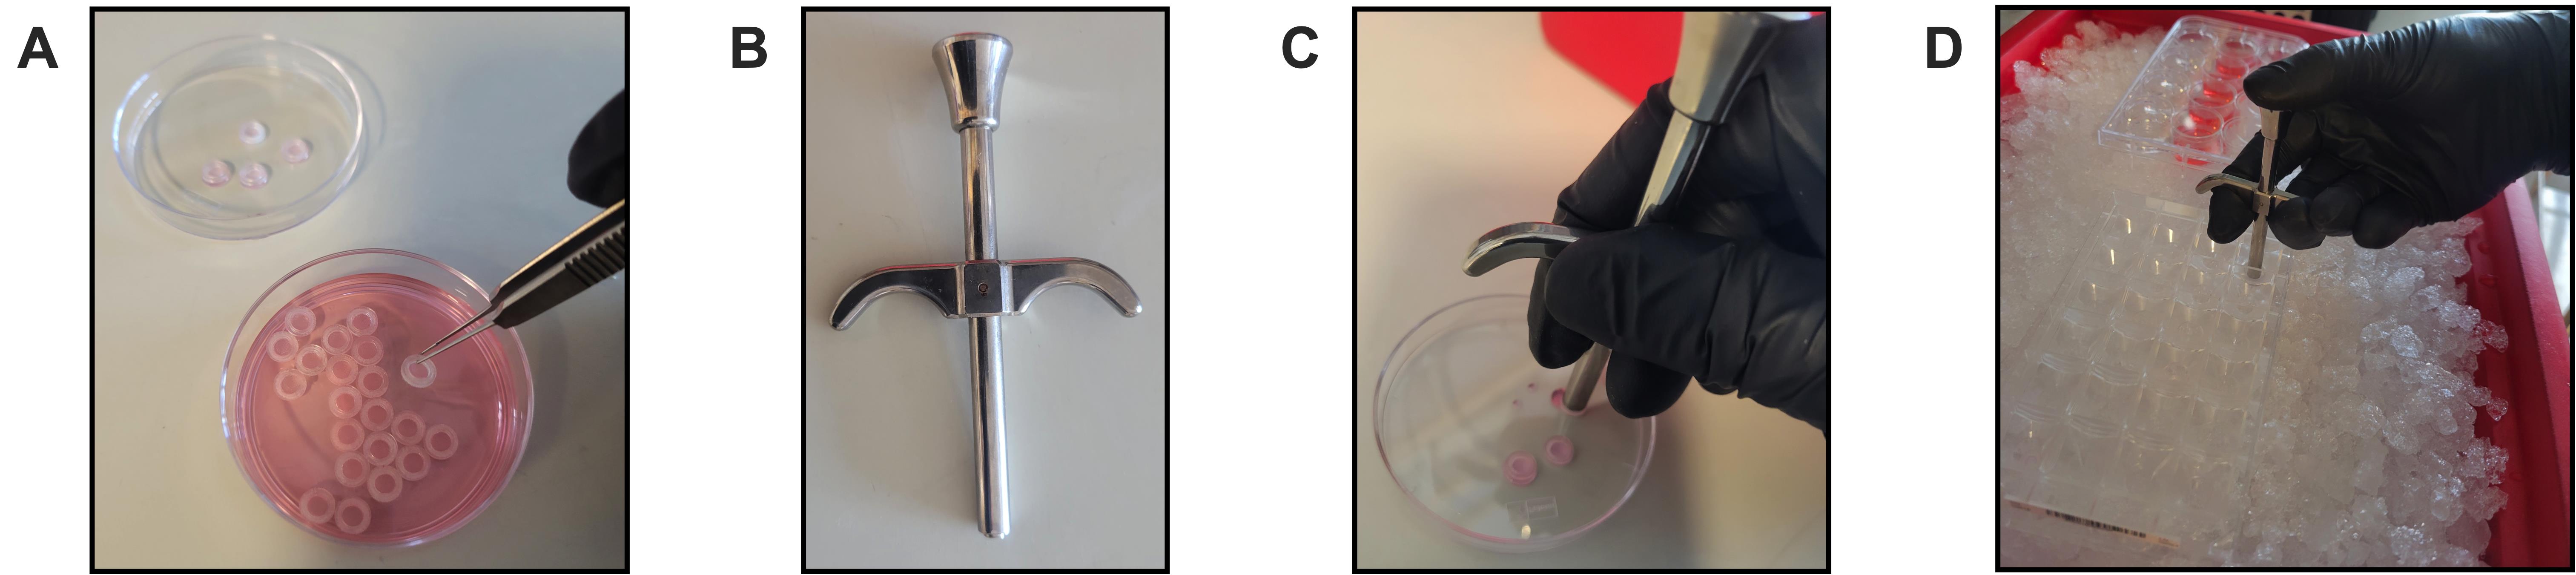
Figure 3. Addition of Islet Capture Screens to XF24 Well Islet Capture microplate. (A) Islet Capture screens transferred to the top of a 6 cm Petri dish for easy access for subsequent use. (B) Screen Capture Insert tool. (C) Using the Screen Insert tool to pick up the Islet Capture screens. (D) Addition of Islet Capture screens to the blank wells of the XF24 Well Islet Capture microplate using the Screen Insert tool.
7. Prepare dissection station: Set out all necessary tools (dissection scissors, forceps, biopsy punchers, cutting mat, Kimwipes, 70% ethanol).
Note: It is important to have the station fully set up since once dissections start, speed is critical to ensure tissue viability.
C. Dissection and plating
Note: A minimum of five consecutive tissue punches is recommended for each sample type. Dissections and subsequent plating can be performed on the benchtop. The dissection and plating steps should take 15 min or less for all animals. Maintaining sterility is not necessary for this protocol, as the Agilent Bioanalyzer itself is not a sterile environment.
1. Euthanize the individual animal according to your lab and institution-approved euthanasia method.
Note: Inhaled isoflurane overdose using a bell jar, followed by cervical dislocation, was used for our experiments.
2. Prepare station
a. Remove five Islet Capture screens from a 6 cm Petri dish containing wash media and place them in the dry top of the Petri dish for quick subsequent use while waiting for the euthanasia process to complete.
b. Clean tools and station (if working on subsequent animals) while waiting for the euthanasia process to complete.
3. Dissection
a. Make a large vertical incision into the abdominal cavity of the animal using dissection scissors. Use curved forceps to pull up the skin and fascial layers while making the incision into the peritoneum.
Note: The incision should take up the majority of the mouse abdomen. Make additional horizontal incisions on each side through the skin and peritoneal layers along the middle of the incision to widen the opening for subsequent intestinal removal if necessary.
b. Carefully dissect out the entire intestine with the stomach and cecum intact. Gently remove mesenteric fat as you dissect the intestine.
Note: First, gently uncoil the intestines starting near the stomach using forceps and scissors. Once uncoiled, cut the distal colon to release the distal intestine from its attachment. Next, cut the stomach away from its attachments. The entire intestine should be removed for ease of visualization of the different parts and for reproducibility with subsequent animals.
c. Cut 2.5 cm of the desired intestinal region.
Note: It is recommended to take the region closest to the stomach for duodenum samples, the most central region for jejunal samples, and the section closest to the cecum for ileum samples.
d. Use forceps to gently press out any visible luminal contents.
e. Place the intestinal tissue piece into a PBS-containing well of the 12-well plate (on ice).
f. (Optional) Quickly cut additional piece(s) of intestine and put them into the wash media well(s) of the 12-well plate, which should be on ice. These will serve as a backup if necessary.
4. Sample preparation
Note: The current protocol was designed to assess samples with the serosal side oriented facing upward. As such, full-thickness biopsies were obtained from each intestinal segment. The biopsy punchers largely retain the orientation of the sample, so if the mucosal surface is desired, the intestine may be cut longitudinally and subsequently biopsy-punched to preserve orientation (see General note 5 for additional comments and Figure S1). It is recommended to first obtain all consecutive punches and place them into the Seahorse plate, then add all of the screens, and then add media to each well.
a. Rinse the tissue piece in the PBS well, using forceps, by moving the tissue piece back and forth three times while submerged in PBS.
b. Remove the intestinal piece from the PBS and place it on the cutting board.
c. Use forceps to gently press out any remaining luminal contents and remove any remaining mesenteric fat.
Note: It is easier to use two pairs of curved forceps to do so. One is for holding the tissue in place, while the other is for pressing out the remaining luminal contents.
d. Punch out a full-thickness intestinal piece using a 2 mm biopsy punch and immediately add it to the center of an individual well of the Seahorse plate, which should be on ice (see Figure 4A, B).
Note: Use blunted, straight forceps to move the tissue punch if it does not easily detach from the biopsy punch.
e. Use the blunted, straight forceps to gently reposition the tissue punch into the center of the well, if it is not already there.
Critical: It is important that the tissue piece is in the center of the well (especially for OCR measurements).
f. Repeat with four consecutive punches for the remaining wells (at least five per genotype).
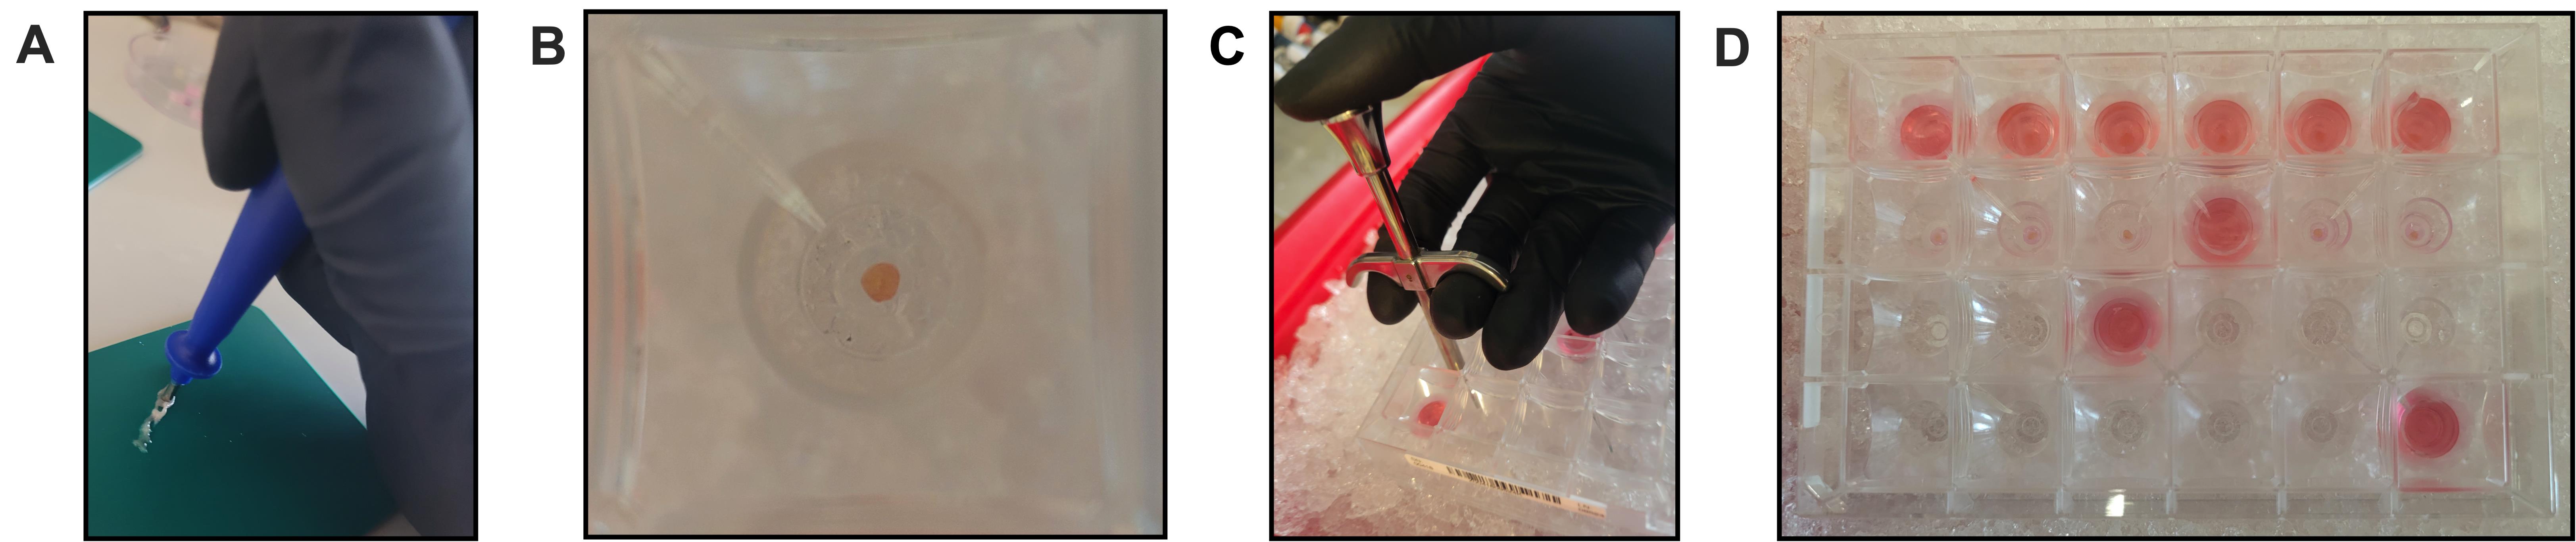
Figure 4. Tissue preparation and addition to the XF24 Islet Capture microplate. (A) Biopsy punching of intestinal segment. (B) A 2-mm intestinal biopsy punch within the middle of the corresponding well in the Islet Capture microplate. (C) Each tissue piece is held in place with a screen using the Screen Insert tool. (D) Islet Capture microplate showing a completed first row with tissue biopsy punches, Islet Capture screens, and wash media added, and the second row with tissue biopsy punches with Islet Capture screens added to each of the five replicates prior to the addition of wash media.
5. Add screens and wash media to individual wells of the Seahorse plate (see Figure 4C, D).
a. Add Islet Capture screens with the Capture Screen Insert tool as previously described in step B6b.
b. Add 500 μL of chilled wash media to each well with a tissue sample.
Critical: It is important to work quickly to add the wash media to the tissue pieces covered with the screens.
6. Repeat for additional mice, work quickly, and alternate between genotypes or conditions.
D. Washes
Note: When aspirating the media, avoid directly touching the middle of the screen as it may displace the tissue. Wash steps should be completed in 5 min or less.
1. Bring the assay media to the working station from the water bath.
2. Aspirate the wash media from each well.
3. Add 500 μL of new wash media to each well.
4. Aspirate the wash media from each well.
5. Add 500 μL of assay media to each well.
6. Aspirate the assay media from each well.
7. Add 450 μL of new assay media to each well for incubation.
E. Incubation
1. Incubate the plate with tissue punches for 45 min at 37 °C in a non-CO2 incubator.
2. Keep the remaining assay media in a 37 °C water bath for later use.
F. Calibration
1. While the tissue plate is incubating, bring the calibration plate to the Seahorse XFe24 Analyzer.
2. Set up assay parameters in the Wave software.
a. In the Wave Software on the controller, select Template.
b. Select Blank under Template options.
c. Add the appropriate number of groups for samples under the Group Definition tab.
d. Specify the sample locations under the Plate Map tab.
e. Select Protocol tab to outline parameters for the assay.
f. Keep the existing Calibrate and Equilibrate preselected options.
g. Under the Baseline column in the center of the screen, select Edit Measurement Details.
h. Increase the number of Cycles to 10. Keep the preset “03:00” for Mix, “02:00” for Wait, and “03:00” for Measure (see Figure 5).
i. Verify if sample locations and protocol parameters have been appropriately set prior to running the assay.
j. Select Run Assay at the top of the screen.
k. Select Start Run on the right-hand side of the screen under the Run Assay tab.
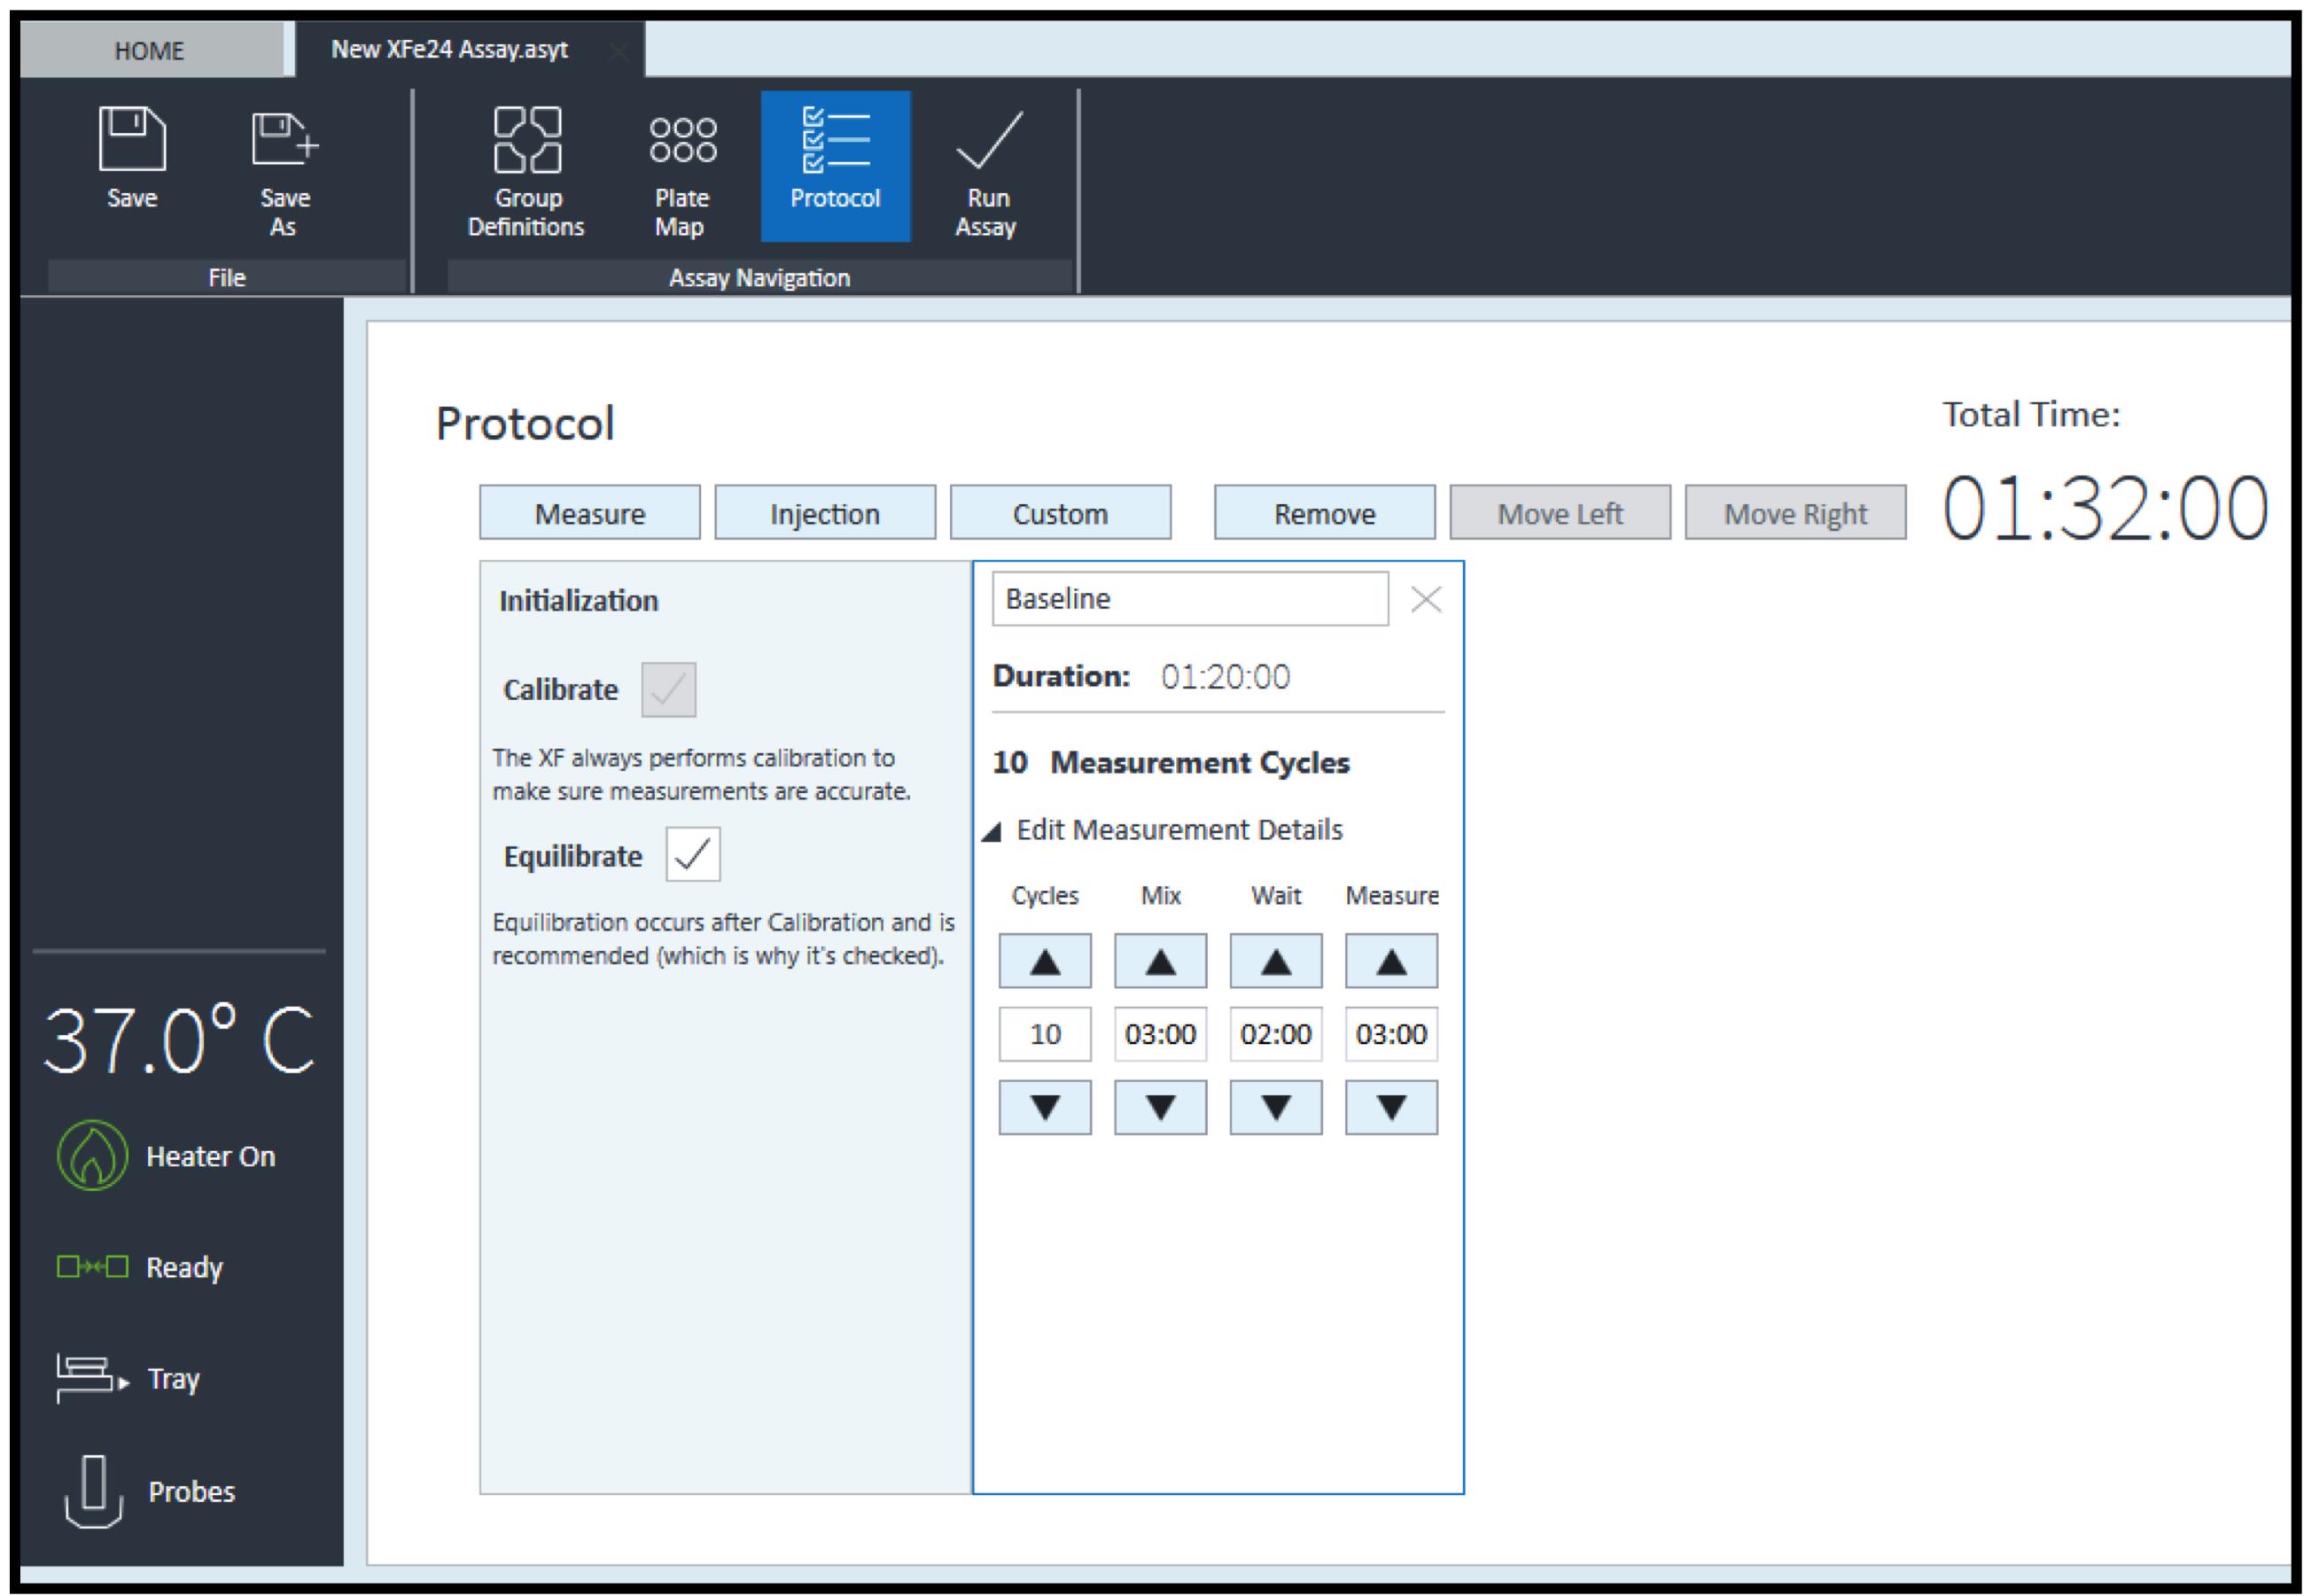
Figure 5. Protocol settings on the Agilent Controller. Protocol settings for measuring basal metabolism, comprised of 10 measurement cycles, defined as 3 min for “Mix,” 2 min for “Wait,” and 3 min for “Measure”.
3. Put the calibration plate in the machine when prompted.
a. Place the calibration plate within the Bioanalyzer when prompted.
b. Select I’m Ready once the plate is in place to run calibration.
Note: Make sure that the lid is off and that the red Hydro-Booster has been removed before placing the calibration plate in the Bioanalyzer. The calibration process takes approximately 20 min and will be complete by the time the 45-min incubation of the tissue plate is complete.
F. Running the assay
1. After the 45-min incubation of the tissue plate is complete, aspirate the media from each well in the tissue plate.
2. Add 450 μL of fresh, warmed assay media to each well prior to the Bioanalyzer Assay run.
3. Bring the tissue plate to the Seahorse XFe24 Analyzer and replace the calibration plate when prompted.
a. Select Open Tray when prompted.
b. Remove the calibration plate (utility plate) when prompted.
c. Add the tissue plate to the Bioanalyzer when prompted.
d. Select Load Cell Plate to begin the assay.
Note: The calibration process should be complete by the time the 45-min incubation period is over. Be sure to remove the lid from the tissue plate prior to placing it in the Bioanalyzer.
4. Run the assay. The total assay time is around 90 min.
5. When the assay is complete, select Eject to remove the tissue plate with the Sensor Cartridge (green).
6. Select View Results when prompted (see Figure 6 for sample results as displayed within the Wave software).
7. Select Export from the top of the screen and select Export to export the desired file type (i.e., Excel).
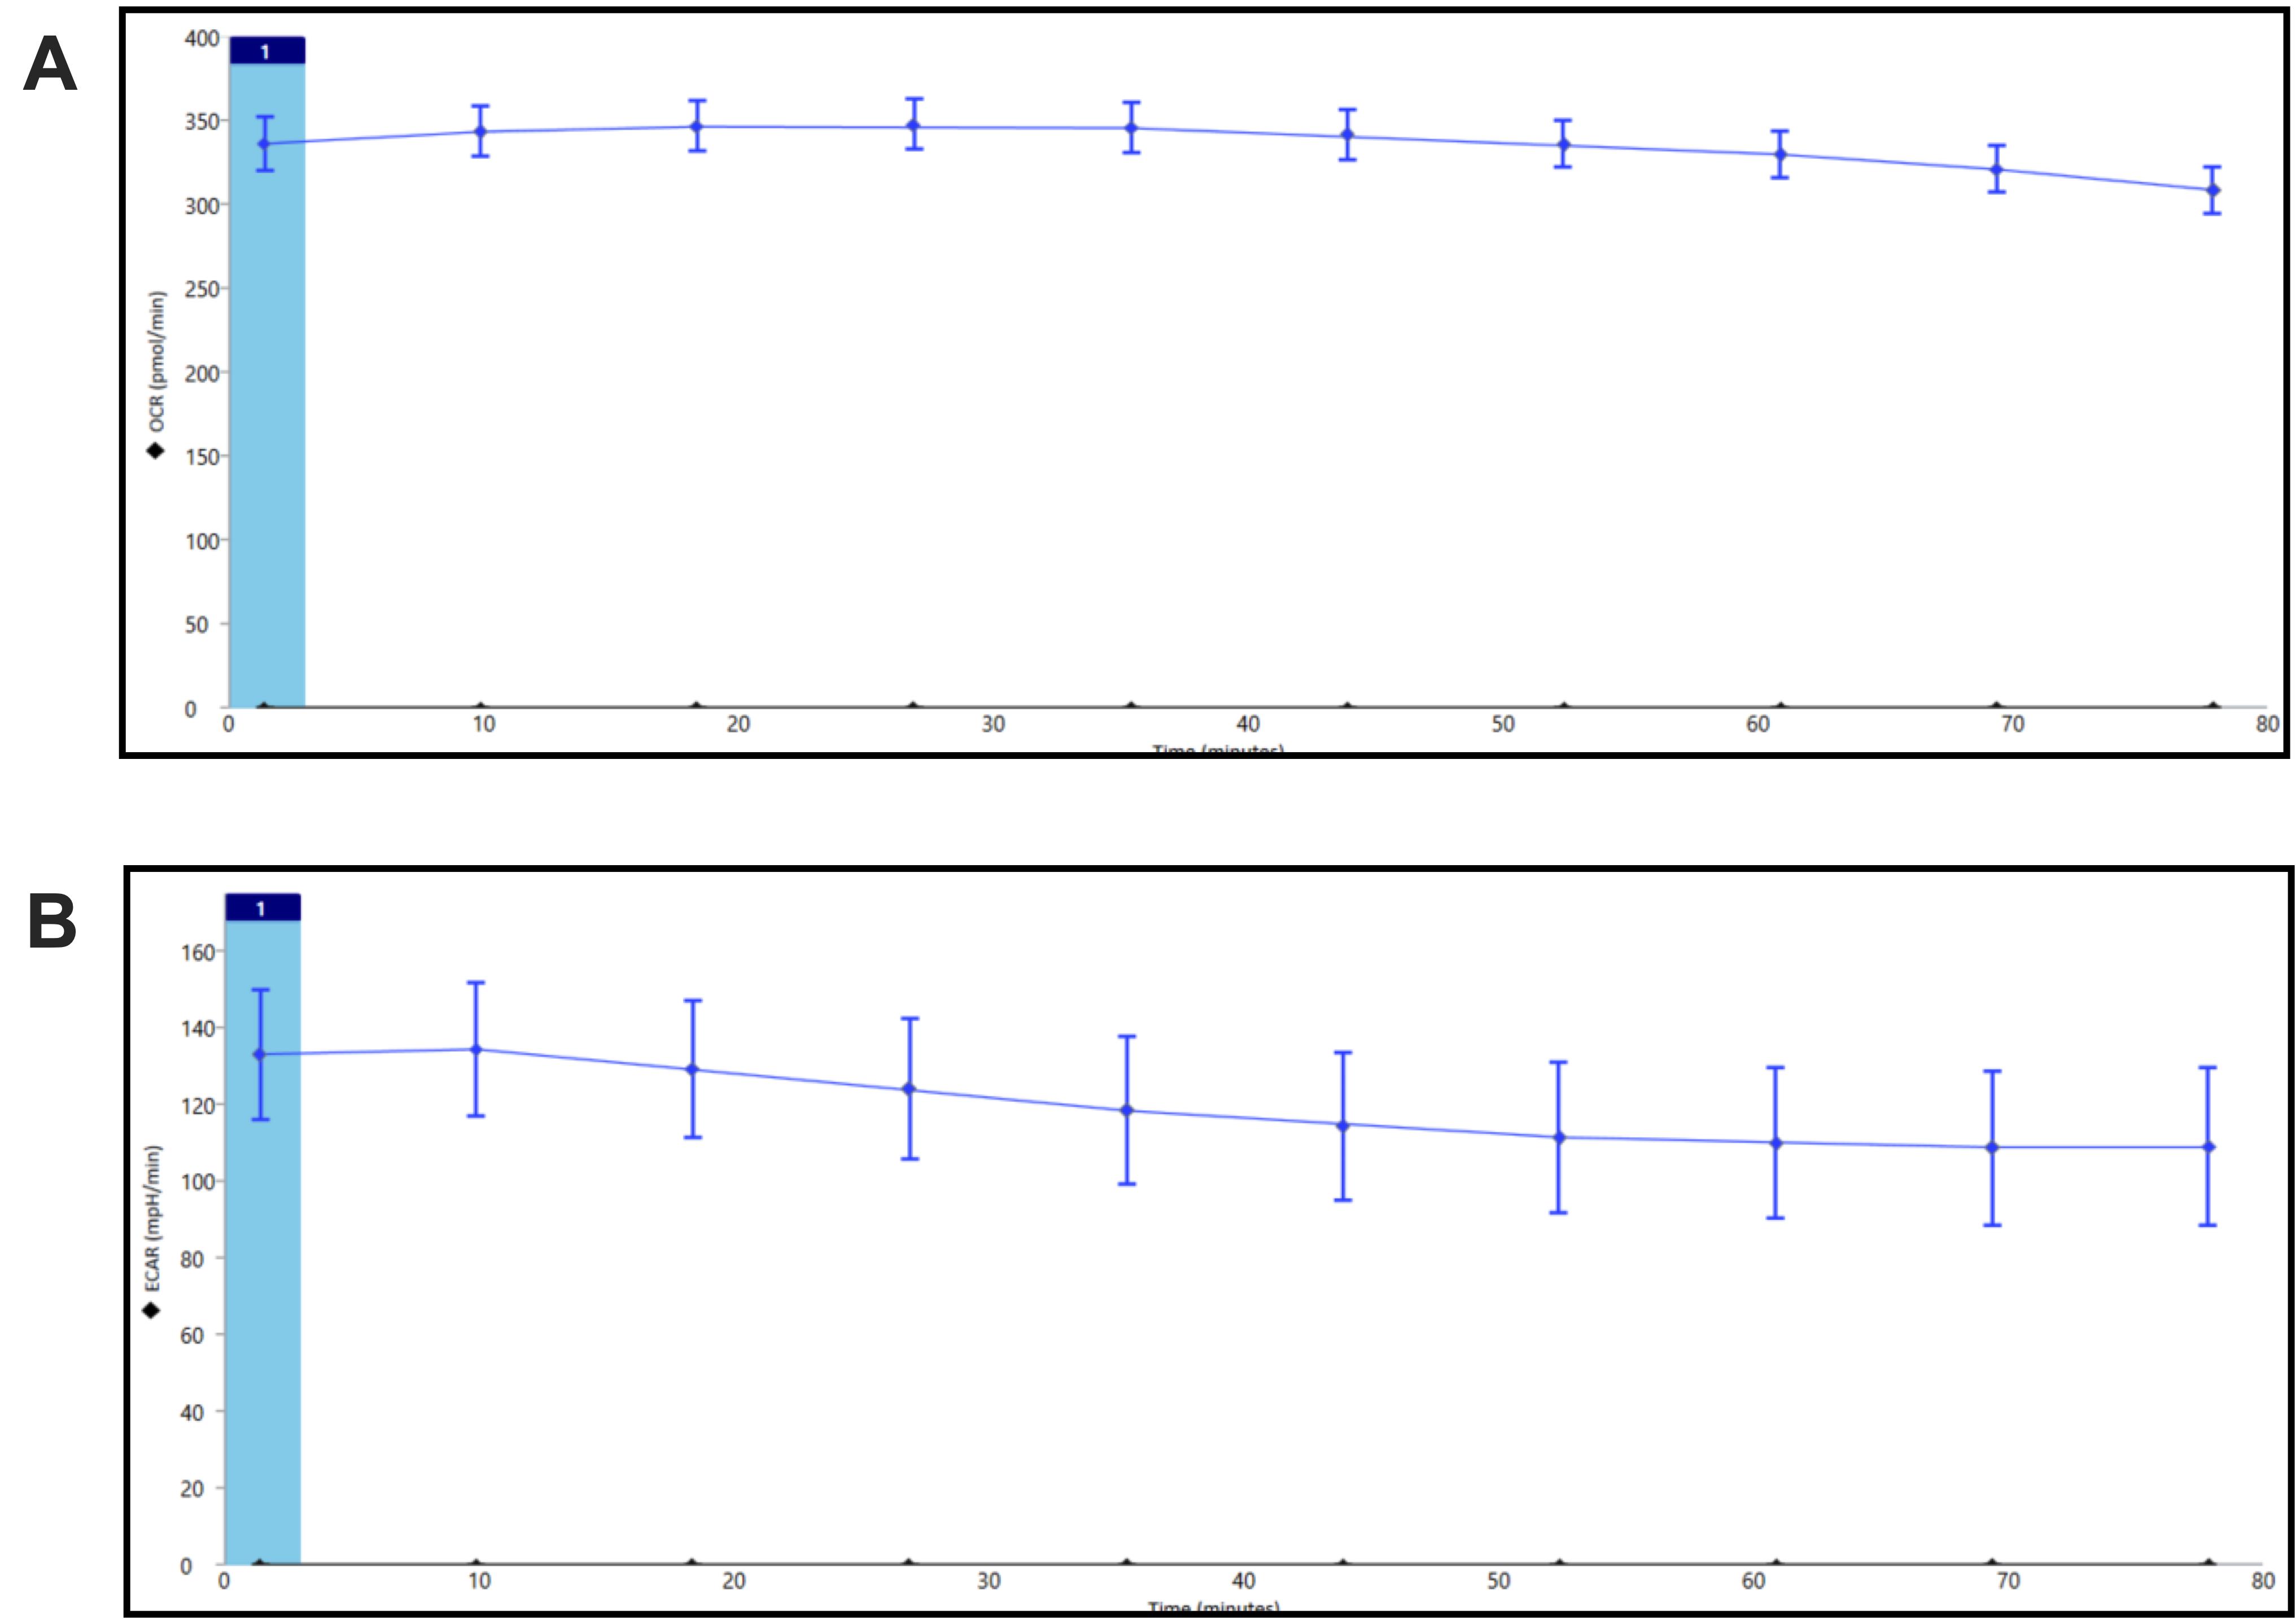
Figure 6. Assay results displayed within the Wave Software on the Agilent Controller. (A) Sample oxygen consumption rate (OCR) and (B) extracellular acidification rate (ECAR) output from the Wave Software on the Agilent Controller. Samples from 2 mm jejunal biopsy punches from wild-type mice. Data presented as average ± standard error of the mean (SEM) for 10 replicates.
Data analysis
Wave software is necessary for running the Seahorse assay (on the Controller/computer) and is free for download. Data are then exported to Microsoft Excel for further analysis. In our work, the average of five replicates was obtained for each measurement. Subsequently, each replicate average was then averaged to obtain a cumulative average ECAR value for each respective section of intestine per animal. When running multiple plates across numerous days, perform the same calculations as previously described, obtaining an average for each intestinal section for each mouse. Then, analyses can be performed with these values. An unpaired, two-tailed Student’s t-test with Welch’s correction was used to assess significance between groups; this is the recommended approach for reporting these data (see Figure 7A and [1] and [2]). Additional averages for each measurement cycle can also be reported, though they are not necessary (see Figure 7B). For these analyses, each replicate was averaged to obtain an average value per intestinal region for each mouse for each measurement. Statistical significance was assessed with a repeated-measures two-way ANOVA with the Geisser–Greenhouse correction (see [1]). Statistics were performed using GraphPad Prism 10.3.0.
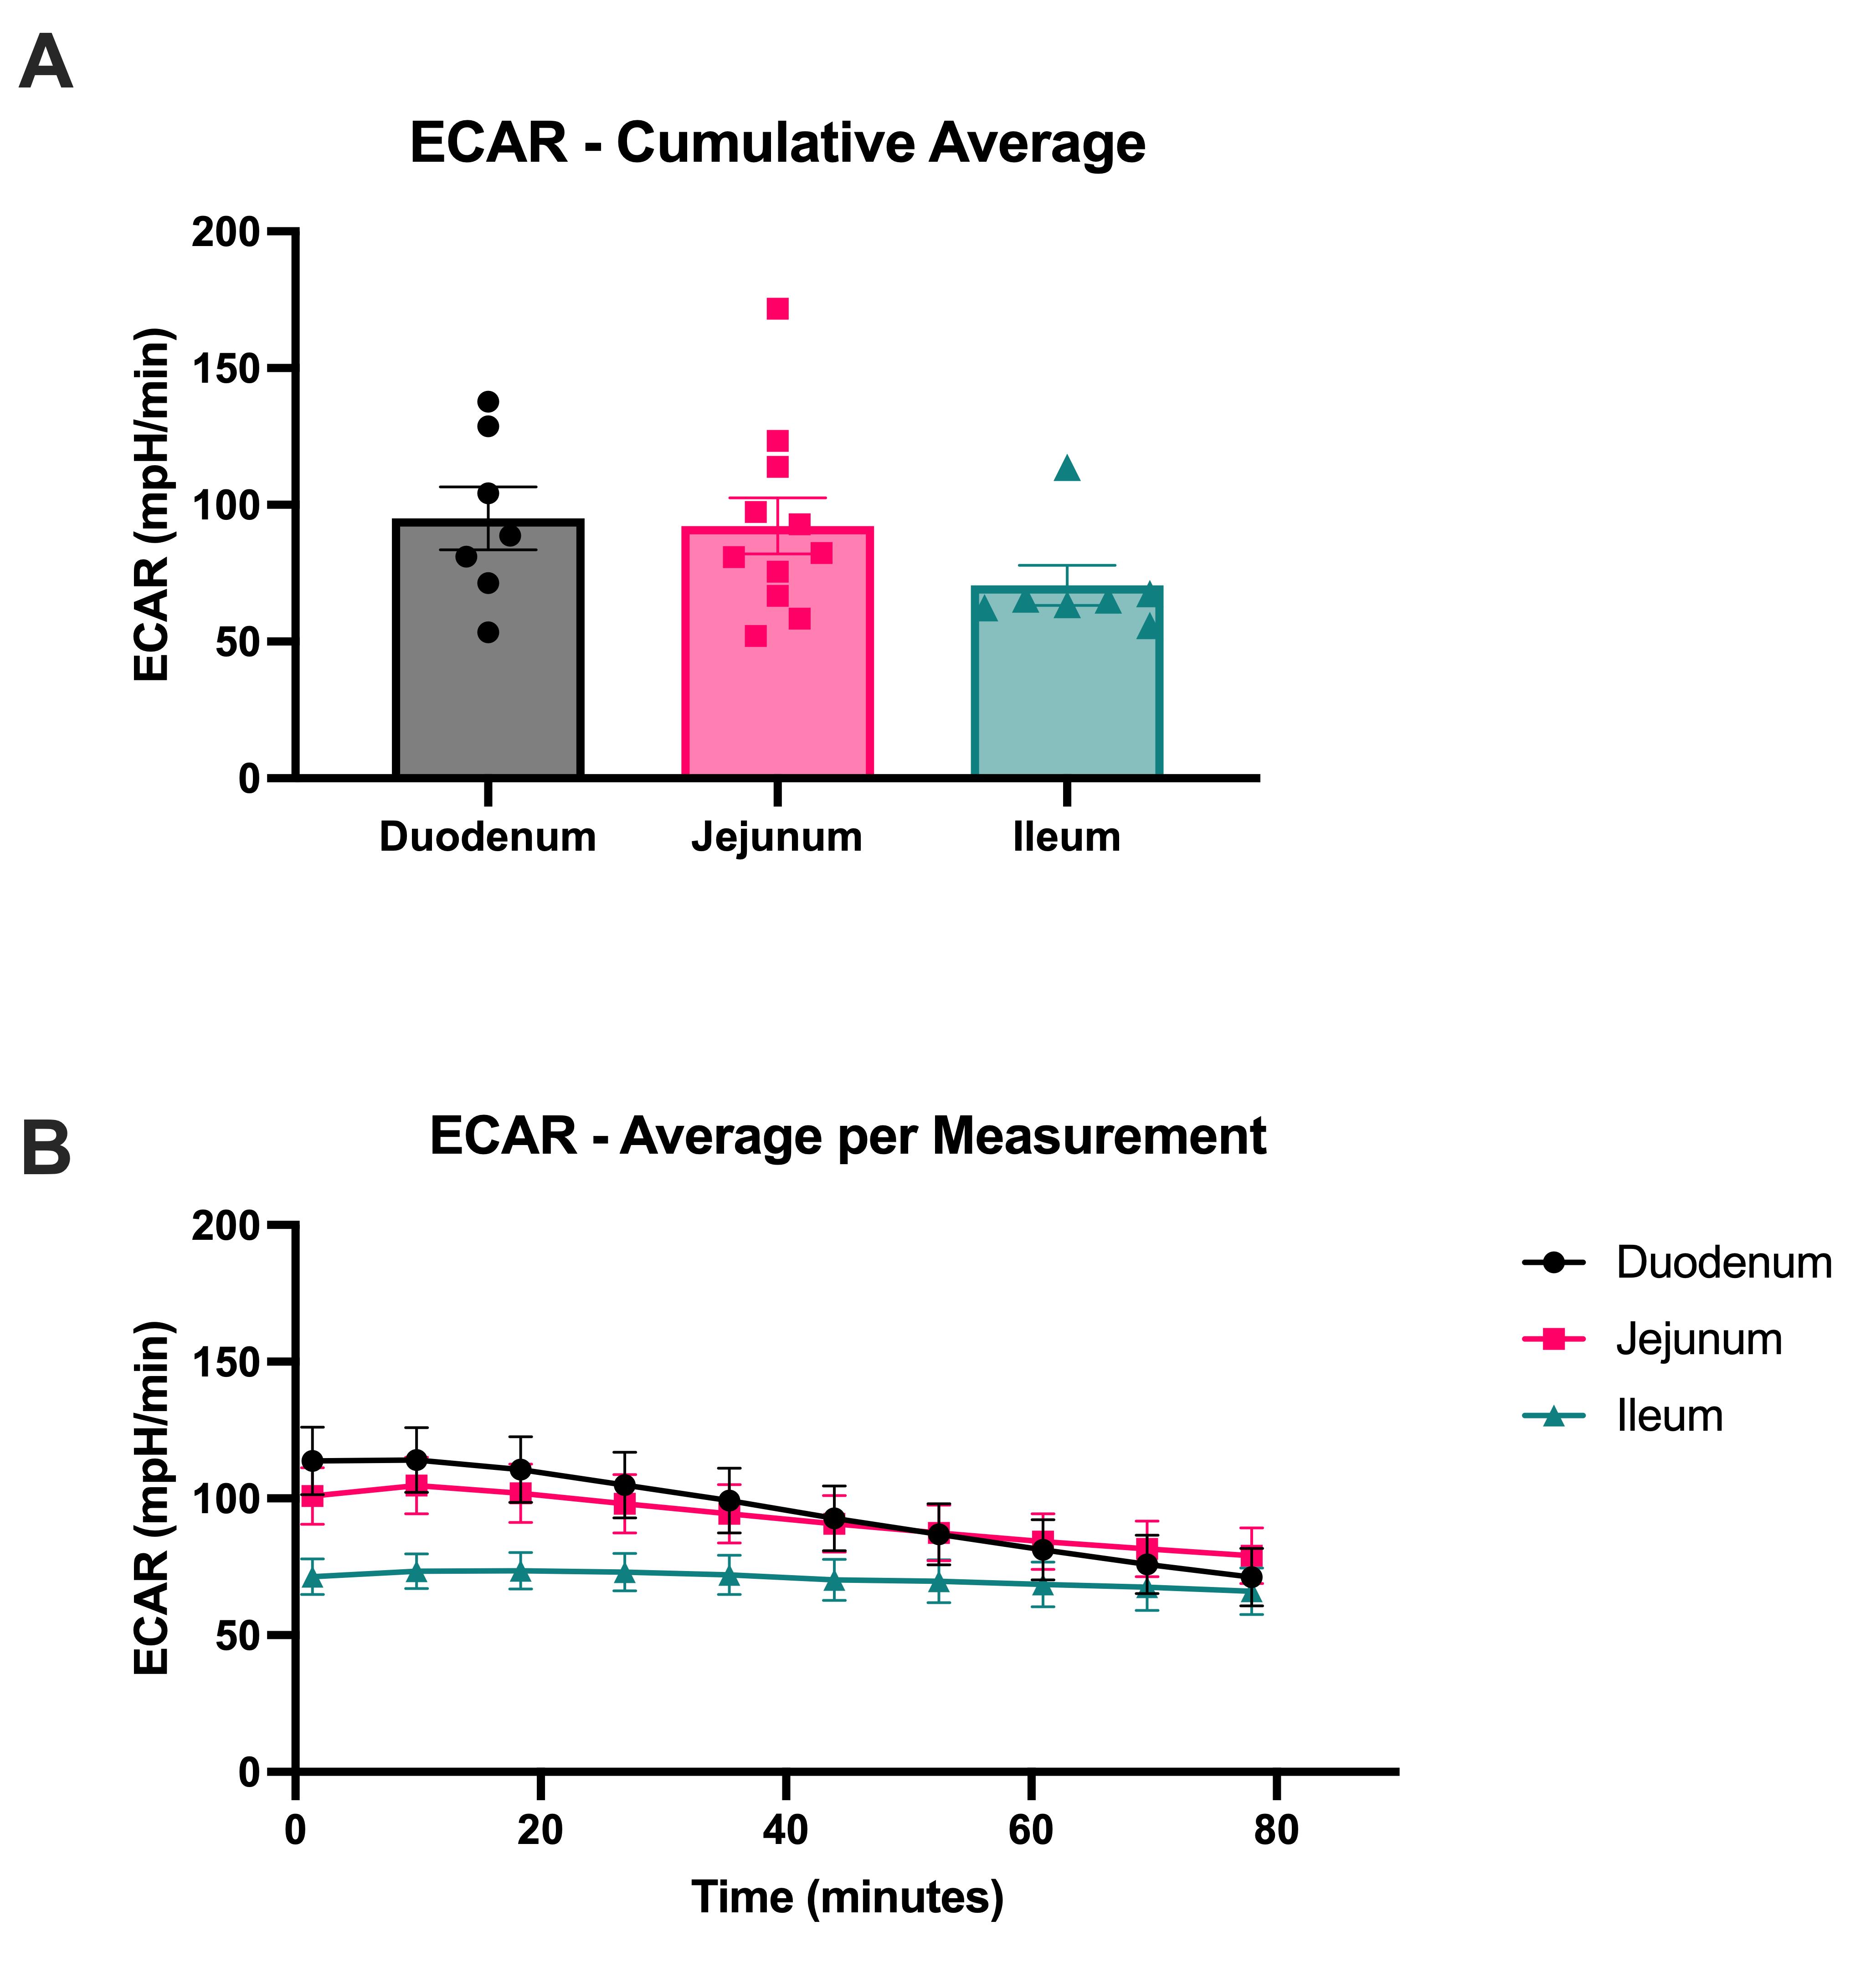
Figure 7. Ex vivo assessment of extracellular acidification rate (ECAR) in murine intestinal tissue. (A) Average extracellular acidification rate from wildtype murine duodenum (n = 7), jejunum (n = 11), and ileum (n = 7). These data represent the cumulative average of replicates and measurements such that each point represents one animal. (B) Average ECAR for each measurement cycle throughout the duration of the assay from wildtype murine duodenum (n = 7), jejunum (n = 11), and ileum (n = 7). Data are presented as average ± standard error of the mean (SEM). These experiments utilized samples from wild-type male and female mice, approximately 8–12 weeks of age. 5–7 biopsy punches were used per intestinal section per animal.
Validation of protocol
This protocol has been used and validated in the following research article:
• Lesser et al. [1]. Intestinal adaptations increase basolateral intestinal glucose uptake and glycolysis in a mouse model of cystic fibrosis. American Journal of Physiology: Gastrointestinal and Liver Physiology (Figure 6A–F).
This current protocol was adapted and optimized for the assessment of ex vivo intestinal extracellular acidification rate from a previously validated protocol, which was initially established for the ex vivo assessment of brown adipose tissue oxygen consumption rate:
• Fan et al. [2]. KLF15 controls brown adipose tissue transcriptional flexibility and metabolism in response to various energetic demands. iScience. (Figure 3C).
General notes and troubleshooting
General notes
1. Overview
These instructions are for assessing the extracellular acidification rate in murine intestinal samples. The same approach can be applied to other tissues, which will require optimization for each individual tissue type (see General notes 2, 4, 7, and 8 below). The same approach can be used to study OCR with some modifications (see General note 3 and Figure S2). A minimum of five tissue punches is recommended for each sample type. For intestinal studies, a maximum of four mice were used per assay. It is recommended to alternate between genotypes or conditions so that one group is not sitting in wash media for a longer duration than the other during the preparation phase. Samples must be immediately processed after collection, so if additional samples from the same animals are required for other experiments, another lab member should collect them after the samples for the Seahorse Assay are collected. Inhaled isoflurane overdose utilizing a bell jar, followed by cervical dislocation, was used for our experiments. Depending on the euthanasia method employed and time for dissection, additional optimization experiments for size may need to be performed (see General note 2). Additionally, it is recommended that the workstation be near the euthanasia setup for quick processing of samples.
This protocol was originally designed to assess functional metabolism within one part of the intestine (i.e., jejunum) between two different genotypes. The same approach could be taken to compare metabolism among different segments of the intestine within a single genotype. The Seahorse Bioanalyzer measures OCR and ECAR directly above the sample. It is currently unclear the degree to which differences in layer thickness and mucosal content among the different intestinal segments may impact such measurements. Further optimization experiments may be necessary to fully interrogate length-dependent effects within a single genotype.
2. Tissue biopsy punch size
Initial optimization should first assess tissue size. Various methods were initially attempted to obtain similarly sized tissue pieces. Using tissue biopsy punches was determined to be the best approach to quickly obtain uniform tissue sizes. Previous attempts trying to cut and weigh tissue pieces took longer and had reduced tissue viability. The size of the biopsy punch will depend on the metabolic activity of the tissue and the parameters assessed. For every tissue type, multiple sizes of tissue biopsy punches should be assessed. For instance, 2-mm biopsy punches were used for our studies of extracellular acidification rate [1]. However, several biopsy punch sizes were assessed (Figure S3). We were primarily concerned with extracellular acidification rate for our studies, which dictated our choice of media and tissue size. 2 mm was able to give a consistent ECAR measurement and was, in our hands, much easier to work with compared to the smaller sizes (1.2 and 1.5 mm), which tended to stick more to the biopsy puncher. In general, larger tissue sizes are easier to work with. However, if oxygen consumption rate is the desired parameter for intestinal tissue, a smaller tissue size should be used for intestinal samples, in addition to different media (i.e., DMEM-based) (see General note 3).
3. Assessing oxygen consumption rate
Seahorse Bioanalyzers measure oxygen consumption rate (OCR) and extracellular acidification rate (ECAR) with each assay. However, if OCR is the primary endpoint, additional protocol optimization may be required. For instance, Agilent’s glycolytic rate media is not necessary. Agilent’s additional media (DMEM- or RPMI-based) would be acceptable. Additionally, if assessing OCR as the primary endpoint in intestinal tissues, a smaller tissue size may be needed. The 2-mm size was at the upper limit of the recommended basal oxygen consumption range for the Seahorse Bioanalyzer (50–400 pmol/min) and likely insufficient for detecting more subtle differences in oxygen consumption rate. In comparison, a much smaller tissue punch was used when assessing oxygen consumption rate in murine brown adipose tissue, illustrating the importance of tissue size optimization [2]. When assessing the tissue biopsy punch size, it is important to have steady oxygen consumption rates to ensure tissue viability throughout the duration of the assay (Figure S4). For those interested in studies of mitochondrial respiration, we would recommend having an OCR consistently within the 100–300 pmol/min range. We found more variability and issues with OCR measurements at the lower and upper limits of the machine’s recommended 50–400 pmol/min basal OCR range.
4. Tissue preparation
Different tissue preparation methods were assessed, in addition to what is described in the current protocol. One method involved cutting the intestinal segments in half longitudinally and then washing the halves in PBS. Subsequently, the bisected segments were biopsy punched. This approach did not yield substantial differences in ECAR compared to the method described herein (Figure S5). This likely reflects how the Seahorse analyzer measures ECAR, which is through a microbubble directly above the tissue sample. Additionally, the high concentrations of nutrients within the media may also contribute to similar measurements. Due to the similarity of approaches, the faster and easier method without bisecting the intestine was chosen for the protocol.
Additionally, similar optimization experiments were also performed with and without fasting the mice for 4 h prior to tissue collection. Again, a substantial difference was not seen between these conditions, likely reflecting the high amounts of nutrients within the media (Figure S6). Thus, short fasting was determined not to be necessary for experiments on extracellular acidification rate.
5. Biopsy punch orientation
The current protocol details a method that features full-thickness biopsy punches such that the serosal side is facing upward within the individual wells (Figure S1). We desired to assess the serosal side as we were investigating a serosal phenotype as opposed to a mucosal phenotype. Two preparation methods were assessed with and without longitudinally bisecting the intestine, and we did not see a difference (Figure S5). This likely reflects how the Seahorse analyzer measures directly above the sample, in addition to the saturating nutrient concentrations within the media. If assessing the mucosal surface is desired, it is reasonable to open the intestine longitudinally and biopsy the inner mucosal surface. In initial test experiments with dual colored paper or paper with a letter drawn on it, the outward-facing orientation was largely preserved with the biopsy punches. Inclusion of multiple technical replicates is important in case one of the samples’ orientations may have reversed. However, given the high concentration of nutrients within the media, it is unclear whether the assay in its current form is sensitive enough to detect a mucosal vs. serosal difference. Additionally, having multiple biopsy punchers with frequent replacement to avoid dulling of the edge is useful to ensure clean biopsy punches.
6. Wash media preparation
The wash media used within this protocol was DMEM-based with a total concentration of 25 mM of glucose and 25 mM of HEPES. The goal of the wash media is to ensure tissue viability prior to the start of the Seahorse Assay. The recommended base of the wash media should be of the same base (i.e., DMEM, RPMI, etc.) as what is used to culture the cell or organoid culture equivalent of the tissue being assayed. DMEM-based medium has various nutrients, including amino acids and micronutrients, whereas the glycolytic rate medium is more minimal. DMEM-based media was chosen for the wash media for our assay to ensure tissue viability prior to the start of the assay. Additional compositions of wash media (i.e., DMEM without phenol, different concentrations of glucose, glycolytic rate media) could be used as long as tissue viability is maintained throughout the Seahorse assay, evident through stable oxygen consumption rates.
7. Assay media selection
Seahorse media must be supplemented with glucose, glutamine, and pyruvate. L-Glutamine, as opposed to GlutaMAX, is recommended for Seahorse Assays. Seahorse Assay media must be used within 4 h of preparation. The concentration of glucose, glutamine, and pyruvate used for these intestinal samples was based on the concentrations used in our lab’s intestinal organoid cultures. Thus, these are supraphysiologic levels, which is a limitation of the current approach, but ensured viability throughout the duration of the assay. Additionally, Seahorse media is DMEM- or RPMI-based. Assay media should reflect the media used for cell or organoid culture, equivalent to the tissue of interest. Several media are available through Agilent, including glycolytic rate Seahorse media and the Seahorse XF base media minimal DMEM. We tested different media types (Figure S7). However, we were most interested in assessing glycolysis (ECAR), so we chose the glycolytic rate Seahorse media for our experiments. The media choice should be made based on the desired endpoint. Studies of oxygen consumption rate (mitochondrial function) do not need to use the specific Agilent glycolytic rate Seahorse media [2].
8. Inhibitor/uncoupler concentrations
Standard Seahorse assays assessing glycolysis or mitochondrial function utilize various inhibitors to interrogate different components of the metabolic pathways. Numerous attempts were made to assess various drug concentrations with ex vivo tissue samples. However, we were unable to reliably produce inhibitory effects in our ex vivo tissue samples, which require higher concentrations than needed for a cell monolayer. Thus, we focused solely on basal measurements, which were able to be consistently reproduced.
9. Selection of Agilent Seahorse platform
This protocol utilizes the Agilent Seahorse XFe24 platform. The advantage of the 24-well platform is the existing standardized Islet Capture microplates and corresponding Islet Capture screens. The Islet Capture screens are desirable as they can hold tissue pieces in place throughout the washing steps and various mixing and measurement cycles within the Seahorse Bioanalyzer. Most Seahorse protocols using tissue samples utilize the 24-well platform and corresponding Islet Capture screens for this reason [1–4,6]. This protocol could be adapted for other Agilent platforms, including the 96-well and 8-well formats, which do not have compatible Islet Capture screens. If utilizing these platforms, additional measures to ensure that the tissue can be held in place during washing steps would be required. Alternatively, elimination of the washing steps and placing the tissue directly into the desired assay media may be necessary. The use of these additional Agilent platforms would also require smaller biopsy punch sizes due to the smaller well diameters. Changes to the Bioanalyzer parameters (i.e., eliminating the Mixing step) may also be necessary to prevent disruption of tissue placement.
Troubleshooting
Problem 1: OCR values steadily dropping throughout the assay.
Possible causes: Decreased tissue viability, sample preparation is taking too long.
Solutions: Steadily dropping OCR values likely reflect decreased tissue viability. Ensure that all precautions are being taken to maximize the efficiency of sample preparation. These include limiting the time that the tissue is not on ice and working quickly to add the tissue samples to the plate. Samples should not be without media for an extended period of time. Some tissue types require a more involved dissection or are more sensitive. If that is the case, it may be necessary to employ the assistance of another lab member. Thus, one person can perform the dissection, while the other prepares (biopsy punches) and/or plates the tissue samples. Additionally, the number of measurement cycles can be reduced from 10 to 5 cycles if the OCR is consistently maintained over a shorter measurement time. If multiple mice are being used and the tissue viability appears to only impact the earlier samples, reduce the number of mice being used. For our studies, a maximum of four mice were used per experiment run, and genotypes of interest were alternated.
Problem 2: One or several OCR values are reading as low, zero, or negative.
Possible causes: Missing tissue, tissue sample is not centered, or tissue biopsy punch size is too big or too small.
Solutions: Numerous factors can cause OCR values to read as low, zero, or negative. After the assay, check the plate to see if the samples are present and/or centrally located. OCR readings are especially sensitive and will likely be greatly reduced if the biopsy punch is not located directly in the center of the well. Five technical replicates are recommended. Thus, if there is a clear technical reason for an OCR discrepancy for a particular well (i.e., no sample present), there are still enough replicates for statistics.
Problem 3: Most or all of the OCR values are reading as low, zero, or negative.
Possible causes: Sample biopsy punch size is too small or too big, sample is not viable.
Solutions: Viability issues are possible (see Problem 1). Additionally, tissue biopsy sizes that are too small may not be detected. Alternatively, samples that are too large may also register a low OCR reading since they are at the detection limits of the machine due to greater fluctuation of oxygen levels during measurement cycles. Multiple sizes of biopsy punches should be tested for each tissue type, and size selection will depend on the experiment’s primary end points (glycolysis vs. mitochondrial respiration) (see General note 2).
Supplementary information
The following supporting information can be downloaded here:
1. Figure S1. Schematic for tissue biopsy punch orientation.
2. Figure S2. Ex vivo assessment of oxygen consumption rate in murine intestinal tissue.
3. Figure S3. ECAR by biopsy punch size.
4. Figure S4. OCR by biopsy punch size.
5. Figure S5. ECAR by preparation method.
6. Figure S6. ECAR by fasting status.
7. Figure S7. ECAR by media type.
Acknowledgments
Conceptualization: A.F.L.; Investigation: A.F.L.; Writing—Original Draft: A.F.L.; Writing—Review & Editing: M.L.D.; Funding acquisition: M.L.D.; Supervision: M.L.D. This work was supported by the Cystic Fibrosis Foundation Grants DRUMM24R0 (to M.L.D.), DRUMM22G0-GI (to M.L.D.), and T32 GM152319 (to A.F.L.). This protocol details the methodology recently described and validated in Lesser et al. [1]. The current protocol was adapted from Fan et al. (2022) for studies of extracellular acidification rate in murine intestinal tissue [2]. The authors would also like to thank Andrei Maiseyeu and his lab members for sharing their equipment and lab space, in addition to offering their continued support while developing this method. The authors thank the Cystic Fibrosis Mouse Resource Center for providing the animals used for this study. The Graphical Abstract and Figure S1 were made using BioRender (https://BioRender.com).
Competing interests
The authors declare no conflicts of interest.
Ethical considerations
All animal use and procedures were approved by Case Western Reserve University’s Institutional Animal Care and Use Committee.
References
- Lesser, A. F., Perez, A., Wu, C., Hao, S., Erokwu, B., Host, D., Jafri, A., Barbato, E., Yeh, L., Eastman, J., et al. (2026). Intestinal adaptations increase basolateral intestinal glucose uptake and glycolysis in a mouse model of cystic fibrosis. Am J Physiol Gastrointest Liver Physiol. 330(1): G45–G61. https://doi.org/10.1152/ajpgi.00102.2025
- Fan, L., Lesser, A. F., Sweet, D. R., Keerthy, K. S., Lu, Y., Chan, E. R., Vinayachandran, V., Ilkayeva, O., Das, T., Newgard, C. B., et al. (2022). KLF15 controls brown adipose tissue transcriptional flexibility and metabolism in response to various energetic demands. iScience. 25(11): 105292. https://doi.org/10.1016/j.isci.2022.105292
- Dunham-Snary, K. J., Sandel, M. W., Westbrook, D. G. and Ballinger, S. W. (2014). A method for assessing mitochondrial bioenergetics in whole white adipose tissues. Redox Biol. 2: 656–660. https://doi.org/10.1016/j.redox.2014.04.005
- Wang, F., Huynh, P. M. and An, Y. A. (2024). Protocol for Seahorse analysis of ex vivo mouse brown and white adipose tissues. STAR Protoc. 5(2): 103042. https://doi.org/10.1016/j.xpro.2024.103042
- Shetty, T., Park, B. and Corson, T. W. (2021). Measurement of mitochondrial respiration in the murine retina using a Seahorse extracellular flux analyzer. STAR Protoc. 2(2): 100533. https://doi.org/10.1016/j.xpro.2021.100533
- Schuh, R. A., Clerc, P., Hwang, H., Mehrabian, Z., Bittman, K., Chen, H. and Polster, B. M. (2011). Adaptation of microplate‐based respirometry for hippocampal slices and analysis of respiratory capacity. J Neurosci Res. 89(12): 1979–1988. https://doi.org/10.1002/jnr.22650
Article Information
Publication history
Received: Mar 25, 2026
Accepted: Jun 4, 2026
Available online: Jun 17, 2026
Published: Jul 20, 2026
Copyright
© 2026 The Author(s); This is an open access article under the CC BY-NC license (https://creativecommons.org/licenses/by-nc/4.0/).
How to cite
Lesser, A. F. and Drumm, M. L. (2026). Ex Vivo Assessment of Extracellular Acidification Rate in Murine Intestinal Tissue. Bio-protocol 16(14): e5749. DOI: 10.21769/BioProtoc.5749.

 Download Citation in RIS Format
Category
Biochemistry > Carbohydrate
Cell Biology > Cell metabolism > Carbohydrate
Cell Biology > Tissue analysis > Physiology
Do you have any questions about this protocol?
Post your question to gather feedback from the community. We will also invite the authors of this article to respond.
 Post a Question


