


- Protocols

- Articles and Issues
- For Authors
- About
- Become a Reviewer


Manipulation of Gene Expression in Mouse Pancreas via Intraductal Delivery of Adeno-Associated Viral Vectors

(*contributed equally to this work) Published: Vol 16, Iss 8, Apr 20, 2026 DOI: 10.21769/BioProtoc.5657 Views: 491
Reviewed by: Gururaj RaoAnonymous reviewer(s)
 PDF
PDF  Ask a question
Original research article
The authors used this protocol in:
Dec 2018
Advertisement


Protocol Collections
Comprehensive collections of detailed, peer-reviewed protocols focusing on specific topics




Abstract
The rising global incidence of pancreatitis, pancreatic cancer, and diabetes has increased the need for efficient in vivo gene manipulation approaches to study the pancreas and develop new therapies. Although transgenic mouse models are widely used, they are time-consuming and costly to generate and maintain. Systemic viral delivery methods offer greater flexibility but often lack pancreatic specificity and require high viral doses. Here, we describe a streamlined protocol for intrapancreatic ductal delivery of adeno-associated viruses (AAVs) for targeted gene delivery. Our protocol requires standard surgical equipment and can be implemented in most laboratories. Specifically, we adopted a clamping strategy at the hepatopancreatic duct near the liver, as well as beneath the major duodenal papilla at the duodenum. This strategy exposes the duodenal papilla, facilitating viral delivery, preventing backflow, and enabling efficient pancreatic transduction at lower viral doses. Overall, this method provides a fast, simple, and effective approach for pancreas-targeted gene manipulation, facilitating preclinical studies of pancreatic biology and disease.
Key features
• Rapid, pancreas-specific in vivo gene manipulation using simple rodent surgical techniques.
• Efficient gene manipulation can be achieved with lower viral doses while minimizing off-target effects.
• AAVs trigger minimal adverse complications, and the surgery is well-tolerated in mice.
• This method can be combined with traditional genetic manipulation and lineage tracing to enhance studies of gene function or pancreatic diseases.
Keywords: Intrapancreatic ductal injection Gene delivery
Adeno-associated virus
In vivo islet transduction
Aseptic mouse surgery
Gene delivery
Adeno-associated virus
In vivo islet transduction
Aseptic mouse surgery
Graphical overview

Schematic illustrating the murine hepatopancreatic duct injection site and the experimental timeline. (A) Anatomical location of the major duodenal papilla, and the placement of clamps and the injection needle. (B) Surgery timeline.
Background
The pancreas is located in the upper abdomen, behind the stomach, and contains both exocrine and endocrine compartments. The exocrine pancreas comprises approximately 90% of the organ and produces digestive enzymes such as amylase, lipase, and proteases [1]. These enzymes are transported through a branched pancreatic ductal system that joins the bile duct to form a hepatopancreatic duct, which empties into the duodenum through the major duodenal papilla to aid food digestion [2]. In contrast, the endocrine pancreas accounts for only 1%–2% of the pancreatic mass and is organized into clusters known as islets of Langerhans. Islet cells secrete hormones, including insulin and glucagon, that regulate blood glucose levels [3]. Disorders such as chronic pancreatitis, cystic fibrosis, or pancreatic duct obstruction by tumors or cysts can result in exocrine pancreatic insufficiency and malnutrition, whereas obesity and diabetes place a significant burden on endocrine islet hormone production and secretion [2].
With the global rise in pancreatic disorders, faster development of effective therapies is urgently needed [2,4,5]. Preclinical rodent models provide powerful systems for modeling disease etiology and evaluating novel therapeutic strategies. For example, Kras and Trp53 mutant mice recapitulate key features of pancreatic ductal adenocarcinoma, while non-obese diabetic (NOD) mice exhibit accelerated autoimmune-mediated islet destruction that parallels type 1 diabetes [6]. However, generating and maintaining transgenic mouse models is complex and time-consuming, requiring large colonies to preserve specific genotypes [7]. To overcome these limitations and enable rapid, flexible gene manipulation in the pancreas, injectable transduction methods via viral vectors have been developed. Viral vector-mediated gene manipulation can incorporate regulatory elements to enhance cell specificity and increase transgene expression. A variety of viral vector systems have been explored for this purpose, including retroviruses, lentiviruses, adenoviruses, herpes simplex viruses, and adeno-associated viruses (AAVs). Among these, AAVs offer relatively low immunogenicity and have been extensively validated for their safety and long-term transgene expression in a wide range of animal models of human disease [8].
In this protocol, we demonstrate intrapancreatic ductal delivery of AAVs for islet-specific gene manipulation. This procedure relies on standard rodent surgical equipment and can be rapidly implemented in most laboratories. In contrast to intravenous and intraperitoneal injections, direct AAV injection into the hepatopancreatic duct via the duodenal papilla allows viral vectors to rapidly diffuse throughout the pancreas, enabling efficient transduction of exocrine and endocrine cells with minimal off-target effects. As a result, comparable transduction can be achieved with lower AAV doses than with systemic delivery. Our technique builds on previously described intraductal injection methods to enhance efficiency and ease of use [9,10]. Specifically, the protocol employs a faster, catheter-free injection, reducing surgical time and complexity without compromising transduction quality or efficiency. Injection is facilitated by clamping beneath the duodenal papilla to create a clear injection site and prevent backflow into the duodenum. Together, these refinements enable faster surgeries while maintaining efficient pancreatic transduction.
Materials and reagents
Biological materials
1. Adeno-associated virus, 1011 genome copies/mouse
Note: In this manuscript, we used scAAV8-Ins1Cre [11] to induce beta cell–specific gene recombination and used scAAV8-Ins1Empty as control. Both vectors are custom-ordered from Vector Biolabs (pAAV210119-1011afm and VB230512-1203mkx, respectively). Increased AAV dosage can be used but may lead to off-target effects with little increase in transduction efficacy.
2. 6–8-week-old mice
Notes:
1. Young adult mice are recommended, as their duodenal papillae and hepatopancreatic ducts are fully developed. Papilla size and duct thickness vary with age, strain, and sex. In our experience, NOD mice have more prominent papillae than C57BL/6J, with optimal surgical outcomes observed in NOD mice > 6 weeks and C57BL/6J mice > 8 weeks. Ten-week-old CD1-mice are also suitable [12], and intrapancreatic ductal delivery of substrates via the cystic duct has been performed in 4-week-old FVB/N mice [13]. Older mice (>16 weeks) can be used; however, increased adiposity can make it difficult to visualize the hepatopancreatic duct in the surgical field, and age-related fibrosis or inflammation may partially limit AAV delivery within the pancreas.
2. In this study, we used 6-week-old female NOD.Cpefl/fl.ROSAmTmG mice [Cpetm1a(EUCOMM)Hmgu Gt(ROSA)26Sortm4(ACTB-tdTomato,-EGFP)Luo/J].
Reagents
1. General inhalation anesthetic isoflurane (Fresenius Kabi, catalog number: M60303)
2. Pharmaceutical-grade sterile 0.9% NaCl (B. Braun, catalog number: L8002)
3. Dulbecco’s phosphate-buffered saline (DPBS) (Gibco, catalog number: 14190144)
4. Ophthalmic lubricant (Optixcare®) (Aventix, catalog number: B07CQ9MN9Y)
5. Meloxicam injectable (Metacam®) (Boehringer Ingelheim, catalog number: NDC 0010-6013-01)
6. Buprenorphine injectable (Temgesic®) (controlled substance; order through your institutional animal care facility)
7. Chlorhexidine skin disinfectant 4% (Stanhexidine®) (Omega Laboratories, catalog number: L0000014)
8. Pluronic F-68 non-ionic surfactant (Gibco, catalog number: 24040032)
9. Fast green dye (Sigma, catalog number: F7252)
10. Histoacryl tissue glue (B. Braun, catalog number: 1050052)
11. DietGel recovery enhanced water gel (ClearH2O, catalog number: 72-06-5022)
12. Ethyl alcohol 70% (Commercial Alcohols, catalog number: P016Ea95)
13. Prevail concentrate (Prevail, catalog number: 909-12305)
Solutions
1. AAV buffer (see Recipes)
2. AAV working solution (see Recipes)
3. Prevail working solution (see Recipes)
Recipes
1. AAV buffer
| Reagent | Final concentration | Quantity or volume |
|---|---|---|
| Fast green dye | 0.1% | 10 mg |
| Pluronic F-68 non-ionic surfactant | 0.001% | 1 µL |
| DPBS | 100% | 10 mL |
Prepare AAV buffer and filter sterilize. This buffer can be stored at room temperature.
2. AAV working solution
| Reagent | Final concentration | Quantity or volume |
|---|---|---|
| AAV stock solution (~1013 vg/mL) | 1011 vg/mouse | 10 µL |
| AAV buffer | 90% | 90 µL |
Prepare AAV working solution in a Biosafety Level 1 biological safety cabinet dedicated to virus work. The calculation is based on transducing a single young mouse (25–30g body weight) with AAV8, a serotype known for its pancreatic tropism [14]. It is advisable to produce or purchase self-complementary adeno-associated virus (scAAV) stocks with titers of at least 1013 viral genomes (vg)/mL. Viral dosage varies depending on the vector and gene of interest; therefore, pilot testing is recommended for each project to determine optimal conditions. AAV working solution should be freshly prepared and kept on ice prior to mouse surgery.
3. Prevail working solution
| Reagent | Final concentration | Quantity or volume |
|---|---|---|
| Prevail concentrate | 1× | 1 part |
| Tap water | 39 parts |
Prepare 1:40 working solution from Prevail concentrate; it is stable up to 30 days after dilution.
Laboratory supplies
1. 1 mL syringes (Air-Tite, catalog number: 14-817-179)
2. Insulin syringe (Air-Tite, catalog number: 76290-414)
3. 30 G needles (BD, catalog number: 305106)
4. 25 G needles (BD, catalog number: 305122)
5. 4-0 absorbable monofilament sutures (Ethicon, catalog number: Y513G)
6. 5-0 absorbable braided filament sutures (Ethicon, catalog number: J463G)
7. 100 mm Petri dishes (ESBE Scientific, catalog number: SPL-10090)
8. 4 × 4 gauze tissue (10 per surgery) (Safe Dent, catalog number: C6012)
9. 2 × 2 gauze tissue (10 per surgery) (Safe Dent, catalog number: C6011)
10. 6-inch cotton tipped swabs (10 per surgery) (Puritan, catalog number: 806-WC)
11. Autoclave pouches (Fisher Scientific, catalog number: 01-812-50)
12. 10 μL graduated pipette tips (Labcon, catalog number: 1038-260-000-9)
13. Surgical gloves (Ansell, ENCORE® Latex Acclaim)
Equipment
1. Large loop scissors (FST, catalog number: 14101-14)
2. Sharp tip scissors (FST, catalog number: 14002-12)
3. Blunt tip scissors (FST, catalog number: 14013-17)
4. Toothed micro-Adson forceps (FST, catalog number: 11019-12)
5. Serrated micro-Adson forceps (FST, catalog number: 11018-12)
6. Ring forceps (FST, catalog number: 11103-09)
7. Micro needle holder (FST, catalog number: 12500-12)
8. Colibri retractors (FST, catalog number: 17000-04)
9. Straight clip (ROBOZ, catalog number: RS-5452)
10. Curved clip (ROBOZ, catalog number: 5459)
11. Cordless small pet hair grooming trimmer (Oneisall, catalog number: N6)
12. Anesthetic machine (Dispomed, Moduflex System)
13. Ear notch (FST, catalog number: 24214-02)
14. V-shaped heating bed with microflex breather (E-Z systems, catalog number: HB-1000-V)
15. Hot-bead sterilizer (preheated to 250 °C) (FST, catalog number: 18000-45)
16. Dissection microscope with 0.5× Aux objective (Nikon, catalog number: MZ745T)
17. Ring light with dial (Nikon, catalog number: MXK60559)
18. Goose neck light source (Dolan-Jenner, catalog number: Mi-150)
19. Heating pad (Sunbeam, catalog number: 756-500-CNR)
20. Timer (Fisher, catalog number: 14-649-17)
21. Scale (Fisher, catalog number: 8343501667)
22. Trimmer (Oneisall N5, catalog number: CW03002)
Procedure
A. Preoperative preparations
1. The day before surgery (time needed: 1.5 h, including autoclave)
a. Autoclave all surgical instruments.
b. Autoclave surgical consumables (2 × 2 gauze tissue, 4 × 4 gauze tissue, and 6” cotton tipped swab; 10 of each per mouse).
Note: Place surgical instruments and surgical consumables in autoclave pouches for sterilization. Autoclave settings: 121 °C at a pressure of 15–30 psi for 30 min. Allow to cool in a clean, cool environment.
c. Autoclave a box of p10 pipette tips.
d. Prepare AAV buffer (see Recipes).
2. Surgery day (time needed: 100 min)
a. Don personal protective equipment, including surgical gloves, surgical gown, bouffant, and mask.
b. Record animal body weights and fill up post-surgical monitoring sheets.
c. Set up the mouse recovery station: place a paper towel–lined mouse cage on a heating pad. Also, place 1 mL syringes full of sterile 0.9% NaCl on the heating pad to preheat it.
d. Place the dissection microscope and the V-shaped heating bed inside the biosafety cabinet used for animal surgery. Spray the surgical surface, including microscope knobs, light source gooseneck, and the heating bed, with Prevail working solution and allow a 5-min contact time (Figure 1A).
e. Place the sterile instruments on the dominant-hand side of the workspace (Figure 1B).
f. Anesthetize the mouse with isoflurane in an induction chamber (4% in 1 L/min oxygen flow).
g. Perform a full-body scruff of the mouse to tighten the skin on the abdomen and shave the hair from the hip line toward the sternum with the shaver held at a 45° angle (Figure 1C). Wipe the shaved area to remove fur clippings. Transfer the mouse onto the V-shaped heating bed and fit a nose cone to deliver oxygen (0.8 L/min) and isoflurane (set to 2.5% and adjusted as needed to maintain the surgical plane of anesthesia). Confirm the depth of anesthesia using a toe-pinch or tail-pinch reflex test. Change gloves before beginning surgery.
h. Prepare the surgical drapes by cutting a central opening measuring 3 cm (length) × 2 cm (width) in 4 × 4 gauze pads.
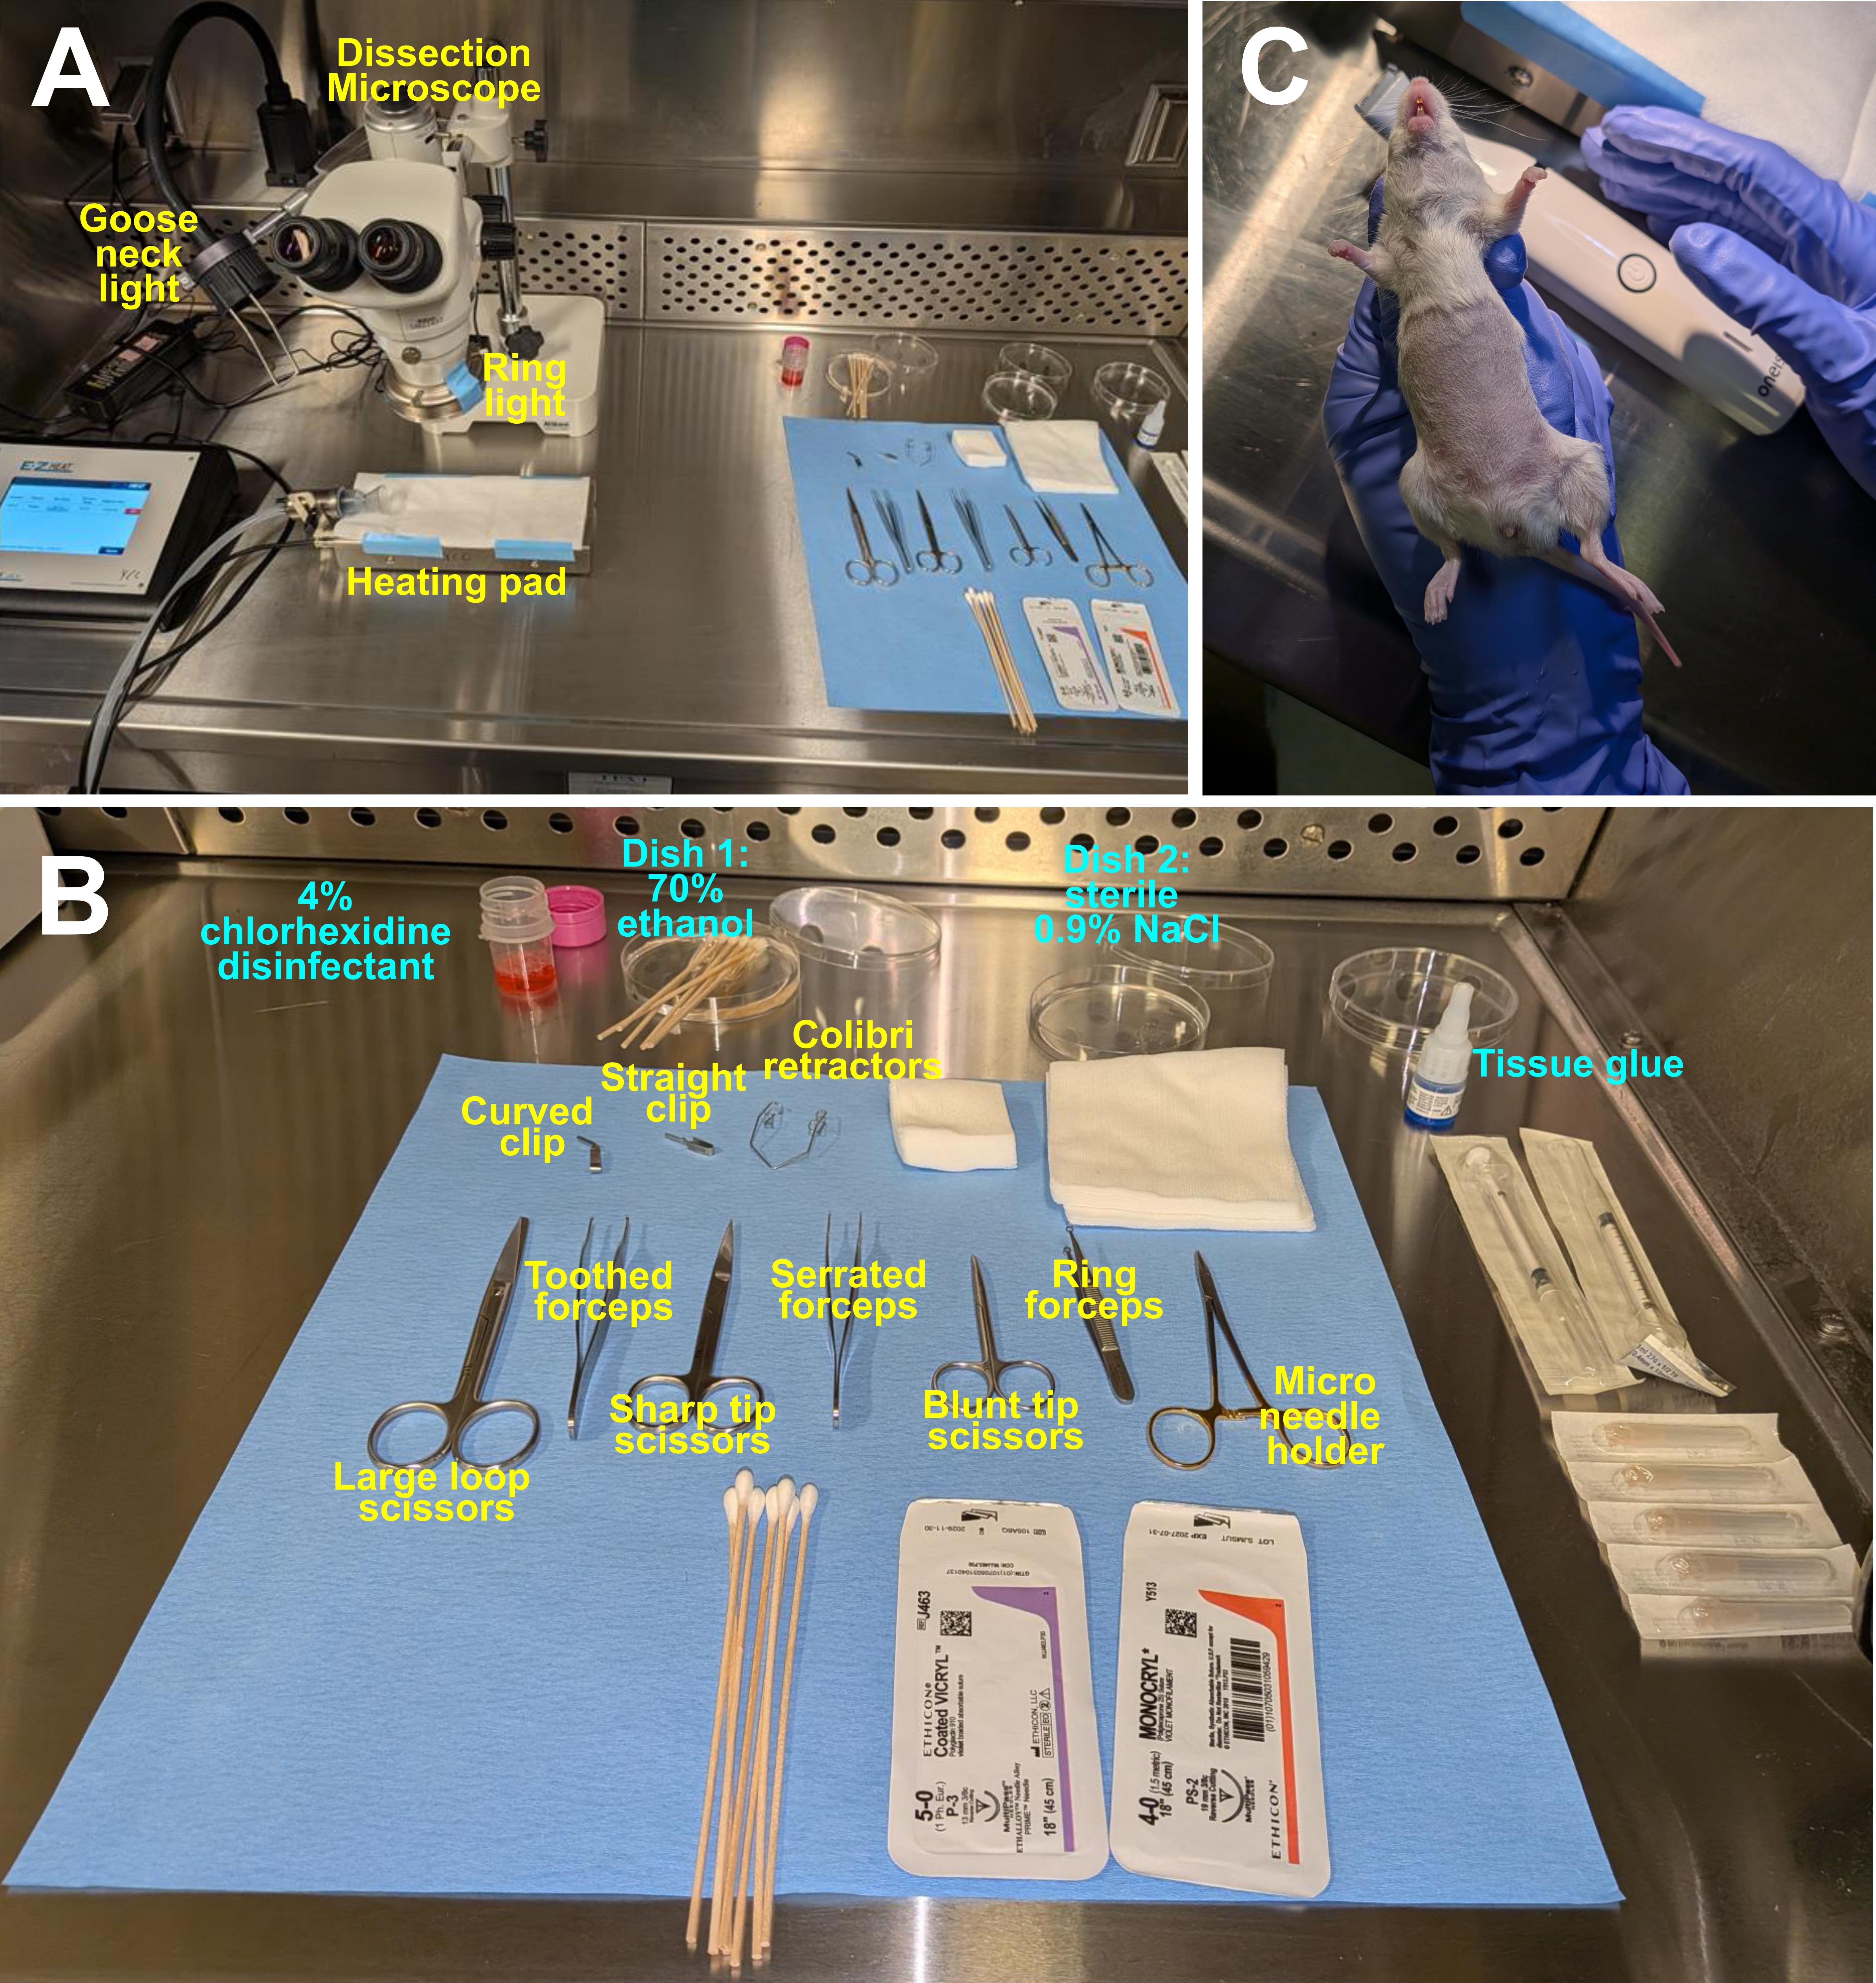
Figure 1. Preparation for intraductal injection surgery. (A) Dissection microscope, heating pad, light sources, and surgical tools are prepared under a biosafety cabinet designated for procedures involving adeno-associated virus (AAV) treatment in mice. (B) Surgical tools used in intraductal surgery. (C) Shaving the experimental mice.
B. Intraductal injection surgery
Note: Each mouse takes 30–45 min to complete.
1. Access the peritoneal cavity by midline laparotomy
a. Apply one small drop of ophthalmic lubricant to each eye, taking care not to touch the cornea.
b. Inject meloxicam (5 mg/kg) and buprenorphine (0.1 mg/kg) subcutaneously immediately before surgery.
c. Disinfect the shaved area of the abdomen three times with chlorhexidine, followed by a single wipe with 70% ethyl alcohol using a cotton swab, moving in a circular motion from the center outward (Figure 2A). Never bring a used tip back to the center.
d. Cover the mouse with a surgical drape (prepared as described in step A2h).
e. Use toothed forceps to gently lift the skin at the lower abdomen and make a small initial incision using the sharp tip scissors, taking care not to penetrate the muscle layer.
f. Lift the skin and extend the incision cranially along the midline for approximately 1 inch, keeping the skin elevated.
g. Grasp the sternum with serrated forceps and make a small incision in the muscle layer using sharp tip scissors.
h. Lift the muscle layer with serrated forceps and extend the incision along the midline for approximately 1 inch using blunt-end scissors, taking care to avoid damage to internal organs.
i. Insert a retractor into the muscle incision to maintain exposure of the abdominal cavity during surgery (Figure 2B).
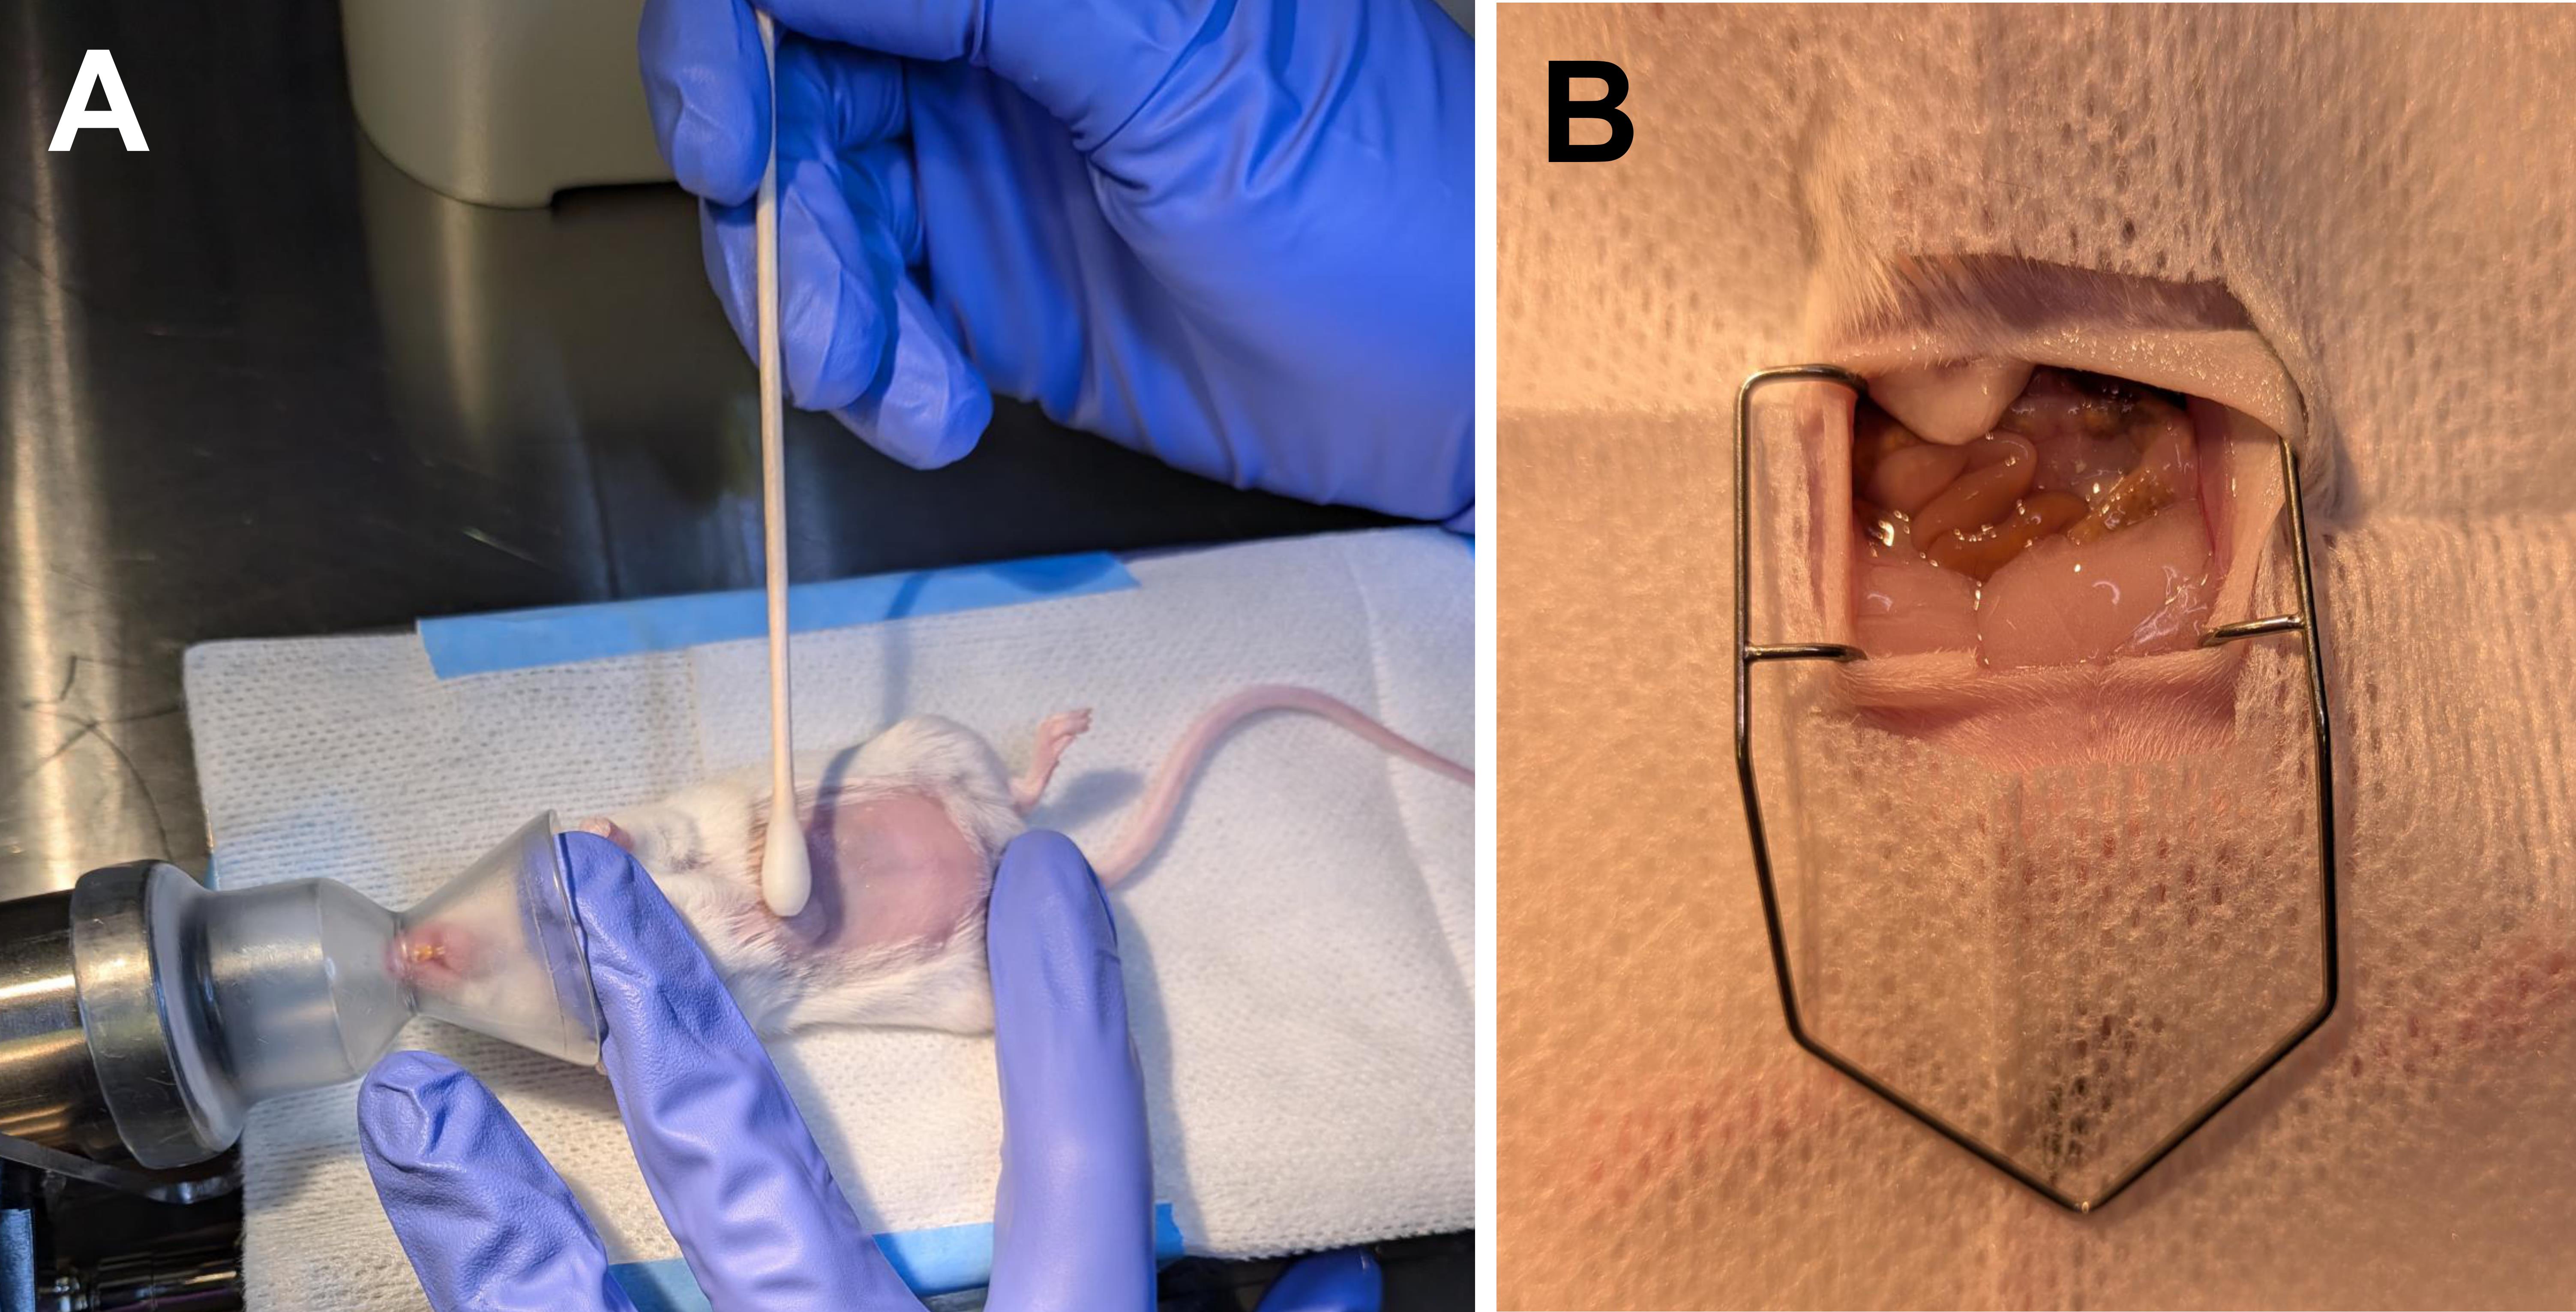
Figure 2. Midline laparotomy. (A) Aseptic preparation of the surgical site prior to incision. (B) Insertion of the retractor.
2. Intraductal injection
a. Adjust the lighting and position the mouse under the dissecting microscope. Adjust the microscope objective as needed.
b. Gently lift the retractor to create space for liver manipulation.
c. Use a sterile 0.9% NaCl–wetted cotton-tipped applicator to gently flip the liver upward.
Critical: Avoid touching the liver with surgical tools, as it is highly vascularized and easily damaged.
d. Use ring forceps to gently pull the duodenum downward to expose the duodenal papilla, the pale ampulla on the duodenum at the end of the hepatopancreatic duct; see Figure 3A.
e. Rotate the surgical stage so that the mouse’s head is angled 45° toward the non-dominant hand. Straighten the duodenum with the ring forceps using the non-dominant hand.
f. Using the dominant hand, apply a straight clip beneath the duodenal papilla.
Critical: Perform this step slowly and deliberately to ensure proper clip placement (Figure 3B).
Notes:
1. While holding the clip in the open position, gently use the clip to grasp the intestine, including the tissue surrounding the duodenal papilla, then slowly close the clip to prevent clip displacement. Proper clip placement results in a straightened hepatopancreatic duct with the duodenal papilla positioned directly above the clip, which is essential for successful intraductal injection. See Troubleshooting 1.
2. If clip placement is suboptimal, the clip may be gently removed and the clamping repeated. Ensure that the tissue is fully released before removing the clip. Never pull on the tissue during clip release, as this may cause intestinal rupture.
g. Reposition the surgical stage so that the mouse’s head points to the operator.
h. Using the non-dominant hand, take a sterile 0.9% NaCl–wetted cotton-tipped swab and gently flip the liver away to expose the hepatopancreatic duct. With the dominant hand, take the curved clip, position it as close to the gallbladder as possible while avoiding the portal vein beneath the hepatopancreatic duct, and carefully close the clip.
i. Moisten all exposed tissues with sterile 0.9% NaCl using a cotton swab, and continuously monitor tissue hydration throughout the procedure, reapplying sterile 0.9% NaCl as needed.
j. Adjust the dissecting microscope’s magnification and lighting to obtain a clear view of the hepatopancreatic duct and duodenal papilla.
k. Attach a 30 G needle to a 1 mL syringe and slowly pull the plunger back to suck in about 10 µL of air (to create an air lock to prevent post-injection leakage). After this is done, fill the syringe with the AAV working solution through the needle. Using a needle driver, grasp the 30G needle at its midpoint and bend the shaft to a 45° angle. Ensure the bend is made on the bevel side (Figure 3C), so that when the syringe is held vertically, the bevel faces upward and is angled correctly for insertion into the duct.
l. Hold the straight clip firmly between the thumb and index finger of the non-dominant hand, as it is small and may slip. Carefully insert the needle into the duodenal papilla, advance it approximately 2 mm into the hepatopancreatic duct, and slowly inject the solution at 2 µL/s (Figure 3C).
Critical: Perform this step slowly.
Note: Make sure to obtain a very clear view of the hepatopancreatic duct and duodenal papilla. Advance the needle slowly and steadily into the hepatopancreatic duct. See Troubleshooting 2.
m. The pancreas should appear slightly inflated, and the dye should be visible within the pancreas (Figure 3D).
n. Using a sterile p10 pipette tip, apply a tiny dab (0.3 µL) of Histoacryl tissue glue on the insertion site. Allow the adhesive to polymerize completely for 1 min. During this time, the pressure inside the pancreas will equilibrate and prevent AAV flow into the gallbladder after the clamps are removed.
o. Carefully remove both clamps.
p. Lift the retractor and return all exposed organs to their original positions within the body cavity, gently pushing them with a sterile 0.9% NaCl–wetted cotton-tipped swab. Re-moisten organs with sterile 0.9% NaCl–wetted cotton-tipped swabs and carefully remove the retractor.
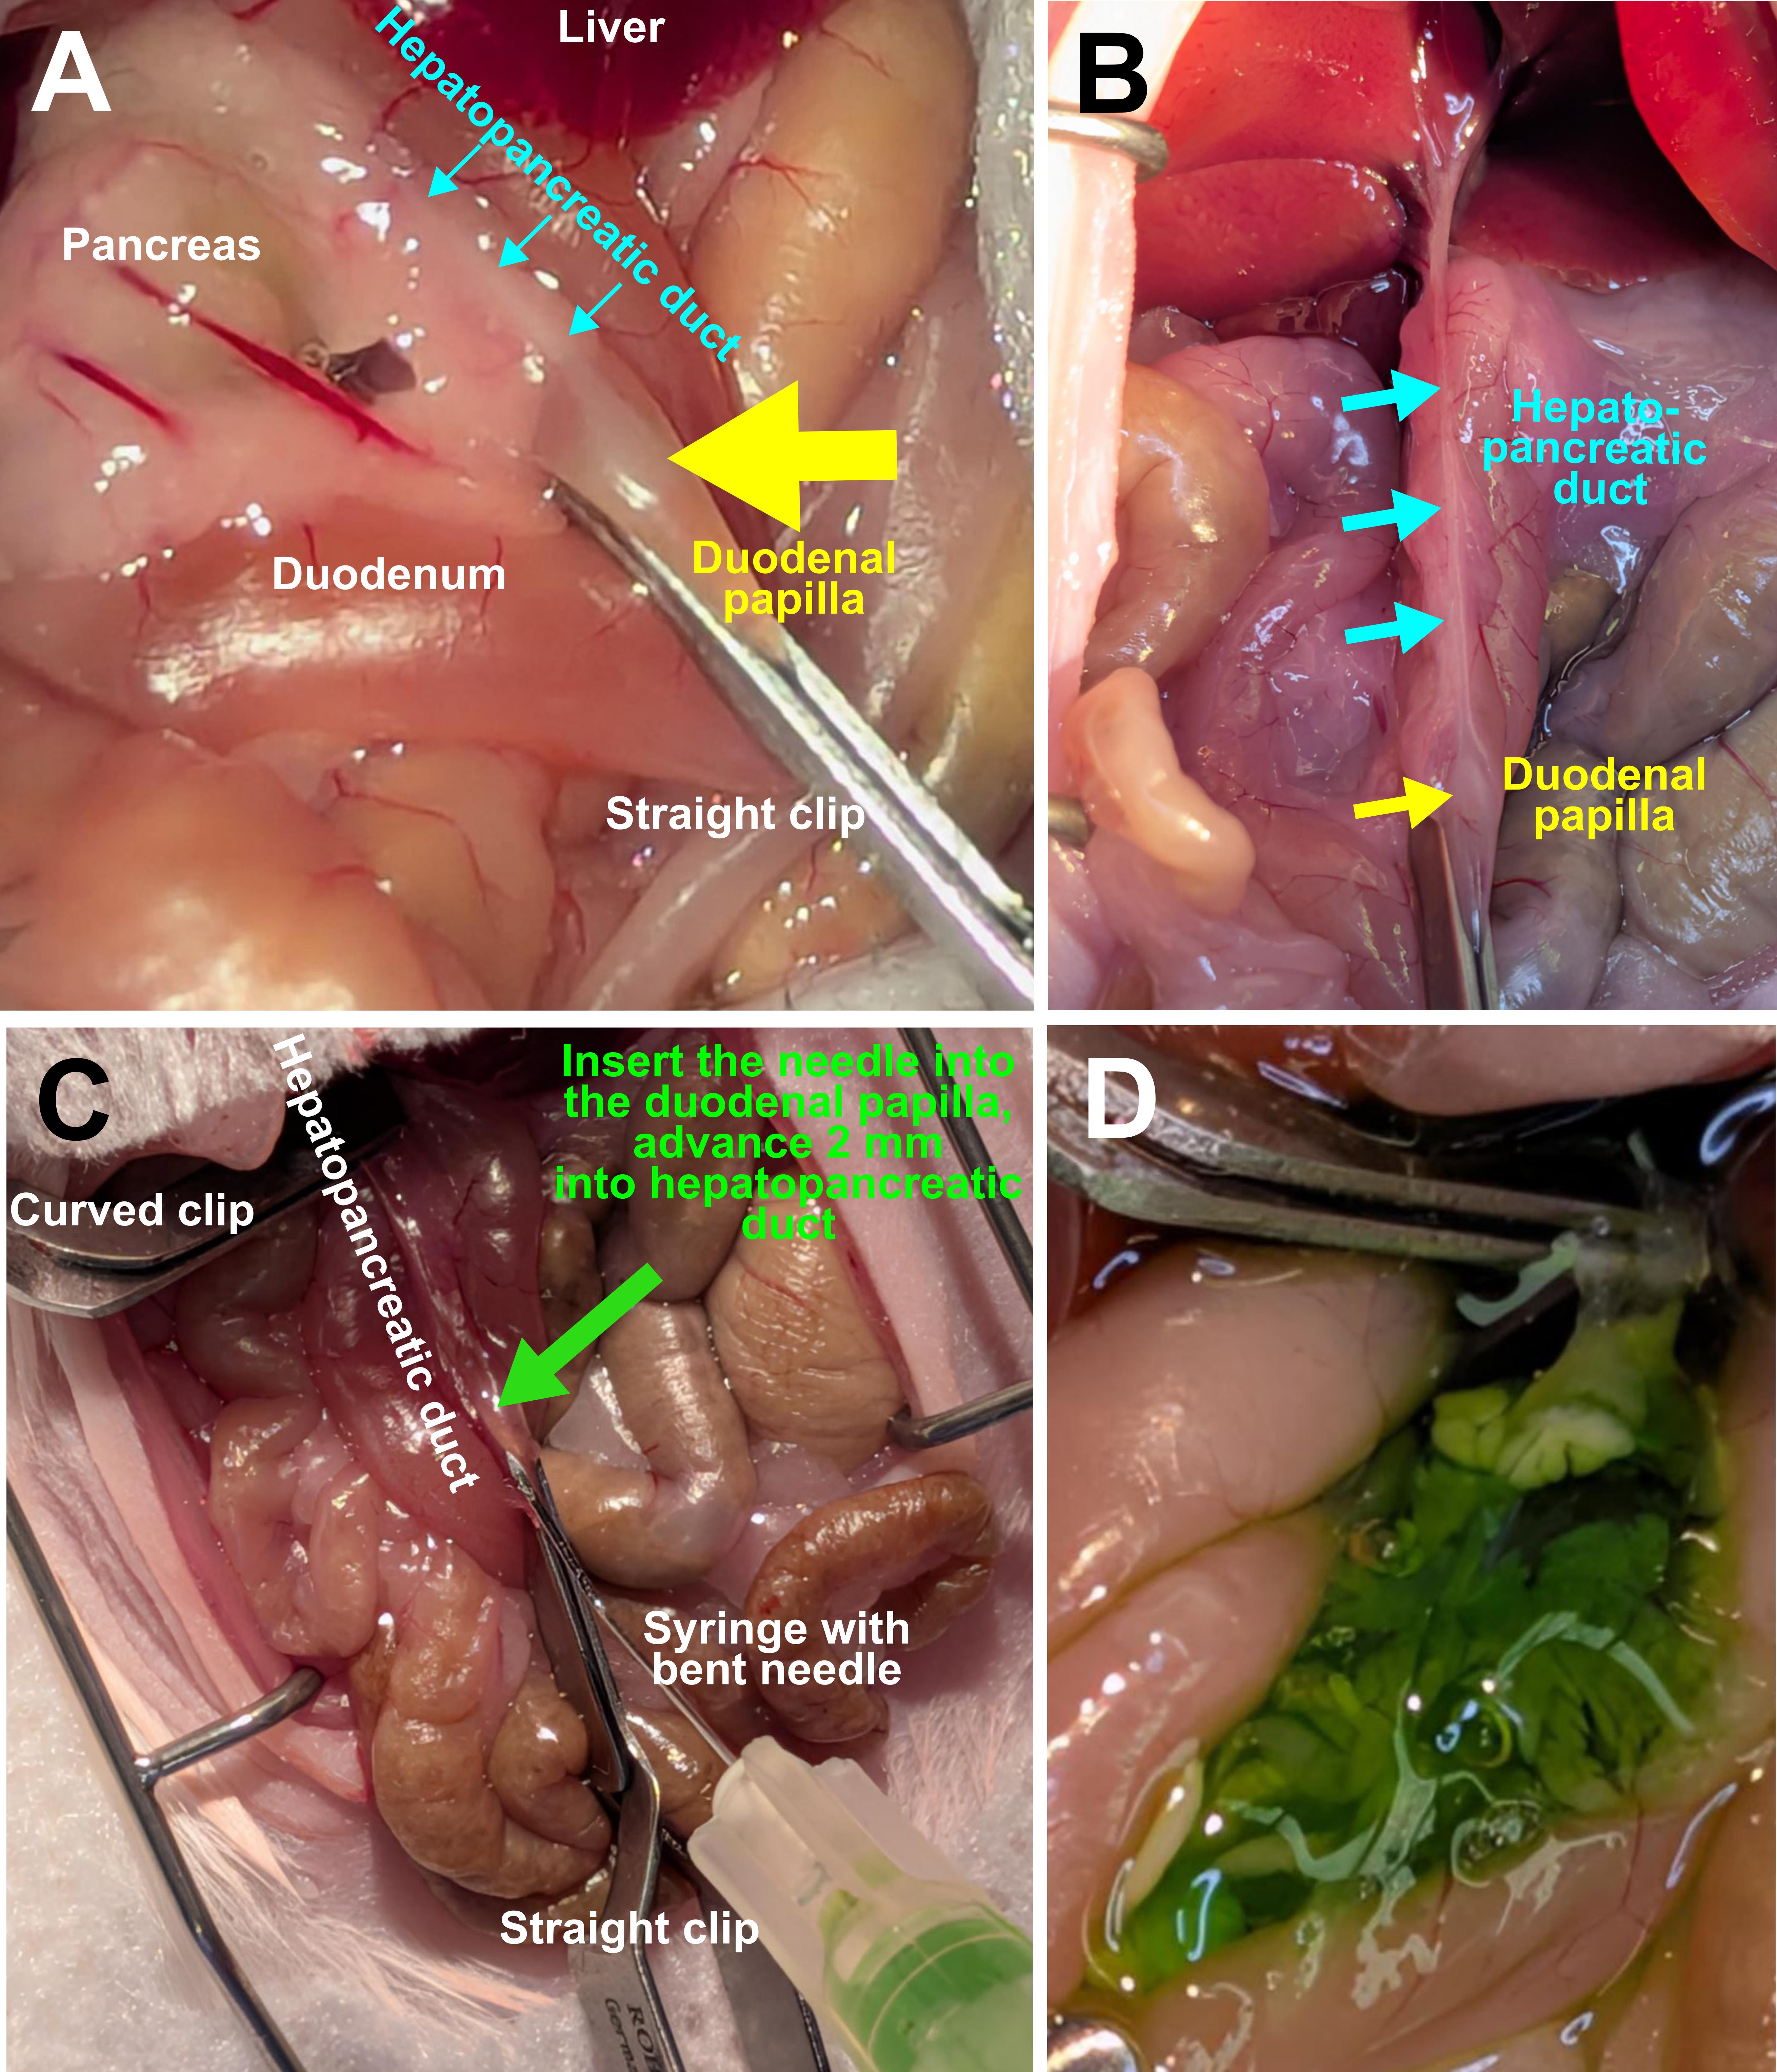
Figure 3. Clamping and injection. (A) Insert the straight clip underneath the duodenal papilla and clamp the duodenum to lift the injection site and prevent leakage into the duodenum. (B) Hold the straight clip and align it in a straight line from the duodenal papilla to the hepatopancreatic duct. (C) After placing the curved clip to clamp the hepatopancreatic duct (near the liver), insert the bent needle into the duodenal papilla, and slowly advance the needle into the hepatopancreatic duct. (D) The use of dye facilitates confirmation of successful pancreatic infusion.
3. Surgical site closure and postoperative care
a. Close the muscle layer with a running stitch using the 5–0 braided absorbable suture. Each new stitch should be 3–5 mm apart. Make sure to suture the muscle but not the fat tissue.
b. Push air out of the body cavity before closing the last stitch on the muscle layer with a square knot. Cut off the remaining suture to end the running suture.
c. Using the 4–0 monofilament absorbable suture, start a running stitch to close the skin layer. Make a square knot at the top of the incision, placing it on the inner side of the skin. Start stitching by always pushing the needle from the inside to the outside, 2–3 mm away from the edge. Gently pull the thread to evenly tighten the stitches. Do not over-tighten to avoid overlapping the skin edges. Continue placing the stitches 2 mm apart. Use the modified Aberdeen knot to finish your suture. Briefly, at the end of your continuous suture, leave a large loop. Hold the loop open, grab the suture (with the needle), pass it through the loop twice, and carefully tighten. Pass the needle through the adjacent skin from the inside out and pull gently until the knot buries inside. Cut the thread at a length of 2–3 mm and stretch the skin. The thread end should disappear inside.
Note: A running stitch is used to reduce procedure time and aid in recovery. Please consult with your facility vet for the best practices.
d. Administer 0.5 mL of warmed sterile 0.9% NaCl subcutaneously. Turn off the isoflurane and turn up the oxygen to 1 L flow level, allowing the mouse to gradually wake up.
e. Transfer the mouse to the recovery station and monitor closely. Once the mouse regains motor control and begins grooming, transfer it to a clean cage housed with other postoperative mice and provide access to an enhanced water gel. Position the cage partially on a heating pad to allow the mouse to self-regulate body temperature during full recovery.
f. After full recovery from anesthesia, transfer mice to the housing room and monitor every 2 h. Animals should be checked until 5:00 PM if surgeries are completed before noon, or again in the early evening if performed in the afternoon. Administer a pain control regimen in strict accordance with your institutional standard operating procedures. Inspect the incision site the following day for inflammation, infection, or suture failure, and complete postoperative monitoring records. Administer 0.5 mL warmed sterile 0.9% NaCl subcutaneously daily until mice start to gain weight.
4. Between mice
a. Sterilize surgical instruments using a hot-bead sterilizer for 20 s before preparing the next mouse for surgery.
b. Allow instruments to cool for at least 5 min before initiating surgery on the next mouse to prevent thermal injury.
c. Replace the surgical instruments with a fresh set of autoclaved instruments after every five mice.
Data analysis
The effects of the procedure (i.e., gene recombination or overexpression) should be achieved at 2 weeks post-viral injection. However, it is recommended that in vivo assays be performed 1 month post-procedure to allow sufficient recovery and to minimize the risk of wound rupture. Here, we present two standard assays to evaluate transduction efficiency and cell type specificity.
1. Flow cytometry: Intraductal injection enables highly cell type–specific gene delivery while requiring lower viral doses than intraperitoneal administration.
a. NOD.Cpefl/fl.ROSAmTmG mice were administered with scAAV8-Ins1Cre at the indicated doses and via the specified routes: 1 × 10¹² GC/mouse intraperitoneally (IP, n = 3), 5 × 10¹¹ GC/mouse intraductally (ID, n = 3), or 1 × 10¹¹ GC/mouse intraductally (n = 3). scAAV8-Ins1Cre-treated mice are expected to express Cre recombinase in insulin-positive β cells, resulting in gene recombination characterized by membrane GFP expression and absence of membrane tdTomato.
b. All mice were euthanized at 4 weeks post-viral injection.
c. Mouse islets were isolated [15], hand-picked, and dispersed to a single-cell suspension [16].
d. Islet cells were first stained with a viability dye, followed by fixation and permeabilization, and then stained with fluorophore-conjugated anti-insulin and anti-glucagon antibodies, as described [17].
e. GFP- and tdTomato-expression patterns in β cells (insulin-positive, glucagon-negative) were analyzed (Figure 4). Recombination efficiency was calculated via the equation below:
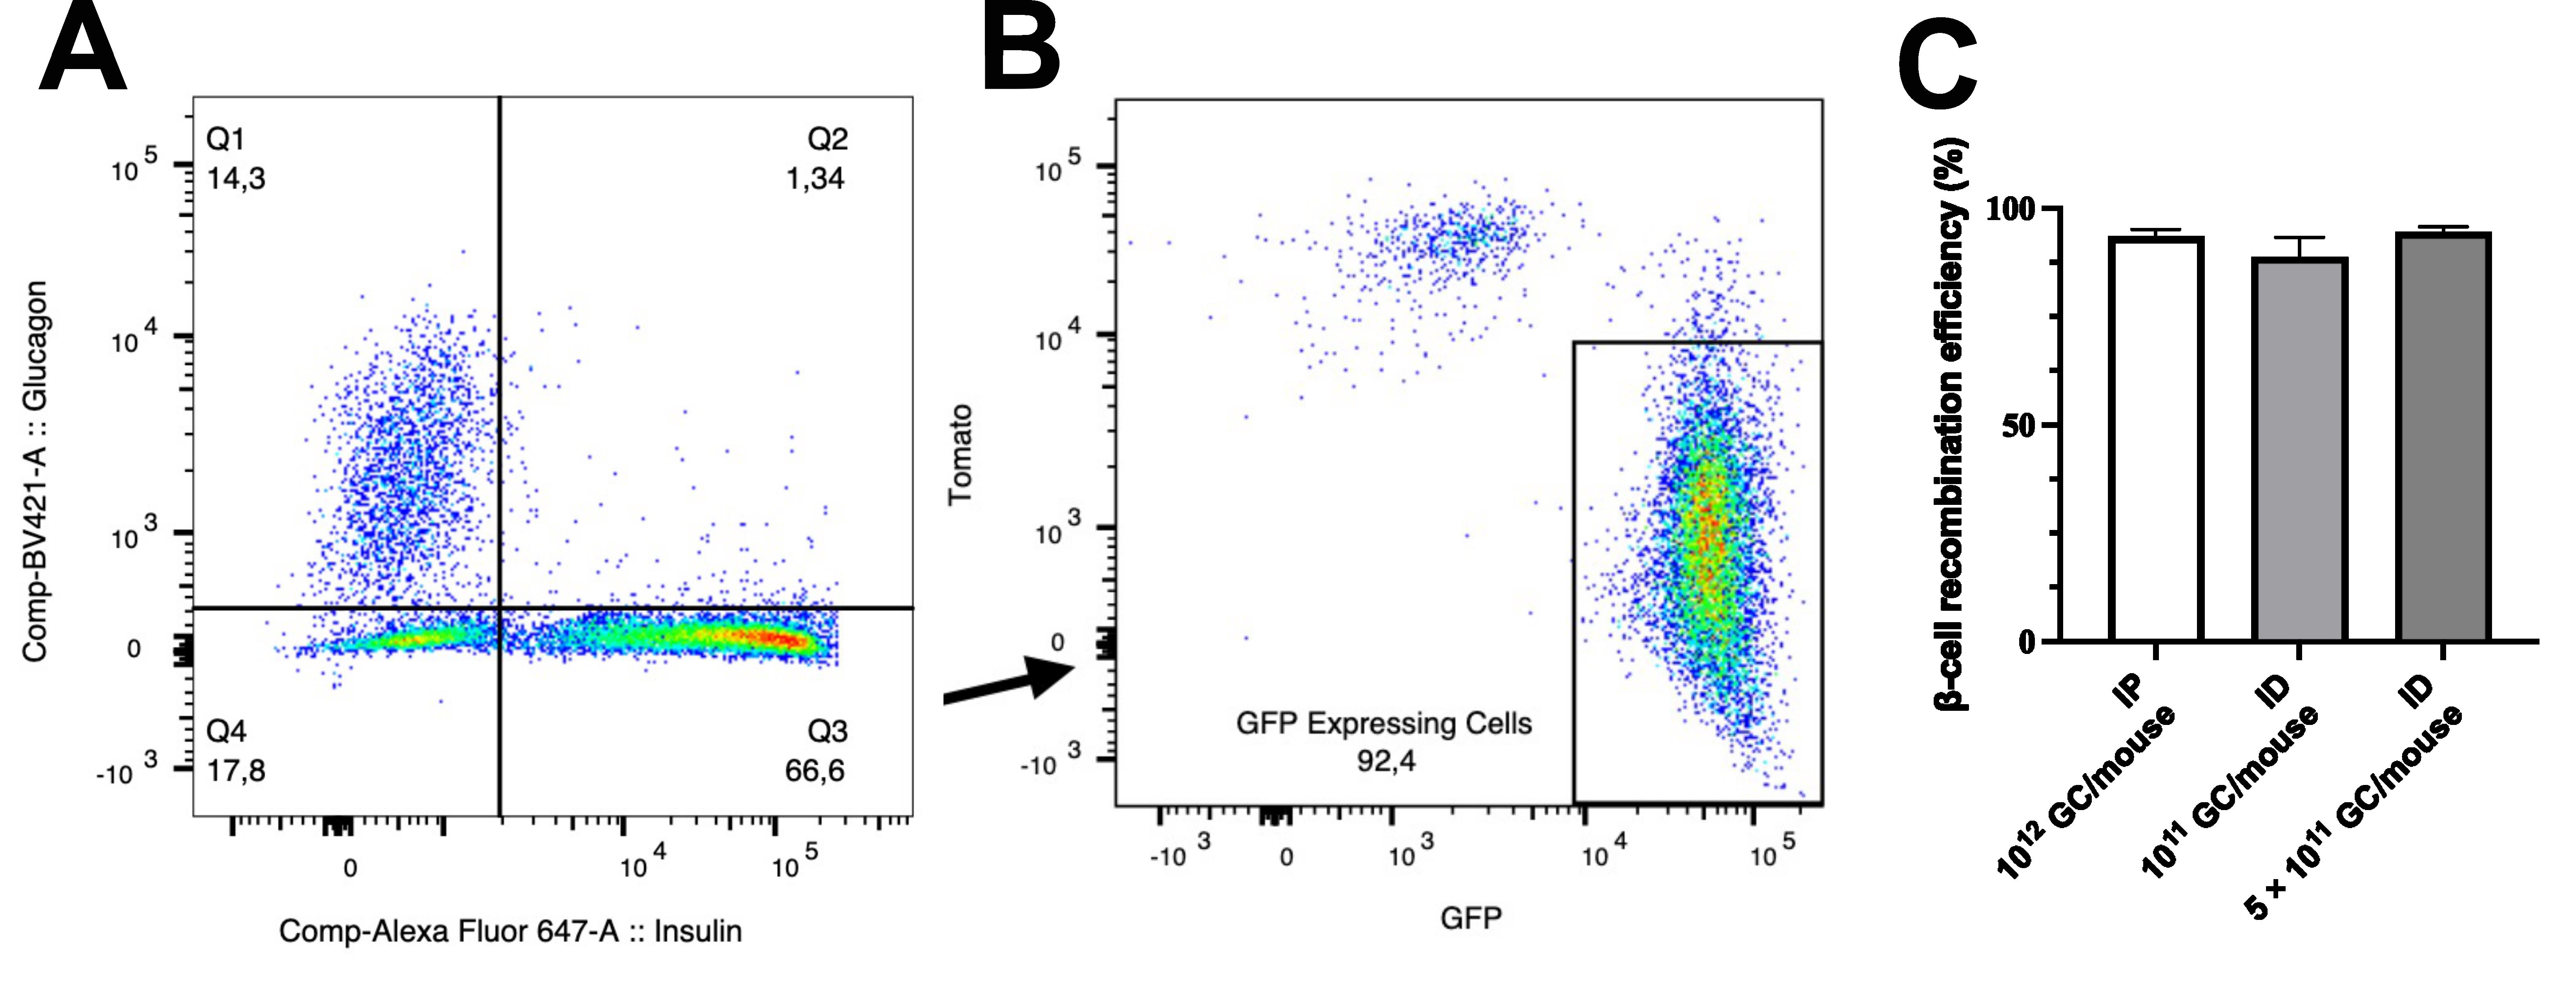
Figure 4. Evaluation of β-cell transduction efficiency via flow cytometry. (A, B) Single live pancreatic islet cells were stained with fluorophore-conjugated anti-insulin and anti-glucagon antibodies, and cells in quadrant 3 (Q3, lower right corner) were analyzed for GFP and tdTomato expression patterns; GFP-expressing β cells represent cells successfully transduced with scAAV8-Ins1Cre and have undergone gene recombination. (C) Quantitative analysis of β-cell recombination efficiency in mice administered with 1 × 10¹² GC/mouse intraperitoneally (IP, 93.43 ± 1.702%), 1 × 10¹¹ GC/mouse intraductally (ID, 88.73 ± 4.518%), or 5 × 10¹¹ GC/mouse intraductally (94.43 ± 1.247%). Data are expressed as mean ± SEM. Statistical analysis using one-way ANOVA revealed no significant differences among groups (n = 3 per group).
2. Immunostaining: Verification of cell type–specific protein deletion.
a. NOD.Cpefl/fl mice were administered with 1 × 10¹¹ GC/mouse scAAV8-Ins1Cre or scAAV8-Ins1Empty intraductally. In scAAV8-Ins1Cre-treated mice, Cre expression in insulin-positive β cells drives recombination, leading to Cpe deletion.
b. All mice were euthanized at 4 weeks post-viral injection.
c. Mouse pancreases were fixed, paraffin-embedded, and sectioned to 5 µm thickness. Pancreatic sections were stained with antibodies against insulin and Carboxypeptidase E (Cpe), as described [18], and images were taken using a confocal microscope (Figure 5).
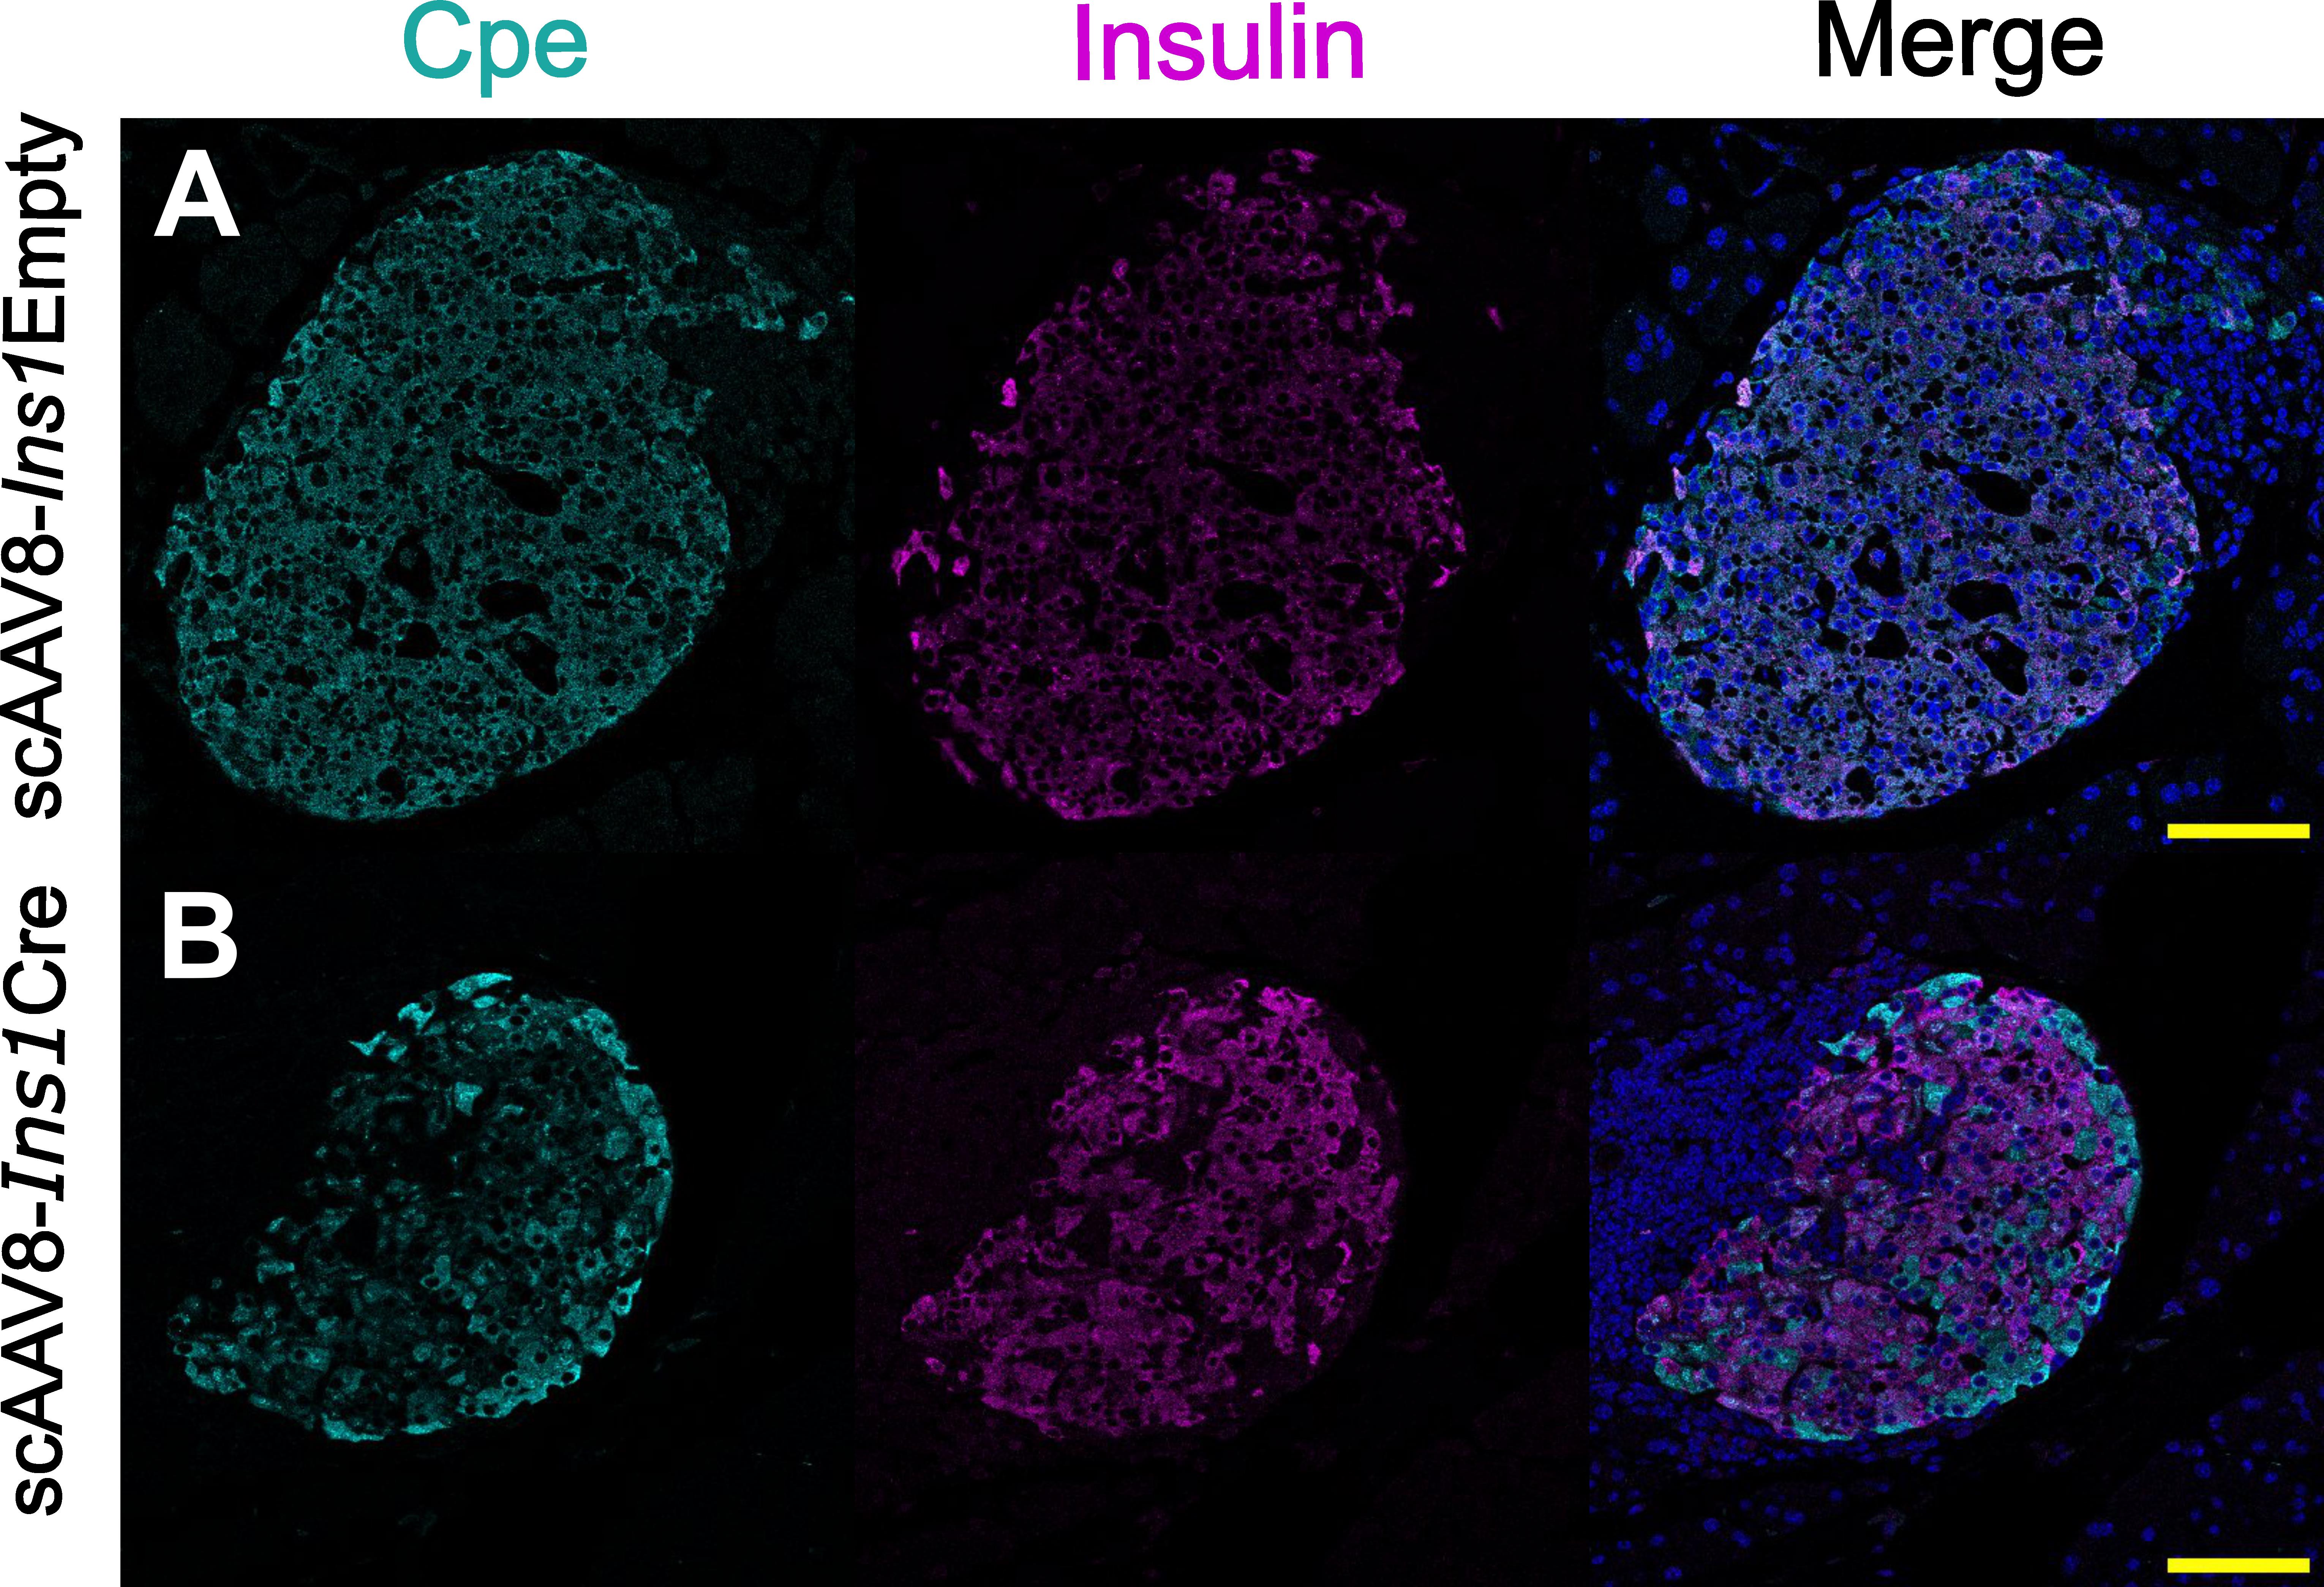
Figure 5. Evaluation of cell type–specific transduction immunofluorescence staining. Pancreatic sections from NOD.Cpefl/fl mice intraductally injected with 1 × 10¹¹ GC/mouse scAAV8-Ins1Empty (A) or scAAV8-Ins1Cre (B) were stained with anti-Cpe and anti-insulin antibodies, and islets were imaged using a confocal microscope (scale bars, 75 μm). In islets from scAAV8-Ins1Cre-treated mice, Cpe expression was markedly reduced in insulin-positive β cells but remained unchanged in non-β cells. Notably, the insulin antibody used (Agilent, IR00261-2) detects both proinsulin and mature insulin. Loss of Cpe increases proinsulin levels [19], resulting in elevated insulin immunostaining.
Note: Intrapancreatic ductal administration of the AAV8 vector without a tissue-specific promoter may result in modest non-pancreatic transgene expression (such as in the liver and gallbladder); incorporating a tissue-specific promoter is highly recommended. Additional validation of potential off-target transduction in liver and gallbladder cells may also be helpful, for example, by assessing GFP+ tdTomato- cells using flow cytometry (Figure 4), as well as target protein expression by immunostaining (Figure 5), or target gene expression by qRT-PCR.
Validation of protocol
This protocol has been used in the following research articles:
Obach et al. [20]. Prevention of autoimmune diabetes and islet allograft rejection by beta cell expression of XIAP: Insight into possible mechanisms of local immunomodulation. Molecular and Cellular Endocrinology. (Figure 1A, C, D)
Ramzy et al. [11]. AAV8 Ins1-Cre can produce efficient β-cell recombination but requires consideration of off-target effects. Scientific Reports. (Figure 4D, E; Figure 6G, H)
General notes and troubleshooting
General notes
1. The intraductal injection procedure requires practice for a reliable performance; operators with prior experience in islet isolation [21] are often able to efficiently develop proficiency in duct cannulation and injection techniques.
2. Recombination efficiency or level of gene overexpression may vary among genes. Therefore, it is recommended to perform preliminary experiments to determine the optimal viral dose and/or scAAV design for each target gene, as well as to assess cell-type specificity.
3. The intraductal injection surgery requires a high level of attention. Surgeries should be conducted in small cohorts, with breaks between animals to maintain precision and reduce operator fatigue.
4. This AAV-mediated approach is not suitable for developmental or early-stage studies because it does not produce germline integration, requires mice to reach a certain age for surgery, and needs 2–4 weeks before phenotypes can be assessed.
Troubleshooting
Problem 1: AAV solution leaking into the intestine immediately after viral injection.
Possible cause: Improper clamping underneath the duodenal papilla.
Solution: Position the clip beneath the duodenal papilla, clamp sufficient tissue to obstruct intestinal access while elevating the duodenal papilla, and maintain a straight, visible alignment with the hepatopancreatic duct (Figure 3).
Problem 2: Rupture of the duodenal papilla or hepatopancreatic duct.
Possible cause A: Advancing the needle too quickly, resulting in ductal perforation and leakage. Cavity will show a yellow color by autopsy if there is bile leakage.
Solution: Hold the straight clip firmly with the non-dominant hand and, using the dominant hand, slowly and steadily insert and advance the needle into the duodenal papilla toward the hepatopancreatic duct. Ensure that the needle remains stationary while depressing the syringe. If needed, place a 10-mm Petri dish beneath the wrist of the dominant hand to provide additional stabilization.
Possible cause B: Continuing injection after feeling resistance in the syringe.
Solution: Abort the injection by slowly retracting the needle. Try to reinsert the needle or switch to a new needle to complete the injection.
Problem 3: Mouse experiences poor post-surgical recovery.
Possible cause: Procedure takes longer than 45 min.
Solution: Practicing on cadavers beforehand is recommended to ensure proficiency.
Acknowledgments
This protocol was modified from Guo et al. Lab Invest (2013) DOI: 10.1038/labinvest.2013.113.
Conceptualization, G.S., C.B.V., Y-C.C.; Investigation, G.S., L.D., M.K., Y-C.C.; Writing—Original Draft, L.S., Y-C.C.; Writing—Review & Editing, G.S., L.S., L.D., M.K., V.A., J.D.J., C.B.V, Y-C.C.; Funding acquisition, C.B.V., Y-C.C.; Supervision, Y-C.C. Funding sources: Canadian Islet Research Network NSERC-CREATE MSc studentship (to L.S.), Canadian Institutes of Health Research and Breakthrough T1D [TDP-186359 and 3-COE-2022-1103-M-B to C.B.V.; Research Excellence, Diversity, and Independence (REDI) Early Career Transition Award to Y-C.C.].
The following figure was created using BioRender: Graphical overview, BioRender.com/vtrofhr & BioRender.com/vhydzli.
Competing interests
The authors declare that they have no competing interests.
Ethical considerations
All animal procedures must be conducted in accordance with the institutional ethical guidelines, and the use of AAV must be approved by the institutional biosafety committee.
References
- Pandiri, A. R. (2013). Overview of Exocrine Pancreatic Pathobiology. Toxicol Pathol. 42(1): 207–216. https://doi.org/10.1177/0192623313509907
- Karpińska, M. and Czauderna, M. (2022). Pancreas—Its Functions, Disorders, and Physiological Impact on the Mammals’ Organism. Front Physiol. 13: e807632. https://doi.org/10.3389/fphys.2022.807632
- Campbell, J. E. and Newgard, C. B. (2021). Mechanisms controlling pancreatic islet cell function in insulin secretion. Nat Rev Mol Cell Biol. 22(2): 142–158. https://doi.org/10.1038/s41580-020-00317-7
- Bressler, N. M. (2022). JAMA Ophthalmology—The Year in Review, 2021. JAMA Ophthalmol. 140(5): 455. https://doi.org/10.1001/jamaophthalmol.2022.0441
- WHO (2024) Diabetes. https://www.who.int/news-room/fact-sheets/detail/diabetes. Accessed 5 Feb 2025
- Lee, J. W., Komar, C. A., Bengsch, F., Graham, K. and Beatty, G. L. (2016). Genetically Engineered Mouse Models of Pancreatic Cancer: The KPC Model (LSL‐KrasG12D/+;LSL‐Trp53R172H/+;Pdx‐1‐Cre), Its Variants, and Their Application in Immuno‐oncology Drug Discovery. Curr Protoc Pharmacol. 73(1): e2. https://doi.org/10.1002/cpph.2
- Ormandy, E. H. and Dale J. (2011). Griffin G. Genetic engineering of animals: ethical issues, including welfare concerns. Can Vet J. 52(5): 544–50. https://pubmed.ncbi.nlm.nih.gov/22043080/
- Bulcha, J. T., Wang, Y., Ma, H., Tai, P. W. L. and Gao, G. (2021). Viral vector platforms within the gene therapy landscape. Signal Transduction Targeted Ther. 6(1): e1038/s41392–021–00487–6. https://doi.org/10.1038/s41392-021-00487-6
- Jimenez, V., Ayuso, E., Mallol, C., Agudo, J., Casellas, A., Obach, M., Muñoz, S., Salavert, A. and Bosch, F. (2011). In vivo genetic engineering of murine pancreatic beta cells mediated by single-stranded adeno-associated viral vectors of serotypes 6, 8 and 9. Diabetologia. 54(5): 1075–1086. https://doi.org/10.1007/s00125-011-2070-3
- Guo, P., Wiersch, J., Xiao, X. and Gittes, G. (2019). Simplified Purification of AAV and Delivery to the Pancreas by Intraductal Administration. Methods Mol Biol. 1950: 373–387. https://doi.org/10.1007/978-1-4939-9139-6_22
- Ramzy, A., Tudurí, E., Glavas, M. M., Baker, R. K., Mojibian, M., Fox, J. K., O’Dwyer, S. M., Dai, D., Hu, X., Denroche, H. C., et al. (2020). AAV8 Ins1-Cre can produce efficient β-cell recombination but requires consideration of off-target effects. Sci Rep. 10(1): e1038/s41598–020–67136–w. https://doi.org/10.1038/s41598-020-67136-w
- Guo, P., Xiao, X., El-Gohary, Y., Criscimanna, A., Prasadan, K., Rymer, C., Shiota, C., Wiersch, J., Gaffar, I., Esni, F., et al. (2013). Specific transduction and labeling of pancreatic ducts by targeted recombinant viral infusion into mouse pancreatic ducts. Lab Invest. 93(11): 1241–1253. https://doi.org/10.1038/labinvest.2013.113
- Quirin, K. A., Kwon, J. J., Alioufi, A., Factora, T., Temm, C. J., Jacobsen, M., Sandusky, G. E., Shontz, K., Chicoine, L. G., Clark, K. R., et al. (2018). Safety and Efficacy of AAV Retrograde Pancreatic Ductal Gene Delivery in Normal and Pancreatic Cancer Mice. Mol Ther Methods Clin Dev. 8: 8–20. https://doi.org/10.1016/j.omtm.2017.09.006
- Jimenez, V., Ayuso, E., Mallol, C., et al. (2011) In vivo genetic engineering of murine pancreatic beta cells mediated by single-stranded adeno-associated viral vectors of serotypes 6, 8 and 9. Diabetologia. 54(5): 1075–1086. https://doi.org/10.1007/s00125-011-2070-3
- Salvalaggio, P. R. O., Deng, S., Ariyan, C. E., Millet, I., Zawalich, W. S., Basadonna, G. P. and Rothstein, D. M. (2002). Islet filtration: a simple and rapid new purification procedure that avoids ficoll and improves islet mass and function.. Transplantation. 74(6): 877–879. https://doi.org/10.1097/00007890-200209270-00023
- Cui, C., Leander, D. C., Gray, S. M., El, K., Chen, A., Grimsrud, P. A., Becker, J. O., Taylor, A., Zhang, G. F., Sloop, K. W., et al. (2025). α cells use both PC1/3 and PC2 to process proglucagon peptides and control insulin secretion. Sci Adv. 11(38): eady8048. https://doi.org/10.1126/sciadv.ady8048
- de Brito Monteiro, L., Archambault, A. S., Soukhatcheva, G., Dai, D., Velghe, J., Chen, Y. C., Verchere, C. B. and Klein Geltink, R. I. (2025). Assessment of protein synthesis rate enables metabolic profiling of resident-immune cells of the islets of Langerhans. Front Immunol. 16: e1662986. https://doi.org/10.3389/fimmu.2025.1662986
- Chen, Y. C., Taylor, A. J., Fulcher, J. M., Swensen, A. C., Dai, X. Q., Komba, M., Wrightson, K. L., Fok, K., Patterson, A. E., Klein Geltink, R. I., et al. (2023). Deletion of Carboxypeptidase E in β-Cells Disrupts Proinsulin Processing but Does Not Lead to Spontaneous Development of Diabetes in Mice. Diabetes. 72(9): 1277–1288. https://doi.org/10.2337/db22-0945
- Fulcher, J. M., Swensen, A. C., Chen, Y. C., Verchere, C. B., Petyuk, V. A. and Qian, W. J. (2023). Top-Down Proteomics of Mouse Islets With Beta Cell CPE Deletion Reveals Molecular Details in Prohormone Processing. Endocrinology. 164(12): e1210/endocr/bqad160. https://doi.org/10.1210/endocr/bqad160
- Obach, M., Hosseini-Tabatabaei, A., Montane, J., Wind, K., Soukhatcheva, G., Dai, D., Priatel, J. J., Orban, P. C. and Verchere, C. B. (2018). Prevention of autoimmune diabetes and islet allograft rejection by beta cell expression of XIAP: Insight into possible mechanisms of local immunomodulation. Mol Cell Endocrinol. 477: 48–56. https://doi.org/10.1016/j.mce.2018.05.015
- Corbin, K. L., West, H. L., Brodsky, S., Whitticar, N. B., Koch, W. J. and Nunemaker, C. S. (2021). A Practical Guide to Rodent Islet Isolation and Assessment Revisited. Biol Proced Online. 23(1): e1186/s12575–021–00143–x. https://doi.org/10.1186/s12575-021-00143-x
Article Information
Publication history
Received: Jan 26, 2026
Accepted: Mar 2, 2026
Available online: Mar 22, 2026
Published: Apr 20, 2026
Copyright
© 2026 The Author(s); This is an open access article under the CC BY-NC license (https://creativecommons.org/licenses/by-nc/4.0/).
How to cite
Readers should cite both the Bio-protocol article and the original research article where this protocol was used:
- Soukhatcheva, G., Stanley, L., Dai, L., Komba, M., Andriiets, V., Johnson, J. D., Verchere, B. C. and Chen, Y. (2026). Manipulation of Gene Expression in Mouse Pancreas via Intraductal Delivery of Adeno-Associated Viral Vectors. Bio-protocol 16(8): e5657. DOI: 10.21769/BioProtoc.5657.

 Download Citation in RIS Format
Category
Medicine
Microbiology > Heterologous expression system > Adeno-associated viruses
Biological Sciences > Biological techniques > Animal surgery
Do you have any questions about this protocol?
Post your question to gather feedback from the community. We will also invite the authors of this article to respond.
 Post a Question


