


- Protocols

- Articles and Issues
- For Authors
- About
- Become a Reviewer


Workflow for Crystallographic Fragment Screening by Crystal Soaking for Protein Targets: A Case Study on Thioredoxin Glutathione Reductase From Schistosoma mansoni

Published: Vol 16, Iss 8, Apr 20, 2026 DOI: 10.21769/BioProtoc.5651 Views: 635
Reviewed by: Joana Alexandra Costa ReisVandana MishraAnonymous reviewer(s)
 PDF
PDF  Ask a question
Original research article
The authors used this protocol in:

Jan 2024
Advertisement



Protocol Collections
Comprehensive collections of detailed, peer-reviewed protocols focusing on specific topics




Related protocols
Abstract
Among the biophysical techniques used in fragment-based drug discovery (FBDD) campaigns, crystallography is the most sensitive, allowing for the identification of low-affinity ligands and the characterization of protein–ligand complexes at atomic resolution. Although powerful, the proper application of this technique depends on obtaining crystals capable of diffracting X-rays at high resolution. Additionally, in crystallographic compound screening, the crystals must be resistant to multiple organic solvents used in chemical libraries, such as DMSO. In this protocol, we describe recombinant protein production suitable for crystallization and procedures for X-ray crystallographic screening of a library of 768 fragments. As a case study, we used the Schistosoma mansoni thioredoxin glutathione reductase (SmTGR), a redox enzyme with a key role in controlling oxidative stress in parasites of the Schistosoma genus, which causes schistosomiasis. As a validated pharmacological target, SmTGR is used in the development of new schistosomicidal drugs. The experimental pipeline includes SmTGR expression, purification, and crystallization, crystal soaking, diffraction data collection, and refinement. The 768 fragments from the Diamond-SGC Poised Library (DSPL) were individually soaked onto the crystals, and diffraction data were collected and processed at the I04-1 beamline of the Diamond Light Source synchrotron. Diffraction data were subsequently analyzed using PanDDA to identify fragment-binding events and to enable reliable detection of low-occupancy ligands within the protein crystal structures. In addition to the core experimental steps, this protocol incorporates systematic approaches to overcome limitations frequently encountered in crystallographic screening campaigns, including assessment of crystal solvent tolerance, acceleration of crystal mounting through the use of auxiliary devices, acoustic dispensing–based soaking of hundreds of fragments for low material consumption and high throughput, automated data collection, and efficient data analysis pipeline for the detection of weakly bound ligand. This protocol can be broadly applied to screen diverse compound sets against multiple targets amenable to crystallization.
Key features
• Obtaining SmTGR through expression in ExpiSf9 cells with proper yield and purity for crystallization assays.
• Systematic testing of buffer solutions to determine crystallization conditions, assessment of crystal tolerance to DMSO, and crystallographic data collection.
• Integration of crystallization, acoustic dispensing, shifter-aided crystal mounting, data collection, and analysis powered by an in-house software pipeline.
• This protocol builds upon the method developed by [1] and extends its application to other soluble proteins.
Keywords: SmTGR Protein production
Acoustic dispensing
Soaking
Crystallography
Fragment
Drug discovery
XChem
Protein production
Acoustic dispensing
Soaking
Crystallography
Fragment
Drug discovery
XChem
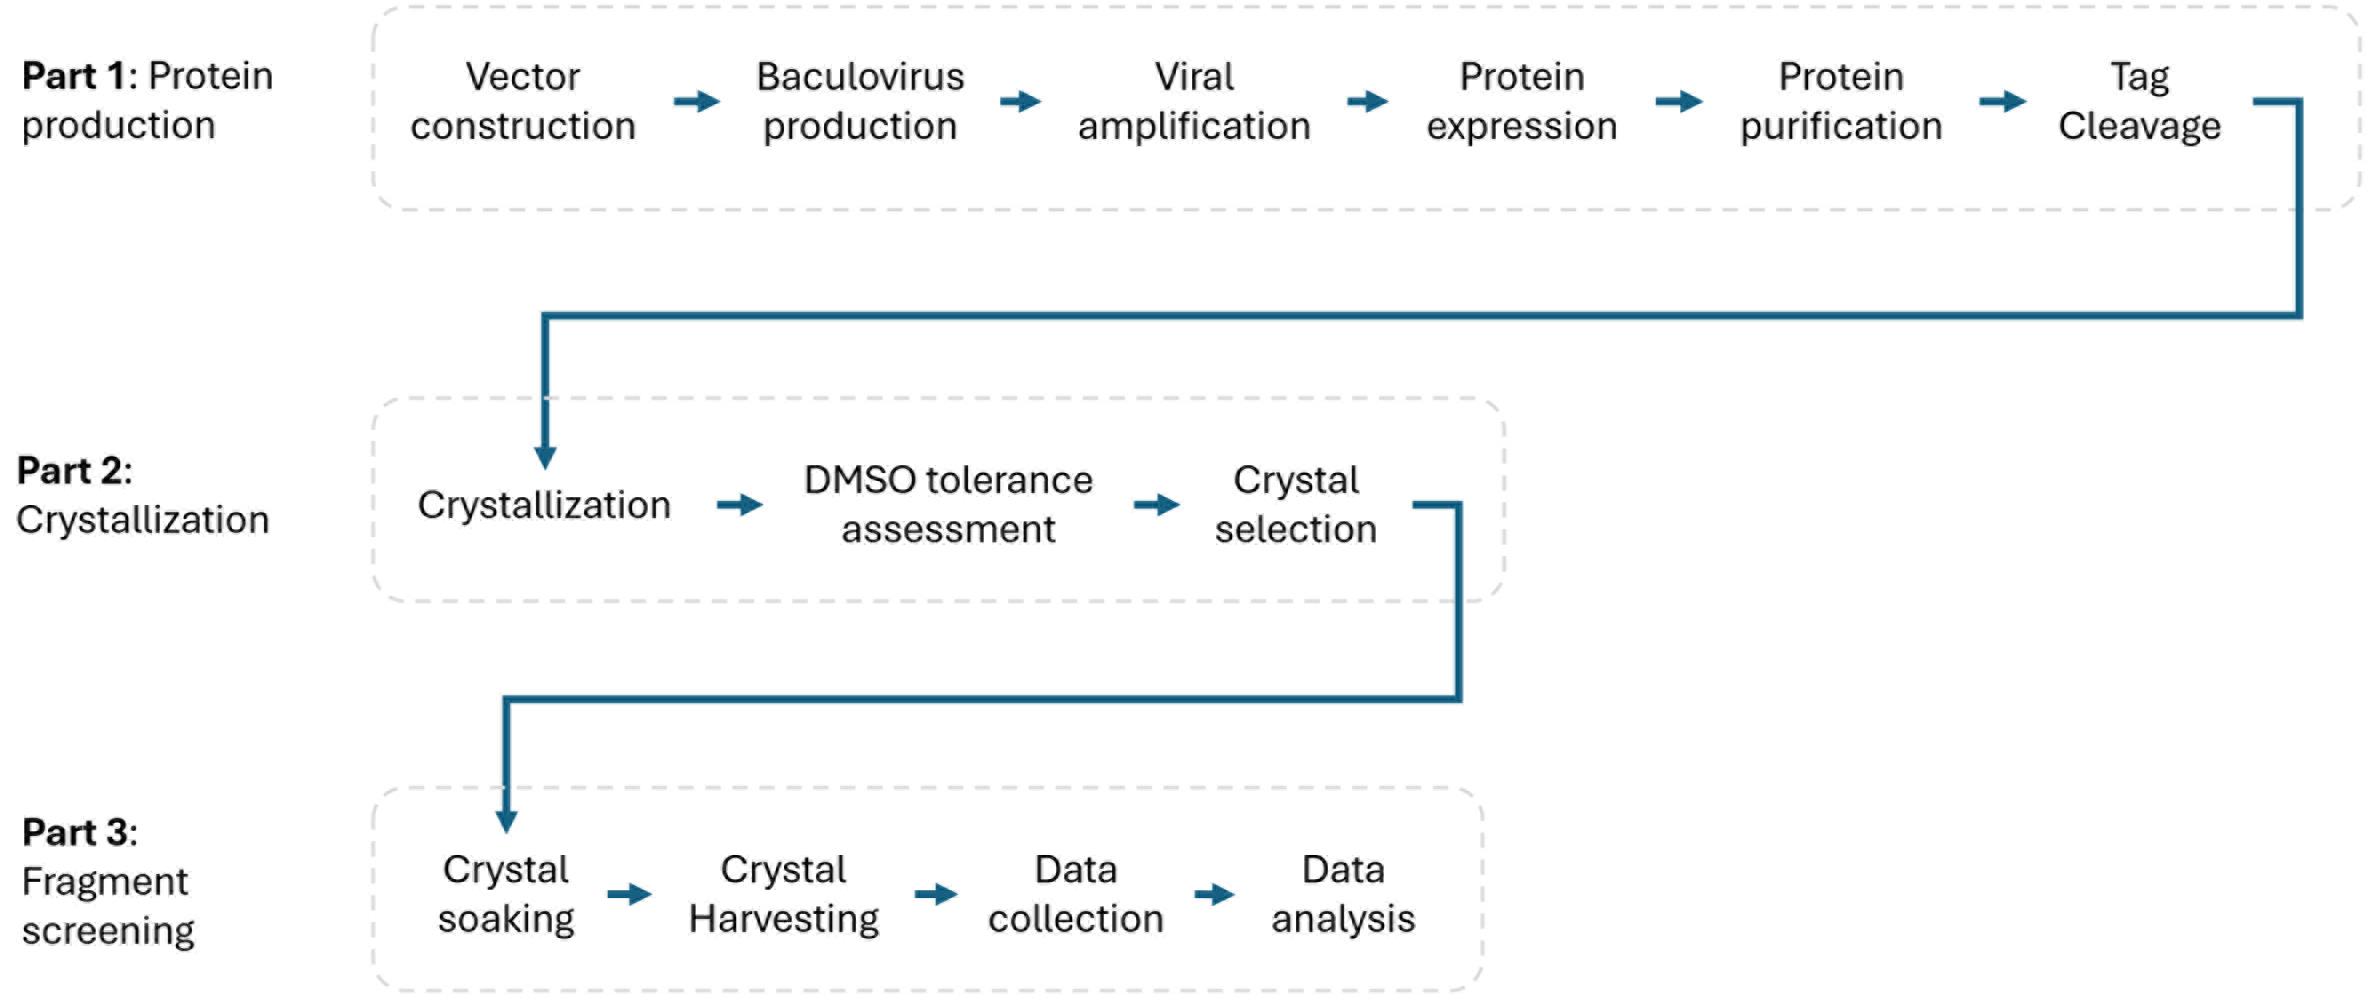
Graphical overview
Background
Recently, fragment-based drug discovery (FBDD) has gained prominence as a robust approach for drug development. Novel experimental setups have streamlined several stages of the process, accelerated workflows, and enhanced result throughput. When combined with advanced biophysical techniques such as X-ray crystallography, this method enables the identification of low-affinity ligands and facilitates detailed characterization of protein–ligand interactions at atomic resolution, which is essential for the rational design of new therapeutics [2].
Various methodologies have been employed in FBDD, including high-throughput screening and structure-based drug design [3]. However, the crystallography-based approach is particularly distinguished by its unique sensitivity to detect low-affinity ligands, such as fragments. Our protocol presents a comprehensive pipeline encompassing vector construction, baculovirus production, expression, purification, and crystallization of the target protein, followed by crystallographic screening of a small (near 800 compounds) fragment library. This systematic approach significantly accelerates the acquisition of high-quality crystals suitable for X-ray diffraction, which is crucial for identifying potential inhibitors. Moreover, in addition to the prerequisite of obtaining enough high-quality crystals, access to a synchrotron light source and to the integrated computational pipeline described herein are essential for the successful application of this protocol.
The targeting of Schistosoma mansoni thioredoxin glutathione reductase (SmTGR) is crucial in the search for effective treatments against schistosomiasis, a parasitic disease that affects millions globally. SmTGR is a redox enzyme that plays a vital role in managing oxidative stress within parasites, and it has emerged as a validated pharmacological target for developing new schistosomicidal drugs [4]. While crystallography offers detailed structural insights, it can be time-consuming and requires substantial expertise. Nonetheless, this protocol not only advances our understanding of SmTGR but also holds promise for investigating crystallizable protein targets across diverse contexts, thereby expanding its applicability in the field of drug discovery.
Materials and reagents
Biological materials
1. ExpiSf9 cells (Gibco, catalog number: A35243)
2. Escherichia coli StellarTM competent cells (Takara Bio, catalog number: 636763)
3. Diamond-SGC Poised Library (DSPL) (https://www.diamond.ac.uk/Instruments/Mx/Fragment-Screening/Fragment-Libraries/DSPL.html)
Reagents
1. Agar (Sigma-Aldrich, catalog number: A6686)
2. Ampicillin (Sigma-Aldrich, catalog number: A9393)
3. Anti-histidine tag antibody (Merck, catalog number: SAB1306082)
4. Benzonase (Merck, catalog number: E1014-5KU)
5. BCS Crystallization Screen kit (Molecular Dimensions, catalog number: MD1-104)
6. Bsu36I (New England Biolabs, catalog number: R0524L)
7. CaCl2·2H2O (Sigma-Aldrich, catalog number: 223506)
8. Chloramphenicol (Sigma-Aldrich, catalog number: C0378)
9. Coomassie InstantBlue (Abcam, catalog number: ab119211)
10. Deionized water
11. DMSO (Sigma-Aldrich, catalog number: D2650)
12. Ethanol (Sigma-Aldrich, catalog number: 459844)
13. ExpiSf9 CD medium (Gibco, catalog number: A3767803)
14. Fetal bovine serum (FBS) (Thermo Fisher Scientific, catalog number: A2720801)
15. Fetal calf serum (FCS) (Sigma-Aldrich, catalog number: F1051)
16. FuGENE HD transfection reagent (Promega, catalog number: E2311)
17. Glucose (Sigma-Aldrich, catalog number: G7021)
18. Glycerol (Sigma-Aldrich, catalog number: 5516)
19. HCl (Sigma-Aldrich, catalog number: 258148)
20. HindIII (New England Biolabs, catalog number: R0104M)
21. HisTrap FF Ni-NTA columns, 5 mL (Cytiva, catalog number: 1752860)
22. Imidazole (Sigma-Aldrich, catalog number: I2399)
23. Imidazole (Sigma-Aldrich, catalog number: 1.04716)
24. In-Fusion HD Cloning kit (Takara Bio, catalog number: 102518)
25. Isopropanol (Sigma-Aldrich, catalog number: 190764)
26. JCSG-Plus Crystallization Screen kit (Molecular Dimensions, catalog number: MD1-37)
27. Kanamycin (Sigma-Aldrich, catalog number: K1377)
28. KCl (Sigma-Aldrich, catalog number: P5405)
29. KpnI (New England Biolabs, catalog number: R3142M)
30. Liquid nitrogen
31. Luria broth (LB) (Melford, catalog number: L24400)
32. MgCl2·6H2O (Sigma-Aldrich, catalog number: M9272)
33. Morpheus Crystallization Screen kit (Molecular Dimensions, catalog number: MDS1-46)
34. NaCl (Sigma-Aldrich, catalog number: S9888)
35. NaOH (Sigma-Aldrich, catalog number: 221465)
36. NEB Express Ni-NTA magnetic beads (New England Biolabs, catalog number: S1423L)
37. NEBufferTM 3 (New England Biolabs, catalog number: B7003S)
38. Nucleobond BAC 100 Kit (Macherey-Nagel, catalog number: 740579)
39. PEG 2000 (Sigma-Aldrich, catalog number: 8.14172)
40. PEG 3350 (Sigma-Aldrich, catalog number: 8.17045)
41. PEG 4000 (Sigma-Aldrich, catalog number: 8.07490)
42. PEG 5000 monomethyl ether (Sigma-Aldrich, catalog number: 17929)
43. PGA Crystallization Screen kit (Molecular Dimensions, catalog number: MD1-50)
44. PIPES (Sigma-Aldrich, catalog number: P6757)
45. pOPINS3C (Addgene, catalog number: 41115)
46. PierceTM HRV 3C Protease Solution kit (Thermo Fisher Scientific, catalog number: 88946)
47. Protease inhibitor cocktail (Sigma-Aldrich, catalog number: P8849)
48. PureYieldTM miniPlasmid Miniprep System (Promega, catalog number: A1223)
49. SG1 Crystallization Screen kit (Molecular Dimensions, catalog number: MD1-88)
50. SigmaMarker low-range molecular weight standard (Sigma, catalog number: M3913)
51. Swissci triple-drop crystallization plates (Molecular Dimensions, catalog number: MD11-003-100)
52. TCEP (Sigma-Aldrich, catalog number: C4706)
53. Tris base (Sigma-Aldrich, catalog number: T1503)
54. Trypan blue solution, 0.4% (Gibco, catalog number: 15250-061)
55. Tryptone (Merck, catalog number: T9410)
56. Tween-20 (Sigma-Aldrich, catalog number: 11332465001)
57. Yeast extract (Merck, catalog number: 92144)
Solutions
1. Washing buffer (see Recipes)
2. Lysis buffer (see Recipes)
3. Elution buffer (see Recipes)
4. Gel filtration buffer (see Recipes)
5. Crystallization buffer (BCS C12) (see Recipes)
6. 2 M MgCl2 solution (see Recipes)
7. Tris-EDTA buffer (see Recipes)
8. SOC medium (see Recipes)
9. Sterile KCl 250 mM (see Recipes)
10. Sterile NaOH 5 N (see Recipes)
11. Sterile glucose 1 M (see Recipes)
12. LB-agar medium (see Recipes)
Recipes
1. Washing buffer
| Reagent | Final concentration | Amount |
|---|---|---|
| Tris base | 50 mM | 6.06 g |
| HCl | n/a | As needed to adjust pH to 7.5 |
| NaCl | 500 mM | 29.22 g |
| Imidazole | 30 mM | 2.042 g |
| dH2O | n/a | 1,000 mL |
2. Lysis buffer
| Reagent | Final concentration | Amount |
|---|---|---|
| Tris base | 50 mM | 6.06 g |
| HCl | n/a | As needed to adjust pH to 7.5 |
| NaCl | 500 mM | 29.22 g |
| Imidazole | 30 mM | 2.04 g |
| Tween-20 | 0.2% | 2 mL |
| dH2O | n/a | 1,000 mL |
3. Elution buffer
| Reagent | Final concentration | Amount |
|---|---|---|
| Tris base | 50 mM | 6.06 g |
| HCl | n/a | As needed to adjust pH to 7.5 |
| NaCl | 500 mM | 29.22 g |
| Imidazole | 500 mM | 34.04 g |
| dH2O | n/a | 1,000 mL |
4. Gel filtration buffer
| Reagent | Final concentration | Amount |
|---|---|---|
| Tris base | 20 mM | 2.42 g |
| HCl | n/a | As needed to adjust pH to 7.5 |
| NaCl | 200 mM | 11.69 g |
| TCEP (optional) | 1 mM | 0.29 g |
| dH2O | n/a | 1,000 mL |
5. Crystallization buffer (BCS C12)
| Reagent | Final concentration | Amount |
|---|---|---|
| CaCl2.2H2O | 100 mM | 14.7 g |
| MgCl2.6H2O | 100 mM | 20.3 g |
| PIPES | 100 mM | 3.36 g |
| PEG 3350 | 5.625% (w/v) | 56.25 g |
| PEG 4000 | 5.625% (w/v) | 56.25 g |
| PEG 2000 | 5.625% (w/v) | 56.25 g |
| PEG 5000 monomethyl ether | 5.625% (w/v) | 56.25 g |
| dH2O | n/a | 1,000 mL |
6. 2 M MgCl2 solution
| Reagent | Final concentration | Amount |
|---|---|---|
| MgCl2.6H2O | 2 M | 40.1 g |
| dH2O | n/a | 100 mL |
7. Tris-EDTA buffer
| Reagent | Final concentration | Amount |
|---|---|---|
| Tris base | 100 mM | 1.21 g |
| EDTA | 10 mM | 0.29 g |
| dH2O | n/a | 1,000 mL |
8. SOC medium
| Reagent | Final concentration | Amount |
|---|---|---|
| Tryptone | 2% (w/v) | 20 g |
| Yeast extract | 0.5% (w/v) | 5 g |
| NaCl | 10 mM | 0.58 g |
| Glucose | 20 mM | 20 mL |
| KCl | 2.5 mM | 10 mL |
| NaOH | n/a | As needed to adjust pH to 7.4 |
| MgCl2 2 M | 10 mM | 5 mL |
| dH2O | n/a | 1,000 mL |
9. Sterile KCl 250 mM
| Reagent | Final concentration | Amount |
|---|---|---|
| KCl | 250 mM | 1.96 g |
| dH2O | n/a | 100 mL |
10. Sterile NaOH 5 N
| Reagent | Final concentration | Amount |
|---|---|---|
| NaOH | 5 N | 50 g |
| dH2O | n/a | 250 mL |
11. Sterile glucose 1 M
| Reagent | Final concentration | Amount |
|---|---|---|
| Glucose | 1 M | 18.02 g |
| dH2O | n/a | 100 mL |
12. LB-agar medium
| Reagent | Final concentration | Amount |
|---|---|---|
| Tryptone | 1% (w/v) | 10 g |
| Yeast extract | 0.5% (w/v) | 5 g |
| NaCl | 10 mM | 10 g |
| Agar | 1.5% (w/v) | 15 g |
| NaOH | n/a | As needed to adjust pH to 7.4 |
| dH2O | n/a | 1,000 mL |
Laboratory supplies
1. Amicon® Ultra, 30 kDa MWCO (Merck Millipore, catalog number: UFC9030)
2. Centrifuge bottles (Thermo Scientific Nalgene, catalog number: 31410250)
3. Cryogenic vial with washer (Corning, catalog number: CLS431417)
4. Luer-lock 0.22 µm syringe filter (Sartorius, catalog number: SLGSVR255F)
5. Plastic microtubes (Eppendorf, catalog number: 05-402)
6. Disposable 20–200 μL pipette tip (Gilson, catalog number: F171503)
7. Disposable cell culture dishes (Corning, catalog number: 430167)
8. Borosilicate glass funnel (Fisherbrand, catalog number: FB56642)
9. Culture dishes (Corning, catalog number: CLS430167)
10. Dual-thickness 50, 100, 150, and 200 µm microloops (Mitegen, catalog number: M5)
11. Disposable scalpel (Med Pride, catalog number: MPR-47101)
12. Erlenmeyer baffled 500 mL cell culture flasks (Corning, catalog number: zCLS431401)
13. HiLoad 16/60 Superdex 200 SEC column (Cytiva, catalog number: 28-9893-35)
14. MagRack 6 (Cytiva, catalog number: 28-9489-64)
15. PES syringe filter (Nalgene, catalog number: Z741696)
16. Rotor adapters for 500 mL CorningTM bottle (Thermo Fisher Scientific, catalog number: 75007302)
17. Swissci triple-drop crystallization plates (Molecular Dimensions, catalog number: MD11-003-100)
18. VIEWseal transparent plate sealer (Greiner, catalog number: 676070)
19. 1 L Erlenmeyer flask (Corning, catalog number: CLS431147)
20. 125 mL Erlenmeyer flask (Nalgene, catalog number: TMO4116-0125)
21. 24-well cell culture plates (Scientific Laboratory Supplies, catalog number: TIS1018)
22. 24-well round-bottom block (Qiagen, catalog number: 19583)
23. 30 mL polypropylene Luer Lock syringe (BD, catalog number: 302832)
24. 0.45 µm vacuum filter unit (Thermo Scientific Nalgene, catalog number: 10568632)
25. 500 mL conical centrifuge tube (Appleton Woods, catalog number: 431123)
26. 5 L Erlenmeyer flask (Corning, catalog number: 421685)
27. 50 mL black centrifuge tube (Fisherbrand, catalog number: HS4429)
28. 6-well tissue culture plates (Corning, catalog number: CLS3516-1EA)
29. 8-well tube strips, 0.2 mL (Corning, catalog number: CLS6542)
30. 8-well 5 μL micro-reservoir strips (TTP Labtech, catalog number: 4150-03100)
31. 96-well sample block (Greiner, catalog number: 780261)
Equipment
1. Acoustic liquid handling platform (Labcyte, model: Echo 550)
2. Automated protein purification system (Cytiva, model: ÄKTA™ Xpress)
3. Bench pH meter (Thermo Fisher Scientific, model: Orion Lab Star PH111)
4. Bent cryo tongs (MiTeGen, model: M-CP-111-030)
5. Class II microbiological safety cabinet (Contained Air Solutions, model: BioMAT2)
6. Crystal plate imager (Formulatrix, model: RockImager 1000)
7. Incubated orbital shaker (Thermo Fisher Scientific, model: MaxQ 6000)
8. Liquid handler (Art Robbins Instruments, model: Hydra 96)
9. Low volume dispenser for crystallization plates (SPT Labtech, model: Mosquito® LV)
10. Microvolume spectrophotometer (Thermo Fisher Scientific, model: Nanodrop 8000)
11. Plate-moving platform (Oxford Lab Technologies, model: Shifter)
12. Refrigerated bench centrifuge (Beckman Coulter, model: Allegra X-15R)
13. Refrigerated bench centrifuge (Thermo Fisher Scientific, model: Sorvall Legend XTR)
14. Stereomicroscope (Leica, model: M165 C)
15. Thermocycler (Thermo Fisher Scientific, model: QuantStudio 3)
16. Ultracentrifuge (Thermo Fisher Scientific, model: Sorvall Lynx 6000)
17. Ultracentrifuge rotor (Beckman Coulter, model: JS-5.3)
18. Ultra-low temperature freezer (Thermo Fisher Scientific, model: TDE60086LA)
19. Ultrasonic cell disruptor (Branson, model: SFX250)
20. Ultrasonic processor (Fisherbrand, model: 505 Sonicator with Probe)
21. Vortex (IKA, model: Vortex 3)
22. 20–200 μL multichannel pipette (Gilson, model: PIPETMAN L)
Software and datasets
1. ImageJ [5]
2. XDS [6]
3. xia2 [7]
4. autoPROC [8]
5. DIALS [9]
6. XChemExplorer [10]
7. PanDDA [11]
8. Coot [12]
9. GRADE v. 1.2.19 [13]
10. Phenix Refine [14]
Procedure
A. Vector construction
1. Linearize the pOPINS3C plasmid (Figure 1) using KpnI and HindIII.
Note: This vector introduces an N-terminal histidine tag along with a SUMO fusion protein to enhance protein expression, and a S3C cleavage site (SSGLEVLQF↓GP) connecting the tag to the SmTGR (MA-HIS6-SUMO-SSGLEVLQF↓GP-POI).
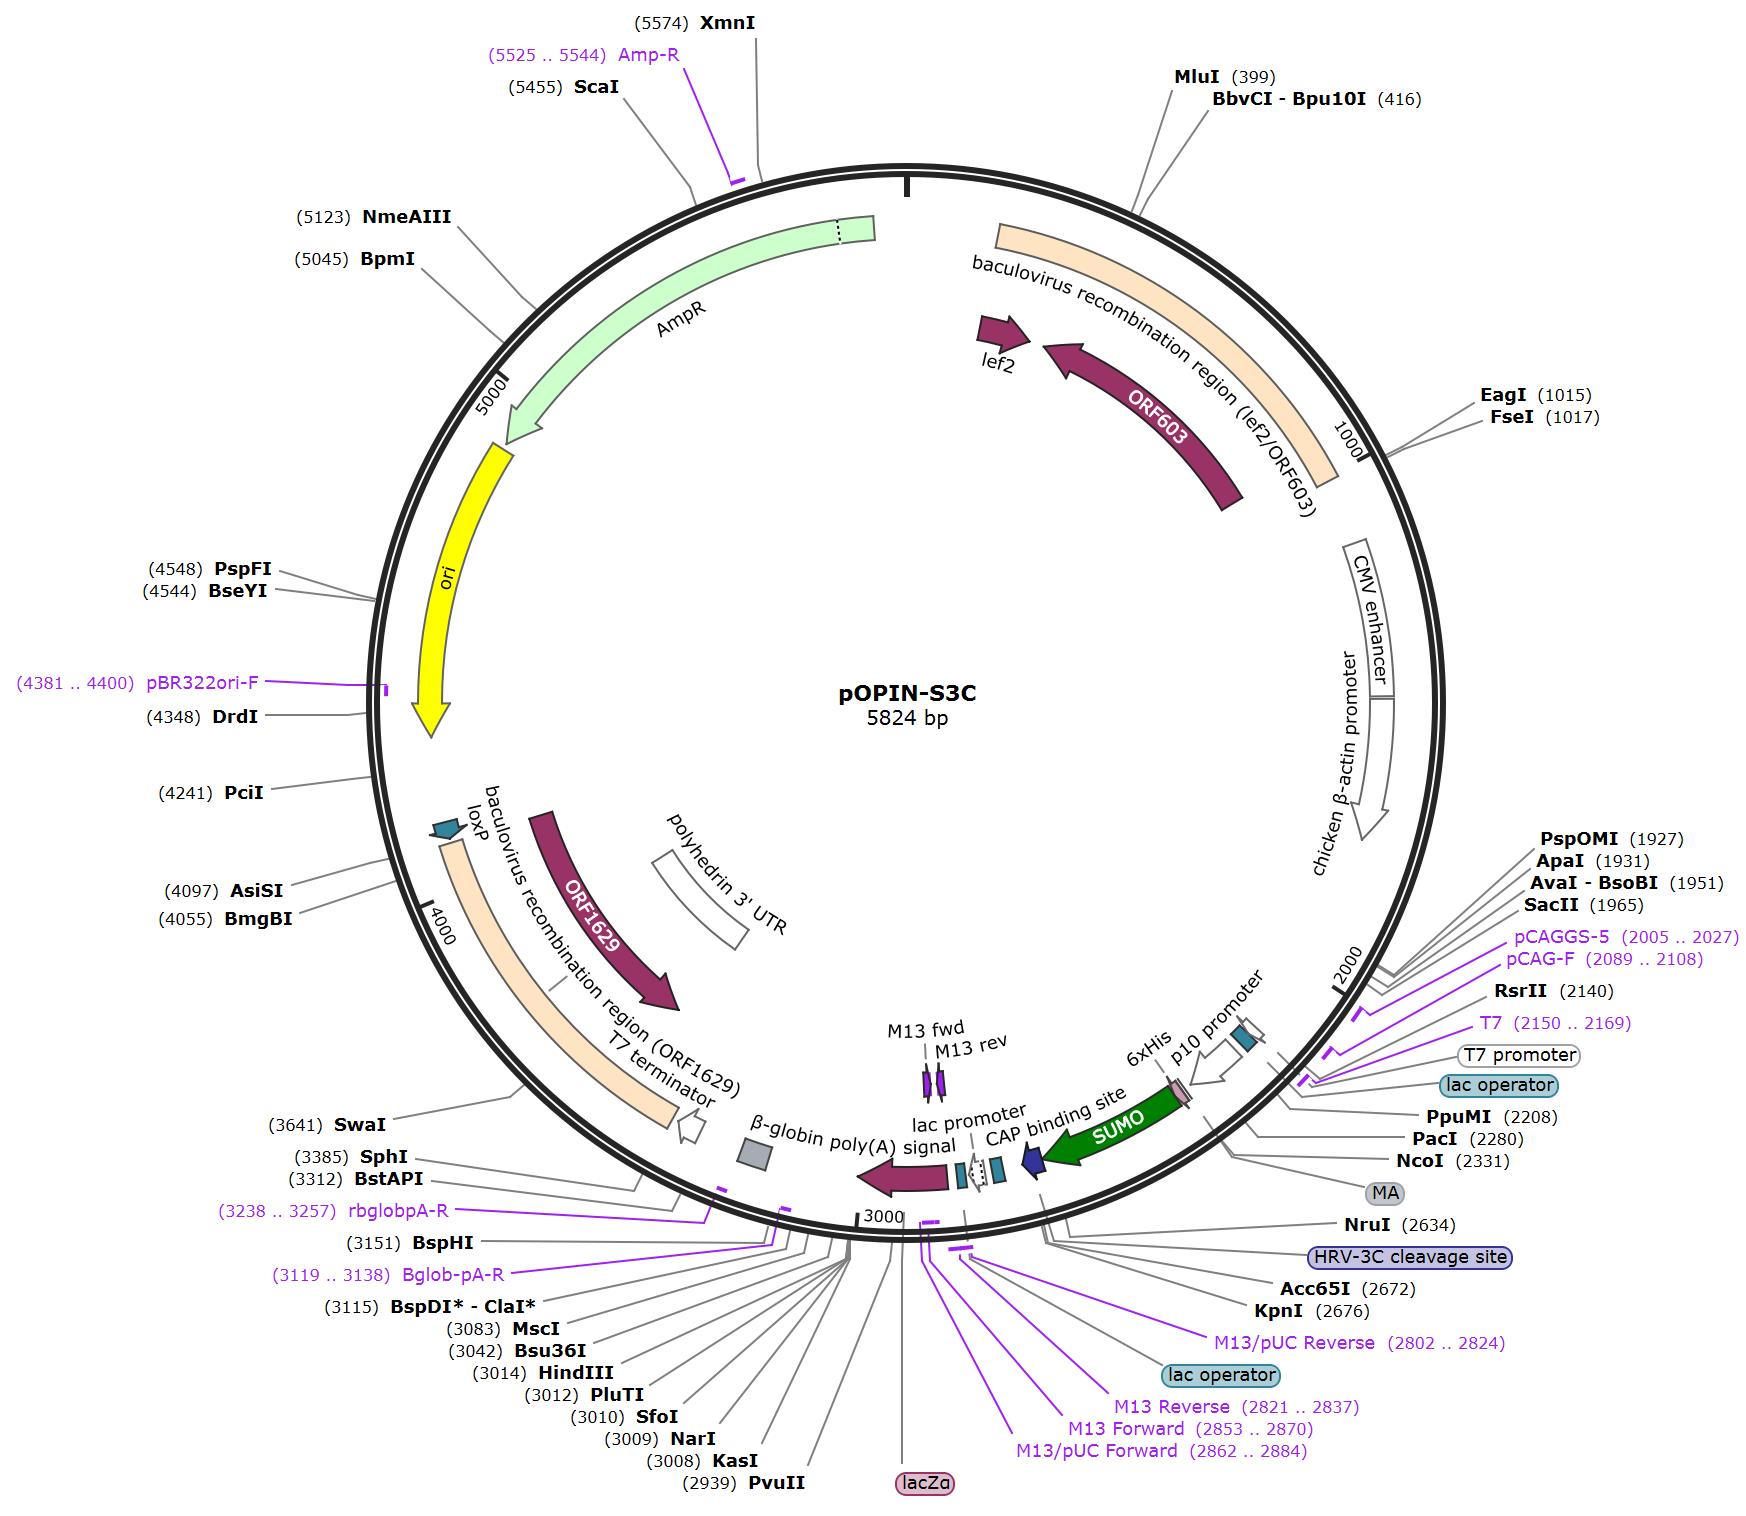
Figure 1. Vector map of pOPIN-S3C. This is a versatile expression vector designed for multi-host systems, including Escherichia coli, mammalian, and insect cells. Spanning 5824 base pairs, it features a pUC origin for high copy number replication and confers ampicillin resistance (AmpR). The plasmid utilizes the T7 promoter for bacterial expression, the CMV enhancer and chicken β-actin promoter for mammalian cells, and baculoviral elements (including the p10 promoter) for insect cell expression. A key component is the baculoviral recombination region (lef-2/ORF603), which facilitates the insertion of genes into baculovirus for insect expression. The plasmid also incorporates the lac operon, allowing IPTG-inducible expression, along with a CAP binding site for regulation. Furthermore, the protein of interest (POI) can be expressed as a fusion with tags like His6-SUMO, enhancing both purification and solubility. Image generated with SnapGene 8.2.
2. Amplify the sequence of the truncated form of SmTGR (SmTGR U597_G598del) using the specific primers.
Note: The sequences of the PCR primers are SmTGRfwd 5′ aagttctgtttcagggcccgCCTCCAGCTGATGsGAACATC 3′ and SmTGRrev 5′ atggtctagaaagctttaGCAACCGCTCACTATGGGC 3′.
3. Clone the SmTGR gene (UNIPROT ID: Q962Y6), without the last two C-terminal residues (Δ597-598), into the pOPINS3C vector using the In-fusion cloning kit.
4. For 10 μL of In-fusion reaction, mix 1 μL of the SmTGR insert, 1 μL of the linearized plasmid, and 8 μL of water to the lyophilized ligase mix.
5. Incubate the reaction at 42 °C for 1 h and then place immediately on ice.
6. Add 40 μL of sterile Tris-EDTA buffer to each reaction (see Recipes).
7. Use 5 μL of the solution to transform 20 μL of Stellar competent cells, by incubating on ice for 30 min and then heat shocking at 42 °C for 45 s using the dry bath.
8. Add 400 μL of SOC media and incubate at 37 °C for 45 min.
9. Plate 100 μL of the cell culture on LB-agar plates supplemented with 100 μg/mL ampicillin.
10. Incubate at 37 °C for 16 h.
11. Pick six individual colonies and transfer each one to 3 mL of LB containing 100 μg/mL ampicillin.
12. Incubate at 37 °C for 16 h.
13. Produce glycerol stocks by preparing cryotubes containing 1 mL of 50% (v/v) sterile glycerol and LB in a 1:1 ratio.
14. Freeze the stock in an ultra-low temperature freezer at -80 °C.
15. Isolate the DNA using miniprep from 2 mL of the overnight LB culture.
16. Measure the purity and concentration of DNA using a NanoDrop spectrophotometer.
Note: Ideally, your DNA sample should have an A260/A280 ratio of approximately 1.8. This indicates minimal protein contamination.
17. Sequence the resulting SmTGR expression construct for correct insertion of the target sequence.
18. Grow a sequenced, validated construct from glycerol stock in 150 mL of LB culture and prepare a stock of purified DNA.
Pause point: Use the purified DNA for the construction of baculovirus by co-transfection of insect ExpiSf9 cells.
B. Bacmid preparation
1. Extraction of bacmid using the Nucleobond BAC 100 kit
Note: Baculovirus construction is based on the protocol of [15]. The mCherry-containing baculovirus bacmid was kindly provided by Arnaud Poterszman [16].
a. Inoculate 200 mL of LB + kanamycin (50 μg/mL) + chloramphenicol (25 μg/mL) with mCherry bacmid glycerol stock.
Notes:
1. If starting from bacmid DNA, transform into any Escherichia coli cloning strain and plate out onto LB-agar plates containing chloramphenicol and kanamycin.
2. Expect the transformation frequency of the large bacmid to be very low.
b. Grow overnight at 37 °C with 200 rpm.
c. Harvest bacteria from an LB culture by centrifugation at 4,500–6,000× g for 15 min at 4 °C.
d. Carefully resuspend the pellet of bacterial cells in 24 mL of Buffer S1 + RNase A.
e. Add 24 mL of Buffer S2 to the suspension. Mix gently by inverting the tube 6–8 times.
f. Incubate the mixture at room temperature for 2–3 min (maximum 5 min).
Note: Do not vortex, as this will release contaminating chromosomal DNA from cellular debris into the suspension.
g. Add pre-cooled 24 mL of Buffer S3 to the suspension. Immediately mix the lysate gently by inverting the flask 6–8 times until a homogeneous suspension containing an off-white flocculate is formed. Incubate the suspension on ice for 5 min.
h. Spin the lysate at 4,000 rpm for 15 min.
i. Equilibrate a NucleoBond® BAC 100 (Maxi) column with 6 mL of buffer N2. Allow the column to be empty by gravity flow. Discard the flowthrough.
j. Place a NucleoBond® folded filter in a funnel of appropriate size. Wet the filter with a few drops of buffer N2 and load the bacterial lysate onto the wet filter. Collect the filtrate.
k. Load the cleared lysate from step B1j onto the NucleoBond® column. Allow the column to be empty by gravity flow.
l. Wash the column twice with 18 mL of buffer N3. Discard the flowthrough each time.
m. Elute the plasmid DNA with 15 mL of buffer N5.
Note: Preheating buffer N5 to 50 °C prior to elution may improve yields for high-molecular-weight constructs such as BAC.
n. Add 11 mL of isopropanol to precipitate the eluted plasmid DNA.
o. Mix carefully and centrifuge at ≥5,000× g for 30 min. Carefully discard the supernatant.
p. Add 2 mL of 70% ethanol to the pellet. Vortex briefly and centrifuge at 5,000× g for 10 min at approximately 25 °C.
q. Carefully remove ethanol from the tube with a pipette tip. Allow the pellet to dry at room temperature for no less than the indicated time. Drying for longer periods of time will not harm the quality of plasmid DNA, but overdrying may render the DNA less soluble.
r. Dissolve the pellet in 300 μL of sterile deionized H2O. Expect yield of approximately 180 μg (600 ng/μL).
2. Bsu36I digestion
a. Digest 10 × 6 μg aliquots of the bacmid each in 100 μL final volume containing 10 μL 10× NEBufferTM 3 and 1 μL 100× BSA 1 μL Bsu36I.
b. Incubate for 2 h at 37 °C.
c. Add another 1 μL of Bsu36I per 6 μg of DNA.
d. Incubate another 2–3 h at 37 °C.
e. Heat at 72 °C for 20 min. No additional purification of the bacmid is required.
f. Divide into 10 μL aliquots in PCR 8-well strip tubes and store the cut bacmid at -70 °C.
C. Baculovirus production
1. Production of P0 virus
a. Add the necessary volume of ExpiSf9 cells at 0.5 × 10⁶ cells/mL to a well plate, as indicated in Table 1.
b. Incubate at room temperature for 30 min.
Note: During this time, the cells will adhere to the plate bottom. When manipulating the plate, avoid resuspending the cells.
c. For each well, prepare a transfection mix in 1.5 mL plastic microtubes, according to the concentrations in Table 1. For 24 well plates:
Table 1. Amount of each reagent required to prepare the transfection mix
| Reagent | 24-well plate | 12-well plate | 6-well plate |
|---|---|---|---|
| ExpiSf9 Cells at 5 × 10⁵ cells/mL | 500 μL | 1,000 μL | 2,000 μL |
| Transfection mix (per well) | |||
| ExpiSf CD medium | 50 μL | 100 μL | 200 μL |
| Linearized bacmid | 250 ng | 500 ng | 750 ng |
| Vector | 100–500 ng | 200–1,000 ng | 500–1,500 ng |
| FugeneHD | 1.5 μL | 2 μL | 4 μL |
d. Gently mix 5 μL of bacmid (approximately 50–60 ng/μL), 100–500 ng of vector DNA, and 50 μL of ExpiSf CD medium. Then, add 1.5 μL of FugeneHD, pipetting directly into the liquid. See General notes 6 and 7.
Notes:
1. Avoid pipetting against the plastic as this may reduce transfection efficiency.
2. As a control of the transfection process, a construct containing green fluorescent protein (GFP) was also used following the same procedure.
e. Incubate the transfection mix for 30 min at 25 °C.
f. Transfer the transfection mix slowly to the wells.
Note: Pipette the transfection reagent slowly and directly into the liquid. Avoid disrupting the monolayer of cells.
g. Gently swirl the well plate to distribute the transfection mix across the well.
h. Incubate the plate statically for 7 days at 28 °C.
Note: We recommend checking the expression from days 3 to 6 under a fluorescent microscope. Cells that have been successfully infected and are expressing the bacmid (with mCherry reporter) will fluoresce red. In the control well, cells that have taken up the GFP-containing construct will fluoresce green. Make a note of the day on which fluorescence appears to be highest. This should be the day that cell pellets are harvested during small- and large-scale expression of your protein for optimal yield.
i. After 7 days, harvest cells into 1.5 mL microtubes.
j. Centrifuge at 6,000× g for 15 min.
k. Sterilize the viral supernatant (P0 virus stock) using a 0.22 μm syringe filter.
l. Store the P0 virus at 4 °C in the dark. This can be stored for at least 6 months.
2. Production of P1 virus
a. Infect 3 mL of ExpiSf9 cells at 1 × 10⁶ cells/mL with 10 μL of P0 stock (1:300 dilution) in 24-well round-bottom blocks.
Note: Although expression screening can be performed using the P0 virus if time is an issue, the most reliable route is to first amplify the P0 virus and then use the resulting P1 virus for small- or medium-scale expression screening.
b. Incubate for 7 days at 28 °C with 220 rpm.
c. Centrifuge blocks at 1,000× g for 10 min at room temperature to pellet the cells and debris.
d. Collect viral supernatant (P1 virus stock) in fresh tubes and store at 4 °C in the dark.
Note: This can be stored for at least 6 months. For longer-term storage, add FBS to 10% and store at -80 °C.
3. Amplification of viral stocks
a. Prepare 50 mL of ExpiSf9 cells at 1 × 10⁶ cells/mL in a 125 mL baffled Erlenmeyer flask.
b. For amplifying P1, add 170 μL of P0 virus stock (1:300 dilution). For amplifying P2, add 500 μL of P1 virus stock (1:100 dilution).
c. Incubate for 7 days at 28 °C with 120 rpm.
d. Transfer to a fresh, sterile Falcon tube and spin for 10 min at 1,000× g. Discard the cell pellet.
e. Transfer the supernatant to a fresh 50 mL Falcon.
f. Sterilize the supernatant using a 0.22 μm syringe filter and store at 4 °C in a black centrifuge tube. This can be stored for around 1 month at 4 °C. Adding FCS to 10% can extend storage at 4 °C. For long-term storage, add FBS to 10% and freeze at -80 °C.
D. SmTGR production
1. Small-scale expression test using P1 virus
a. Prepare 24-deep-well round-bottom plates with 3 mL of ExpiSf9 cells at 1 × 10⁶ cells/mL in each well.
b. Add 30 μL of P1 virus (1:100 dilution) to each well (including a GFP control virus) and incubate for 4–6 days at 28 °C with 220 rpm.
c. Transfer 3 mL to a 24-deep-well plate with conical bottoms and centrifuge at 6,000× g for 15 min. Remove the supernatant and freeze the cells at -80 °C for at least 30 min.
Pause point: Cell pellets can be frozen and stored at -80 °C for analysis with Ni-NTA pulldown later.
2. Small-scale purification
a. Add lysozyme at 1 mg/mL to the lysis buffer being used for cell lysis.
b. Use 5 mL of lysis buffer for each gram of harvested cell pellet.
c. Subject the suspension to sonication for a total of 3 min, using 10-s pulses alternating with 10-s pauses.
d. Dispense 50 μL of bead slurry into each tube and add 200 μL of lysis buffer to equilibrate beads.
e. Place the tube onto a magnetic rack to pellet the beads, remove, and discard supernatant.
f. Resuspend thawed cell pellets in 1 mL of lysis buffer. This is your lysate. Keep 10 μL of lysate sample for analysis.
g. Centrifuge at 18,800× g for 10 min at 4 °C.
h. Add 1 mL of cleared lysate to the equilibrated beads.
i. Incubate for 30 min with end-over-end mixing at 4 °C.
Note: Beads may adhere to the sides or the cap of the tube during mixing. Samples can be briefly spun in the microcentrifuge prior to pelleting with the magnetic rack.
j. Place tubes in the magnetic rack and remove supernatant. Keep 10 μL of flowthrough sample for analysis.
k. Add 500 μL of wash buffer and briefly mix beads before returning the tube to the magnetic rack.
l. Remove the supernatant and reserve 10 μL of wash sample for analysis.
m. Repeat wash steps (steps D2k–l) twice more, ensuring all wash buffer is removed in the final wash.
n. Add 100 μL of elution buffer and mix for 2 min on a benchtop shaker at 850 rpm.
o. Place the tube in the magnetic rack to pellet the beads.
p. Transfer the supernatant, containing eluted protein, to a new tube. Keep 10 μL of elute sample for analysis.
q. After completion, you should have four samples for each protein: lysate, flowthrough, wash, and elute.
r. Run a 4%–12% Bis-Tris SDS-PAGE gel of samples to assess expression.
3. Protein expression scale-up
a. Prepare 2.5 L of ExpiSf9 cells at 1 × 10⁶ cells/mL in a 5 L Erlenmeyer flask.
b. Add 25 mL of either P1 or P2 virus stock (1:100 dilution) per 2.5 L.
c. Incubate for 4–6 days at 28 °C with 120 rpm.
d. Harvest by spinning at 6,000× g for 15 min.
Note: We recommend using 500 mL conical centrifuge tubes, as the pellet forms at the cone of the bottle and stores well at -80 °C (Figure 2).
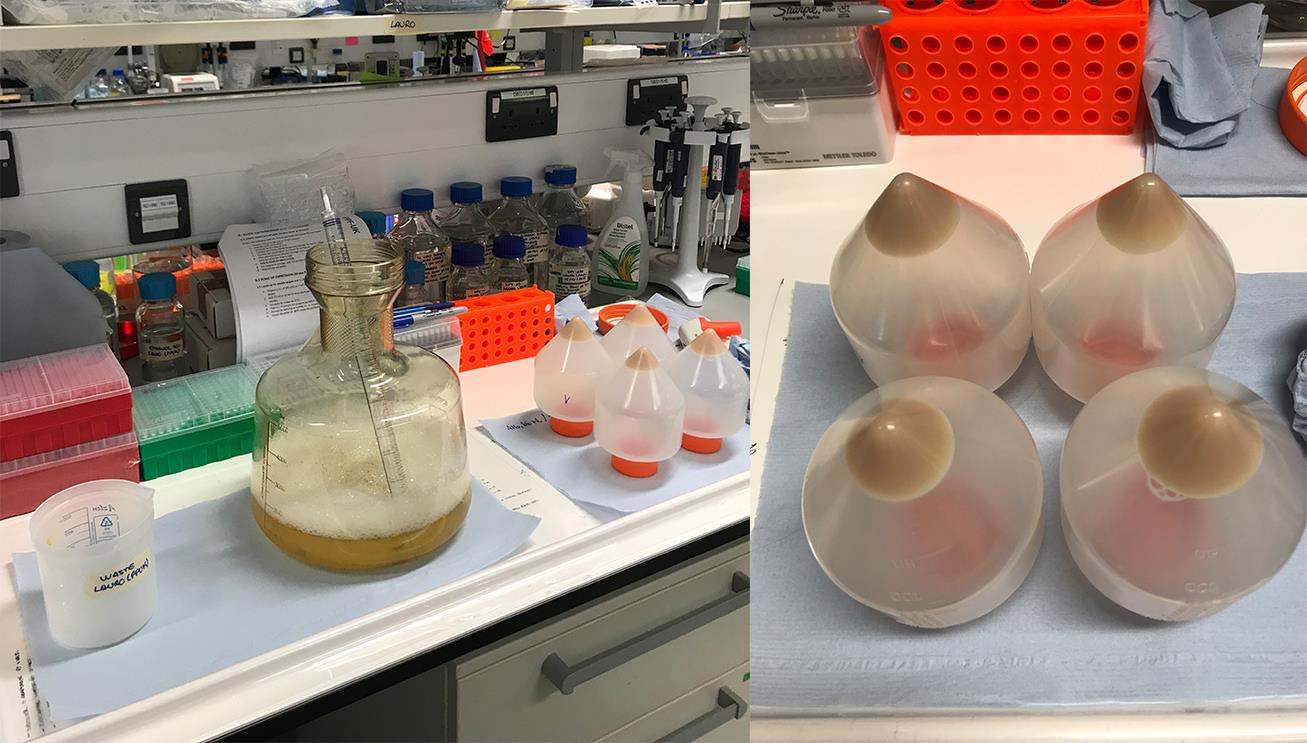
Figure 2. Culture bottles for bacterial culture. (Left) Culture bottle used for bacterial growth alongside the centrifugation bottles employed for harvesting the culture. (Right) Centrifugation bottles containing the recovered cell pellets after culture pelletization.
e. Discard supernatant.
Pause point: Freeze the cell pellet at -80 °C.
3. Protein purification scale-up
Note: The affinity chromatography followed by size exclusion protocol was developed for the ÄktA Pure platform, according to the method previously published [17]. A transcript of the Unicorn method is provided in the Supplementary material.
a. Take the thawed cell pellet and resuspend in approximately 50–100 mL of lysis buffer per 10 g of pellet. Supplement this with 100 μL of protease inhibitors and 5 μL of Benzonase per gram of cell pellet. 2 mM MgCl2 can be added to aid the Benzonase activity (see Recipes).
b. Make sure the lysate is homogeneous by stirring or pipetting up and down before proceeding to the next stage. Keep lysate on ice.
c. Sonicate the sample three times for 3 min, using 9 s pulses at 60% amplitude. Swirl the sample after each 3-min set.
d. Centrifuge at 30,000× g for 1 h at 4 °C. Repeat this step if the supernatant is still cloudy.
e. After centrifugation, decant the cleared lysate away from the insoluble fraction. Filter the cleared lysate through a 0.45 μm bottle top filter. If the lysate quickly blocks the filter, centrifuge again. Do not proceed with the purification unless the product has gone through the filter.
f. Insert the bottles containing the wash buffer, elution buffer, gel filtration buffer, and your sample as requested by the system.
Note: To prevent air from being introduced into the system, ensure that all inlets are fully submerged at the bottom of the bottles.
g. Equilibrate a HiLoad 16/600 Superdex 200 size-exclusion column (SEC) into gel filtration buffer (see Recipes), flowing at 1.0 mL/min for 1.5 column volumes (CV).
h. Equilibrate a HisTrap FF 5 mL nickel-affinity column into washing buffer (see Recipes), flowing at 5.0 mL/min for 2.0 CV.
i. Connect a 10 mL sample loop between loop 1E and loop 1F.
j. Add a peak-to-loop connector between Outlet 1 and Syringe Port.
k. Load the entire volume-cleared lysate over the equilibrated HisTrap column, at 5.0 mL/min.
l. Wash the HisTrap column with washing buffer (see Recipes) at 5.0 mL/min to wash any unbound sample.
m. Wash the HisTrap column with elution buffer (see Recipes) at 5.0 mL/min and collect the eluted His-tagged protein into the 10 mL sample loop.
n. Inject sample loop onto the SEC.
o. Flow gel filtration buffer (see Recipes) over the SEC at 1.0 mL/min for 0.95 CV. Collect 1.8 mL fractions in a 96-well deep-well block.
Note: The above can be automated using the AKTA Pure HPLC System by sequentially running the below custom method queues, included as Supplementary Materials, and following the prompts through each method.
i. 1 – System Preparation and Column Equilibration
ii. 2 – HisTrap Preparation and Equilibration
iii. 4A – SEC and Re-equilibration to H2O (1 SAMPLE ONLY OR LAST SAMPLE)
iv. 5 – Cleaning System and EtOH Equilibration
p. Use an adhesive plate seal to seal the 96-well block containing purified protein fractions and store at 4 °C.
Note: The SmTGR contains an FAD cofactor, which gives the enzyme-containing fractions and crystals a yellowish color (Figure 3).
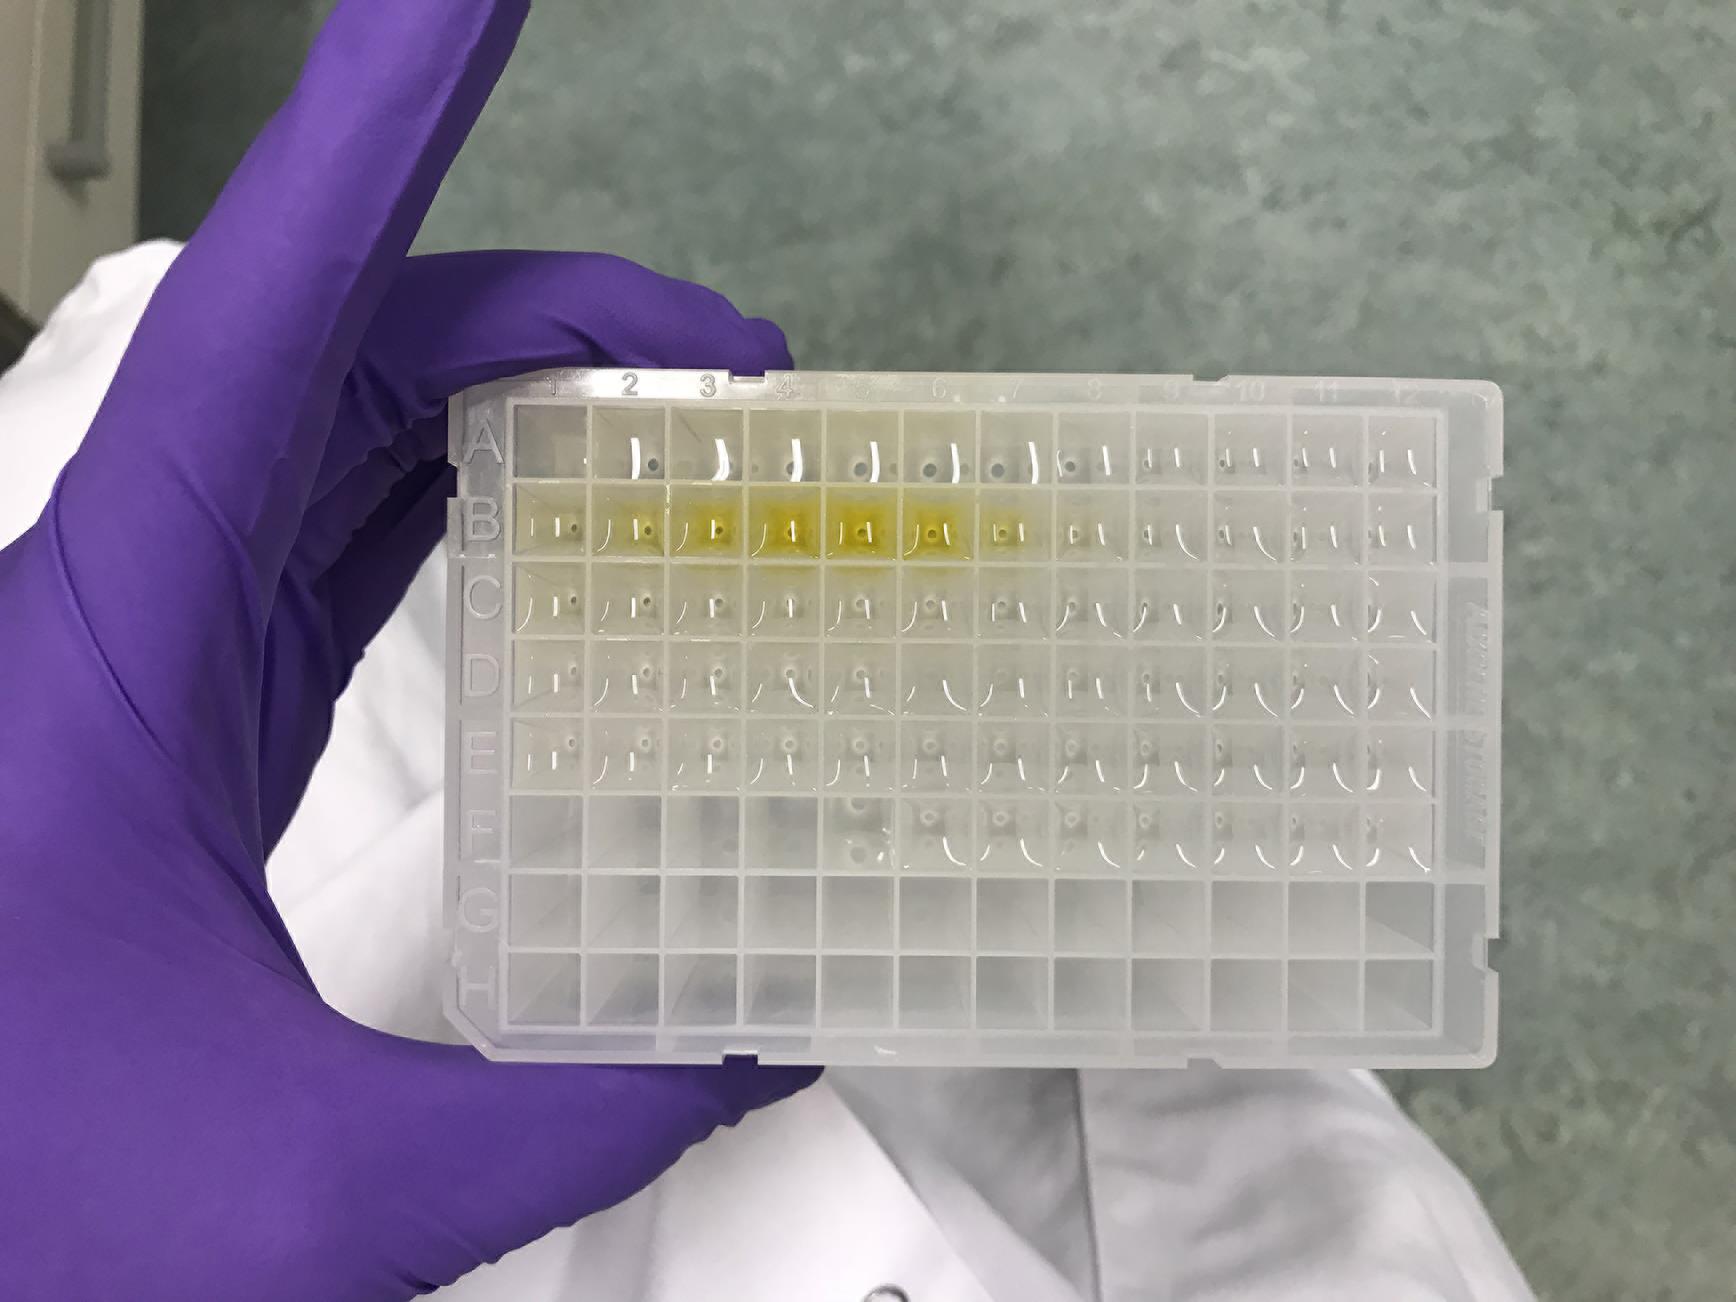
Figure 3. A 96-well block containing fractions of recently purified SmTGR enzyme. The yellowish color observed in some wells indicates the presence of the FAD cofactor, characteristic of a successful recovery of the enzyme.
q. Clean all sample and buffer lines and re-equilibrate SEC into 20% ethanol for storage.
r. Run a 4%–12% SDS-PAGE to check for SmTGR expression using 10 μL of protein and 10 μL of sample buffer. Before applying in the gel, heat the sample at 95 °C for 5 min.
s. Stain the gel using Coomassie InstantBlue (Figure 4).
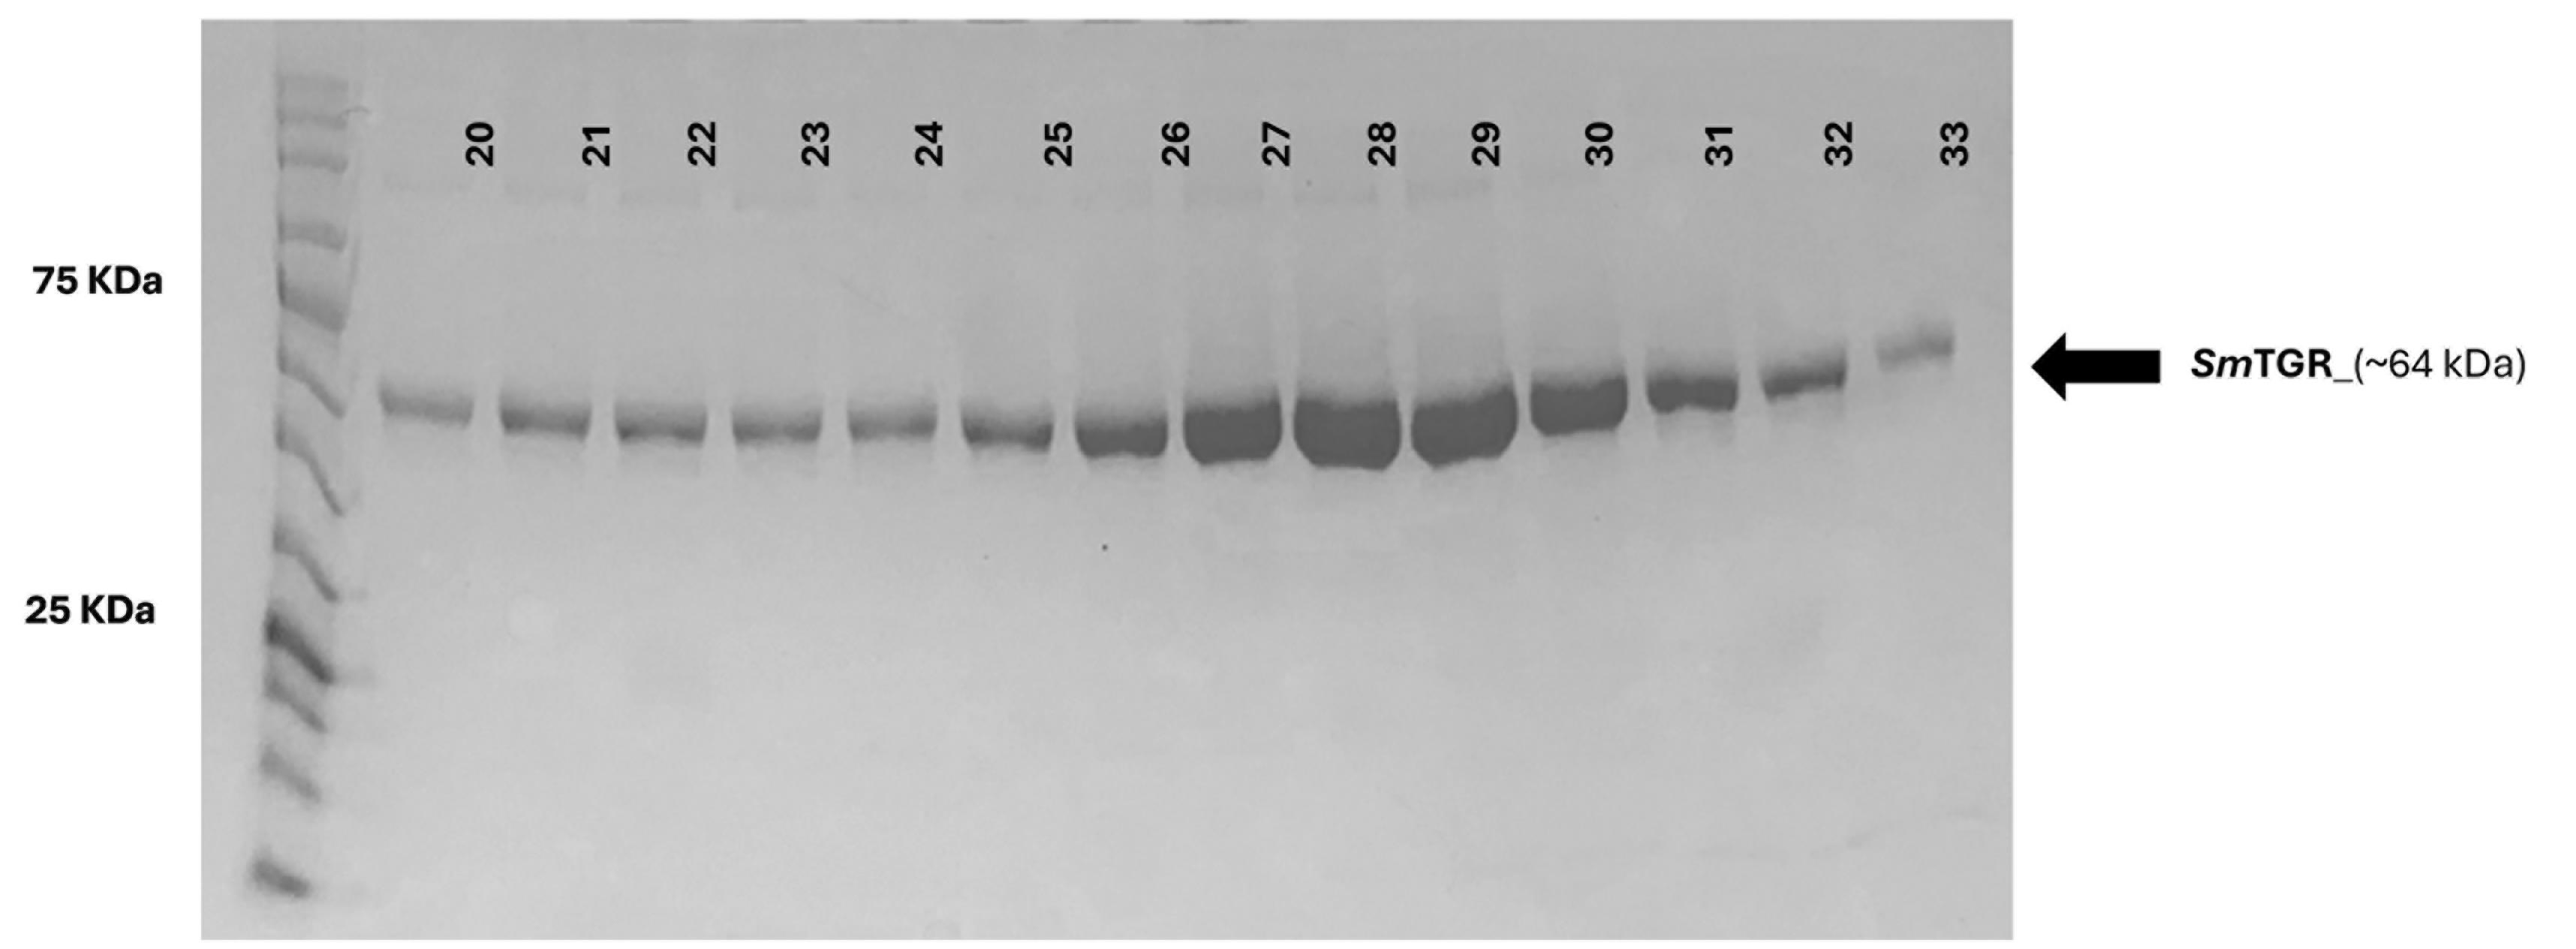
Figure 4. Multiple SmTGR eluted fractions analyzed by SDS-PAGE after size-exclusion polishing
5. His-tag cleavage
a. Cleave the sample His-tag using the S3C Protease kit, following the manufacturer’s instructions for optimal conditions and reaction times.
b. Retrieve the overnight-incubated sample and use a syringe to manually load it into the affinity column for reverse IMAC purification.
c. Equilibrate the column with 25 mL of wash buffer.
d. Save the flowthrough containing SmTGR.
e. Elute the His tag using the elution buffer.
f. Concentrate the flowthrough using a 30 kDa MWCO centrifuge filter.
Note: Rinse the filter using the wash buffer before applying your sample.
g. Adjust the protein concentration to 12 mg/mL using gel filtration buffer.
h. Run a 12% SDS-PAGE to assess sample purity. Estimate protein purity using ImageJ software.
i. Measure protein concentration using a Nanodrop spectrophotometer. Use SmTGR theoretical molar extinction coefficient.
Pause point: Either freeze your untagged protein at -80 °C or proceed to crystallization.
E. Crystal handling
1. Crystallization of SmTGR
a. Use either the Hydra liquid handler or a multichannel pipette to transfer 30 μL from each crystallization buffer from BCS, JCSG-plus, Morpheus, SG1, and PGA kits to the reservoir of the crystallization plate.
b. Fill a mosquito 8-well strip with protein at a concentration of 12 mg/mL.
c. For each chamber containing a set of 3 lenses and a reservoir (Figure 5), use the Mosquito handling platform to set 100 nL sitting drops of each crystallization buffer in each lens.
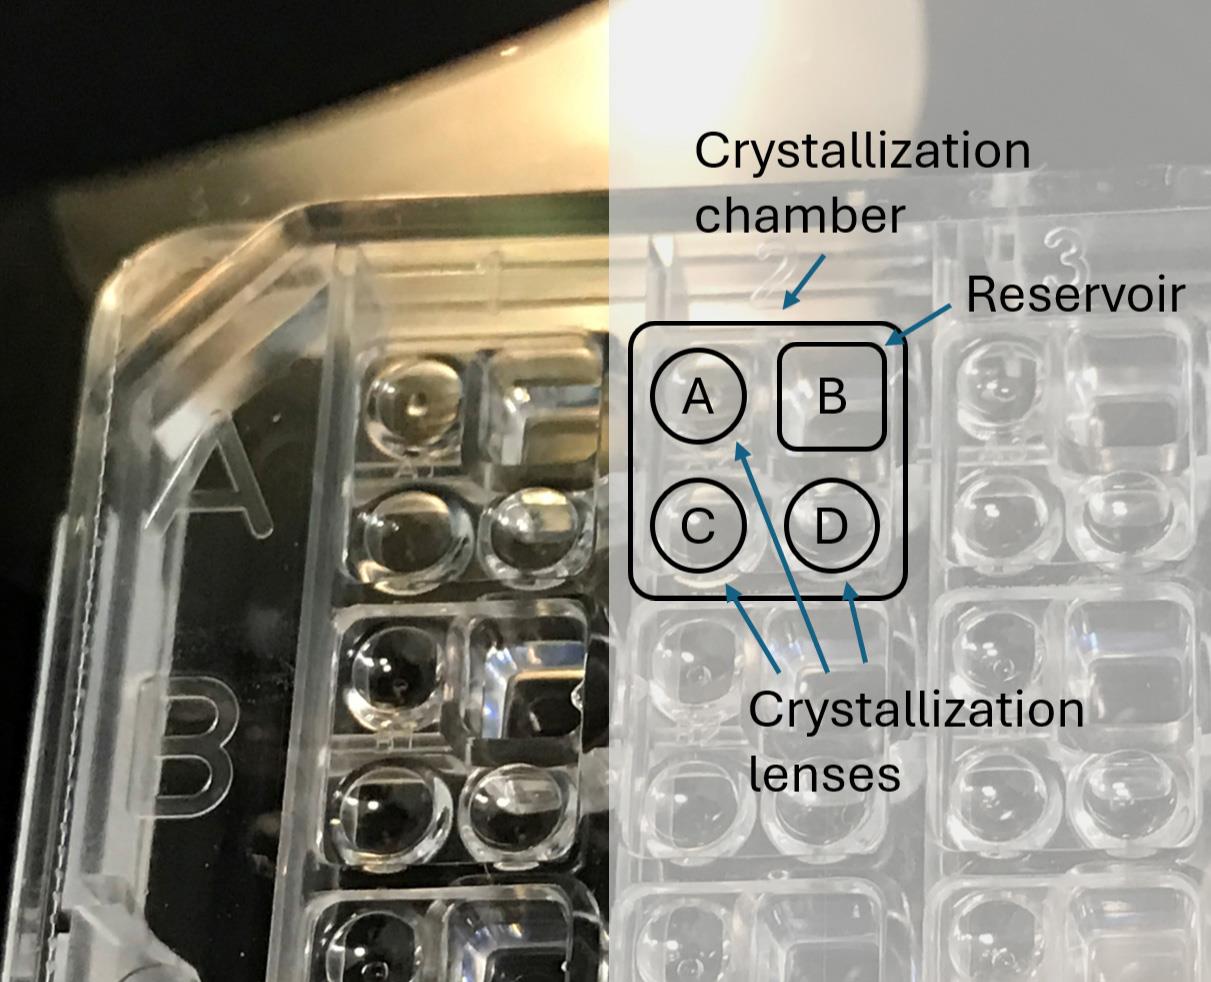
Figure 5. Image of the 96-well plate with an overlay diagram representing the crystallization chamber architecture. Each well has three compartments for crystal growth (A, C, and D) and one reservoir for capturing vapor released from the droplets (B).
d. Transfer 100 nL of the protein sample to each drop in the same set, achieving the final volume of 200 nL.
e. Seal the crystallization plate using an optical seal.
f. Store the plate in the plate imager at 20 °C.
g. Image the plates using the Formulatrix imager at 20 °C.
Note: When refining crystallization, a sparse matrix of conditions can be used to determine the optimal conditions for protein crystallization, as exemplified in Figure 6.
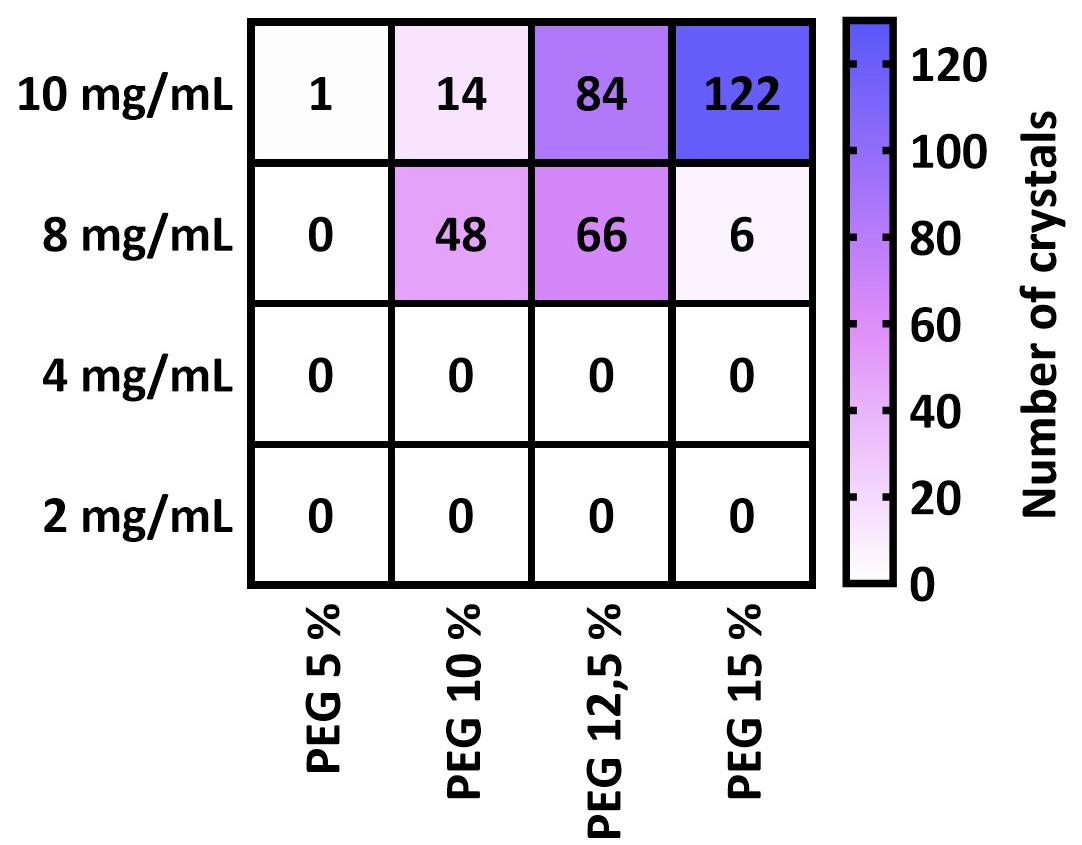
Figure 6. Sparse matrix sampling for optimizing crystal growth conditions. The two variables were protein and polyethylene glycol (PEG) concentration. The number of grown crystals is indicated in the corresponding cells.
h. Choose the crystal-forming condition based on the size, shape, and diffraction resolution of the preliminarily tested crystals (Figure 7).
Notes:
1. In our experience with SmTGR, we identified 75 crystallizable conditions, from which the condition C12 from the BCS Screen kit was the chosen one.
2. We recommend harvesting and analyzing initial crystals to confirm their identity and diffraction capability prior to downstream experiments. This step helps ensure that the observed crystals are diffracting and correspond to the same crystal form, which is important for reliable ligand detection at later stages.
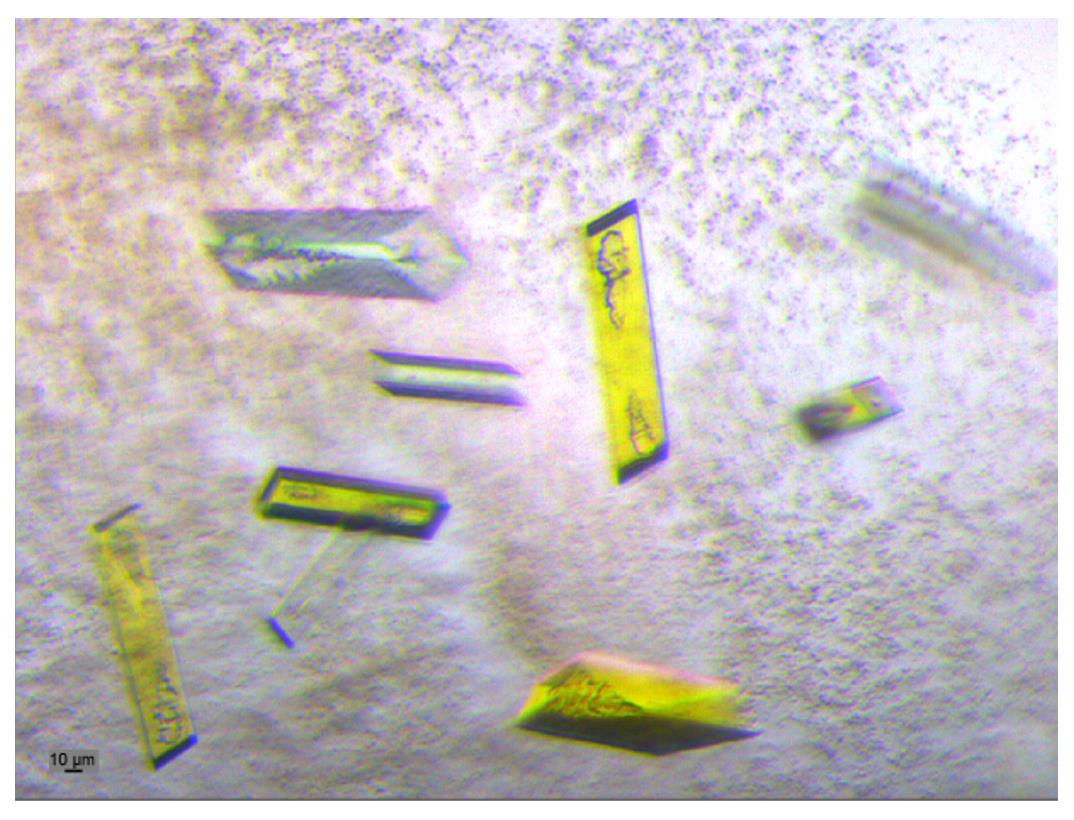
Figure 7. SmTGR crystals grown in BCS C12 condition. These crystals were approximately 100–160 μm in length.
2. Crystal selection using TeXRank
a. Start by opening TeXRank [18] on a computer and selecting the crystallization plate. This can be done either by choosing the plate from a list at the bottom right or by entering the barcode in the box at the top left of the window.
Note: The TeXRank aids in classifying the drops, prioritizing those with a higher likelihood of containing crystals, which are shown first. This likelihood is plotted in a graph at the bottom of the window (Figure 8). However, visual inspection may become unproductive, as the last images are increasingly unlikely to contain crystals beyond a certain point.
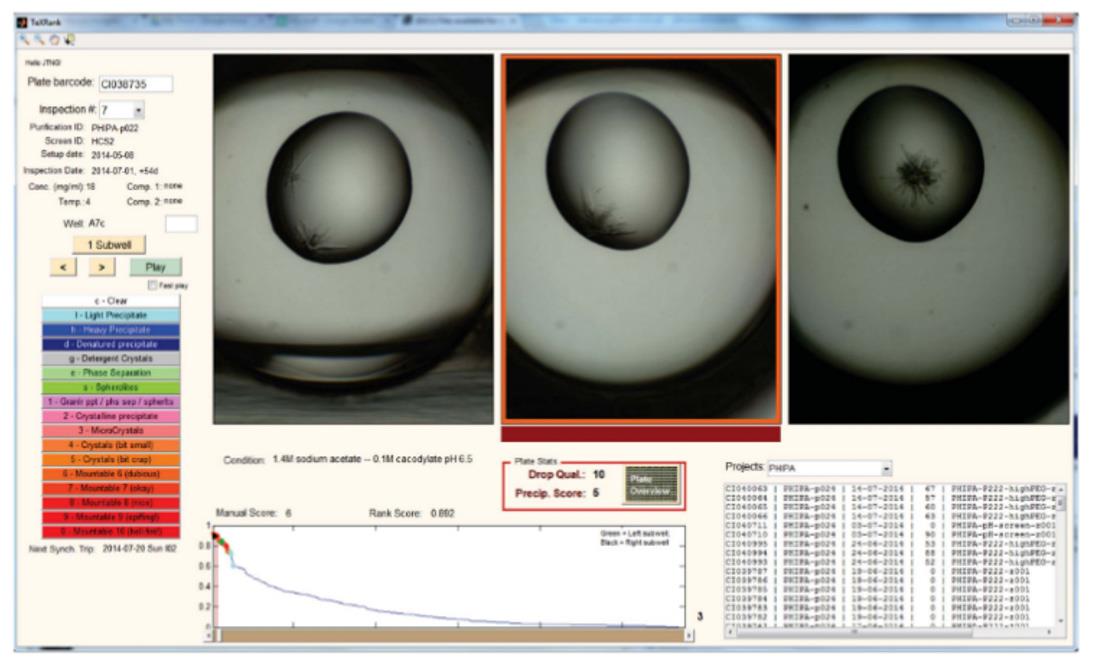
Figure 8. TeXRank main window. This figure depicts the main interface of the TeXRank software, which aids in classifying drops by prioritizing those with a higher likelihood of containing crystals. Adapted from https://www.diamond.ac.uk/Instruments/Mx/Fragment-Screening/The-XChem-Pipeline.html.
b. At the bottom left, choose the view mode. This can be switched between 1-subwell and 3-subwell views.
c. Still at the bottom left, select the image format.
Note: The different image formats relate to the type of crystal incubator/imager system used to acquire the drop image. Among the options, there are Formulatrix RockImager and Rigaku Minstrel image formats.
d. Once you have identified a suitable crystal, indicate where to add the compound. Transfer the solvent containing the compound by left-clicking over the crystal drop edge, with minimal overlap of the drops. The use of acoustic dispensing allows precise drop allocation, which in turn enables the slow diffusion of solvent throughout the crystal. The slow equilibration times provide higher tolerated solvent concentrations for the crystals [1].
Notes:
1. In some cases, a relationship between crystal size, thickness, and solvent tolerance may be observed. However, no such correlation was observed for SmTGR.
2. The crystal tolerance to DMSO is expected to be reproducible across different drop volumes. However, it is important to note that diffusion time increases with larger volumes. Therefore, to maintain the slow diffusion principle, increasing the drop volume is generally preferable to reducing it.
3. Assessment of crystal tolerance to DMSO
a. From the preliminary crystallization tests, ideally reserve crystals for experiments in triplicate across 9 distinct conditions as represented in Table 2.
Note: Table 2 presents the variables under which the crystals were tested, as well as the number of crystals analyzed. In this case, different incubation times and concentrations were evaluated. Because concentration control at this stage was only approximate, based on the initial volume of the crystallization drop, which cannot be reliably determined after days of evaporation, Table 3 clarifies the actual volumes of DMSO used in the tests.
Table 2. Number of crystals for each condition evaluated in the DMSO tolerance test
| Incubation time (min) | ||||
| 60 | 120 | 180 | ||
| DMSO concentration (%) | 5 | 4 | 4 | 4 |
| 10 | 4 | 4 | 4 | |
| 20 | 8 | 8 | 8 | |
| 30 | 4 | 4 | 4 | |
b. Using the acoustic dispenser, transfer the volumes of DMSO according to Table 3.
Table 3. MSO volumes and corresponding final concentrations. This table outlines the volume of DMSO needed to achieve various final concentrations (5%, 10%, 20%, and 30%) in 200 nL drops. The values represent the DMSO volume in nanoliters necessary for each drop size and concentration. This table corresponds to one-third of the total conditions and should be repeated for each exposure time and its corresponding final concentrations.
| Final DMSO concentration | DMSO volume to 200 nL drop |
|---|---|
| 5% | 10 |
| 10% | 20 |
| 20% | 50 |
| 30% | 80 |
Note: Throughout the crystallization process, part of the solvent in the crystallization drop evaporates, making it impractical to measure its exact volume. Therefore, all concentrations during soaking are calculated based on the initial 200 nL drop.
c. Set up a dewar foam and place two pucks inside before pouring liquid nitrogen to avoid spills.
Caution: Use proper individual protection equipment when manipulating liquid nitrogen.
d. Visually inspect the crystal integrity and mount the crystals on microloops.
Note: In the example of crystals presented in Table 2, we observed that the effects of DMSO varied across different concentrations and incubation times. Up to 20% DMSO, no apparent changes in the crystals were observed. Above this concentration, crystals began to exhibit fracturing and loss of mechanical integrity. Some crystals, although appearing intact, failed to diffract when exposed to X-ray beams. Quantitatively, no crystal damage was observed at DMSO concentrations up to 20%. At 30% DMSO, approximately half of the crystals melted, whereas at 50% DMSO, approximately 75% of the crystals were lost. Based on these observations, 20% DMSO was defined as the maximum concentration.
e. Submerge the loop into liquid nitrogen to freeze the crystals for data collection.
Note: Cryogenic temperature during data collection prevents radiation damage to the crystals, allowing for a better diffraction pattern with less noise, helping to improve the resolution of the data obtained from the crystal.
f. Collect diffraction data on these crystals and choose the incubation condition based on diffraction resolution.
Note: Choose the longest possible incubation time. When soaking the DSPL fragments, this will enable the collection of data from a larger number of crystals in a single experiment. For instance, if you choose to screen 100 compounds with a 60-min incubation period, you will need to harvest the crystals at a rate of 100 crystals per hour to ensure that the last crystal is harvested within the incubation window. Additionally, the higher the DMSO concentration, the greater the final fragment concentration will be. This is particularly relevant for screening low-affinity ligands such as fragments.
4. Crystal soaking
a. Reserve enough SmTGR crystals to screen the intended number of fragments.
b. Open the Echo software and select New to begin dispensing solutions with the acoustic dispenser.
c. Dispense the fragment stock solution into each well of the same chamber according to Table 4.
Note: Your fragment/compound library must have been previously plated in a 1536-well polypropylene plate in a 500 mM stock solution diluted in 100% DMSO.
Table 4. Drop settings and final concentrations
| Final drop volume (nL) | Compound stock volume (nL) | Final DMSO concentration (%) | DSPL compound final concentration (mM) |
|---|---|---|---|
| 210 | 10 | 4.76 | 23.8 |
| 220 | 20 | 9.09 | 45.45 |
| 250 | 50 | 20 | 100 |
| 280 | 80 | 28.57 | 142.85 |
d. Select the correct source well plate type.
e. Select the appropriate liquid class.
f. Select the correct destination plate type.
g. Check the Custom box and proceed.
h. Click Import and choose the relevant batch file.
i. Follow the software prompts to complete the necessary steps.
j. Use plate maps to verify the solutions to be dispensed and the corresponding destination locations.
k. Run the protocol, following the prompts as they appear.
l. Wait for the dispensing process to be completed, at which point the plates will be ejected. Store the compounds plate by sealing it with foil (Figure 9).
Note: To extend the shelf life of the compound stock and because DMSO is highly hygroscopic, it is advisable to use a heavy inert gas, such as argon, to displace the moisture-containing air from the compound wells before sealing them.
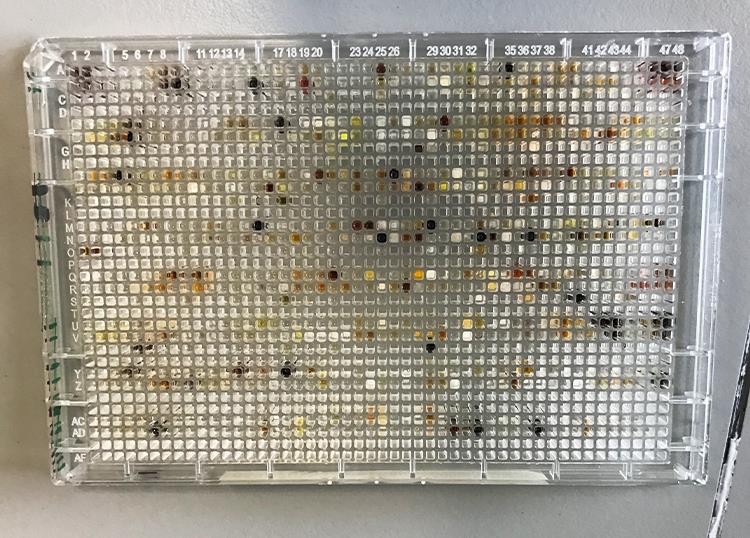
Figure 9. Plate with 768 compounds from the DSPL library. This set of compounds is used in fragment-based crystallographic screening for ligand identification.
m. Place the crystallization plate in the incubator for the incubation period previously determined during the DMSO tolerance assessment.
5. Crystal harvesting
a. Set up the crystallization plate on the Shifter stage mounted over a stereoscopic microscope (Figure 10).
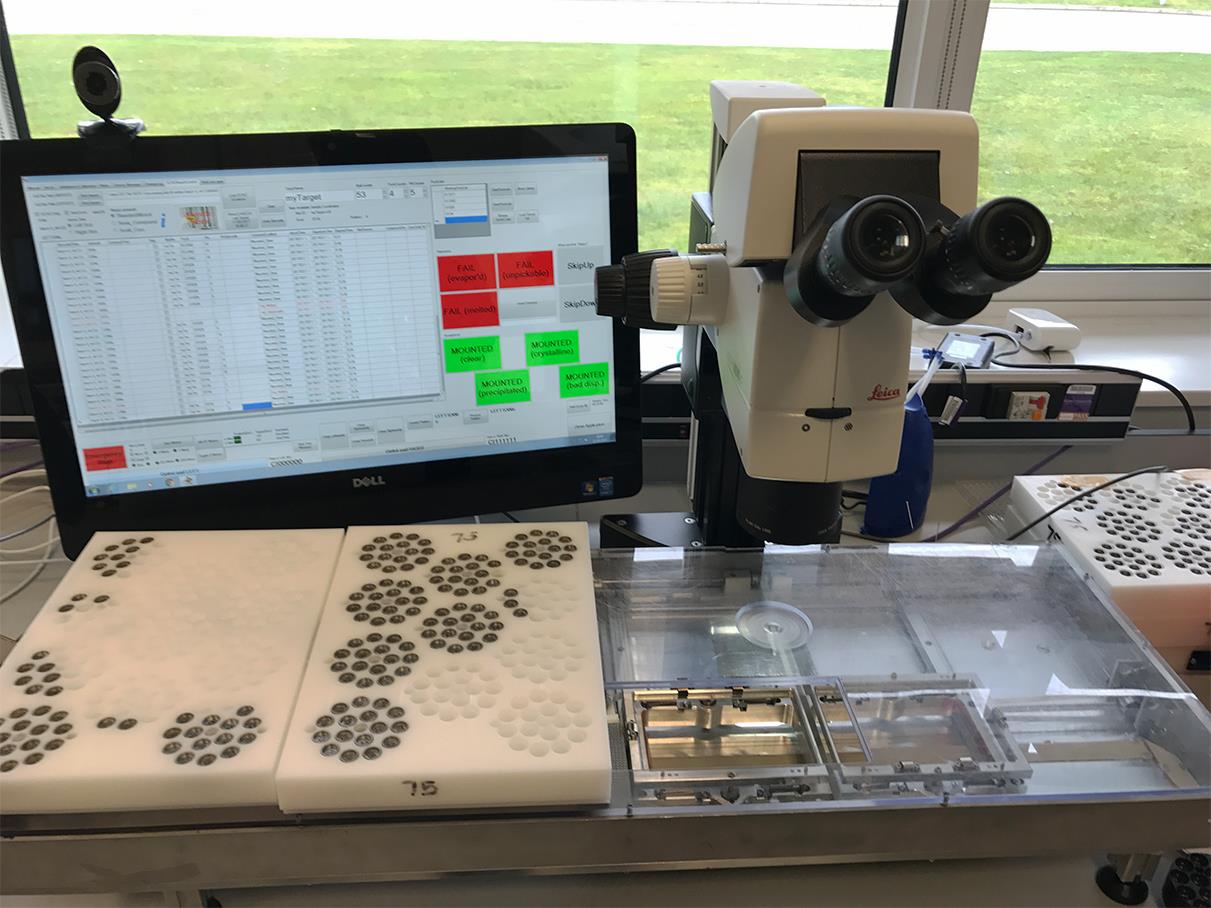
Figure 10. Shifter-aided crystal harvesting. The image depicts the Shifter, a plate-moving platform connected to a computer, equipped with a top-mounted Leica M165 C stereomicroscope. Two trays containing microloops for crystal harvesting are also shown.
b. Press the Start Workflow button to move to the first selected well position.
c. Use a scalpel to cut out a square of seal over the selected crystal drop.
d. Mount the crystals using the microloops and immediately freeze in liquid nitrogen (Video 1).

Note: This is a visually intensive task that relies on time and practice. Choosing between different microloop sizes may influence your ability to capture crystals.
e. Use the puck to store the crystals separately.
f. Add compounds onto crystals/drops according to Table 4.
Note: Add the compound drop partially overlapping the crystallization sitting drop. This is potentially less harmful to the crystal’s internal structure, since it allows a slow diffusion of solvent throughout its lattice.
g. Set up a dewar foam and place two pucks inside before pouring liquid nitrogen to avoid spills.
Caution: Use proper individual protection equipment when manipulating liquid nitrogen (Figure 11).
h. Wait 1 min to let the puck temperature equilibrate.
i. Choose an adequate microloop size and place it onto a magnetic wand. If the crystal remains intact, mount it on the loop, plunge it into liquid nitrogen, and store it in a puck.
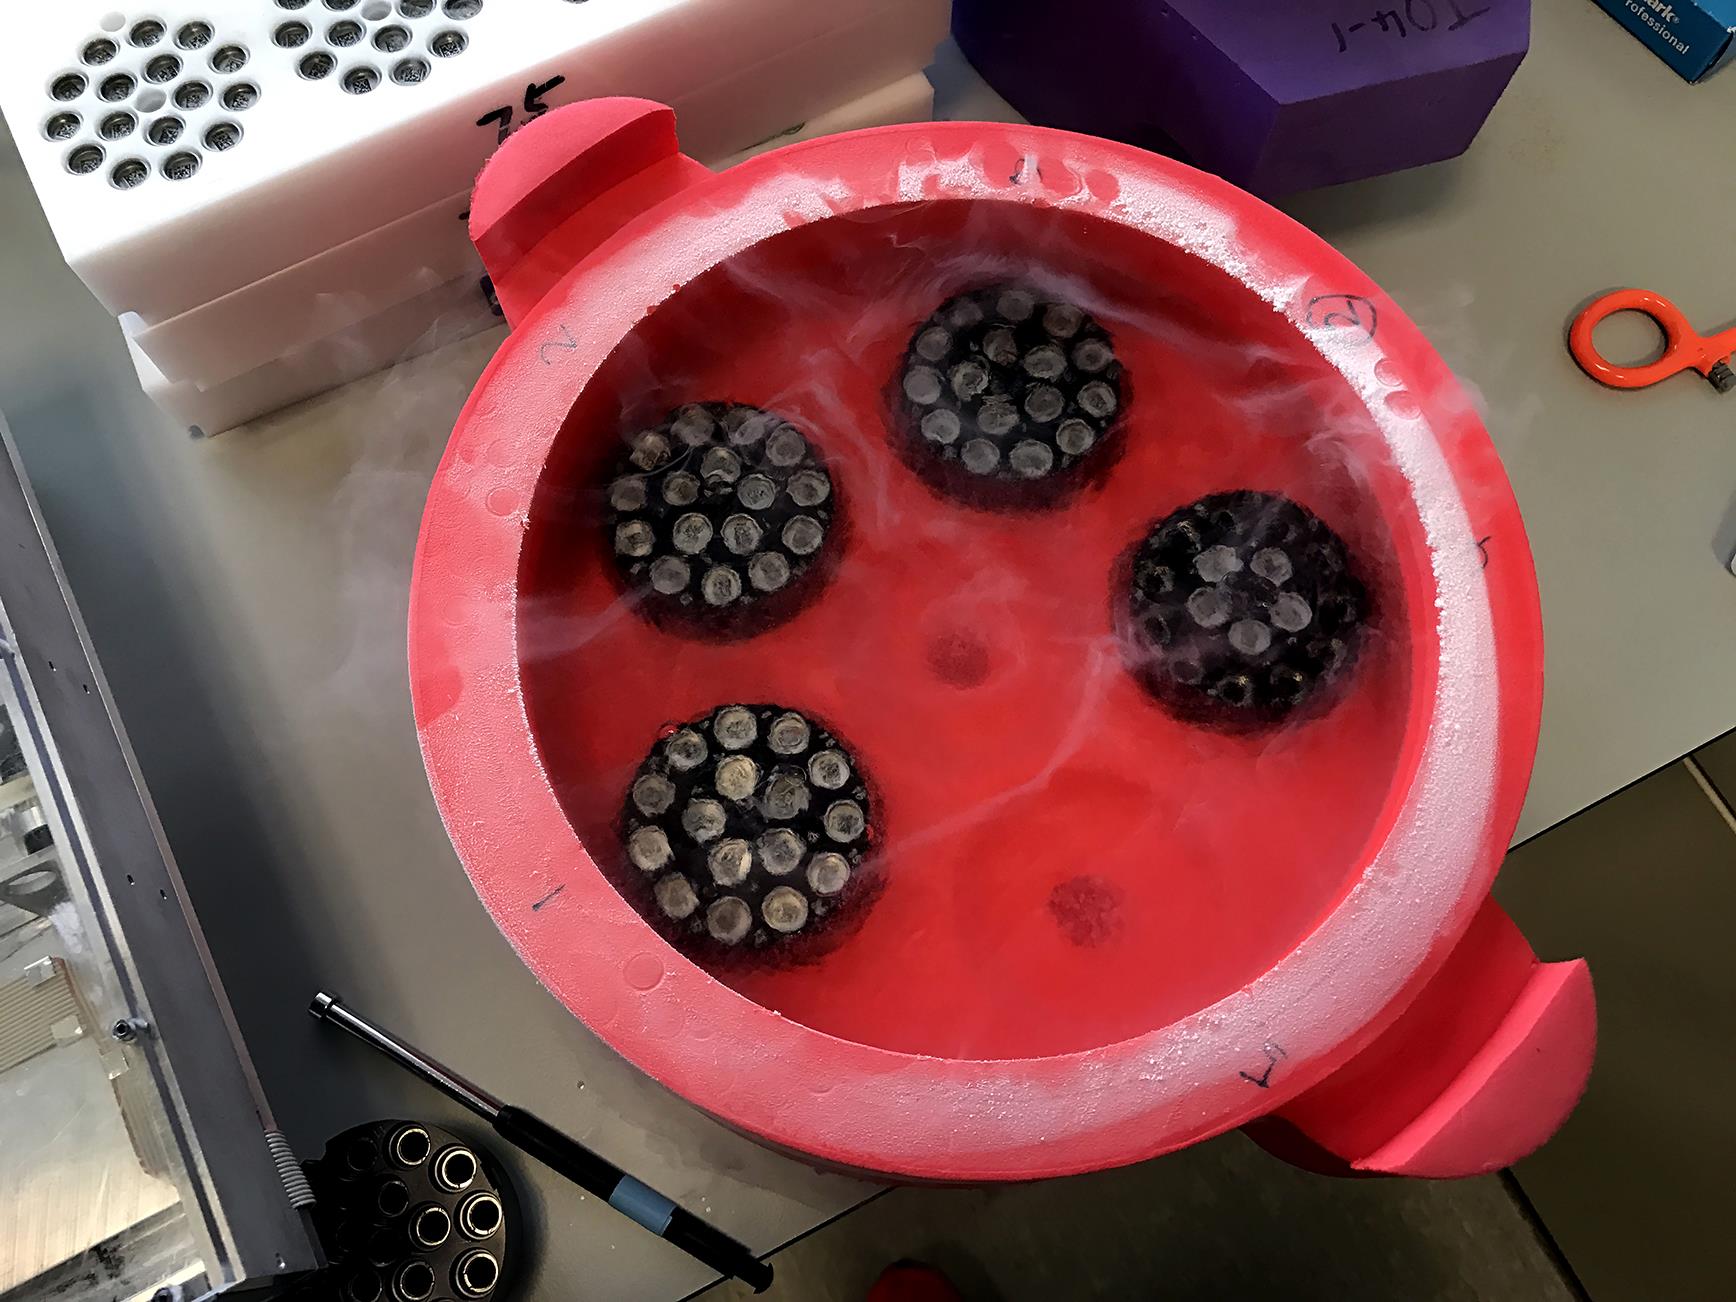
Figure 11. Foam dewar setup for crystal harvesting. Image showing a foam dewar filled with liquid nitrogen, containing four immersed pucks.
j. From the interface, select the appropriate description for the crystal based on your visual analysis.
k. Record the compound’s state description.
l. If the crystal is successfully mounted, select Mounted; if not, choose Fail.
m. Once the crystals are harvested, bring the pucks to the barcode scanner and individually place them in the holder to scan the barcodes on both the puck and the pin.
n. Put the lids on the pucks and store them in a liquid nitrogen dewar.
F. Modeling, refinement, and validation
1. Data collection
a. Place the puck into the liquid nitrogen dewar at the beamline to supply the automatic sample changer system (Figure 12).
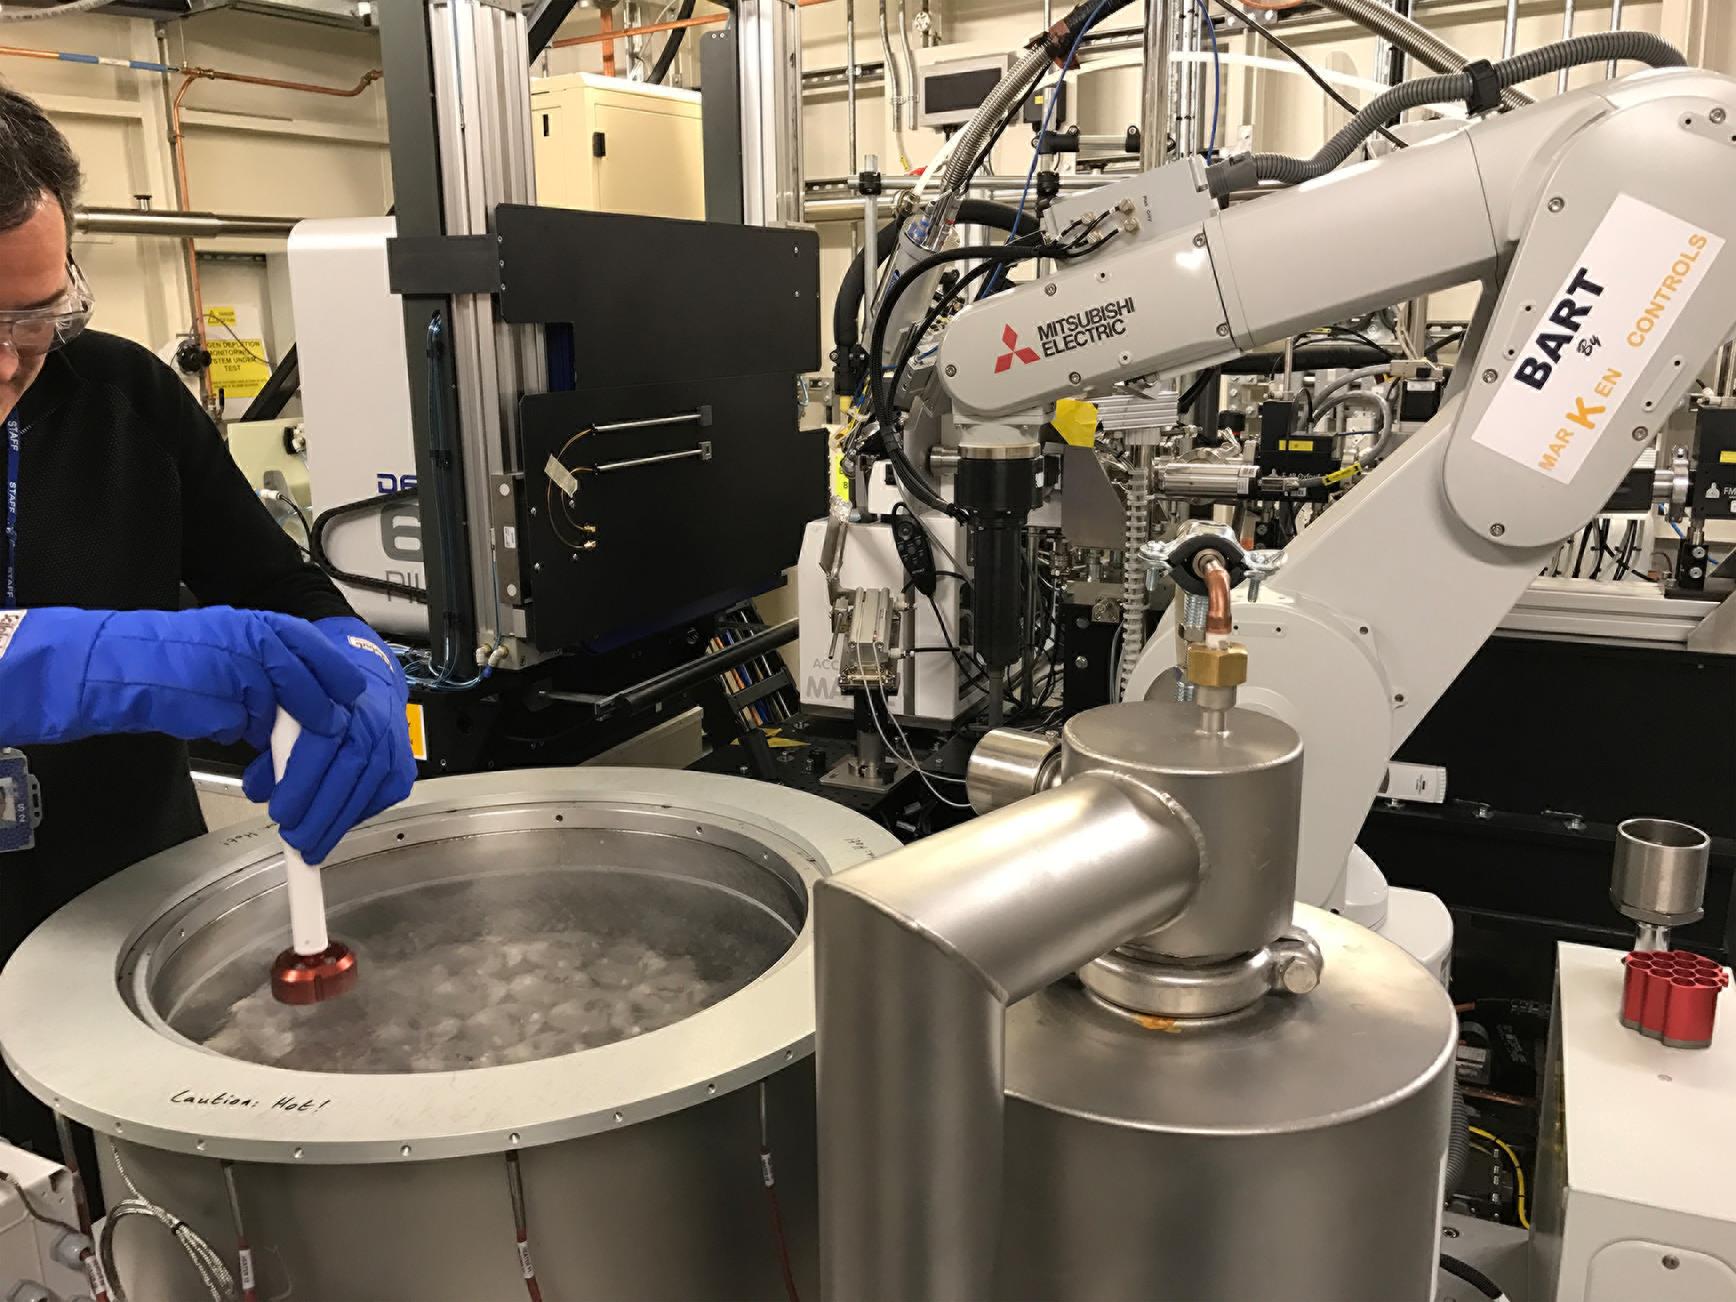
Figure 12. Automated crystal changing system. The image depicts a researcher placing a puck inside a dewar filled with liquid nitrogen for cryopreservation of crystals. The crystal changing during semi-automated data collection is aided by a robotic arm (BART).
b. To retrieve the miscentered samples, access the sample changer view in ISPyB (Figure 13) and sort the samples by auto-processed resolution, using a color gradient from green to red to indicate their ranking.
Note: The results presented in this example are associated with proposal numbers LB16978 and LB13385–59.
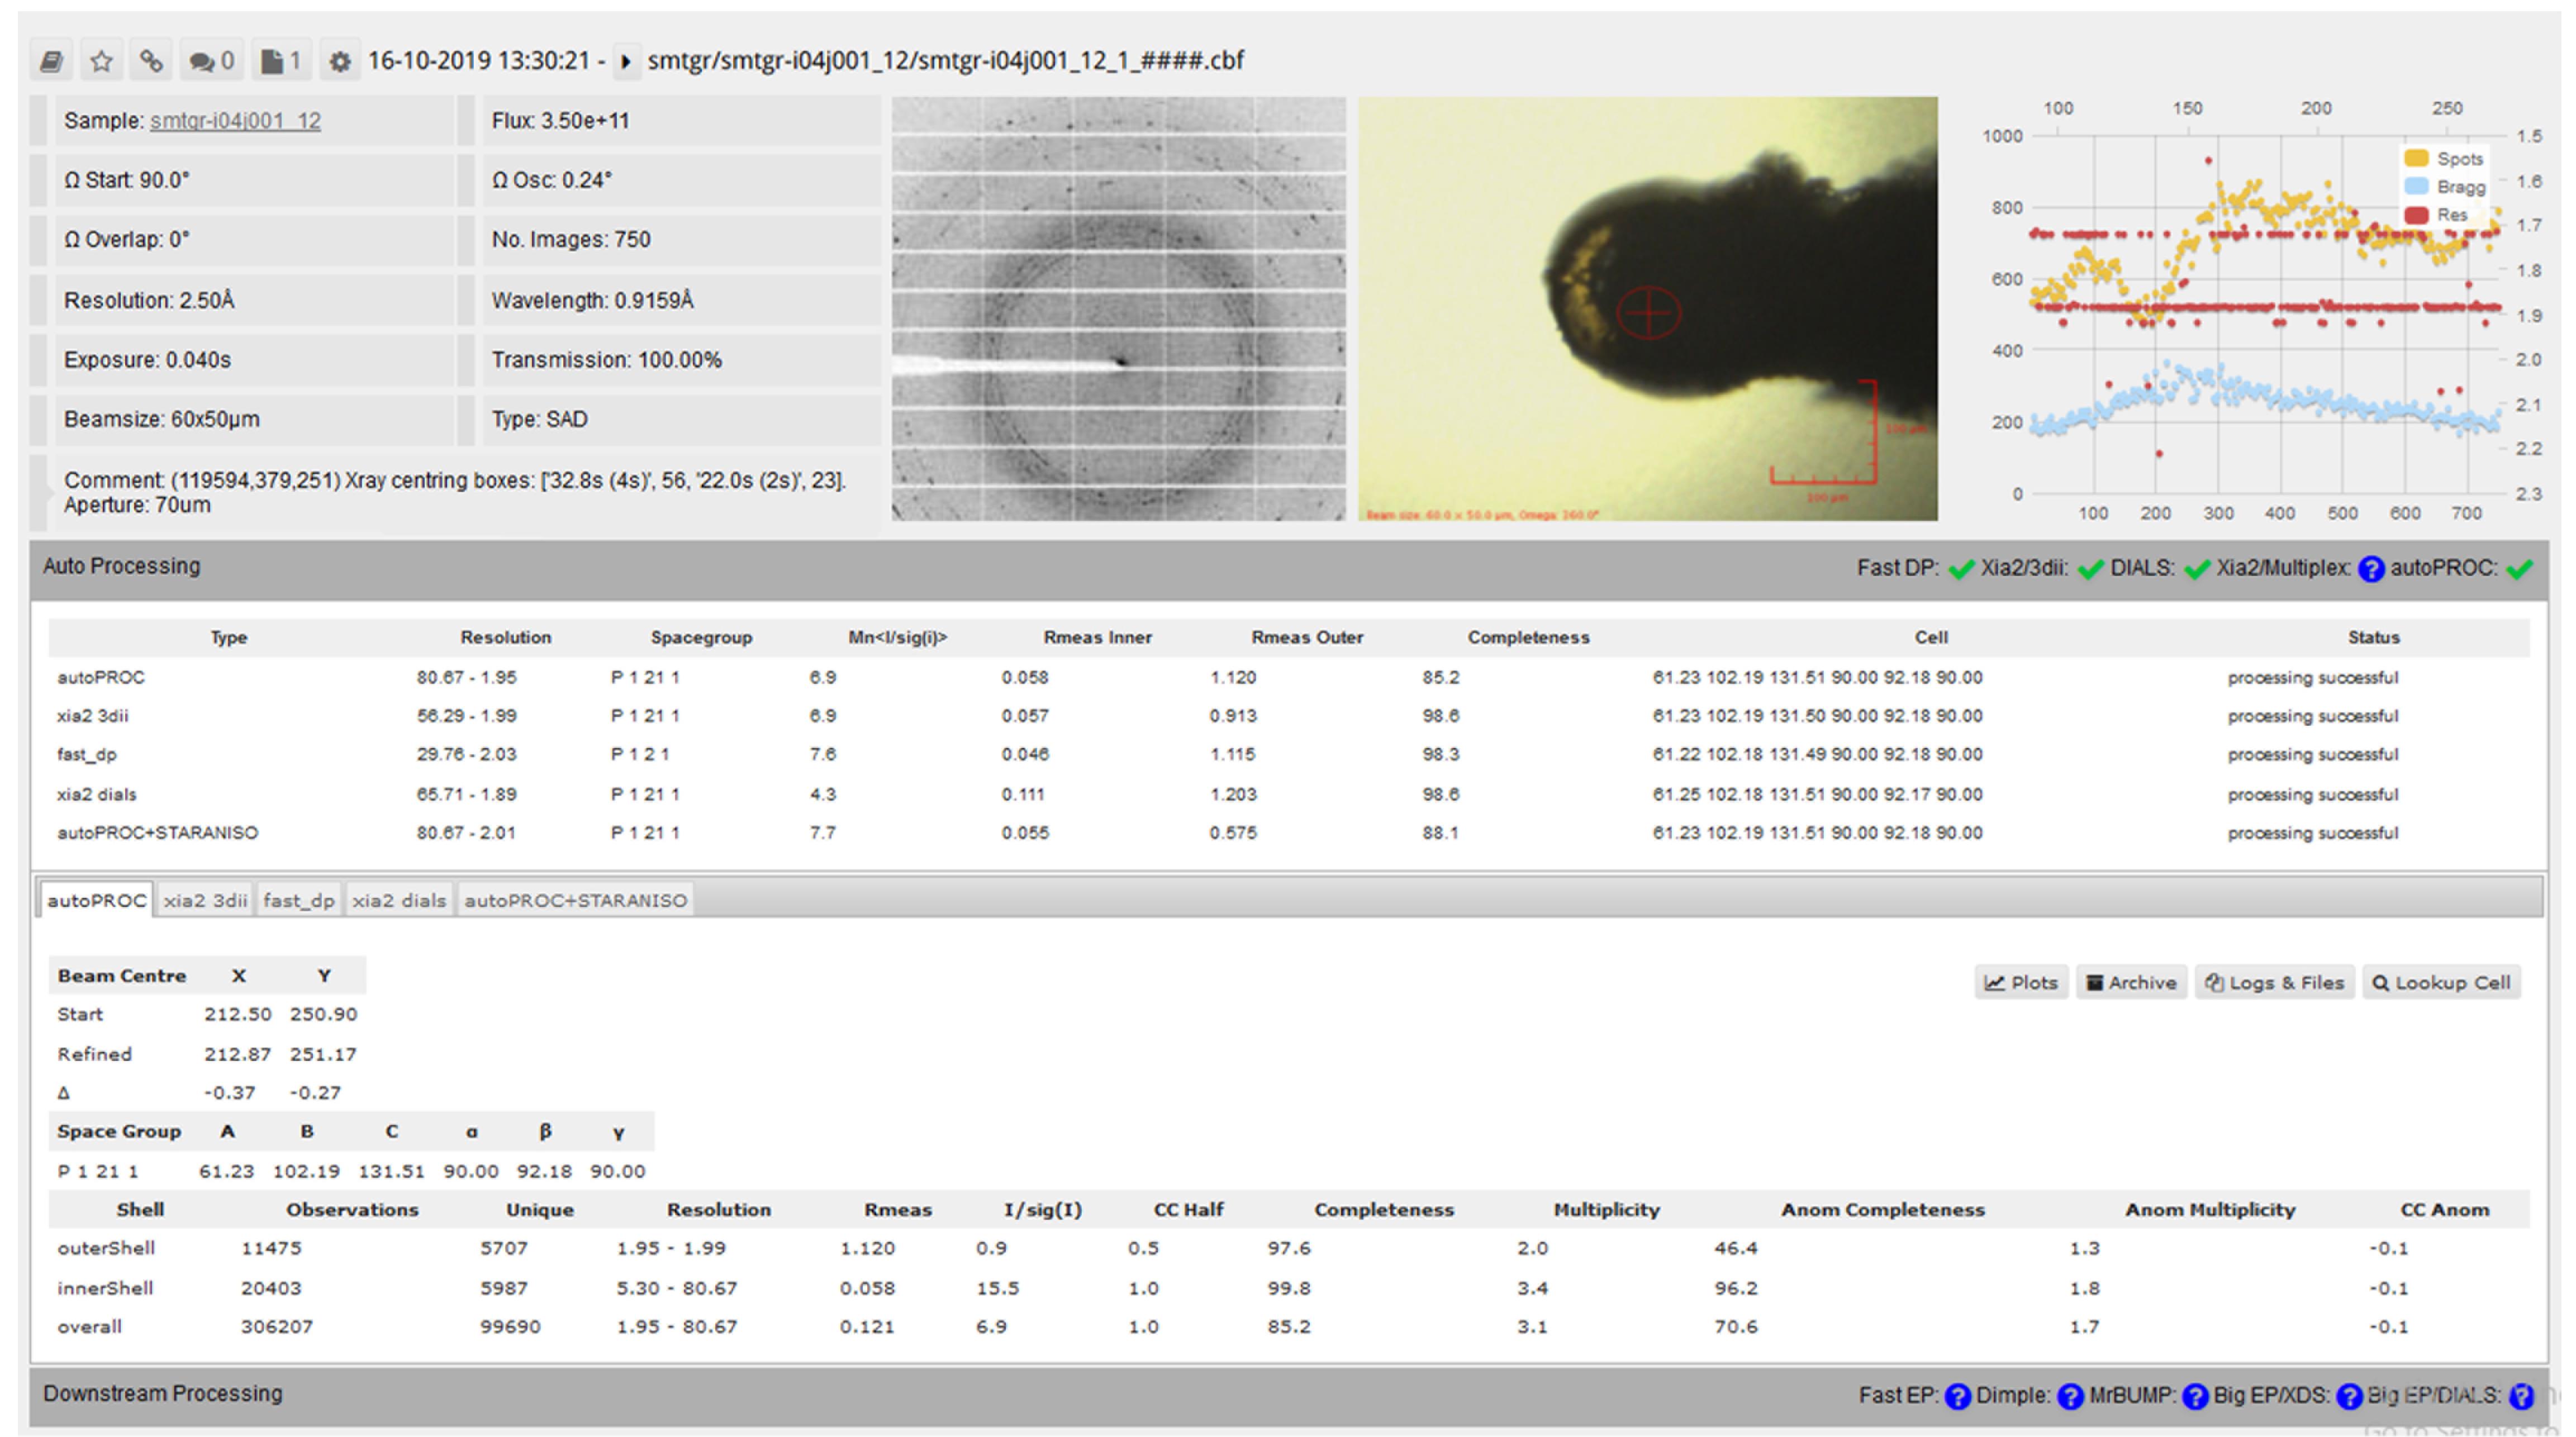
Figure 13. ISPyB graphical user interface
c. Click on the samples to identify any that are marked red or yellow and then review the crystal snapshots to determine if the crystal has been properly centered.
2. Data processing and analysis
a. Once the data has been collected under the beamline conditions (Table 5), it is semi-automatically processed using the XCE and PanDDA software tools available on the Diamond systems.
Table 5. Specifications for the I04-1 macromolecular crystallography beamline at Diamond Light Source
| Parameter | Value |
|---|---|
| Standard energy (Å/keV) | 0.92/13.53 |
| Flux at 12.66 keV (ph/s) | 3.8 × 10¹² (70 μm aperture, 300 mA ring current) |
| Beam size options (μm) | 60 × 50 (FWHM, h × v) 10, 20, 30, 50, 70 (round, μm) |
| Sample changer | Diamond BART with unipucks |
| Sample exchange time | <20 s |
| Detector | Pilatus 2 2M |
| Dewar pin numberPins and pucks | 592 SPINE standard pins and unipucks |
| Sample rate (xtals/h) | 29 (queued, automatic X-ray centering) |
b. For data analysis, you should be working in the Processing subdirectory of the XChem visit identified at the top-level directory by the lab visit number.
c. Within this working directory, a structured set of folders will have been established. Important folders to be aware of are as follows:
i. Analysis: Contains the data collection results and PanDDA analysis.
ii. Database: Contains the database file that holds all the analysis results.
iii. Group_deposition: Contains the complete set of files for automatic deposition to the Protein Data Bank (PDB) if that option is followed.
iv. Lab36: Contains a directory that holds the files from the lab work described above (i.e., the soak database, echo datafiles, shifter datafiles, etc.).
v. Reference: Contains the reference model in PDB format to be used for molecular replacement.
d. A molecular replacement model in the PDB format should be placed in the reference folder. It should best represent the crystal system used in the screening experiment and contain all waters, cofactors, and fixed ligands (i.e., any other small molecules included in the screening experiment that are not fragments being screened).
e. Within the Processing directory, open XCE from the Unix command line (Figure 14).
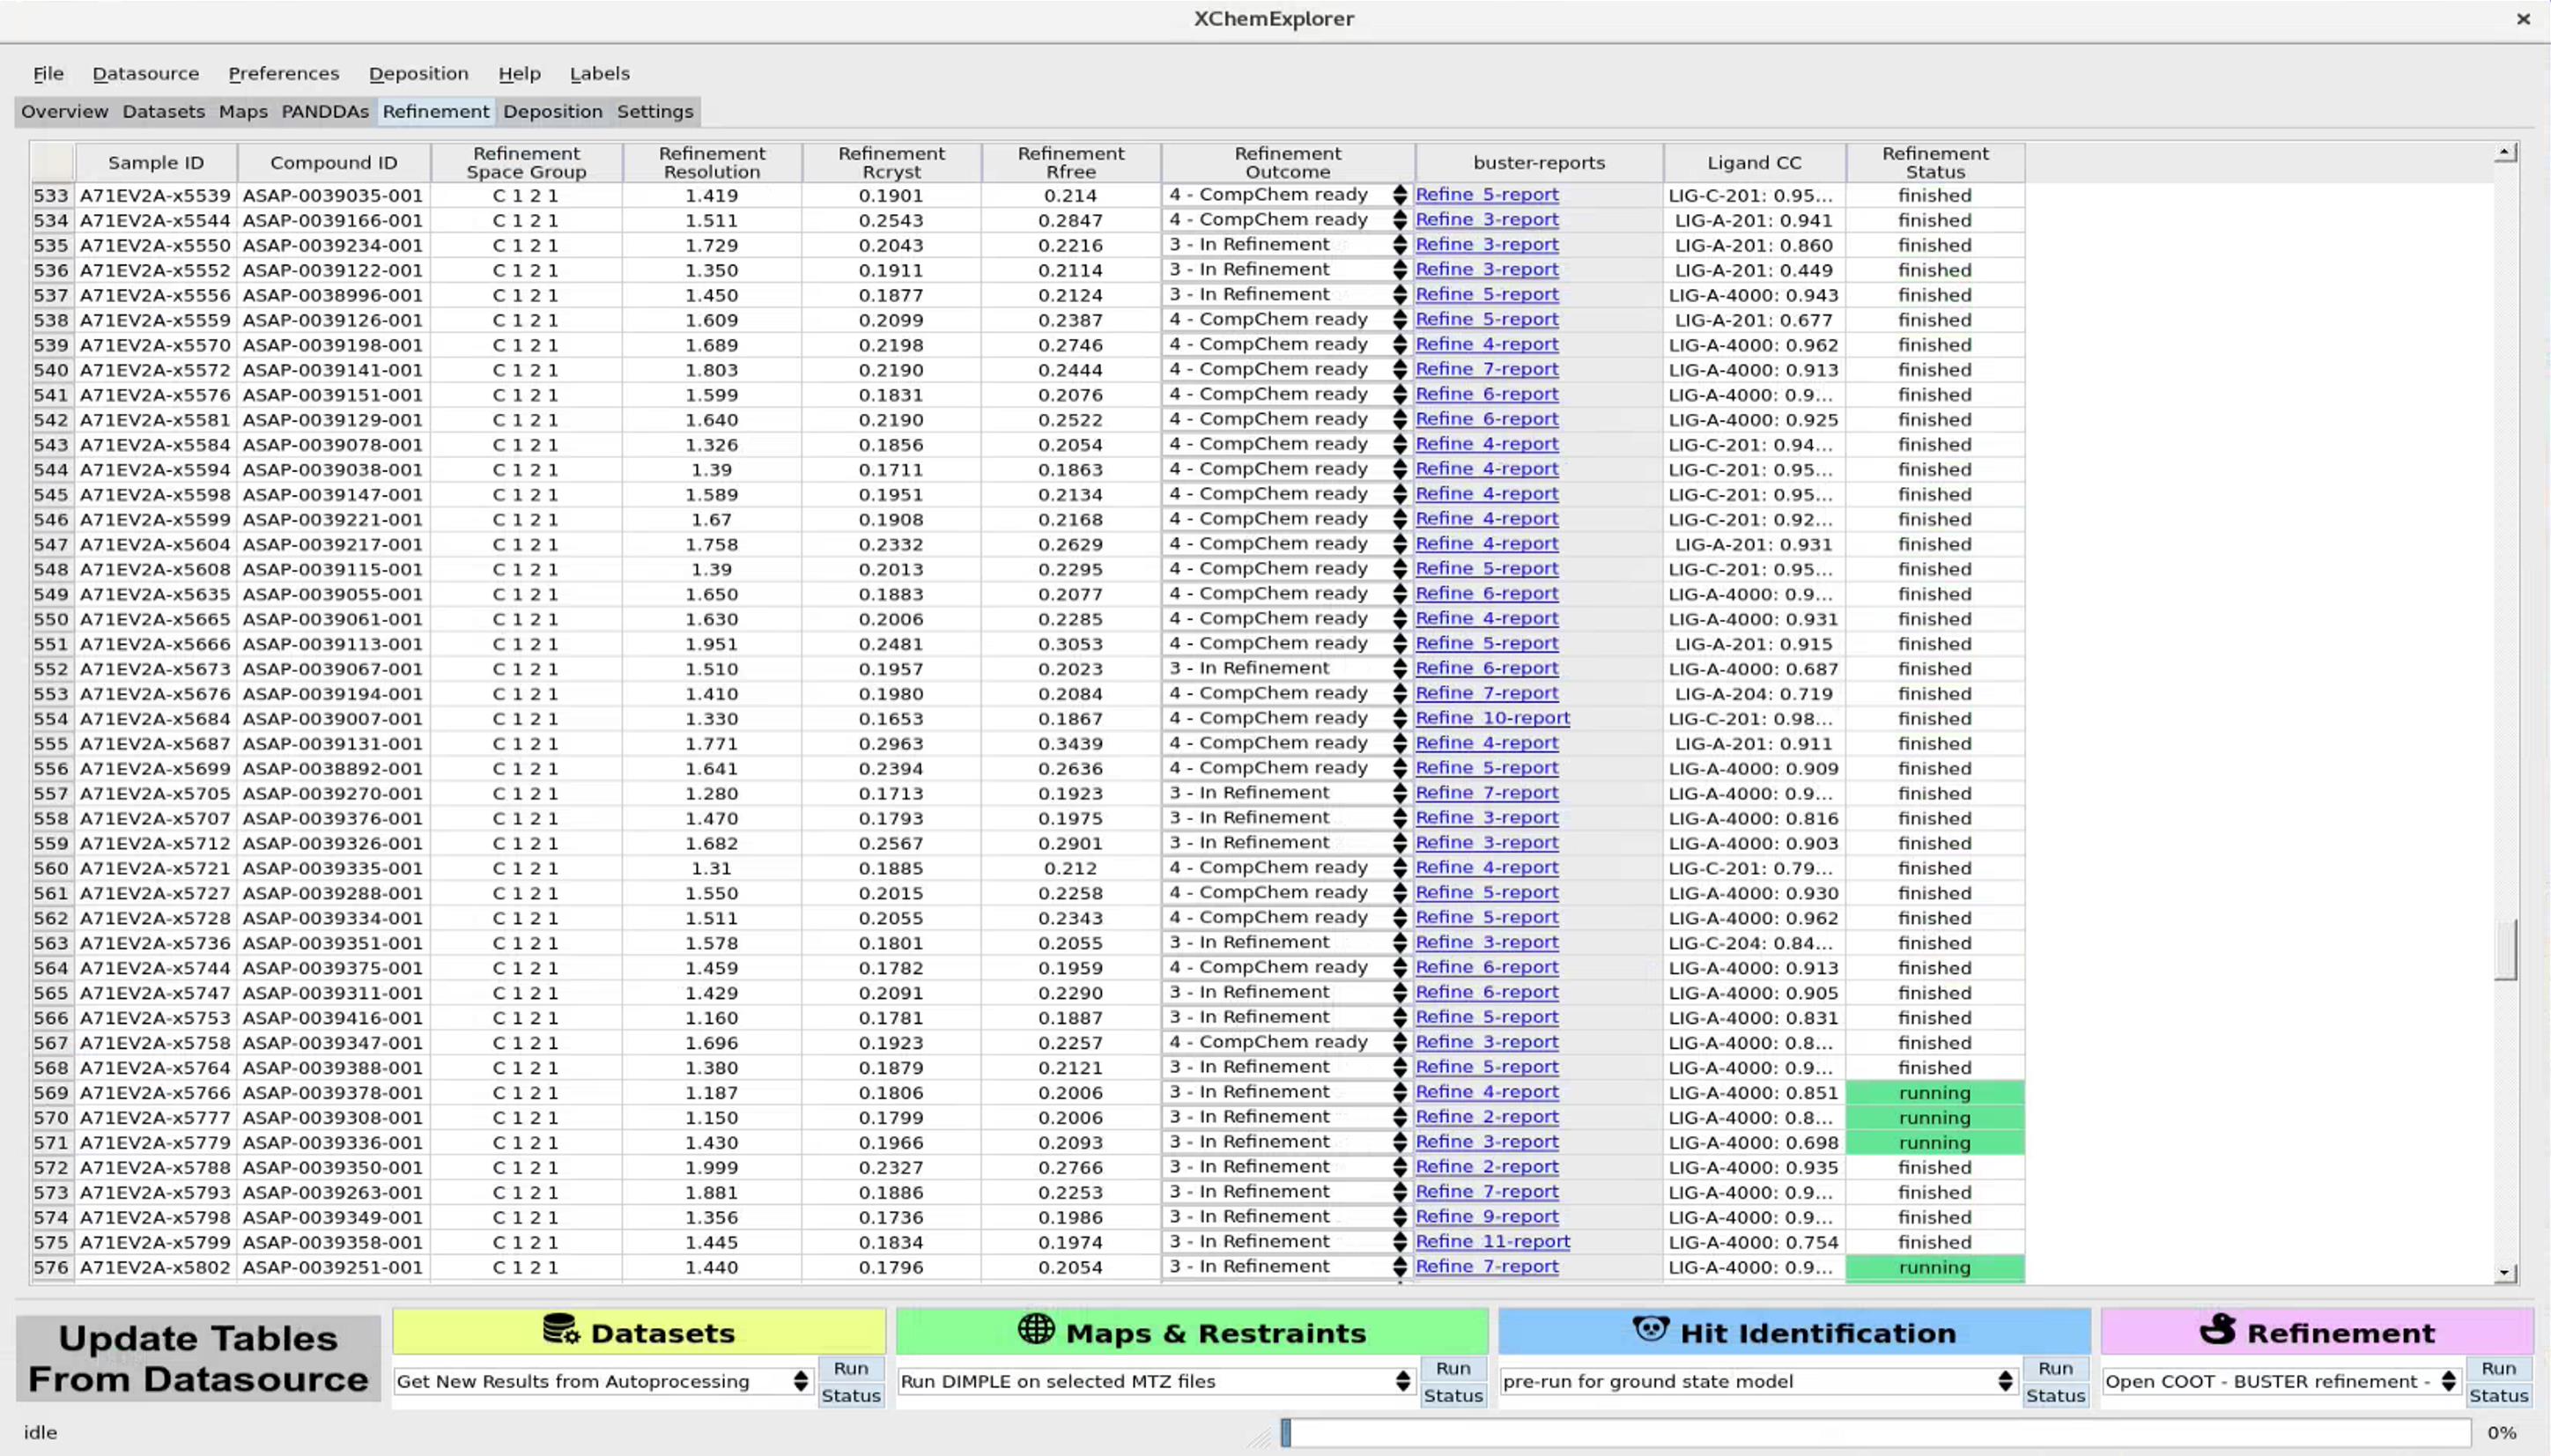
Figure 14. Main Refinement tab in the XChemExplorer window
f. Ensure the directory and file paths are correct in the XCE settings table. If XCE has been opened in the correct directory, all paths should be automatically loaded and correct. Two paths are required for XCE to process the data: Project Directory, which should be the /analysis/model_building/ subdirectories of the Processing directory, and Data Source, which should point to the soakDBDataFile.sqlite in the Database subdirectory of the processing directory.
g. In XCE preferences, several parameters can be defined. The default options are usually sufficient; however, Dimple reference model selection criteria for the maximum allowed unit cell difference between Reference structure and Target, the acceptable resolution limit for datasets, and the default restraints generation program may need to be altered to account for variation within the experiment.
h. Navigate to the Overview and then Data Source tabs of the main XCE window and click Update Table from Datasource to populate the XCE tables.
i. Navigate to the Datasets tab and select the target name from Select Target from the dropdown menu on the top right.
j. Under the yellow Datasets heading in the bottom panel, select Get New Results from Autoprocessing and click Run. This will load the processed datasets into XCE.
k. For each processed dataset, check if the space group and unit cell dimensions are consistent with the reference structure to be used for molecular replacement. XCE will automatically select the best processing of the data based on the parameters defined in the preferences (see step F2f). By clicking on the sample row, a window will be shown that has the results for all the automatic data processing programs run, and alternative processing results can be selected. If an alternative data processing is chosen, ensure that this is updated in XCE by clicking on Update Datasource.
l. Running DIMPLE for molecular replacement: Select the Maps tab and select the (de)-select all samples for DIMPLE tick-box. If the DIMPLE step needs to be re-run due to failures in the initial processing attempt, such as low data quality, issues with MTZ files, or incorrect space-group assignment, the specific datasets to be reprocessed can be selected using the individual selection checkbox in each sample row of the data table. Under the green Maps & Restraints panel at the bottom of the window, select run DIMPLE on selected MTZ files and click Run. To check the status of the DIMPLE processing, shown in the Dimple Status column of the table, click on Update Tables From Datasource.
m. Create ligand restraints: Using the default program set in Preferences (see step F2f), under the green Maps & Restraints panel at the bottom of the window, select create CIF/PDB/PNG files for ALL compounds and click Run. To check the status of the restraint generation processing, shown in the Compound Status column of the table, click on Update Tables From Datasource.
n. A ground state model is required for PanDDA to use as a reference model. A pre-run ground state model action from the hit identification action box needs to be executed to create the necessary reference directory and required files. Once completed, select build ground state model and use the mean map and difference maps (2Fo-Fc/Fo-Fc) loaded into Coot to remodel and refine the reference model and save. Re-run Dimple (as in step F2l) using the new reference model (Figure 15).
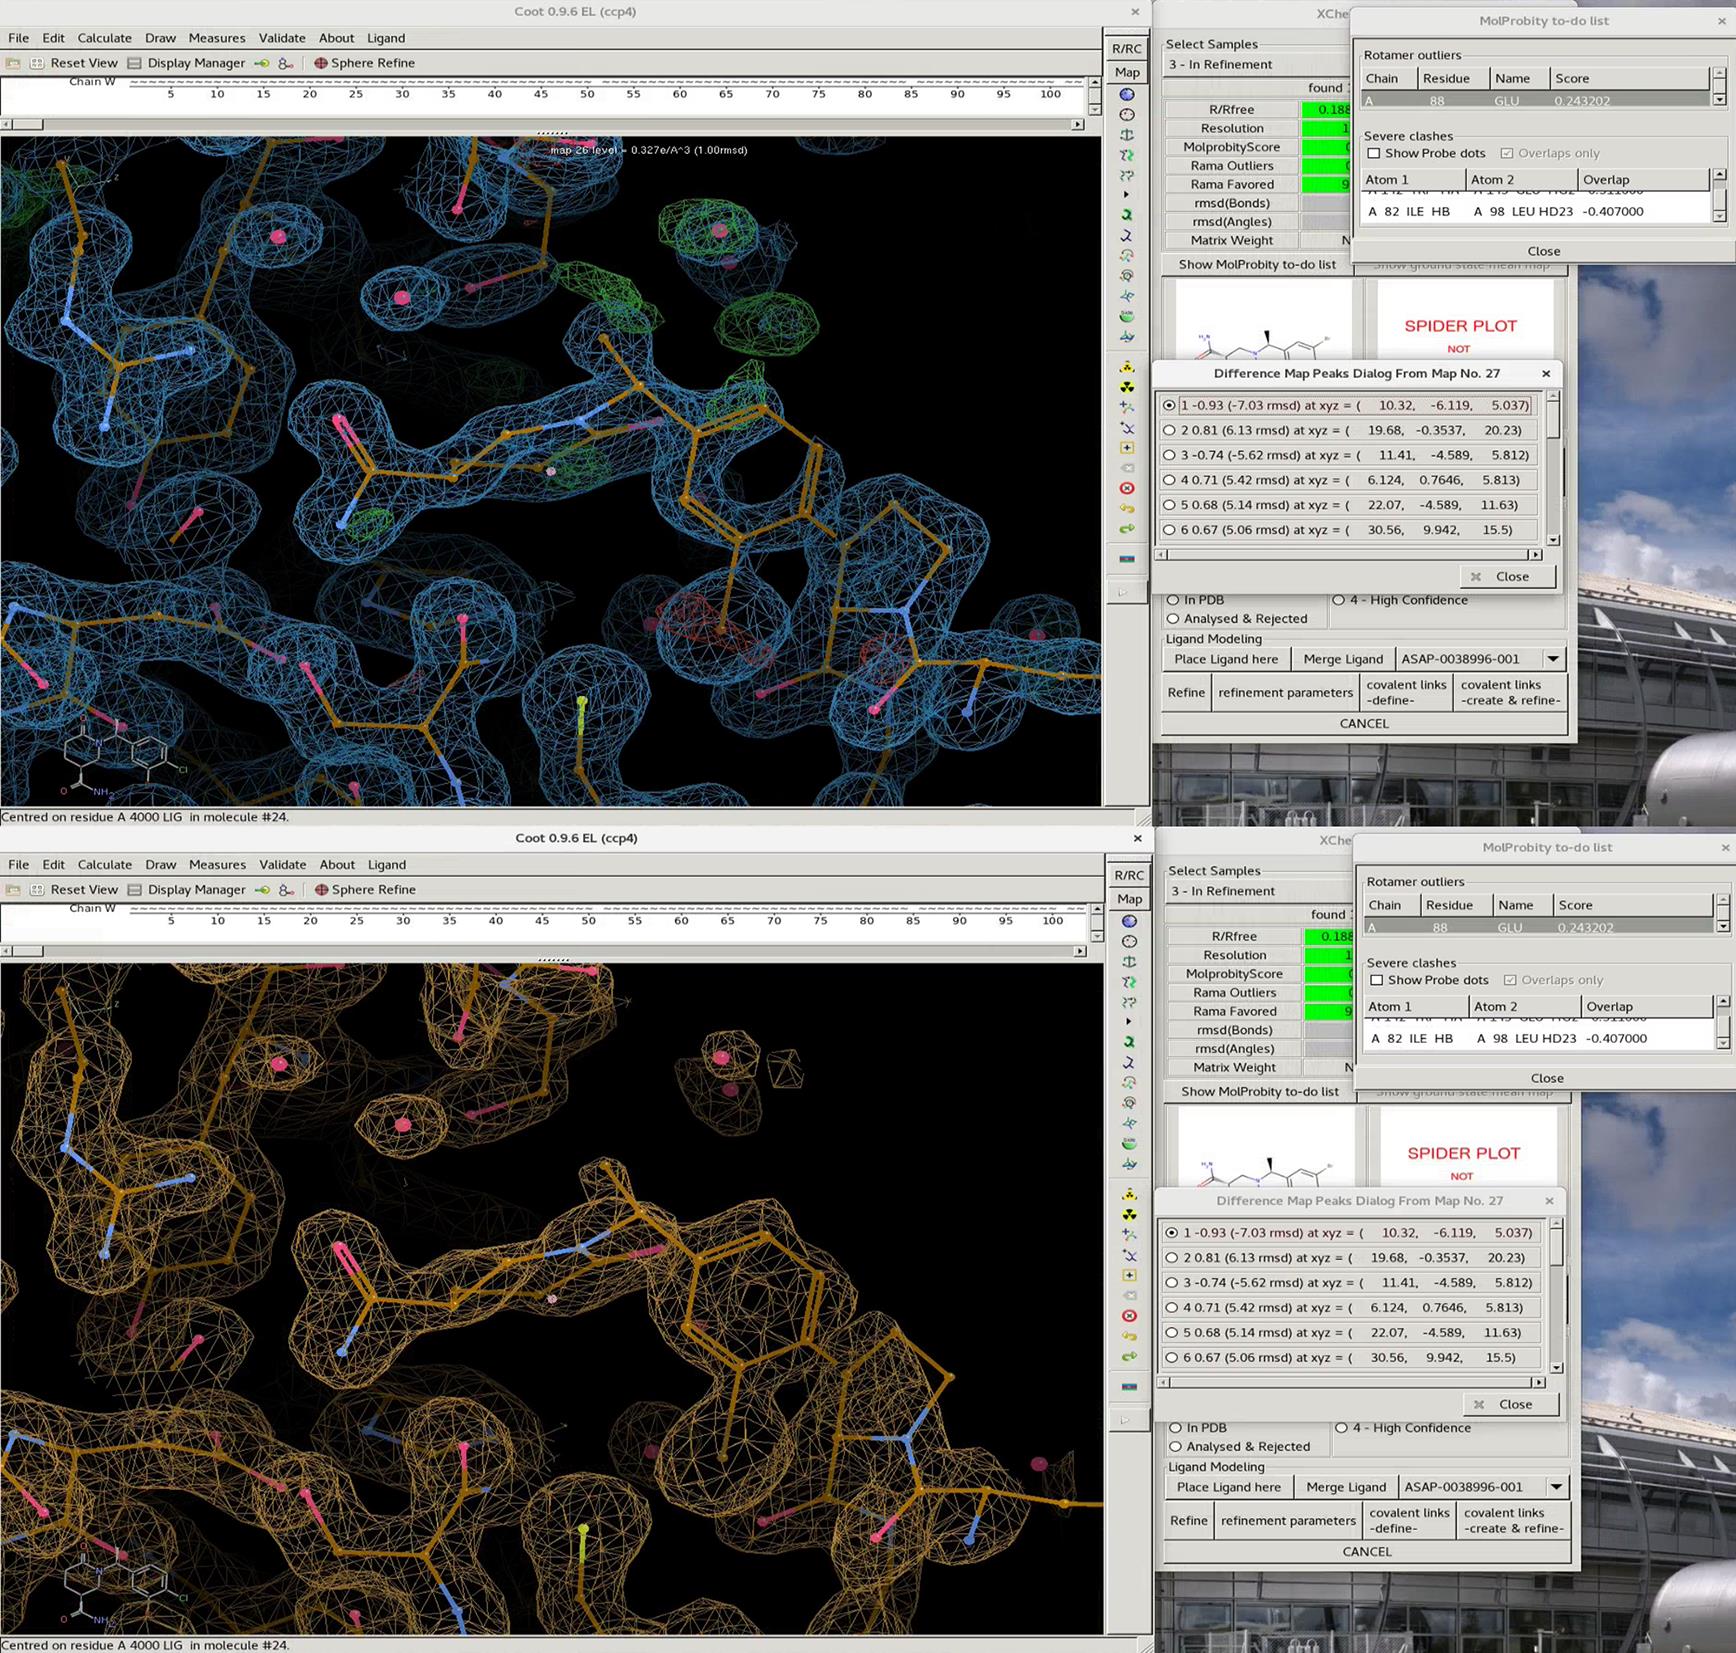
Figure 15. PanDDA event map in the Coot window. Event map showing the ligand with some surrounding structure (top) and event map from the same point of view with the usual 2Fo–Fc and Fo–Fc maps (bottom).
o. Perform the main PanDDA analysis by creating a timestamped processing directory in the Select PanDDA Directory, selecting panda.analyse, and click Run under Hit Identification.
p. Once completed, select pandda.inspect and click Run under Hit Identification. This will launch Coot and the panda.inspect interface. At the top of the interface are navigation panels that allow stepping through each event/potential hit identified by PanDDA. As each event is selected, the maps/model in the Coot interface will be refocused to that position. A summary of PanDDA statistics is given, as well as an opportunity to record the event information. If a hit has been identified, then Mark Event as Interesting and Ligand Placed must be selected. A confidence value can also be given (High/Medium/Low).
q. Limited modeling can be carried out to improve the fit of the hit to the map in Coot, as well as to prune or add new solvent molecules in the event area and/or add alternative sidechain conformations. Only change the model in the event area and do not navigate away from the intel view. Merge or add ligands to the model using the Merge Ligand with Model button on the inspection interface and save the updated model either by clicking Save Model or moving to the next event using the Next (Save Model) button. Do not save empty or doubtful hits.
r. Once all event sites have been inspected and annotated, select Export ALL PANDDA models from Hit identification and click Run. This generates an ensemble model of bound and ground states and performs refinement using REFMAC.
s. Once completed, select Open coot in Refinement and click Run. This will launch Coot and the XCE refinement control panel. In this panel, select the category of samples for refinement and click GO. This will load information on how many samples are in that category and allow you to navigate through each event. As the round of refinement has already been done, this step is to analyze the refinement output and check statistics to either annotate as either Comp Chem Ready (i.e., ligand and binding site refined but some atoms to refine elsewhere) or Ready for Deposition or to model further in Coot and refine further using the Refine button.
t. Once all the hit models are refined and no further adjustments are required, models can be exported for group deposition using the instructions within the XCE interface.
Validation of protocol
This protocol has been used and validated in the following research article(s):
de Souza Neto et al. [19]. Fragment library screening by X-ray crystallography and binding site analysis on thioredoxin glutathione reductase of Schistosoma mansoni. Sci Rep.
General notes and troubleshooting
General notes
1. This protocol can be broadly applied to screen diverse compound sets against multiple targets amenable to crystallization.
2. The SmTGR is catalytically active at 37 °C but should be kept at 4 °C during handling.
3. For short-term use (up to one week), SmTGR may be stored at 4 °C, and for long-term storage, the protein should be maintained at -20 °C.
4. To reduce repeated freeze-thaw cycles, the protein should be aliquoted into appropriate volumes immediately after receipt.
5. Each SmTGR subunit contains catalytically relevant cysteine pairs, making the enzyme sensitive to oxidative conditions. Therefore, storage under reducing conditions is recommended to prevent disulfide bond formation and protein aggregation. The tris(2-carboxyethyl) phosphine (TCEP) at 1 mM is recommended as the reducing agent due to its superior stability and specificity compared to other reducing agents, such as DTT.
6. This protocol is best suited for enzymes that can be produced in large quantities and crystallize reliably, as crystal production typically requires tens of milligrams of protein. For proteins with challenging crystallization behavior, crystal growth is likely to be the main bottleneck in the pipeline; thus, advanced production and stockpiling of crystals is recommended.
7. This protocol only considers the use of DMSO as the solvent for the fragment library, since multiple components of this screening pipeline are compatible with this solvent. Considerations regarding biological, equipment, and chemical compatibility must be taken into account before using solvents other than DMSO.
Troubleshooting
1. Although no time-dependent effects were observed, DMSO concentrations above 20% began to cause effects ranging from crystal fracturing to complete loss of diffraction capability.
2. The use of acoustic dispensing or other precise liquid transfer techniques is crucial to place the compound drop accurately, allowing slow and controlled diffusion into the crystal.
3. Protein expression and stability: To handle poor protein expression or instability in ExpiSf9 cells, optimization of expression conditions is recommended. Suggested strategies include performing a small-scale expression screen to determine optimal harvest time, utilizing stabilization additives, or trialling alternative expression vectors. A further suggestion includes trialling alternative expression systems such as Expi293 or E. coli.
4. If a fragment is poorly soluble, it can be incubated in a dry bath overnight to improve solubilization. It is important to check the compound’s melting point beforehand to avoid degradation. For most compounds, 40 °C is usually acceptable.
Supplementary information
The following supporting information can be downloaded here:
Supplementary File 1: AKTAPure IMAC-SEC method.zip
Acknowledgments
The authors would like to thank the Brazilian research funding agencies (CAPES, CNPq, FAPERJ, and FIOCRUZ) that supported this work. FPSJr is a CNPq productivity fellow and a FAPERJ CNE fellowship recipient. This study was partially funded by the Coordenação de Aperfeiçoamento de Pessoal de Nível Superior—Brasil (CAPES)—Finance Code 001. RJO received grant support from the University of Oxford GCRF Research England Fund and MRC MR/K018779/1 (OPPK-UK). NF was supported by MRC project grant MR/M026221/1 and, with FPS, Academy of Medical Sciences & Newton Fund award NAF\R2\180641.
This protocol is based on the following published paper: de Souza Neto, L.R., Montoya, B.O., Brandão-Neto, J. et al. Fragment library screening by X-ray crystallography and binding site analysis on thioredoxin glutathione reductase of Schistosoma mansoni. Sci Rep 14, 1582 (2024). https://doi.org/10.1038/s41598-024-52018-2.
Competing interests
There is no competing interest.
References
- Collins, P. M., Ng, J. T., Talon, R., Nekrosiute, K., Krojer, T., Douangamath, A., Brandao-Neto, J., Wright, N., Pearce, N. M., von Delft, F., et al. (2017). Gentle, fast and effective crystal soaking by acoustic dispensing. Acta Crystallogr D Struct Biol. 73(3): 246–255. https://doi.org/10.1107/s205979831700331x
- Maveyraud, L. and Mourey, L. (2020). Protein X-ray Crystallography and Drug Discovery. Molecules. 25(5): 1030. https://doi.org/10.3390/molecules25051030
- AlKharboush, D. F., Kozielski, F., Wells, G. and Porta, E. O. (2025). Fragment-based drug discovery: A graphical review. Cur. Res Pharmacol Drug Discov. 9: 100233. https://doi.org/10.1016/j.crphar.2025.100233
- Kuntz, A. N., Davioud-Charvet, E., Sayed, A. A., Califf, L. L., Dessolin, J., Arnér, E. S. J. and Williams, D. L. (2007). Thioredoxin Glutathione Reductase from Schistosoma mansoni: An Essential Parasite Enzyme and a Key Drug Target. PLoS Med. 4(6): e206. https://doi.org/10.1371/journal.pmed.0040206
- Schneider, C. A., Rasband, W. S. and Eliceiri, K. W. (2012). NIH Image to ImageJ: 25 years of image analysis. Nat Methods. 9(7): 671–675. https://doi.org/10.1038/nmeth.2089
- Kabsch, W. (2010). XDS. Acta Crystallogr D Biol Crystallogr. 66(2): 125–132. https://doi.org/10.1107/S0907444909047337
- Winter, G., Lobley, C. M. C. and Prince, S. M. (2013). Decision making in xia2. Acta Crystallogr D Biol Crystallogr. 69(Pt 7): 1260–1273. https://doi.org/10.1107/S0907444913015308
- Vonrhein, C., Flensburg, C., Keller, P., Sharff, A., Smart, O., Paciorek, W., Womack, T. and Bricogne, G. (2011). Data processing and analysis with the autoPROC toolbox. Acta Crystallogr D Biol Crystallogr. 67(4): 293–302. https://doi.org/10.1107/s0907444911007773
- Beilsten-Edmands, J., Winter, G., Gildea, R., Parkhurst, J., Waterman, D. and Evans, G. (2020). Scaling diffraction data in the DIALS software package: algorithms and new approaches for multi-crystal scaling. Acta Crystallogr D Biol Crystallogr. 76(4): 385–399. https://doi.org/10.1107/s2059798320003198
- Krojer, T., Talon, R., Pearce, N., Collins, P., Douangamath, A., Brandao-Neto, J., Dias, A., Marsden, B. and von Delft, F. (2017). TheXChemExplorergraphical workflow tool for routine or large-scale protein–ligand structure determination. Acta Crystallogr D Struct Biol. 73(3): 267–278. https://doi.org/10.1107/s2059798316020234
- Pearce, N. M., Krojer, T., Bradley, A. R., Collins, P., Nowak, R. P., Talon, R., Marsden, B. D., Kelm, S., Shi, J., Deane, C. M., et al. (2017). A multi-crystal method for extracting obscured crystallographic states from conventionally uninterpretable electron density. Nat Commun. 8(1): e1038/ncomms15123. https://doi.org/10.1038/ncomms15123
- Emsley, P., Lohkamp, B., Scott, W. G. and Cowtan, K. (2010). Features and development of Coot. Acta Crystallogr D Biol Crystallogr. 66(4): 486–501. https://doi.org/10.1107/s0907444910007493
- Long, F., Nicholls, R. A., Emsley, P., Gražulis, S., Merkys, A., Vaitkus, A. and Murshudov, G. N. (2017). AceDRG: a stereochemical description generator for ligands. Acta Crystallogr D Biol Crystallogr. 73(2): 112–122. https://doi.org/10.1107/s2059798317000067
- Emsley, P., Lohkamp, B., Scott, W. G. and Cowtan, K. (2010). Features and development of Coot. Acta Crystallogr D Biol Crystallogr. 66(4): 486–501. https://doi.org/10.1107/s0907444910007493
- Zhao, Y. (2003). Improving baculovirus recombination. Nucleic Acids Res. 31(2): 6e–6. https://doi.org/10.1093/nar/gng006
- Kolesnikova, O., Zachayus, A., Pichard, S., Osz, J., Rochel, N., Rossolillo, P., Kolb-Cheynel, I., Troffer-Charlier, N., Compe, E., Bensaude, O., et al. (2022). HR-Bac, a toolbox based on homologous recombination for expression, screening and production of multiprotein complexes using the baculovirus expression system. Sci Rep. 12(1): e1038/s41598–021–04715–5. https://doi.org/10.1038/s41598-021-04715-5
- Nettleship, J. E., Rahman-Huq, N. and Owens, R. J. (2009). The Production of Glycoproteins by Transient Expression in Mammalian Cells. Methods Mol Biol. 245–263. https://doi.org/10.1007/978-1-59745-196-3_16
- Ng, J. T., Dekker, C., Kroemer, M., Osborne, M. and von Delft, F. (2014). Using textons to rank crystallization droplets by the likely presence of crystals. Acta Crystallogr D Biol Crystallogr. 70(10): 2702–2718. https://doi.org/10.1107/s1399004714017581
- de Souza Neto, L. R., Montoya, B. O., Brandão-Neto, J., Verma, A., Bowyer, S., Moreira-Filho, J. T., Dantas, R. F., Neves, B. J., Andrade, C. H., von Delft, F., et al. (2024). Fragment library screening by X-ray crystallography and binding site analysis on thioredoxin glutathione reductase of Schistosoma mansoni. Sci Rep. 14(1): e1038/s41598–024–52018–2. https://doi.org/10.1038/s41598-024-52018-2
Article Information
Publication history
Received: Dec 22, 2025
Accepted: Feb 25, 2026
Available online: Mar 12, 2026
Published: Apr 20, 2026
Copyright
© 2026 The Author(s); This is an open access article under the CC BY-NC license (https://creativecommons.org/licenses/by-nc/4.0/).
How to cite
Neto, L. R. S., Montoya, B. O., Brandão-Neto, J., Parker, K., Von Delft, F., Furnham, N., Owens, R. J. and Silva-Jr, F. P. (2026). Workflow for Crystallographic Fragment Screening by Crystal Soaking for Protein Targets: A Case Study on Thioredoxin Glutathione Reductase From Schistosoma mansoni. Bio-protocol 16(8): e5651. DOI: 10.21769/BioProtoc.5651.

 Download Citation in RIS Format
Category
Biophysics > X-ray crystallography
Drug Discovery > Drug Screening
Biochemistry > Protein > Interaction > Protein-ligand interaction
Do you have any questions about this protocol?
Post your question to gather feedback from the community. We will also invite the authors of this article to respond.
 Post a Question


