- Protocols

- Articles and Issues
- For Authors
- About
- Become a Reviewer

Introducing Exogenous DNA Vectors Directly into Trypoxylus dichotomus Larvae Via In Vivo Electroporation
Published: Vol 16, Iss 4, Feb 20, 2026 DOI: 10.21769/BioProtoc.5602 Views: 224
Reviewed by: Anonymous reviewer(s)
Original research article
The authors used this protocol in:

Jul 2025
Advertisement


Protocol Collections
Comprehensive collections of detailed, peer-reviewed protocols focusing on specific topics


Abstract
In the Japanese rhinoceros beetle Trypoxylus dichotomus, gene function studies have relied mainly on systemic larval RNA interference (RNAi), as gain-of-function techniques remain underdeveloped and germline transgenesis is impractical given the species’ approximately one-year generation time. In addition, because larval RNAi is systemic, it has been difficult to analyze the function of lethal genes. Here, we present a simple and efficient protocol for the direct introduction of exogenous DNA into T. dichotomus larvae via in vivo electroporation. This protocol includes optimized procedures for adult breeding and egg collection, as well as a rigorously parameterized electroporation technique that delivers a piggyBac transposon vector into region-specific larval tissues. Within one day after electroporation, treated larvae exhibit mosaic expression of a reporter gene, enabling rapid tissue-specific functional analysis without the need to establish stable germline transgenic lines. Moreover, the key promoter used in this system (T. dichotomus actinA3 promoter) is effective across diverse insect species, indicating that the method can be readily adapted to other non-model insects. Overall, this electroporation-based approach provides a valuable gain-of-function tool for T. dichotomus and potentially many other insect species.
Key features
• A simple and efficient method for in vivo electroporation of T. dichotomus larvae.
• Applicable to other insect species.
• The T. dichotomus actinA3 promoter functions effectively across a diverse range of insect species.
• An optimized method for egg collection in T. dichotomus.
Keywords: ElectroporationBackground
Electroporation transiently permeabilizes cell membranes with electrical pulses, enabling intracellular delivery of nucleic acids and other macromolecules [1–3]. In vivo applications have supported tissue-specific gene function analyses in vertebrates and multiple insects [4–11]. Electroporation is compatible with both gain and loss-of-function assays and genetic mosaic analysis within a single organism [9]. The Japanese rhinoceros beetle, Trypoxylus dichotomus (Coleoptera, Scarabaeidae, Dynastini) (Figure 1), is a large insect species reaching up to 90 mm in body length. In T. dichotomus, molecular studies still rely heavily on systemic larval RNAi [12–16]. Gain-of-function and region-specific approaches remain underdeveloped, and germline transgenesis or genome editing is impractical due to the 10–12-month generation time [17]. In addition, because larval RNAi is systemic, it has been difficult to analyze the function of lethal genes. Therefore, electroporation is the optimal technique for gain-of-function and region-specific approaches in T. dichotomus. In large-bodied insects such as T. dichotomus, however, the efficiency of delivery of exogenous DNA vectors via electroporation depends critically on developmental stage, body size, electrode geometry/placement, pulse parameters, and cargo properties, underscoring the need for standardized, reproducible protocols. We present a rigorously parameterized, region-specific gain-of-function in vivo electroporation protocol for T. dichotomus larvae, optimized for reproducibility [18].
Figure 1. Trypoxylus dichotomus. (A) Adult male and (B) female T. dichotomus. Scale bar: 10 mm.
Materials and reagents
1. Filter pipette tips (RNase/DNase-free) [Labcon, catalog number: 1055-965-018-9 (20 μL) and QSP, catalog number: TF102-10-Q (2 μL)]
2. Microloader (Eppendorf, catalog number: 2229001206)
3. 1.5 mL microtubes, flat-bottom, DNase/RNase-free (Watson, catalog number: 131-415C)
4. 0.2 mL Flat PCR tube 8-cap strips (INA OPTIKA, catalog number: 3247-00)
5. Lavender nitrile powder-free exam gloves (Kimberly-Clark, catalog number: 52818)
6. Plasmid pBac[Tdic-actA3-nls-EGFP_Dmel-hsp70-DsRed2] (Figure 2) [18]
7. Plasmid pBac[phsp-pBac] [19]
8. UltraPureTM DNase/RNase-free distilled water (UPW) (Invitrogen, catalog number: 10977023)
9. Blow container 750 cc (Hobby Club, https://www.hobby-club.jp/items/25101620)
10. Humus (Dorcus Owner’s shop, https://www.dorukusu.com/item/847/)
11. Pro-jelly 16 g (KB farm, https://www.wraios.co.jp/zeri.htm)
12. Jelly Splitter II (Coelacase, https://www.din.or.jp/~coelacan/n_sp.html)
13. Clean cup (Risupack, catalog number: 200B)
14. Spoon (stainless steel) 180 mm (AS ONE, catalog number: 6-522-04)
15. Bamboo chopsticks (generic)
16. Insect pins (Shigakontyu, model: INSECT PINS, No. 3)
17. Nylon mesh cloth (70 mesh) (NBC Meshtec, catalog number: T-NO.70S)
18. Container [454 mm (L) × 292 mm (W) × 250 mm (H)] (Fudogiken, catalog number: NUE250)
19. Tray [860 mm (L) × 530 mm (W) × 150 mm (H)] (Sanko, catalog number: 673015)
20. Yogurt crate H-20-3 (Sanko, catalog number: 200758)
21. Ultrasound gel, LOGIQLEAN HARD (GE HealthCare, catalog number: 2369385)
22. Glass capillary with a scale (NARISHIGE, model: GDC-1; scale added in 0.6 mm increments by Daiwa Union Co., Ltd., Japan)
Figure 2. Schematic of the plasmid vector for piggyBac transformation of T. dichotomus. To establish an in vivo electroporation method in T. dichotomus tissues, we employ the promoter of the actin A3 gene, which is ubiquitously expressed [18]. This vector also contains a DsRed2 expression cassette driven by the Drosophila hsp70 promoter, which is active in various insects—including the silkworm Bombyx mori [20], the red flour beetle Tribolium castaneum [21], and the butterflies Bicyclus anynana [22] and Papilio xuthus [9]—as well as an EGFP expression cassette driven by the 3xP3 promoter. NLS indicates a nuclear localization signal.
Equipment
1. Micropipette [Gilson, catalog number: F144054M (P2), F144056M (P20)]
2. Centrifuge (TOMY, model: MX-307)
3. Micropipette puller (Sutter Instrument, model: P-97/IVF)
4. Micropipette grinder (NARISHIGE, model: EG-400)
5. Microinjector (Eppendorf, model: FemtoJet 4i)
6. Fluorescent stereomicroscope (Nikon, model: SMZ18)
7. Electroporation electrodes [NEPAGENE, model: CUY665Ti9-2.5-0.5 (0.5 mm), CUY650P1 (1 mm), CUY650P3 (3 mm), CUY650P10 (10 mm)]
8. Electroporator (NEPAGENE, model: NEPA21 Type II)
9. Manipulator (NARISHIGE, model: M-152, HI-7)
Procedure
A. Breeding and egg collection
Note: Perform all of the following operations at room temperature (25 °C). In winter, maintaining the room at 25 °C using an oil heater in addition to an air conditioner can help ensure the female lays a sufficient number of eggs.
1. Use a perforation tool to make holes (diameter ≤ 0.5 mm) in the plastic bag containing the humus and aerate it for at least 3 days (Figure 3).
Note: Immediately after purchase, humus is typically enclosed in a sealed plastic bag and often exhibits ongoing anaerobic fermentation. Using it as is may adversely affect T. dichotomus rearing. Therefore, perforate the plastic bag with a perforation tool (Figure 3A, C) or an INSECT PIN No. 3 (Figure 3B, D) and expose the contents to air for at least 3 days (Figure 3E). The small hole size (≤ 0.5 mm) provides ventilation while preventing the entry of pests such as fungus gnats. Aeration can alternatively be achieved by spreading the humus onto a tray; however, this approach carries a risk of fungus gnat infestation (Video 1).

Figure 3. Preparation of humus for T. dichotomus breeding. (A) A perforation tool (a handmade device equipped with multiple INSECT PINS No. 3). (B) A single INSECT PIN No. 3 (diameter 0.5 mm, length 40 mm). Commercial humus is often sold in airtight plastic bags, and the substrate may remain oxygen-limited, allowing anaerobic fermentation to continue. To minimize negative effects on T. dichotomus rearing, vent the bag by making small holes with a perforation tool (C) or a single INSECT PIN No. 3 (D), and aerate the humus for at least 3 days (E). Magenta circles indicate holes perforated using a perforation tool (C’). With holes of this diameter, fungus gnats cannot enter.

2. Prepare a pair of fully mature T. dichotomus (one male and one female) and place them together in a blow container (Figure 4A).
Note: Fully mature T. dichotomus adults are individuals that are at least two weeks post-eclosion and have begun regular feeding.
3. Confirm that mating has occurred and wait for the male to naturally detach from the female (approximately 0.5–6 h) (Figure 4B, C).
Note: If the pair is forcibly pulled apart by hand, the male’s external genitalia may tear and remain inside the female, which can prevent her from laying eggs (Figure 4D).
Figure 4. Mating of T. dichotomus. (A) Place a pair of fully mature T. dichotomus in a blow container and observe them every 1–2 h. (B) Locate individuals engaged in mating, and (C) wait until mating ends and the male departs from the female. (D) If the pair is forcibly pulled apart by hand, the male’s external genitalia may tear and remain inside the female, which can prevent her from laying eggs. The red arrowheads indicate the male’s external genitalia.
4. Fill a plastic rearing container [approximately 454 mm (L) × 292 mm (W) × 250 mm (H)] approximately two-thirds with humus and pack the humus down firmly (Figure 5A, Video 2).
Note: Compaction of the humus facilitates egg laying.
5. Add an additional layer of humus on top of the packed humus (Figure 5B, Video 2).
6. Place bamboo chopsticks on the humus as footholds to prevent the T. dichotomus from overturning (Figure 5C, Video 2).
Note: T. dichotomus often overturns and is unable to right itself, which can result in death. Providing footholds (e.g., chopsticks) helps prevent this (Video 3).
7. Place jelly on top of the humus (Figure 5D, Video 2).
Note: Make sure the jelly supply does not run out, as females may take several days to resume egg laying after the food is replaced. The jelly can be easily cut and prepared for use with the Jelly Splitter II (Video 2).
8. Place the mated female adult into the prepared container (Figure 5E, Video 2).
Note: The male should not be kept in the container. If a male is present, the risk of egg damage increases; therefore, only the female should be kept.
9. Cover the container with a mesh and then secure the lid (this constitutes the egg-laying setup) (Figure 5F, G, Video 2).
Note: Fungus gnats can infest and breed in the humus; however, covering it with a mesh can effectively prevent infestation (Video 1).
Figure 5. Egg-laying setup for T. dichotomus. (A) Fill approximately two-thirds of the container case with humus, firmly compacting the humus, and then (B) add additional humus on top. (C) Place chopsticks on the humus as footholds to prevent T. dichotomus from overturning, then (D) position the jelly. (E) Place the mated female adult into the prepared container, (F) cover the container with mesh cloth, and (G) securely close the lid.
10. Pour the humus from the egg-laying setup onto the tray every 3–7 days and carefully examine for eggs (Figure 6A–C).
Note: A female can continue laying eggs for roughly three months, often producing over 100 eggs in total. Freshly laid eggs are ellipsoidal, approximately 2–3 mm in size, becoming spherical with a diameter of about 5–6 mm as development progresses. Freshly laid eggs are extremely delicate and easily damaged. We recommend scooping eggs up with a spoon along with some surrounding substrate rather than picking them up directly. To minimize stress on the female, we recommend egg-checking only once or twice a week. If eggs are not checked and collected regularly, the female may damage eggs. Females tend to lay eggs in compacted humus layers (lower layers).
11. Prepare collection cups by filling a small plastic cup (e.g., a clean plastic cup) with humus and gently place collected eggs on the surface of the humus (Figure 6D, E).
12. Transfer each larva to an individual blow container after the eggs hatch and rear it until it is used in experiments (Figure 6F).
Note: The embryonic development period is approximately 14 days at 25 °C.
B. Electroporation
1. Turn on the FemtoJet apparatus in advance.
2. Add donor plasmid DNA and helper plasmid DNA (5 μg/μL each) to a 1.5 mL microtube, mix thoroughly by pipetting, and centrifuge at 13,000× g for 1 min.
Note: The purpose of this centrifugation is to remove air bubbles and to pellet any large debris to prevent clogging of the capillary.
3. Transfer the supernatant to a 0.2 mL PCR tube.
4. Produce glass capillaries using a micropipette puller.
Note: For T. dichotomus, the puller settings are as follows: heat 745, pull 40, vel 28, and time 220.
5. Crack the tip of the glass capillary with tweezers under a stereomicroscope to obtain a suitably fine opening (Figure 7).
Note: A micropipette grinder can also be used to sharpen the capillary tip (Figure 7, blue).
6. Use a microloader tip to load the plasmid solution from step B3 into the capillary (Figure 8A).
7. Set the capillary into the injection holder and mount it on the micromanipulator (Figure 8B).
8. Attach the electrodes to the electroporator and turn the power on.
Note: Select the electrode size according to the application (Figure 9).
Figure 6. Egg collection of T. dichotomus. (A) Humus is transferred from the egg-laying setup container into a tray. (B) A small amount of the humus is transferred to a container, where (C) it is then carefully examined for eggs. (D) Eggs are scooped up with a spoon and (E) gently placed into a plastic cup containing humus. (F) After hatching, transfer each larva into a blow container and rear it until it is used in experiments.
Figure 7. Glass capillary used for injection. (A) GDC-1 glass capillary and GDC-1 glass capillary with a scale added in 0.6 mm increments. The inner diameter of the GDC-1 glass capillary is 0.6 mm, yielding approximately 0.17 μL per scale division (0.3 mm × 0.3 mm × π × 0.6 mm ≈ 0.17 μL). (B) The tip of a glass capillary produced with a micropipette puller is sealed (green). Under a stereomicroscope, the capillary tip should be broken with tweezers to obtain a suitably narrow aperture (magenta). If the aperture is excessively wide, it may result in larval mortality (gray). Additionally, sharpening the tip of the broken glass capillary with a micropipette grinder can reduce mechanical damage to the larva (blue).
Figure 8. Plasmid vector loading into glass capillaries. (A) Using a microloader tip, load the plasmid vector into the capillary. (B) Set the capillary into the injection holder and mount it on the micromanipulator.
Figure 9. Types of electroporation electrodes. Electroporation electrodes should be selected based on the target region and the size of the insect. For first- or second-instar T. dichotomus larvae, 3.0 mm electroporation electrodes are used. In addition to the electrodes shown in the figure, various other types are commercially available.
9. Set the electroporation parameters for the poring pulse and transfer pulse (Figure 10A).
Note: In the case of T. dichotomus, set the poring pulse to two 5-ms pulses of 300 V at 50 ms intervals and the transfer pulse to ten 90 ms pulses of 20 V at 100 ms intervals.
10. Apply ultrasound gel to the electrodes (Figure 10B).
Note: While an electrolyte such as PBS can be used, an electrode gel offers better handling. If no conductive medium is applied, the electrical resistance will be high, and the larval body surface can become scorched.
11. Hold the larva securely by hand and position it between the electrodes (Figure 10C).
Note: If the larva is very small, it can be anesthetized with CO2 before this step.
12. Perform the microinjection on the side of the larva closest to the positive electrode. After withdrawing the capillary, immediately deliver an electric pulse (Figure 10D) (Video 4).
Note: The volume represented by one scale division on the glass capillary is approximately 0.17 μL. Adjust the injection volume within 1–15 scale divisions (0.17–2.55 μL), not exceeding the maximum non-injurious volume for the larvae. Injecting the DNA solution near the region of interest where transformation is desired increases DNA uptake efficiency. Injecting at a shallow depth and angle that does not damage the gut improves the survival rate of the larvae.
Figure 10. Introduction of exogenous DNA vectors directly into T. dichotomus larvae via in vivo electroporation. (A) Electroporator for use in electroporation of T. dichotomus. (B) Apply ultrasound gel to the electrodes. (C) Position the larvae between the electrodes. (D) Perform the microinjection on the side of the larva closest to the positive electrode, and immediately after withdrawing the capillary, deliver an electric pulse.
13. Return the larva to the humus.
14. Examine the larva on the following day under a fluorescence stereomicroscope to check for fluorescent signals (Figure 11).
Note: In T. dichotomus, using larvae weighing 1.57 g or less allows more efficient piggyBac vector introduction [18]. This is thought to be due to increased electrical resistance in larger larvae.
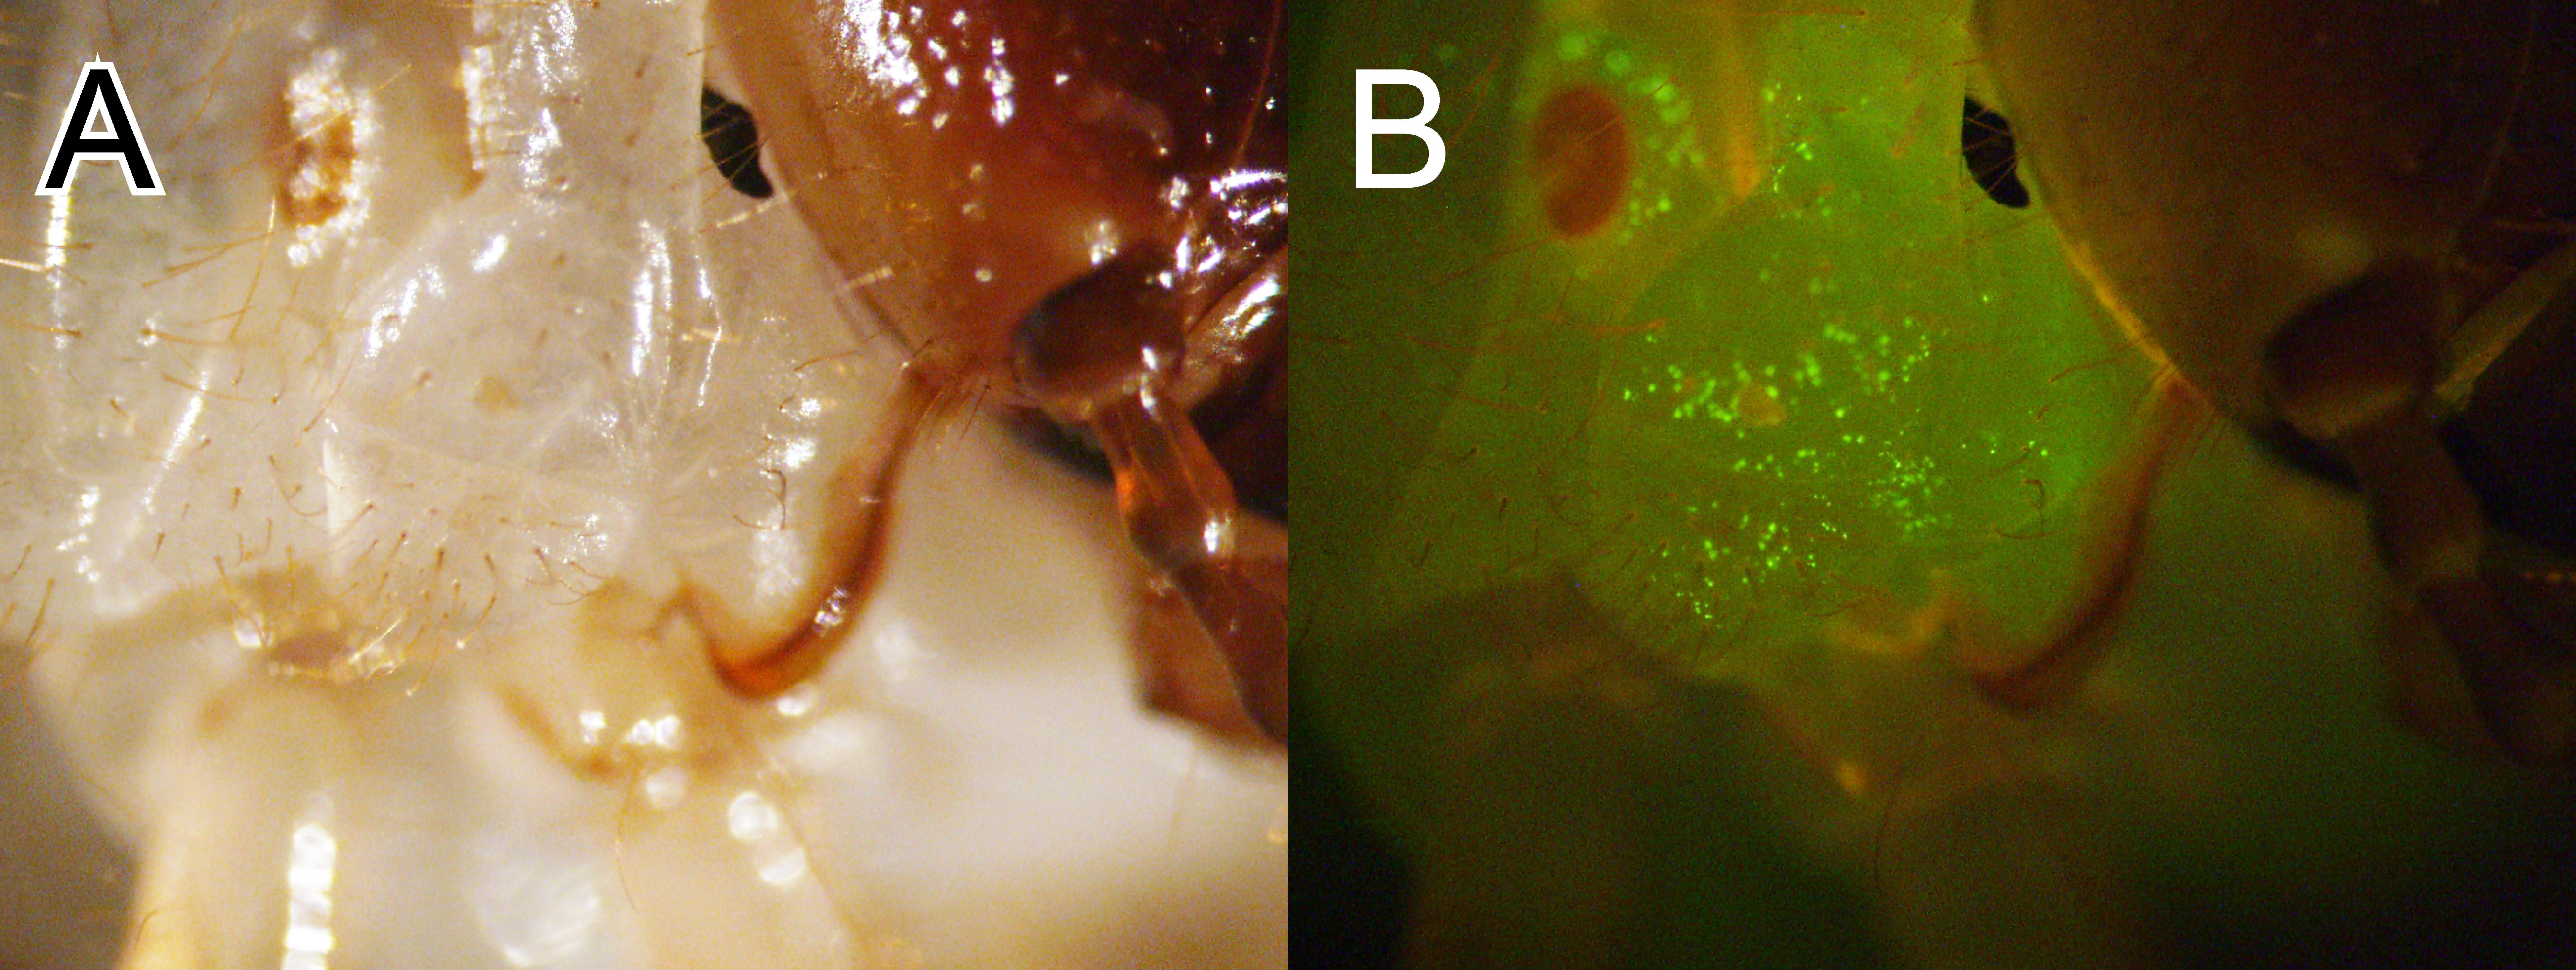
Figure 11. Expression of exogenous enhanced green fluorescent protein in T. dichotomus larvae. The larval thorax was electroporated with the donor plasmid pBac[Tdic-actA3-nls-EGFP_Dmel-hsp70-DsRed2] and a piggyBac helper plasmid. (A) Bright field. (B) EGFP fluorescence resulting from the expression of the egfp gene on the donor plasmid was detected on the right side of the thorax.
Note: This protocol is applicable not only to T. dichotomus but also to a variety of other species. Moreover, we have confirmed that the Tdic-actA3 promoter drives gene expression in the ladybird beetle Harmonia axyridis and the silkworm Bombyx mori, indicating that this system can be utilized across diverse insect species.
General notes and troubleshooting
General notes
The glass capillary with a scale is a custom-made product by Daiwa Union Co., Ltd., Japan. Daiwa Union Co., Ltd. provides support only in Japanese and accepts orders exclusively by FAX (+81-265-24-2183).
Troubleshooting
Problem 1: Adverse effects of T. dichotomus rearing due to anaerobic fermentation of humus.
Possible cause: Humus remained under oxygen-limited conditions (e.g., kept in an airtight bag), allowing anaerobic fermentation to continue.
Solutions: 1) Perforate the plastic bag with a perforation tool or an INSECT PIN No. 3 and expose the contents to air for at least 3 days. 2) Check the odor; if it has a normal humus-like smell (i.e., it is not malodorous), the humus is suitable for use.
Problem 2: Clogged capillary.
Possible causes: 1) Capillary tip too fine or blocked by debris. 2) DNA solution contains precipitates or bubbles. 3) Tissue fragments clogging the tip.
Solutions: 1) Flush the capillary before injection to ensure flow. 2) Centrifuge the DNA solution to remove debris and bubbles; avoid loading any precipitate. 3) If clogging persists, gently break the tip to slightly widen the opening or prepare a new capillary.
Problem 3: Electrolysis (bubbling) at electrodes during pulsing.
Possible causes: 1) Poor electrode contact (sparking). 2) Voltage/pulse too high.
Solutions: 1) Use recommended buffer/gel with proper conductivity; ensure electrodes are fully coated with conductive gel and firmly touching the larval cuticle. 2) Reduce the voltage or pulse duration if excessive bubbling is observed.
Problem 4: Scorching/burn marks on larval cuticle (after electroporation).
Possible causes: 1) No conductive medium applied, causing high resistance. 2) Electrodes dried out or not in full contact.
Solutions: 1) Always apply ample ultrasound gel (or saline) to electrode pads and keep them moist throughout pulsing. 2) Make sure electrodes are in full contact with the larval body. 3) If burning occurs, consider lowering the voltage or shortening the pulse length.
Problem 5: Low expression efficiency (few or no fluorescent cells after electroporation).
Possible causes: 1) DNA did not reach target cells. 2) Electroporation parameters are suboptimal or insufficient. 3) Larva too large. 4) Degradation or low concentration of plasmid DNA. 5) Inappropriate promoter choice (promoter is weak or inactive in the target tissue/developmental stage/species).
Solutions: 1) Verify injection position and depth; inject into the intended area and ensure the solution actually enters the larva. 2) Optimize electroporation settings, e.g., increase pulse number or voltage slightly (within safe range) if no expression, or try a shorter interval. 3) Use smaller/younger larvae as recommended for higher efficiency. 4) Ensure plasmid prep is high quality and at the proper concentration. 5) Select a promoter that has been previously validated and shown to be effective in the target tissue and developmental stage. If no well-characterized promoter is available, first test a positive-control reporter driven by a ubiquitous and robustly expressed promoter (e.g., the Tdic-actA3 promoter used in this protocol).
Problem 6: High larval mortality post-electroporation.
Possible causes: 1) Overly harsh pulse settings, causing internal damage. 2) Injection injury. 3) Larvae stressed by handling
Solutions: 1) Use the optimized pulse parameters provided. 2) Refine the injection technique. 3) After electroporation, place larvae in fresh, humid substrate.
Validation of protocol
This protocol has been used and validated in the following research article:
Sakura et al. [18]. Electroporation-mediated functional analysis method of genes in the giant insect Trypoxylus dichotomus. Scientific Reports (Figures 2–5 and Tables 1–2).
Acknowledgments
We thank the Model Plant Research Facility/NIBB BioResource Center, the Emerging Model Organisms Facility/NIBB Trans-Scale Biology Center, and Toshiyuki Sazi of the Section of Instrument Design Room at NIPS. This protocol was adapted from Sakura et al. (2025). This work was supported by JSPS KAKENHI Grant Numbers 19K16181, 21K15135, and 25K02028 (to S. M.), the Sumitomo Foundation Grant Number 2402226 (to S. M.), and MEXT KAKENHI Grant Numbers 16H01452, 18H04766, 20H04933, and 20H05944 (to T. N.).
Competing interests
The authors declare no competing interests.
References
- Tsong, T. Y. (1990). On electroporation of cell membranes and some related phenomena. J Electroanal Chem Interfacial Electrochem. 299(3): 271–295. https://doi.org/10.1016/0022-0728(90)87529-s
- Tsong, T. (1991). Electroporation of cell membranes. Biophys J. 60(2): 297–306. https://doi.org/10.1016/s0006-3495(91)82054-9
- Shi, J., Ma, Y., Zhu, J., Chen, Y., Sun, Y., Yao, Y., Yang, Z. and Xie, J. (2018). A Review on Electroporation-Based Intracellular Delivery. Molecules. 23(11): 3044. https://doi.org/10.3390/molecules23113044
- Pu, H. and Young, A. P. (1990). Glucocorticoid-inducible expression of a glutamine synthetase-CAT-encoding fusion plasmid after transfection of intact chicken retinal explant cultures. Gene. 89(2): 259–263. https://doi.org/10.1016/0378-1119(90)90014-i
- Titomirov, A. V., Sukharev, S. and Kistanova, E. (1991). In vivo electroporation and stable transformation of skin cells of newborn mice by plasmid DNA. Biochim Biophys Acta. 1088(1): 131–134. https://doi.org/10.1016/0167-4781(91)90162-f
- Müller, F., Lele, Z., Váradi, L., Menczel, L. and Orbán, L. (1993). Efficient transient expression system based on square pulse electroporation and in vivo luciferase assay of fertilized fish eggs. FEBS Lett. 324(1): 27–32. https://doi.org/10.1016/0014-5793(93)81525-5
- Muramatsu, T., Mizutani, Y., Ohmori, Y. and Okumura, J. i. (1997). Comparison of Three Nonviral Transfection Methods for Foreign Gene Expression in Early Chicken Embryosin Ovo. Biochem Biophys Res Commun. 230(2): 376–380. https://doi.org/10.1006/bbrc.1996.5882
- Eide, F. F., Eisenberg, S. R. and Sanders, T. A. (2000). Electroporation‐mediated gene transfer in free‐swimming embryonic Xenopus laevis. FEBS Lett. 486(1): 29–32. https://doi.org/10.1016/s0014-5793(00)02124-4
- Ando, T. and Fujiwara, H. (2013). Electroporation-mediated somatic transgenesis for rapid functional analysis in insects. Development. 140(2): 454–458. https://doi.org/10.1242/dev.085241
- Nishikawa, H., Iijima, T., Kajitani, R., Yamaguchi, J., Ando, T., Suzuki, Y., Sugano, S., Fujiyama, A., Kosugi, S., Hirakawa, H., et al. (2015). A genetic mechanism for female-limited Batesian mimicry in Papilio butterfly. Nat Genet. 47(4): 405–409. https://doi.org/10.1038/ng.3241
- Okude, G., Futahashi, R., Kawahara-Miki, R., Yoshitake, K., Yajima, S. and Fukatsu, T. (2017). Electroporation-mediated RNA interference reveals a role of the multicopper oxidase 2 gene in dragonfly cuticular pigmentation. Appl Entomol Zool. 52(3): 379–387. https://doi.org/10.1007/s13355-017-0489-9
- Emlen, D. J., Warren, I. A., Johns, A., Dworkin, I. and Lavine, L. C. (2012). A Mechanism of Extreme Growth and Reliable Signaling in Sexually Selected Ornaments and Weapons. Science. 337(6096): 860–864. https://doi.org/10.1126/science.1224286
- Ito, Y., Harigai, A., Nakata, M., Hosoya, T., Araya, K., Oba, Y., Ito, A., Ohde, T., Yaginuma, T., Niimi, T., et al. (2013). The role of doublesex in the evolution of exaggerated horns in the Japanese rhinoceros beetle. EMBO Rep. 14(6): 561–567. https://doi.org/10.1038/embor.2013.50
- Ohde, T., Morita, S., Shigenobu, S., Morita, J., Mizutani, T., Gotoh, H., Zinna, R. A., Nakata, M., Ito, Y., Wada, K., et al. (2018). Rhinoceros beetle horn development reveals deep parallels with dung beetles. PLOS Genet. 14(10): e1007651. https://doi.org/10.1371/journal.pgen.1007651
- Morita, S., Ando, T., Maeno, A., Mizutani, T., Mase, M., Shigenobu, S. and Niimi, T. (2019). Precise staging of beetle horn formation in Trypoxylus dichotomus reveals the pleiotropic roles of doublesex depending on the spatiotemporal developmental contexts. PLOS Genet. 15(4): e1008063. https://doi.org/10.1371/journal.pgen.1008063
- Sakura, K., Morita, S. and Niimi, T. (2022). RNA Interference Method for Gene Function Analysis in the Japanese Rhinoceros Beetle Trypoxylus dichotomus. Bio Protoc. 12(8): e4396. https://doi.org/10.21769/bioprotoc.4396
- Johns, A., Gotoh, H., McCullough, E. L., Emlen, D. J. and Lavine, L. C. (2014). Heightened Condition-Dependent Growth of Sexually Selected Weapons in the Rhinoceros Beetle, Trypoxylus dichotomus (Coleoptera: Scarabaeidae). Integr Comp Biol. 54(4): 614–621. https://doi.org/10.1093/icb/icu041
- Sakura, K., Morita, S., Ando, T., Yuzaki, K., Shigenobu, S. and Niimi, T. (2025). Electroporation-mediated functional analysis method of genes in the giant insect Trypoxylus dichotomus. Sci Rep. 15(1): 25923. https://doi.org/10.1038/s41598-025-10780-x
- Handler, A. M. and Harrell Ii, R. A. (1999). Germline transformation of Drosophila melanogaster with the piggyBac transposon vector. Insect Mol Biol. 8(4): 449–457. https://doi.org/10.1046/j.1365-2583.1999.00139.x
- Uhlířová, M., Asahina, M., Riddiford, L. M. and Jindra, M. (2002). Heat-inducible transgenic expression in the silkmoth Bombyx mori. Dev Genes Evol. 212(3): 145–151. https://doi.org/10.1007/s00427-002-0221-8
- Oppenheimer, D. I., MacNicol, A. M. and Patel, N. H. (1999). Functional conservation of the wingless–engrailed interaction as shown by a widely applicable baculovirus misexpression system. Curr Biol. 9(22): 1288–1296. https://doi.org/10.1016/s0960-9822(00)80050-0
- Ramos, D. M., Kamal, F., Wimmer, E. A., Cartwright, A. N. and Monteiro, A. (2006). Temporal and spatial control of transgene expression using laser induction of the hsp70promoter. BMC Dev Biol. 6(1): 55. https://doi.org/10.1186/1471-213x-6-55
Article Information
Publication history
Received: Nov 18, 2025
Accepted: Jan 12, 2026
Available online: Jan 22, 2026
Published: Feb 20, 2026
Copyright
© 2026 The Author(s); This is an open access article under the CC BY-NC license (https://creativecommons.org/licenses/by-nc/4.0/).
How to cite
Morita, S. and Niimi, T. (2026). Introducing Exogenous DNA Vectors Directly into Trypoxylus dichotomus Larvae Via In Vivo Electroporation. Bio-protocol 16(4): e5602. DOI: 10.21769/BioProtoc.5602.
Category
Developmental Biology > Genome editing
Molecular Biology > DNA > Transformation
Cell Biology > Tissue analysis > Electroporation
Do you have any questions about this protocol?
Post your question to gather feedback from the community. We will also invite the authors of this article to respond.