- Protocols

- Articles and Issues
- For Authors
- About
- Become a Reviewer

Quantifying Intestinal Glucose Absorption Using Isolated Vascularly Perfused Rat Small Intestine
Published: Vol 15, Iss 22, Nov 20, 2025 DOI: 10.21769/BioProtoc.5514 Views: 1624
Reviewed by: Wendy Leanne HempstockAnonymous reviewer(s)
Original research article
The authors used this protocol in:

May 2025
Advertisement


Protocol Collections
Comprehensive collections of detailed, peer-reviewed protocols focusing on specific topics


Related protocols
Abstract
Intestinal glucose absorption has been studied for several decades. However, the different methods available for investigating absorption are often the reason for variability in the results, and it is difficult to measure the relative contribution of paracellular absorption using existing methods. Thus, we have established a new model for measuring glucose absorption. In the isolated in situ vascularly perfused small intestine, the intestinal epithelium is completely preserved, and the entire transport pathway is intact. In the present model, we use radioactive labeled 14C-d-glucose, which allows for sensitive quantification of glucose absorption even with low luminal concentrations. The described method is optimized for intestinal glucose absorption but can be applied to other macro/micronutrients that can be radioactively labeled. The described procedure is a novel approach for measurements of intestinal nutrient absorption and gut permeability in which luminal nutrient concentrations resemble physiological concentrations.
Key features
• Sensitive quantification of intestinal glucose absorption at physiologically relevant luminal glucose concentrations.
• Accurate distinction between transcellular vs. paracellular glucose absorption using mannitol as an indicator of paracellular intestinal absorption.
• Differentiation between apical and basolateral pathways for transport across the intestinal epithelium.
Keywords: Nutrient absorptionGraphical overview
Illustration of perfusion setup and analysis. The graphical overview illustrates the study setup. The rat's small intestine is surgically isolated. The small intestine is vascularly perfused through a catheter in the superior mesenteric artery while stimulating the intestinal lumen with 14C-d-glucose. Venous effluent samples are collected in 1-min intervals through a catheter in the portal vein. Radioactivity (14C) in venous effluent samples is subsequently measured using liquid scintillation counting.
Background
Glucose absorption has been studied extensively since the 1960s, when Crane et al. [1] described a transepithelial glucose transporter later named sodium-glucose transporter 1 (SGLT1). Subsequently, in the 1980s, the low-affinity glucose transporter 2 (GLUT2) was characterized [2]. Since then, both transcellular (using SGLT1 and GLUT2) and paracellular glucose absorption have been studied using several in vivo, ex vivo, and in vitro methods [3–7]. A widely used in vivo method is the oral glucose tolerance test (OGTT) [8] with stable or radioactive tracers (e.g., [13C]- or [3H]-glucose) [9,10] to track absorption kinetics. While being physiologically relevant, the method is not intestine-specific, neither is it possible to determine the relative contributions of transcellular and paracellular absorption. Another widely used method is the ex vivo method involving the Ussing chamber [11,12], in which segments of intestinal mucosa are mounted between two half-chambers to separately bathe/perfuse mucosal and serosal sides and subsequently measure glucose flux. This method does not allow differentiating between transcellular and paracellular absorption; further, the method is limited to small tissue samples and is inadequate regarding transport kinetics. In vitro cell culture models, such as the Caco-2 monolayers (a colon-derived cell line), are beneficial for mechanistic and molecular studies of transepithelial transport; however, they lack physiological context, as cell culture models do not represent the complexity of the intestinal epithelium and do not allow measurements of adequate flow rates [13–15].
In rodent in vivo models, single-pass intestinal perfusion glucose absorption has been measured in a defined intestinal segment. Previously, glucose absorption was measured by applying a controlled concentration of glucose to the intestinal lumen and then collecting the luminal outflow to measure unabsorbed glucose [16–18]. However, the sensitivity of that method may be a problem, as measuring this small difference requires highly accurate glucose assays, and small assay errors may mask real absorption. In the present method, we employ a single-pass perfusion system, in which the small intestine is surgically isolated and vascularly perfused via the superior mesenteric artery with a modified Krebs-Ringer buffer. The intestinal lumen is stimulated with glucose labeled with a radioactive tracer [14C-d-glucose]; this radioactive tracer is subsequently measured in the venous effluent drawn from the portal vein. With this model, the cytoarchitecture and whole transport pathway is completely preserved, mimicking in vivo conditions. Further, is it possible to surgically isolate a specific intestinal segment, allowing comparison between different gut regions [19,20].
Materials and reagents
Animals
Male Wistar rats (~250 g, 8–10 weeks old) were purchased from Janvier (Saint Berthevin Cedex, France) based on weight. It is possible to use both smaller and larger rats; however, using both may make it difficult to perform some critical steps of the surgery [e.g., placing the arterial catheter in smaller rats (<200 g); for larger rats (>400 g), the greater amount of visceral fat may prolong the surgery]. Rats are housed in pairs in an air-conditioned (21 °C) and humidity-controlled (55%) room and kept in a 12/12 h light/dark cycle with ad libitum access to standard chow and drinking water. Rats are not fasted before the surgery. Female rats may be used; however, one needs to be aware of the effects of the female reproductive system.
Reagents
1. Sodium chloride (NaCl) (Sigma-Aldrich, CAS: 7647-14-5)
2. Calcium chloride dihydrate (CaCl2·2H2O) (Merck, catalog number: 102382)
3. Magnesium sulfate heptahydrate (MgSO4·7H2O) (Merck, CAS: 10034-99-8)
4. Potassium dihydrogen phosphate (KH2PO4) (Merck, catalog number: 105886)
5. Sodium bicarbonate (NaHCO3) (Merck, CAS: 144-55-8)
6. Bovine serum albumin (BSA) (Sigma-Aldrich, catalog number: 1.12018.0500)
7. Dextran T-70 (Pharmacosmos, CAS: 9004-54-0)
8. Fumaric acid (Merck, catalog number: 76635)
9. Glutamate (Merck, catalog number: 106445)
10. Pyruvate (Merck, catalog number: 106619)
11. D-glucose (Sigma-Aldrich, catalog number: G8270)
12. Glucose, d-[1-14C] (Revity, catalog number: NEC043X)
13. Ultima Gold (Revity, catalog number: 6013321)
14. Potassium chloride (KCl) (Merck, CAS: 7447-40-7)
15. Sodium hydroxide (NaOH) (Merck, CAS: 1710-73-2)
16. Hydrogen chloride (HCl) (Merck, CAS: 7647-01-0)
17. D-mannitol (Sigma-Aldrich, catalog number: M4125)
18. Mannitol, d-[2-14C] (Revity, catalog number: NEC852050UC)
19. Ketamine (VetViva, catalog number: QN01AX03)
20. Dexmedetomidine (Orion Pharma, catalog number: QN05CM18)
Solutions
1. Isotonic saline (see Recipes)
2. Modified Krebs-Ringer buffer (see Recipes)
3. Glucose solution (see Recipes)
4. Mannitol solution (see Recipes)
Recipes
1. Isotonic saline
| Reagent | Final concentration | Quantity or volume |
|---|---|---|
| NaCl | 0.9% w/v | 9.0 g |
| MilliQ | 1,000 mL |
Isotonic saline should be sterile. Prepare the saline in advance. It can be stored at 4 °C.
2. Modified Krebs-Ringer buffer
| Reagent | Final concentration | Quantity or volume |
|---|---|---|
| BSA | 0.1% w/v | 1.0 g |
| Dextran T-70 | 5% w/v | 50.0 g |
| D-glucose | 3.5 mmol/L | 0.631 g |
| Fumaric acid | 5 mmol/L | 0.800 g |
| Glutamate | 5 mmol/L | 0.936 g |
| Pyruvate | 5 mmol/L | 0.550 g |
| NaCl | 118 mmol/L | 6.9 g |
| KCl | 4.7 mmol/L | 0.35 g |
| CaCl2·2H2O | 2.5 mmol/L | 0.37 g |
| MgSO4·7H2O | 1.2 mmol/L | 0.30 g |
| KH2PO4 | 1.2 mmol/L | 0.16 g |
| NaHCO3 | 25 mmol/L | 2.10 g |
| MilliQ | 1,000 mL |
The buffer can be made in advance and stored at -20 °C in aliquots of 1 L. Move the needed amount from the freezer to 4 °C and thaw overnight the day before the perfusion protocol.
3. Glucose solution
| Reagent | Final concentration | Quantity or volume |
|---|---|---|
| D-glucose | 100 mmol/L | 0.360 g |
| Isotonic saline | 20 mL | |
| Glucose, d-[1-14C] | 20 μL |
4. Mannitol solution
| Reagent | Final concentration | Quantity or volume |
|---|---|---|
| D-mannitol | 100 mmol/L | 0.360 g |
| Isotonic saline | 20 mL | |
| Mannitol, d-[2-14C] | 20 μL |
Laboratory supplies
1. MINISORP, Nunc-immuno tube (Thermo Fisher, catalog number: 468608)
2. Q-tips, medical cotton swaps (Bio-Medical, catalog number: MDS202000)
3. Coors Buchner Funnel (Merck, catalog number: Z247340)
4. Qualitative filter paper (Merck, catalog number: WHA1001110)
Equipment
Surgical tools
1. Surgical scissors, straight, blunt (Anima Lab, catalog number: 14000-12FST)
2. Surgical fine scissors, straight (Anima Lab, catalog number: 14060-12FST)
3. Graefe forceps, curved (Anima Lab, catalog number: 11051-10FST)
4. Vannas spring scissors (microscissors) (Anima Lab, catalog number: 1508-10FST)
5. Qtips, medical cotton swaps (Bio-Medical, catalog number: MDS202000)
6. Black sterile silk 5-0 (Vömel, catalog number: 14739)
7. Absorptive compression gauze 5 × 5 cm (Mölnlycke Health Care, catalog number: 156015)
8. 10 mL plastic syringe for luminal stimuli (Merck, catalog number: Z683590)
Single-pass perfusion system (Hugo Electronics-Harvard apparatus, March-Hugstetten, Germany)
9. Universal perfusion system (Harvard Bioscience Inc., catalog number: 73-2316)
10. Basic Unit Uniper UP-100, Type 834 (Harvard Bioscience Inc)
11. Roller Pump (Harvard Bioscience Inc., catalog number: 75-1000)
12. Windkessel (Harvard Bioscience Inc., catalog number: 73-2068)
13. Thermostatic Circulator Bath (Harvard Bioscience Inc., catalog number: 73-2802)
14. Operating table with tripod (Harvard Bioscience Inc, catalog number: PY2 73-3776)
15. Cannula with basket and side port, OD = 1.3 mm, ID = 1.0 mm (Harvard Bioscience Inc, catalog number: 73-3311)
16. Cannula with basket, OD = 2.0 mm, ID = 1.5 mm (Harvard Bioscience Inc, catalog number: 73-3312)
17. Plastic tube for luminal stimulus (Merck, catalog number: BR143255-20M)
18. Coors Buchner Funnel (Merck, catalog number: Z247340)
19. Qualitative filter paper (Merck, catalog number: WHA1001110)
20. Benchmark magnetic stirrer (Merck, catalog number: Z742551)
21. Magnetic stir bar (Merck, catalog number: HS120551)
22. Fraction collector, F9-R (Äkta, catalog number: 29011362)
Glucose measurements
23. Quantulus GCT 6220 liquid scintillation counter (Revity, catalog number: A622000)
24. 6 mL pony vial for liquid scintillation counting (Revity, catalog number: 6000292)
Procedure
A. Preparations before surgical procedure
1. Prepare an appropriate amount of the modified Krebs-Ringer perfusion buffer. Adjust the pH to 7.4. Calculate the needed amount by multiplying the perfusion flow rate (7.5 mL/min) by protocol length. Remember the 30-min baseline before protocol initiation and 5% overhead [7.5 mL/min × (65 + 30 min) = 758 mL (thaw 1 L of frozen buffer)]. When thawed, filter the perfusion buffer through a Buchner funnel with filter paper. After filtering, the buffer needs to be pH-adjusted to 7.3–7.5 using a pH meter by adding either HCl or NaOH. When ready, place the buffer on a magnetic stirrer at medium speed. Add the gas (95% O2, 5% CO2) to the buffer, and you should see small bubbles. The perfusion buffer is gassed during the entire protocol.
2. Prepare glucose/mannitol solution. Luminal stimuli (e.g., d-glucose) are prepared in isotonic saline at the final concentration. For this protocol, we are administering 100 mmol/L d-glucose in two consecutive 15-min periods. For a 15-min stimulation period, 17.5 mL (5 min at 2.5 mL/min and 10 min at 0.5 mL/min) of glucose is needed. Dissolve 0.720 g of d-glucose in 40 mL of isotonic saline using a magnetic stirrer and low heat. Prewarm the saline and add glucose gradually.
B. Designing the perfusion protocol
1. The perfusion protocol was designed with a baseline period with luminal saline infusion followed by two consecutive luminal glucose stimulations (14C-d-glucose) separated by a luminal saline infusion period. By designing the experiments in this way, the first glucose stimulation period can be used as the control period. In the second glucose stimulation period, it is possible to investigate glucose absorption while adding specific stimulators or inhibitors, either luminal or vascularly.
2. The order of control and stimulation periods can, of course, also be reversed; further, several stimulation periods can also be added, or each period can be prolonged. We have successfully performed intestinal perfusion protocols lasting 2 h.
3. Example of a perfusion protocol (Figure 1):
Min 0–10: Saline infusion – baseline (luminal flow: 2.5 mL/min)
Min 11–25: 14C-d-glucose infusion – glucose stimulus (luminal flow: 5 min at 5 mL/min → 10 min at 2.5 mL/min)
Min 25–40: Saline infusion – baseline
Min 41–55: 14C-d-glucose infusion – second glucose stimulus
Min 56–65: Saline infusion – baseline
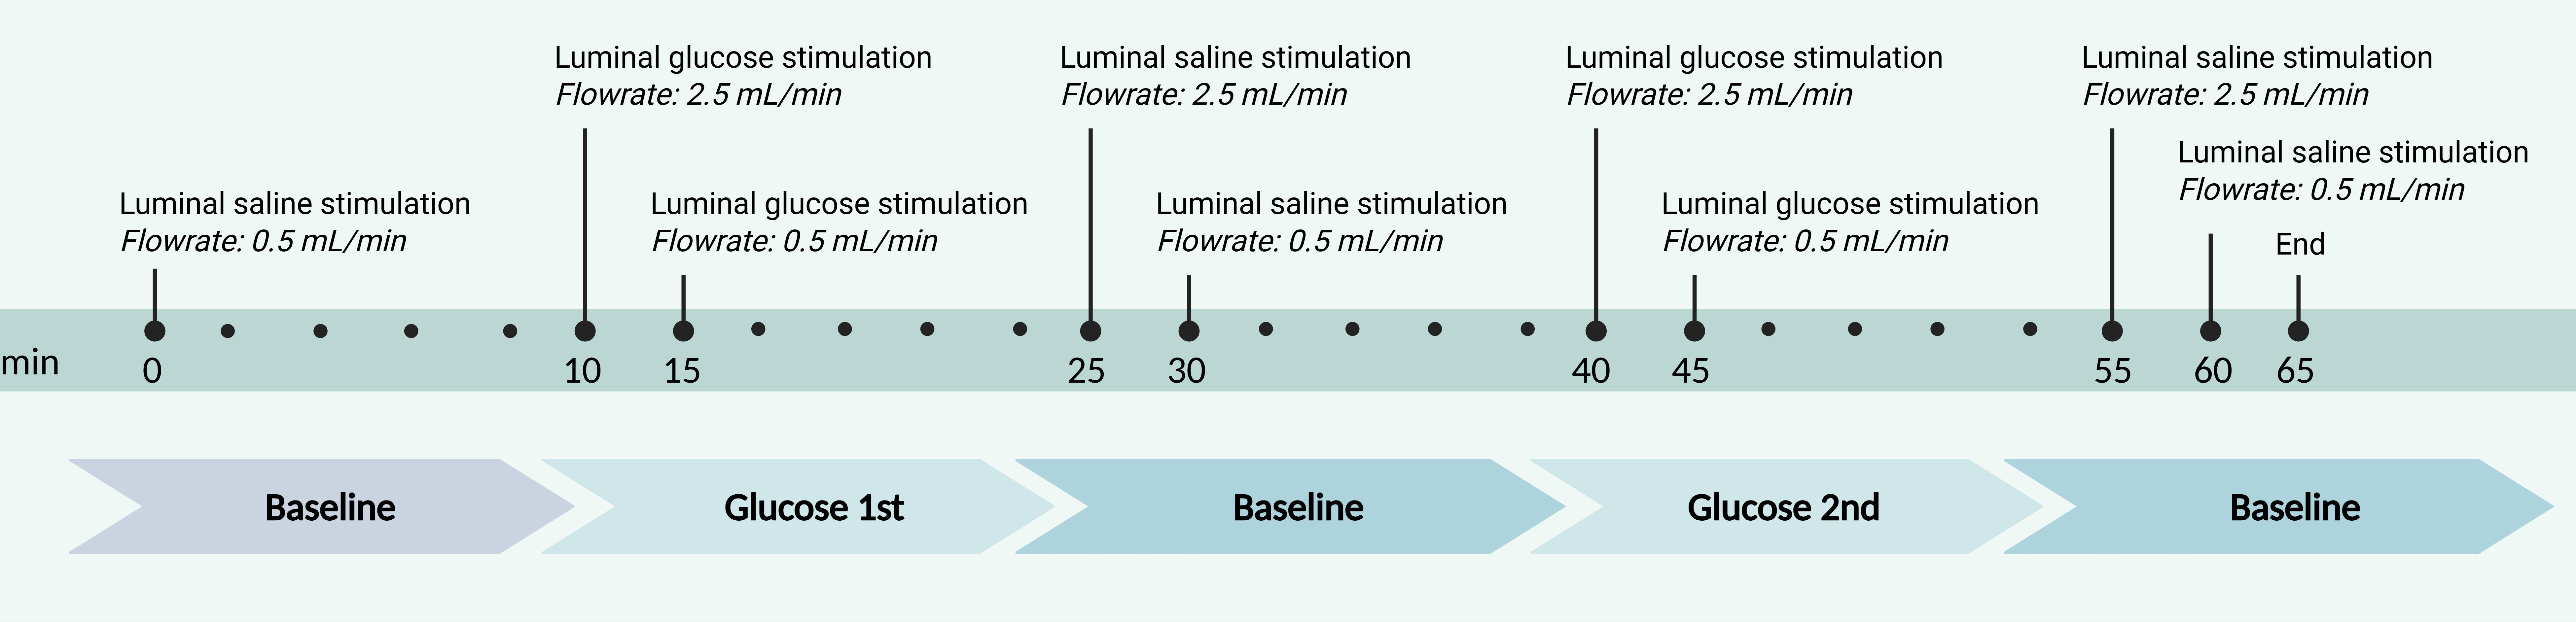
Figure 1. Schematic timeline of the perfusion experiment outlining the luminal stimulation and flow rates
In the second glucose stimulation period, it is possible to add specific glucose transport inhibitors, either luminally through the luminal tube or arterially through a three-way valve connected to the perfusion system. This enables you to block a specific transporter or stimulate it, differentiating between the apical and basolateral membranes. Each time a new luminal solution is introduced, perfusion is preceded by a 5-min washout with that solution, after which the flow rate is reduced to 2.5 mL/min.
Ideas for applications:
Phlorizin (CAS: 7061-54-3) is a well-known SGLT1 inhibitor and can be added (1 mmol/L) to the intestinal lumen to block apically expressed SGLT1. Adding phlorizin to the arterial side of the preparation through the three-way valve can be used as proof of concept, as phlorizin should not block glucose absorption because SGLT1 is not expressed at the basolateral membrane. Phloretin (CAS: 60-82-2) is a well-known GLUT2 inhibitor and can, similarly to phlorizin, be administered (1 mmol/L) both luminally and arterially to block GLUT2 at the apical or basolateral membrane, or block them simultaneously. Mannitol (D-mannitol, Sigma-Aldrich, catalog number: M4125; Mannitol, d-[2-14C], Revity, catalog number: NEC852) is a sugar molecule approximately the same size as glucose; however, it is indigestible and is absorbed into the blood by passive diffusion. Mannitol can, like glucose, be marked with a radioactive tracer (14C) and act as an indirect marker of paracellular glucose absorption. This enables you to distinguish between transcellular and paracellular absorption.
C. Surgical procedure
1. Start by anesthetizing the rat with a subcutaneous injection of Ketamine/Dexmedetomidine (0.4 mL/kg body weight).
2. Confirm lack of reflexes to establish proper anesthesia; this can be done by toe pinching.
a. The rat is usually fully anesthetized after 10 min.
b. Add half the dose of anesthetic every 30 min during surgery to ensure proper anesthesia.
3. Place the rat on a 37 °C heated operating table (Figure 2).
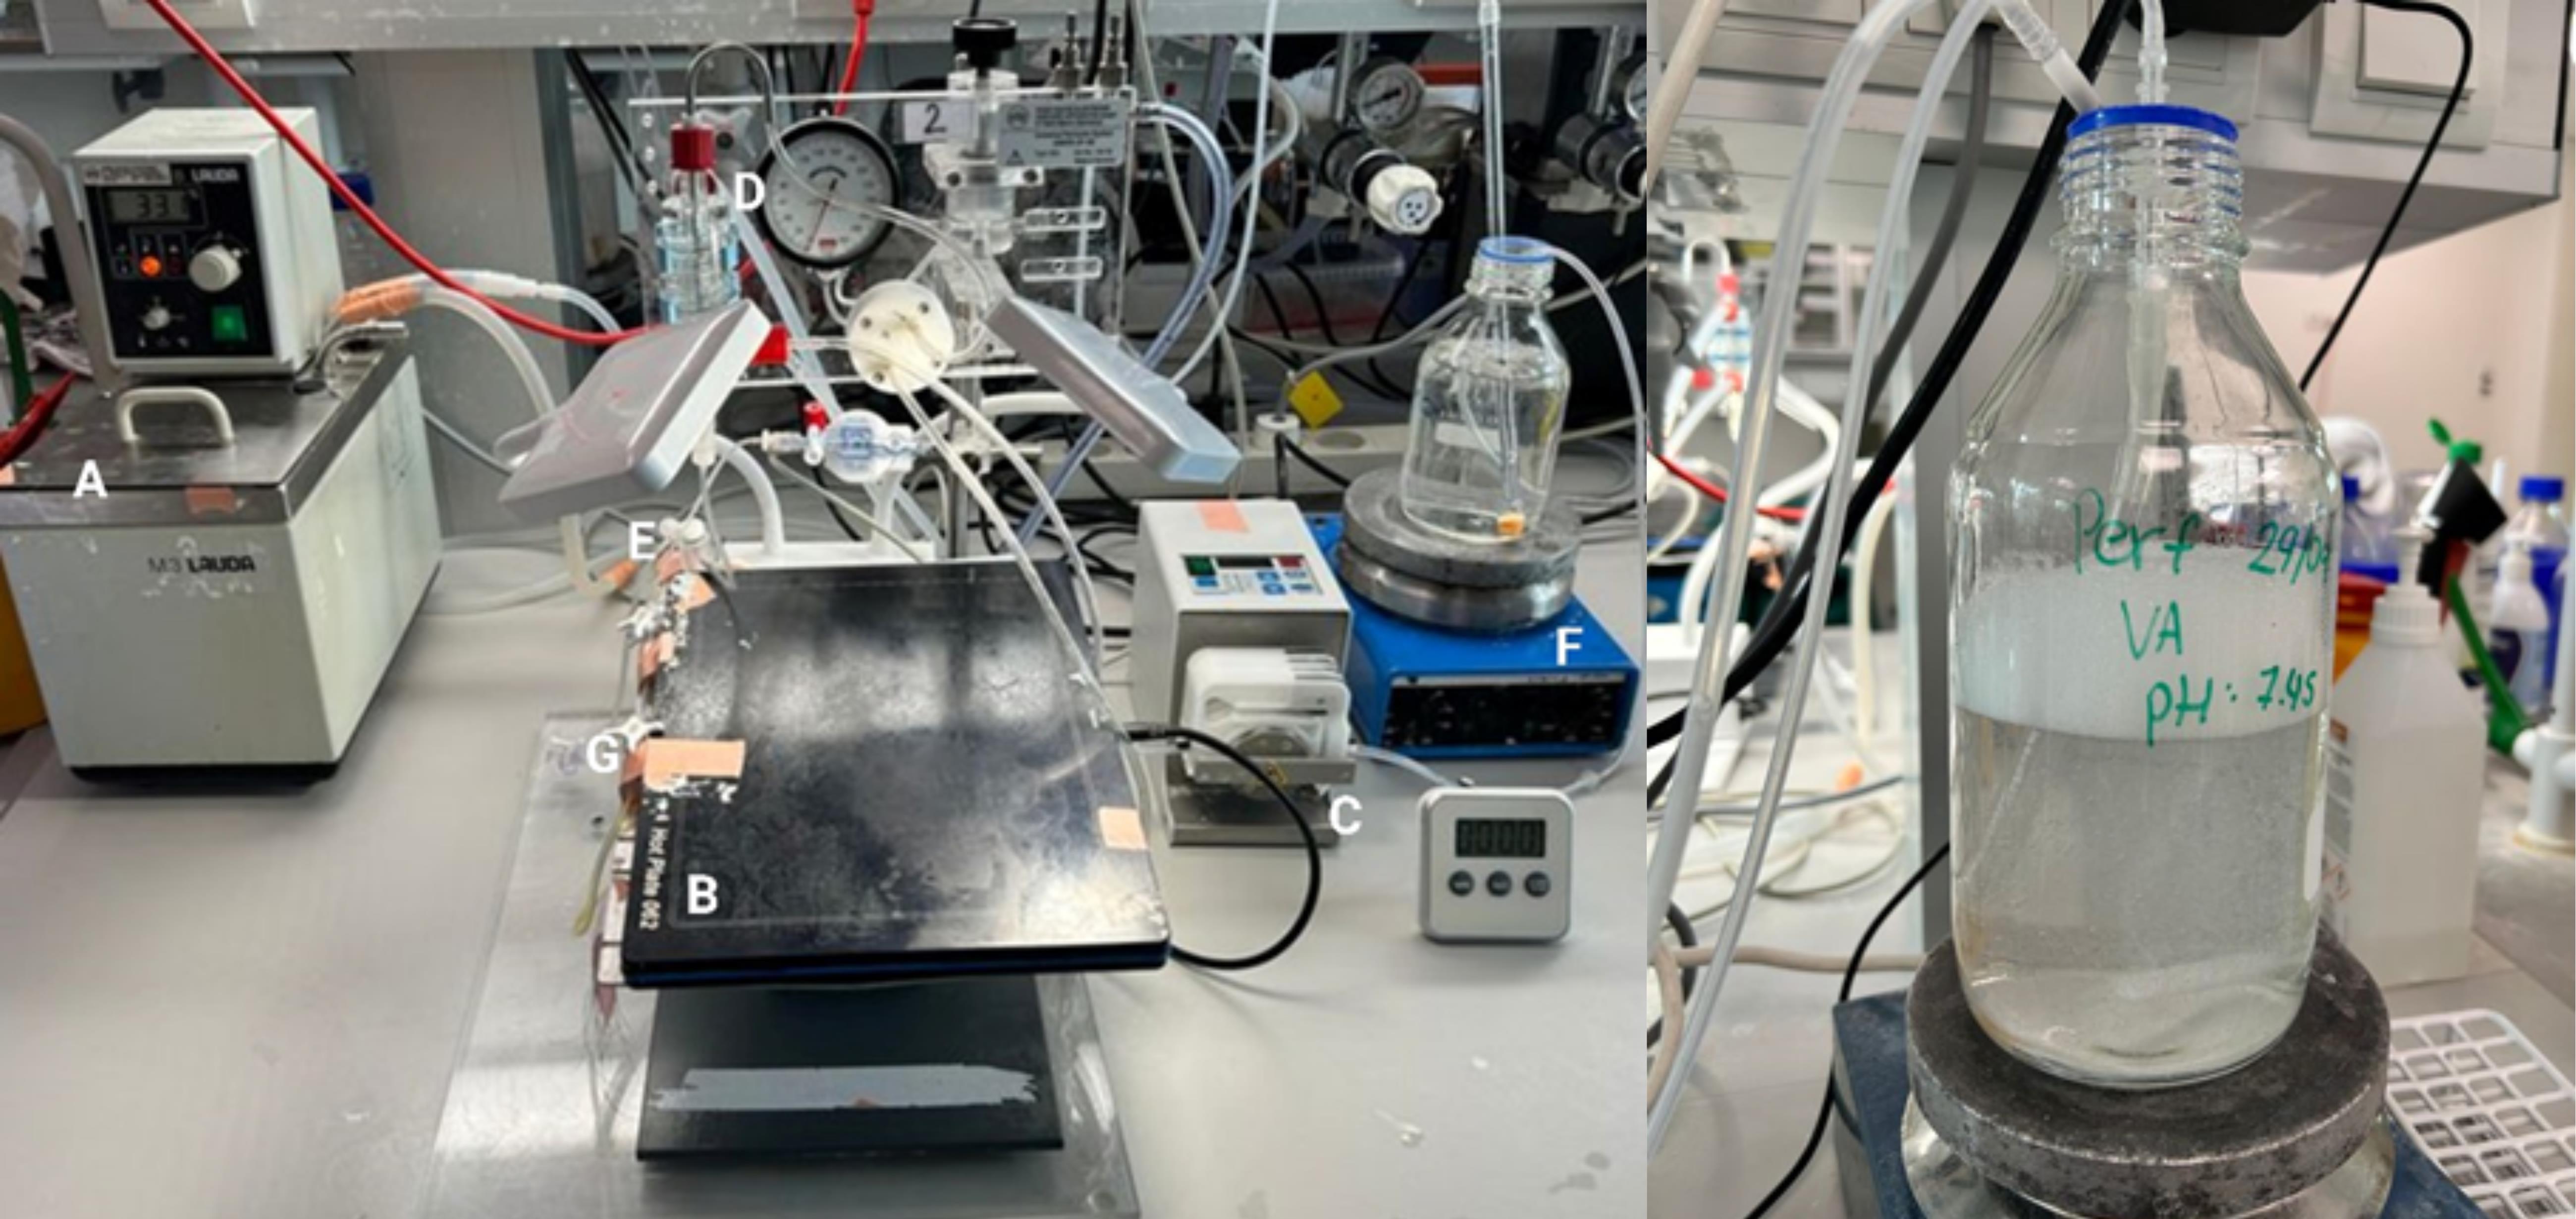
Figure 2. Single-pass perfusion system and gassed (95% O2) perfusion buffer. (A) Thermostatic circulating bath. (B) Heated operating table on a tripod. (C) Roller pump. (D) Windkessel for heat exchange. (E) Bubble trap to trap air bubbles from going into the catheter. (F) Magnetic stirrer stirring the gassed perfusion buffer. (G) Three-way clock valve for administering drugs.
4. Prepare the surgical area by spraying with 70% ethanol (Figure 3B).
5. Initiate the surgical procedure by opening the abdomen with blunt scissors (Figure 3C).
Note: Be careful not to point the scissors inward to avoid damaging the intestine.
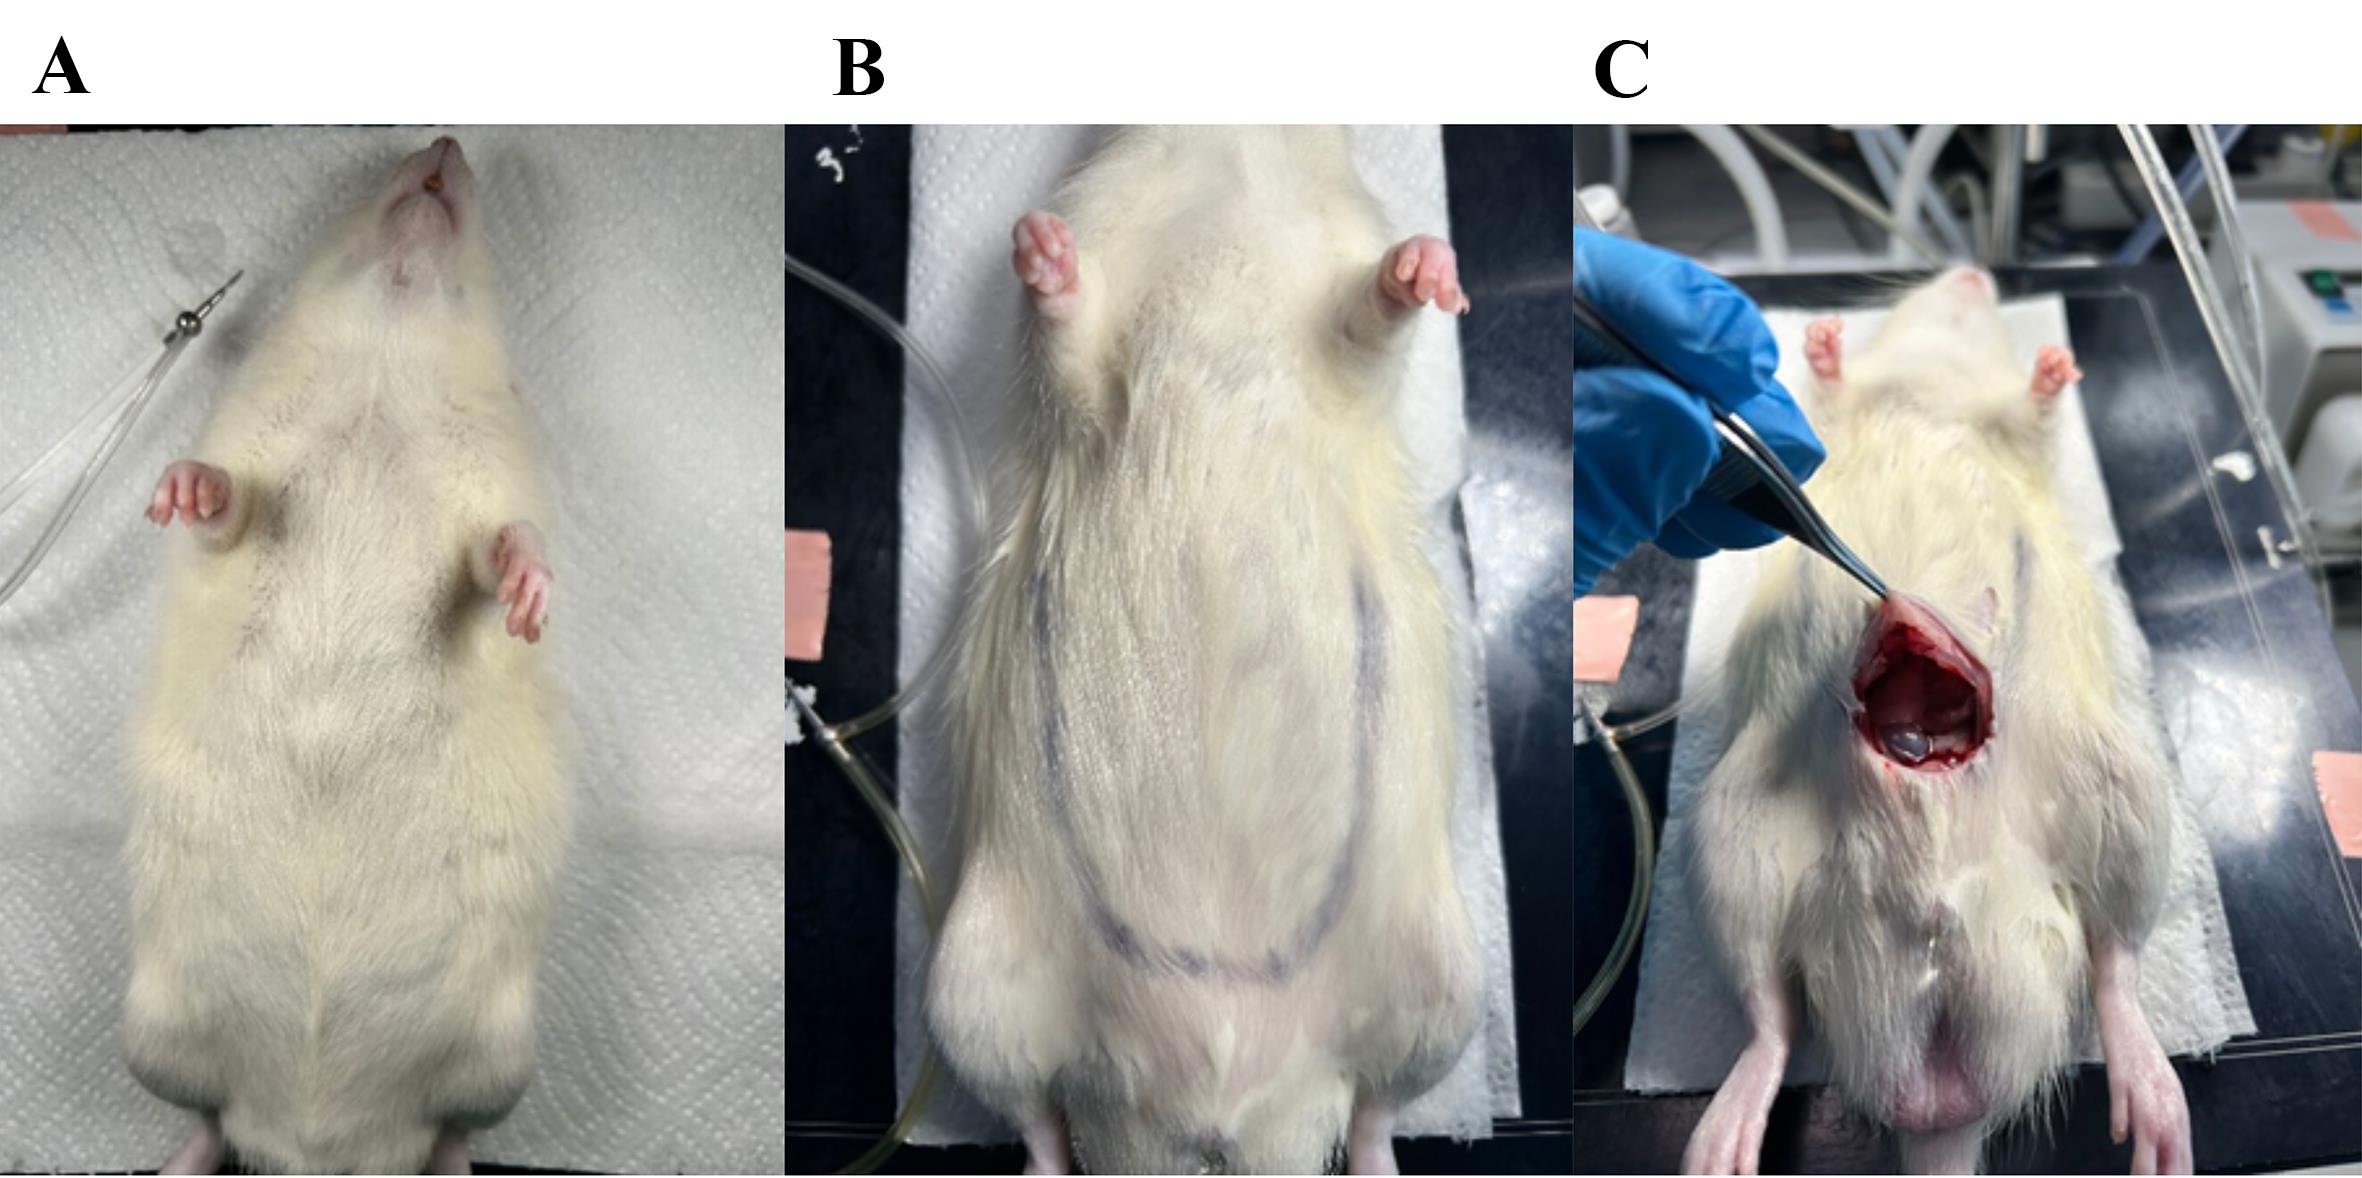
Figure 3. Initiation of surgical procedure. (A) Anesthetized rat on the heated surgical table lying on tissue-paper. (B) The area for opening the abdomen is outlined. (C) First cut with blunted surgical scissors in the bottom of the abdomen while pulling on the skin to avoid cutting into the organs.
6. The abdomen with the gastrointestinal organs is now fully visible (Figure 4A). Then, excise the colon.
7. Move the small intestine to the side with a Q-tip to make the colon visible (Figure 4B).
8. Mobilize the colon by removing the surrounding fascia, avoiding touching the vasculature. The surrounding fascia connects the colon to the posterior abdominal wall. With a tweezer, lift the colon and push through the fascia with a Q-tip.
9. Place two tight ligatures around the distal colon (0.5–1 cm apart) and cut the colon between the sutures with fine surgical scissors (Figure 4C, D).
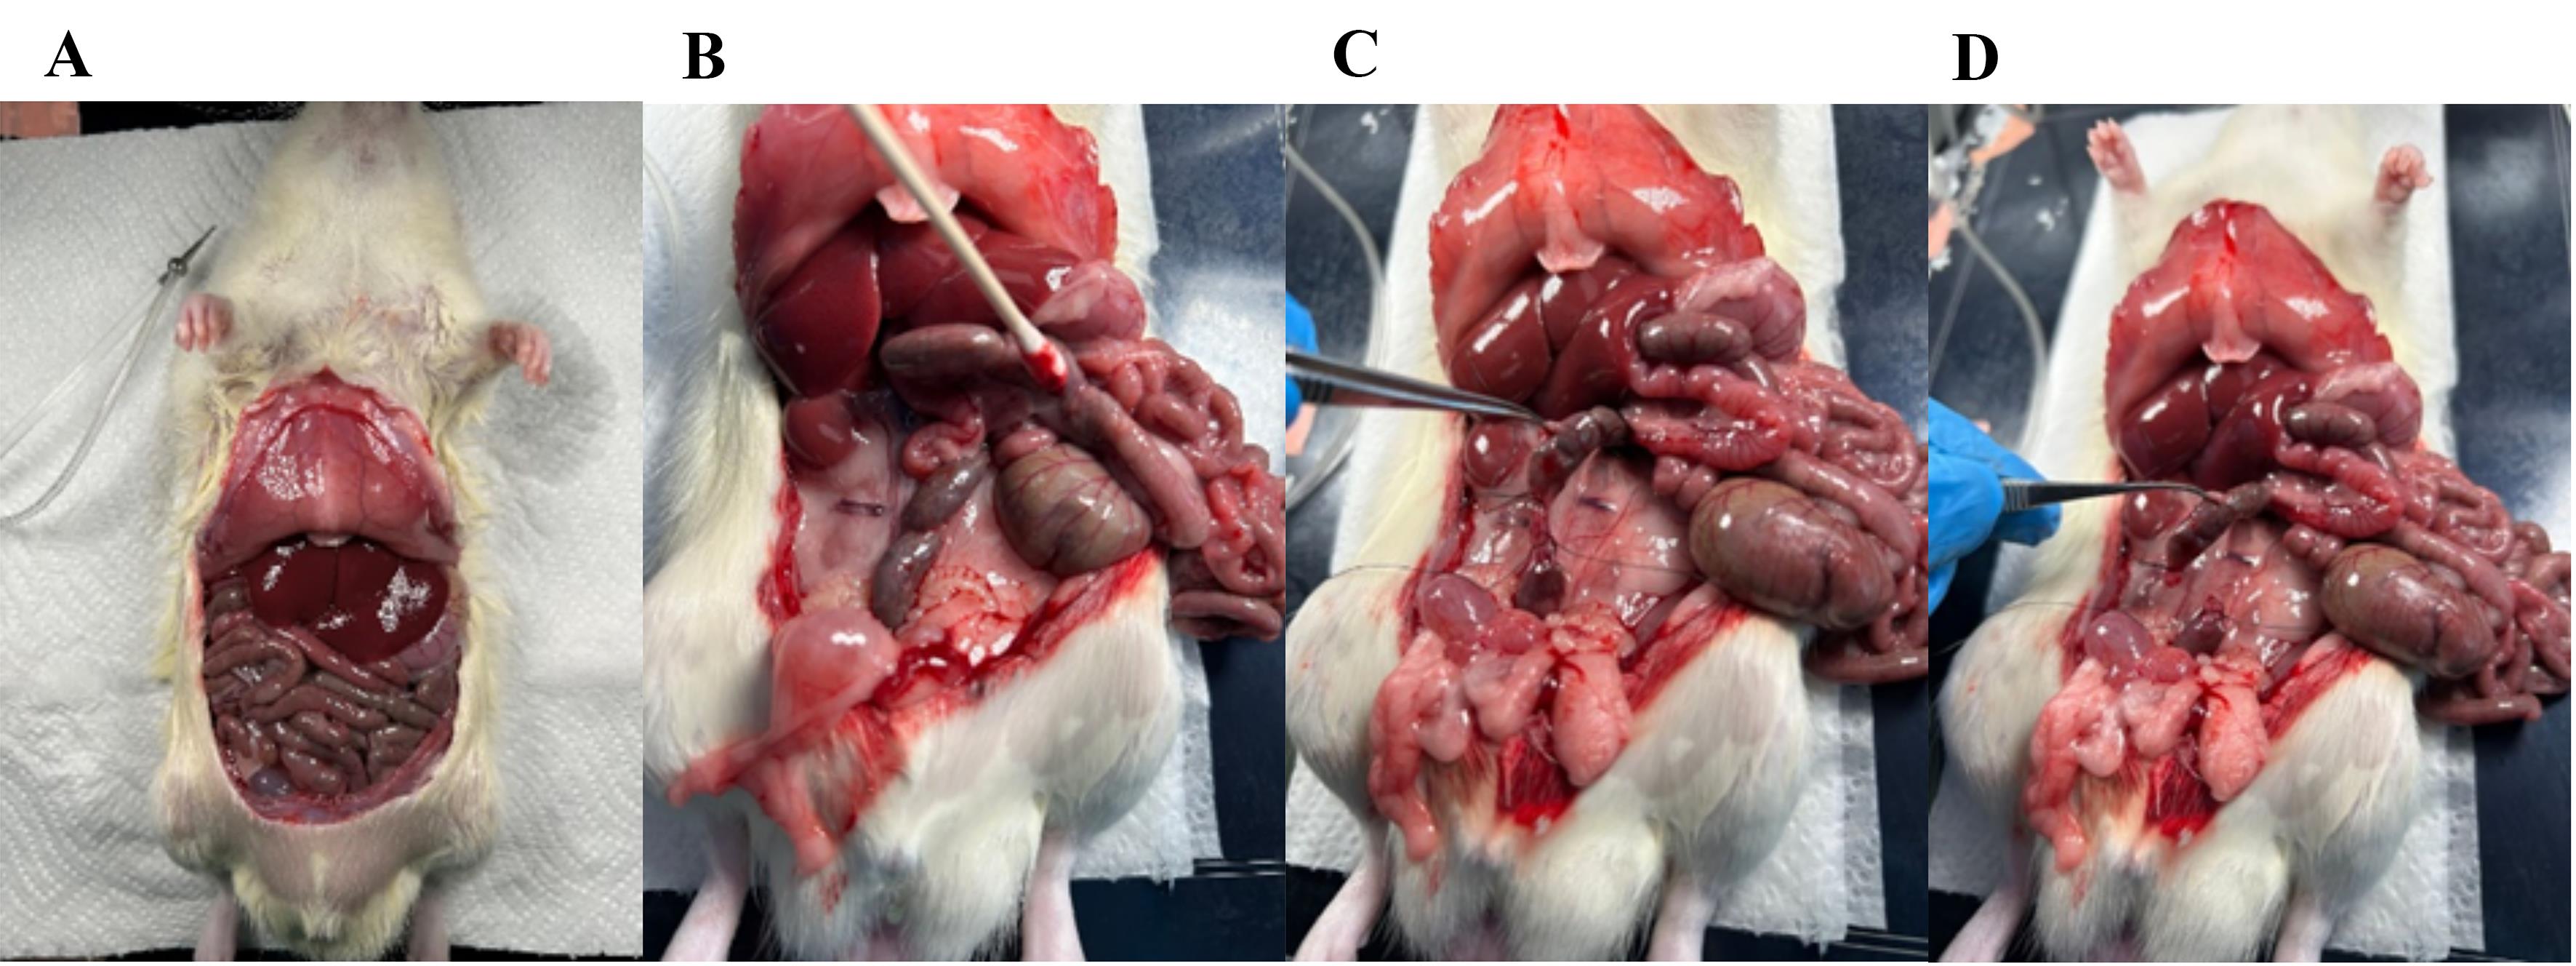
Figure 4. Visual overview of the intestinal tract and ligation of the distal colon. (A) The rat abdomen is opened, and the gastrointestinal tract is fully visible. (B) The small intestine is pushed gently to the side to make the distal colon visible. (C) Two ligatures are placed around the colon with a small space in between. (D) With scissors, cut through the colon between the two ligatures.
10. Ligate the vasculature supplying the colon and cecum (Figures 5 and 6); then, transect the ileum and excise the colon and cecum, leaving the small intestinal lumen open in the distal end (Figure 7).
Note: The superior mesenteric artery branches into smaller arteries that perfuse the colon and need to be ligated; (1) the inferior mesenteric artery, (2) the middle colic artery, (3) the right colic artery, and (4) the ileocolic artery. The right colic artery and the ileocolic artery can be ligated simultaneously.
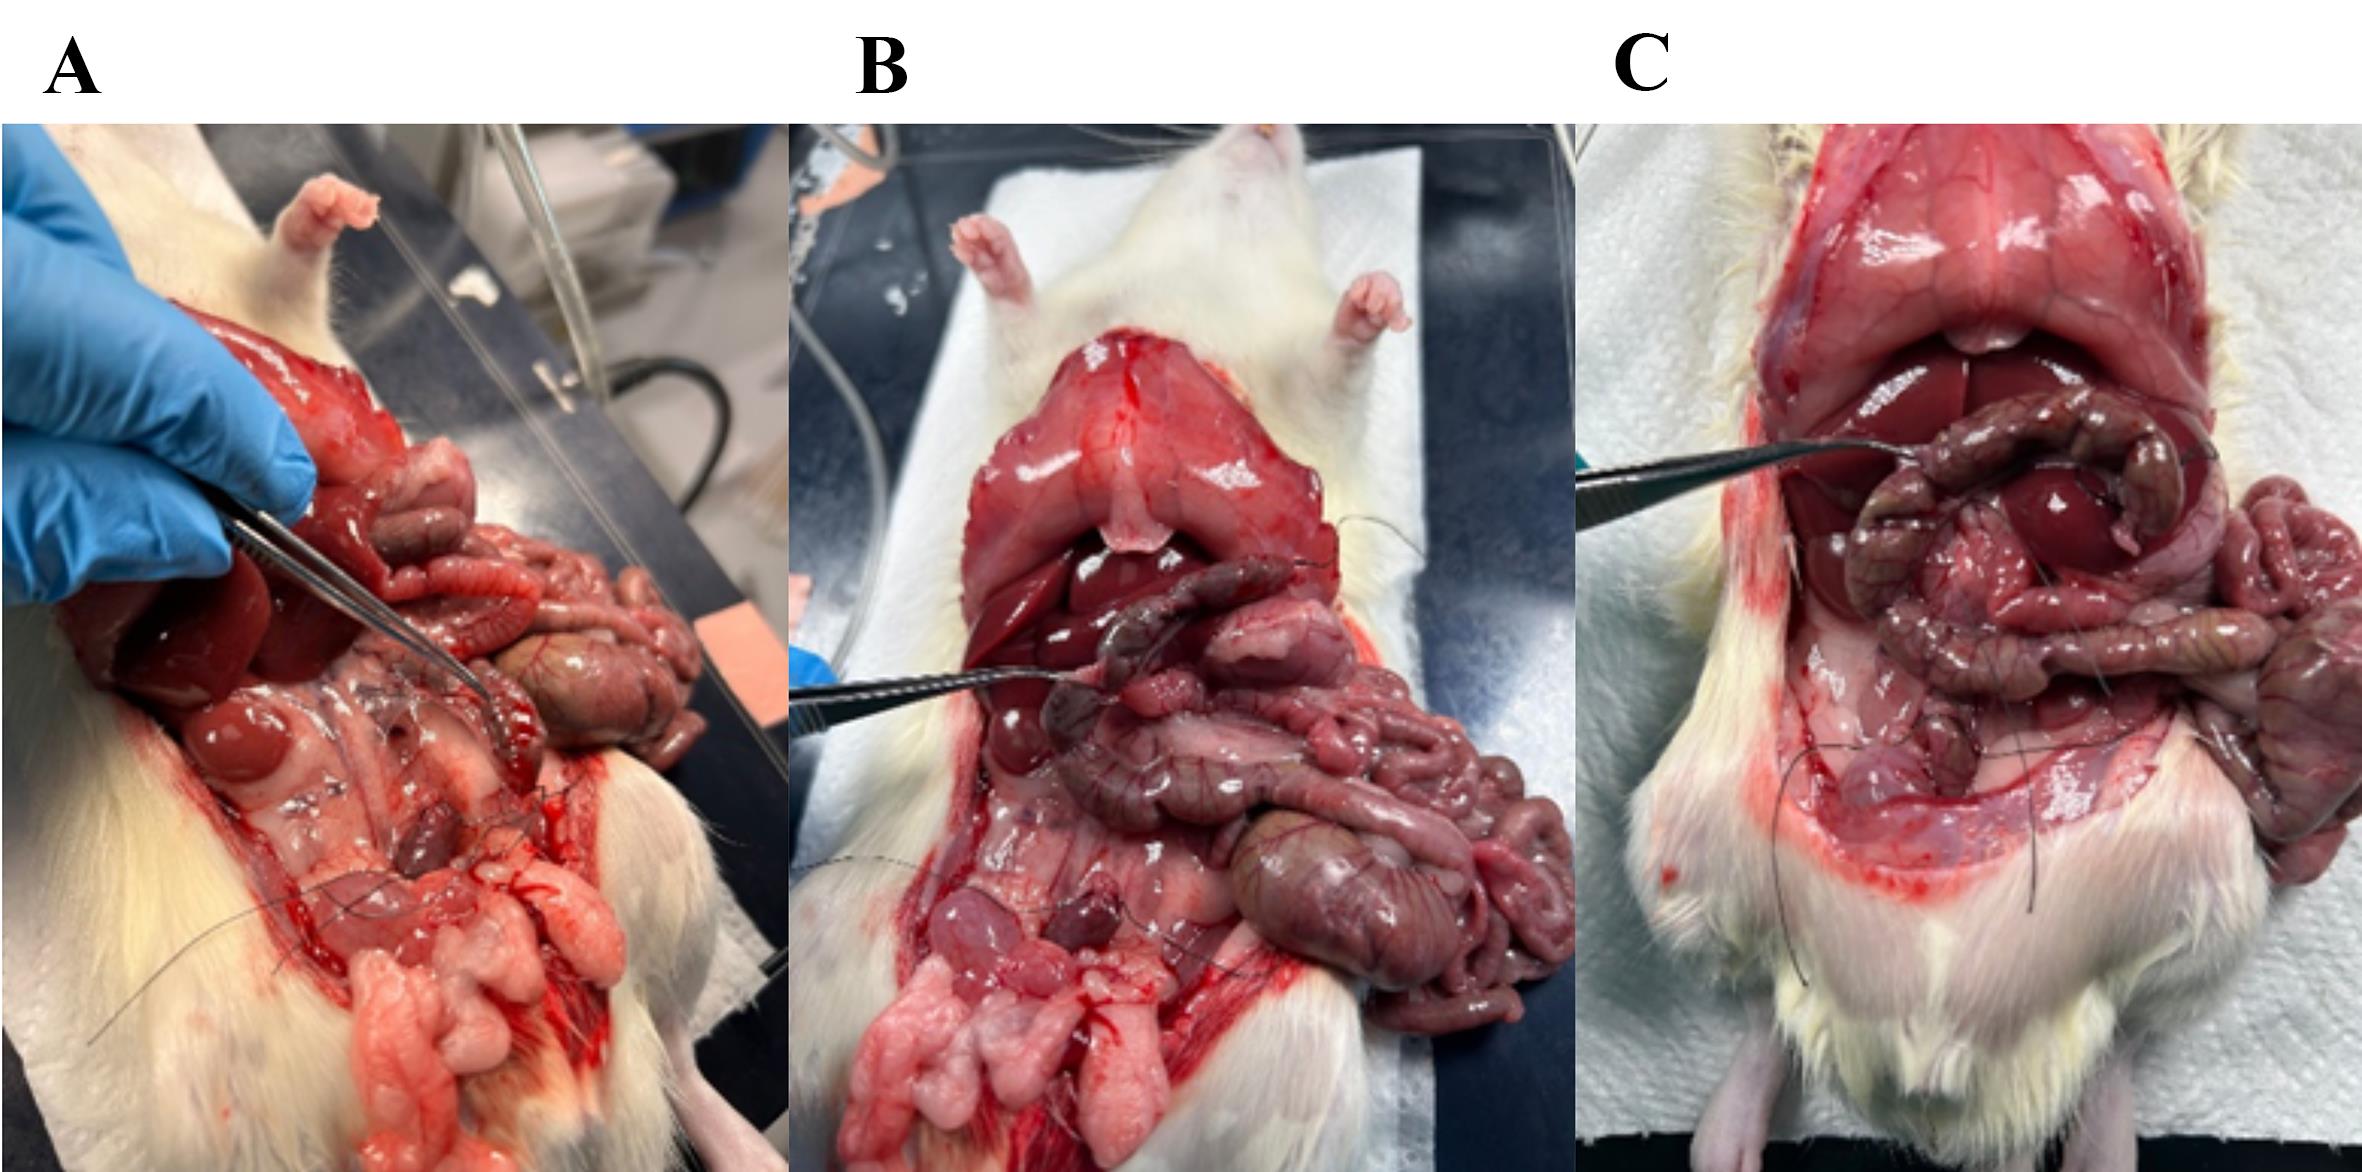
Figure 5. Removing fascia and ligating the vasculature to the distal colon. (A) Fascia connecting the colon to the posterior abdominal wall (cut gently or scrape with Q-tips). (B) Fascia surrounding the vasculature (superior mesenteric artery) perfusing the distal colon. (C) Ligature placed around the artery; with scissors, cut through the artery as close to the colon as possible so that the ligature is intact, ensuring no bleeding from the small intestine occurs.
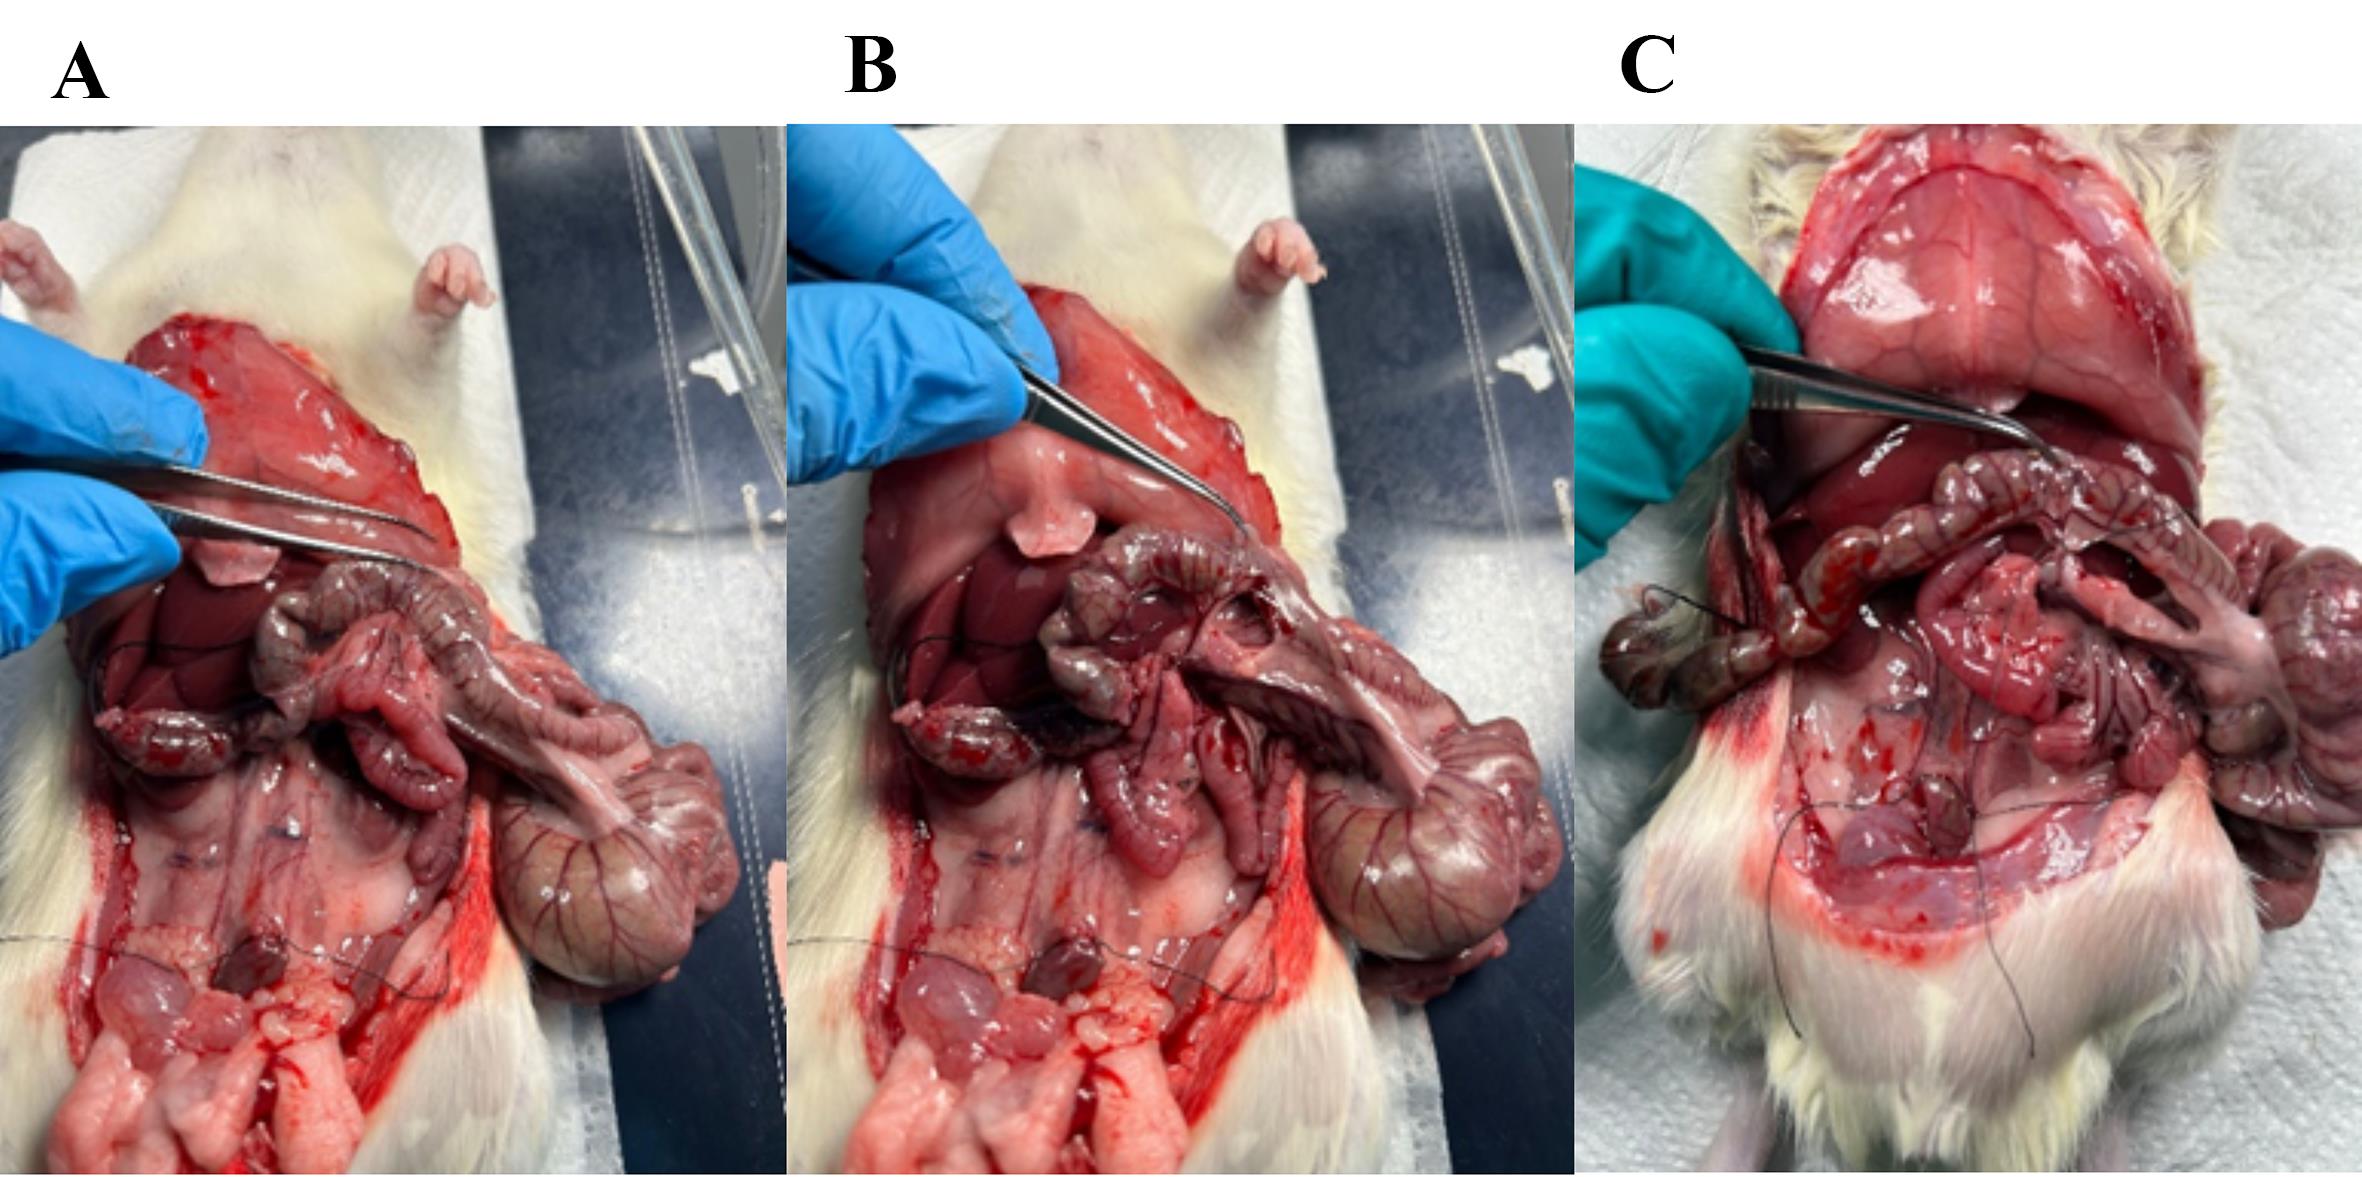
Figure 6. Ligate the vasculature supplying the proximal colon. (A) Fascia surrounding the vasculature perfusing the middle colon. (B) Fascia removed with a Q-tip, making the vasculature visible. (C) Ligature placed around the vasculature perfusing the middle colon; with scissors, cut through the artery as close to the colon as possible so that the ligature is intact, ensuring no bleeding from the small intestine occurs.
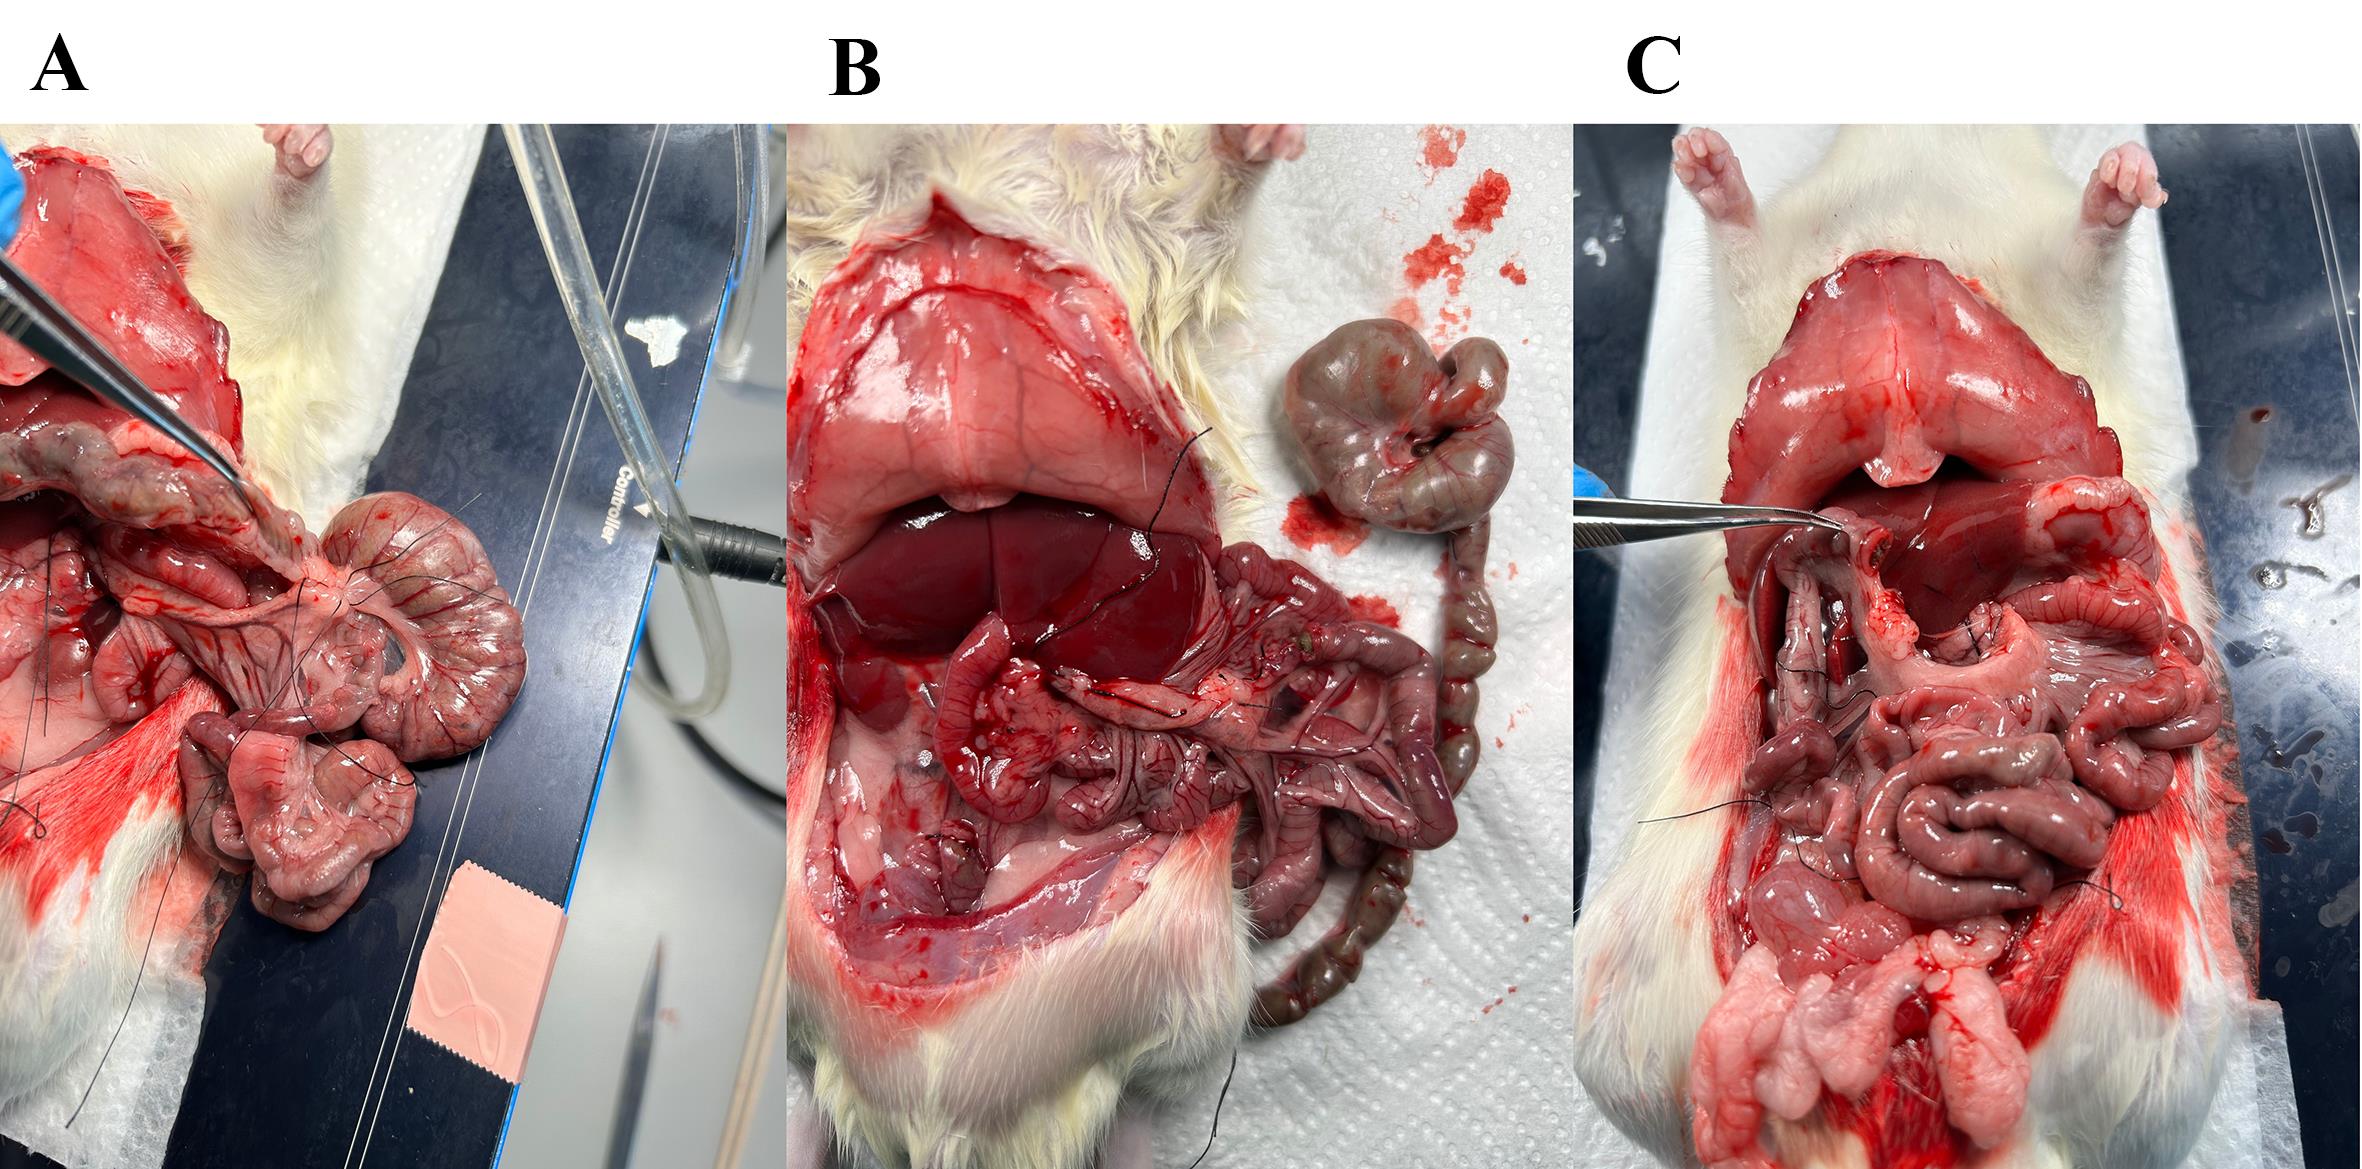
Figure 7. Ligature on vasculature to the proximal colon and cecum followed by excision. (A) Ligature placed around the vasculature supplying the proximal colon and the cecum; with scissors, excise the colon and cecum leaving the ligature on the small intestine intact. (B) The colon and cecum are excised. (C) The distal small intestine is left open, and the intestinal content and luminal stimuli empty through here.
11. Now, only the small intestine is left behind, and the distal intestinal lumen is open (Figure 7). Place a plastic tube in the proximal intestinal lumen to administer luminal stimulation.
12. Place a loose ligature around the small intestine immediately after the pancreas, approximately 0.5–1 cm distal of the stomach (Figure 8).
a. There is a lot of vasculature in this area that you need to be careful not to cut through.
b. By lifting the stomach slightly with your forceps, a small “window” appears below the small intestine; place the ligature there (Figure 8A).
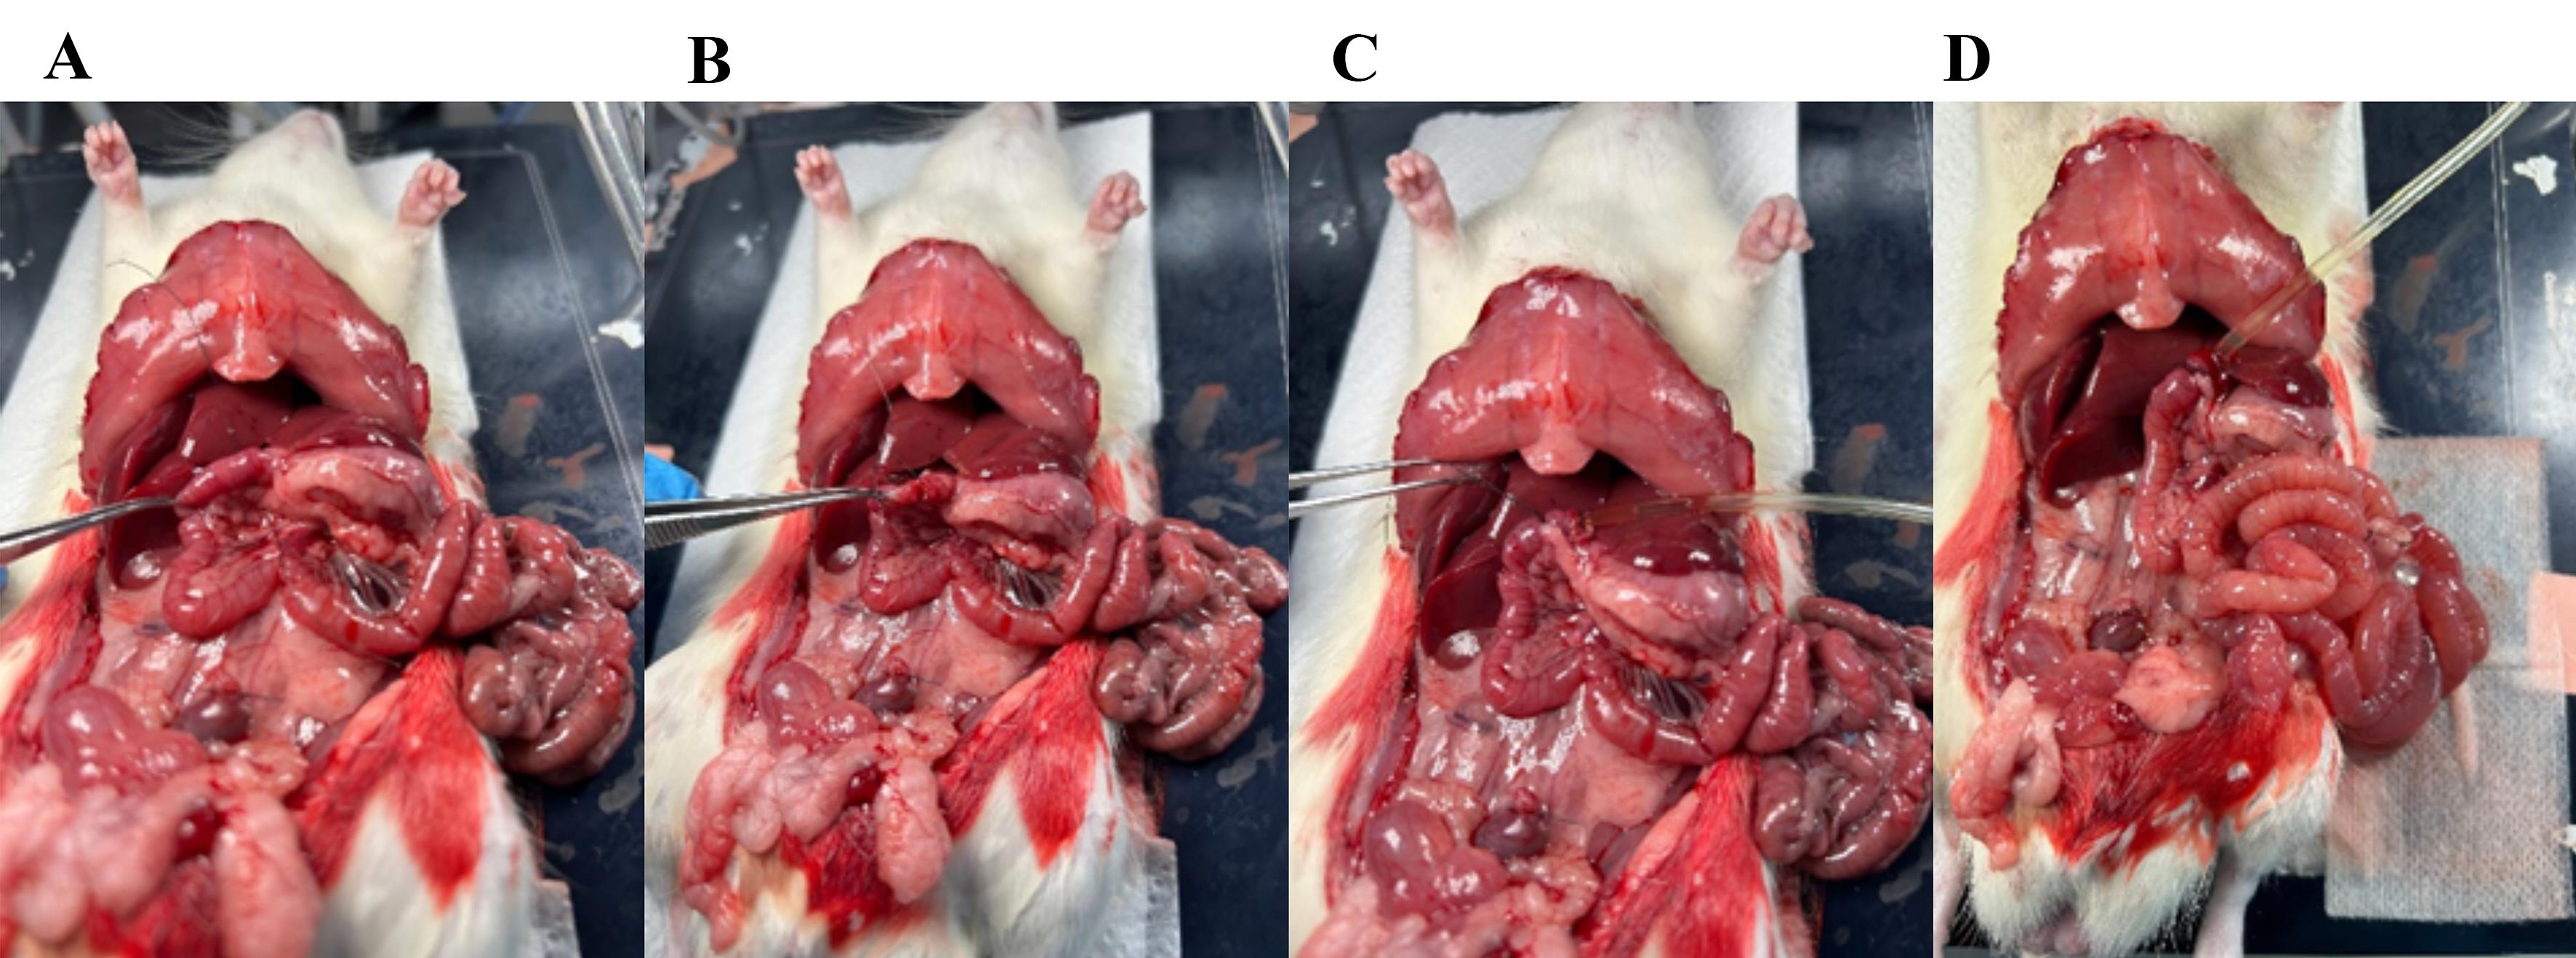
Figure 8. Placing a plastic tube in the intestinal lumen. (A) By lifting the proximal small intestine, a small “window” appears; through this window, place a loose ligature around the intestine. (B) Cut a small hole in the small intestine. (C) Place the plastic tube into the intestinal lumen. (D) Secure the plastic tube inside by tightening the ligature.
13. Cut a small hole in the intestine and place the plastic tube 1 cm inside the lumen (Figure 8B).
14. With the tube in place, tighten the suture, securing its position in the intestinal lumen (Figure 8C, D).
15. The plastic tube is connected to a 10 mL syringe and syringe pump (Figure 2).
16. Flush the intestinal lumen with pre-heated (37 °C) isotonic saline (30 mL at 5–10 mL/min).
a. To help clear the luminal content, gently use Q-tips to move intestinal contents forward while flushing.
b. The luminal effluent is discarded. In this setup, we place a container below the tripod to collect this effluent.
17. After flushing all luminal content, maintain a constant luminal flow of pre-heated saline (0.5 mL/min) using a 10 mL syringe and syringe pump.
Note: The luminal tube can be secured in the same place by taping it to the heating pad.
18. Place a catheter in the superior mesenteric artery (Figure 9A).
19. To visualize the artery and assure correct placement of the catheter, very gently remove the fascia surrounding the artery using dry Q-tips and small tweezers (Figure 9B).
a. Use the tweezers to gently pull the fascia to separate from the artery.
b. Be careful not to pull the artery, only touching the fascia with the tweezers, as it easily breaks.
c. Scrape Q-tips in the same direction as the artery to avoid damaging it.
20. When the artery is clearly visible, place two loose long ligatures around the artery (Figure 9C, D).
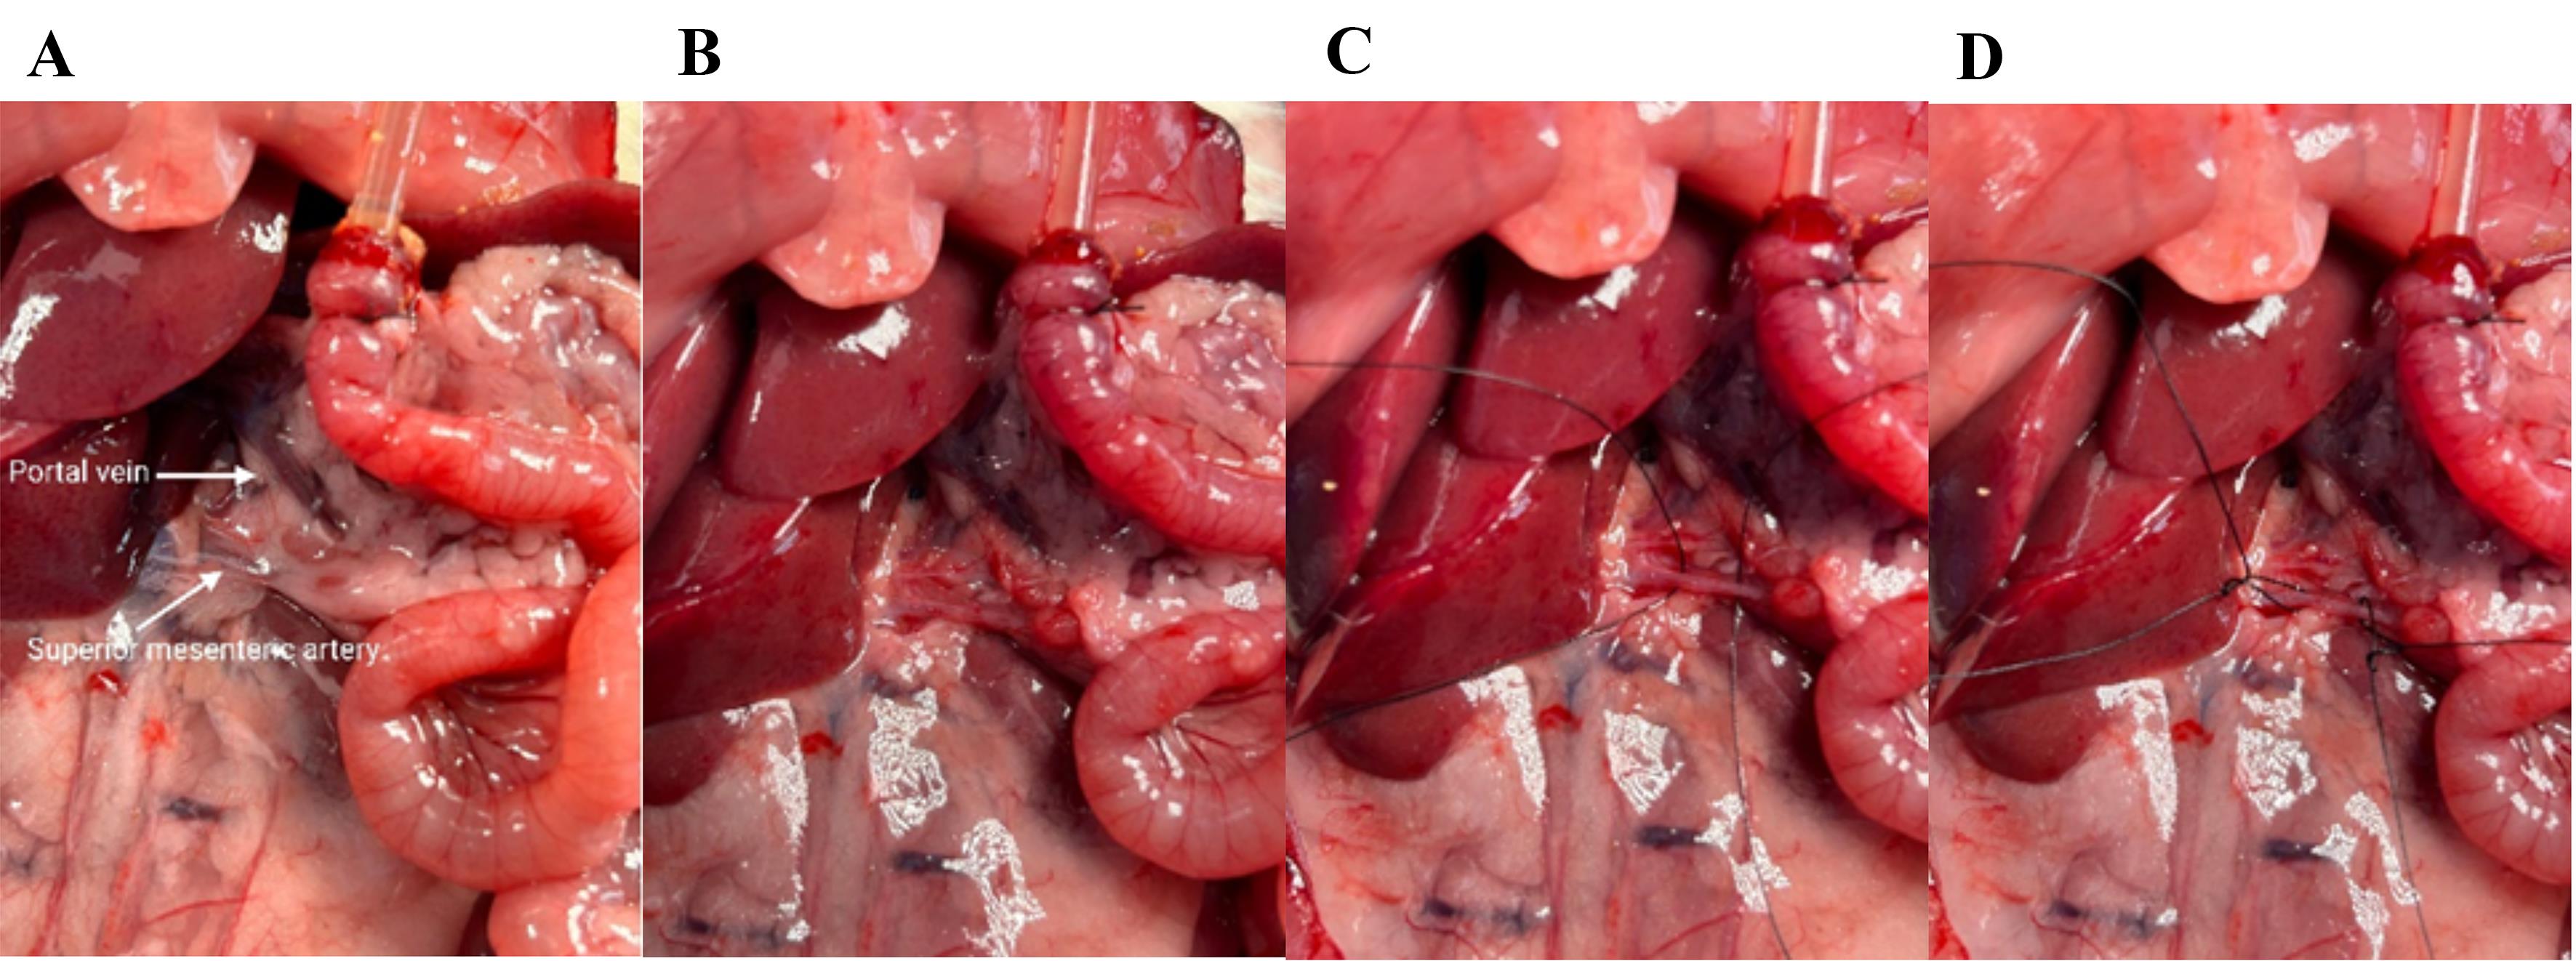
Figure 9. Visualizing and cleaning the superior mesenteric artery. (A) Zoom in on the superior mesenteric artery and the portal vein. (B) The superior mesenteric artery is rinsed. (C) Two ligatures are placed around the superior mesenteric artery. (D) Loose knots in the ligatures; on the left is the proximal ligature, and on the right is the distal ligature, which should finally secure the catheter.
21. Start the rolling pump (Figure 1) (0.5–1 mL/min) while preparing to place the catheter.
22. While gently pulling the proximal suture, cut a small hole in the artery with microscissors. Immediately place a plastic catheter in the artery and tighten the proximal ligature to stop the bleeding (Figure 10A, B).
23. Replace the plastic catheter with a metal catheter (cannula with basket and side port) that is connected to the perfusion setup and tighten the distal ligature securing the catheter in the artery (Figure 10C, D).
a. This is a critical step. Make sure not to remove the plastic catheter before the metal catheter is in; otherwise, the artery will collapse.
b. With the left hand, hold the proximal ligatures. With the right hand, lift the plastic catheter slightly and place the metal catheter below the plastic. Simultaneously with placing the metal catheter, remove the plastic one in one slow step. It is possible to place the metal catheter directly without the use of the plastic one; this is a personal preference. This step requires the most practice.
Note: If the catheter is placed correctly, the small intestine starts to appear pale.
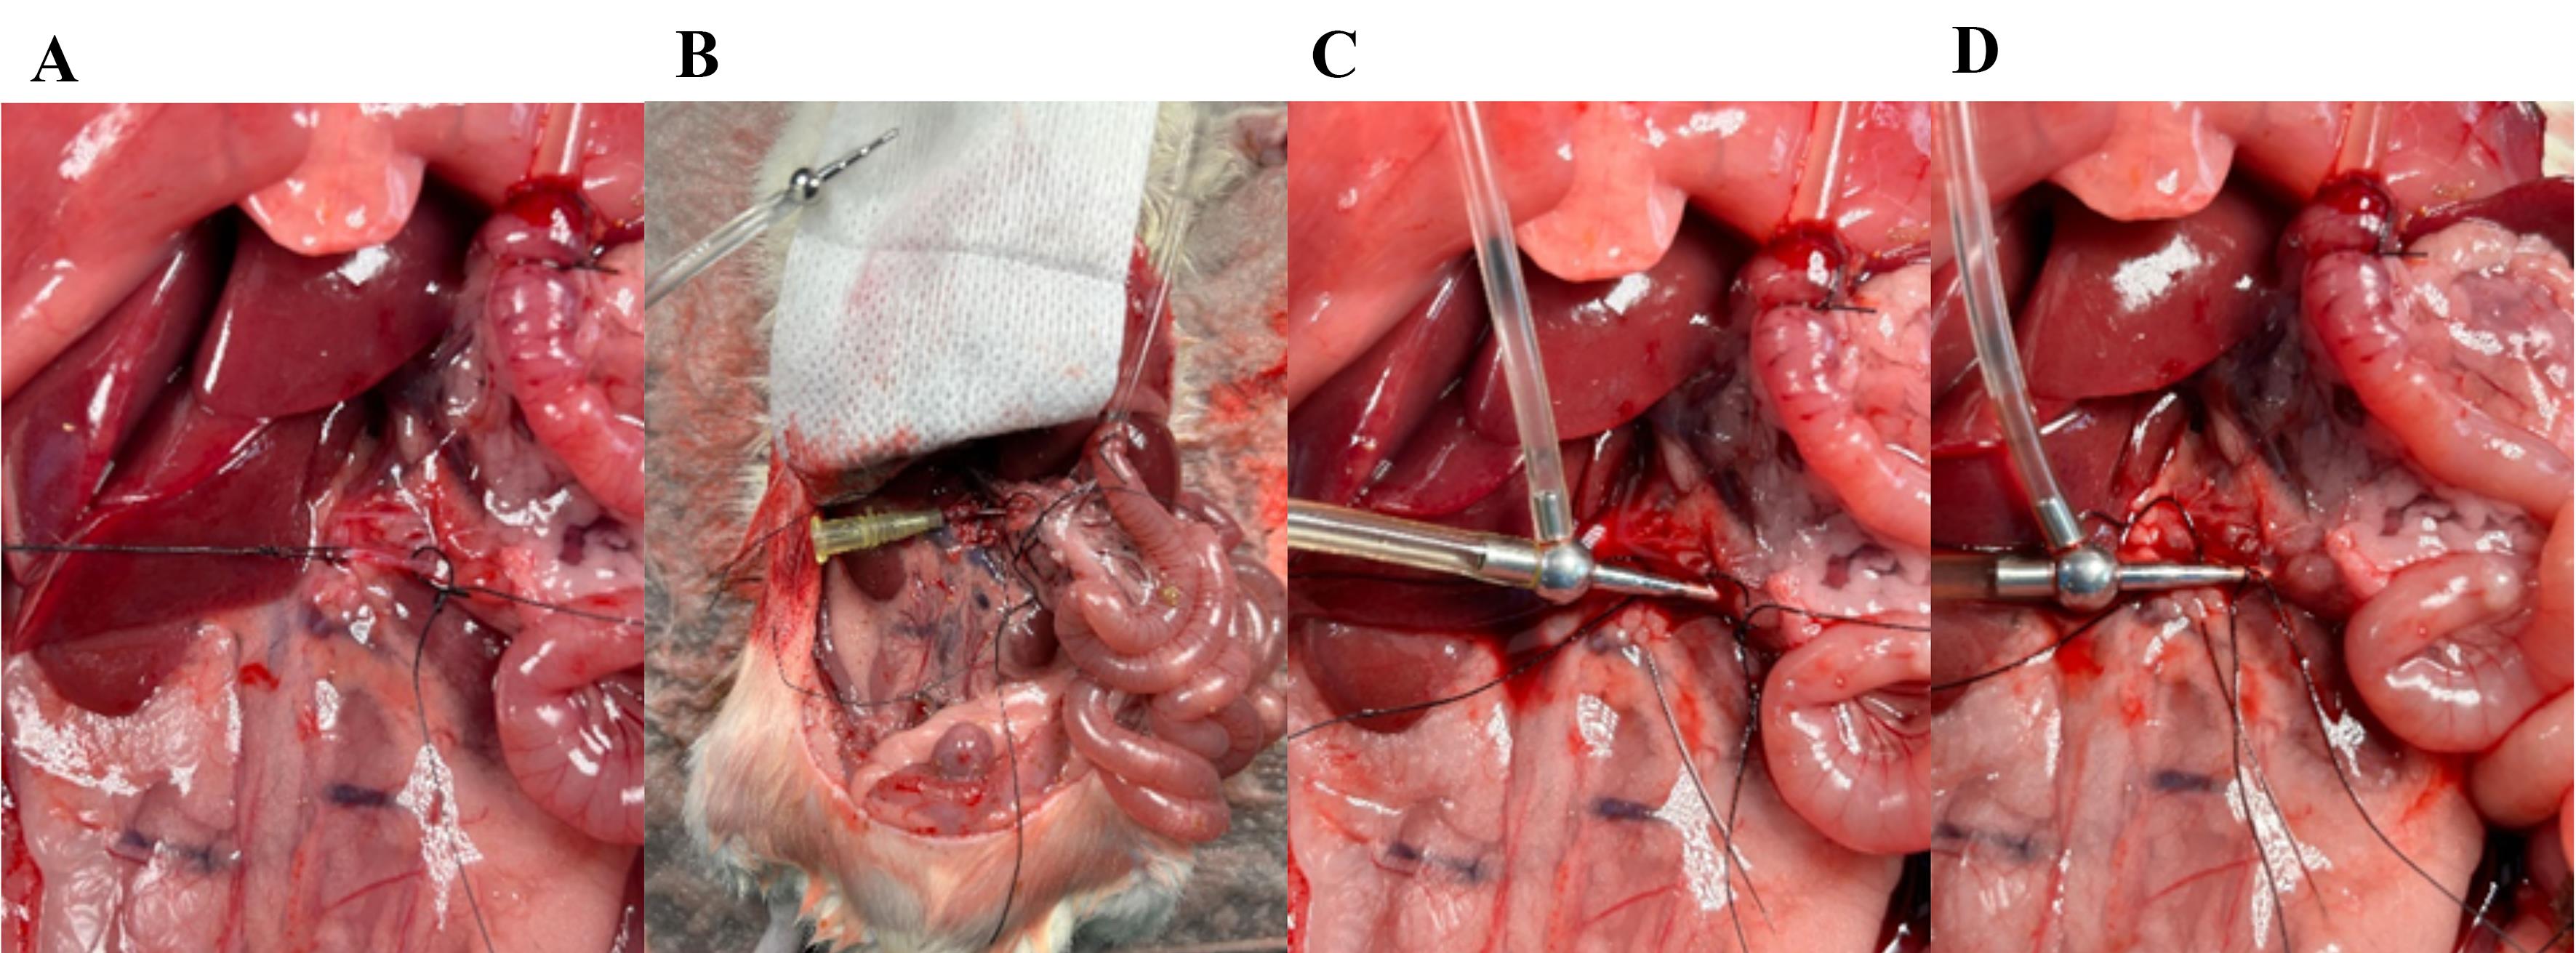
Figure 10. Placing the arterial catheter in the superior mesenteric artery. (A) Gently pull the proximal ligature; with microscissors, cut a small hole in the artery right between the two ligatures. (B) Place a plastic catheter in the artery and tighten the proximal ligature. (C) Place a metal catheter (cannula with basket and side port) into the artery. (D) Secure the catheter by tightening the distal ligature.
24. Collect the perfusion buffer through the portal vein (venous effluent). Identify the portal vein and place two loose ligatures around the vein (Figure 11A). The portal vein is situated just proximal to the liver. When the mesenteric artery is perfused with perfusion buffer, the red blood is replaced with a clear liquid, making it easier to identify.
25. While gently pulling on the vein with the upper ligature (Figure 11A), cut a small hole in the vein with microscissors and immediately place a metal catheter in the vein in the direction opposite to the flow (pointing toward the pancreas and away from the liver) (Figure 11B, C).
26. Secure the catheter by tightening the distal ligature around the catheter and vein (Figure 11B, C).

Figure 11. Placing the venous catheter in the portal vein. (A) Place two loose ligatures around the portal vein; while gently pulling the top ligature, cut a small hole in the vein between the two ligatures. (B) Place the metal catheter (cannula with basket) and secure it by tightening the ligature around the catheter. (B) The small intestine appears pale when properly perfused. (D) Cover the small intestine and soak it with prewarmed saline.
27. Increase perfusion flow to 7.5 mL/min.
28. Measure venous effluent in a 10 mL measuring cylinder for 1 min to ensure the correct flow rate.
29. A venous effluent flow ≥6 mL/min indicates a successful perfusion.
Note: After a few minutes, it should be possible to observe peristaltic movements in the intestine if properly perfused.
30. When proper perfusion flow is apparent, euthanize the rat by cutting the diaphragm with fine scissors.
31. Place a piece of gauze over the intestine and soak it with prewarmed saline (Figure 11D).
32. Set a timer for 30 min to let the system equilibrate.
a. Make sure to exchange luminal syringes when empty; they empty approximately every 10–15 min.
b. Prefill 10 mL syringes with saline and keep them warm in a plastic bag in the thermostatic circulating bath.
33. Prepare/label appropriate tubes to collect venous effluent every minute using a fraction collector.
D. Perfusion experiment
1. After 30 min of equilibration, initiate the experiment and collect the venous effluent. The tube connected to the venous catheter should be long enough to reach the fraction collector. The fraction collection is set to change position every 1 min.
2. The first 10 min of the experiment are baseline measurements with luminal saline perfusion. Replace the 10 mL syringe containing saline with a 10 mL syringe containing the glucose solution and set the syringe pump at 2.5 mL/min for 5 min. The syringe is empty; replace the syringe with a new 10 mL syringe containing glucose and change the flow to 0.5 mL/min for 10 min. Continue in the same manner for the next glucose stimulation and final baseline period (Figure 1).
3. Venous samples should be collected from the fraction collector as the experiment is proceeding and immediately placed on ice.
4. When the experiment is finished, store all samples at -20 °C for further analysis.
E. Glucose measurements
1. To quantify total glucose absorption, save 2 mL of the glucose tracer solution that is used for luminal perfusion. This 2 mL glucose is used as a standard and should be measured together with the venous effluent samples in order to calculate glucose concentration based on radioactivity.
Note: In our studies, we used 1 μL of 14C-d-glucose per 1 mL of d-glucose solution.
2. Determine the specific activity of the 14C-d-glucose [counts per minute (CPM) per mmol glucose] by liquid scintillation counting (LSC) with 1 mL glucose solution.
3. Prepare each sample by mixing 1 mL of venous effluent with 4 mL of Ultima Gold in a 6 mL plastic vial specific for LSC.
4. Measure the glucose standard and all samples for 10 min in the Quantulus Liquid Scintillation Counter.
5. Radioactivity (counts) in each sample translates to glucose concentration based on the specific activity of the luminal glucose solution employed.
6. Venous effluent samples were analyzed for radioactivity to determine glucose concentration. A 1 mL aliquot of the perfusion stock solution (100 mmol/L glucose with added [14C]-glucose tracer, 1 μL/mL) was counted to obtain the reference CPM. The ratio of CPM in each effluent fraction to the CPM in the stock provided the fractional tracer recovery. From this ratio, the amount of glucose present in each fraction was calculated as:
Where neff is the amount of glucose (mmol) in the effluent fraction, [G]stock is the glucose concentration of the stock (100 mmol/L), and Vstock is the volume of the glucose stock solution used for the reference count (1 mL). Dividing neff by the effluent sample volume yields the glucose concentration in each fraction. Background CPM (CPM in perfusion buffer without tracer) was subtracted from all samples, and because stock and effluent were counted under identical conditions, counting efficiency was assumed to cancel out.
Data analysis
Glucose absorption is visualized by plotting the min-by-min venous glucose concentration in GraphPad Prism. Total glucose absorption can be measured by summing the effluent contents of glucose eluted for each 15-min glucose stimulation period. Differences in glucose absorption may be analyzed by a paired t-test. Figure 12 shows an arbitrary illustration of results.
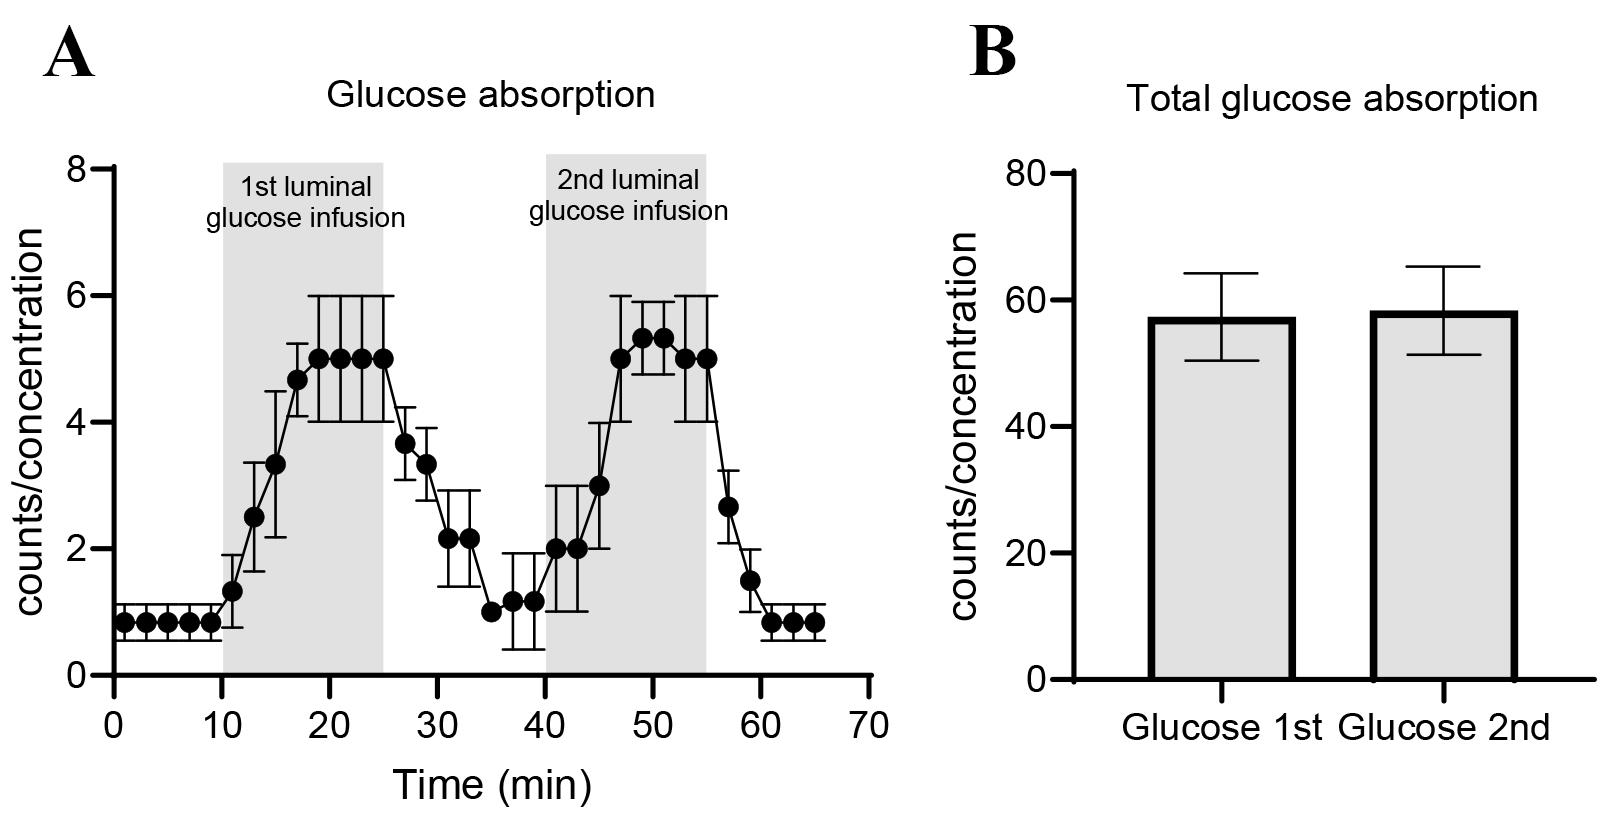
Figure 12. Example of results from perfusion study. (A) Glucose absorption per minute and (B) total glucose absorption calculated as area under the curve. Data is shown as mean ± SEM. For further examples, see [21].
Validation of protocol
This protocol has been used and validated in the following research article:
• Bæch-Laursen et al. [21]. Glucose absorption by isolated, vascularly perfused rat intestine: A significant paracellular contribution augmented by SGLT1 inhibition. Acta Physiol (Oxf). 2025 May; 241(5): e70033. doi: 10.1111/apha.70033. PMID: 40186371; PMCID: PMC11971594.
General notes and troubleshooting
General notes
1. Open the abdomen wide without perforating the diaphragm. A wide opening of the abdomen makes the surgery easier, as the visual overview of the intestine is improved.
2. Minimize touching the small intestine during the surgical procedure. The small intestine is easily bruised, which may affect the outcome.
3. Use tight sutures when excising the cecum and colon. Loose sutures can result in a leak of perfusion buffer, thereby lowering perfusion flow.
4. Keep the tissue wet by applying saline to the surgical area during the surgery. After the surgery is complete, lay a piece of absorptive compression over the tissue and keep wetting it with saline through the perfusion protocol.
5. Make sure to keep track of time. The animal should be under full anesthesia. If you notice the rat waking or moving a lot during the surgery, administer extra anesthetics and wait until fully anesthetized before proceeding. Sometimes you will notice some light movement while opening the abdomen; this may be because of the big nerves and not due to improper anesthesia. If you notice this movement, check reflexes again before proceeding with the surgery.
Troubleshooting
Problem 1: Trouble clearing the luminal content.
Sometimes the stool is very dense, and it can be difficult to clear the lumen of its contents. Try using warm saline to flush; while flushing, gently use Q-tips to mobilize the content, helping it to move along. Avoid rough touching, as it can bruise the epithelium.
Problem 2: Low venous effluent flow rate.
Possible cause and solution 1: The venous catheter may be placed too deeply in the portal vein. Try to loosen the ligature by allowing careful movements of the catheter. Reorganizing the placement of the venous catheter does not affect the outcome. This should be done within the first 30 min of baseline before initiating the experiment.
Possible cause and solution 2: High arterial pressure, which can be caused by impurities in the perfusion buffer, clots in the catheter, or a too-tight ligature. Avoid loosening the suture on the catheter securing the arterial catheter. Increase the perfusion system pressure (maximum 100 mm Hg) to increase venous flow rate.
Acknowledgments
Specific contributions of each author: Conceptualization, J.J.H., C.B-L.; Investigation, C.B-L.; Writing—Original Draft, C.B-L.; Writing—Review & Editing, J.J.H., C.B-L.; Funding acquisition, J.J.H.; Supervision, J.J.H.
The present work was supported by a grant from the Novo Nordisk Foundation (NNF18CC0034900).
The original research paper was published in Acta Physiologica [21]. The perfusion model was used and validated by our research group in studies of intestinal endocrine secretion [21,22].
Competing interests
Authors declare no conflicts of interest.
Ethical considerations
Animal studies were conducted with permission from the Danish National Committee for Animal Research (2018-15-0201-01397) and from the local animal use committee (SUND, EMED, P19-435) and in accordance with the guidelines of Danish legislation governing animal experiments.
References
- Crane, R. K. (1960). Intestinal Absorption of Sugars. Article. Physiol Rev. 40(4): 789–825. https://doi.org/10.1152/physrev.1960.40.4.789
- Thorens, B., Sarkar, H. K., Kaback, H. R. and Lodish, H. F. (1988). Cloning and functional expression in bacteria of a novel glucose transporter present in liver, intestine, kidney, and β-pancreatic islet cells. Cell. 55(2): 281–290. https://doi.org/10.1016/0092-8674(88)90051-7
- Karasov, W. H. (2017). Integrative physiology of transcellular and paracellular intestinal absorption. J Exp Biol. 220(14): 2495–2501. https://doi.org/10.1242/jeb.144048
- Drozdowski, L. and Thomson, A. B. R. (2006). Intestinal sugar transport. World J Gastroenterol. 12(11): 1657–1670. https://doi.org/10.3748/wjg.v12.i11.1657
- Pappenheimer, J. R. (1993). On the coupling of membrane digestion with intestinal absorption of sugars and amino acids. Am J Physiol Gastrointest Liver Physiol. 265(3 28-3): 409–417. https://doi.org/10.1152/ajpgi.1993.265.3.g409
- Kellett, G. L. (2001). The facilitated component of intestinal glucose absorption. J Physiol. 531(3): 585–595. https://doi.org/10.1111/j.1469-7793.2001.0585h.x
- Sala‐Rabanal, M., Ghezzi, C., Hirayama, B. A., Kepe, V., Liu, J., Barrio, J. R. and Wright, E. M. (2018). Intestinal absorption of glucose in mice as determined by positron emission tomography. J Physiol. 596(13): 2473–2489. https://doi.org/10.1113/jp275934
- Bartoli, E., Fra, G. P. and Schianca, G. P. C. (2011). The oral glucose tolerance test (OGTT) revisited. Eur J Intern Med. 22(1): 8–12. https://doi.org/10.1016/j.ejim.2010.07.008
- Beger, R. D., Hansen, D. K., Schnackenberg, L. K., Cross, B. M., Fatollahi, J. J., Lagunero, F. T., Sarnyai, Z. and Boros, L. G. (2009). Single valproic acid treatment inhibits glycogen and RNA ribose turnover while disrupting glucose-derived cholesterol synthesis in liver as revealed by the [U-13C6]-d-glucose tracer in mice. Metabolomics. 5(3): 336–345. https://doi.org/10.1007/s11306-009-0159-1
- Bruce, C. R., Hamley, S., Ang, T., Howlett, K. F., Shaw, C. S. and Kowalski, G. M. (2021). Translating glucose tolerance data from mice to humans: Insights from stable isotope labelled glucose tolerance tests. Mol Metab. 53: 101281. https://doi.org/10.1016/j.molmet.2021.101281
- Rozehnal, V., Nakai, D., Hoepner, U., Fischer, T., Kamiyama, E., Takahashi, M., Yasuda, S. and Mueller, J. (2012). Human small intestinal and colonic tissue mounted in the Ussing chamber as a tool for characterizing the intestinal absorption of drugs. Eur J Pharm Sci. 46(5): 367–373. https://doi.org/10.1016/j.ejps.2012.02.025
- Sjögren, E., Eriksson, J., Vedin, C., Breitholtz, K. and Hilgendorf, C. (2016). Excised segments of rat small intestine in Ussing chamber studies: A comparison of native and stripped tissue viability and permeability to drugs. Int J Pharm. 505: 361–368. https://doi.org/10.1016/j.ijpharm.2016.03.063
- Li, B., Fu, L., Abe, C., Nectoux, A. M., Yamamoto, A. and Matsui, T. (2020). Theaflavins inhibit glucose transport across Caco-2 cells through the downregulation of the Ca2+/AMP-activated protein kinase-mediated glucose transporter SGLT1. J Funct Foods. 75: 104273. https://doi.org/10.1016/j.jff.2020.104273
- Kulkarni, C. P., Thevelein, J. M. and Luyten, W. (2021). Characterization of SGLT1-mediated glucose transport in Caco-2 cell monolayers, and absence of its regulation by sugar or epinephrine. Eur J Pharmacol. 897: 173925–173925. https://doi.org/10.1016/j.ejphar.2021.173925
- Andrade, N., Silva, C. and Martel, F. (2018). The effect of oxidative stress upon intestinal sugar transport: an in vitro study using human intestinal epithelial (Caco-2) cells. Toxicol Res. 7(6): 1236–1246. https://doi.org/10.1039/c8tx00183a
- Dezani, T. M., Dezani, A. B., Junior, J. B. d. S. and Serra, C. H. d. R. (2016). Single-Pass Intestinal Perfusion (SPIP) and prediction of fraction absorbed and permeability in humans: A study with antiretroviral drugs. Eur J Pharm Biopharm. 104: 131–139. https://doi.org/10.1016/j.ejpb.2016.04.020
- Lozoya-Agullo, I., Zur, M., Fine-Shamir, N., Markovic, M., Cohen, Y., Porat, D., González-Álvarez, I., González-Álvarez, M., Merino-Sanjuán, M., Bermejo, M., et al. (2017). Investigating drug absorption from the colon: Single-pass vs. Doluisio approaches to in-situ rat large-intestinal perfusion. Int J Pharm. 527(1–2): 135–141. https://doi.org/10.1016/j.ijpharm.2017.05.018
- Helliwell, P. A. and Kellett, G. L. (2002). The active and passive components of glucose absorption in rat jejunum under low and high perfusion stress. J Physiol. 544(2): 579–589. https://doi.org/10.1113/jphysiol.2002.028209
- Kuhre, R. E., Frost, C. R., Svendsen, B. and Holst, J. J. (2015). Molecular Mechanisms of Glucose-Stimulated GLP-1 Secretion From Perfused Rat Small Intestine. Article. Diabetes (New York, N.Y.). 64(2): 370–382. https://doi.org/10.2337/db14-0807
- Kuhre, R. E. and Holst, J. J. (2019). Mechanisms Underlying Gut Hormone Secretion Using the Isolated Perfused Rat Small Intestine. J Visualized Exp. 144: e3791/58533. https://doi.org/10.3791/58533
- Bæch‐Laursen, C., Kuhre, R. E., Modvig, I. M., Veedfald, S. and Holst, J. J. (2025). Glucose absorption by isolated, vascularly perfused rat intestine: A significant paracellular contribution augmented by SGLT1 inhibition. Acta Physiol. 241(5): e70033. https://doi.org/10.1111/apha.70033
- Kuhre, R. E., Frost, C. R., Svendsen, B. and Holst, J. J. (2015). Molecular Mechanisms of Glucose-Stimulated GLP-1 Secretion From Perfused Rat Small Intestine. Article. Diabetes (New York, N.Y.). 64(2): 370–382. https://doi.org/10.2337/db14-0807
Article Information
Publication history
Received: Aug 27, 2025
Accepted: Oct 14, 2025
Available online: Nov 2, 2025
Published: Nov 20, 2025
Copyright
© 2025 The Author(s); This is an open access article under the CC BY-NC license (https://creativecommons.org/licenses/by-nc/4.0/).
How to cite
Bæch-Laursen, C., Bæch-Laursen, S. and Holst, J. J. (2025). Quantifying Intestinal Glucose Absorption Using Isolated Vascularly Perfused Rat Small Intestine. Bio-protocol 15(22): e5514. DOI: 10.21769/BioProtoc.5514.
Category
Biochemistry > Carbohydrate > Glucose
Cell Biology > Tissue analysis > Physiology
Do you have any questions about this protocol?
Post your question to gather feedback from the community. We will also invite the authors of this article to respond.