- Protocols

- Articles and Issues
- For Authors
- About
- Become a Reviewer

ClearDepth Method for Evaluations of Root Depth in Soil-Filled Pots
Published: Vol 15, Iss 16, Aug 20, 2025 DOI: 10.21769/BioProtoc.5425 Views: 2173
Reviewed by: Anonymous reviewer(s)
Original research article
The authors used this protocol in:
Jan 2025
Advertisement


Protocol Collections
Comprehensive collections of detailed, peer-reviewed protocols focusing on specific topics


Abstract
Despite its significant relevance to drought adaptation, optimization of nutrient acquisition, and carbon sequestration in soil, genetic factors determining root depth remain poorly explored, mostly due to the limitations of the methods currently available to estimate it. Although several such methods have been developed for crops, their applicability to large-scale studies and those involving smaller, more fragile root systems is severely limited. To address this, we have developed ClearDepth, a simple, non-destructive, low-cost method. In ClearDepth, the root system develops naturally inside the soil in clear pots. As it expands, secondary roots reach the transparent walls of the pot ("wall roots"), becoming visible. The shallowness of each wall root is then measured (wall root shallowness, WRS), and the depth of the root system is expressed as the average of all single WRS measurements. We demonstrated the suitability of ClearDepth for root depth studies using Arabidopsis thaliana and Oryza sativa (rice), two species with contrasting root system architecture (RSA) and root size. The robustness and sensitivity of the WRS trait allow us not only to reproducibly discriminate between shallow and deep root systems but also to detect smaller yet significant differences in depth determined by the influence of environmental factors, such as light. Here, we present a comprehensive protocol for utilizing this method.
Key features
• ClearDepth measures the depth of a minimum number of secondary roots, set by the user, to estimate the depth of the root system.
• The method captures differences of root depth at a spatio-developmental stage rather than at one specific time point after planting.
• ClearDepth captures differences in root depth independently of differences in total root biomass.
Keywords: ArabidopsisGraphical overview

Overview of the ClearDepth method for estimations of root depth in soil. In ClearDepth, seedlings are planted in transparent pots, which allows the detection of roots growing at different depths as they touch the walls of the pot, thus becoming visible. The shallowness of individual wall roots is then measured and averaged to estimate the depth of the root system.
Background
Root depth is a trait of great relevance in the adaptation of plants to changes in the content and distribution of nutrients in the soil. Shallow roots are pivotal for the uptake of nutrients more abundantly found in topsoil layers, like phosphorus [1–3], whereas deep roots are involved in the uptake of nitrates, which move with water [4,5]. Deep roots have also been shown to improve plant resilience to drought [6–8] and are a desirable trait for strategies that aim to fight climate change by increasing carbon storage in the soil [9–11]. Despite its enormous agricultural relevance, the genetic determinants of root depth are poorly understood. This is largely due to the current lack of methods suitable for mid- and large-scale studies of root depth in soil. While excavation methods (shovelomics) and imaging techniques like X-ray have proved useful to estimate the distribution of root biomass across soil depths in crop species, the amount of labor, the complexity of image analysis, the destructiveness of the methods, and their cost, among other factors, severely limit their use to rather small, validation experiments [12–17]. Such limitations are even more severe when the study involves species characterized by small, fragile roots like the model organism Arabidopsis. In recent years, at least two methods for the study of the Arabidopsis root system architecture (RSA) and root depth in soil have been published. The GLO-Roots method relies on the use of plants transformed to express the luciferase marker, which allows the imaging of roots growing in thin, soil-filled, transparent pots [18]. The GLO-RIA software is then used to analyze the images and extract traits such as depth [18]. In Ogura's method, whole pots containing the root system are sectioned in two halves at the center of the plant, and images of the exposed roots are obtained and processed for measurements of "shallowness" (standard deviation of all root pixels in x-axis direction in a picture divided by that in y-axis direction), a proxy for root depth [19]. Although both provide valuable insights into the genetic control of RSA traits and root depth in Arabidopsis, their applicability is restricted by the need to use transformants, in one case, and the considerable amount of labor, in the other.
We have recently developed ClearDepth, a conceptually simple, low-cost, and robust method to evaluate root depth in soil [20]. The method relies on the use of clear pots, allowing the visualization of roots that reach the transparent walls of the pot ("wall roots") after having grown buried in the soil. Importantly, in our method, the root system develops entirely inside the soil, in a three-dimensional, natural manner. This contrasts with other methods that rely on the use of rhizotrons, where the roots grow in a restricted, almost 2D soil environment that severely limits their radial expansion. The shallowness of each wall root (wall root shallowness, WRS) is measured, and the depth of the root system is expressed as the average of all single WRS measurements (mean WRS). Deep-rooted and shallow-rooted systems are characterized by relatively low or high mean WRS values, respectively.
The mean WRS parameter captures differences of root depth at a developmental stage defined by a minimum number of wall roots or WRS measurements set by the user (in our case, five; Arabidopsis and rice), and not at a specific time after planting. Importantly, estimates of root depth by the mean WRS parameter are independent of total root biomass, and the method does not measure root length distribution by depth, typical of, for example, shovelomics-based approaches. ClearDepth's second trait, resolution time (RT), considers the temporal aspect of root system expansion in the soil. It is defined as the time needed for a root system to display the minimum number of wall roots established by the user. Although less sensitive than the mean WRS parameter to differentiate between shallow and deep root systems, RT can be especially useful to compare root systems that do not differ significantly in mean WRS: the faster the wall roots appear in deep soil layers, the deeper the root system.
The value of ClearDepth is not limited to estimations of Arabidopsis' root depth; the method can also be applied to species characterized by larger, fibrous root systems, like the monocot rice. In addition, the method not only distinguishes between shallow-rooted and deep-rooted systems but is sensitive enough to detect small differences in root depth determined by the influence of, for example, an environmental factor like light. ClearDepth’s main limitation is the relatively long times (30–45 days) that some deep-rooted systems require to display wall roots. This and other aspects of the method, such as the automation of WRS measurements and the extension of its use to species other than Arabidopsis and rice, are current areas of improvement and exploration. In conclusion, ClearDepth offers a simple, low-cost, and easily scalable method for robust and sensitive measurements of root depth in soil-filled pots in controlled environment settings. Here, we provide a detailed protocol for its use.
Materials and reagents
Biological materials
1. Seeds of the accessions, varieties, mutants or genotypes to evaluate
Reagents
1. Murashige and Skoog (MS) basal salts (Caisson, catalog number: MSP01-1KG)
2. Sucrose (Fisher Bioreagents, catalog number: BP220-10)
3. 1 M KOH (Sigma-Aldrich, catalog number: 244720)
3. Phytagel (plantMedia, catalog number: 40000035-3)
4. Germicidal ultra bleach (Waxie, catalog number: 170018)
5. 1 N HCl (Fisher Scientific, catalog number: SA48-1)
6. Sterile (autoclaved) ddH2O
Solutions
1. 1/4 strength MS phytagel medium (see Recipes)
Recipes
1. 1/4 strength MS phytagel medium
| Reagent | Final concentration | Quantity or Volume |
| MS basal salts | 1/4 strength | 1.1 g |
| Sucrose | 1% | 10 g |
| Phytagel | 1% | 10 g |
| ddH2O | n/a | up to 1 L |
Laboratory supplies
1. 14 × 9–10.7 cm (depth × diameter) pots (Webrestaurant Store) (https://www.webstaurantstore.com/choice-32-oz- microwavable-contact-clear-round-deli-container-pack/999RD32BULK.html)
2. 12 × 12 cm plates (Greiner Bio-One, catalog number: 688161)
3. 10 × 15 inch seed germination paper (Nasco Education, catalog number: SB39211)
4. Sunshine Mix 4 soil (Sungro, https://www.sungro.com/retail-product/sunshine-mix-4-aggregate-plus-with-mycorrhizae) containing a mix of Canadian sphagnum peat moss, perlite, dolomite lime, a proprietary blend of endomycorrhiza, RESiLIENCE® for improved resistance to wilting, a wetting agent, and a low phosphorus fertilizer
5. Sterile 100 mL serological pipettes (Corning Incorporated, catalog number: 4484)
6. Graduated beakers (Grainger, catalog number: 3VEZ3)
7. 1 L graduated Pyrex bottles (Sigma-Aldrich, catalog number: CLS13951L)
8. 3M surgical tape (Micropore, catalog number: 1530-0)
9. FisherbrandTM fine precision medium tipped tweezers/forceps (Fisher Scientific, catalog number: 12-000-157)
10. 250 mL graduated Pyrex beakers (Sigma-Aldrich, catalog number: CLS1000250)
11. 2 mL microcentrifuge tubes (SealRite, catalog number: 1620-2700)
12. 96-well microtube rack (Sigma-Aldrich, catalog number: 8780)
13. Sterile 200 μL pipette tips (USA Scientific TipOne®, catalog number: 1110-1730)
Equipment
1. Laminar flow hood (NuAire, model: Nu.425.600)
2. Analytical balance (Bonvoisin, model: HZ50002B)
3. pH meter (Fisher Scientific, model: Accumet AB150)
4. Magnetic stir plate (Fisher Scientific, model: Isotemp) and magnetic stir bars (Fisher Scientific)
5. Pipetboy (VWR, model: Powerpette Plus)
6. Autoclave (Consolidated Sterilizer Systems, CSS, model: 3AV-5)
7. Walk-in growth chamber (Conviron, model: MTPS216) or reach-in vertical growth chamber (Conviron, model: PGC20)
8. Fume Hood (Hanson)
9. NalgeneTM bio-transport carrier (Thermo Scientific, catalog number: 7135-0001)
10. Microwave Oven (Panasonic)
11. Fridge or cold room (Imperial Manufacturing)
12. Water bath (Thermo Fisher, model: Precision 50)
Procedure
A. Preparation of MS phytagel medium plates
1. To prepare 1/4 strength MS phytagel medium, start by mixing and fully dissolving MS basal salts and sucrose (as described in Recipe 1) in 1 L of ddH2O, in a beaker with a magnetic bar inside, using a magnetic stir plate (300–400 rpm).
Note: The use of heat is not needed to dissolve the MS basal salts and sucrose.
2. Adjust pH to 5.7 using KOH.
Note: The solution containing the dissolved MS basal salts and sucrose typically has a pH in the range 4–5. Use a 1 M KOH solution to adjust the pH to 5.7 (approximately 100 μL per liter of medium). A 0.1 M KOH solution can be used at the end, for fine adjusting (approximately 200 μL per liter of medium).
Caution: KOH can cause severe burns and damage to skin, eyes, and lungs.
Pause point: The medium containing MS basal salts and sucrose (without added phytagel) can be stored at 4 °C for up to 2 days.
3. Add 10 g of phytagel and autoclave at 121 °C (20 min for 8 L of medium) after removing the magnetic bar from the bottle with medium.
Pause point: If necessary, the bottles with autoclaved medium can be stored for up to 4 weeks at 4 °C.
4. Allow the autoclaved medium to cool to approximately 60 °C using a water bath.
Note: If using bottles that were stored at 4 °C, melt the solidified medium in a microwave oven set at medium power level for approximately 10 min. Swirl at regular intervals.
Caution: Loosen the bottle lids before starting the microwave.
5. Pour the medium onto square plates (50 mL per plate), inside a laminar flow hood, with the help of a Pipetboy and sterile 100 mL serological pipettes. Wait for the medium to solidify, close the plates, and store them at 4 °C until use.
Note: The plates with semi-solid medium can be stored at 4 °C for up to 8 weeks.
B. Seed sterilization, sowing, and germination
1. Aliquot the Arabidopsis seeds in 2 mL microcentrifuge tubes and place the tubes in a rack.
2. Place the rack with the open tubes into a bio-transport carrier and place the carrier on top of a magnetic stir plate, inside a fume hood.
3. Inside the fume hood, prepare a mixture of 200 mL of bleach and 5 mL of concentrated HCl in a 250 mL Pyrex beaker with a stir bar and put it inside the carrier. Close the carrier and start stirring for vapor-phase sterilization of the seeds (300–400 rpm; no heat).
Caution: HCl is irritating to the eyes and skin. Bleach can cause irritation, burns, and respiratory problems.
4. After 1 h, stop stirring and remove the beaker with the bleach/HCl mix from the carrier. Put the carrier lid back, slightly offset to allow the seeds to vent inside the fume hood. After 15–20 min, close the tubes with the sterile seeds.
Pause point: Sterilized seeds can be stored at 4 °C until use.
5. Inside a laminar flow hood, plant the sterilized seeds on semi-solid MS medium plates. To do this, touch a sterile 200 μL pipette tip to the surface of the gel to allow for the seeds to stick and plant each seed where desired on the plate.
6. Seal the plates using surgical tape and store them for at least 48 h at 4 °C in the dark, for seed stratification.
7. Take the plates with the Arabidopsis seeds to a growth chamber for germination and seedling growth under controlled environmental conditions [Arabidopsis: 16/8 h light/dark cycle, 100 μmol m-2·s-1 light intensity (LED), 60% humidity at 21 °C (daytime)/15 °C (nighttime)]. The rice seeds can be sown without previous sterilization in a Petri plate on moist germination paper for 48 h at 28 °C or room temperature.
C. Planting and launching of the experiment
1. Fill the clear pots with 1.2–1.5 L of soil, depending on the degree of compaction of the soil source in use (Figure 1A). As you fill it, gently tap the bottom of the pot against the working surface at regular intervals for soil compaction. Ensure that the pot is completely filled with soil and minimize as much as possible differences in the height of the soil column among pots.
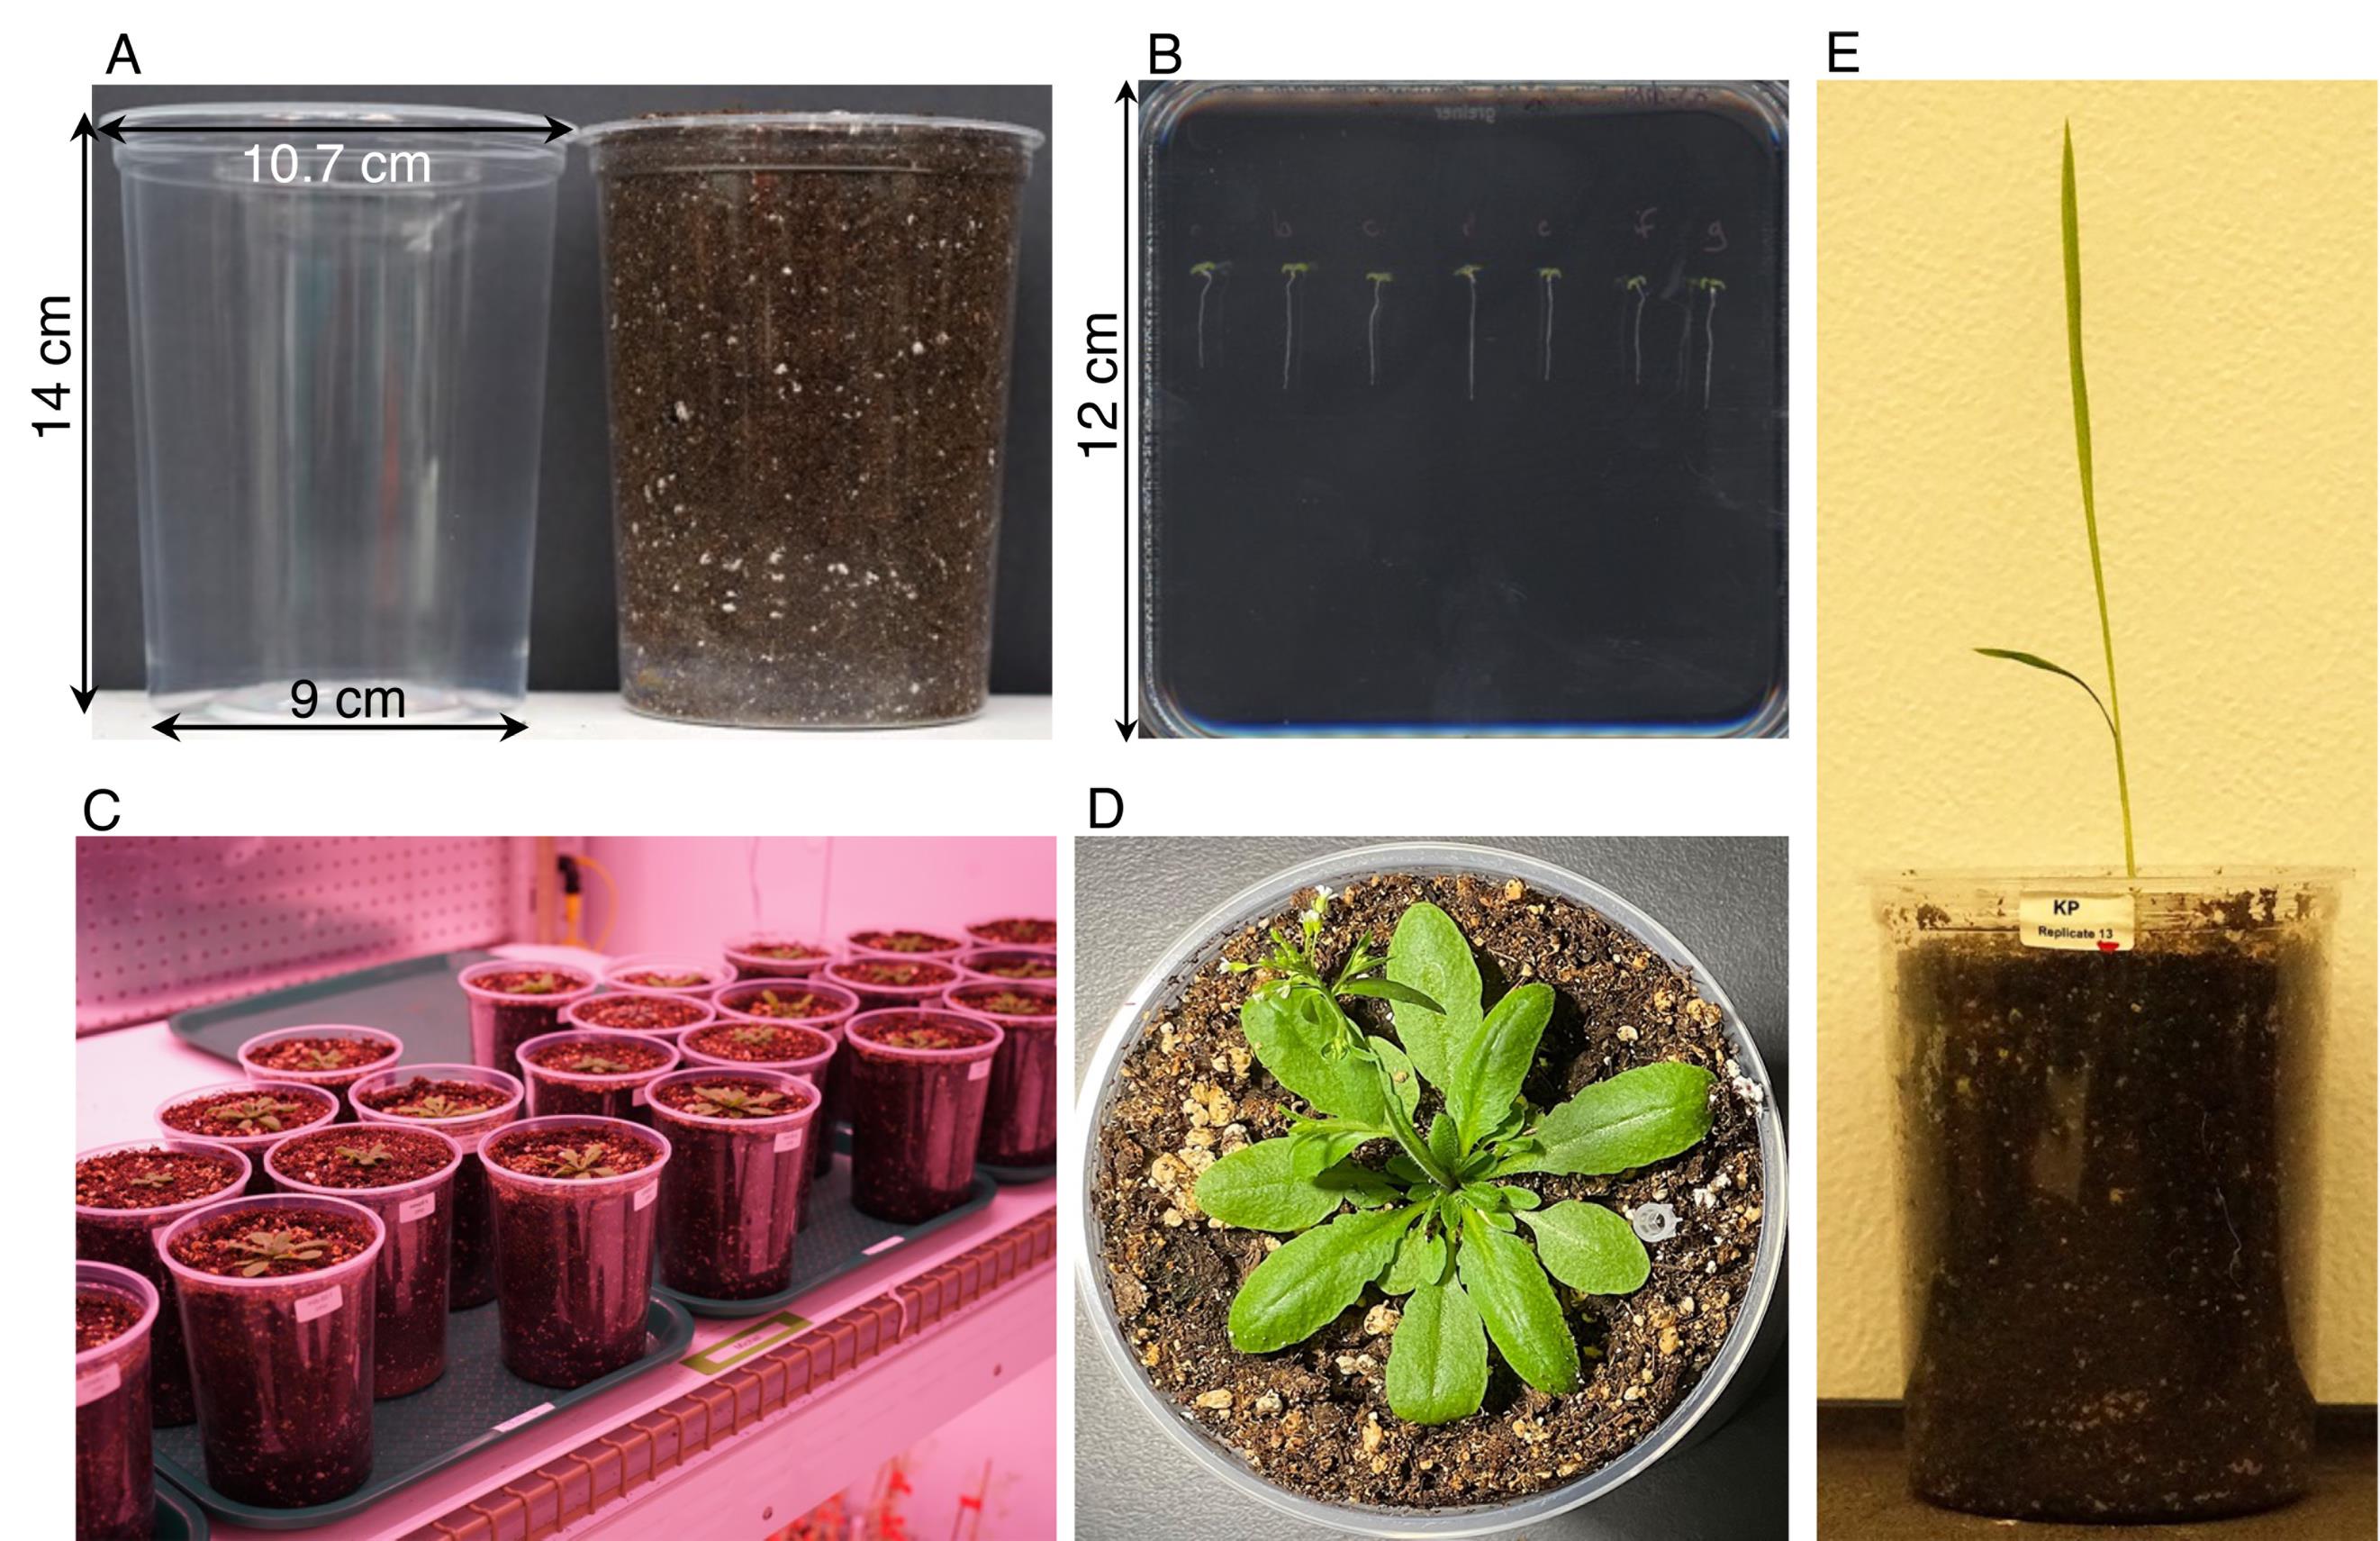
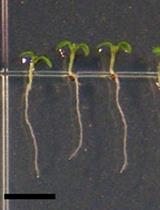
Figure 1. Planting and seedling development in a typical ClearDepth experiment. (A) Clear pots used in ClearDepth, before and after filling with soil. (B) 6–7-day-old Arabidopsis seedlings of the Mib-60 natural accession grown in MS phytagel plates, ready for transplantation into clear pots. (C) Clear pots from an Arabidopsis ClearDepth experiment conducted under controlled conditions, in a growth chamber [18 days after planting (DAP)]. (D) Example of an Arabidopsis (Mib-60) plant grown in a clear pot as part of a ClearDepth experiment (28 DAP). A pipette tip was used to mark the replicate in the figure as resolved. (E) Example of a rice plant (Kinandang Patong variety) grown in a clear pot as part of a ClearDepth experiment (13 DAP).
2. Gently pour 100 mL of tap water at the center of the pot filled with soil, in a circular manner (200 mL for rice).
3. Poke a 1.5 cm-deep, 1 cm-wide hole in the soil at the center of the pot. To assist with finding the center, use a piece of fabric or mesh that fits the circumference of the opening of the pot and has a 1 cm-wide hole in its center.
Note: Ensuring that the seedlings are planted exactly at the center of the pot is important to avoid artifactual differences in wall root depth among replicates due to more or less proximity of the growing roots to the walls of the pots.
4. Gently plant the pre-germinated, 6–7-day-old Arabidopsis seedlings (Figure 1B) (or 2-day-old rice seedlings) in the carved hole with the help of tweezers.
5. Pour an additional 100 mL of water (200 mL for rice), peripherally to the transplanted seedling.
6. Move the planted pots to a growth chamber for the start of the experiment [Arabidopsis: 16/8 h light/dark cycle, 100 μmol m-2·s-1 LED, 60% humidity at 21 °C (daytime)/15 °C (nighttime); rice: 16/8 h light/dark cycle, 200 μmol m-2·s-1 LED at 28 °C (daytime)/23 °C (nighttime)]. Figure 1C–E provides examples of Arabidopsis and rice seedlings as they grow in clear pots, during typical ClearDepth experiments.
Note: Root growth is known to be highly responsive to fluctuations in environmental factors. We therefore recommend positioning the pots following a pre-established randomized scheme to disperse the replicates of each genotype in order to mitigate potential positional effects unequally affecting plant and root growth. We also recommend covering the pots with a thin layer of a transparent material like Saran wrap for at least two days after planting (DAP), to maintain moisture and prevent the soil from drying while the freshly transplanted seedlings adapt to the new environment.
7. Gently water the pots twice a week, from above, with 100 mL of tap water (Arabidopsis) each time. For rice, water with 200 mL each time.
D. Measurements of WRS and estimations of root depth
1. Inspect the walls of the clear pots for the presence of wall roots at the pre-established phenotyping timepoints and mark the wall roots where they first emerge on the pot walls (Figures 2 and 3).
Notes:
1. Once marked, the WRS of individual wall roots can be measured at any time during or at the end of the experiment.
2. It is not possible to exclude the possibility that some wall roots return to the soil after touching the walls and reappear afterward. To minimize the likelihood of measuring the same wall root twice, consider only those separated by at least 5 mm from the closest neighbor.
3. In rare cases, the wall roots appear as clusters in a specific area of the pot wall as opposed to being scattered throughout the wall. Discard those replicates.
4. For both Arabidopsis and rice, we set five as the minimum number of wall roots (five single WRS measurements) necessary to estimate the depth of a root system. If there are fewer than five wall roots at the first time point of the phenotyping schedule, continue inspecting its walls for more roots for as many time points as needed. A pot or replicate is "resolved" when the pre-established minimum of wall roots is reached. No further inspection of the pot is needed at that point, and the depth of the root system can be estimated.
5. The schedule for the WRS measurements is set by the user. The first time point depends on how fast the first wall roots appear on the walls of the pots. In our experience, this happens around 17–21 DAP for shallow Arabidopsis accessions and 7–10 DAP for shallow rice varieties, but the possibility of an earlier onset in some genotypes should not be excluded. The method does not set a maximum of wall roots to average for estimations of mean WRS. As often happens, more than five wall roots can be found on the pot walls, and they should all be considered when estimating the mean WRS, to avoid bias. That being said, a large number of wall roots considerably extends the time needed to estimate the root depth, as it implies more individual WRS measurements. We therefore recommend avoiding late starts to the phenotyping phase. The final time point of the phenotyping schedule will depend on how long it takes for all replicates of all genotypes or experimental groups to be resolved. In our Arabidopsis studies, some replicates of deep-rooted mutants took as long as 45 days to be resolved, using our criteria of a minimum of five wall roots. How often pots are inspected for wall roots is also a choice made by the user. In our conditions, a schedule consisting of only four time points, most typically 21, 24, 28, and 35 DAP, proved effective for capturing differences in root depth between Arabidopsis genotypes and experimental groups with sensitivity and reproducibility. In some experiments, 25 and 29 instead of 24 and 28 DAP, respectively, were explored with similar results. For rice, whose root system typically grows much faster than that of Arabidopsis, we used the following schedules: 7, 10, 14, and 17 DAP, or a daily phenotyping schedule from 10 through 14 DAP.
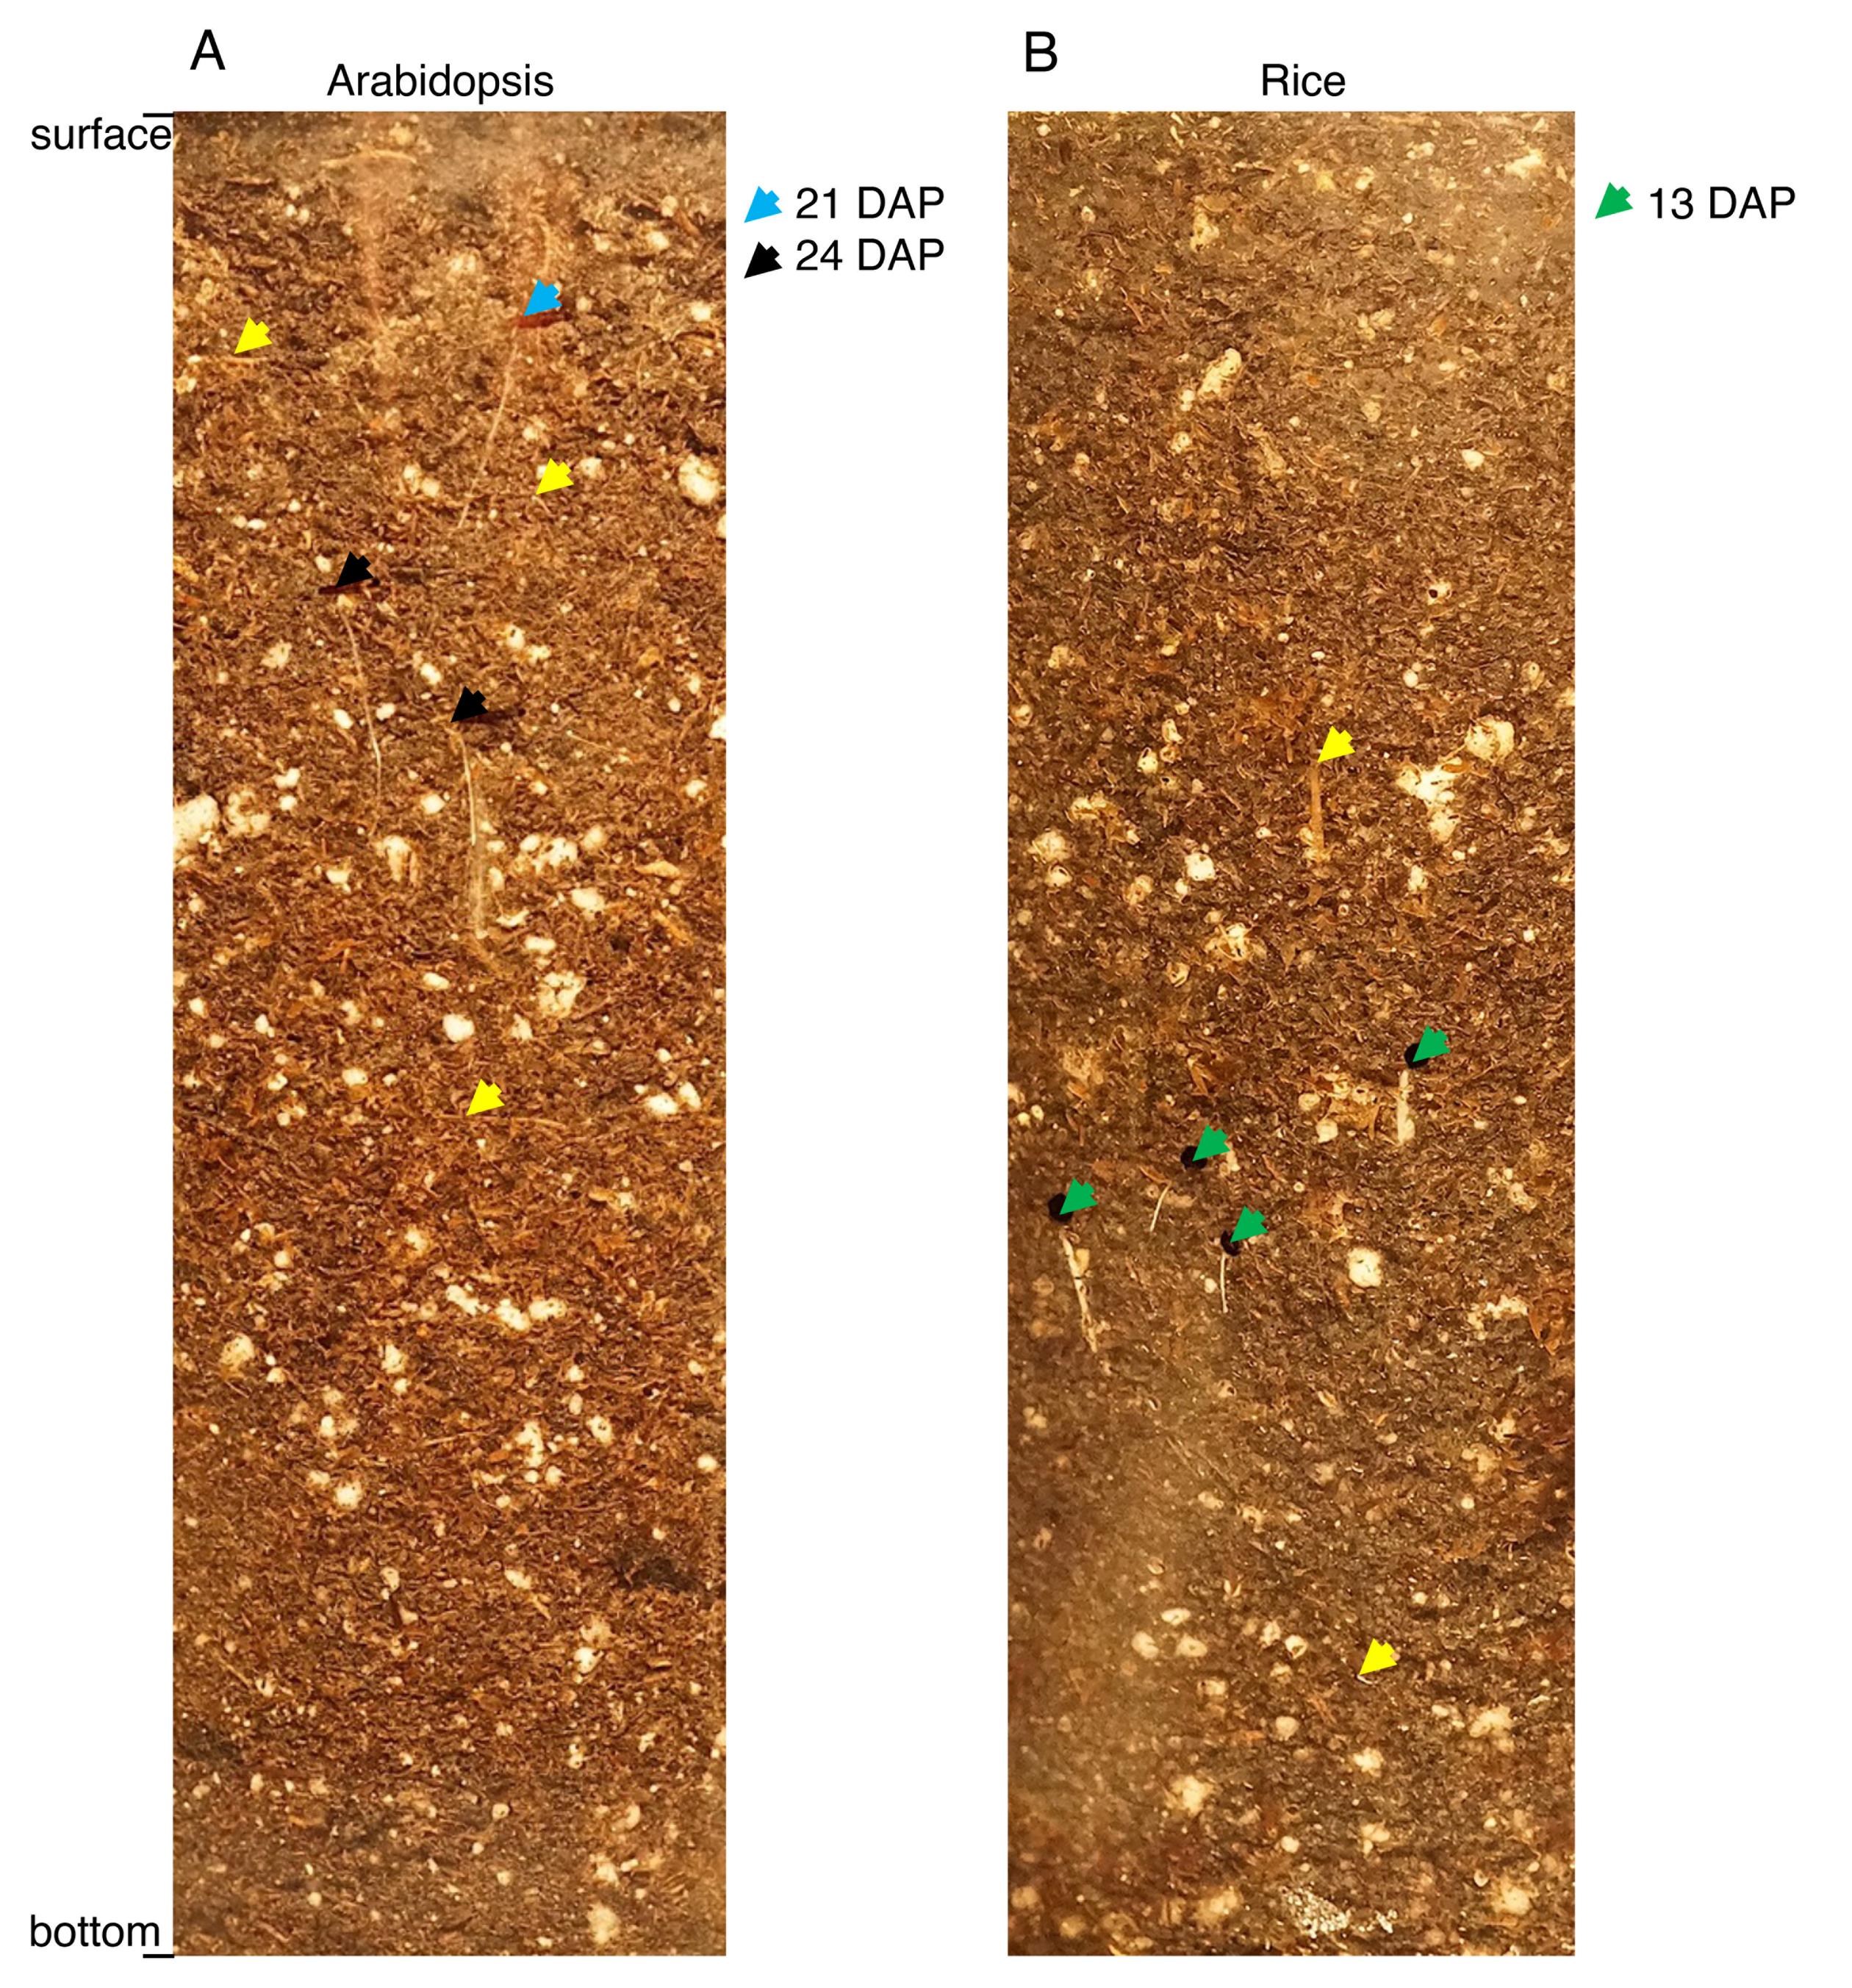
Figure 2. Examples of clear pot walls (sections) with Arabidopsis and rice wall roots. (A) Arabidopsis wall roots marked with light blue and black arrows were detected upon examination of the clear pot 21 and 24 days after planting (DAP), respectively. (B) Rice wall roots marked with green arrows were detected 13 days after planting. Yellow arrows indicate examples of straw and other plant materials that are not wall roots.
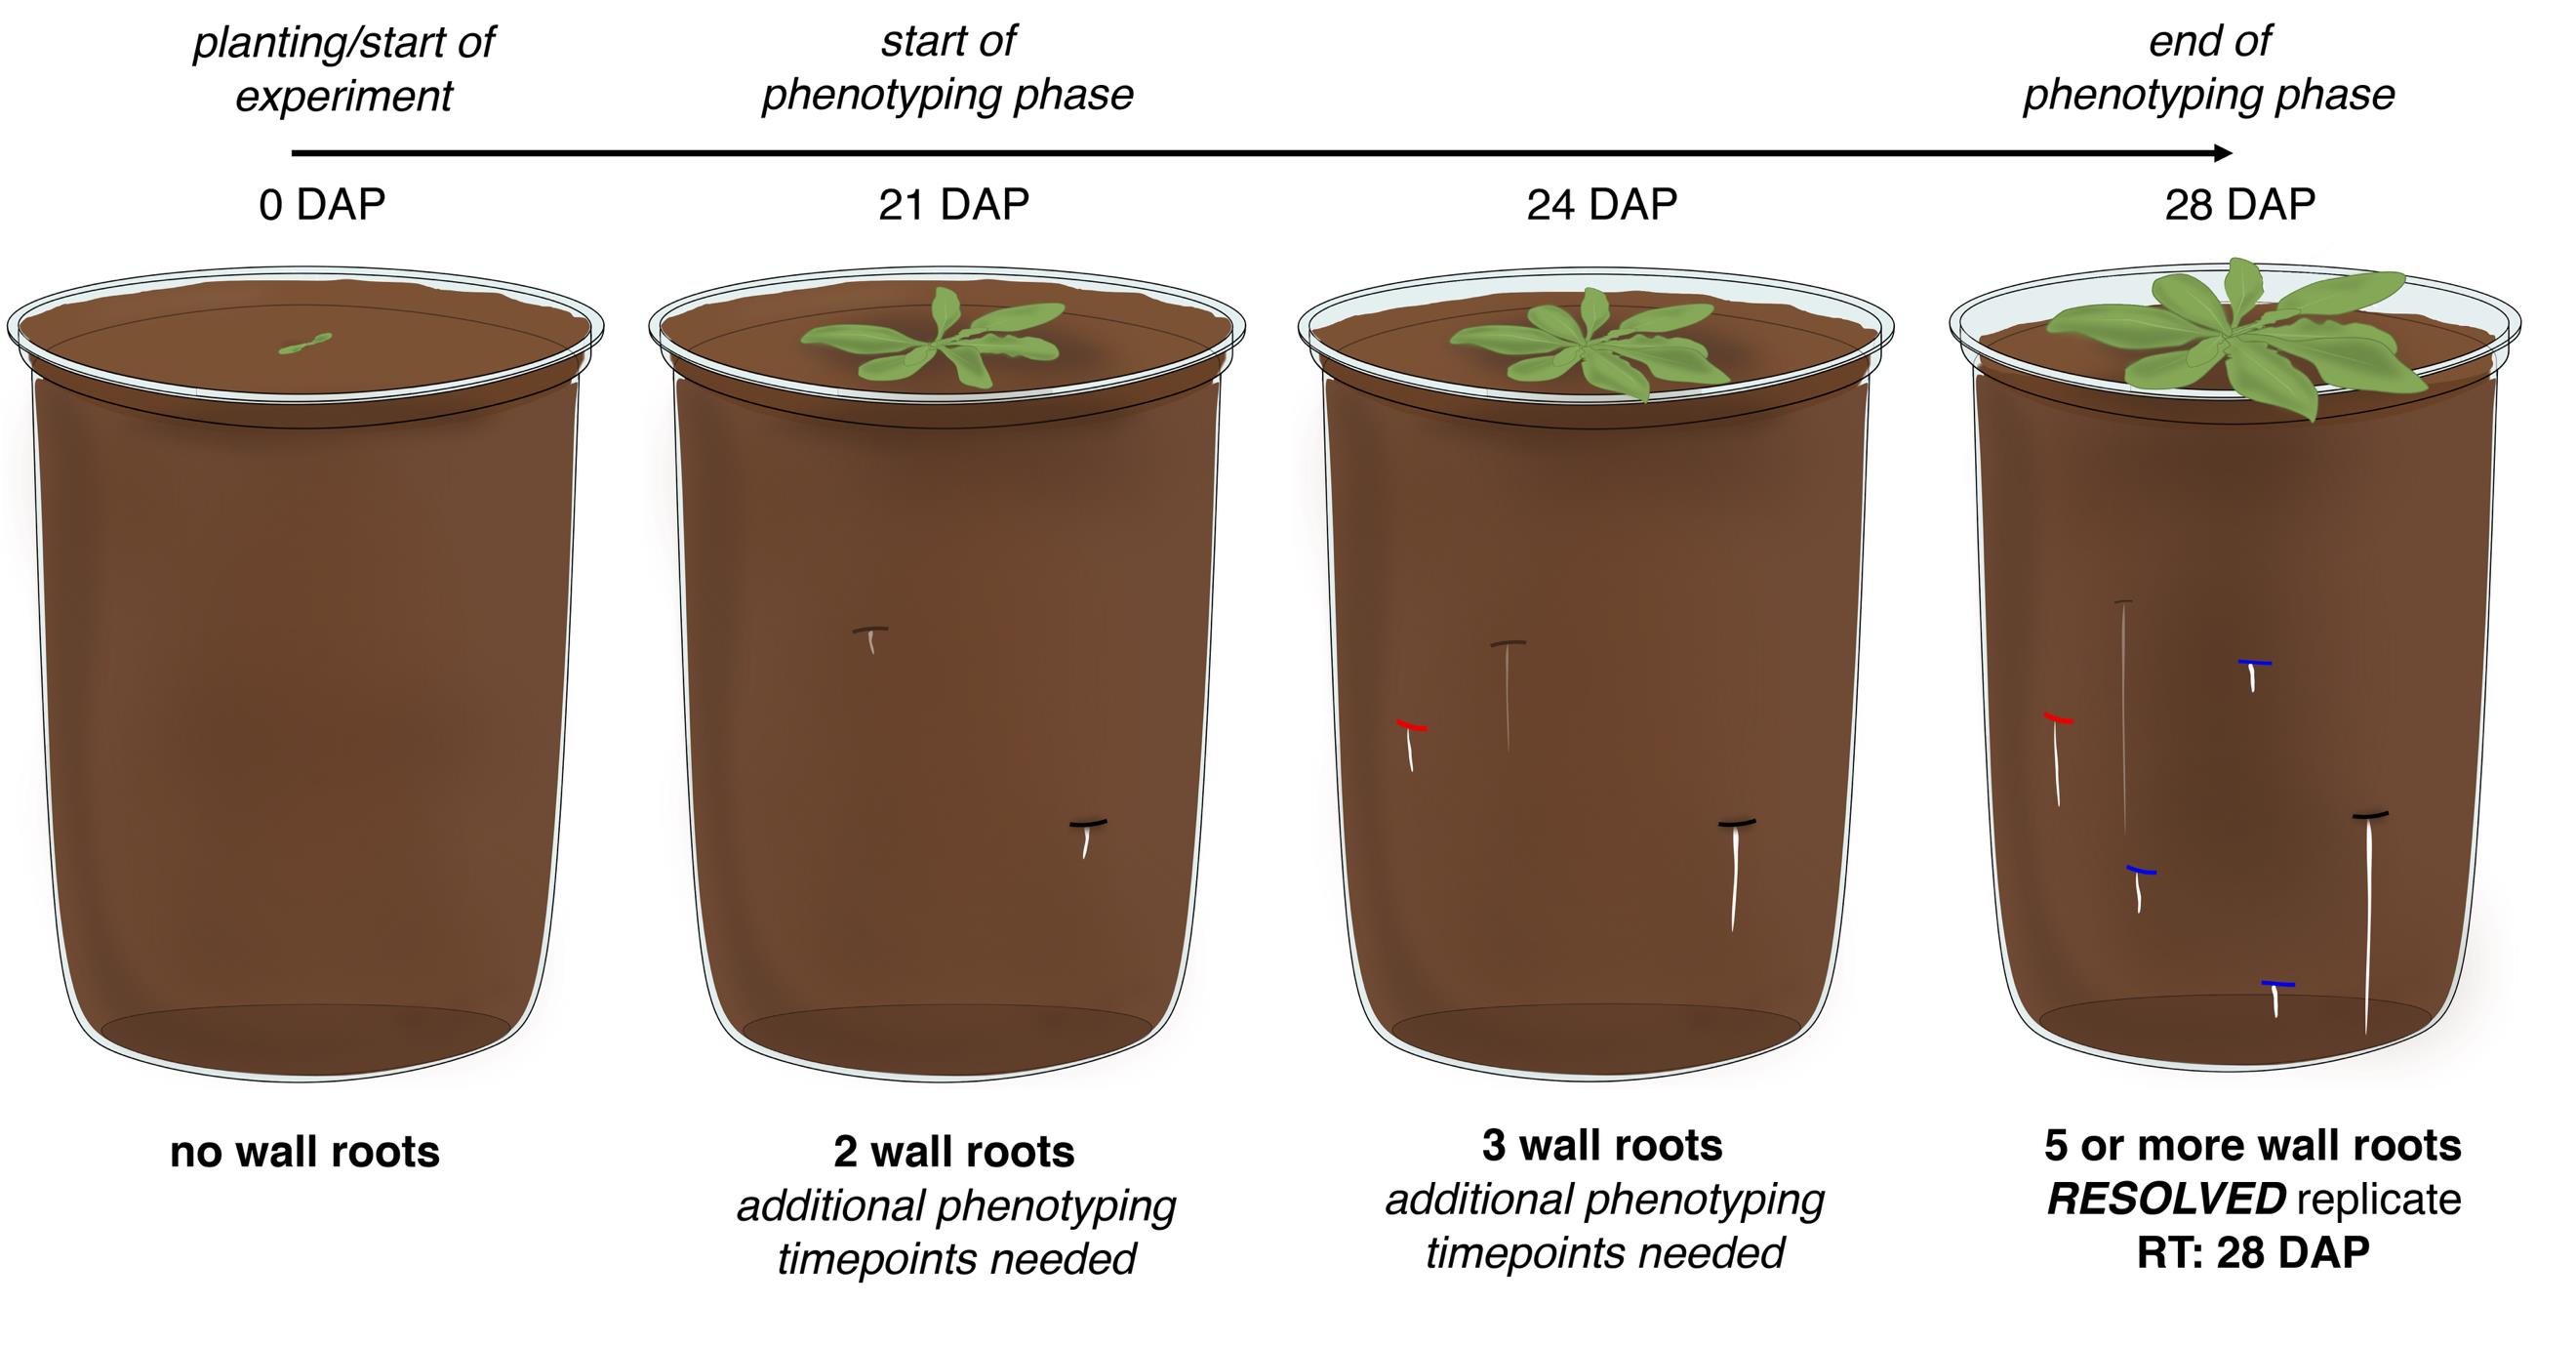
Figure 3. Workflow of a typical Arabidopsis ClearDepth experiment. On the day of planting, there are no wall roots on the walls of the pot. The appearance of the first wall roots marks the start of the phenotyping phase, 21 days after planting (DAP) in the example. The replicate in the example meets the requirement of five or more wall roots ("resolved") on the third pre-established phenotyping timepoint of 28 DAP. Wall roots detected on the first, second, and third timepoints are marked in black, red, and blue, respectively. RT: resolution time.
2. Measure the soil sinkage level (SSL) of the pot on the phenotyping timepoint when the pot is resolved (Figure 4).
Note: In our experience, watering the pots from above causes the soil column to sink from a few millimeters to more than one centimeter as the experiment progresses. Because the extent of the sinkage varies from pot to pot and among experiments, we normalize the WRS measurements by adding the SSL to the mean WRS. We measure the soil sinkage level as the shortest vertical distance between the upper edge of the pot and the surface of the soil in the center of the pot.
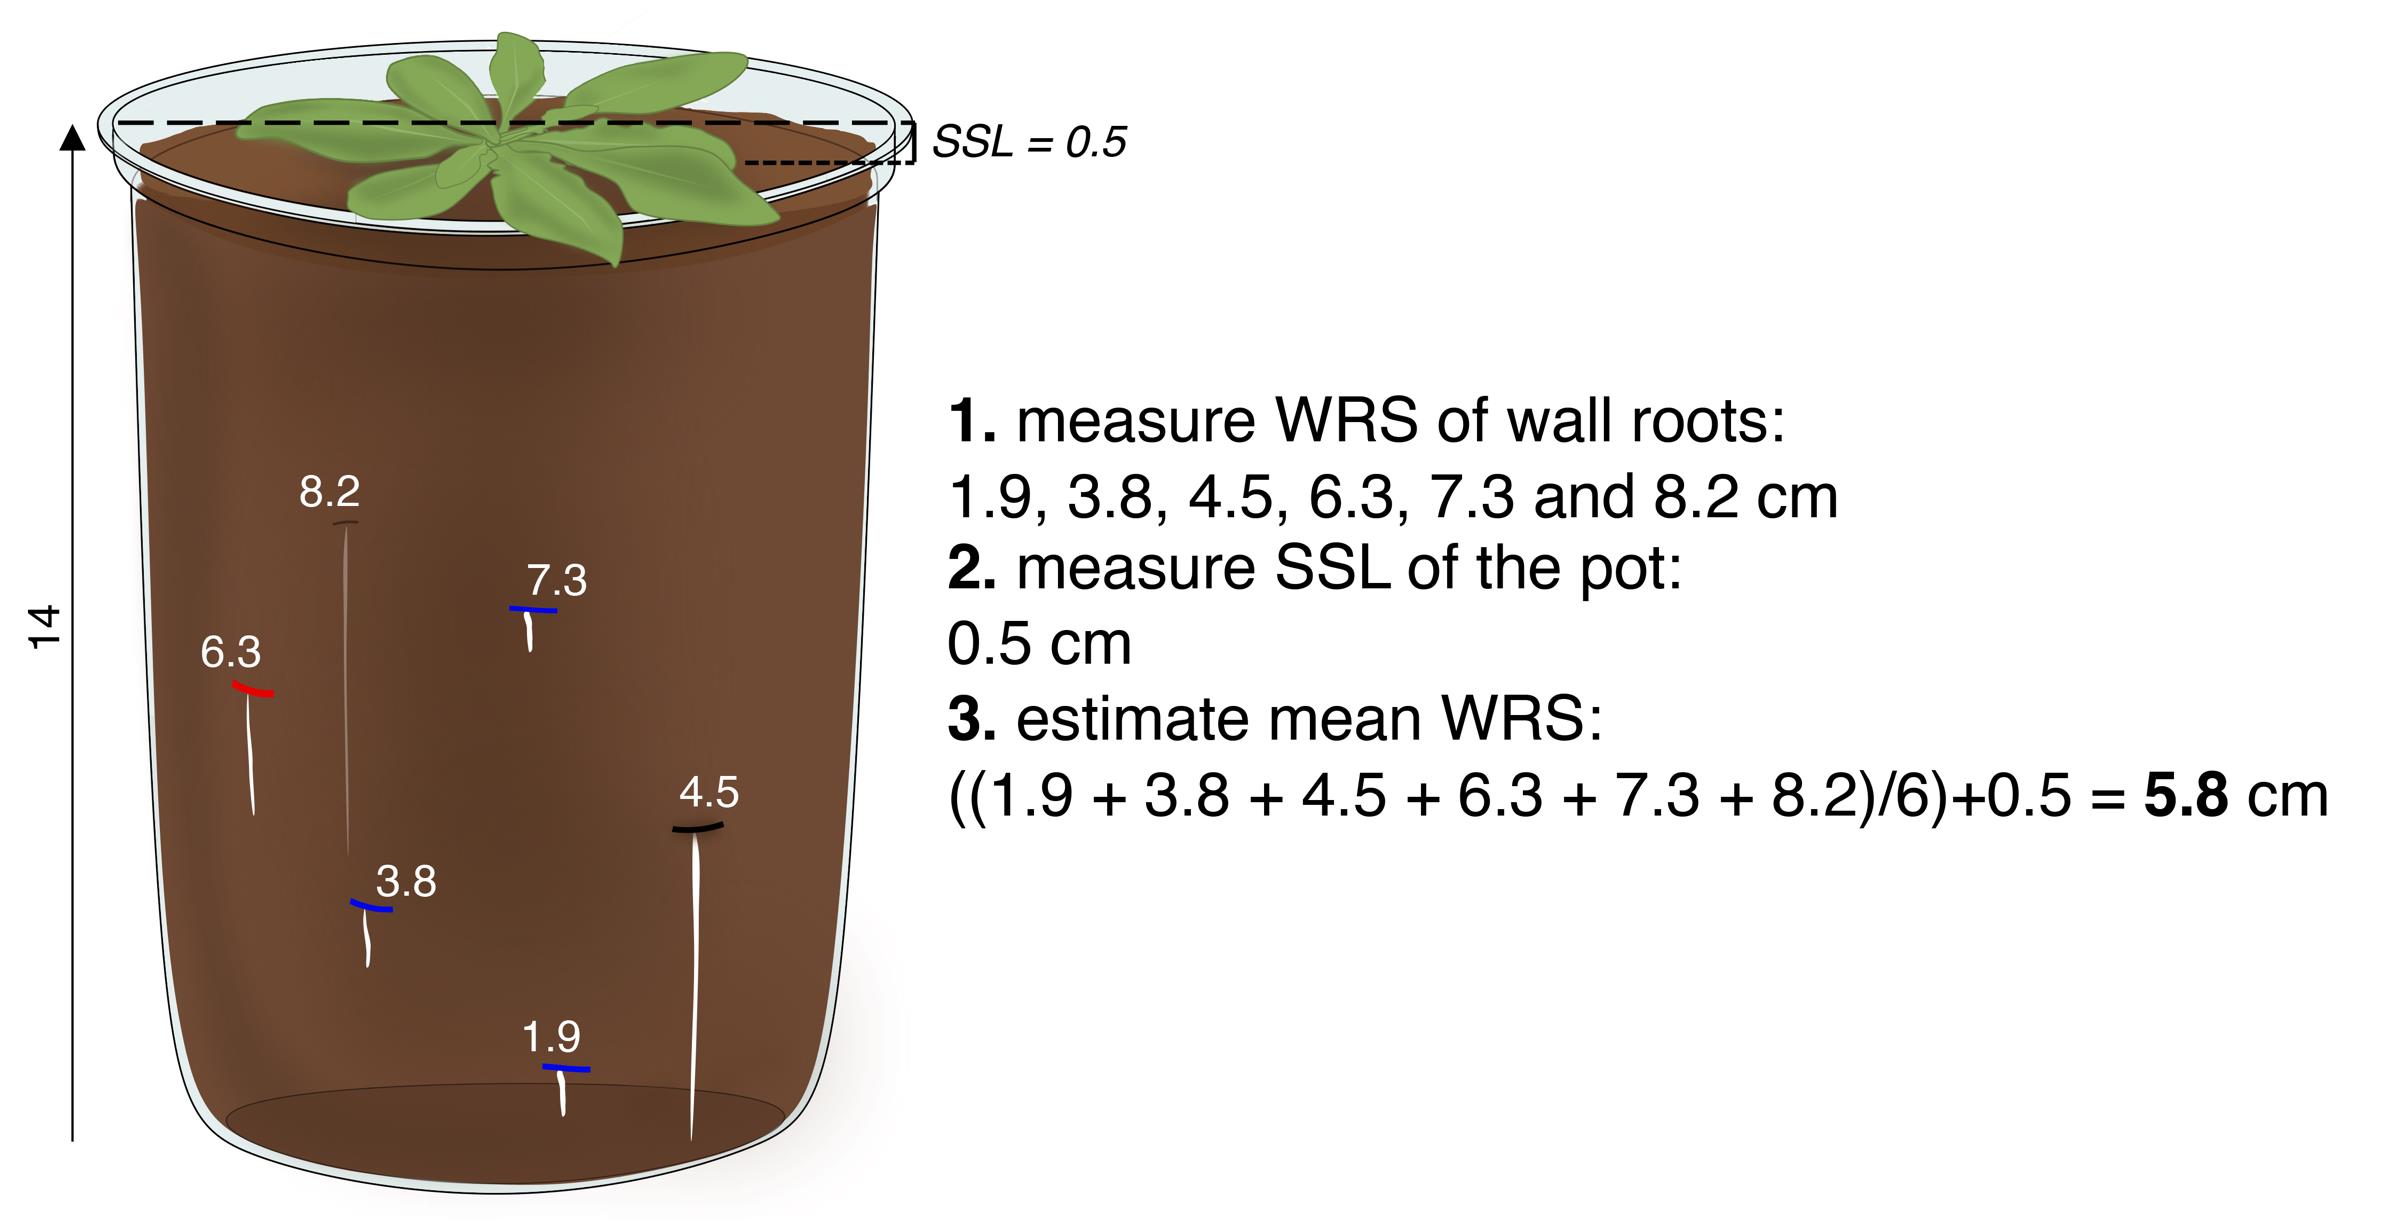
Figure 4. Measurements of wall root shallowness (WRS) and mean WRS. Once a replicate is resolved (5 or more wall roots), the depth of the root system in the pot can be expressed as the mean WRS or average of the WRS of the individual wall roots. All measurements are in centimeters. Discontinuous, horizontal black lines indicate the soil sinkage level (SSL).
3. Measure the distance from the bottom of the pot to the point where each wall root first touched the wall (WRS) and average the individual WRS measurements (mean WRS) (Figure 4).
4. Add the SSL of the pot to its mean WRS to express the depth of the root system in the pot (Figures 4 and 5A).
5. Average the mean WRS of all pots to express the mean WRS of the genotype or experimental group (Figure 5B).
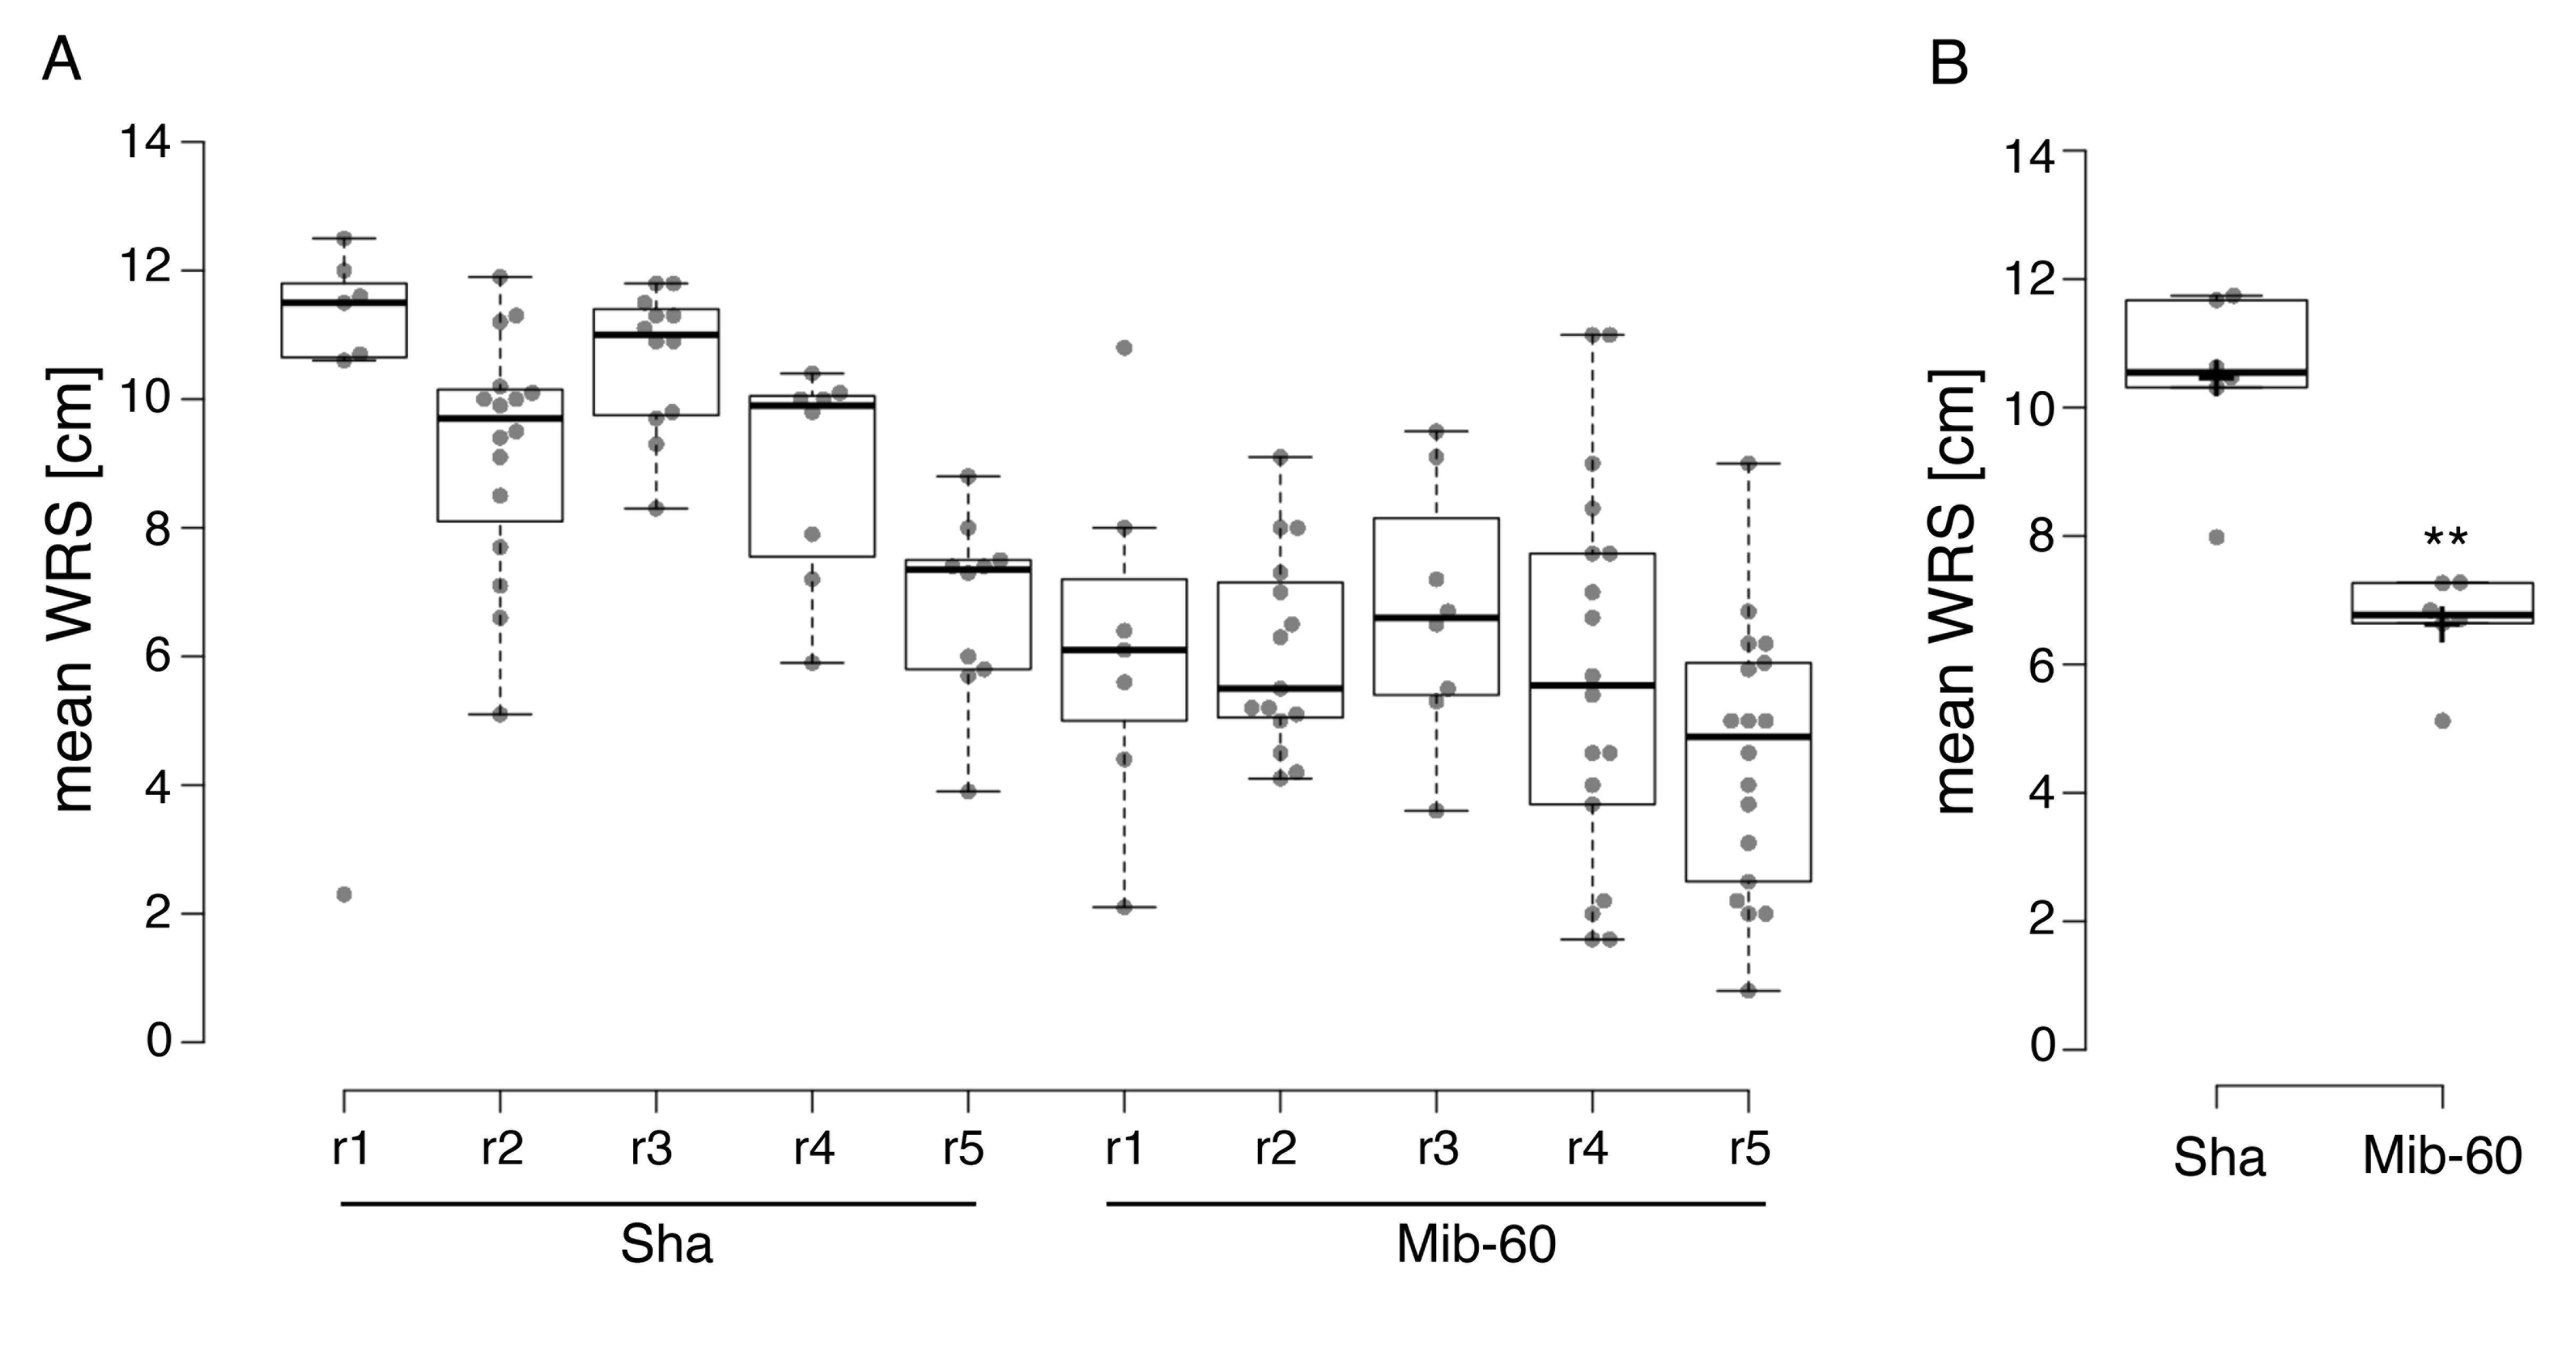
Figure 5. Example of the results of a ClearDepth experiment. Differences in root depth between the Arabidopsis natural accessions Sha and Mib-60 were assessed using ClearDepth with five replicates ("r") per accession. (A) The mean wall root shallowness (WRS) of each replicate was estimated. Dots represent WRS measurements of individual wall roots in the corresponding pot or replicate. (B) The root depth of the two accessions was compared by averaging the mean WRS of the corresponding replicates in A. Dots represent the mean WRS of individual pots or replicates. According to the results of this experiment, a root system representative of Mib-60 (mean WRS = 6.6 cm) is significantly deeper than a root system representative of Sha (mean WRS = 10.5 cm). Center lines show the medians; crosses show the means; box limits indicate the 25th and 75th percentiles; whiskers extend 1.5 times the interquartile range from the 25th and 75th percentiles. n = 5 replicates. Two asterisks in B denote a statistically significant difference (t-test, p < 0.01).
Data analysis
We recommend a minimum of five pots (replicates) per genotype or experimental group.
Standard Microsoft Excel software was used for data analysis and t-tests. The box plots in Figure 5 were generated using the statistical platform http://shiny.chemgrid.org/boxplotr/.
Validation of protocol
This protocol has been used and validated in the following research article:
• Ruiz Rosquete et al. [20] ClearDepth: a simple, robust, and low‐cost method to assess root depth in soil. The Plant Journal (Figure 1, Figure 2A–C, Figure 3F–H, Figure 4I, Figure 5, Figure 6, and Supplemental Figures 1 and 4).
For the validation of the protocol in the original article cited above, we performed multiple ClearDepth experiments with the Arabidopsis natural accessions Sha and Mib-60, previously characterized as shallow and deep, respectively [19]. In the case of rice, the varieties IR64 and Kinandang Patong (KP), previously described as shallow and deep, respectively [21], were used for validation purposes. The results published in our original article show that ClearDepth, through its main parameter, mean WRS, found Mib-60 root systems to be significantly deeper than Sha root systems, and KP root systems to be significantly deeper than IR64 root systems, in accordance with what was previously reported with the use of other methods [19,21].
General notes and troubleshooting
General notes
1. We validated the ClearDepth method with pots that remained exposed to light throughout the duration of the experiments. We assessed whether covering the pots to protect the roots from exposure to light alters the mean WRS and found a small yet significant difference between exposed pots (common procedure) and pots of the same genotype that were covered with a dark paper to limit exposure to light. Although the difference in mean WRS between covered and exposed replicates was of the same magnitude in the two Arabidopsis natural accessions tested (Sha and Mib-60), therefore not affecting the difference in depth between them, we suggest considering or testing the use of covered pots. Also, protecting from light exposure limits the growth of algae on the walls of the pots, in our experience.
2. We use pre-germinated Arabidopsis and rice seedlings in our ClearDepth experiments to eliminate the possibility of losing replicates because of no germination, which can be critical for large experiments, including different genotypes and a restricted number of replicates per genotype. If interested, the user can explore launching the experiment with seeds directly sown in soil instead of transplanted seedlings.
Acknowledgments
The authors would like to express their special thanks to A. Paez-Garcia for initial discussions on the use of clear pots. This research was supported by gifts to the Salk Institute's Harnessing Plants Initiative (HPI) from the Bezos Earth Fund, the Hess Corporation, and the TED Audacious Project. The Graphical overview was created with Inkscape. M.R.R. and W.B. conceived the study and designed the experiments. W.B. supervised work and provided funds and resources. M.R.R. and W.B. wrote the manuscript. M.R.R., J.G., K.W., and N.G. conducted and analyzed the experiments. J.G. created the cartoons. S.P. advised and assisted with the rice experiments. All the authors discussed the results and commented on the manuscript.
The original research paper in which the protocol was described and validated is [20].
Competing interests
W.B. is a co-founder of Cquesta, a company that works on crop root growth and carbon sequestration.
References
- Bonser, A. M., Lynch, J. P. and Snapp, S. (1996). Effect of phosphorus deficiency on growth angle of basal roots in Phaseolus vulgaris. New Phytol. 132: 281–288. https://doi.org/10.1111/j.1469-8137.1996.tb01847.x
- Ho, M. D., Rosas, J. C., Brown, K. M. and Lynch, J. P. (2005). Root architectural tradeoffs for water and phosphorus acquisition. Funct Plant Biol. 32(8): 737–748. https://doi.org/10.1071/FP05043
- Miguel, M. A., Postma, J. A. and Lynch, J. P. (2015). Phene synergism between root hair length and basal root growth angle for phosphorus acquisition. Plant Physiol. 167(4):1430–1439. https://doi.org/10.1104/pp.15.00145
- Lynch, J. P. (2013). Steep, cheap and deep: an ideotype to optimize water and N acquisition by maize root systems. Ann Bot. 112(2): 347–357. https://doi.org/10.1093/aob/mcs293
- Dresbøll, D. B. and Thorup‐Kristensen, K. (2014). Will breeding for nitrogen use efficient crops lead to nitrogen use efficient cropping systems?: a simulation study of G×E×M interactions. Euphytica. 199: 97–117. https://doi.org/10.1007/s10681-014-1199-9
- Feng, X., Jia, L., Cai, Y., Guan, H., Zheng, D., Zhang, W., Xiong, H., Zhou, H., Wen, Y., Hu, Y., et al. (2022). ABA-inducible DEEPER ROOTING 1 improves adaptation of maize to water deficiency. Plant Biotechnol J. 20(11): 2077–2088. https://doi.org/10.1111/pbi.13889
- Johnson, D. M., Sherrard, M. E., Domec, J. C. and Jackson, R. B. (2014). Role of aquaporin activity in regulating deep and shallow root hydraulic conductance during extreme drought. Trees. 28: 1323–1331. https://doi.org/10.1007/s00468-014-1036-8
- Uga, Y., Sugimoto, K., Ogawa, S., Rane, J., Ishitani, M., Hara, N., Kitomi, Y., Inukai, Y., Ono, K., Kanno, N., et al. (2013). Control of root system architecture by DEEPER ROOTING 1 increases rice yield under drought conditions. Nat Genet. 45(9): 1097–1102. https://doi.org/10.1038/ng.2725
- Kell, D. B. (2011). Breeding crop plants with deep roots: their role in sustainable carbon, nutrient and water sequestration. Ann Bot. 108(3): 407–418. https://doi.org/10.1093/aob/mcr175
- Pierret, A., Maeght, J. L., Clément, C., Montoroi, J. P., Hartmann, C. and Gonkhamdee, S. (2016). Understanding deep roots and their functions in ecosystems: an advocacy for more unconventional research. Ann Bot. 118(4): 621–635. https://doi.org/10.1093/aob/mcw130
- Eckardt, N., Ainsworth, E. A., Bahuguna, R. N., Broadley, M. R., Busch, W., Carpita, N. C., Castrillo, G., Chory, J., DeHaan, L. R., Duarte, C. M., et al. (2023). Climate change challenges, plant science solutions. Plant Cell. 35(1):24–66. https://doi.org/10.1093/plcell/koac303
- Maeght, J. L., Rewald, B. and Pierret, A. (2013). How to study deep roots—and why it matters. Front Plant Sci. 13(4): 299. https://doi.org/10.3389/fpls.2013.00299
- Johnson, M. G., Tingey, D.T., Phillips, D. L. and Storm, M. J. (2001). Advancing fine root research with minirhizotrons. Environ Exp Bot. 45(3): 263–289. https://doi.org/10.1016/s0098-8472(01)00077-6
- Arifuzzaman, M., Oladzadabbasabadi, A., McClean, P. and Rahman, M. (2019). Shovelomics for phenotyping root architectural traits of rapeseed/canola (Brassica napus L.) and genome-wide association mapping. Mol Genet Genomics. 294(4): 985–1000. https://doi.org/10.1007/s00438-019-01563-x
- Narisetti, N., Henke, M., Seiler, C., Junker, A., Ostermann, J., Altmann, T. and Gladilin, E. (2021). Fully-automated root image analysis (faRIA). Sci-Rep. 11(1): 16047. https://doi.org/10.1038/s41598-021-95480-y
- Perret, J., Al-Belushi, M. and Deadman, M. (2007). Non-destructive visualization and quantification of roots using computed tomography. Soil Biol Biochem. 39(2): 391–399. https://doi.org/10.1016/j.soilbio.2006.07.018
- Tracy, S. R., Roberts, J. A., Black, C. R., McNeill, A., Davidson, R. and Mooney, S. J. (2010). The X-factor: visualizing undisturbed root architecture in soils using X-ray computed tomography. J Exp Bot. 61(2): 311–313. https://doi.org/10.1093/jxb/erp386
- Rellán-Álvarez, R., Lobet, G., Lindner, H., Pradier, P. L., Sebastian, J., Yee, M., Geng, Y., Trontin, C., LaRue, T., Schrager-Lavelle, A., et al. (2015). GLO-Roots: an imaging platform enabling multidimensional characterization of soil-grown root systems. eLife. 19(4): e07597. https://doi.org/10.7554/eLife.07597
- Ogura, T., Goeschl, C., Filiault, D., Mirea, M., Slovak, R., Wolhrab, B., Satbhai, S. and Busch, W. (2019). Root system depth in Arabidopsis is shaped by EXOCYST70A3 via the dynamic modulation of auxin transport. Cell. 178(2): 400–412. https://doi.org/10.1016/j.cell.2019.06.021
- Ruiz Rosquete, M., Gonzalez, J., Wertz, K., Gonzalez, N., Baez, M., Wang, L., Zhang, L., Patil, S., Funaro, L. and Busch, W. (2025). ClearDepth: a simple, robust, and low-cost method to assess root depth in soil. Plant J. 121(1): e17177. https://doi.org/10.1111/tpj.17177
- Uga, Y., Okuno, K. and Yano, M. (2011). Dro1, a major QTL involved in deep rooting of rice under upland field conditions. J Exp Bot. 62(8): 2485–2494. https://doi.org/10.1093/jxb/erq429
Article Information
Publication history
Received: May 12, 2025
Accepted: Jul 10, 2025
Available online: Aug 5, 2025
Published: Aug 20, 2025
Copyright
© 2025 The Author(s); This is an open access article under the CC BY-NC license (https://creativecommons.org/licenses/by-nc/4.0/).
How to cite
Rosquete, M. R., Gonzalez, J., Gonzalez, N., Wertz, K., Patil, S. and Busch, W. (2025). ClearDepth Method for Evaluations of Root Depth in Soil-Filled Pots. Bio-protocol 15(16): e5425. DOI: 10.21769/BioProtoc.5425.
Category
Plant Science > Plant physiology > Phenotyping
Plant Science > Plant developmental biology > Gravitropism
Do you have any questions about this protocol?
Post your question to gather feedback from the community. We will also invite the authors of this article to respond.