- Protocols

- Articles and Issues
- For Authors
- About
- Become a Reviewer

Intravitreal NHS-Biotin Injection and Immunohistochemistry to Label and Image Protein Transport in the Mouse Optic Nerve
Published: Vol 15, Iss 16, Aug 20, 2025 DOI: 10.21769/BioProtoc.5419 Views: 2742
Reviewed by: Geoffrey C. Y. LauAnonymous reviewer(s)
Original research article
The authors used this protocol in:
Jan 2022
Advertisement


Protocol Collections
Comprehensive collections of detailed, peer-reviewed protocols focusing on specific topics


Related protocols
Abstract
The process of moving proteins and organelles along the axon is essential for neuronal survival and function, ensuring proper communication between the cell body and distant synapses. The efficient and precise delivery of proteins via axon transport is critical for processes ranging from synaptic plasticity and neurotransmission to neuronal growth and maintenance. However, the identities of all the transported proteins have only recently begun to be investigated. Retinal ganglion cells (RGCs) provide a unique opportunity for access to central nervous system (CNS) axons as the retina is located outside the brain in the eye, with long axonal projections (~1 cm in mouse) that innervate the brain. We have developed and optimized methods for unbiased in vivo protein labeling in rodent RGC somata with intravitreal N-hydroxysuccinimido (NHS)-biotin and subsequent visualization of transported proteins along the optic nerve using confocal microscopy. Here, we describe these procedures in detail.
Key features
• Expands on the intravitreal injection method presented in Schiapparelli et al. [1] and extends it to whole mount optic nerve immunolabeling.
• Unbiased in vivo labeling of proteins in the mouse central nervous system.
• Optimized mouse intravitreal injection procedure using glass needles to reduce injury and costs.
• Immunofluorescent imaging of the cleared intact optic nerve to visualize transported labeled proteins.
Keywords: Axon transportGraphical overview
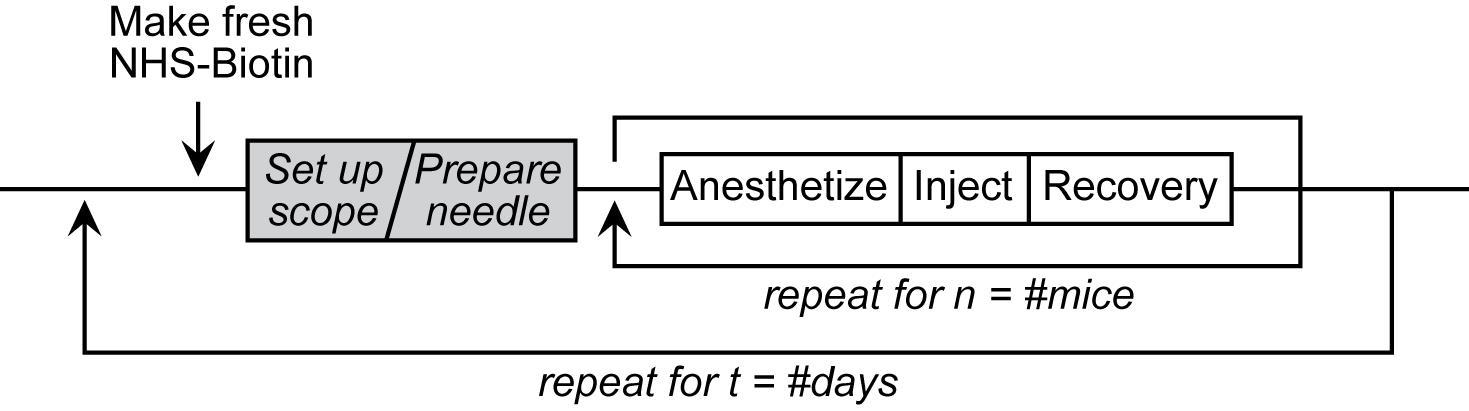
Intravitreal Injection Workflow
Background
In the vertebrate visual system, retinal ganglion cells (RGCs) in the eye extend axons through the optic nerve to retinorecipient target areas in the brain that process visual information. Proteins perform many essential functions in cells, and the capacity to perform these functions depends on their subcellular distribution. Protein distribution in cells is tightly regulated, particularly in neurons, which are highly polarized with different cellular compartments in axons, dendrites, and cell bodies. A primary means of regulating protein distribution is by controlling their transport into axons and dendrites. To identify proteins that are transported from RGC somata into axons and synaptic targets in vivo, we labeled proteins in the retina in rodents using intravitreal injections of N-hydroxysuccinimidobiotin (NHS-biotin) and analyzed biotinylated proteins in optic nerves and their projections in the visual system using immunohistochemical, biochemical, and mass spectrometry methods. These studies identified thousands of proteins that are transported along RGC axons from the cell bodies in the retina to the presynaptic axon terminals in the target areas, including the lateral geniculate nucleus (LGN) and superior colliculus (SC) [1–3].
In vivo protein biotinylation with NHS-biotin has many advantages for the investigation of protein identification, distribution, and function: NHS-biotin is a membrane-permeable biotin reagent that binds covalently to exposed lysines and N-terminal amino acids of proteins, resulting in extensive protein labeling. Biotin is a naturally occurring molecule that binds to many proteins without altering their function or activities. NHS-biotin cannot be re-incorporated into other proteins after protein degradation because the succinimide group is quenched after reacting with amino groups and because the resulting biotin-tagged amino acids, such as biotinyl-lysine, cannot be charged onto tRNAs [4]. Injecting NHS-biotin in the relatively large intravitreal space in the eye, ~2 mm away from the neural retina, avoids damaging the retina or the optic nerve and allows NHS-biotin to be taken up by retinal cells that line the back of the eye, including RGC cell bodies. The intravitreal chamber serves as a natural reservoir for the injected NHS-biotin, increasing the opportunity for protein labeling. NHS-biotin-labeled proteins distribute throughout RGC cells, including axons and dendrites. The optic nerve exits the back of the eye and extends to the brain, so that proteins that are transported along the optic nerve to the LGN, SC, and other targets in the brain can be captured by isolating the optic nerves. Proteins that are transported to the retinorecipient targets can be identified and characterized by local dissection of the target areas [2]. We call this population of proteins the transported proteome, or the transportome. A subset of proteins that are transported from the RGC cell bodies to the LGN are further transported via geniculocortical axons to the visual cortex [1]. As additional uses, we applied this in vivo intravitreal protein labeling strategy to mice with mutations in motor proteins and demonstrated molecular mechanisms underlying protein transport [3]. Also, we used intravitreal injection of the noncanonical amino acid azidohomoalanine to label newly synthesized RGC proteins in a model of glaucoma-induced optic nerve injury, and identified changes in transport of newly synthesized proteins in response to optic nerve injury [5]. Additionally, we injected NHS-biotin unilaterally into one cortical lobe in mouse pups to label intercortical callosal axons [1]. Together, these studies represent a range of applications of intravitreal protein labeling strategies.
Here, we present a detailed protocol for intravitreal NHS-biotin injections, optic nerve dissection, and methods for minimally invasive and unbiased in vivo labeling of proteins and immunostaining of whole optic nerve samples to investigate protein transport along the entire optic nerve, enabling analysis of protein transport in the optic nerves of animals of different ages and genotypes.
Materials and reagents
Intravitreal injections
1. EZ-Link NHS-biotin (ThermoFisher, catalog number: 20217)
2. Hybri-Max DMSO (Sigma, catalog number: D2650)
3. 1.5 mL microfuge tubes (regular and light-blocking amber or cover with foil)
4. 0.22 μm centrifugal filters (MilliporeSigma, catalog number: UFC30GV0S)
5. 1 mL syringe [(BD, catalog number: 309659) or gel-loading tips (Eppendorf, catalog number: 930001007)]
6. Borosilicate glass capillaries (Sutter, catalog number: BF-150-110-10)
7. Ruler (metric)
8. Fine-tip permanent marker
9. Reverse-action/Self-closing forceps (Fine Science Tools, catalog number: 11487-11)
10. Whetstone or sandpaper (Fine Science Tools, catalog number: 29008-22)
11. Mineral oil
12. #55 forceps (Fine Science Tools, catalog number: 11255-30)
13. Absorbent underpads (VWR, catalog number: 56617-014)
14. Lab tape
15. Heating pads (2)
16. Anesthesia nose cone + tubing (Kent Scientific, catalog numbers: SOMNO-0801, SOMNO-0602)
17. Anesthesia induction chamber + tubing (Kent Scientific, catalog number: SOMNO-0710)
18. Ophthalmic ointment (Henry Schein, catalog number: 1371627)
19. Triple antibiotic ointment (Henry Schein, catalog number: 5703130)
20. Sterile cotton swabs
21. Isoflurane
22. VaporGuard gas scavengers (VetEquip, catalog number: 931401)
23. Mice (experiment-specific genotype; albino strains are ideal for learning/training)
24. Disposable nitrile gloves, lab coat, and additional PPE as needed
Dissection
Note: All dissections were performed as described by Cameron et al. [6]. Please refer to the referenced Bio-protocol article for a list of reagents and tools necessary to complete dissections.
1. 16% Paraformaldehyde ampules (Electron Microscopy Sciences, catalog number: 15710)
Immunolabeling
1. 16% Paraformaldehyde ampules (Electron Microscopy Sciences, catalog number: 15710)
2. Slides
3. 1.5 mL microfuge tubes
4. 48-well plate (can be reused)
5. Parafilm
6. No. 15 (or smaller) Feather scalpel (Electron Microscopy Sciences, catalog number: 7204215)
7. #1.5 Coverslips
8. Embryo/Ring forceps (Fine Science Tools, catalog number: 11103-09)
9. Pipetman + tips
10. Fine-tipped transfer pipettes (Samco, catalog number: 235)
11. Goat anti-biotin antibody (Thermo, catalog number: 31852)
12. Alexa-568 donkey-anti-goat antibody (Invitrogen, catalog number: A11057)
13. Hoechst 33342 (AnaSpec, catalog number: AS-83218)
14. FocusClear clearing solution (CelExplorer, catalog number: FC-101)
15. MountClear mounting media (CelExplorer, catalog number: MC-301)
Solutions
1. PTx wash buffer (see Recipes)
2. Permeabilization buffer (see Recipes)
3. Block-Perm buffer (see Recipes)
4. Block-antibody buffer (see Recipes)
Recipes
1. PTx wash buffer (1 L)
1× PBS pH 7.4 + 0.1% Triton X-100
2. Permeabilization buffer (50 mL)
1× PBS pH 7.4 + 0.5% Triton X-100
3. Block-Perm buffer (20 mL)
Permeabilization buffer + 4% bovine serum albumin + 1% donkey serum
4. Block-antibody buffer (20 mL)
PTx wash buffer + 4% bovine serum albumin + 1% donkey serum
Equipment
1. Bunsen burner
2. Sutter glass puller (Sutter Instruments, model: P-97), fitted with a box filament (FB330B)
3. Microfuge
4. Dissecting microscope with ample working distance and light source
5. PicoSpritzer (Parker, catalog number: 052-0500-900) (or Toohey Spritzer or other back-pressured injection system)
6. Micromanipulator (Narshige, model: MM-3)
7. Magnetic base (Narshige, model: GJ-8)
8. Iron plate (Narshige, IP)
9. Anesthesia machine/Hi-Flow Precision Vaporizer for isoflurane administration
10. Pelco BioWave Pro (Ted Pella, catalog number: 36700)
11. Orbital mixer/rotator (Light Labs, Mini LabRoller, catalog number: H5500)
Procedure
A. Preparation for injections
1. Grind down reverse action forceps:
a. Under the dissecting scope, put mineral oil onto a whetstone.
b. Using the whetstone and mineral oil, grind down the tip of the reverse-action forceps to make it blunt and safer for the mouse.
2. Score glass capillaries (Figure 1A, B):
a. Using a ruler and tape, create a guide for scoring the glass capillaries.
b. Tape down one (or several) glass capillaries against the metric side of the ruler.
c. Use a fine-point permanent marker to carefully mark a line every 2 mm.
d. Note that 2 mm = 2 μL for the glass specified here (10 cm holds 100 μL). Results will vary if different inner and outer diameter glass capillaries are used.
e. The gradations will not be perfectly straight, particularly at the edges, due to the curvature of the glass capillaries (Figure 1B, C). The level is measured by the meniscus at the center of the gradation, and small variations should only affect the injection volume by 0.1–0.2 μL.
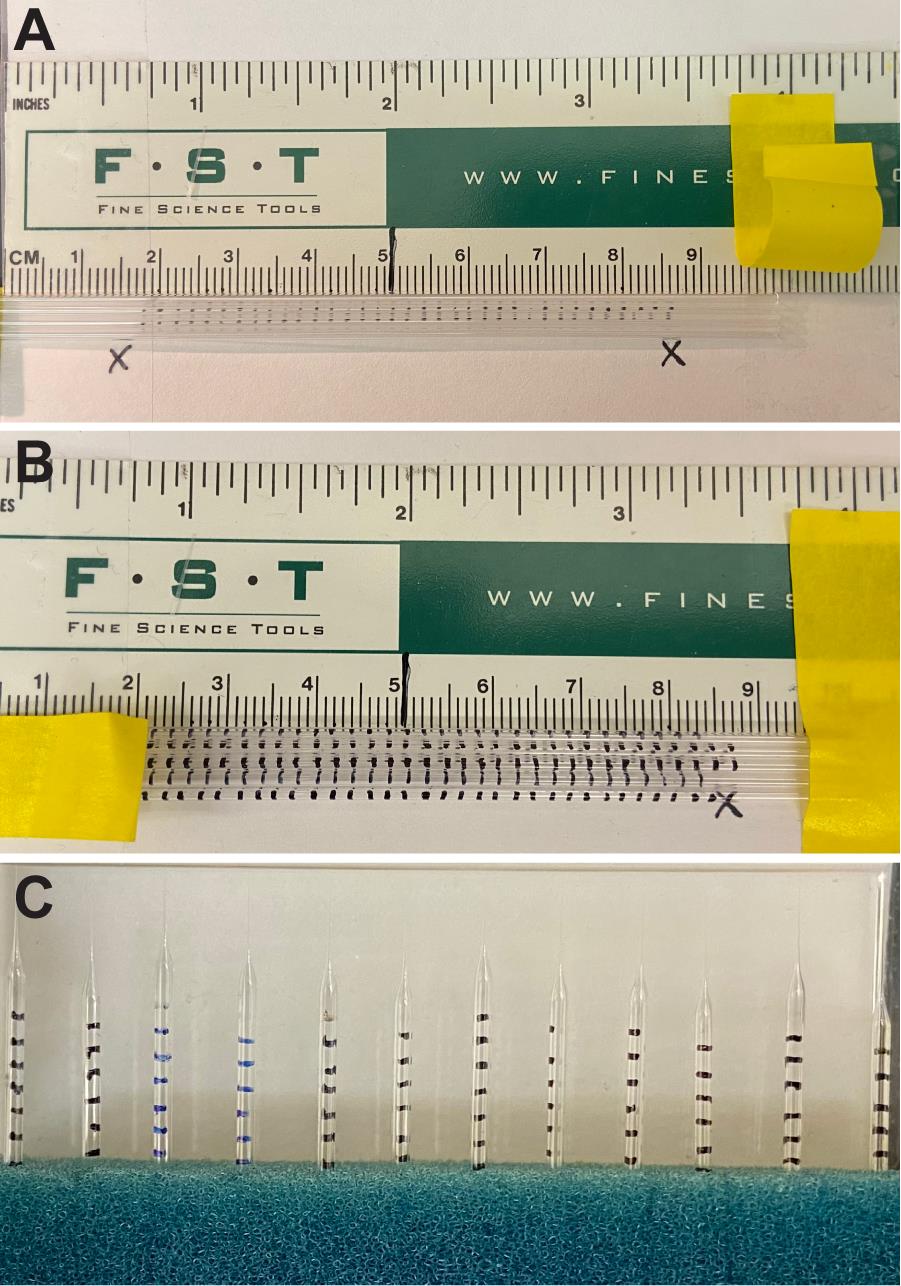
Figure 1. Prescoring glass capillaries for needle gradations. A scoring rig using a ruler and tape (A) can be used to mark capillaries every 2 mm along the length (B). Pulled needles will have gradations for measuring dispensed volumes while injecting (C). Note that the gradations closest to the needle tip burn off during the pulling process, but this ensures that the experimenter never dispenses air into the intravitreal space.
3. Pull needles (Figure 1C):
a. Needles can be pulled to your preferred specifications.
b. A long taper works well for strength, penetrability, flow, and minimal injury.
c. Using a Sutter P-97 puller, with a 3 mm square box filament (FB330B, ramp 550), we used the following program:
Heat 580
Pull 30
Velocity 150
Time 100
d. Note that results will differ based on the filament and ramp value for your machine. Please refer to The Pipette Cookbook, written by Adair Oesterle, for more details: https://www.sutter.com/PDFs/cookbook.pdf.
4. Draw out syringes (Figure 2A; [7]):
a. Pull out the plunger of a 1 mL syringe to the 0.9 mL mark.
b. Using a Bunsen burner, heat the syringe near the 0.2 mL mark, rotating over the flame to evenly melt the plastic.
c. When the syringe is melted (or aflame), remove from the flame and allow gravity to pull the tip to the floor.
d. Carefully pull the melted tip with gloved hands to elongate the plastic.
e. Continue to manually pull as the plastic hardens.
f. Syringes can be drawn out straight or curved, depending on your personal preference. Two different examples are shown in Figure 2A.
g. Trim the drawn-out tip with a razor blade.
h. Label the syringe with the name of the injection compound on tape as shown in Figure 2A and set aside.
i. Drawn-out syringes are reusable indefinitely; however, more costly single-use disposable gel-loading tips can also be used to backload needles.
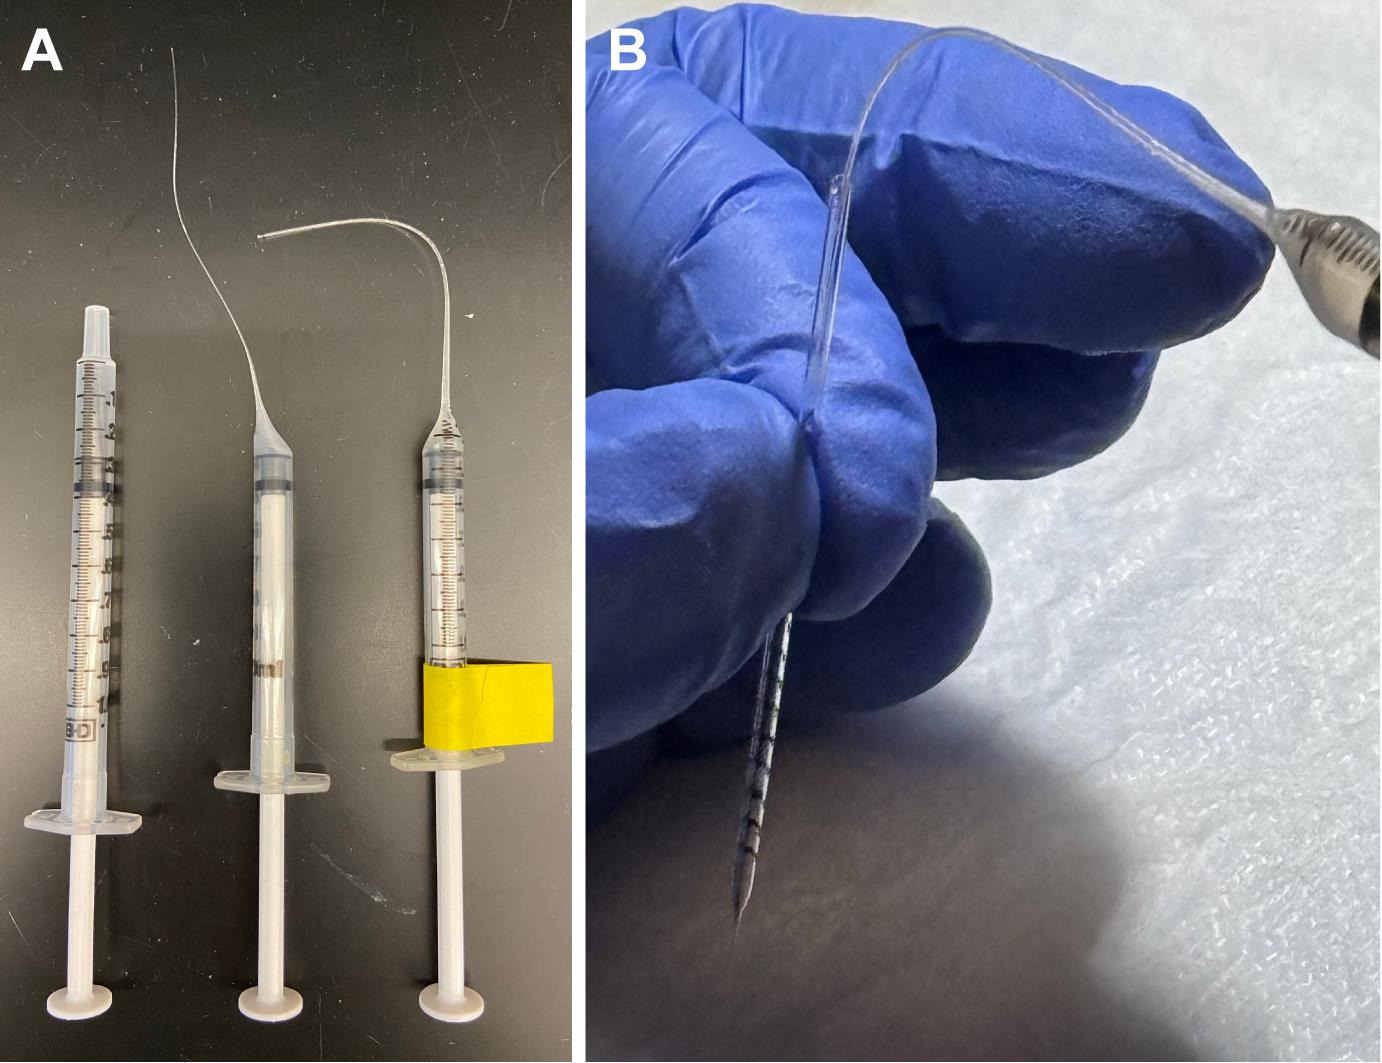
Figure 2. Drawn-out syringes for loading needles. Drawn-out syringes (A) work well for back-loading glass needles (B). Both the syringes and the needles can be reused for consistency and as a cost-saving measure.
5. Prepare NHS-biotin (make fresh daily, cannot be reused on subsequent days):
a. Always wear appropriate PPE.
b. Weigh out 5 mg of EZ-link NHS-biotin and place in a microfuge tube.
c. Add 300 μL of DMSO.
d. Mix thoroughly and briefly spin to collect the solution at the bottom of the tube.
e. Transfer solution to a 0.22 μm microfuge filter unit.
f. Spin for 1 min at 10,000× g to filter the solution.
g. Discard the filter and wrap the tube in foil or transfer filtered solution to an amber tube to protect from light.
B. Setup for injections (Figure 3A)
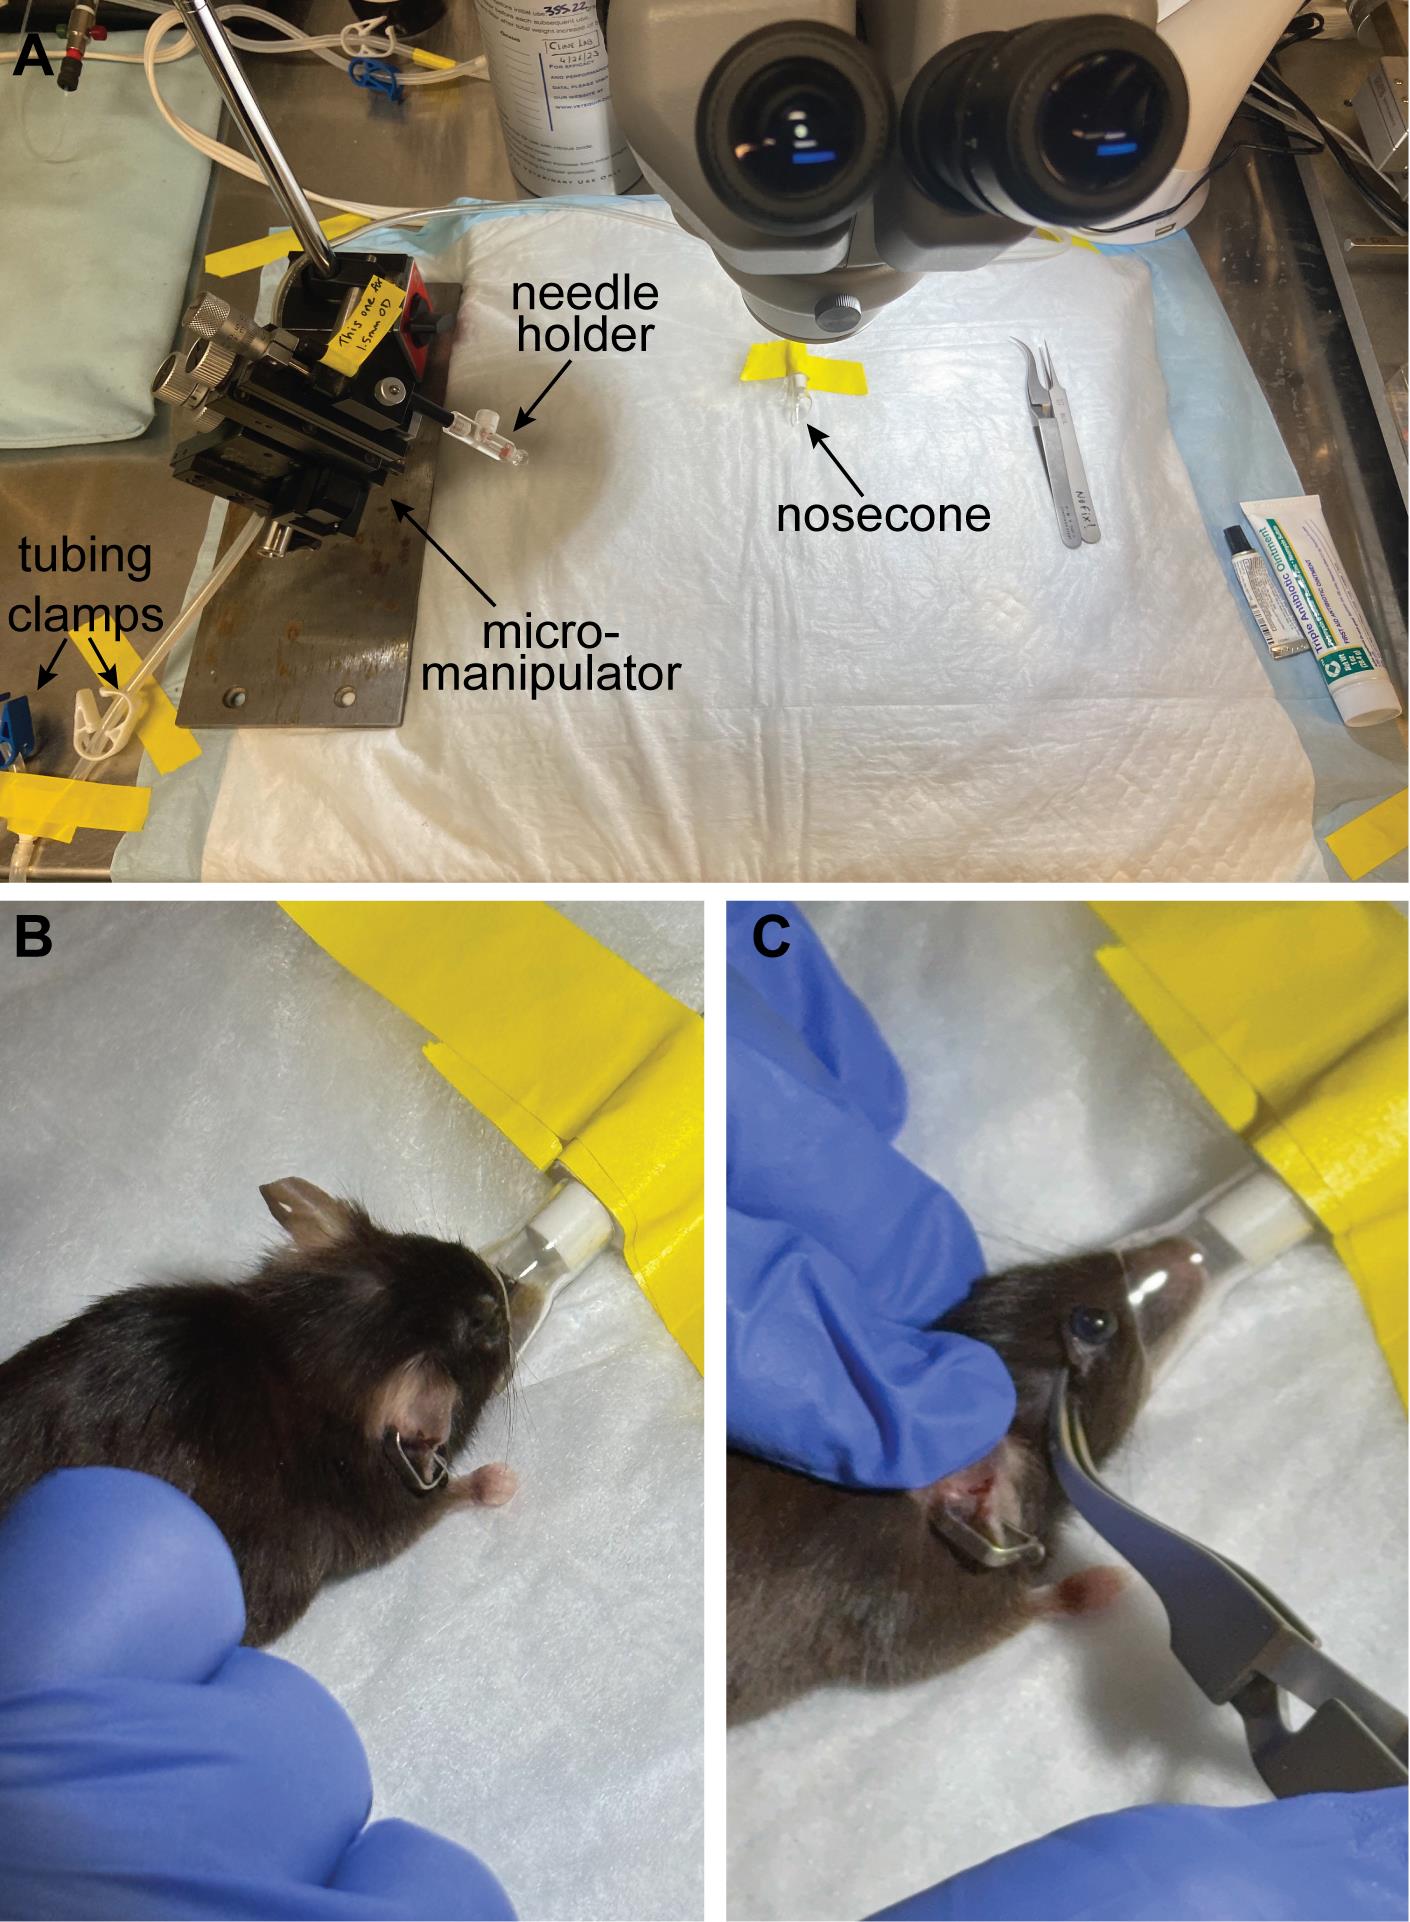
Figure 3. Injection setup and positioning the mouse. (A) Position the nose cone in the top center of the field of view and make sure the needle holder can reach that space and is in focus. (B) Position the mouse so that the nose is snugly in the nose cone, and (C) proptose the eye with a pair of reverse-action forceps so the eye is pointing up and accessible for injection (C).
1. Place the heating pad on the microscope base and turn on the settings so that it is warm to the touch (~37 °C).
2. Cover the heating pad with absorbent paper and tape down the corners.
3. Position the nose cone so that it is in the upper portion of the field of view (so that the eyes will be in the center of the field of view). Tape down in place.
4. Adjust microscope lighting and focus so that the nose cone is visible.
5. Place the micromanipulator with the needle holder close to the microscope (left or right side, depending on your handedness).
6. Adjust the micromanipulator so that the needle holder is at a 45° angle with respect to the worktop.
7. Swing the needle holder into the center of the working area and make sure you can maneuver it and get it in focus close to the nose cone.
8. Attach PicoSpritzer tubing to the needle holder.
9. Turn on air (house or nitrogen tank) and adjust PicoSpritzer pressure to ~40 psi.
10. Set PicoSpritzer timing to 10–20 ms (you will adjust this later)
11. Tap the foot pedal to make sure that you can feel a puff of air coming out of the needle holder opening on your fingertip.
12. Attach the nose cone to the anesthesia tubing and gas scavenger can.
13. Attach the anesthesia box to the tubing and gas scavenger can.
14. Tape the tubing in place near the tubing clamps.
15. Attach tubing to the isoflurane/oxygen precision vaporizer.
16. Lay out your tools: reverse-action forceps, #55 forceps, ophthalmic ointment, antibiotic ointment, and cotton swabs.
17. Create a recovery chamber by placing a paper towel inside a clean (ideally high-walled) mouse cage on top of the second heating pad.
18. Back-load a needle with NHS-biotin reagent (Figure 2B):
a. Aspirate a small amount of NHS-biotin solution using the prepared syringe with the drawn-out tip (Figure 2A).
b. Place the tip of the syringe into the glass needle as far in as possible.
c. Slowly dispense the liquid by gently pressing the syringe plunger while backing the syringe out of the needle. This will help avoid getting bubbles in the needle. It is extremely important not to introduce bubbles into the glass capillary. Some bubbles can be forced to rise to the top by flicking the middle of the needle, but do so cautiously to avoid breaking it.
19. Load the needle into the needle holder in the micromanipulator. Make sure the glass capillary goes completely through the rubber O-ring in the needle holder before tightening.
20. Rotate the micromanipulator so that the needle is in the microscope field of view and focus on the tip.
21. Gently break the tip of the needle while looking through the microscope:
a. Using #55 forceps, carefully touch along the length of the needle to find the area where the tip goes from being almost hairlike to being slightly more rigid.
b. Break the tip of the needle at the point just above where the needle begins to flex less by pinching it with the forceps. The goal is to have an opening ~20–30 μm in diameter, as measured using a microforge or microscope.
c. Tap the foot pedal and see if any fluid is ejected. The goal is to dispense small droplets (~4–6× the diameter of the tip) of liquid from the needle.
d. If a small droplet is ejected, then the needle is open and ready for injections.
e. If nothing comes out, first check the pressure and time of the PicoSpritzer. Pressure can be increased to 40 psi, and time can be increased up to 30 ms. If nothing dispenses, the tip is likely still sealed closed, so move the forceps a little higher up the needle tip and break again.
f. If fluid squirts straight out of the needle onto the absorbent paper, then the needle opening is likely too big. You can try to decrease the time (~10 ms) and the pressure (~20 psi) and test the flow again, but it is likely that you will have to try again with a new needle.
g. Once you have a needle that flows well, hold a Kimwipe close to the needle tip and tap the foot pedal to dispense the reagent until the meniscus is visible and lines up with one of the prescored gradations.
h. Without moving the base, rotate the micromanipulator out of the way to avoid breaking the needle while you prepare the mouse for injection.
i. Note that some protocols recommend using a Hamilton Intraocular Injector syringe with a removable 34-gauge small hub metal needle; however, in our experience, these needles leave a large wound in the mouse eye, and they dull quickly, requiring frequent (and costly) replacement. Pulled glass needles reduce the risk of injury to the animal and are both inexpensive and easily replaceable.
C. Intravitreal injection procedure
1. Anesthetize a mouse with 4% isoflurane in 1.5 L/min oxygen in the induction chamber (1–2 min).
2. Redirect anesthesia to the nose cone with tubing clamps (close the clamp going to the induction chamber and open the clamp going to the nose cone tubing) and reduce isoflurane to 1.5%.
3. Rotate the nose cone ~45–90° from vertical to allow access to one eye.
4. Place the mouse on the heating pad and position it so that the nose cone covers the nose and mouth (Figure 3B). Note that the animal shown in Figure 4A does not have a snugly fitting nose cone and should be readjusted to ensure proper administration of isoflurane anesthesia without leakage into the room.
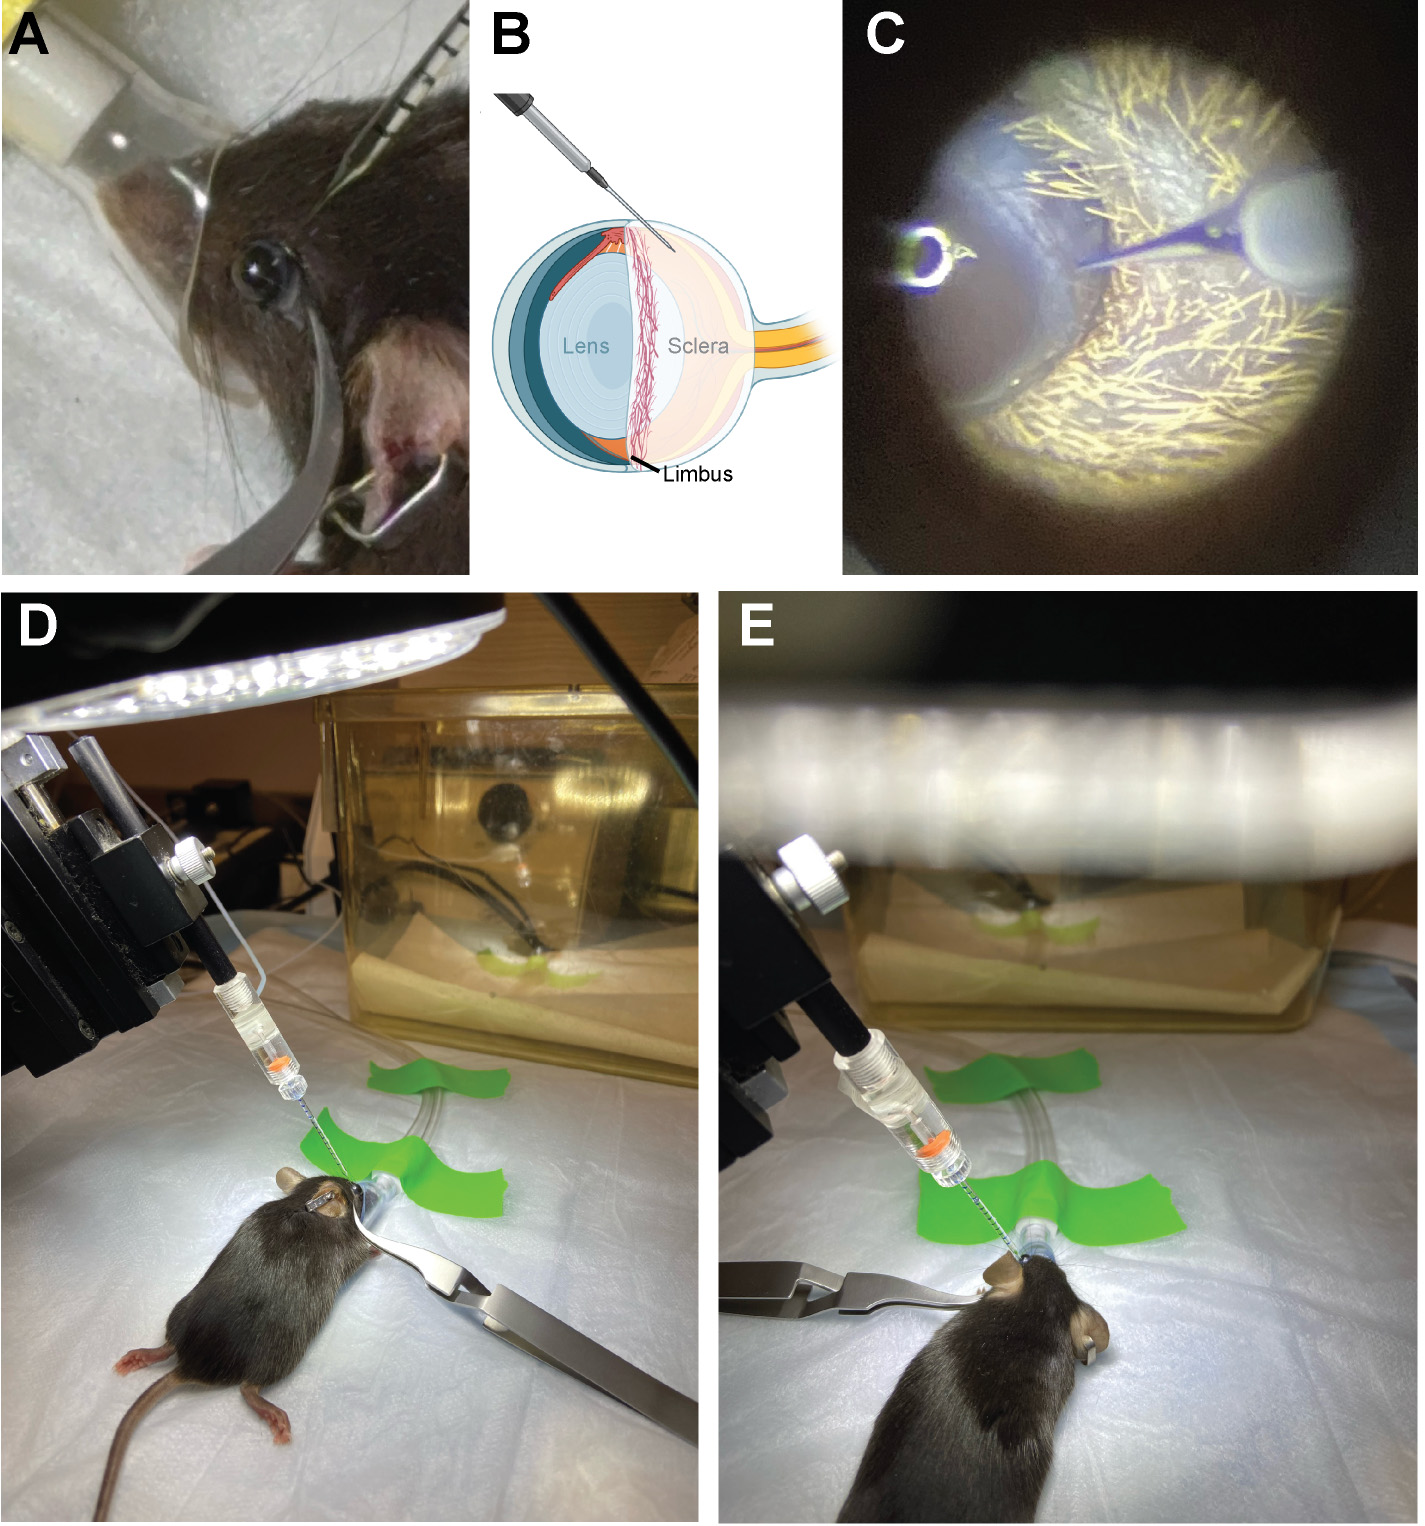
Figure 4. Positioning the needle for intravitreal injection. (A) Position the micromanipulator so that the needle approaches the eye at a 45° angle. (B, C) The injection site is in the cloudy-colored sclera, just below/behind the heavily vascularized limbus. (D) Inject the first eye and then (E) reposition the mouse and nose cone to inject the second eye.
5. Check that the mouse is in a surgical plane of anesthesia.
6. Adjust the nose cone rotation as necessary so that the right eye is facing upward and can be seen in the center of the microscope field of view.
7. Using the reverse-action forceps, gently pull back the eyelid on both sides of the eye and close the forceps to proptose the eyeball. Gently lay the forceps to the side to keep the eyeball accessible (Figure 4D).
8. Rotate the micromanipulator so that the needle is positioned above the eye and lower the needle into the field of view (Figure 4A).
9. The target of injection should be in the sclera (cloudy white part on the back half of the eyeball), just posterior to the limbus (Figure 4B). Line up the needle so that the tip is pointing at the target area (Figure 4B, C). Be careful to avoid the ring of blood vessels that circles the equator of the eye; the injection site is posterior to these vessels (Figure 4C).
10. Carefully advance the needle using the micromanipulator to insert the needle tip into the eye. There will be some resistance (this eye tissue rigidity increases with mouse age).
11. Once the needle has punctured the eye, back it out slightly and begin injecting by making rapid pulses with the foot pedal.
12. Watch the solution level in the needle and only inject 2 μL (one full gradation mark).
13. Once 2 μL has been dispensed, back the needle out of the eye and swing the micromanipulator out of the way.
14. Remove the reverse-action forceps and use the side of them to gently stroke the eyelids toward the eye to ease the eye back into place.
15. Rotate the nose cone and mouse 180° to repeat the procedure with the other eye (Figure 4D, E).
16. Record animal number, injection start and stop time, needle number, and any additional notes for future reference (download table).
17. Injections in both eyes should take 3–4 min (total per animal). If the injections take longer than 5 min, the eye may start to dry out as evidenced by a loss of glossy appearance on the surface of the eyeball. Dry eyes should be treated with a small amount of ophthalmic ointment applied directly to the eyeball before returning the animal to the recovery chamber.
18. If there is any bleeding or damage to the eye, treat with a small amount of antibiotic ointment.
19. Place the animal into the recovery chamber. The animal will awaken within 1–2 min and can then be returned to the home cage. Note that this level of isoflurane anesthesia (< 10 min total) is well under the lethal dose of up to several days; animals have no issues in quickly resuming normal activity after this procedure.
20. Repeat with additional mice (Figure 5).
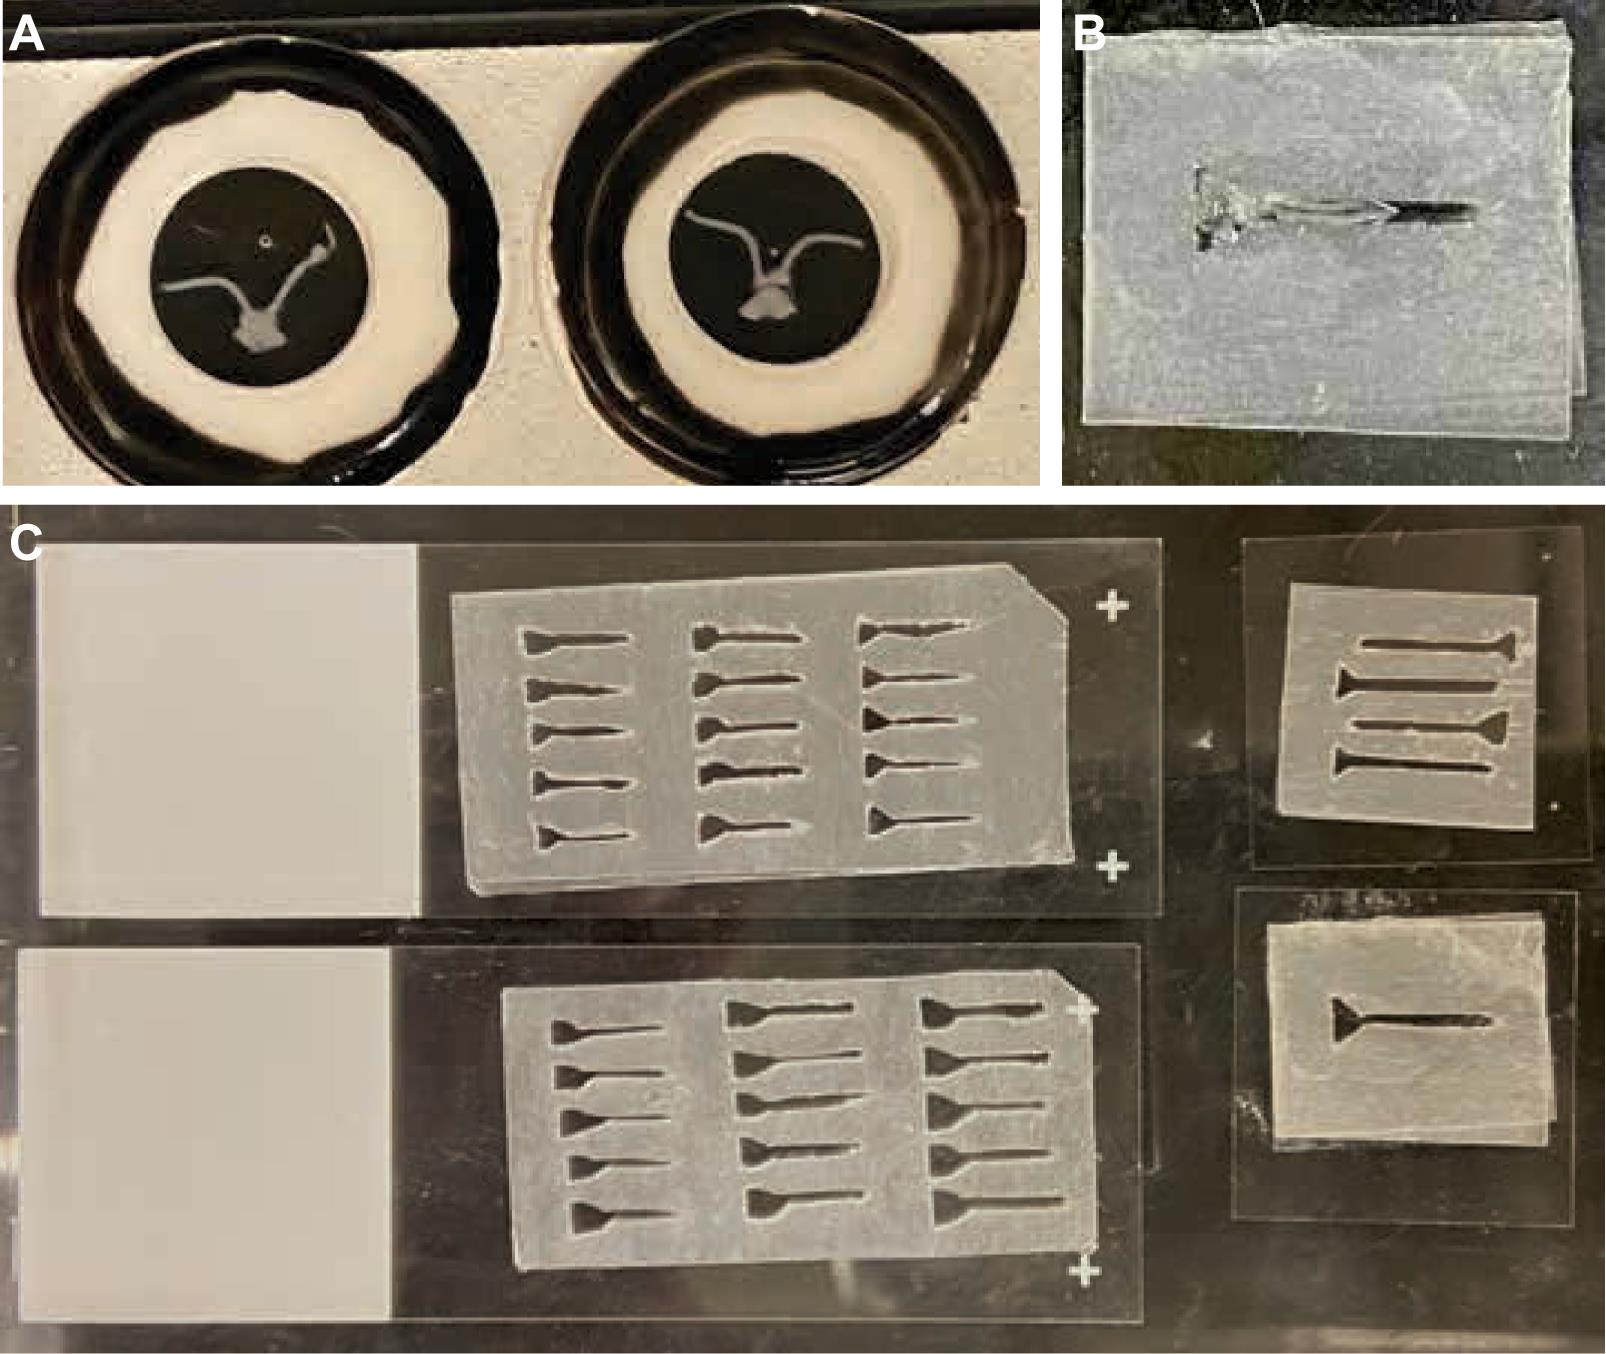
Figure 5. Creation of parafilm mounting rigs. (A) Fixed optic nerves have an inherent curvature, as shown after being mounted under four spacing rings. (B, C) Various mounting rigs are carved out of parafilm to assist in positioning the optic nerves linearly for confocal imaging. Note that the top-right corner of the mounting rig has been cut for orientation purposes.
21. Needles can be reused between animals depending on the experimental paradigm and local IACUC regulations. On average, a glass needle can stay sharp for 6–10 animals (12–20 eyes).
22. Repeat injections daily with fresh NHS-biotin for up to 3 days for increased labeling.
D. Optic nerve dissection procedure
1. Just prior to dissections, prepare 4% paraformaldehyde solution (PFA) in PBS from a newly opened ampule of PFA.
2. 1–5 days after injections, euthanize the mouse and dissect optic nerves (connected at the chiasm) as described [6].
3. Immediately place optic nerves in freshly made 4% PFA in a labeled 48-well plate or microfuge tubes and store at 4 °C.
4. Samples can be stored in fixative at 4 °C indefinitely. Be sure to seal the plate with parafilm or place optic nerves in closed microfuge tubes for long-term storage.
E. Optic nerve whole-mount immunolabeling
In the original manuscript [2], we embedded the optic nerves and sectioned them at 20 μM using a cryostat before immunolabeling. We have since developed a whole-mount labeling protocol that gives better 3D resolution in the intact tissue and facilitates comparison and quantitative analysis of labeling. We have optimized this protocol for anti-biotin immunolabeling while maintaining genetically expressed GFP fluorescence. We present the whole-mount immunostaining protocol here.
E1. Preparation for immunolabeling
1. Make mounting rigs for imaging (Figure 5B, C):
a. Layer three sheets of Parafilm M together on top of a slide or other stiff substrate.
b. Using a microscalpel, carve out the shape of an elongated Y or funnel.
c. The specifications for the carved rig are approximately 0.8–1 cm long, 1 mm wide along the length (to accommodate both optic nerves), and 2 mm wide at the top of the Y (to accommodate the optic chiasm tissue).
d. Repeat for multiple optic nerves arrayed on the same slide.
e. Make mounting rigs of various sizes to accommodate differences among samples.
2. Prepare immunolabeling solutions as shown below. These can be prepared as needed at the time of the labeling. Blocking solutions with serum need to be stored at 4 °C and used within 1–2 weeks. (Volumes listed are for 10 samples. Adjust as needed.)
a. PTx wash buffer (1 L)
1× PBS pH 7.4
0.1% Triton X-100
b. Permeabilization buffer (50 mL)
1× PBS pH 7.4
0.5% Triton X-100
c. Block-Perm buffer (20 mL)
Permeabilization buffer
4% bovine serum albumin
1% donkey serum
d. Block-antibody buffer (20 mL)
PTx Wash buffer
4% bovine serum albumin
1% donkey serum
E2. Whole-mount immunolabeling procedure
1. Adjust the spacing screw on the embryo forceps so that the rings do not touch and have a ~2–3 mm gap. This allows for the tissue sample to be collected via surface tension in a droplet of buffer and not touched or damaged by the forceps. Alternatively, regular forceps can be used to transfer tissues by the optic chiasm (assuming the experiments do not require the chiasm to remain intact), but use caution to not grab the sample by the optic nerve itself, which would damage the tissue sample.
2. Using embryo forceps, transfer optic nerve samples from fixative into individually labeled 1.5 mL microfuge tubes with > 1 mL PTx wash buffer. Wash for 5–10 min while rotating at room temperature.
3. Permeabilize:
a. Remove PTx with a fine-tipped transfer pipette.
b. Add > 1 mL of permeabilization buffer.
c. Rotate for ≥ 48 h at room temperature.
4. Block:
a. Remove perm buffer with a fine-tipped transfer pipette.
b. Add > 1 mL of block-perm buffer.
c. Rotate for ≥ 48 h at 4 °C.
5. Primary antibody:
a. Dilute goat anti-biotin antibody 1:500 in blocking solution.
b. Use Pelco BioWave to help drive Ab into tissue as follows:
i. Put 1 mL of Block+Ab solution per well in a 48-well plate.
ii. Add one optic nerve per well, taking care to note the location of each sample, or label the plate as needed.
iii. Include one extra well of block solution anywhere on the plate for the temperature probe.
iv. Using a Pelco BioWave with a water-cooled baseplate, we use the following program for primary antibody penetration:
2 min ON (200 W)
2 min OFF (200 W)
2 min ON (200 W)
END
v. Take note of the max temp reached once the program is complete. Ideally, the temperature in the samples will stay at or below 40 °C.
c. Transfer the samples back to tubes containing fresh block+primary antibody solution.
d. Rotate at 4 °C for 2–4 days.
Note: We have found that the optic nerve is a difficult tissue for antibodies to penetrate. Increasing the detergent concentration, increasing the time, and using the BioWave are the best methods we have found for antibody penetration throughout the entire depth of the optic nerve (~200–300 μm).
6. Secondary antibody:
a. Remove primary antibody solution with a fine-tipped transfer pipette and add > 1 mL of PTx wash buffer to each sample.
b. Wash samples five times in PTx for 20–25 min each, rotating at room temperature.
c. Dilute secondary antibody, Alexa-568 donkey anti-goat (or the fluorophore and species of your choice) 1:500 in blocking solution.
d. Use Pelco BioWave to help drive Ab into tissue as described in step E2.5b.
e. Transfer the samples back to tubes with fresh block+secondary antibody solution.
f. Rotate at 4 °C for 2–4 days.
7. Nuclear labeling (optional):
A. Remove secondary antibody solution with a fine-tipped transfer pipette and add > 1 mL of PTx wash buffer to each sample.
b. Wash samples two times in PTx for 20 min each, rotating at room temperature.
c. Add Hoechst 33342 to PTx wash buffer at 1:1,000 and rotate for 1 h at room temperature.
d. Wash samples two times in PTx for 20 min each, rotating at room temperature.
8. Final washes (if not using nuclear label):
a. Remove secondary antibody solution with a fine-tipped transfer pipette and add > 1 mL of PTx wash buffer to each sample.
b. Wash samples five times in PTx for 20–25 min each, rotating at room temperature.
9. Tissue clearing:
a. Using a fine-tipped transfer pipette, remove as much liquid from the samples as possible.
b. Add 100 μL of Focus Clear.
c. Let tissues clear in closed tubes at room temperature for 2 days.
d. Transfer samples to 4 °C (keep in Focus Clear) until ready to mount.
e. Samples can be stored in Focus Clear in closed/sealed tubes at 4 °C indefinitely. If using a 48-well plate, be sure to seal with parafilm.
10. Mounting:
Note: Samples have inherent curl (Figure 5A) and are best mounted in custom carved rigs described above in step E1 and shown in Figure 5B, C). Alternatively, you can image them in their curved form using spacers (Figure 5A) or cut them at the chiasm and image the nerves individually (however, the latter will result in the loss of proximal/distal information provided by the chiasm).
a. Prewarm Mount Clear solution at 50 °C to solubilize.
b. Place Parafilm rig onto a coverslip.
c. Mount optic nerves directly onto the coverslip using forceps to arrange the tissue inside the opening of the rig.
d. Wick away excess Focus Clear with a Kimwipe or small piece of Whatman filter paper.
e. Using a cut pipette tip, add 20–50 μL of prewarmed Mount Clear onto each sample in the mounting rig.
f. Mount slide on top of coverslip (this ensures that when you flip the slide over, the sample is flat against the coverslip and closest to the objective). Note that coverslips are not sealed; the Mount Clear is sticky enough to keep the coverslip in place, and then the coverslip can be removed easily for sample storage (see steps E2.10h–i below).
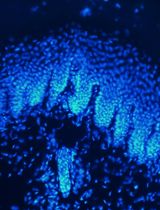
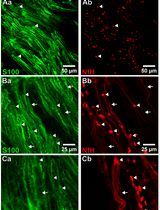
g. Image optic nerves on a confocal microscope or a plate/slide scanner. A standard confocal, like a Nikon C2, with large image stitching and multi-point imaging, works well for multiple optic nerves; it can run overnight, and imaging takes ~3 h per sample since the optic nerves are each ~0.5–1 cm long (Figure 6). Higher magnification and high-resolution confocal imaging can reveal detailed subcellular localization of the NHS-biotin-labeled proteins in the optic nerve (Figure 7).
h. After imaging, carefully separate the coverslip from the slide. Be sure to do this under the microscope so that you can keep track of multiple optic nerves. Put the optic nerves back into 50 μL of Mount Clear, wrap tubes in foil, and store at 4 °C. Samples can be reimaged and reused several times if needed.
i. Rinse parafilm rig with ddH2O and store for future re-use.
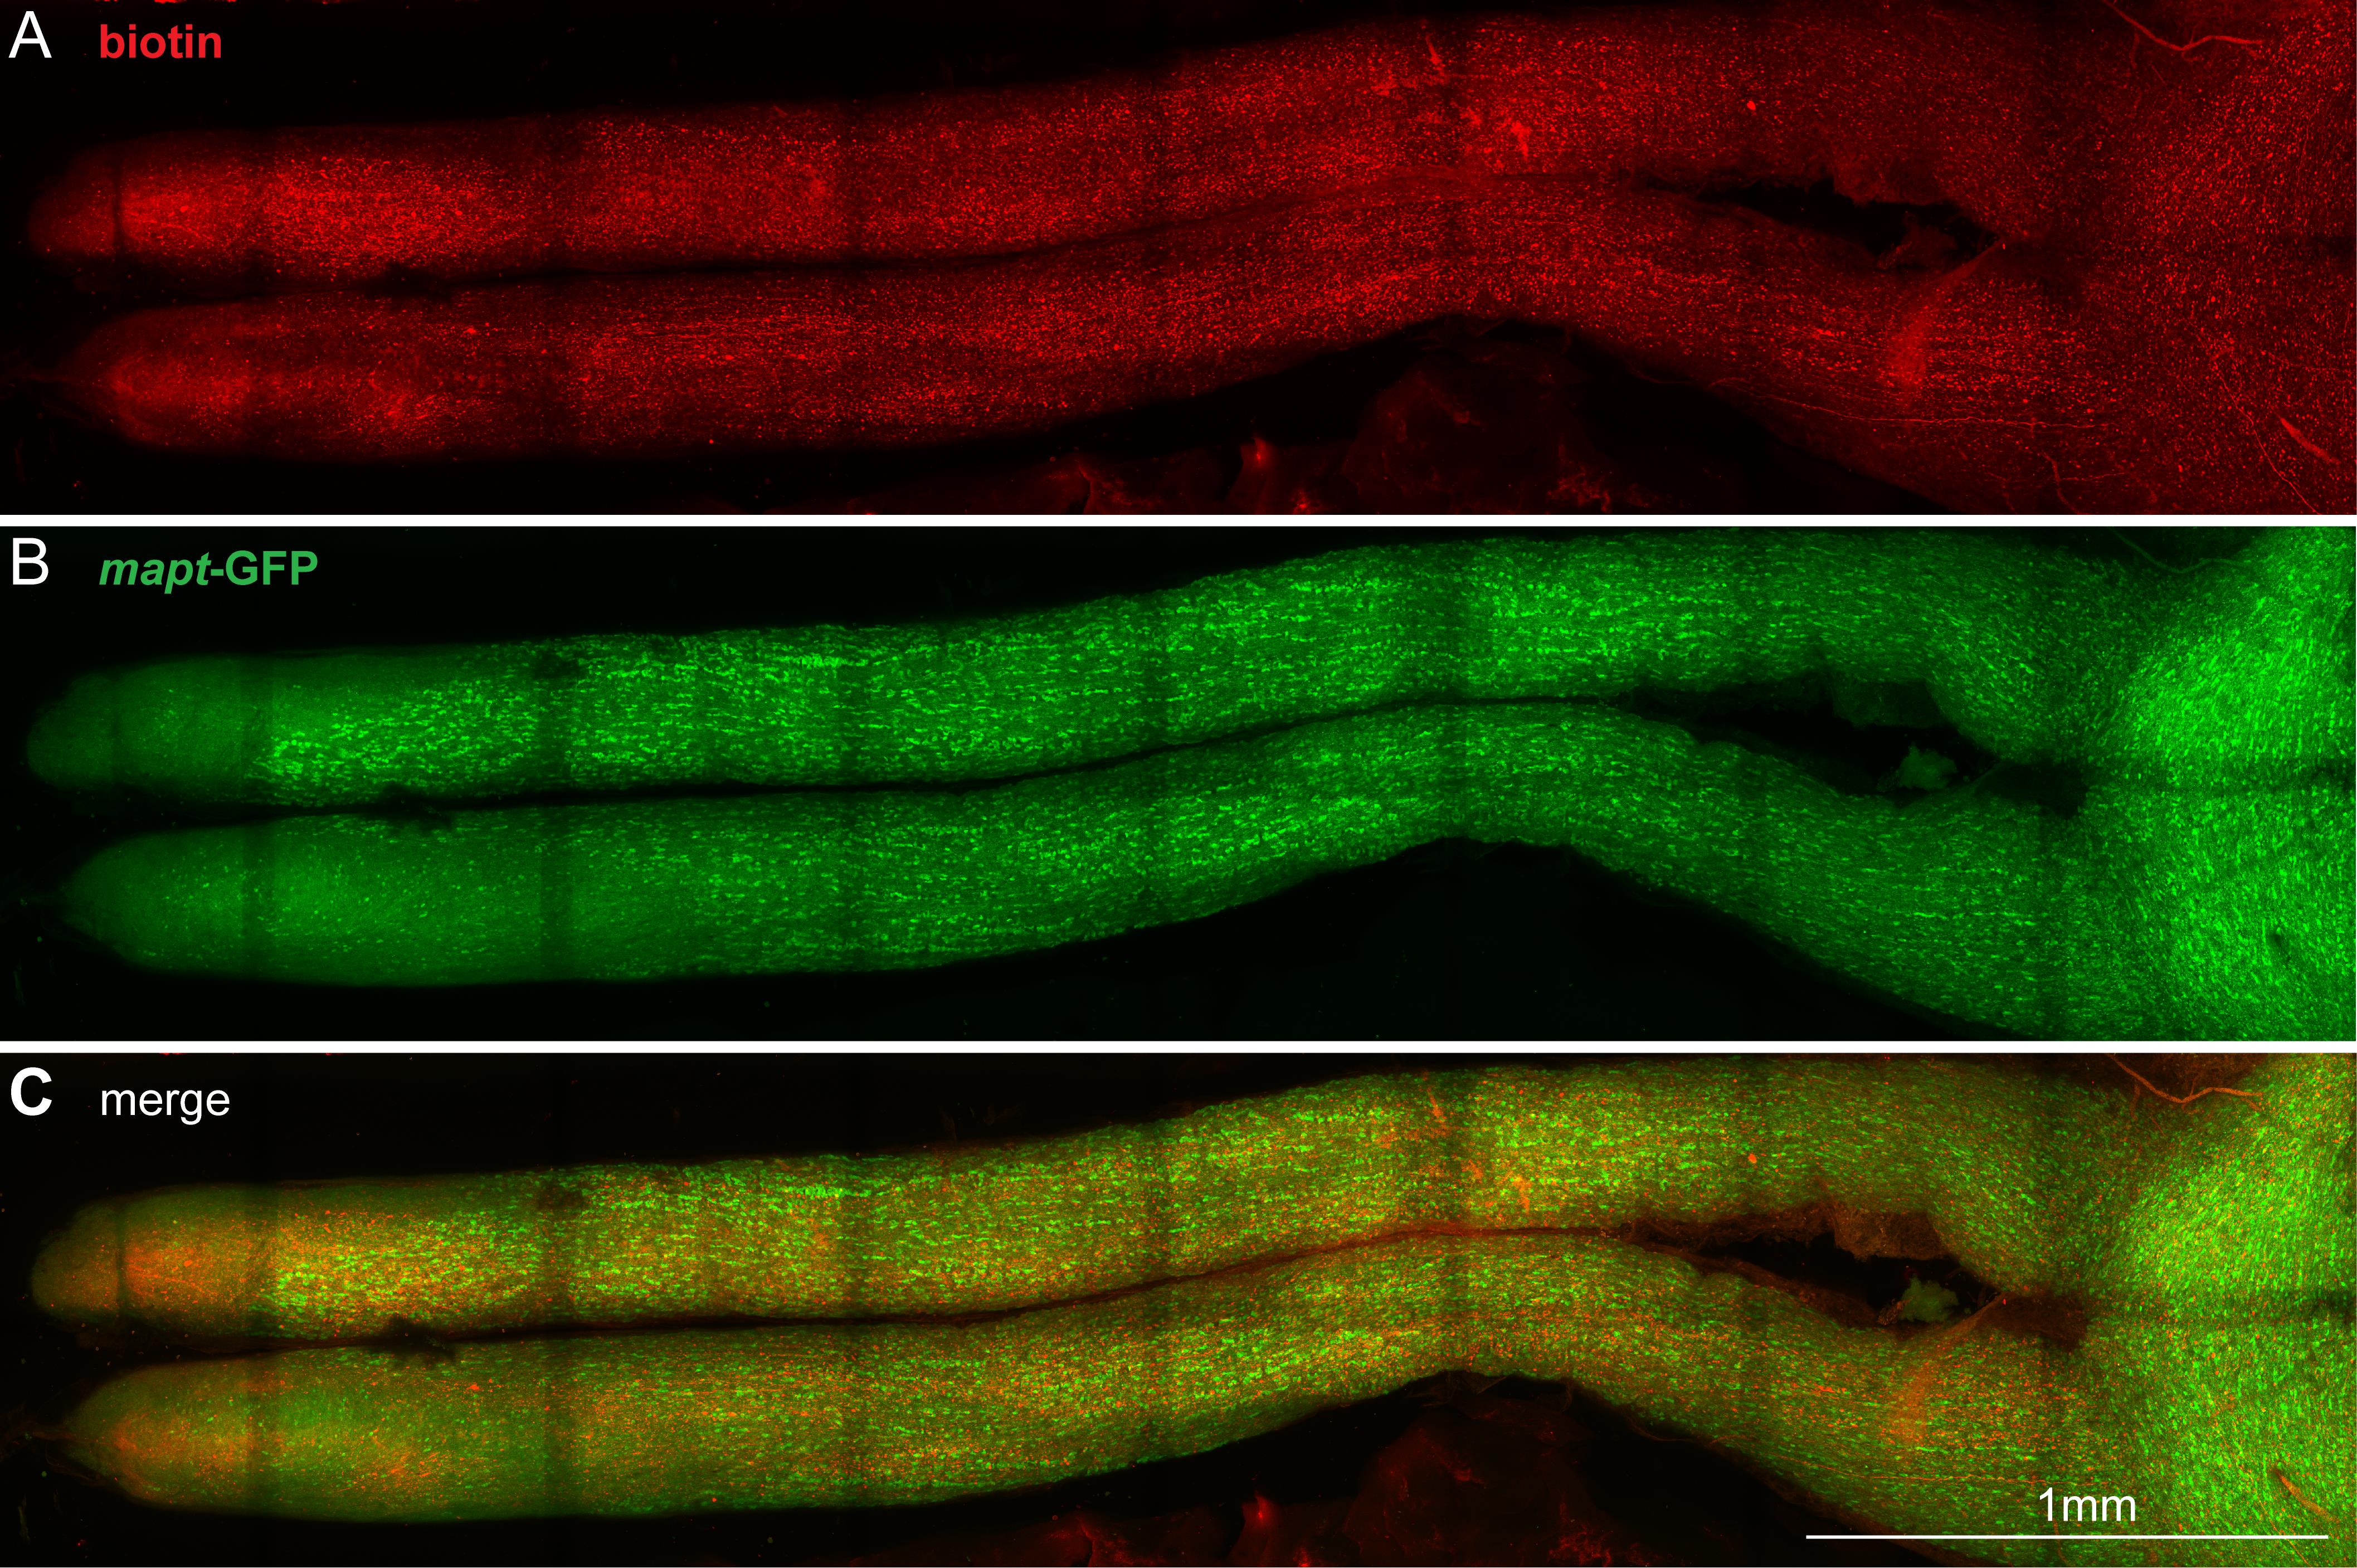
Figure 6. Image of the whole optic nerve. Confocal z-projection image of stitched Z stacks of an entire optic nerve from a mouse with biotin injected intravitreally. Anti-biotin is shown in red (A), and GFP expressed under control of the mapt promotor is shown in green (B); (C) shows the merged image. The darker stripes across the optic nerve are the result of photobleaching in the overlapping areas during large image stitching. We have found that the Alexa-568 and the endogenous GFP photobleach at the same rate, making red:green ratios consistent across different regions of the sample. Scale bar, 1 mm.
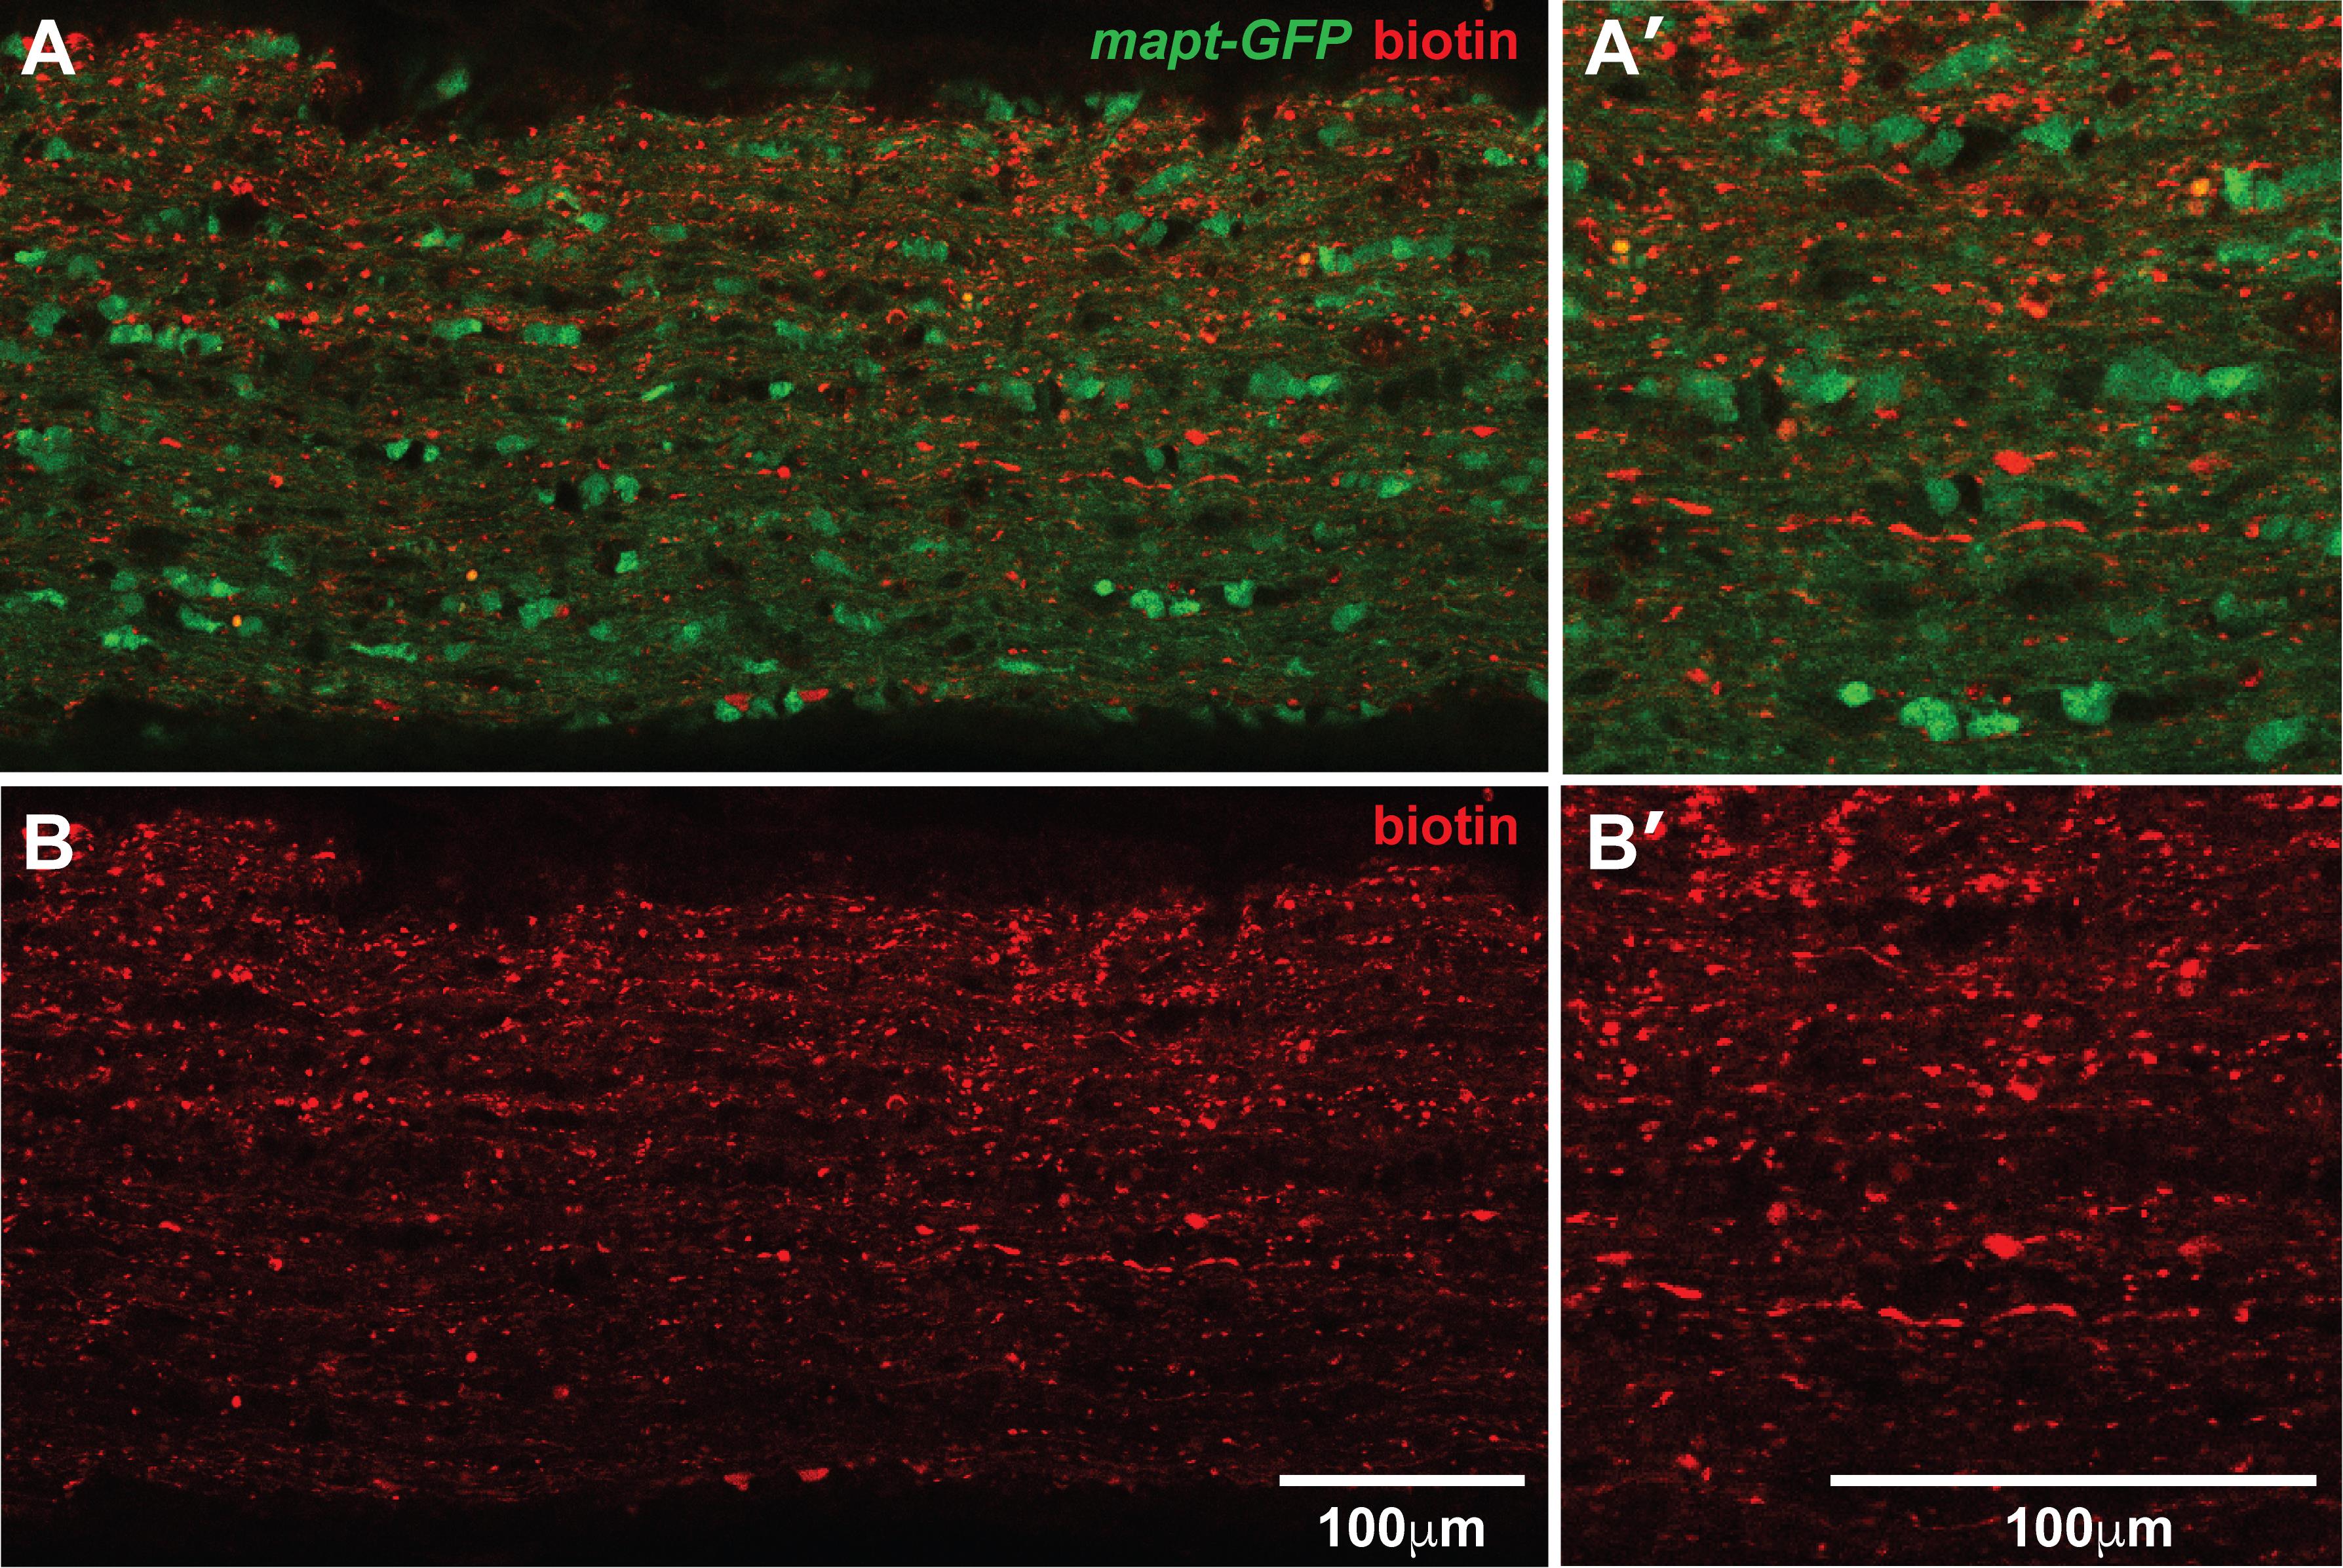
Figure 7. Confocal images of biotinylated proteins in the optic nerve. Single optical section of a whole-mount immunolabeled optic nerve from a mapt-GFP mouse with biotin injected intravitreally. Biotin is shown in red and GFP in green (A, B). GFP fluorescence is maintained in the samples using this protocol (A, A’). Biotinylated puncta can be visualized easily at 20× magnification on a confocal microscope (B, B’). Scale bars in B B’ also apply to A, A’.
Validation of protocol
This protocol or parts of it has been used and validated in the following research articles:
• Schiapparelli et al. [1]. Proteomic screen reveals diverse protein transport between connected neurons in the visual system. Cell Reports (Figure 1).
• Schiapparelli et al. [2]. The Retinal Ganglion Cell Transportome Identifies Proteins Transported to Axons and Presynaptic Compartments in the Visual System In Vivo. Cell Reports (Figures 1 and 2).
• Shah et al. [3]. Quantitative transportomics identifies Kif5a as a major regulator of neurodegeneration. eLife (Figure 1).
• Shah et al. [5]. Quantitative BONCAT Allows Identification of Newly Synthesized Proteins after Optic Nerve Injury. J Neuroscience (Figure 1).
General notes and troubleshooting
General notes
1. Fixed NHS-biotin-labeled optic nerves can also be embedded and sectioned for staining and imaging via confocal or electron microscopy.
2. Prior to fixation, NHS-biotin-labeled ON samples can also be used for biochemistry such as western blotting, click-chemistry, and mass spectrometry proteomic analysis of biotinylated proteins transported along the optic nerve [2].
3. We recommend practicing intravitreal injections on albino animals using Evans blue dye (5% w/v in ddH2O) to easily visualize the injection.
4. In our experience, NHS-biotin flows easily through the glass needles, likely due to being dissolved in DMSO. However, other compounds may clog needles and would require a larger bore opening, more frequent needle changes, or a different needle tip shape (if using something other than NHS-biotin, you will need to optimize the pull protocol for your specific compound).
5. Negative controls, including intraocular injections of vehicle and typical controls for immunolabeling, are suggested. We have found that levels of endogenous biotin in the optic nerve are undetectable by immunostaining, that intravitreal injection of biotin (without the reactive NHS moiety) does not label anything in the optic nerve [2], and that optic nerve injury results in an accumulation of labeled proteins at the injury site [5]. These controls indicate that proteins are labeled specifically with NHS-biotin and transported along the optic nerve away from the eye.
Troubleshooting
| Problem | Likely cause | Solution |
| Mouse awakens during injection | Nose cone fit issues | Reposition the mouse to ensure the nose cone has a snug fit. |
| Low isoflurane levels | Make sure the tubing clamp on the nose cone side is completely open and closed on the chamber side. Ensure tubing is not pinched. | |
| Make sure the isoflurane dispenser is full. | ||
| Cannot access the back of the eyeball | Difficulty with proptosis | Manually pull back the skin surrounding the eye area before using the forceps. |
| Gently push down on the lower lid at the center of the eye to retract the eyelid before closing the forceps on both the upper and lower lids. | ||
| Needle won’t penetrate the eye | Incorrect positioning or angle of approach | Try a different angle of approach by repositioning the mouse or the needle. |
| Dull or blunt needle | Try a new needle. | |
| Old animal | If the animal is ≥1 year old, the eyes are stiffer and more difficult to inject. Try a new needle and/or try to bevel the tip with a ceramic tile. | |
| Injection fluid appears to be leaking out of the eye socket | Needle not in eye | Adjust the angle of injection so that the needle does not slip around the back of the eye, filling the eye socket. |
| Needle tip opening too large | Check the needle in between injections to ensure the tip is intact and flows consistently. | |
| Needle breaks during injection procedure | Operator error | Replace the needle. |
| If the needle breaks in the eyeball, quickly use fine-tipped forceps to remove the glass tip from the eye and treat with antibiotic ointment. | ||
| Difficulty mounting optic nerves | Optic nerve curvature | Curvature of the optic nerves can be tricky for mounting, but hand-carved rigs and patience help. |
| Difficulty unmounting optic nerves | Surface tension | Use caution when removing the coverslip from the slide after imaging. Be sure to remove the coverslip under a dissecting microscope so that you can identify samples if they move during unmounting. |
Acknowledgments
This work was supported by the National Institutes of Health (EY027437, EY031597, and AG075862) and the Hahn Family Foundation to H.T.C. We thank members of the Cline Lab for comments on the manuscript and helpful discussions. This protocol was originally used in Schiapparelli et al. [1].
Competing interests
There are no conflicts of interest or competing interests.
References
- Schiapparelli, L. M., Sharma, P., He, H. Y., Li, J., Shah, S. H., McClatchy, D. B., Ma, Y., Liu, H. H., Goldberg, J. L., Yates, J. R., et al. (2022). Proteomic screen reveals diverse protein transport between connected neurons in the visual system. Cell Rep. 38(4): 110287. https://doi.org/10.1016/j.celrep.2021.110287
- Schiapparelli, L. M., Shah, S. H., Ma, Y., McClatchy, D. B., Sharma, P., Li, J., Yates, J. R., Goldberg, J. L. and Cline, H. T. (2019). The Retinal Ganglion Cell Transportome Identifies Proteins Transported to Axons and Presynaptic Compartments in the Visual System In Vivo. Cell Rep. 28(7): 1935–1947.e5. https://doi.org/10.1016/j.celrep.2019.07.037
- Shah, S. H., Schiapparelli, L. M., Ma, Y., Yokota, S., Atkins, M., Xia, X., Cameron, E. G., Huang, T., Saturday, S., Sun, C. B., et al. (2022). Quantitative transportomics identifies Kif5a as a major regulator of neurodegeneration. eLife. 11: e68148. https://doi.org/10.7554/elife.68148
- Watanabe, T., Muranaka, N., Iijima, I. and Hohsaka, T. (2007). Position-specific incorporation of biotinylated non-natural amino acids into a protein in a cell-free translation system. Biochem Biophys Res Commun. 361(3): 794–799. https://doi.org/10.1016/j.bbrc.2007.07.099
- Shah, S. H., Schiapparelli, L. M., Yokota, S., Ma, Y., Xia, X., Shankar, S., Saturday, S., Nahmou, M., Sun, C., Yates, J., et al. (2022). Quantitative BONCAT Allows Identification of Newly Synthesized Proteins after Optic Nerve Injury. J Neurosci. 42(19): 4042–4052. https://doi.org/10.1523/jneurosci.3100-20.2022
- Cameron, E., Xia, X., Galvao, J., Ashouri, M., Kapiloff, M. and Goldberg, J. (2020). Optic Nerve Crush in Mice to Study Retinal Ganglion Cell Survival and Regeneration. Bio Protoc. 10(6): e3559. https://doi.org/10.21769/bioprotoc.3559
- Bestman, J. E., Ewald, R. C., Chiu, S. L. and Cline, H. T. (2006). In vivo single-cell electroporation for transfer of DNA and macromolecules. Nat Protoc. 1(3): 1267–1272. https://doi.org/10.1038/nprot.2006.186
Article Information
Publication history
Received: Mar 26, 2025
Accepted: Jul 9, 2025
Available online: Jul 28, 2025
Published: Aug 20, 2025
Copyright
© 2025 The Author(s); This is an open access article under the CC BY-NC license (https://creativecommons.org/licenses/by-nc/4.0/).
How to cite
McKeown, C. R., Schiapparelli, L. M. and Cline, H. T. (2025). Intravitreal NHS-Biotin Injection and Immunohistochemistry to Label and Image Protein Transport in the Mouse Optic Nerve. Bio-protocol 15(16): e5419. DOI: 10.21769/BioProtoc.5419.
Category
Neuroscience > Neuroanatomy and circuitry > Optic nerve
Neuroscience > Neuroanatomy and circuitry > Immunofluorescence
Do you have any questions about this protocol?
Post your question to gather feedback from the community. We will also invite the authors of this article to respond.