- Protocols

- Articles and Issues
- For Authors
- About
- Become a Reviewer

Fixation and Expansion Microscopy of Xenopus Egg Extract Spindles
Published: Vol 15, Iss 14, Jul 20, 2025 DOI: 10.21769/BioProtoc.5396 Views: 1212
Reviewed by: Komuraiah MyakalaAnonymous reviewer(s)
Original research article
The authors used this protocol in:
Jun 2025
Advertisement


Protocol Collections
Comprehensive collections of detailed, peer-reviewed protocols focusing on specific topics


Abstract
In vitro systems based on Xenopus egg extracts have elucidated many aspects of spindle assembly. Still, numerous unknowns remain, particularly concerning the variation in spindle morphologies. The X. laevis and X. tropicalis egg extract systems, which recapitulate diverse spindle sizes and architectures, serve as ideal tools to investigate the regulation of spindle morphometrics. However, fully understanding spindle architectural differences is hindered by the spindle's size and high microtubule density. Indeed, classical fluorescence microscopy lacks the resolution to detail the organization of spindle microtubules, and although electron tomography can distinguish individual microtubules, segmenting thousands of microtubules and tracking them across dozens of sections remains an unachieved challenge. Therefore, we set out to apply expansion microscopy to the study of Xenopus egg extract spindles. During this process, we realized that optimizing spindle fixation as well was crucial to preserve microtubule integrity. Here, we present an optimized fixation and expansion microscopy protocol that enables the study of spindle architecture in egg extracts of both X. laevis and X. tropicalis. Our method retains the fluorescence of rhodamine tubulins added to the extracts and allows for both pre- and post-expansion immunofluorescence analysis.
Key features
• Expansion of optimally fixed spindle assembled from egg extracts of X. leavis, X. tropicalis, and possibly others.
• Retains the fluorescence of the rhodamine-tubulin that copolymerizes with endogenous Xenopus tubulin within spindle microtubules, allowing their imaging without immunolabeling.
• Compatible with both pre- and post-expansion immunolabeling to increase labeling possibilities.
• Optimized spindle fixation that best preserves microtubule integrity for expansion and can also be used without expansion for regular immunofluorescence experiments.
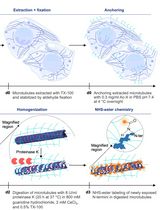
Keywords: XenopusGraphical overview
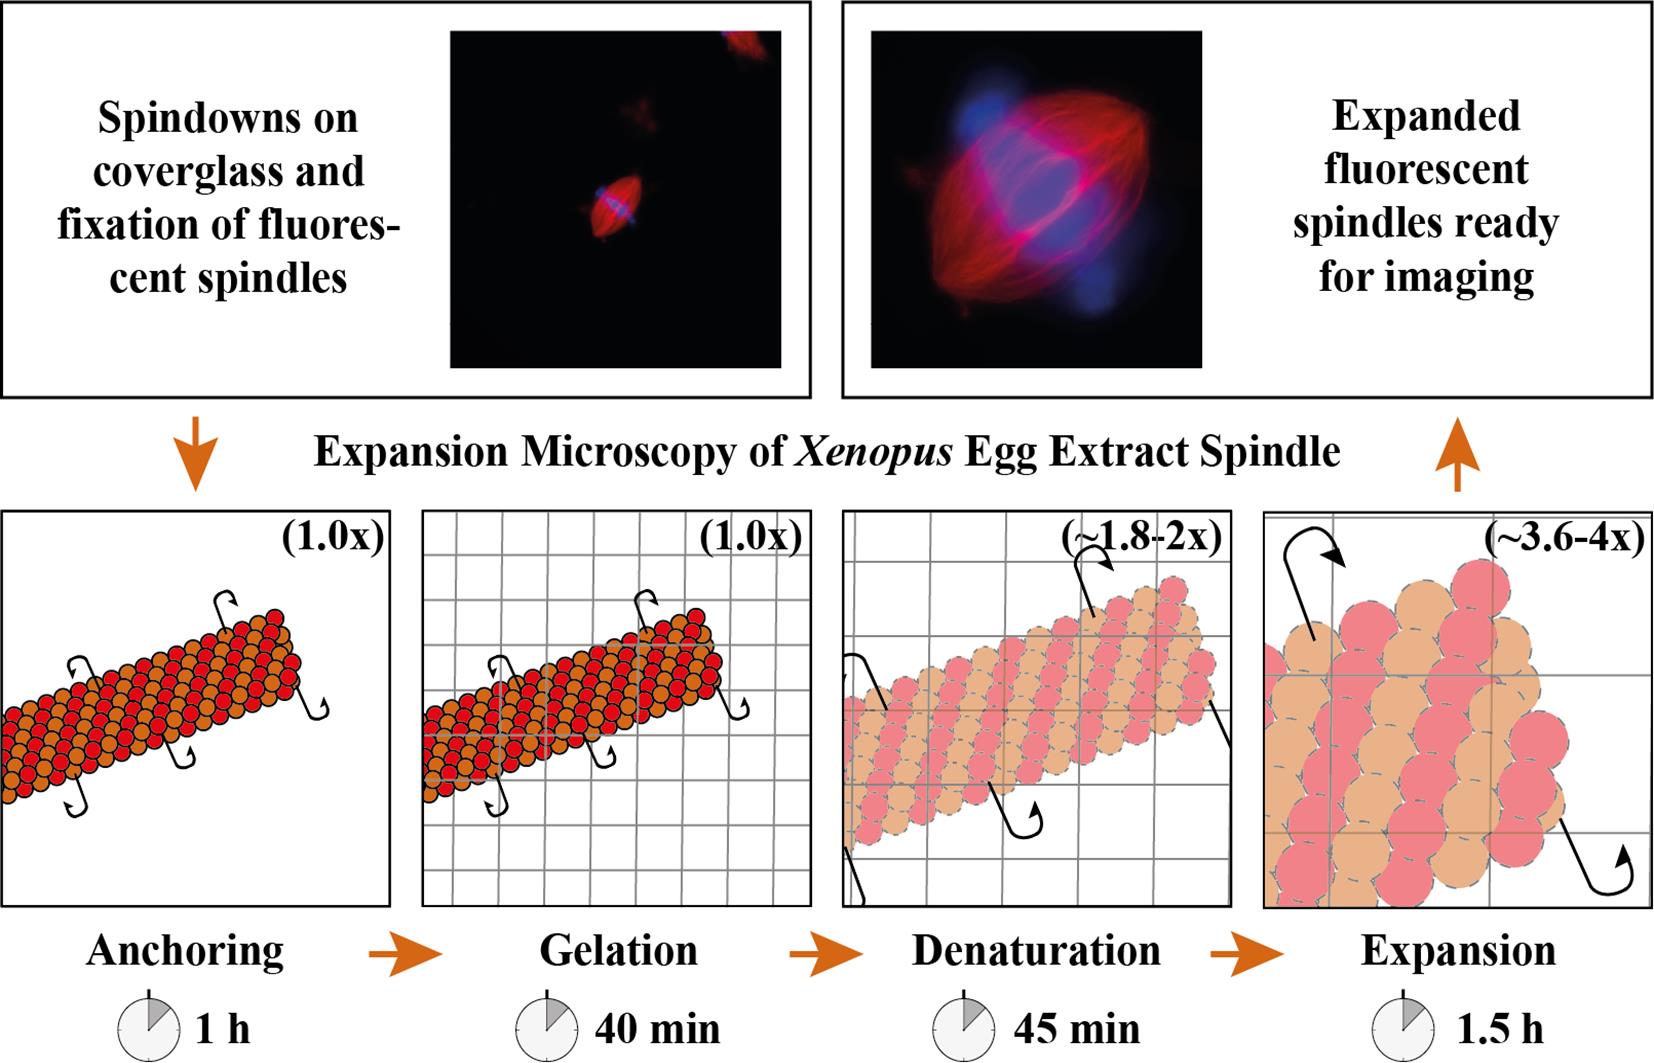
Expansion microscopy of Xenopus egg extract spindles. Spindle assembled in the presence of rhodamine-labeled tubulin can be expanded up to 4 times following anchoring, gelation, denaturation, and expansion to be imaged at higher resolution.
Background
Mitosis is crucial to the cell cycle, ensuring the accurate segregation of replicated chromosomes to daughter cells. This process relies on the spindle, a dynamic, microtubule-based, bipolar structure, which aligns chromosomes at the metaphase plate and separates sister chromatids during anaphase. Studying spindle assembly and function is particularly relevant because chromosome segregation defects underlie various human diseases [1]. Spindle size, architecture, and dynamics vary significantly among different cell types and organisms [2], optimizing its function. However, the establishment of specific spindle morphologies remains poorly understood despite their importance for proper spindle function.
In vitro systems using Xenopus egg extracts have elucidated many aspects of mitosis and spindle assembly [3], but many unknowns remain, especially regarding spindle morphology variation. The X. laevis and X. tropicalis egg extract systems, which recapitulate different spindle sizes and architectures, are ideal tools to explore the basis of vertebrate spindle architecture and size regulation [4]. Previous studies have shown that X. tropicalis spindles are not only shorter than X. laevis spindles [5] but also exhibit distinct microtubule bundling and density patterns [6] as well as more robust kinetochore fibers [7]. However, the high microtubule density in these spindles makes it impossible to resolve individual filaments using classical fluorescence microscopy. Super-resolution techniques have significantly improved microscopy resolution, even reaching the nanometer scale [8,9]. However, these methods often require specific fluorophores, sample environments, and, most importantly, equipment. Electron tomography provides the best resolution, allowing imaging and tracking of individual microtubules. It has been used to reconstruct spindles from various species, including Saccharomyces cerevisiae and Ashbya gossypii [10], Caenorhabditis elegans [11], and HeLa cells [12]. While this technique is labor-intensive and time-consuming, the largest reconstructed spindles are not even half the size of the X. laevis spindle, which still keeps it out of reach.
To gain greater architectural information, we developed an expansion microscopy (ExM) protocol optimized for Xenopus egg extract spindles [13]. Combining aspects of original ExM protocols [14,15], the MAP protocol [16], and the widely-used U-ExM protocol [17], our method maintains the fluorescence of the rhodamine-tubulin, which copolymerizes with endogenous Xenopus tubulin, allowing microtubule imaging without immunolabeling. Since not all antibodies are suitable for post-expansion immunolabeling, this protocol retains the possibility of pre-expansion immunolabeling, addressing the difficulty of finding effective antibodies for Xenopus. By enhancing resolution and minimizing artifacts, our ExM approach, with extended immunolabeling capacities, provides a new and powerful means to explore microtubule and assembly factor organization to better understand spindle architecture and morphology. Although our protocol is now optimized for the Xenopus egg extract systems, it can likely be adapted for structures assembled in extracts beyond spindles and for various other frog species [4,18].
Materials and reagents
Biological materials
1. Spindles assembled from Xenopus egg extracts, prepared as previously described [19,20]
Reagents
1. 1,4-Piperazinediethanesulfonic acid (PIPES) (Sigma-Aldrich, Merck, catalog number: P6757-500G)
2. Ethylene glycol-bis(2-aminoethylether)-N,N,N′,N′-tetraacetic acid (EGTA) (Sigma-Aldrich, Merck, catalog number: E3889)
3. Magnesium chloride 2 M solution (MgCl2) (Sigma-Aldrich, Merck, catalog number: 68475-100ML-F)
4. Potassium hydroxide (KOH) (Sigma-Aldrich, Merck, catalog number: P5958-500G)
5. Tris base (Euromedex, catalog number: 200923-A)
6. Glycerol (Sigma-Aldrich, Merck, catalog number: G5516-1L)
7. Methanol (Sigma-Aldrich, Merck, catalog number: 322415-250ML) stored at -20 °C
8. Triton X-100 (Sigma-Aldrich, Merck, catalog number: T8787)
9. Vaseline (Sigma-Aldrich, Merck, catalog number: 16415)
10. Lanolin (Sigma-Aldrich, Merck, catalog number: L7387)
11. Paraffin wax (Sigma-Aldrich, Merck, catalog number: 76242)
12. 6-((acryloyl)amino)hexanoic acid, succinimidyl ester (AcX) (Thermo Fisher Scientific, catalog number: A20770)
13. Dimethyl sulfoxide (DMSO) (Sigma-Aldrich, catalog number: D2650-5X5ML)
14. Sodium acrylate (Sigma-Aldrich, Merck, catalog number: 408220-100G)
15. Acrylamide 40% solution (Interchim, catalog number: UP873376 ACRYL-40)
16. N,N’-methylenebisacrylamide 2% solution (Sigma-Aldrich, Merck, catalog number: M1533)
17. N,N,N′,N′-Tetramethylethylenediamine (TEMED) (Sigma-Aldrich, Merck, catalog number: T9281-25ML)
18. Ammonium persulfate (APS) (Sigma-Aldrich, Merck, catalog number: A3678-25G)
19. 10× Phosphate buffered saline (PBS) (Euromedex, catalog number: ET330)
20. Sodium dodecyl sulfate 20% solution (SDS) (Sigma-Aldrich, Merck, catalog number: 05030-500ML-F)
21. Sodium chloride (NaCl) (Sigma-Aldrich, Merck, catalog number: 31434-1KG-M)
22. Bovine serum albumin (BSA) (Euromedex, catalog number: 04-100-812-C)
23. IGEPAL® CA-630 (Sigma-Aldrich, Merck, catalog number: I8896-50ML)
24. Hoechst 33342 (Sigma-Aldrich, Merck, catalog number: B2261-25MG)
Solutions
1. 1 M K-PIPES (see Recipes)
2. 0.1 M K-EGTA (see Recipes)
3. 5× BRB80 (see Recipes)
4. Spindle dilution buffer (see Recipes)
5. Spindle cushion buffer (see Recipes)
6. PBS (see Recipes)
7. PBSI (see Recipes)
8. AcX stock solution (see Recipes)
9. Anchoring solution (see Recipes)
10. 1 M Tris base (see Recipes)
11. 4 M NaCl solution (see Recipes)
12. Denaturation buffer (see Recipes)
13. PBT (see Recipes)
14. Sodium acrylate 38% solution (see Recipes)
15. Monomer solution (see Recipes)
16. 10× APS stock solution (see Recipes)
17. Hoechst stock solution (see Recipes)
18. Valap sealant (see Recipes)
Recipes
1. 1 M K-PIPES
| Reagent | Final concentration | Amount |
|---|---|---|
| PIPES | 1 M | 302.37 g |
| KOH | n/a | to pH 6.8 |
| Water (MilliQ) | n/a | to 1 L |
| Total | n/a | 1 L |
To prepare this buffer, begin by adding the powder to 700–800 mL of water in a beaker. Stir the solution continuously while gradually increasing the pH by carefully adding KOH pellets. As the pH rises, the powder will begin to dissolve. Once most of the powder has dissolved, continue adding the pellets one at a time. Wait until the powder is fully solubilized before measuring the pH. At this stage, use a pH meter equipped with temperature compensation. Adjust the pH to 7.8 by first using KOH pellets one by one up to pH 7, then fine-tune the final value with a 10 N KOH solution. Once the target pH is reached, transfer the solution to a measuring cylinder and bring the final volume up to 1 L with water. Filter-sterilize and store at 4 °C.
2. 0.1 M K-EGTA
| Reagent | Final concentration | Amount |
|---|---|---|
| EGTA | 0.1 M | 19.02 g |
| KOH | n/a | to pH 7.8 |
| Water (MilliQ) | n/a | to 500 mL |
| Total | n/a | 500 mL |
To prepare this buffer, begin by adding the powder to 350–400 mL of water in a beaker. Stir the solution continuously while gradually increasing the pH by carefully adding KOH pellets. As the pH rises, the powder will begin to dissolve. Once most of the powder has dissolved, continue adding the pellets one at a time. Wait until the powder is fully solubilized before measuring the pH. At this stage, use a pH meter equipped with temperature compensation. Adjust the pH to 7.8 by first using KOH pellets one by one up to pH 7, then fine-tune the final value with a 10 N KOH solution. Once the target pH is reached, transfer the solution to a measuring cylinder and bring the final volume up to 500 mL with water. Filter-sterilize and store at 4 °C.
3. 5× BRB80
| Reagent | Final concentration | Amount |
|---|---|---|
| 1 M K-PIPES | 400 mM | 400 mL |
| 0.1 M K-EGTA | 5 mM | 50 mL |
| 2 M MgCl2 | 5 mM | 2.5 mL |
| KOH | n/a | to pH 6.8 |
| Water | n/a | To 1 L |
| Total | n/a | 1 L |
Filter-sterilize and store at 4 °C.
4. Spindle dilution buffer
| Reagent | Final concentration | Amount |
|---|---|---|
| Glycerol | 30% | 30 mL |
| 5× BRB80 | 1× | 20 mL |
| Triton X-100 | 0.5% | 500 μL |
| Water (MilliQ) | n/a | to 100 mL |
| Total | n/a | 100 mL |
Filter-sterilize and store at 4 °C.
5. Spindle cushion buffer
| Reagent | Final concentration | Amount |
|---|---|---|
| Glycerol | 40% | 200 mL |
| 5× BRB80 | 1× | 100 mL |
| Water (MilliQ) | n/a | to 500 mL |
| Total | n/a | 500 mL |
Filter-sterilize and store at 4 °C.
6. PBS
| Reagent | Final concentration | Amount |
|---|---|---|
| 10× PBS | 1× | 100 mL |
| Water (MilliQ) | n/a | 900 mL |
| Total | n/a | 1 L |
Filter-sterilize and store at room temperature.
7. PBSI
| Reagent | Final concentration | Amount |
|---|---|---|
| IGEPAL® CA-630 | 0.1% | 10 μL |
| PBS | n/a | 9.99 mL |
| Total | n/a | 10 mL |
Prepare fresh at room temperature. Place on a rotator and allow time for the IGEPAL to get into solution.
8. AcX stock solution
| Reagent | Final concentration | Amount |
|---|---|---|
| AcX | 10 mg/mL | 5 mg |
| DMSO | n/a | 500 μL |
| Total | n/a | 500 μL |
Prepare 10 μL aliquots and store at -20 °C.
9. Anchoring solution
| Reagent | Final concentration | Amount |
|---|---|---|
| AcX stock solution | 0.1 mg/mL | 10 μL |
| PBS | n/a | 990 μL |
| Total | n/a | 1 mL |
Prepare fresh. Freeze the rest at -20 °C and thaw it for one more use.
10. 1 M Tris base
| Reagent | Final concentration | Amount |
|---|---|---|
| Tris base | 1 M | 121.1 g |
| HCl | n/a | to pH 8 |
| Water (MilliQ) | n/a | to 1 L |
| Total | n/a | 1 L |
Filter-sterilize and store at room temperature.
11. 4 M NaCl solution
| Reagent | Final concentration | Amount |
|---|---|---|
| NaCl | 4 M | 58.44 g |
| Water (MilliQ) | n/a | to 250 mL |
| Total | n/a | 250 mL |
Filter-sterilize and store at room temperature.
12. Denaturation buffer
| Reagent | Final concentration | Amount |
|---|---|---|
| 1 M Tris base | 0.1% | 2 mL |
| SDS 20% solution | 200 mM | 11.52 mL |
| 4 M NaCl | 200 mM | 2 mL |
| Water (MilliQ) | n/a | 24.48 mL |
| Total | n/a | 40 mL |
Prepare fresh at room temperature. Place on a rotator and allow time for the solution to homogenize. Count 40 mL per gel.
Note: The SDS precipitates at temperatures below 15 °C and at even higher temperatures when combined with high salt concentration, such as in the denaturation buffer. Therefore, make sure that the room temperature is not too low to prevent the precipitation of the SDS.
13. PBT
| Reagent | Final concentration | Amount |
|---|---|---|
| Triton X-100 | 0.1% | 100 μL |
| PBS | n/a | 99.9 mL |
| Total | n/a | 100 mL |
Prepare fresh at room temperature. Place on a rotator and allow time for the Triton X-100 to get into solution. Count ~100 mL per gel.
14. Sodium acrylate 38% solution
| Reagent | Final concentration | Amount |
|---|---|---|
| Sodium acrylate | 38% (wt/wt) | 19 g |
| Water (MilliQ) | n/a | 31 mL |
| Total | n/a | 31 mL |
Prepare 1.5 mL aliquots and store at -20 °C. Never refreeze; always take a new aliquot.
Note: Sodium acrylate sometimes comes with a variable purity level, which can affect performance. When preparing the sodium acrylate stock solution, check that it is colorless under normal room lighting. The solution should be as clear as possible. If the solution has a yellow tint, discard the solution and order a new batch of sodium acrylate.
15. Monomer solution
| Reagent | Final concentration | Amount |
|---|---|---|
| 10× PBS | 1× | 200 μL |
| Sodium acrylate 38% solution | 19% | 1 mL |
| Acrylamide 40% solution | 10% | 500 μL |
| N,N’-methylenebisacrylamide 2% solution | 0.1% | 100 μL |
| Water (MilliQ) | n/a | 200 μL |
| Total | n/a | 2 mL |
Prepare 85 μL aliquots and store at -20 °C. Never refreeze; always take a new aliquot. Count one per gel.
16. 10× APS stock solution
| Reagent | Final concentration | Amount |
|---|---|---|
| APS | 10% | 1 g |
| Water (MilliQ) | n/a | to 10 mL |
| Total | n/a | 10 mL |
Prepare 50 μL aliquots and store at -20 °C. Never refreeze; always take a new aliquot.
17. Hoechst stock solution
| Reagent | Final concentration | Amount |
|---|---|---|
| Hoechst 33342 | 10 mg/mL | 25 mg |
| Water (MilliQ) | n/a | 2.5 mL |
| Total | n/a | 2.5 mL |
Prepare 200 μL aliquots and store at -20 °C for long-term storage. When thawing an aliquot, keep it at 4 °C until finished.
18. Valap sealant
| Reagent | Final concentration | Amount |
|---|---|---|
| Vaseline | 1/3 | 10 g |
| Lanolin | 1/3 | 10 g |
| Paraffin wax | 1/3 | 10 g |
| Total | n/a | 30 g |
Heat the mixture in a 100 mL glass beaker, just warm enough so that it liquefies. Stir occasionally. Do not overheat. Its color should stay golden yellow. Poor into a 50 mL screw-capped tube and keep at room temperature.
Laboratory supplies
1. 1.5 mL Eppendorf tubes (Eppendorf, catalog number: 0030123611)
2. Rapid-flow filters (Nalgene, Thermo Fischer Scientific, catalog number: 597-4520)
3. Pipette tips (TipOne)
4. 15 mL round-bottom glass centrifuge tube, high-strength (Kimble, catalog number: 45500-15)
5. Teflon adaptor for coverslips (homemade, see technical drawing in Figure 1A)
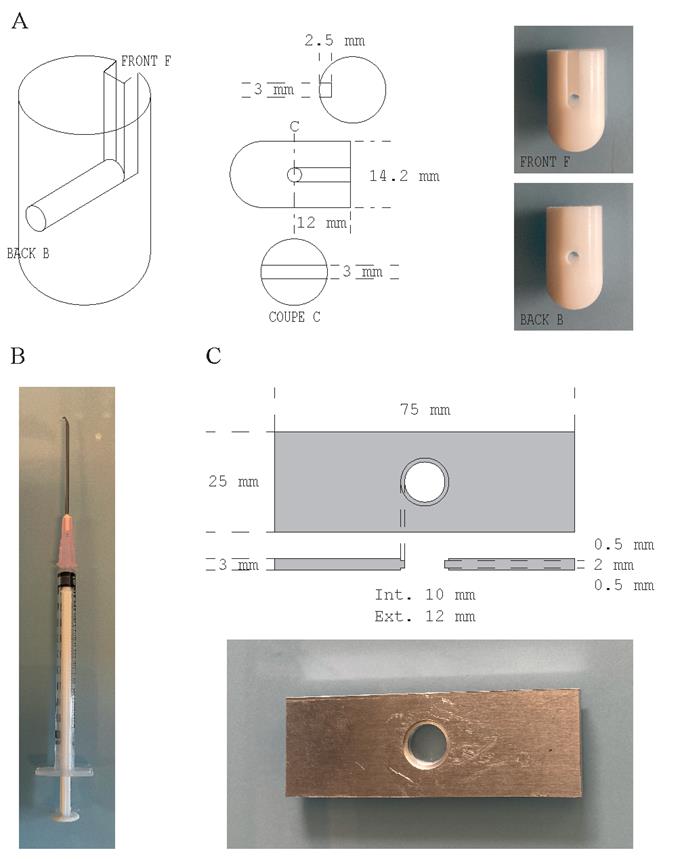
Figure 1. Homemade laboratory supplies. (A) Coverslip adaptor engineered from a Teflon rod according to the technical drawing presented (modified from Gogendeau et al. [21]). (B) Metal hook made from an 18 G needle tip bent as a hook and attached to a 1 mL syringe. (C) Slide to image coverslips engineered from a 3-mm-thick aluminum sheet according to the technical drawing presented.
6. Round 12 mm glass coverslips (Menzel-Gläser, catalog number: CB00120RA020)
7. Adapter rubber sleeve (Kimble, catalog number: 45550-15)
8. 1 mL syringe (Terumo, catalog number: MDSS01SE)
9. 18 G needle (Terumo, catalog number: AN*1838R1)
10. Metal hook (made from an 18G needle tip bent as a hook and attached to a 1 mL syringe; see Figure 1B)
11. Forceps (Dumont, catalog number: #55)
12. Parafilm (Bemis, catalog number: PM996)
13. Kimwipes (Kimtech, Kimberly-Clark, catalog number: 05511)
14. Metal slide for imaging spindles before expansion (homemade, see technical drawing in Figure 1C)
15. Test tube plastic rack (Nalgene, Thermo Fischer Scientific, catalog number: 5970-0530)
16. 6-well plates (Falcon, catalog number: 353046)
17. 100 mL glass beaker
18. 5 cm glass Petri dish
19. 14 cm plastic Petri dish
20. Microscope glass slides 76 mm × 26 mm (Menzel-Gläser)
21. #1.5, 24 mm × 60 mm microscope glass coverslips (Deckgläser)
22. Glass bottom dishes, Poly-d-lysine coated (MatTek, catalog number: P35GC-1.0-14C)
Equipment
1. High-speed centrifuge (Beckman Coulter, model: Avanti JXN-26)
2. Swinging bucket rotor (Beckman Coulter, model: JS13-1)
3. Incubator (Binder, model: B240), constantly set to 37 °C
4. Water bath (Grant, model: GD100-S18), to be set to 95 °C
5. Rotator (Grant, model: PS-3D)
Procedure
A. Spindle spin-downs
1. Take the spindle dilution buffer and spindle cushion buffer out of the fridge at least 2 h before spin-downs.
2. Prepare the PBSI.
3. Prepare the centrifugation setup:
a. Place a Teflon adaptor inside a Kimble glass tube.
b. Add 5 mL of room-temperature spindle cushion buffer, avoiding bubbles and without projecting on the tube wall.
c. Place a 12 mm round coverslip inside the tube and make it settle on the Teflon adaptor.
Note: If the coverslip floats, just touch it with forceps to make it sink.
4. When ready, take 20–50 μL of egg extract spindle reaction using a cut 200 μL pipette tip and add it to 1 mL of room-temperature spindle dilution buffer in a 1.5 mL tube.
Note: The quantity of egg extract can vary based on how many eggs were laid, so the amount of extract in each reaction should be determined based on the total extract amount made and the planned experiments for the day [19,20]. 20–50 μL results in sufficient spindles for imaging and subsequent expansion.
5. Mix by inverting the tube a few times.
6. Layer the mix onto the cushion, pipetting using a cut 1 mL pipette tip (Figure 2A).
Note: Be careful not to mix the two phases. Tilt the tube and make the extract/dilution buffer mixture slowly flow along the wall of the tube.
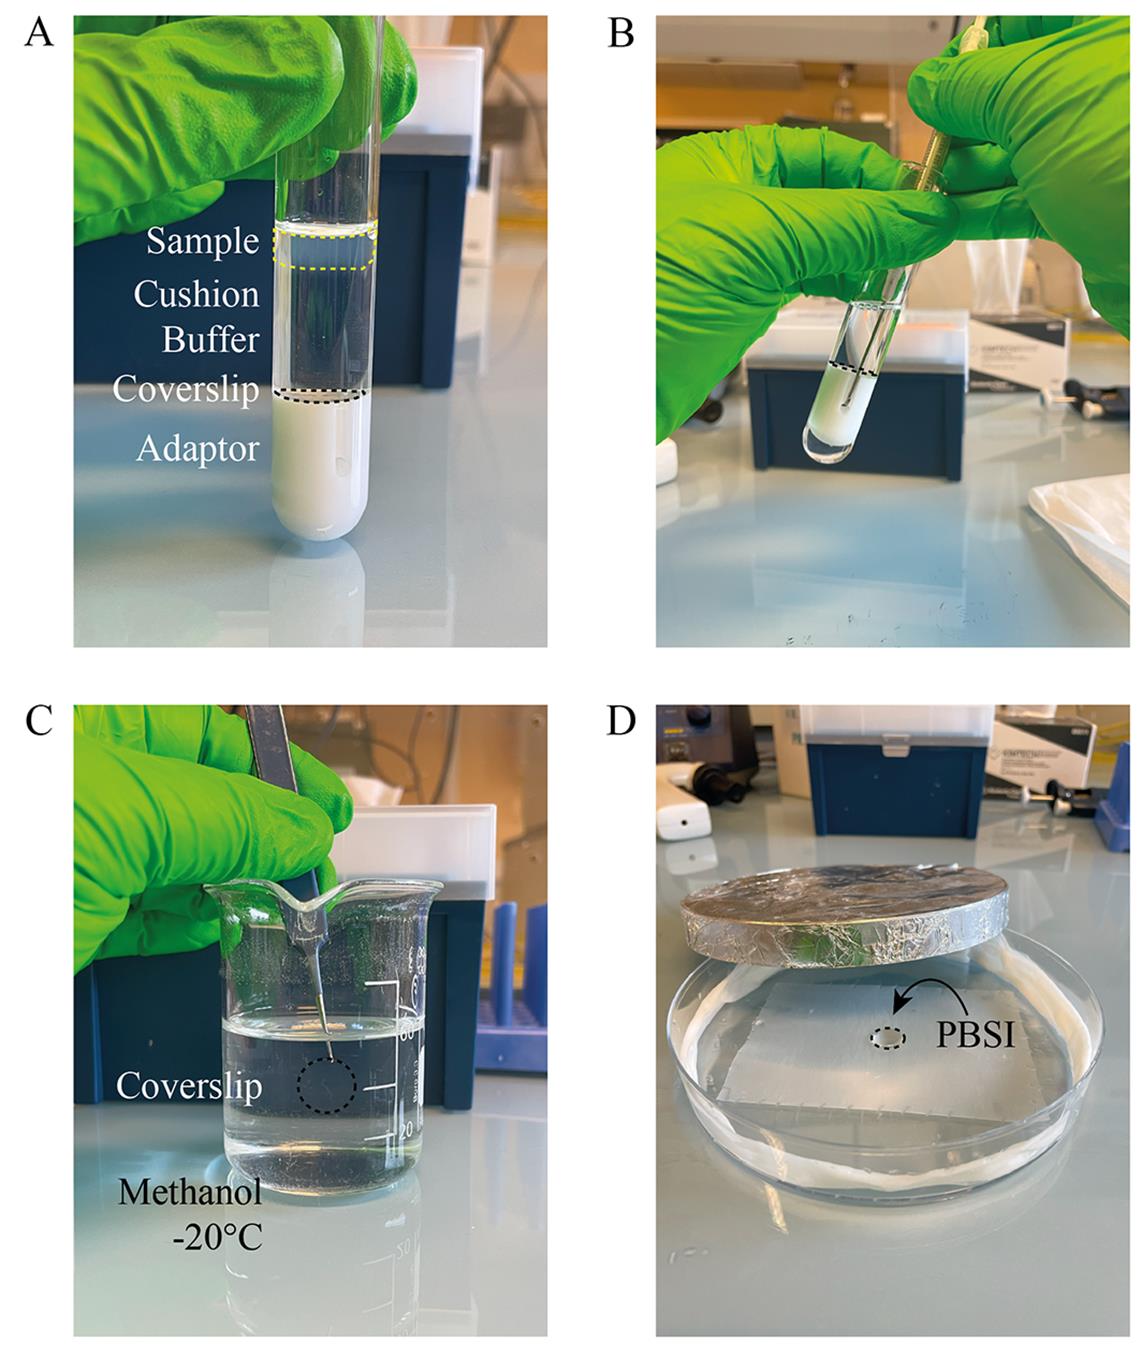
Figure 2. Spindle spin-downs. (A) Centrifugation setup. The fixed extract sample (cloudy layer, yellow dashed line) should rest above the cushion buffer, while the coverslip (black dashed line) rests on the adaptor. (B) Usage of the metal hook to retrieve the coverslip (black dashed line) after centrifugation. (C) Fixation in cold methanol. (D) Rehydration in a humidifying and light-protected Petri dish by pipetting PBSI onto the coverslip (black dashed line).
7. Place the tube in the adapter rubber sleeve within the JS13-1 swinging rotor.
8. Centrifuge at 17,000× g for 15 min at 16 °C.
B. Spindle fixation on the coverslip
This is the most crucial step of the protocol for maintaining faithful microtubule structures; it has been optimized specifically for ExM. See General note 1 for further details before proceeding.
1. Right before the end of centrifugation:
a. Prepare a Petri dish protected from light using aluminum foil and by putting parafilm on the bottom, as well as wet Kimwipes on its sides, so that it will stay humid.
b. Get the metal hook (made from a syringe and bent needle, see Figure 1B), a timer, and forceps ready.
c. Prepare a fresh cold methanol bath by adding approximately 50 mL of -20 °C methanol at the very last moment in a 100 mL beaker.
2. Retrieve the coverslip using the metal hook and forceps (Figure 2B).
3. Dip the coverslip inside the cold methanol for 10 s (Figure 2C). See General note 1.
4. Take the coverslip from methanol and put it on parafilm, sample-side up.
5. Rehydrate immediately using 120 μL of PBSI (Figure 2D).
6. Wash 3 times with 120 μL of PBSI for 5 min and then twice with 120 μL of PBS. See Section G.
Notes:
1. The protocol can be paused at this step for 1–3 days (such as over a weekend) by leaving the coverslip covered with 120 μL of PBS in the humid, light-protected Petri dish at 4 °C.
2. At this step, perform any immunofluorescence labeling of proteins of interest as described in [22].
3. At this step, the coverslip can be imaged to observe spindles before expansion to control for quality or for correlation with post-expansion images to calculate the expansion factor or verify expansion quality (loss of signal or deformations) as described in Guilloux et al. [13].
C. Anchoring
1. Prepare the anchoring solution.
2. Cover the coverslip with 120 μL of anchoring solution.
3. Replace the solution with a new 120 μL of anchoring solution.
4. Incubate for 1 h at room temperature within the light-protected Petri dish.
5. During this time, prepare the denaturation buffer and the PBT and warm up the water bath to 95 °C. Make sure that the incubator is set to 37 °C.
D. Gelation
1. Thaw the monomer solution and the 10× APS stock solution on ice.
2. Add 0.17 μL of TEMED to the 85 μL of monomer solution, flick well, and keep on ice.
3. Add 1.7 μL of 10× APS to the monomer solution, flick well, and keep on ice.
4. Remove as much anchoring solution as possible from the coverslip using vacuum aspiration.
5. Pipette the activated monomer solution up and down 3–4 times and make a 75 μL drop on the parafilm.
6. Retrieve the coverslip using forceps, maintaining vacuum aspiration (Figure 3A), and place it face down on the drop (Figure 3B).
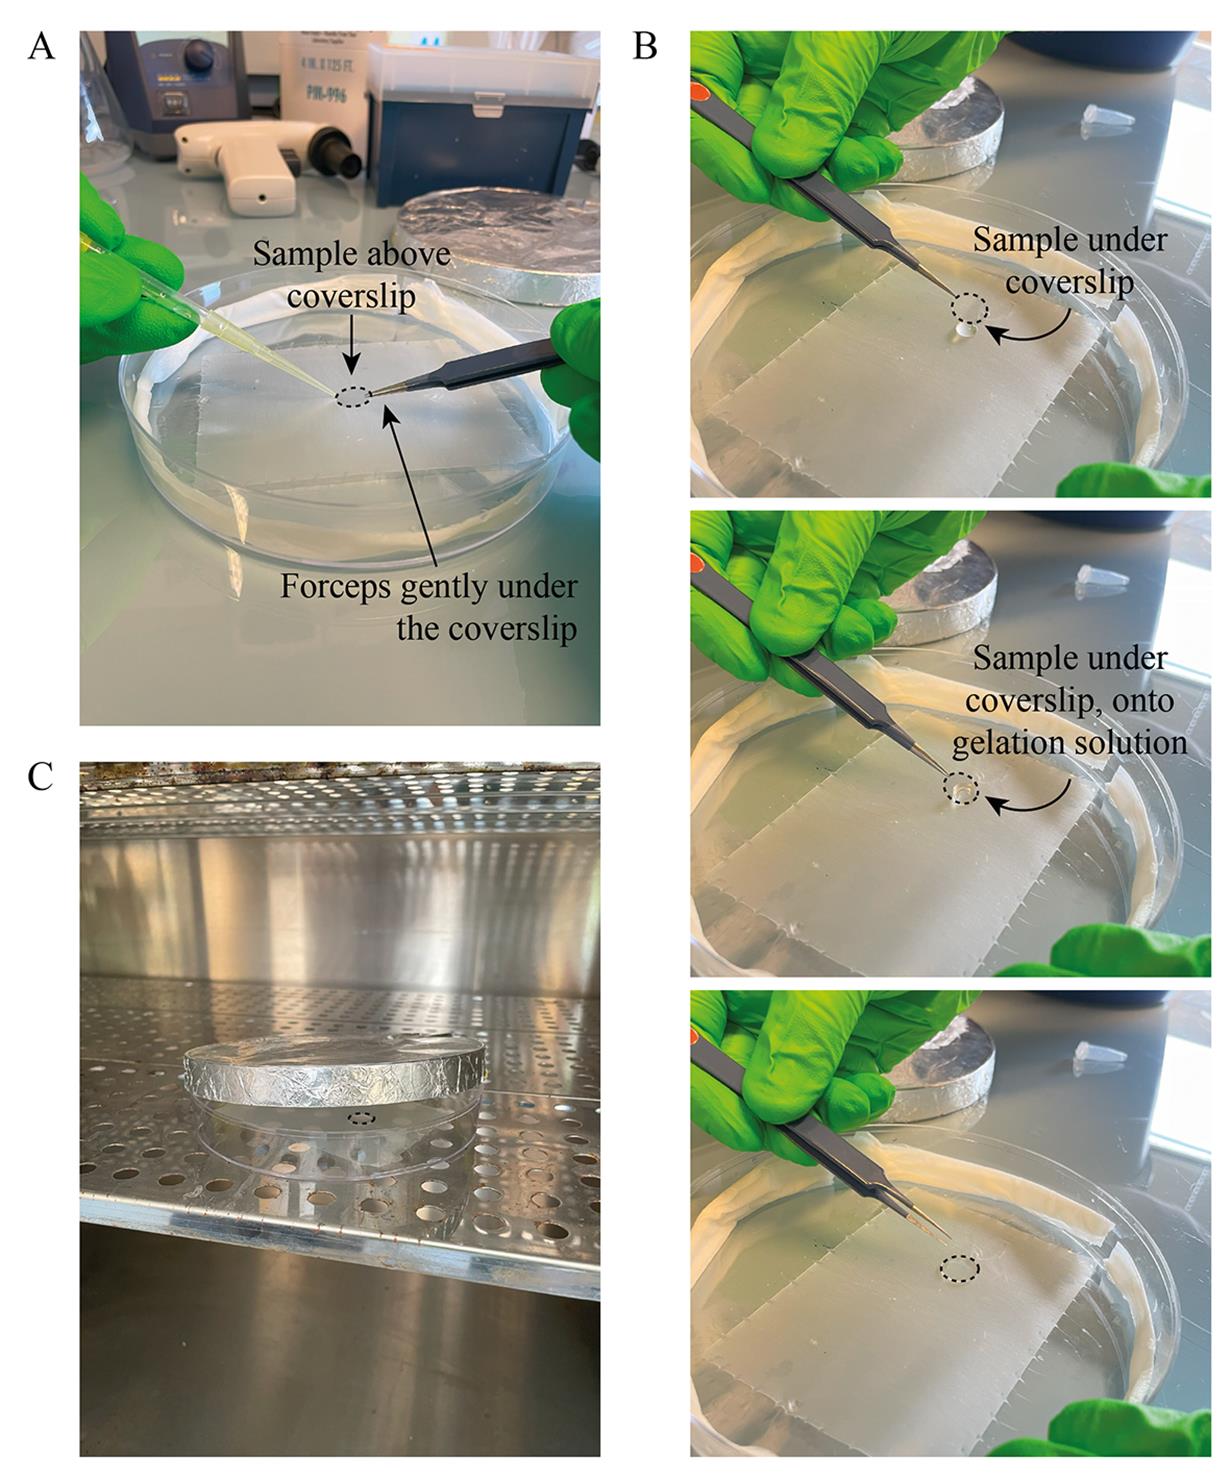
Figure 3. Gelation. (A) Coverslip (black dashed line) retrieved while aspirating. (B) Sample placed face down on the gelation solution. (C) Incubation in the dark without the humid Kimwipes and the lid slightly open.
7. Incubate at room temperature for 10 min.
8. Confirm the gelation by flicking the tube containing the rest of the activated gelation solution and remove the wet Kimwipes from the Petri dish.
9. Move the Petri dish to the 37 °C incubator and incubate for 30 min within the light-protected Petri dish only slightly open (Figure 3C).
E. Denaturation
1. Using a metal spatula, retrieve the gel associated with the coverslip (Figure 4A) and transfer it to a light-protected glass Petri dish containing 5 mL of denaturation buffer, with the coverslip down and gel on top (Figure 4B).
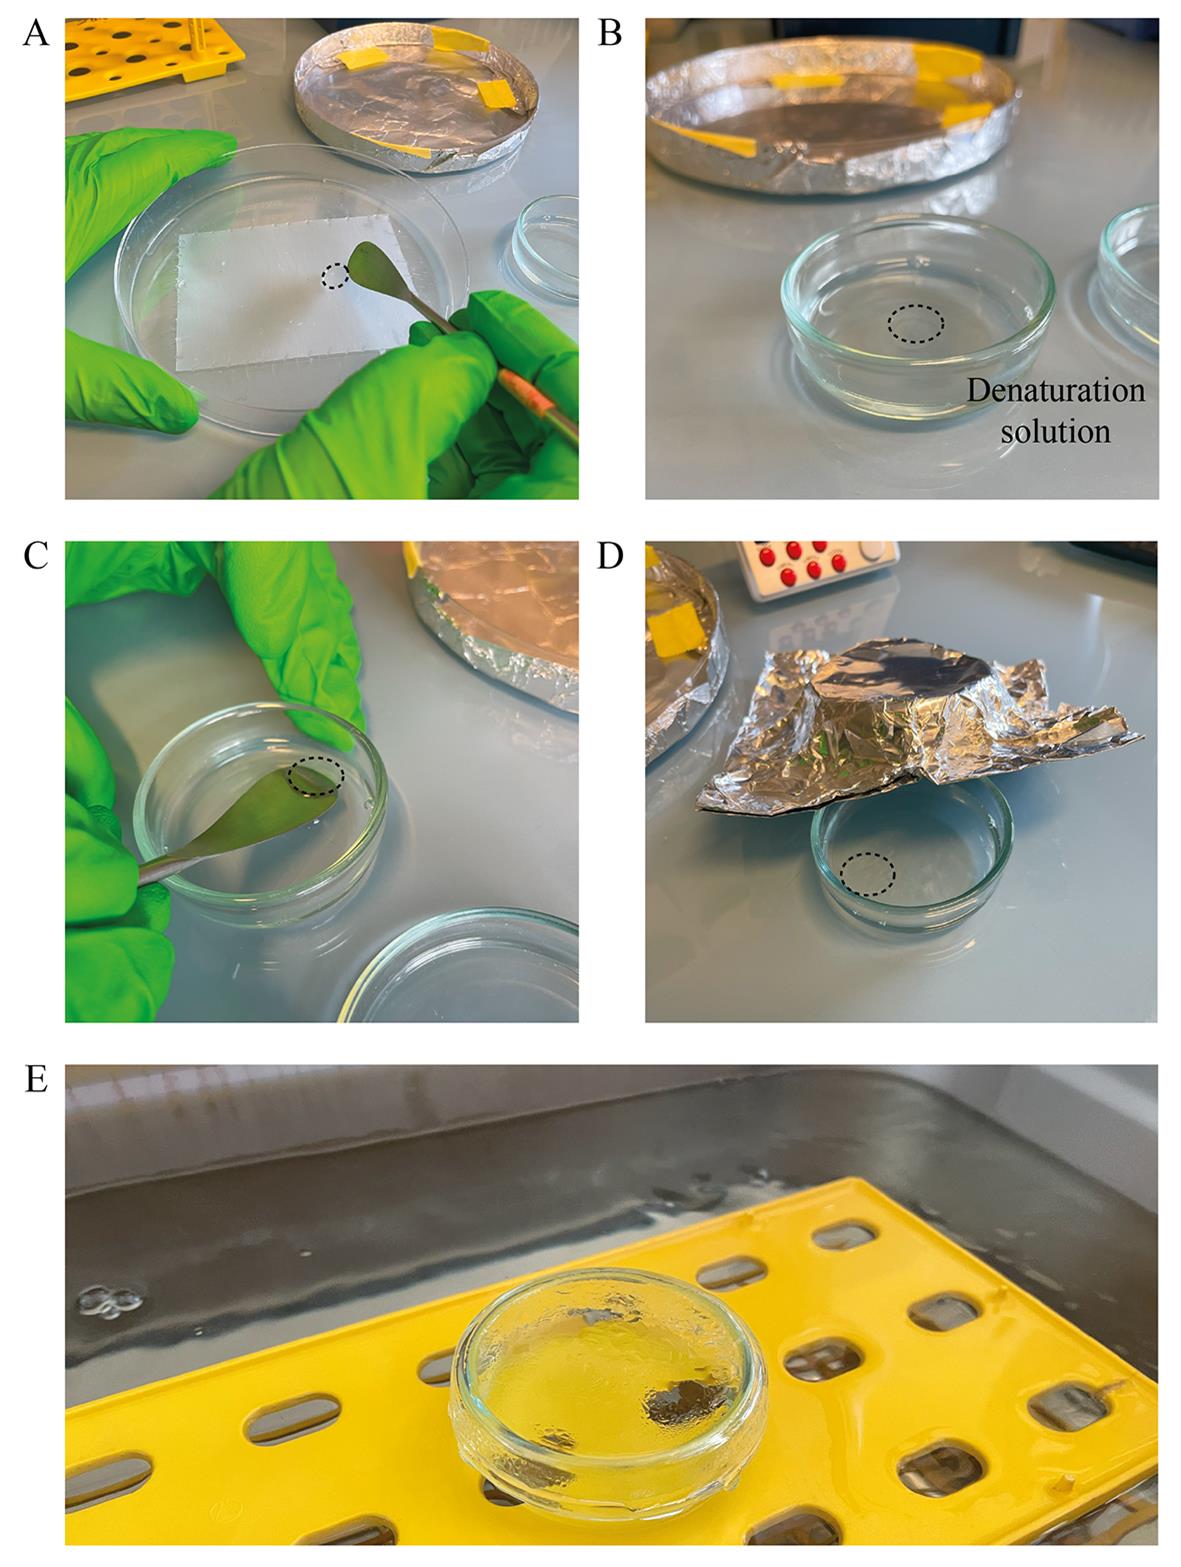
Figure 4. Denaturation. (A) Gel-associated coverslip to be retrieved (black dashed line). (B) Transfer to the denaturation solution. (C) Release of the gel and removal of the coverslip. (D) Incubation of the gel. Keep it in the dark with aluminum foil. (E) Water bath setup. The water bath is closed, protecting the gel from light and maintaining the temperature.
2. Quickly after, carefully remove the coverslip using a flat metal spatula (Figure 4C).
3. Take the coverslip out and add a few milliliters of denaturation buffer (Figure 4D).
4. Incubate at room temperature for 15 min.
Note: If the room temperature is too low and the SDS precipitates from the denaturation buffer in the Petri dish, warm the dish up for a few seconds in the water bath and then keep the Petri dish near a heat source for the rest of the incubation.
See General note 2.
5. Exchange the buffer for fresh denaturation buffer and move the glass dish to the 95 °C water bath, placing it at the water surface using a tube rack (Figure 4E).
6. Close the bath and incubate for 30 min. See General note 3.
7. Wash three times with at least 5 mL of PBT for 5 min at room temperature.
8. Incubate for 5 min at room temperature with Hoechst diluted to 20 μg/mL in PBT on the rotator.
9. Wash two times in PBS at room temperature.
10. Transfer the gel, sample-side up, to a light-protected 6-well plate filled with PBS and store at 4 °C until ready to expand.
F. Expansion
1. Transfer the gel, sample-side up, to a glass Petri dish protected from light using aluminum foil (Figure 5A) and fill the dish with water (MilliQ).
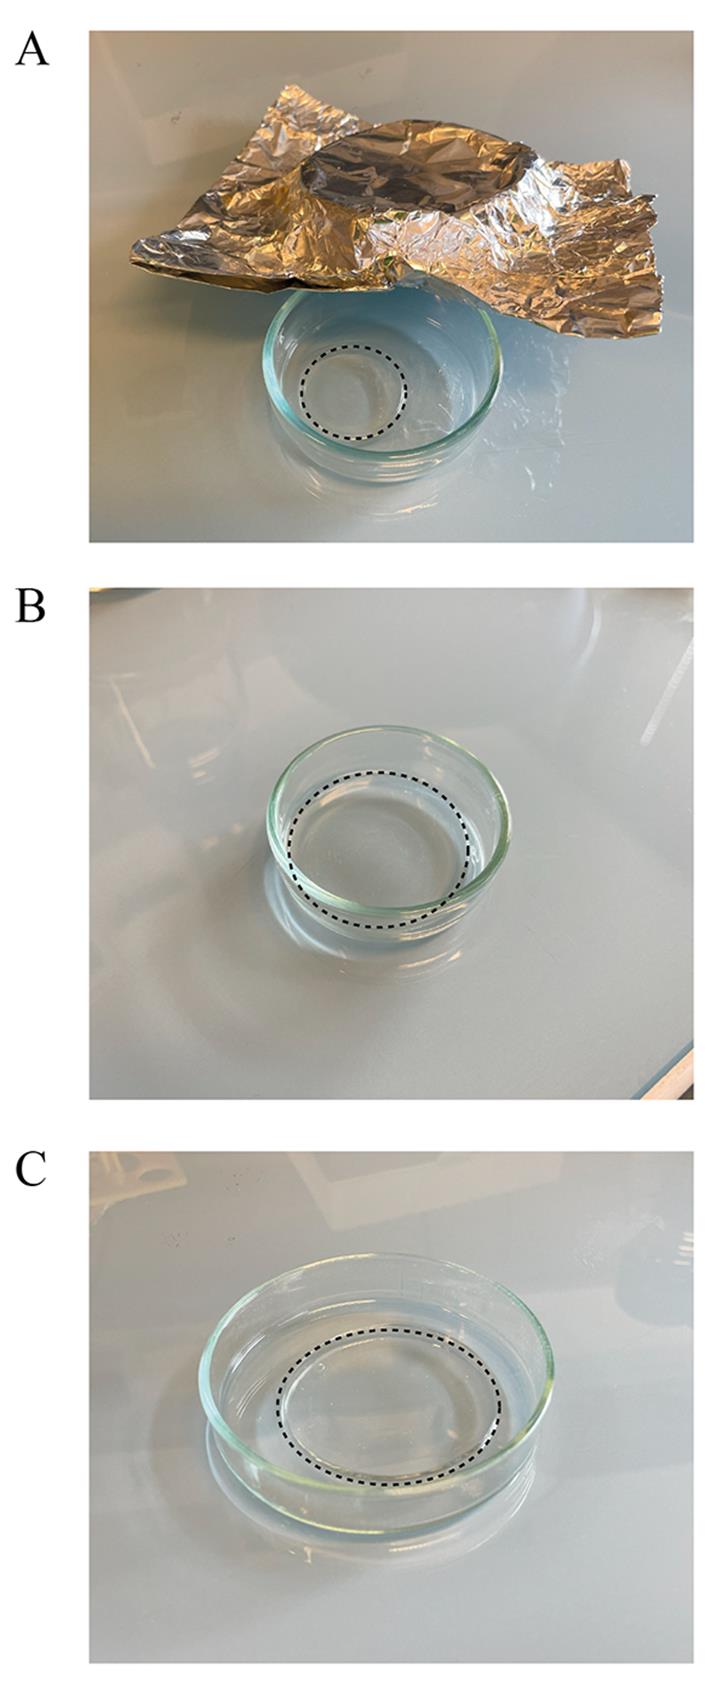
Figure 5. Expansion. (A) Gel after denaturation. (B) Gel after the first expansion in the 5 cm dish. (C) Gel after the second expansion in the 14 cm dish. Keep the gel protected from light at all times using aluminum foil.
2. Let the gel expand for 1 h, making sure that the gel is not sticking to the glass Petri dish.
3. Remove the water (Figure 5B), transfer the gel to a larger glass Petri dish (14 cm), and add fresh water (MilliQ).
4. Incubate the gel until fully expanded (30 additional minutes is usually sufficient), making sure that the gel is not sticking to the glass Petri dish by gently swirling the dish. The fully expanded gel should be approximately 4.5 cm in diameter (Figure 5C). See General note 2.
Note: Alternatively, the second expansion can also be performed in a 5 cm dish to take advantage of its size as a proxy for full gel expansion.
5. The gel is ready for imaging (Figure 5C). See step G2.
6. When done with imaging, retrieve the gel in a glass Petri dish filled with PBS.
7. Incubate for about 30 min at room temperature to shrink the gel back.
8. Transfer the gel to a light-protected 6-well plate filled with fresh PBS and store it at 4 °C to re-expand and image it again later.
Note: It can be useful to re-image a gel, for example, to acquire more structures. The gel preserves better when stored after shrinkage in PBS at 4 °C for (in our hands) up to 4 cycles of expansion/shrinkage without obvious alteration. Additionally, the shrunken form in PBS is necessary for post-expansion immunofluorescence [23].
G. Imaging
See General note 4.
1. Pre-expansion imaging:
a. Replace the PBS with PBS containing 10 μg/mL of Hoechst (Hoechst stock solution diluted 1:1,000 in PBS).
b. Rinse twice with PBS.
c. Seal the bottom side of the metal slide with a 12 mm round coverslip using warm Valap sealant.
d. Fill the cavity with PBS.
e. Mount the coverslip with spindles by putting it sample-side down (Figure 6A) and blotting the excess PBS using Kimwipes (Figure 6B, C).
f. Image using an upright microscope and air objective.
g. Retrieve the coverslip by adding an excess of PBS (Figure 6D).
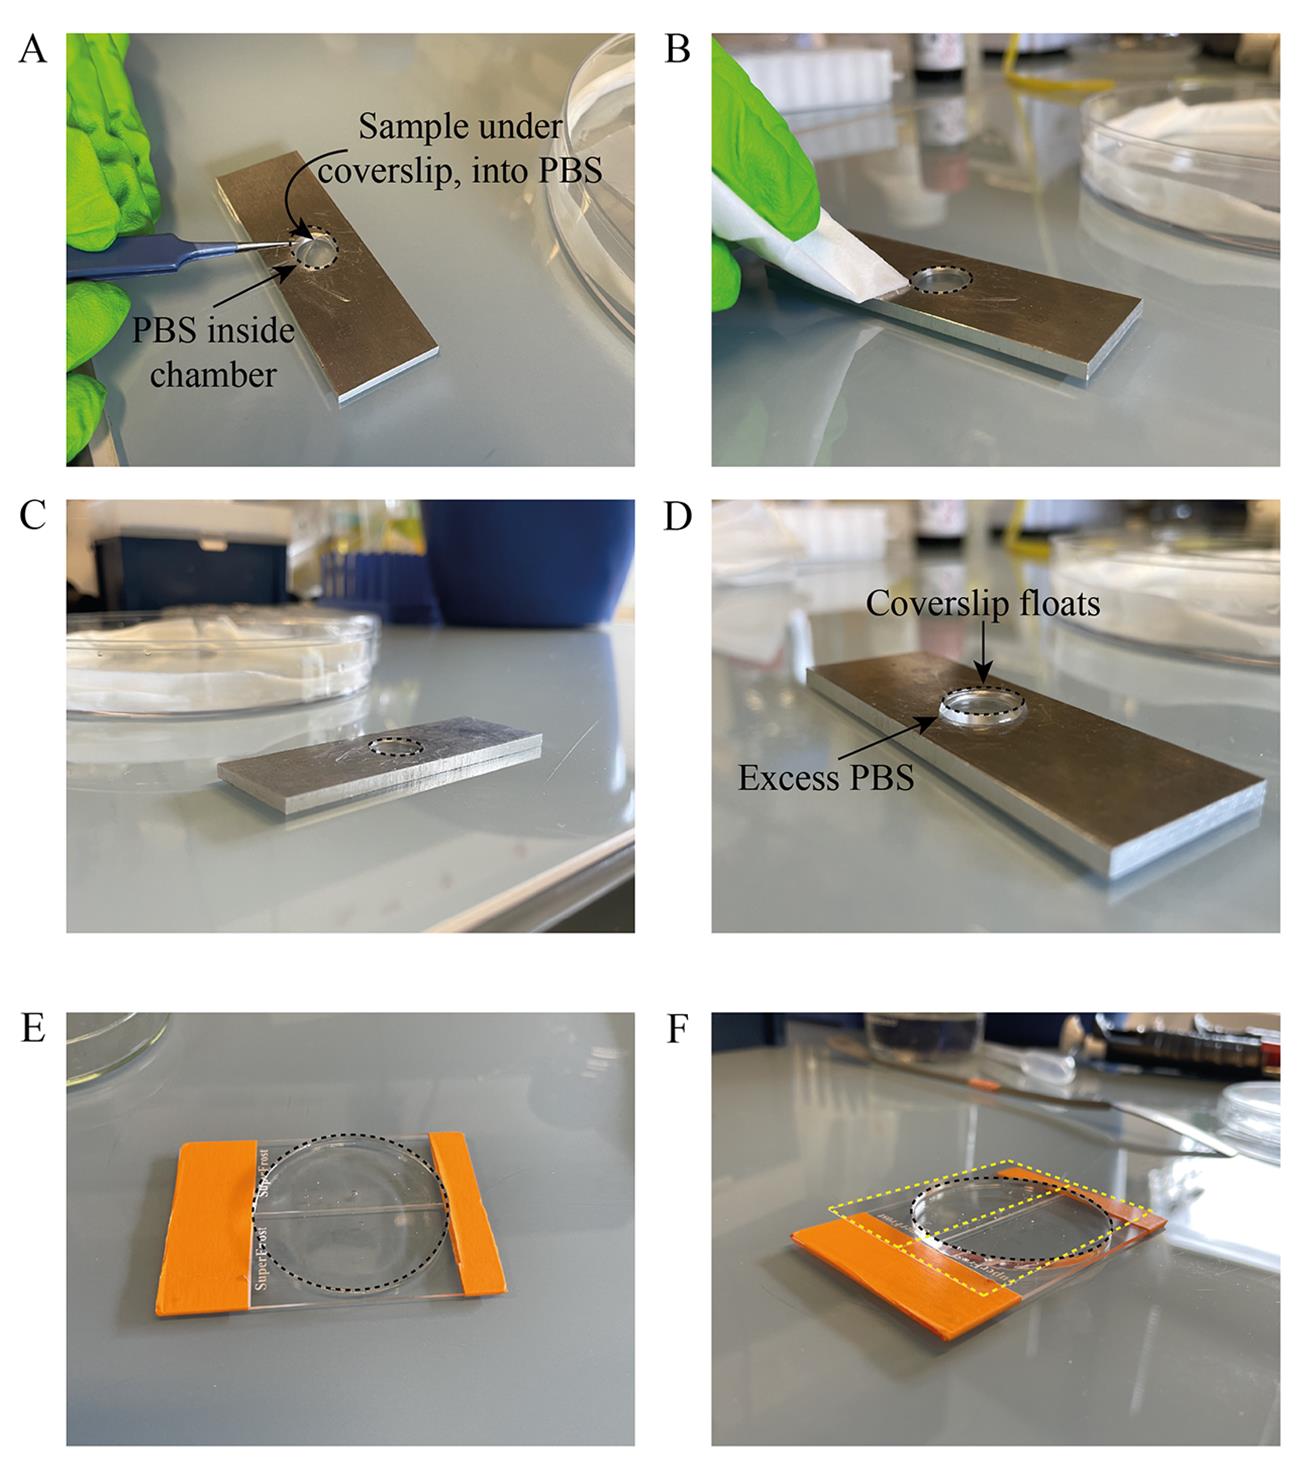
Figure 6. Imaging setups. (A) Placing of the coverslip (black dashed line) on the PBS-filled chamber of the imaging metal slide. (B) Blotting away the excess PBS. (C) Final setup for pre-expansion imaging. (D) Addition of excess PBS floats the coverslip for retrieval after imaging. (E) Expanded gel (black dashed line) placed on taped glass slides, sample-side up. The entire gel can be mounted without cutting. (F) Addition of two large 24 mm × 60 mm coverslips (yellow dashed line) over the expanded gel. The setup is ready for upright post-expansion imaging.
2. Post-expansion imaging
a. With an upright microscope, the whole gel can be mounted on two microscope slides taped together (Figure 6E). This allows screening of the entire gel, keeping its integrity and avoiding loss of structures of interest by cutting the gel to image it.
i. To mount the gel, remove the water from the Petri dish.
ii. Take the gel out using a metal spatula and put its side opposite to the sample on Kimwipes to dry it, which prevents it from moving when on the slide.
iii. Transfer it to the double slide (Figure 6E).
iv. Mount two large (24 mm × 60 mm) coverslips (Figure 6F) by slowly sliding them onto the gel surface, allowing any air bubbles to be pushed out.
v. Image under air or water objectives.
b. With an inverted microscope, pieces of gel can be mounted in a Poly-d-lysine-coated glass-bottom dish to image spindles at higher resolution.
i. Cut the gel into small pieces that would fit on the glass bottom of the dish.
ii. Dry the gel pieces on Kimwipes.
iii. Mount by gently pressing it, sample-face down, onto the Poly-d-lysine-coated glass.
iv. Image using air or water objectives.
Data analysis
This protocol was validated [13] by evaluating the variability of the expansion factor using Elastix (v. 5.00, open source, elastix.dev/download.php) and the maintenance of fluorescence distribution along spindle length measured using Fiji (ImageJ v. 1.54f, open source, https://imagej.net/software/fiji/), and evaluating possible expansion-induced deformations using Wolfram Mathematica (v. 12.1.1.0, requires a commercial license, https://www.wolfram.com/mathematica/) and a previously published dedicated script [24], in various conditions to reach the optimal protocol presented here. Following technical validation, this optimized protocol was used to analyze, at high resolution, 11 spindles from 3 independent X. laevis extracts and 15 spindles from 3 independent X. tropicalis extracts, using Fiji (ImageJ v. 1.54f) and a dedicated macro published in the study, to offer new insights into how spindle architecture can be adapted across different spindle sizes [13].
Validation of protocol
This protocol or parts of it has been used and validated in the following research article(s):
• Guilloux et al. [13]. Optimized expansion microscopy reveals species-specific spindle microtubule organization in Xenopus egg extracts. Molecular Biology of the Cell (Figure 6A–D, Movie S1, Movie S2)
Overall, close to 700 spindles were analyzed to develop this protocol, with particular emphasis on fixation, including 52 spindles from 4 egg extracts to validate the final protocol. Both expanded and non-expanded spindles were imaged, followed by careful measurements with multiple methods and metrics to calculate and characterize the increase in resolution and advantages of expansion microscopy. Measurements allowing to validate the protocol included assessing the variability of the expansion factor, the maintenance of fluorescence distribution along spindle length, and evaluating possible expansion-induced deformations (Guilloux et al. [13], Figures 2–5, Supplemental Figures S3–S4).
General notes and troubleshooting
1. The fixation method described in this protocol is absolutely critical for its success. It differs from standard extract spindowns and has been optimized to best preserve microtubule integrity for expansion. Standard protocols involve the possible addition of 2.5% formaldehyde in the spindle dilution buffer and a 5-min incubation in cold (-20 °C) methanol [19,22], but this results in shorter spindle lengths and buckled microtubules and decreases the expansion factor [13]. The absence of formaldehyde in the spindle dilution buffer and a 10-s, -20 °C methanol fixation step proved to be the best compromise amongst several solutions, temperatures, and timing duration for minimal alteration or damage to microtubules as a result of the cold treatment and sufficient fixation onto the coverslip for further immunofluorescence and ExM processing. Further details can be found in Guilloux et al. [13].
2. The gel may stick to the Petri dish. Gently swirl the glass dish to assess it, and do not hesitate to move it from time to time with the spatula.
3. Denaturation at 95 °C was shown to be the most effective at preserving microtubule structures compared to other disruption protocols prior to expansion that are based on digestion by proteinase [13].
4. To validate spindles before expansion, it is possible to use classical metrics, including length (~40 μm) and uniform tubulin fluorescence distribution from pole to pole [4]. Maintenance of spindle integrity after expansion is measured using Elastix (http://elastix.isi.uu.nl) and a Mathematica (Wolfram) script as previously described [24]. Both methods are described in further detail in Guilloux et al. [13].
Acknowledgments
This protocol was used in Guilloux et al. [13]. For this work, we thank the members of the Gibeaux and the Heald labs for their support. We thank the members of the FAIIA and MRic facilities, in particular Dr. Xavier Pinson. We are grateful to Paul Guichard and Virginie Hamel for guidance in developing this protocol, as well as Julien Maurais for taking great care of our frogs. G.G. was supported by PhD fellowships from the Region Bretagne (ARED) and from the Fondation pour la Recherche Médicale FDT202304016369, and M.K. by a National Science Foundation (NSF) GRFP fellowship. R.H. was supported by NIH MIRA grant R35 GM118183 and the Flora Lamson Hewlett Chair, and R.G. by a Human Frontier Science Program grant CDA00019/2019-C.
Competing interests
The authors declare no conflicts of interest.
Ethical considerations
All animal experimentations performed to develop this protocol (i.e., injections of frogs to induce the production of the eggs used to prepare egg extracts and assemble spindles) were completed according to our animal use protocol APAFiS #26858-2020072110205978, approved by the Animal Use Ethic Committee (#7, Rennes, France) and the French Ministry of Higher Education, Research and Innovation.
References
- Chunduri, N. K. and Storchová, Z. (2019). The diverse consequences of aneuploidy. Nat Cell Biol. 21(1): 54–62. https://doi.org/10.1038/s41556-018-0243-8
- Crowder, M. E., Strzelecka, M., Wilbur, J. D., Good, M. C., von Dassow, G. and Heald, R. (2015). A comparative analysis of spindle morphometrics across metazoans. Curr Biol. 176(11): 1542–1550. https://doi.org/10.1016/j.cub.2015.04.036
- Walczak, C. E. and Heald, R. (2008). Mechanisms of Mitotic Spindle Assembly and Function. Int Rev Cytol. 265: 111–158. https://doi.org/10.1016/s0074-7696(07)65003-7
- Kitaoka, M., Heald, R. and Gibeaux, R. (2018). Spindle assembly in egg extracts of the Marsabit clawed frog, Xenopus borealis. Cytoskeleton. 75(6): 244–257. https://doi.org/10.1002/cm.21444
- Brown, K. S., Blower, M. D., Maresca, T. J., Grammer, T. C., Harland, R. M. and Heald, R. (2007). Xenopus tropicalis egg extracts provide insight into scaling of the mitotic spindle. J Cell Biol. 176(6): 765–770. https://doi.org/10.1083/jcb.200610043
- Helmke, K. J. and Heald, R. (2014). TPX2 levels modulate meiotic spindle size and architecture in Xenopus egg extracts. J Cell Biol. 206(3): 385–393. https://doi.org/10.1083/jcb.201401014
- Loughlin, R., Wilbur, J. D., McNally, F. J., Nédélec, F. J. and Heald, R. (2011). Katanin Contributes to Interspecies Spindle Length Scaling in Xenopus. Cell. 147(6): 1397–1407. https://doi.org/10.1016/j.cell.2011.11.014
- Sahl, S. J., Hell, S. W. and Jakobs, S. (2017). Fluorescence nanoscopy in cell biology. Nat Rev Mol Cell Biol. 18(11): 685–701. https://doi.org/10.1038/nrm.2017.71
- Balzarotti, F., Eilers, Y., Gwosch, K. C., Gynnå, A. H., Westphal, V., Stefani, F. D., Elf, J. and Hell, S. W. (2017). Nanometer resolution imaging and tracking of fluorescent molecules with minimal photon fluxes. Science. 355(6325): 606–612. https://doi.org/10.1126/science.aak9913
- Gibeaux, R., Lang, C., Politi, A. Z., Jaspersen, S. L., Philippsen, P. and Antony, C. (2012). Electron tomography of the microtubule cytoskeleton in multinucleated hyphae of Ashbya gossypii. J Cell Sci. 125(Pt 23): 5830–5839. https://doi.org/10.1242/jcs.111005
- Redemann, S., Baumgart, J., Lindow, N., Shelley, M., Nazockdast, E., Kratz, A., Prohaska, S., Brugués, J., Fürthauer, S. and Müller-Reichert, T. (2017). C. elegans chromosomes connect to centrosomes by anchoring into the spindle network. Nat Commun. 8(1): 15288. https://doi.org/10.1038/ncomms15288
- Kiewisz, R., Fabig, G., Conway, W., Baum, D., Needleman, D. and Müller-Reichert, T. (2022). Three-dimensional structure of kinetochore-fibers in human mitotic spindles. eLife. 11: e75459. https://doi.org/10.7554/eLife.75459
- Guilloux, G., Kitaoka, M., Mocaer, K., Heichette, C., Duchesne, L., Heald, R., Pecot, T. and Gibeaux, R. (2025). Optimized expansion microscopy reveals species-specific spindle microtubule organization in Xenopus egg extracts. Mol Biol Cell. 36(6): ar73. https://doi.org/10.1091/mbc.E24-09-0421
- Chen, F., Tillberg, P. W. and Boyden, E. S. (2015). Expansion microscopy. Science. 347(6221): 543–548. https://doi.org/10.1126/science.1260088
- Tillberg, P. W., Chen, F., Piatkevich, K. D., Zhao, Y., Yu, C.-C., English, B. P., Gao, L., Martorell, A., Suk, H.-J., Yoshida, F., et al. (2016). Protein-retention expansion microscopy of cells and tissues labeled using standard fluorescent proteins and antibodies. Nat Biotechnol. 34(9): 987–992. https://doi.org/10.1038/nbt.3625
- Ku, T., Swaney, J., Park, J. Y., Albanese, A., Murray, E., Cho, J. H., Park, Y. G., Mangena, V., Chen, J., Chung, K., et al. (2016). Multiplexed and scalable super-resolution imaging of three-dimensional protein localization in size-adjustable tissues. Nat Biotechnol. 34(9): 973–981. https://doi.org/10.1038/nbt.3641
- Gambarotto, D., Zwettler, F. U., Le Guennec, M., Schmidt-Cernohorska, M., Fortun, D., Borgers, S., Heine, J., Schloetel, J. G., Reuss, M., Unser, M., et al. (2018). Imaging cellular ultrastructures using expansion microscopy (U-ExM). Nat Methods. 16(1): 71–74. https://doi.org/10.1038/s41592-018-0238-1
- Miller, K. E., Session, A. M. and Heald, R.(2019). Kif2a Scales Meiotic Spindle Size in Hymenochirus boettgeri. Curr Biol. 29(21): 3720–3727.e5. https://doi.org/10.1016/j.cub.2019.08.073
- Maresca, T. J. and Heald, R. (2006). Methods for Studying Spindle Assembly and Chromosome Condensation in Xenopus Egg Extracts. In: Methods in Molecular Biology. 459–474. https://doi.org/10.1007/978-1-59745-000-3_33
- Kitaoka, M., Guilloux, G., Heald, R. and Gibeaux, R. (2024). Preparation of Xenopus borealis and Xenopus tropicalis Egg Extracts for Comparative Cell Biology and Evolutionary Studies. In: Castro, A. and Lacroix, B. (Eds.). Cell Cycle Control. New York, NY: Springer US. 2740: 169–185. https://doi.org/10.1007/978-1-0716-3557-5_11
- Gogendeau, D., Guichard, P. and Tassin, A. M. (2015). Purification of centrosomes from mammalian cell lines. Methods Cell Biol. 129: 171–189. https://doi.org/10.1016/bs.mcb.2015.03.004
- Hannak, E. and Heald, R. (2006). Investigating mitotic spindle assembly and function in vitro using Xenopus laevis egg extracts. Nat Protoc. 1(5): 2305–2314. https://doi.org/10.1038/nprot.2006.396
- Hamel, V. and Guichard, P. (2021). Improving the resolution of fluorescence nanoscopy using post-expansion labeling microscopy. In: Methods in Cell Biology. Elsevier. 161: 297–315. https://doi.org/10.1016/bs.mcb.2020.07.002
- Chozinski, T. J., Halpern, A. R., Okawa, H., Kim, H.-J., Tremel, G. J., Wong, R. O. L. and Vaughan, J. C. (2016). Expansion microscopy with conventional antibodies and fluorescent proteins. Nat Methods. 13(6): 485–488. https://doi.org/10.1038/nmeth.3833
Article Information
Publication history
Received: Apr 22, 2025
Accepted: Jun 22, 2025
Available online: Jul 10, 2025
Published: Jul 20, 2025
Copyright
© 2025 The Author(s); This is an open access article under the CC BY-NC license (https://creativecommons.org/licenses/by-nc/4.0/).
How to cite
Readers should cite both the Bio-protocol article and the original research article where this protocol was used:
- Guilloux, G., Kitaoka, M., Mocaer, K., Heichette, C., Duchesne, L., Heald, R., Pecot, T. and Gibeaux, R. (2025). Fixation and Expansion Microscopy of Xenopus Egg Extract Spindles. Bio-protocol 15(14): e5396. DOI: 10.21769/BioProtoc.5396.
- Guilloux, G., Kitaoka, M., Mocaer, K., Heichette, C., Duchesne, L., Heald, R., Pecot, T. and Gibeaux, R. (2025). Optimized expansion microscopy reveals species-specific spindle microtubule organization in Xenopus egg extracts. Mol Biol Cell. 36(6): ar73. https://doi.org/10.1091/mbc.E24-09-0421
Category
Cell Biology > Cell structure > Microtubule
Cell Biology > Cell imaging > Super resolution imaging
Do you have any questions about this protocol?
Post your question to gather feedback from the community. We will also invite the authors of this article to respond.