- Protocols

- Articles and Issues
- For Authors
- About
- Become a Reviewer

Egg Microinjection for the Silkworm Bombyx mori
Published: Vol 15, Iss 10, May 20, 2025 DOI: 10.21769/BioProtoc.5317 Views: 3357
Reviewed by: Olga KopachJesús Hernández Falcón
Original research article
The authors used this protocol in:

Nov 2012
Advertisement


Protocol Collections
Comprehensive collections of detailed, peer-reviewed protocols focusing on specific topics


Related protocols
Abstract
The silkworm Bombyx mori has been extensively utilized in sericulture and serves as a representative model insect of Lepidoptera in various fields of life sciences and applied research. In recent years, its significance has further increased in molecular genetics and functional genomics. Germline transformation and genome editing in B. mori require the injection of vector solutions into early embryos; however, the thick eggshell of B. mori presents a significant challenge for microinjection. Conventional methods involve arranging eggs, pre-pierced with a tungsten needle, followed by solution injection, making the process both time-consuming and technically demanding. Here, we describe a simplified and more efficient microinjection protocol. Unlike conventional approaches, our method eliminates the need for egg removal from the egg-laying sheet and egg alignment on the slide glass by allowing injections to be performed directly on eggs retained on the egg-laying sheet. A thick-walled glass capillary, capable of penetrating the rigid eggshell, is used to directly pierce the eggshell and deliver the solution. By eliminating the need for egg alignment and micromanipulator operation, this protocol significantly enhances efficiency, enabling higher-throughput embryo injections within a shorter time frame. Moreover, this approach holds potential for application to other insect species with similarly thick eggshells.
Key features
• A simple and efficient microinjection method for silkworm eggs.
• Eliminates the need for egg alignment by injecting directly into eggs attached to the oviposition substrate.
• Conducted without a micromanipulator or tungsten needle to pierce the eggshell, using only a handheld thick-walled glass capillary.
• Applicable to other insect species with thick eggshells.
Keywords: Egg microinjectionBackground
The silkworm Bombyx mori is an important industrial insect widely used for silk production and as a platform for producing foreign proteins and pharmaceuticals [1]. It has also served as a key model organism for lepidopteran insects, contributing to fundamental research in genetics, physiology, biochemistry, developmental biology, and pathology [2–4]. In recent years, the complete sequencing and annotation of the silkworm genome [5,6], along with advances in genetic engineering [7], have further established B. mori as a valuable model for functional genomics research. Germline transformation and genome editing in silkworms require the injection of vector solutions into early embryos [8,9]. However, the thick eggshell of silkworms presents a significant challenge for microinjection [10].
A previous microinjection protocol for silkworm eggs was reported by Tamura et al. [10]. Their protocol consists of three steps: 1) removing the eggs from the egg-laying sheet and arranging them on a glass slide with their ventral sides aligned for injection; 2) pre-piercing the eggshell using a tungsten needle mounted on a micromanipulator; and 3) the glass capillary mounted on the micromanipulator is precisely positioned to be inserted through the hole made in the eggshell and used to inject the solution. Although this method is effective, it requires a specialized manipulator and involves time-consuming procedures such as aligning the eggs and adjusting the micromanipulator. Additionally, it demands a high level of technical skill, making the overall workload substantial.
In contrast, our protocol is simpler and more efficient by eliminating all three steps. Eggs remain on the egg-laying sheet as laid, and injection is performed directly without removal or alignment. A thick-walled glass capillary, capable of penetrating the thick eggshell, is held by hand to directly pierce the eggshell at the desired position and inject the solution. By eliminating the need to align eggs and operate a micromanipulator, our protocol significantly improves work efficiency, enabling injections into a larger number of eggs in less time. In particular, injection into early embryos must be performed within a limited time window during the syncytial blastoderm stage, before the cellular blastoderm forms. Therefore, the efficiency of this method is crucial. Moreover, since it does not require the use of a micromanipulator, the technical burden is reduced, making the technique more accessible to a broader range of researchers.
The microinjection method described in this protocol is not limited to silkworm eggs but can be broadly applied to other species with thick eggshells, such as the gypsy moth Lymantria dispar, the tea tussock moth Orgyia thyellina, the brown-winged green stink bug Plautia stali, and the bell cricket Meloimorpha japonica. By mitigating the technical challenges associated with microinjection, this approach has the potential to facilitate research in a wide range of fields, including functional genomics.
Materials and reagents
Biological materials
1. Bombyx mori eggs, larvae, pupae, and adults can be purchased from the National BioResource Project (NBRP) at Kyushu University; eggs are also available from the National Agriculture and Food Research Organization (NARO). When rearing from eggs or larvae, mulberry leaves (available from NBRP at Kyushu University) or artificial diet (available from Nosan Corporation) can be used as feed
Note: Since some silkworm strains are not suitable for rearing on artificial diets, it is recommended to check the feeding ability of artificial diets using the comprehensive silkworm resource database, Silkworm Base (https://shigen.nig.ac.jp/silkwormbase/about_kaiko.jsp).
Reagents
1. Fast Green FCF (Sigma-Aldrich, catalog number: F7252)
Note: This dye was used in Video 1 as a visual marker at a final concentration of 0.1% to demonstrate the injection process.
Laboratory supplies
1. Micro-loading tip (Eppendorf, catalog number: 5242 956 003)
2. Glass capillary (Daiwa Union, catalog number: uMPm-02)
Note: This glass capillary is a commercially available product suitable for silkworm egg microinjection. It does not require shaping with a puller. The capillary has an outer diameter of 1.5 mm, an inner diameter of 0.6 mm, and a tip outer diameter of approximately 35 μm, which we define as a “fine capillary tip” in this protocol.
3. Egg-laying sheet (Ehime-Sanshu, catalog number: 125)
4. Clear plastic cup (used for mating and oviposition) (Ai’ris, catalog number: 414-9650-727)
5. Insect rearing case (Sanplatec, catalog number: 02322)
6. Petri dish (Ina Optica, catalog number: I-90)
7. Paper towel (placed at the bottom of the rearing case)
8. Humid chamber
Equipment
1. FemtoJet 4i (Eppendorf, catalog number: 2229001215)
2. Microcentrifuge (TOMY, model: MX-307 or equivalent)
3. Foot pedal switch (Eppendorf, included with the FemtoJet 4i)
4. Capillary holder (Narishige, model: HI-7)
5. Grip head for capillary holder (Narishige, model: HIC-1.5)
Note: Although the FemtoJet 4i includes an Eppendorf capillary holder and grip head, we used the Narishige HI-7 capillary holder in this protocol. This holder, when combined with the HIC-1.5 grip head, provides a smoother and more stable grip due to the absence of a joint gap. While the combination of the Eppendorf holder and grip head is also compatible with the same glass capillaries, we found the Narishige setup easier to handle during handheld injection.
6. Pipetman [GILSON, catalog number: F123600 (P20)]
7. Stereomicroscope (Olympus, model: SZX16 or equivalent)
Procedure
A. Egg collection
1. Determine the sex of Bombyx mori pupae and place ten males and ten females in separate insect rearing cases. Allow them to emerge under controlled conditions of 25 °C and a 12/12 h light/dark photoperiod.
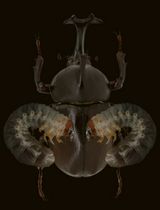
Note: The sex of pupae can be visually determined based on body size and morphological differences in the posterior ventral region (Figure S1). Female pupae are generally larger than males due to egg development. Sex differentiation is possible from the onset of pupation until just before adult emergence.
2. In the evening of the day of eclosion, pair one adult male and one adult female in a clear plastic cup and allow them to mate overnight under light conditions (Figure 1A).
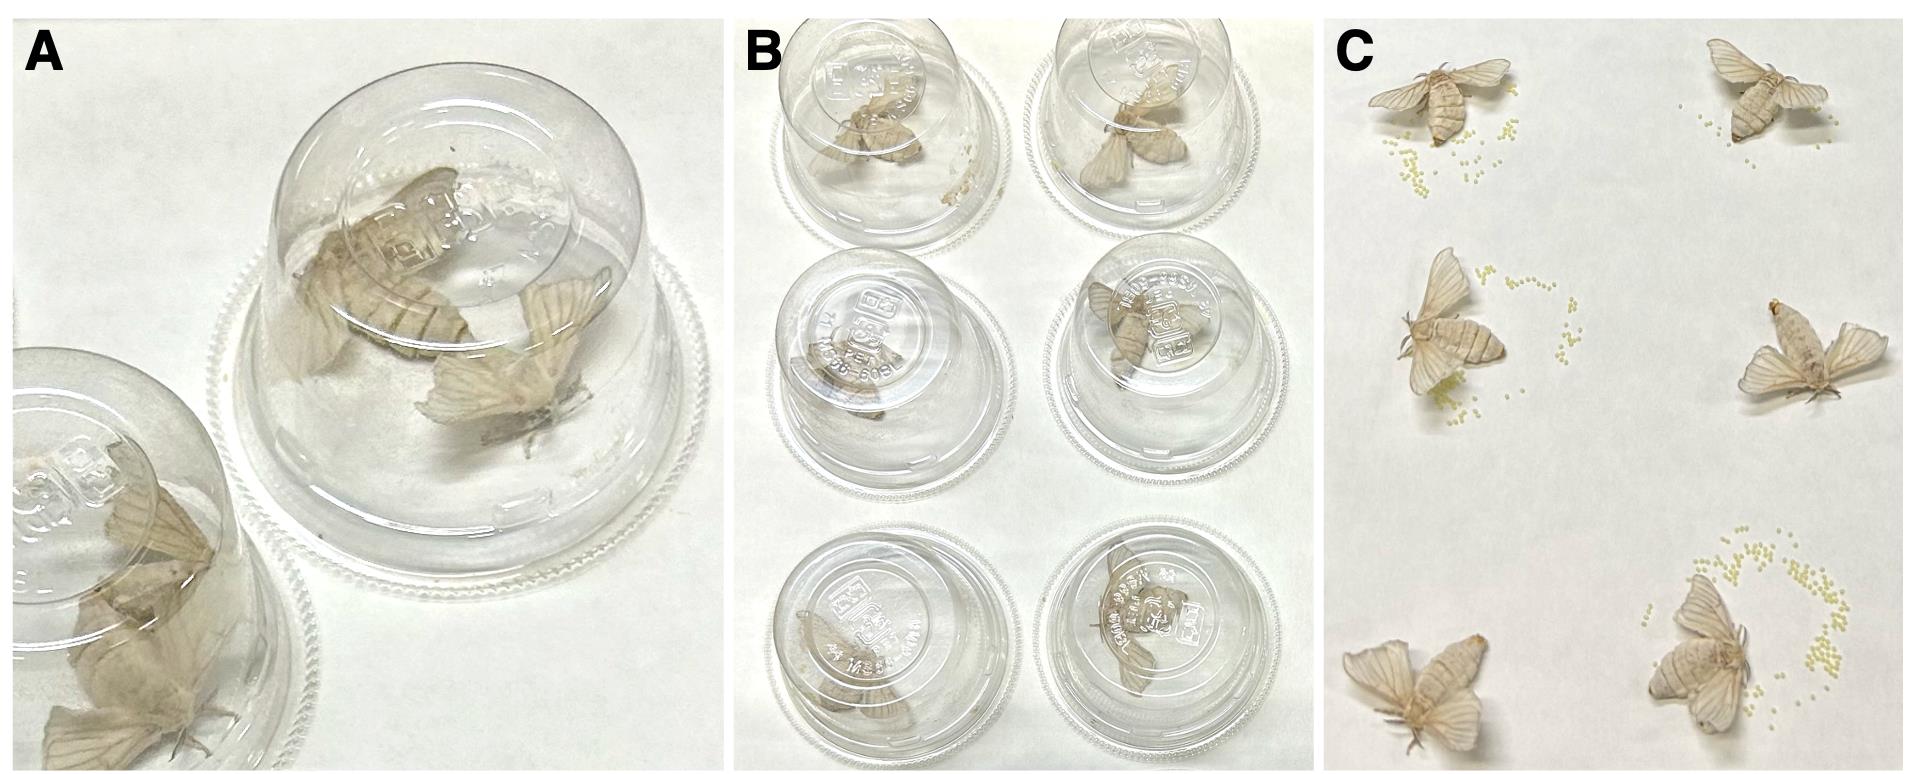
Figure 1. Management of silkworm oviposition. (A) Mating of adult silkworms. (B) Mated female silkworms on egg-laying sheets. (C) Oviposition by mated female silkworms.
3. The following morning, separate the mating pairs and cover each female with a clear plastic cup placed on an egg-laying sheet (Figure 1B).
4. Move the above oviposition setup to a dark environment to initiate egg-laying. Define this time point as 0 h post-oviposition initiation.
Note: A dark environment facilitates oviposition.
5. Check the oviposition status every 30 min. If a female is laying eggs, collect the egg-laying sheet (Figure 1C) for Section B.
6. For females that are still ovipositing or have not yet started laying eggs, repeat step A5 at 30-min intervals to collect eggs suitable for microinjection.
Notes:
1. Eggs are naturally attached to the egg-laying sheet due to an adhesive substance secreted by the female during oviposition.
2. The number and timing of egg-laying vary among individuals.
3. Collecting eggs at 30-min intervals ensures the acquisition of sparsely laid eggs suitable for microinjection.
B. Preparation of eggs
1. Cut out the egg-laying sheet to facilitate handling during injection (Figure 2A).
Note: Select sparsely laid eggs that are easier to inject. Do not use densely clustered eggs (e.g., lower left in Figure 2A).
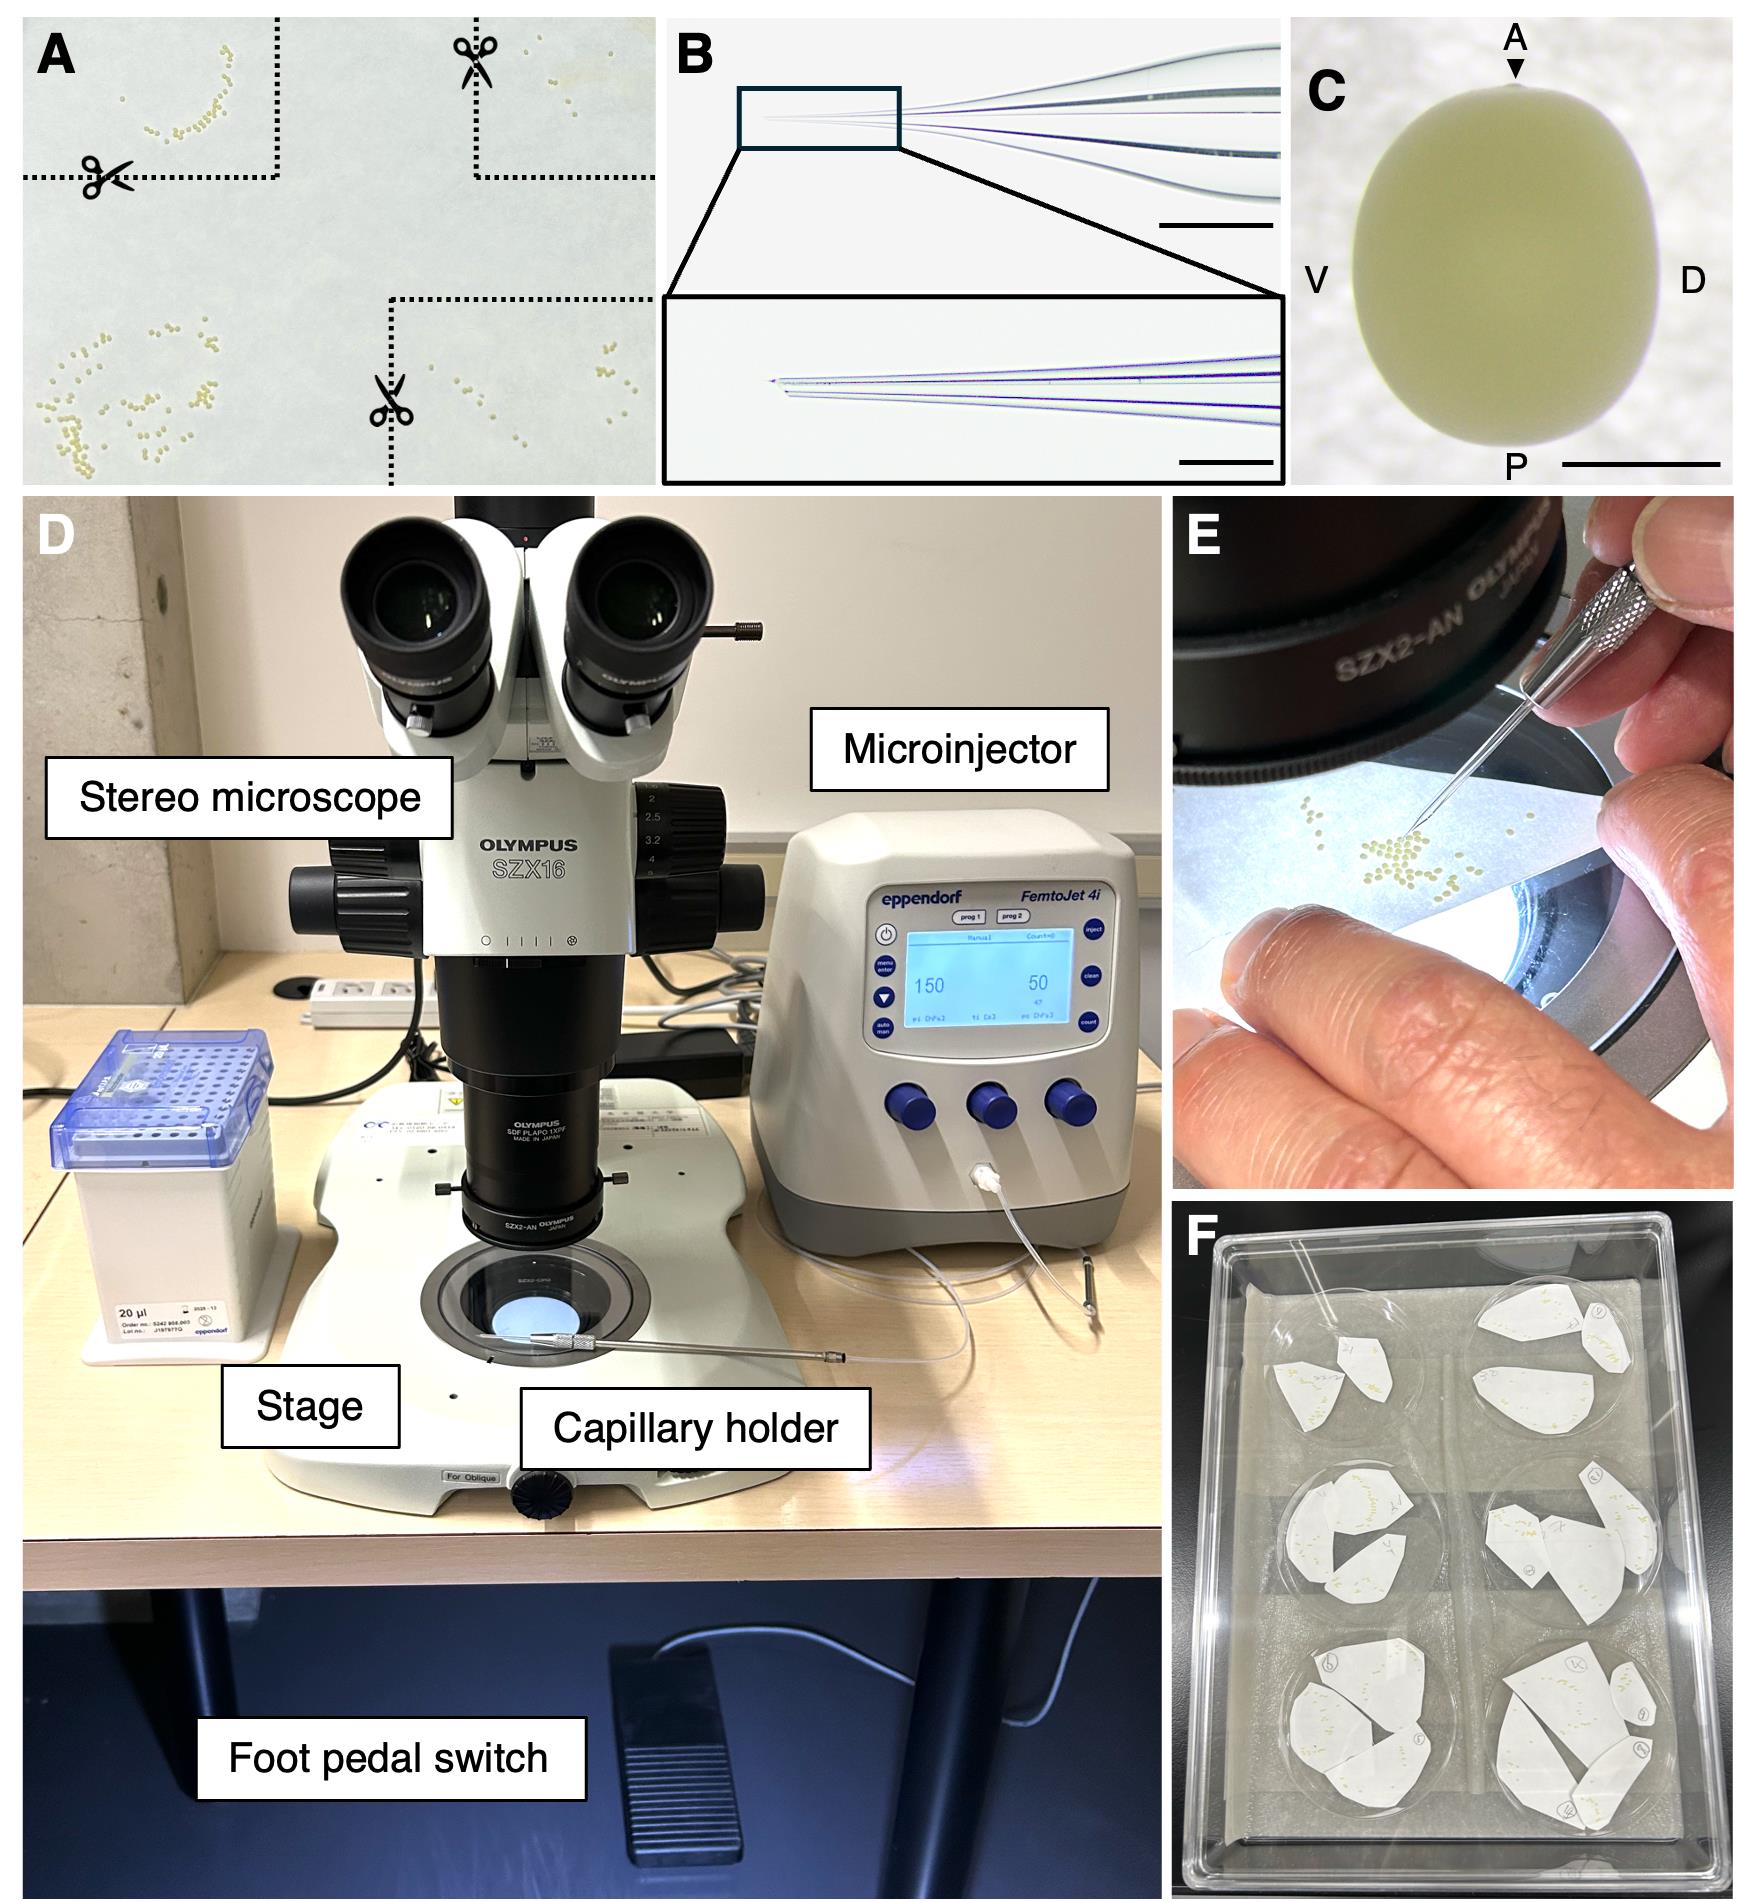
Figure 2. Microinjection setup for Bombyx mori eggs. (A) Selection and cutting of the egg-laying sheet suitable for injection. (B) Thick-walled glass capillary used for injection. The boxed region is magnified to show the capillary tip. Scale bars: upper, 1 mm; lower, 200 μm. (C) B. mori egg. A: anterior; D: dorsal; P: posterior; V: ventral. An arrowhead at the anterior indicates the micropyle. Scale bar, 500 μm. (D) Overview of the microinjection system. (E) Injection process, showing manual handling of the capillary under a stereomicroscope. (F) Injected eggs are kept on Petri dishes in a humid chamber. Moist paper towels are on the bottom.
2. Immerse the cut egg-laying sheet in 70% ethanol for 2 min for egg surface sterilization, followed by air-drying on a clean bench for 5 min.
3. Keep the dried eggs in a sterilized insect rearing case treated with 70% ethanol to maintain aseptic conditions.
C. Preparation of the injection solution and loading it into the injection capillary
Note: This protocol focuses on the injection procedure itself and does not specify a particular injection solution. In Bombyx mori, various substances such as siRNA [2], dsRNA [11,12], mRNA [8], plasmid DNA [13], and proteins [14] have been successfully used for injection by our group and others, depending on the experimental objectives.
1. Centrifuge an injection solution at maximum speed at 4 °C for 3 min to remove debris and prevent capillary clogging.
2. Using a micro-loading tip and a Pipetman, carefully load 10 μL of the injection solution into the back of the injection capillary.
Notes:
1. A pre-shaped, commercially available capillary is used in this step; detailed specifications are described in the Materials and Reagents section.
2. For approximately 100 eggs, 10 μL of injection solution is sufficient.
3. Ensure that the capillary does not contain air bubbles. If present, remove air bubbles by gently flicking the injection capillary, taking care not to break its fine tip (Figure 2B). If the capillary tip is not fine enough, it may create a large hole in the egg during injection, potentially disrupting embryonic development.
3. Attach the capillary to the capillary holder (Figure 2D).
D. Egg microinjection
1. Set FemtoJet 4i to manual mode and adjust the injection parameters as follows: injection pressure (Pi) of 150 hPa and a constant pressure (Pc) of 50 hPa.
2. Place the cut and sterilized egg-laying sheet on the microscope stage and adjust the microscope focus to the surface of the egg.
3. Hold the capillary holder by hand and position the tip of the glass capillary at the center of the microscope field of view. Confirm that both the capillary tip and the egg surface are in focus.
4. Rotate and move the egg-laying sheet with one hand while holding the capillary holder with the other. Bring the capillary tip close to the position of the egg to be injected (Figure 2C, E; Video 1).
Note: For germline transformation, injection should be performed into the posterior ventral region, where germ cells are formed, to enhance transgenesis and genome editing efficiency. The posterior ventral region can be identified under a microscope based on the external features of the egg. The ventral side tends to be slightly more rounded, while the dorsal side appears relatively flat (Figure 2C). In addition, the anterior end of the egg can be recognized by the presence of a micropyle (indicated by an arrowhead in Figure 2C). By using these morphological criteria, the posterior ventral region can be consistently identified for injection.
Critical: Microinjection should be performed within 5 h post-oviposition, during the syncytial blastoderm stage, before cellular blastoderm formation. Once the embryo reaches the cellular blastoderm stage, where cell membranes have formed, macromolecules such as vectors can no longer penetrate. Additionally, the eggshell remains relatively soft immediately after oviposition, making it suitable for penetration with a glass capillary.

5. Insert the glass capillary just slightly into the egg by manually manipulating the capillary holder (Figure 2E; Video 1).
6. Press the foot pedal switch of the FemtoJet to inject the solution.
Note: Since this system does not allow precise control of the injection volume, it is crucial to accurately determine the appropriate amount to inject. A larger injection volume is generally preferable; however, the optimal volume is defined as the amount that does not leak out of the egg when the capillary is withdrawn after injection. To provide a more visual understanding of injection techniques and the appropriate injection volume, we recorded a video demonstrating the injection procedure using a dye solution (Video 1). While a slight variation in injection volume may occur depending on the operator’s technique, the use of visual confirmation and the injection pressure settings (Pi: 150 hPa; Pc: 50 hPa), as described in step D1, ensures consistent and reproducible injection performance.
7. Withdraw the capillary from the egg.
Note: When the capillary is withdrawn from the eggshell, some injection solution inside the capillary may be released outside the eggshell. However, this does not affect the injection process (Video 1).
8. Continue injecting as many eggs as possible using the same glass capillary. With proper injection technique, a single glass capillary can typically be used to inject 100 to 150 eggs.
Note: If the capillary clogs, remove it from the egg and immerse it in a drop of sterile water while pressing the foot pedal switch several times to clear debris. Alternatively, use the CLEAR function of the FemtoJet. If the debris cannot be cleared, replace the glass capillary. Additionally, if the tip of the glass capillary is damaged and the opening becomes enlarged, replace the capillary.
E. Post-injection care of eggs
1. Transfer the egg-laying sheet with the injected eggs to a humid chamber inside an incubator at 25 °C until just before hatching (Figure 2F).
Critical: Eggs pierced during injection are prone to dehydration, which may result in embryonic lethality during development. Therefore, immediately after injection, the egg-laying sheet should be transferred to a humid chamber. To maintain sufficient humidity and prevent dehydration, sterile water should be periodically added to the paper towel lining the bottom of the chamber, either daily or as necessary.
2. Just before hatching (approximately 10 days after oviposition), transfer the egg-laying sheet with the attached eggs to an insect rearing case and provide artificial diet or mulberry leaves.
Note: The hatched larvae can be reared in insect rearing cases on an artificial diet or mulberry leaves until the final instar.
Data analysis
This protocol aims to establish an efficient method for egg microinjection in Bombyx mori and does not involve new experimental data analysis. However, several established approaches for evaluating the effectiveness of egg microinjection have been reported and may serve as useful references for future applications.
For example, Masumoto et al. [11] injected dsRNA targeting the Ubx gene and assessed RNAi efficiency based on morphological abnormalities observed in larval segments. Kobayashi et al. [12] confirmed successful embryonic RNAi by detecting a loss of the target protein expression via western blotting. Masumoto et al. [13] injected a GFP expression vector into embryos and demonstrated successful transgenesis by identifying GFP-positive individuals. Additionally, other studies have confirmed the reduction of target mRNA levels by qRT-PCR following siRNA injection [2]. Silkworm genome editing has been validated by sequencing genomic DNA after injection with TALEN [8] or CRISPR/Cas9 [2].
These examples illustrate commonly used strategies for evaluating the success of egg microinjection in B. mori, depending on the experimental goals and molecular targets.
Validation of protocol
This protocol has been used and validated in the following research articles:
• Masumoto et al. [11]. Functional analysis of Ultrabithorax in the silkworm, Bombyx mori, using RNAi. Dev. Genes Evol. (Figure 3)
• Masumoto et al. [13]. A baculovirus immediate-early gene, ie1, promoter drives efficient expression of a transgene in both Drosophila melanogaster and Bombyx mori. PLoS One. (Figure 6)
• Kobayashi et al. [12]. Cloning of cDNA encoding a Bombyx mori homolog of human oxidation resistance 1 (OXR1) protein from diapause eggs, and analyses of its expression and function. J. Insect Physiol. (Figure 6)
Supplementary information
The following supporting information can be downloaded here:
1. Figure S1. Representative male and female pupae of the silkworm Bombyx mori.
Acknowledgments
T.Y., K.M., and T.N. conceived and developed the protocol. T.N. supervised the study. H.Y. and T.N. performed experiments to validate the protocol. H.Y. and T.N. wrote the manuscript with feedback from all authors. All authors reviewed and approved the final version of the manuscript. H.Y. acknowledges support from the Japan Society for the Promotion of Science (JSPS) (Grant No. 22K05451). We also appreciate the support of Dr. Kenichiro Itami (RIKEN), who facilitated the acquisition of research equipment through JSPS (Grant No. 19H05463). This protocol was adapted from Masumoto et al. [11,13] and Kobayashi et al. [12]. We thank the Emerging Model Organisms Facility of NIBB Trans-Scale Biology Center for technical assistance.
Competing interests
The authors declare no conflicts of interest.
References
- Li, Z., You, L., Zhang, Q., Yu, Y. and Tan, A. (2022). A Targeted In-Fusion Expression System for Recombinant Protein Production in Bombyx mori. Front Genet. 12: e816075. https://doi.org/10.3389/fgene.2021.816075
- Kiuchi, T., Koga, H., Kawamoto, M., Shoji, K., Sakai, H., Arai, Y., Ishihara, G., Kawaoka, S., Sugano, S., Shimada, T., et al. (2014). A single female-specific piRNA is the primary determiner of sex in the silkworm. Nature. 509(7502): 633–636. https://doi.org/10.1038/nature13315
- Xiang, H., Liu, X., Li, M., Zhu, Y., Wang, L., Cui, Y., Liu, L., Fang, G., Qian, H., Xu, A., et al. (2018). The evolutionary road from wild moth to domestic silkworm. Nat Ecol Evol. 2(8): 1268–1279. https://doi.org/10.1038/s41559-018-0593-4
- Tong, X., Han, M. J., Lu, K., Tai, S., Liang, S., Liu, Y., Hu, H., Shen, J., Long, A., Zhan, C., et al. (2022). High-resolution silkworm pan-genome provides genetic insights into artificial selection and ecological adaptation. Nat Commun. 13(1): 5619. https://doi.org/10.1038/s41467-022-33366-x
- The International Silkworm Genome Consortium. (2008). The genome of a lepidopteran model insect, the silkworm Bombyx mori. Insect Biochem Mol Biol. 38(12): 1036–1045. https://doi.org/10.1016/j.ibmb.2008.11.004
- Kawamoto, M., Jouraku, A., Toyoda, A., Yokoi, K., Minakuchi, Y., Katsuma, S., Fujiyama, A., Kiuchi, T., Yamamoto, K., Shimada, T., et al. (2019). High-quality genome assembly of the silkworm, Bombyx mori. Insect Biochem Mol Biol. 107: 53–62. https://doi.org/10.1016/j.ibmb.2019.02.002
- Tamura, T., Thibert, C., Royer, C., Kanda, T., Eappen, A., Kamba, M., Kômoto, N., Thomas, J. L., Mauchamp, B., Chavancy, G., et al. (2000). Germline transformation of the silkworm Bombyx mori L. using a piggyBac transposon-derived vector. Nat Biotechnol. 18(1): 81–84. https://doi.org/10.1038/71978
- Shiomi, K., Takasu, Y., Kunii, M., Tsuchiya, R., Mukaida, M., Kobayashi, M., Sezutsu, H., Ichida Takahama, M. and Mizoguchi, A. (2015). Disruption of diapause induction by TALEN-based gene mutagenesis in relation to a unique neuropeptide signaling pathway in Bombyx. Sci Rep. 5(1): 15566. https://doi.org/10.1038/srep15566
- Homma, S., Murata, A., Ikegami, M., Kobayashi, M., Yamazaki, M., Ikeda, K., Daimon, T., Numata, H., Mizoguchi, A., Shiomi, K., et al. (2022). Circadian Clock Genes Regulate Temperature-Dependent Diapause Induction in Silkworm Bombyx mori. Front Physiol. 13: e863380. https://doi.org/10.3389/fphys.2022.863380
- Tamura, T., Kuwabara, N., Uchino, K., Kobayashi, I. and Kanda, T. (2007). An improved DNA injection method for silkworm eggs drastically increases the efficiency of producing transgenic silkworms. J Insect Biotechnol Sericol. 76: 155–159. https://doi.org/10.11416/jibs.76.3_155
- Masumoto, M., Yaginuma, T. and Niimi, T. (2009). Functional analysis of Ultrabithorax in the silkworm, Bombyx mori, using RNAi. Dev Genes Evol. 219: 437–444. https://doi.org/10.1007/s00427-009-0305-9
- Kobayashi, N., Takahashi, M., Kihara, S., Niimi, T., Yamashita, O. and Yaginuma, T. (2014). Cloning of cDNA encoding a Bombyx mori homolog of human oxidation resistance 1 (OXR1) protein from diapause eggs, and analyses of its expression and function. J Insect Physiol. 68: 58–68. https://doi.org/10.1016/j.jinsphys.2014.06.020
- Masumoto, M., Ohde, T., Shiomi, K., Yaginuma, T. and Niimi, T. (2012). A Baculovirus Immediate-Early Gene, ie1, Promoter Drives Efficient Expression of a Transgene in Both Drosophila melanogaster and Bombyx mori. PLoS One. 7(11): e49323. https://doi.org/10.1371/journal.pone.0049323
- Kiuchi, T., Shoji, K., Izumi, N., Tomari, Y. and Katsuma, S. (2023). Non-gonadal somatic piRNA pathways ensure sexual differentiation, larval growth, and wing development in silkworms. PLoS Genet. 19(9): e1010912. https://doi.org/10.1371/journal.pgen.1010912
Article Information
Publication history
Received: Mar 20, 2025
Accepted: Apr 21, 2025
Available online: May 5, 2025
Published: May 20, 2025
Copyright
© 2025 The Author(s); This is an open access article under the CC BY-NC license (https://creativecommons.org/licenses/by-nc/4.0/).
How to cite
Yamada, H., Yaginuma, T., Mase, K. and Niimi, T. (2025). Egg Microinjection for the Silkworm Bombyx mori. Bio-protocol 15(10): e5317. DOI: 10.21769/BioProtoc.5317.
Category
Developmental Biology > Genome editing
Molecular Biology > DNA > Transformation
Do you have any questions about this protocol?
Post your question to gather feedback from the community. We will also invite the authors of this article to respond.