- Protocols

- Articles and Issues
- For Authors
- About
- Become a Reviewer

Dissection and Whole-Mount Immunofluorescent Staining of Mouse Hind Paw Muscles for Neuromuscular Junction Analysis

Published: Vol 15, Iss 10, May 20, 2025 DOI: 10.21769/BioProtoc.5315 Views: 4031
Reviewed by: Helena ChaytowMarion HoggAnonymous reviewer(s)
Original research article
The authors used this protocol in:
Jun 2024
Advertisement


Protocol Collections
Comprehensive collections of detailed, peer-reviewed protocols focusing on specific topics


Related protocols
Abstract
The neuromuscular junction (NMJ) is a peripheral synaptic connection between a lower motor neuron and skeletal muscle fibre that enables muscle contraction in response to neuronal stimulation. NMJ dysfunction and morphological abnormalities are commonly observed in neurological conditions, including amyotrophic lateral sclerosis, Charcot–Marie–Tooth disease, and spinal muscular atrophy. Employing precise and reproducible techniques to visualise NMJs in mouse models of neuromuscular disorders is crucial for uncovering aspects of neuropathology, revealing disease mechanisms, and evaluating therapeutic approaches. Here, we present a method for dissecting the deep lumbrical and flexor digitorum brevis (FDB) muscles of the mouse hind paw and describe the process of whole-mount immunofluorescent staining for morphological analysis of NMJs. Similar whole-mount techniques have been applied to other muscles, such as the diaphragm; however, dense connective tissue in adult samples often impedes antibody penetration. Moreover, large hind limb muscles, including the gastrocnemius and tibialis anterior, are commonly used to examine NMJs but require embedding and cryosectioning. These additional steps increase the complexity and duration of the protocol and can introduce sectioning artefacts, including transection of NMJs and disruption of morphology. Using small hind paw muscles enables whole-mounting, which completely eliminates the requirement for embedding and cryosectioning. As a result, the entire neuromuscular innervation pattern can be visualised, allowing a more accurate assessment of NMJ development, denervation, and regeneration in mouse models of neurological disease and nerve injury, which can be applied across all postnatal ages.
Key features
• Small muscles of the mouse hind paw, i.e., lumbrical and FDB muscles, can be rapidly dissected for whole-mount immunofluorescent analysis without the need for cryosectioning.
• This protocol allows visualisation of the entire neuromuscular innervation pattern using axonal (anti-tubulin βIII), pre-synaptic (anti-synaptophysin), and post-synaptic (α-bungarotoxin) markers.
• Whole-mount immunofluorescence of hind paw muscles enables assessment of developmental, degenerative, and regenerative phenotypes in young and adult mice across disease and injury models.
• High-throughput analysis can be performed using NMJ-Analyser or NMJ-morph to evaluate diverse morphological features of the NMJ.
Keywords: α-bungarotoxin (αBTX)Graphical overview
Background
The neuromuscular junction (NMJ) is a specialised synapse connecting the axon terminal of a lower motor neuron to a skeletal muscle fibre. To generate muscle contraction, the pre-synaptic motor terminal releases acetylcholine in response to an action potential. Acetylcholine traverses the synaptic cleft and binds to acetylcholine receptors (AChRs) clustered in the post-synaptic muscle membrane [1]. Due to its experimental accessibility and well-defined structure, the NMJ serves as a valuable model for studying synaptic formation, organisation, maturation, and function [2,3].
NMJ dysfunction is a principal feature of numerous neurological disorders, as observed in patients and mouse models of amyotrophic lateral sclerosis (ALS) [4], Charcot–Marie–Tooth disease (CMT) [5], and spinal muscular atrophy (SMA) [6,7]. Moreover, the NMJ is the primary site of pathology in congenital myasthenic syndromes [8] and several autoimmune diseases, including myasthenia gravis, in which autoantibodies target post-synaptic AChRs [9]. Muscular dystrophies [10], ageing [11], and toxic neuropathies, such as those induced by chemotherapeutic agents [12], also result in structural and/or functional abnormalities at the NMJ, contributing to muscle weakness and motor dysfunction.
Large muscles of the hind limb, such as the tibialis anterior, soleus, and gastrocnemius, have been traditionally used for NMJ evaluation [13,14]. Distal muscles are valuable for investigating length-dependent diseases such as CMT, where bilateral weakness and sensory deficits mainly affect the extremities [15]. To image NMJs in these thicker muscles, teasing or cryosectioning is required to achieve sufficient antibody penetration. However, this process is time-consuming and can introduce artefacts from inconsistent fixation and sectioning. While whole-mount immunofluorescence of thinner muscles (e.g., diaphragm) addresses these limitations, dense connective tissue in adult samples can impede antibody penetration and thus restrict application to only embryonic and neonatal mice [16]. This poses challenges for studying neurological disease models, where analysis of adult tissues is critical for examining disease progression or late-stage pathology.
We present a method for whole-mount immunostaining of the deep lumbricals and flexor digitorum brevis (FDB). These fast-twitch, hind paw muscles exhibit significant NMJ denervation in mouse models of ALS, CMT, and SMA [7,17,18], underlining their relevance to studies of neuromuscular disease. Their small, thin structure eliminates the requirement for embedding and cryosectioning, thus reducing preparation time and minimising experimental artefacts. NMJs are smaller than the usual section thickness of 30–50 μm, extending <15 μm along the z-dimension [14]. As a result, cryosectioning of larger muscles often transects NMJs and prevents visualisation of the entire innervation pattern. Moreover, since NMJs are not always aligned along the length of the muscle and can span a variety of orientations in three-dimensional space, cryosectioning often leads to fragmented or incomplete visualisation of endplates, compromising their spatial arrangement. In contrast, our approach enables three-dimensional confocal imaging of the complete neuromuscular network within a manageable z-stack depth, providing high-resolution, comprehensive, and accurate analysis of NMJ development and degeneration [19]. Importantly, the method is appropriate for assessing both young and adult mice.
Our protocol offers broad applicability for investigating several aspects of NMJ biology, e.g., endplate size [20], innervation status [21], nodal sprouting [22], AChR turnover [23,24], and axonal regeneration following injury [25]. The use of additional antibodies further extends the utility of this protocol. For instance, terminal Schwann cells (tSCs) can be identified using anti-S100, and their growth and morphology can be assessed, with a significant reduction in tSC sprouting serving as evidence for impaired remodelling capacity [26]. These applications establish this method as a powerful approach for exploring NMJ function and pathology.
Materials and reagents
Note: Similar materials, reagents, and equipment can be purchased from alternative sources.
Biological materials
1. Mouse
Note: This protocol is suitable for mice of any post-natal age, sex or genetic background. Mice can be sourced from any reputable supplier, such as Charles River or The Jackson Laboratory (JAX).
Reagents
Dissection of hind paw muscles
1. 16% paraformaldehyde (PFA) (Thermo Scientific, catalog number: 28908)
2. Milli-Q® water
3. OxoidTM phosphate buffered saline tablets (PBS) (Thermo Scientific, catalog number: BR0014G)
4. Sodium azide (Sigma-Aldrich, catalog number: S2002)
5. Sodium pentobarbital (Merial Animal Health Ltd., catalog number: QN51AA01)
6. Ethanol absolute ≥99.8% (VWR, catalog number: 20821.300)
Whole-mount muscle immunohistochemistry
1. Alexa Fluor 488 goat anti-guinea pig (H+L) antibody (Invitrogen, catalog number: A11073, RRID: AB_2534117)
2. Alexa Fluor 555 conjugated α-bungarotoxin (Invitrogen, catalog number: B35451)
3. Anti-synaptophysin (Nittobo, catalog number: MSFR105690, RRID: AB_2571843)
4. Anti-tubulin βIII (Nittobo, catalog number: MSFR105990, RRID: AB_2571849)
5. Bovine serum albumin (BSA) fraction V (Roche, catalog number: 10735094001)
6. Fluoromount-G mounting medium (Invitrogen, catalog number: 00-4958-02)
7. Milli-Q® water
8. OxoidTM PBS tablets (Thermo Scientific, catalog number: BR0014G)
9. Triton X-100 (Sigma, catalog number: T8787)
Solutions
1. 1× PBS (see Recipes)
2. 10× PBS (see Recipes)
3. 4% (w/v) PFA in 1× PBS (see Recipes)
4. 70% (v/v) ethanol in Milli-Q® water (see Recipes)
5. 2% (v/v) Triton X-100 in 1× PBS (see Recipes)
6. 2% (w/v) sodium azide in 1× PBS (see Recipes)
7. 0.02% (w/v) sodium azide in 1× PBS (see Recipes)
8. Blocking solution [4% (w/v) BSA and 1% (w/v) Triton X-100 in 1× PBS] (see Recipes)
Recipes
1. 1× PBS (1 L)
Note: Add reagents to a 1 L glass bottle and place on a magnetic stirrer until tablets have dissolved. Store at room temperature (RT) (18–22 °C) for up to six months.
| Reagent | Final concentration | Final quantity or volume |
|---|---|---|
| OxoidTM PBS tablets | 137 mM NaCl, 3 mM KCl, 8 mM Na2HPO4, 1.5 mM KH2PO4 | 10 tablets |
| Milli-Q® | n/a | 1 L |
2. 10× PBS (100 mL)
Note: Add reagents to a 100 mL glass bottle and place on a magnetic stirrer until tablets have dissolved. Store at RT. This solution can be stable for many months, provided it remains non-contaminated.
| Reagent | Final concentration | Final quantity or volume |
|---|---|---|
| OxoidTM PBS tablets | 1.37 M NaCl, 30 mM KCl, 80 mM Na2HPO4, 15 mM KH2PO4 | 10 tablets |
| Milli-Q® | n/a | 100 mL |
3. 4% (w/v) PFA in 1× PBS (40 mL)
Note: For best results, the solution should be freshly prepared before use. Store the solution in a 50 mL centrifuge tube. Unused aliquots can be maintained for one week at 4 °C or several months at -20 °C.
| Reagent | Final concentration | Final quantity or volume |
|---|---|---|
| 16% PFA | 4% | 10 mL |
| 10× PBS | 1× | 4 mL |
| Milli-Q® | n/a | 26 mL |
4. 70% (v/v) ethanol in Milli-Q®water (50 mL)
Note: Store at RT for up to one month. Prepare the solution in a 50 mL centrifuge tube.
| Reagent | Final concentration | Final quantity or volume |
|---|---|---|
| Ethanol (≥99.8%) | 70% | 35 mL |
| Milli-Q® | n/a | 15 mL |
5. 2% (v/v) Triton X-100 in 1× PBS (40 mL)
Note: Store at 4 °C for a maximum of three months. Prepare the solution in a 50 mL centrifuge tube. Keep away from light to prevent degradation.
| Reagent | Final concentration | Final quantity or volume |
|---|---|---|
| Triton X-100 | 2% | 0.8 mL |
| 1× PBS | 1× | 39.2 mL |
6. 2% (w/v) sodium azide in 1× PBS (50 mL)
Note: Store at 4 °C for up to 12 months. Sodium azide is toxic; ensure the use of appropriate personal protective equipment and follow all relevant safety protocols when handling it.
| Reagent | Final concentration | Final quantity or volume |
|---|---|---|
| Sodium azide | 2% | 1 g |
| 1× PBS | 1× | 50 mL |
7. 0.02% (w/v) sodium azide in 1× PBS (10 mL)
Note: Store at 4 °C for up to 12 months. Sodium azide is toxic; ensure the use of appropriate personal protective equipment and follow all relevant safety protocols when handling it.
| Reagent | Final concentration | Final quantity or volume |
|---|---|---|
| 2% sodium azide | 0.02% | 0.1 mL |
| 1× PBS | 1× | 9.9 mL |
8. Blocking solution [4% (w/v) BSA and 1% (w/v) Triton X-100 in 1× PBS] (10 mL)
Note: Store at 4 °C and use within one week.
| Reagent | Final concentration | Final quantity or volume |
|---|---|---|
| BSA | 4% | 0.4 g |
| 2% Triton X-100 | 1% | 5 mL |
| 1× PBS | 1× | 5 mL |
Laboratory supplies
Dissection of hind paw muscles
1. 1 L glass bottle (VWR, catalog number: 215-1595)
2. 100 mL glass bottle (VWR, catalog number: 215-1592)
3. 12 mm × 0.2 mm minutiens Austerlitz Insect Pins® (Entomoravia, catalog number: 0.20)
4. 50 mL centrifuge tubes (VWR, catalog number: 734-0448)
5. 60 mm × 15 mm Petri dishes (BD Biosciences, catalog number: 351007)
6. 96-well CytoOne TC-treated plate (Starlab, catalog number: CC7682-7596)
7. BD MicrolanceTM 3 hypodermic needle 30 G × 0.5” (Fisher Scientific, catalog number: 10442014)
8. BD PlastiPak 1 mL syringe (Fisher Scientific, catalog number: 15489199)
9. Bone scissors (Fine Science Tools, catalog number: 14110-15)
10. Curved forceps (Dumont Swissmade, catalog number: 0102-7-PO)
11. Magnetic stirring bar (VWR, catalog number: 442-0272)
12. Small spring scissors (Deutsche BioMedical, catalog number: DBV1005)
13. Straight forceps (Dumont Swissmade, catalog number: 0208-5-PO)
14. SYLGARD® 184 silicone elastomer kit (Scientific Laboratory Supplies, catalog number: 63416.5S)
Note: Prepare silicone-coated Petri dishes at least one day prior to dissection. Mix 100 g of polydimethylsiloxane SYLGARD® 184 with 10 g of curing agent. Pour the mixture into 60 mm × 15 mm Petri dishes and cure overnight at RT.
Whole-mount muscle immunohistochemistry
1. 1.5 mL TubeOne® microcentrifuge tubes (Starlab, catalog number: S1615-5500)
2. 200 m × 326 mm aluminium foil (Scientific Laboratory Supplies, catalog number: 39400)
3. 22 × 64 × 0.13–16 mm cover glass (VWR, catalog number: 631-0880)
4. 3 mL plastic transfer pipettes (Scientific Laboratory Supplies, catalog number: PIP4210)
5. 50 mL centrifuge tubes (VWR, catalog number: 734-0448)
6. 96-well CytoOne TC-treated plate (Starlab, catalog number: CC7682-7596)
7. Polysine®-coated slides (VWR, catalog number: 631-0107)
8. Slide box (Scientific Laboratory Supplies, catalog number: MIC3550)
9. Straight forceps (Dumont Swissmade, catalog number: 0208-5-PO)
10. Kimtech ScienceTM delicate task wipes (Fisher Scientific, catalog number: 15402680)
Equipment
Dissection of hind paw muscles
1. Magnetic stirrer (VWR, catalog number: 422-0883)
2. Dissection microscope, e.g., Motic DSK-500 dual observation stereomicroscope (Motic, catalog number: PM5539B901)
Whole-mount muscle immunohistochemistry
1. Dissection microscope, e.g., Motic DSK-500 dual observation stereomicroscope (Motic, catalog number: PM5539B901)
2. Rotamax 120 shaker (Heidolph, catalog number: 544-41200-00)
Imaging
1. Confocal microscope (Zeiss, model: LSM 780)
Note: Any confocal microscope that provides high-resolution images suitable for automated NMJ scoring should suffice.
Software and datasets
1. ImageJ (Version 2.14.0/1.54f, 2023; https://imagej.net/software/fiji/)
2. NMJ-Analyser [21] or NMJ-morph [27]
Note: These references provide detailed instructions on how to install and use NMJ-Analyser or NMJ-morph.
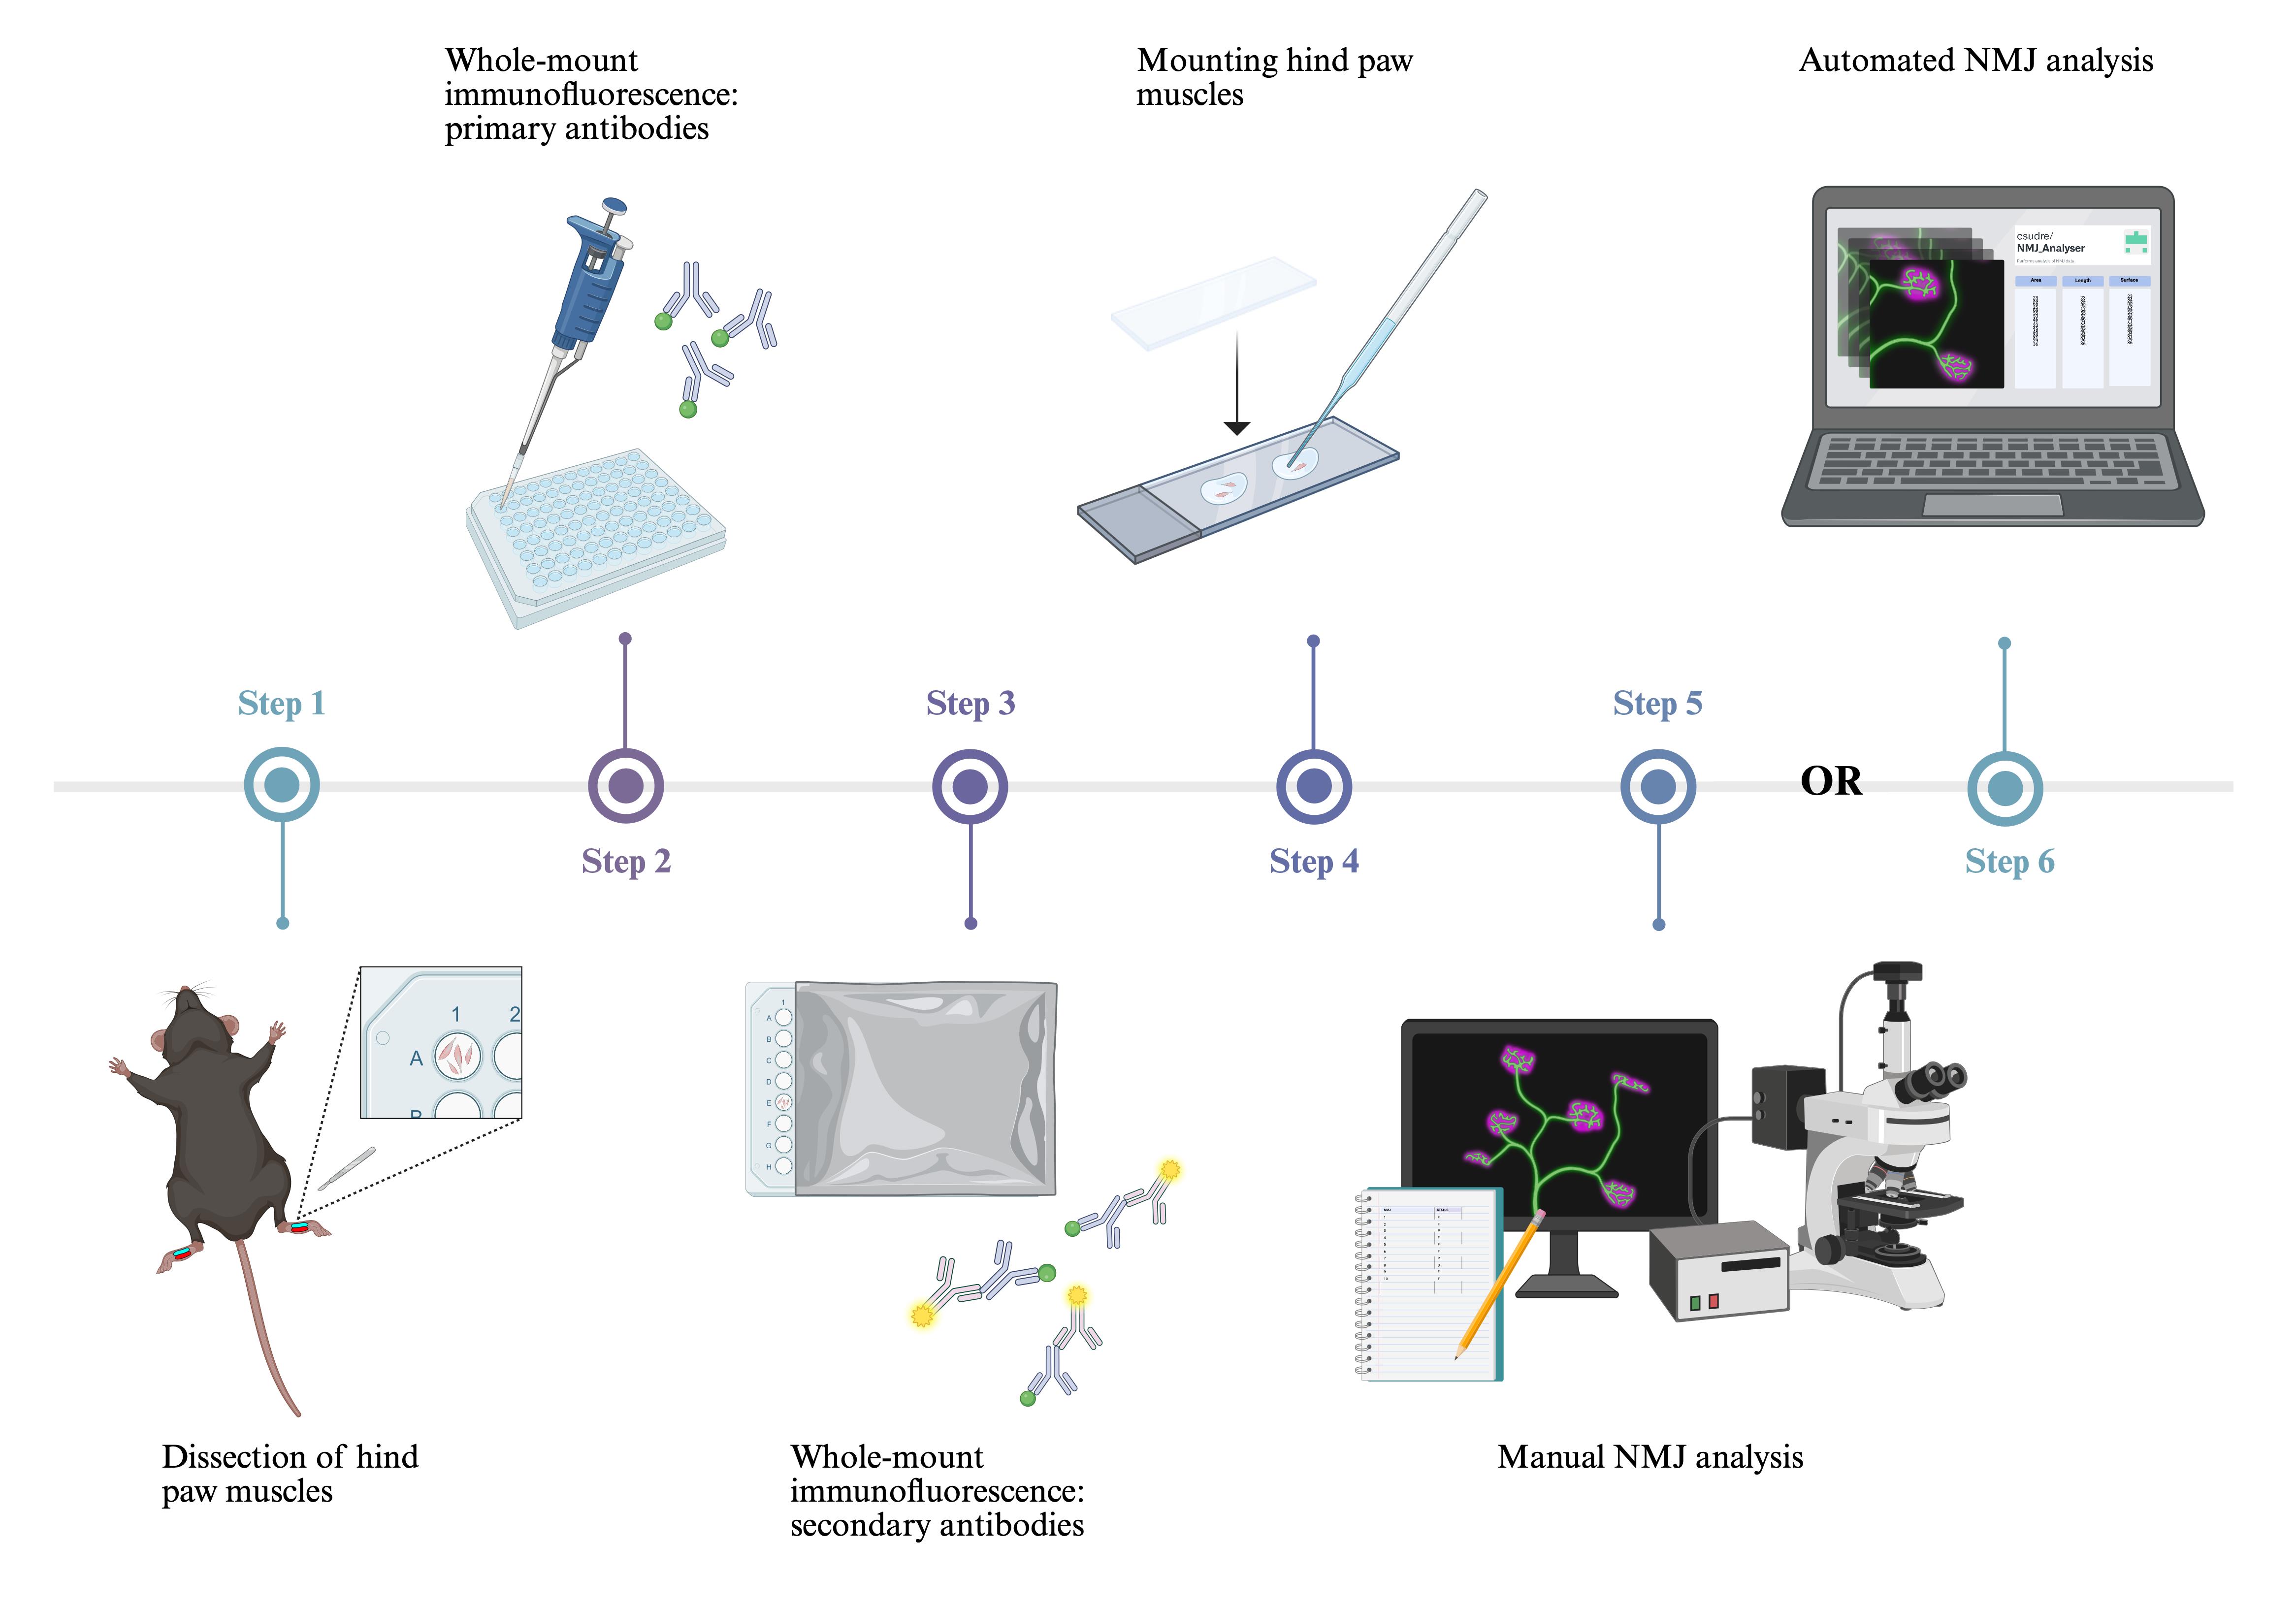
Procedure
A. Dissection of hind paw muscles
Note: Similar protocols for excising the hind paw lumbrical [5] and FDB muscles [28] are available. Before the dissection, familiarise yourself with the anatomical locations of the lumbrical and/or FDB muscles (Figure 1).
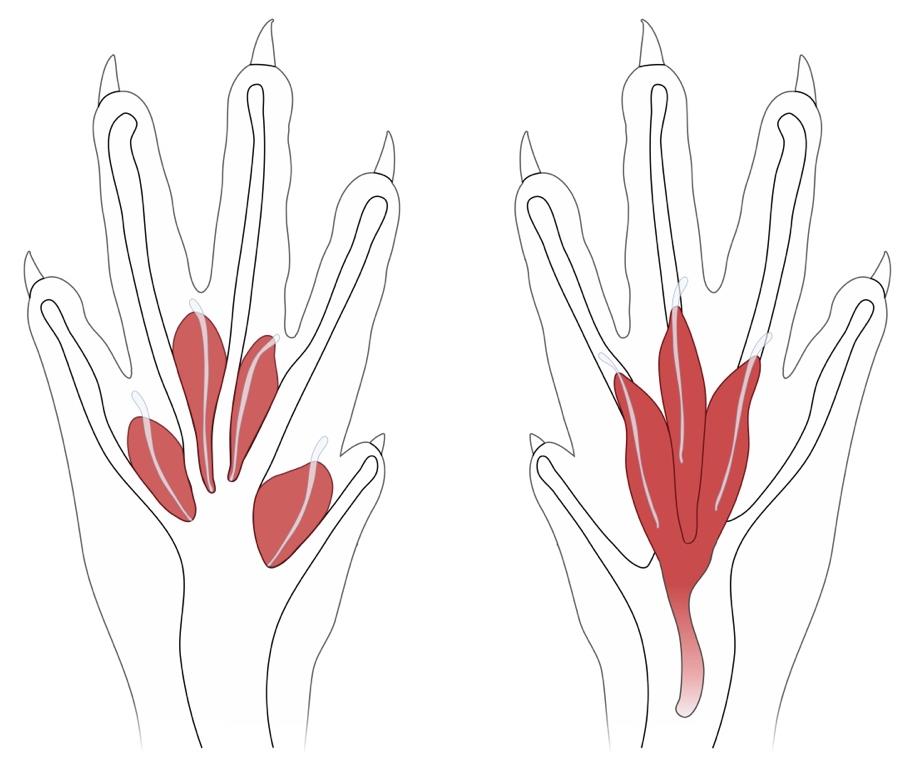
Figure 1. Schematic of the anatomical locations of the deep lumbrical (left) and flexor digitorum brevis (FDB) muscles (right) in the mouse hind paw. The FDB muscle is superficial and ventral to the lumbricals. Figure adapted from Sleigh et al. [5].
Note: This protocol is not suitable for animals that have undergone transcardial perfusion with PFA, as the extended fixation process can hinder dissection and result in ineffective antibody binding [5]. PBS perfusion can be performed to remove blood if desired, but this is not a requirement.
1. Use an appropriate method of euthanasia conforming to national regulations. In the United Kingdom, this involves Schedule 1 of the Animals (Scientific Procedures) Act 1986. A reliable option is intraperitoneal injection of sodium pentobarbital (>150 mg/kg) using a 30 G × 0.5” needle attached to a 1 mL syringe. Confirm death using another humane method, such as cervical dislocation.
Note: Schedule 1 procedures are not regulated. Individuals performing Schedule 1 activities do not require a personal license, but must be assessed for competence and listed on the establishment’s Schedule 1 register.
2. Spray the cadaver with 70% (v/v) ethanol to minimise fur contamination.
3. Detach the hind limbs using bone scissors. To facilitate subsequent skin removal, make the incision close to the hip joint. This approach provides excess musculature for better handling (see step A4).
Note: Place one hind limb on ice while dissecting the other hind paw. This should help to preserve tissue integrity and restrict protein degradation.
4. Holding the musculature of the upper thigh, firmly grasp the overlying skin and pull in the proximal-to-distal direction (i.e., towards the base of the hind paw). The skin should tear around the ankle.
5. Affix the hind paw to a SYLGARD® 184 silicone elastomer-coated Petri dish using Austerlitz Insect Pins®. Position the paw ventral-side up and submerge in ice-cold 1× PBS (Figure 2A).
Notes:
1. Use curved forceps to grasp individual digits of the hind paw and straight forceps for pinning.
2. Place the pins at the most central-distal point of each digit. This ensures the paw is both taut and flat, aiding dissection.
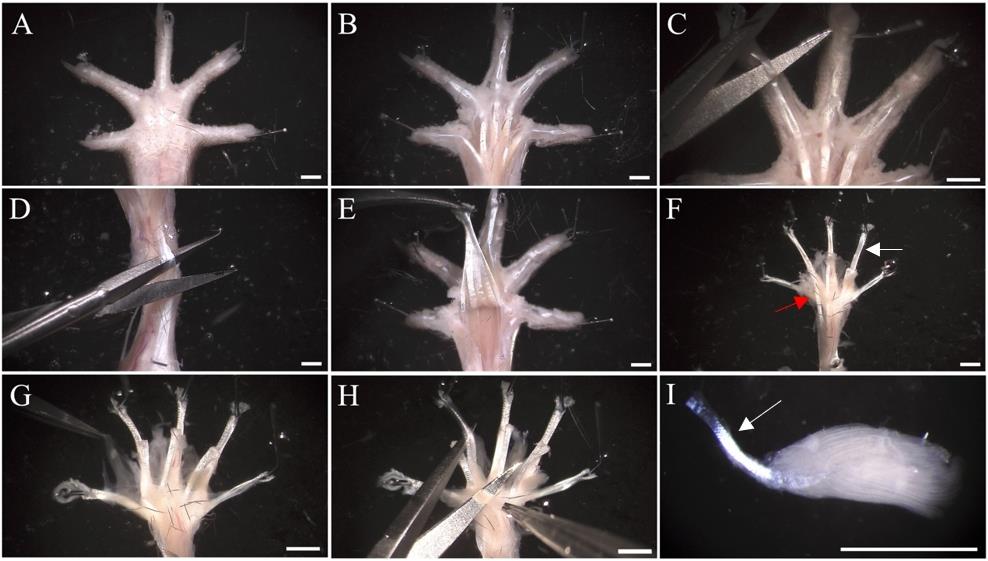
Figure 2. Dissection of hind paw muscles. (A) Pin the hind paw to a SYLGARD® 184 silicone-coated dish and immerse in 1× PBS. The hind paw is positioned ventral-side up. (B) Remove the plantar skin covering the central region of the hind paw, including the footpads. (C) Make transverse cuts to the flexor digitorum longus (FDL) tendon at the distal phalanges. (D) Make a transverse incision at the proximal end of the flexor digitorum brevis (FDB) tendon. At this point, the FDB plantar mass can be removed (not shown, see Video 2). Similarly, make a transverse incision to the exposed FDL tendon. (E) Pull the FDL tendon towards the phalanges and sever at the metatarsophalangeal joint to detach the remaining plantar muscle. (F) To dissect the lumbricals, pin the FDL tendon (white arrow) ventral-side up. To dissect the FDB muscle, pin the FDB tendons (red arrow). (G) Clear connective tissue via blunt dissection to reveal the four underlying deep lumbrical muscles. (H) Following fixation, remove excess connective tissue and disconnect each lumbrical from the FDL tendon. (I) Leaving the lumbrical tendon (white arrow) attached is useful for transferring muscles when staining, but it can also be removed. Images exhibit the hind paw of a wild-type male aged 97 days. Scale bar = 1.5 mm.
6. Using a dissection microscope (e.g., Motic DSK-500), excise the remaining plantar skin and footpads with small spring scissors, exposing the plantar hypodermal surface (Figure 2B).
7. Make transverse incisions to the flexor digitorum longus (FDL) tendon branches within the distal phalanges (Figure 2C).
A1. To dissect the hind paw lumbricals (Video 1)

8. Make a transverse incision to the FDB tendon at the ankle (Figure 2D). Using forceps, peel the tendon in a distal direction (i.e., towards the phalanges).
Note: Peeling the FDB tendon may require removal of surrounding connective tissue. During this process, ensure spring scissor blades are pointing upwards. This prevents damage to the underlying lumbricals.
9. Optional: Sever the FDB tendon at the metatarsophalangeal joint for complete removal of the FDB muscle. This step is not shown in Video 1. This step, and the cutting of the FDL tendon branches (see step A7), can be alternated.
10. Similar to step A8, make a transverse incision to the exposed FDL tendon around the ankle. Peel the tendon in a distal direction, severing connective tissues underneath (Figure 2E). To remove the FDL tendon, cut across the tissues located distally to the lumbricals.
Note: When peeling the FDB tendon, ensure spring scissor blades are pointing downwards.
11. Discard the hind limb and pin the FDL tendon in a taut, ventral-side up position (Figure 2F). Pins should be placed in the main FDL tendon and in each of the distal branches (six pins in total).
Note: The tendons are relatively thin, slippery, and difficult to secure. To overcome this, position the tendon between the tips of straight forceps. In the opposite hand, use another pair of forceps to pin the tendon in place.
12. Using forceps, remove the connective tissue surrounding the four lumbricals via blunt dissection (Figure 2G).
Note: Connective tissue surrounding the muscles is often soft and transparent, making it challenging to remove. For those less confident in dissection, complete the subsequent fixation stage first (see step A13). Following fixation, connective tissue becomes more visible and easier to remove.
13. Fix the muscles in 4% (w/v) PFA in 1× PBS for 10 min at RT.
Caution: PFA is carcinogenic. Appropriate personal protective equipment should be used.
14. To remove PFA, carefully wash muscles three times with 1× PBS. Resubmerge muscles in 1× PBS.
15. Using small spring scissors and straight forceps, remove any remaining connective tissue from each lumbrical before separating them from the FDL tendon. To separate, grasp the lumbrical tendon and pull the muscle proximally (i.e., towards the ankle), ensuring the blade is close to the attachment point (Figure 2H, I).
Note: Residual connective tissue can interfere with staining; ensure it is thoroughly removed before continuing with subsequent steps.
16. Place the separated lumbricals in 0.02% (w/v) sodium azide in 1× PBS in a 96-well plate. Use ~100 μL/well. Store at 4 °C and perform the immunofluorescent staining within one week.
Notes:
1. Lumbricals can adhere to the well walls; ensure muscles are submerged in solution to prevent drying out.
2. Muscles originating from the same hind paw can be stored together in a single well. To obtain a sufficient number of NMJs, aim to dissect 3-4 lumbricals.
3. Under certain conditions, muscles originating from the same hind paw should be stored separately. For instance, the fourth lumbrical is dual-innervated by the lateral plantar and sural nerves, while the remaining three muscles are mono-innervated by terminal branches of the tibial nerve, i.e., medial or lateral plantar nerves [29]. In nerve injury studies, innervation of lumbrical NMJs can vary depending on which branch(es) of the sciatic nerve are affected.
4. For studies involving a large number of dissections spread over multiple days and weeks, it is recommended to perform subsequent immunofluorescent staining in one session. Store muscles as described, and seal the 96-well plate in parafilm or tape to reduce evaporation and desiccation.
A2. To dissect the FDB muscle (Video 2)
Note: These steps are a continuation of section A and should be performed immediately after step A7.
8. Remove the FDB tendon by making a transverse incision at the ankle. Using forceps, peel the tendon in a distal direction (i.e., towards the phalanges). Sever connective tissue underlying the FDB tendon. Cut across the tissues located distally to the FDB muscle.
Note: When peeling the FDB tendon, ensure spring scissor blades are pointing downwards. This prevents damage to the FDB muscle located above.
9. Discard the hind limb and pin the FDB tendon in a taut, ventral-side up position. Pins should be placed in the main FDB tendon and in each distal branch (four in total).
10. Using forceps, remove the connective tissue surrounding the muscle via blunt dissection.
11. Fix the muscle in 4% (w/v) PFA in 1× PBS for 10 min at RT.
12. To remove PFA, wash muscles three times with 1× PBS. Resubmerge muscles in 1× PBS.
13. Using forceps, unpin the left branch and pull in a proximal direction (i.e., away from the central tendon). This can be used to separate the three parts of the muscle. Remove excess connective tissue via blunt dissection and repeat for the right branch.
Note: The FDB can be stained without separation into three parts; however, the division process aids with staining and mounting.
14. Place the separated parts of the FDB muscle in 0.02% (w/v) sodium azide in 1× PBS in a 96-well plate. Use ~100 μL/well. Store at 4 °C and perform the immunofluorescent staining within one week.
Notes:
1. Ensure muscles are submerged in solution to prevent drying out.
2. Separated parts of the FDB muscle originating from the same hind paw can be stored together in a single well. To obtain a sufficient number of NMJs, aim to dissect all three parts of the muscle.
B. Whole-mount muscle immunohistochemistry (Video 3)
The following steps are performed in successive chambers of a 96-well plate. At each stage, muscles are transferred into different solutions using straight forceps; to achieve this, attached tendons are carefully grasped to avoid damaging the muscle itself (Figure 2I). This method eliminates the need for an aspirator or pipette to remove solution, reducing the risk of losing dissected muscles.
Note: Unless specified otherwise, incubation and washing steps are performed on a Rotamax 120 shaker at a speed of ~70 rpm. The minimum required volume of solution for each well is ~100 μL. For experiments involving the comparison of multiple animals, transfer lumbrical and/or FDB muscles from each mouse into a separate well. In such cases, ensure that the same volume of each solution is applied across wells to minimise potential sources of variability.
1. Permeabilise hind paw muscles with 2% (v/v) Triton X-100 in 1× PBS for 30 min at RT. Ensure muscles are submerged in solution to prevent drying out.
2. Immerse muscles in blocking solution for 30 min at RT. As before, ensure muscles are completely submerged.
3. Prepare the primary antibody solution in a 1.5 mL tube. Dilute anti-tubulin βIII and anti-synaptophysin together in blocking solution, each to a final concentration of 1:500 (see General note 1). Ensure the solution is thoroughly mixed.
4. Incubate muscles in primary antibody solution overnight at 4 °C. This duration is sufficient for the antibodies suggested in this protocol.
Notes:
1. In cases where time is limited, muscles can be incubated in primary antibody solution at RT for 4 h. Alternatively, this step can be extended to 2–4 days at 4 °C. If different antibodies are used, longer incubation periods should be tested and optimised to prevent non-specific labelling.
2. To reduce evaporation of the primary antibody solution, 1× PBS can be added between wells. Seal the 96-well plate in parafilm or tape.
5. The following day, wash muscles with ice-cold 1× PBS for 20 min.
6. Repeat step B5 three additional times. Four washes are to be completed in total.
7. Prepare the secondary antibody solution. Perform a 1:250 dilution of Alexa Fluor 488 goat anti-guinea pig in 1× PBS. Alexa Fluor 555 conjugated α-bungarotoxin should also be applied, diluted to a final concentration of 1:1,000 (see General note 2).
Note: To restrict fluorescence bleaching, cover the microcentrifuge tube containing the secondary antibody solution with aluminium foil.
8. Incubate muscles in secondary antibodies and α-bungarotoxin solution for 2 h at RT.
Note: Cover the 96-well plate in aluminium foil to restrict fluorescence bleaching.
9. Wash muscles with ice-cold 1× PBS for 10 min. Re-cover the 96-well plate in aluminium foil.
10. Repeat step B9 two additional times. Three washes are to be completed in total.
11. Using a 3 mL plastic transfer pipette, add one drop of Fluoromount-G mounting medium to a Polysine®-coated slide. Alternative mounting media may be used, e.g., Dako fluorescence mounting medium or Mowiol.
Note: If needed, a second drop of Fluoromount-G can be added to ensure sufficient coverage during mounting. Exceeding two drops generates surplus volume, resulting in excessive coverslip movement, potential displacement of sections, and prolonged drying.
12. Transfer muscles to Fluoromount-G. Using a dissection microscope and forceps, remove dirt/debris from muscles contaminated during the immunofluorescent staining process.
Notes:
1. To prevent damage to the muscles, avoid using spring scissors and instead opt for straight or curved forceps to carefully remove contaminants.
2. If multiple muscles are being co-mounted onto the same slide, position them close together without overlapping.
3. Ensure the muscles are as flat as possible.
13. Gently drop a 22 × 64 × 0.13–16 mm coverslip onto the slide. Tap the coverslip to evenly distribute the mounting medium and remove large air bubbles.
Notes:
1. Ensure the entire coverslip is completely covered with mounting medium, avoiding gaps. Incomplete sealing can increase the risk of sample contamination or physical damage.
2. To avoid air bubbles, position the coverslip at a 45° angle. Lower one edge of the coverslip onto the slide, allowing it to fall gradually on the specimen.
14. Optional: Remove excess Fluoromount-G from the coverslip edges using a clean wipe.
Note: If a non-setting mounting medium is used, seal the edges of the coverslip with nail varnish.
15. Store slides in a box and maintain at 4 °C until the mounting medium has completely dried (usually overnight).
Note: For confocal imaging, slides can be kept at 4 °C for ~6 months or at -20 °C for longer-term storage.
Data analysis
Manual assessment of NMJ innervation status
To assess degeneration, the innervation status of each NMJ can be categorised into distinct groups. This scoring process has been detailed elsewhere [5,30]. NMJs are visualised using a Zeiss LSM 780 confocal microscope equipped with a Plan-Apochromat 63×/1.4 Oil DIC M27 objective (Zeiss, catalog number: 420782-9900-799; Figure 3A, B). For easier assessment of innervation, axonal and pre-synaptic components (i.e., tubulin βIII and synaptophysin) are co-visualised down the eyepiece alongside post-synaptic AChRs labelled with αBTX. This experimental configuration employs a fluorescence dual bandpass filter set, used in combination with a Mercury lamp, for simultaneous excitation and emission of Alexa Fluor 488 and Alexa Fluor 555. The antibodies recommended in this protocol are highly efficient, allowing for clear detection of NMJs using minimal laser power and thereby reducing the risk of photobleaching.
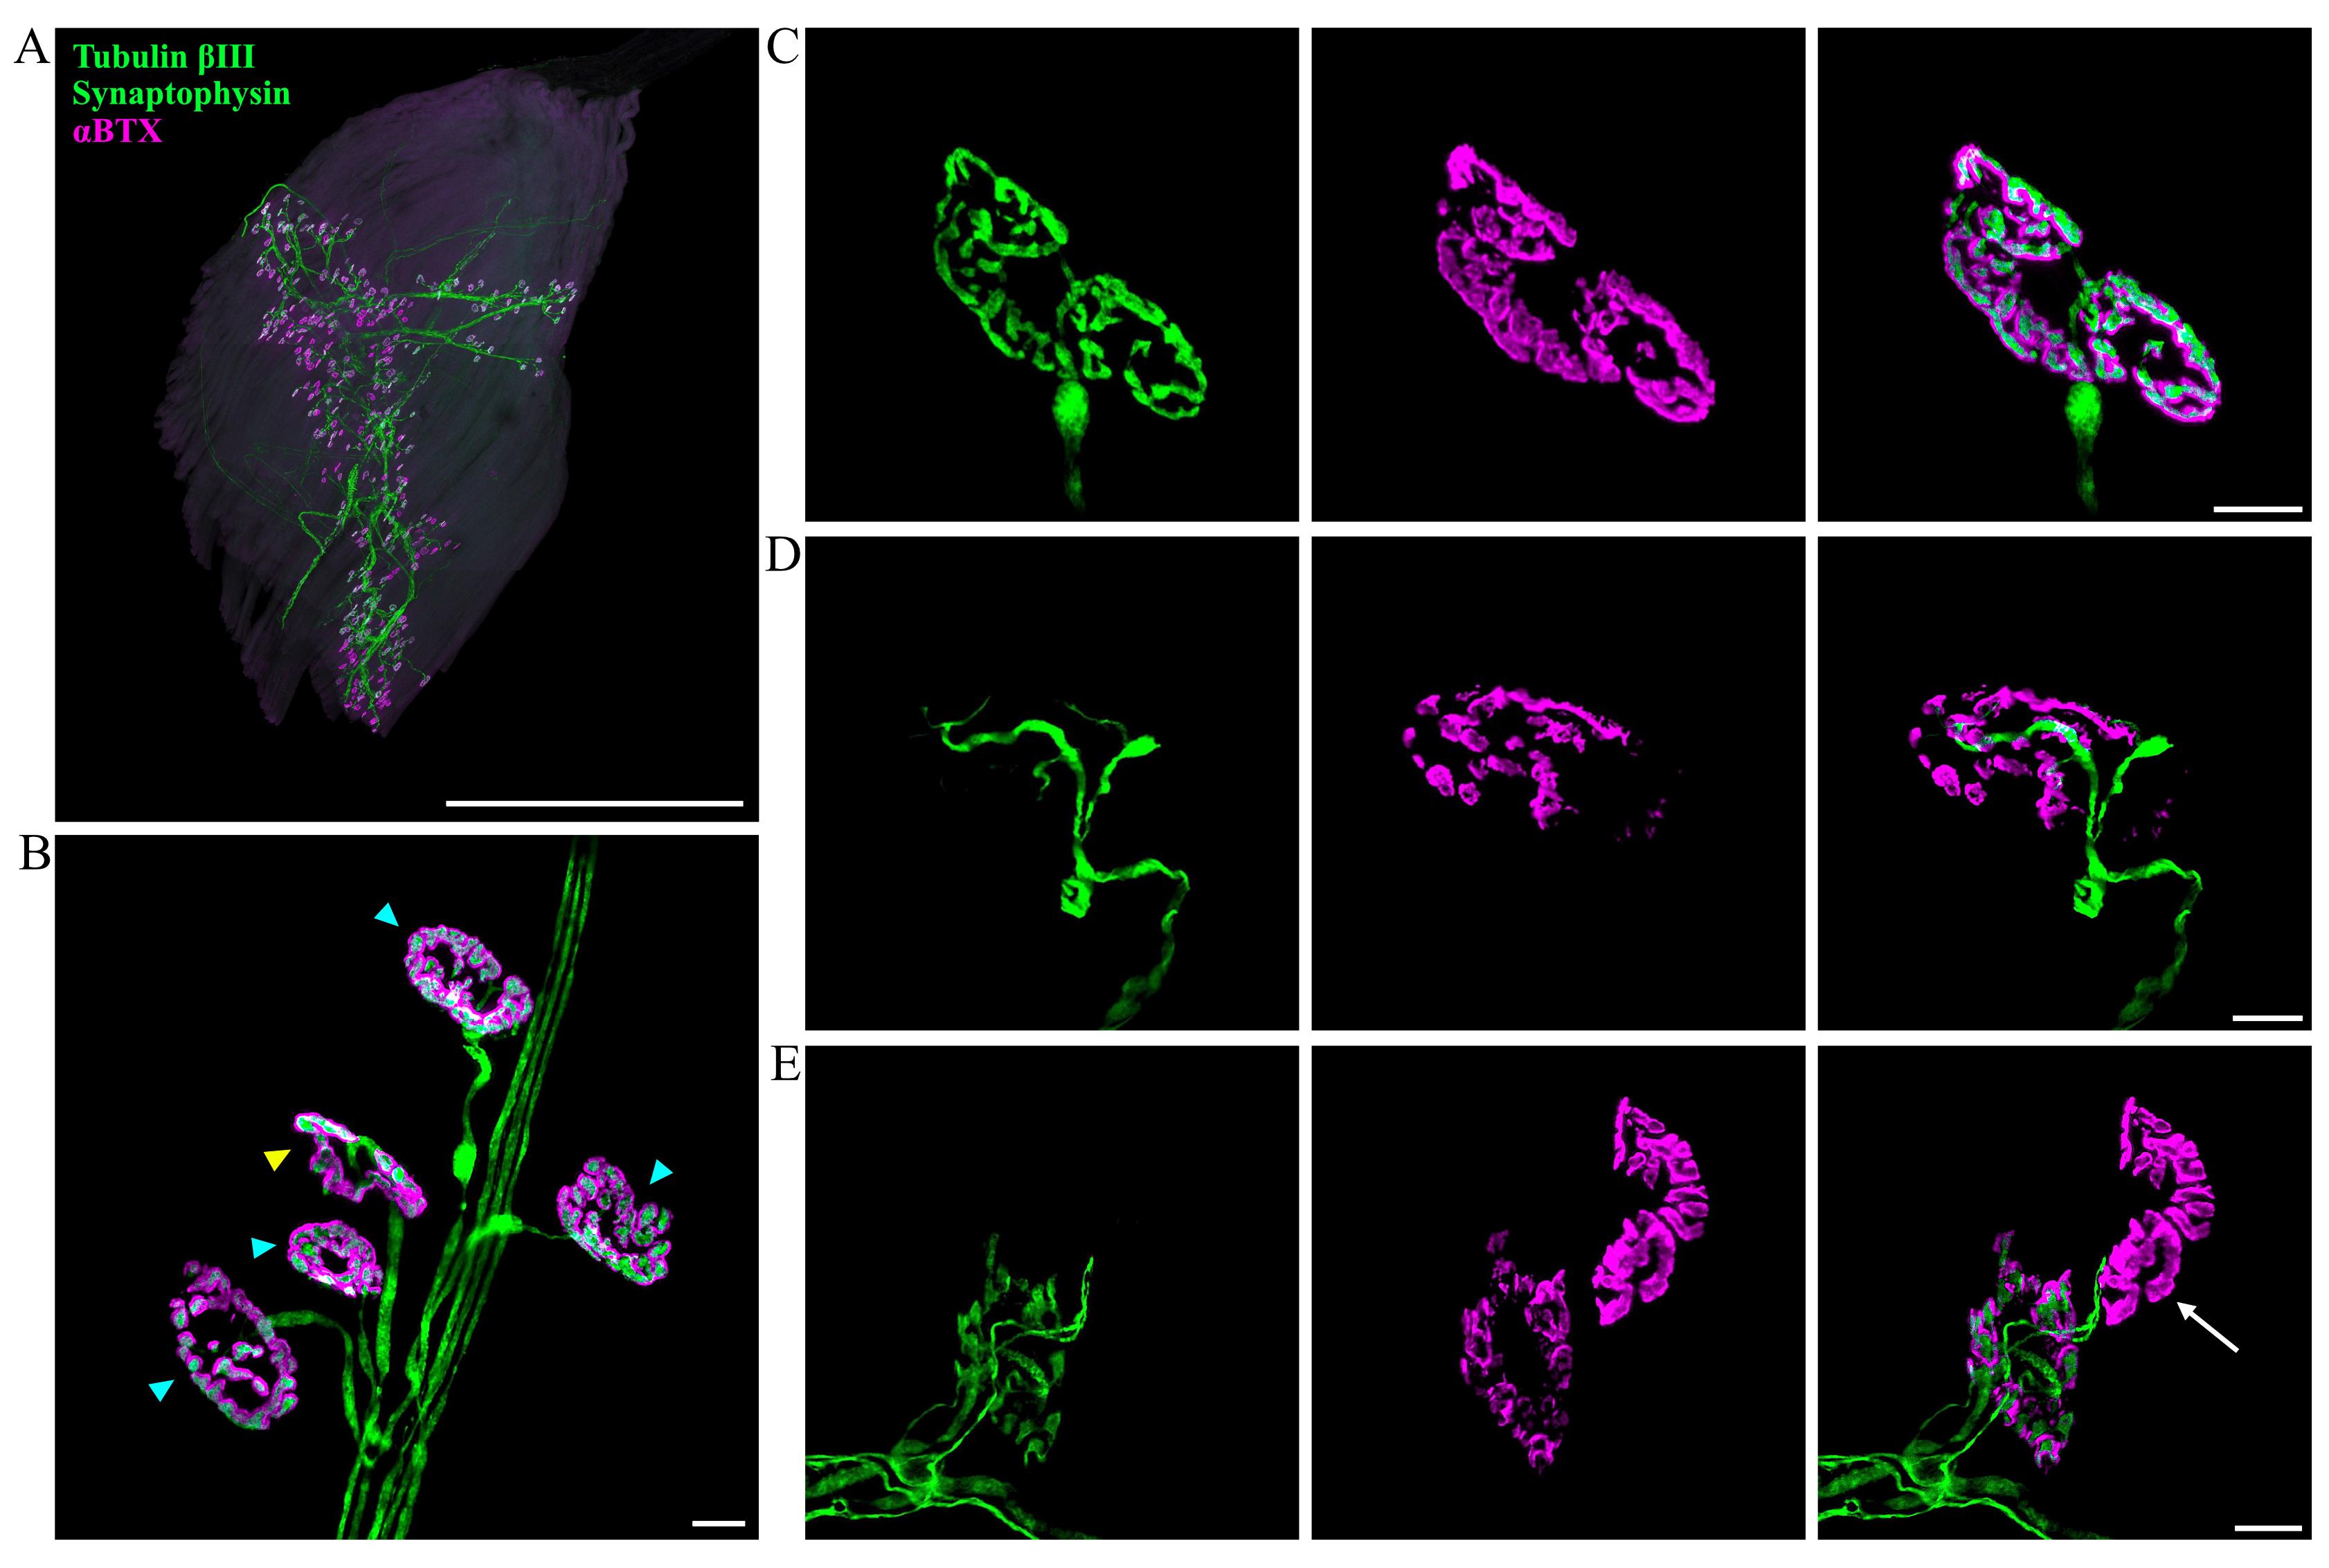
Figure 3. Imaging and evaluation of neuromuscular junction (NMJ) innervation. (A) Representative z-stack confocal image of a hind paw lumbrical muscle. The entire innervation pattern can be observed using this whole-mount protocol. NMJs are visualised using markers against tubulin βIII (green), synaptophysin (green), and post-synaptic acetylcholine receptors (αBTX; magenta). Scale bar = 1 mm. (B) Higher magnification enables detailed visualisation of individual NMJs. En face NMJs (blue triangles) are selected for scoring NMJ innervation, whilst angled or side-facing NMJs are avoided (yellow triangle). (C–E) Examples of NMJs with varying levels of innervation: (C) fully innervated, (D) partially innervated, and (E) almost completely denervated (arrow). Scale bars = 10 μM.
Per mouse, 100 NMJs spanning two lumbrical muscles or separated parts of the FDB are analysed and categorised into one of three groups: fully innervated, partially innervated, or denervated. En face NMJs—where the endplate is flat and fully visible, facing directly towards the observer—provide a more reliable assessment of innervation status compared to angled endplates and are therefore selected for the analysis (Figure 3B). An endplate is considered fully innervated when the pre- and post-synapse are completely juxtaposed, whereas partially innervated NMJs have a portion of the post-synaptic region that lacks neuronal input (Figure 3C, D). A cutoff value for partial innervation should be established, e.g., <80% overlap between the pre- and post-synapse. NMJs are classified as denervated when post-synapses have no associated pre-synapse or axon (Figure 3E). Certain types of degeneration, such as those resulting from hypoxia-reperfusion, can lead to more rapid disintegration of the synaptic terminal, making partial innervation a rarer event [31]. It is therefore important to consider the expected morphology of NMJ degeneration and adjust the classification categories as required. User training is recommended to ensure NMJ innervation assessments are consistent; this involves scoring pre-analysed mutant and wild-type NMJs, whilst remaining blinded to genotype. If the results align with the reference values, the user can proceed with non-analysed samples. Muscles displaying dissection-related damage or exhibiting faint immunostaining as a result of inadequate antibody penetration should be excluded from the analysis. If alterations in tubulin βIII or synaptophysin staining are expected based on the model used, alternative antibodies should be considered. Alternatively, these neuronal markers can be visualised in separate channels by using primary antibodies raised in different species (see General note 1).
Manual NMJ innervation assessments are inherently subjective. For example, criteria for NMJ classification can differ between users, leading to inter-rater variability. Moreover, inconsistencies can arise when analyses are performed over an extended period of weeks or months. To minimise observer bias, it is recommended that a single individual performs all assessments whilst remaining blinded to experimental conditions (e.g., genotype, treatment group). To prevent double-scoring endplates, analyse NMJs at one end of the muscle and proceed in a unidirectional manner.
Automated assessment of NMJ morphology using ImageJ, NMJ-Analyser, or NMJ-morph
Making accurate decisions on innervation status can become challenging when immunostaining is unclear or variable across muscles. For instance, suboptimal staining intensity could result in an overestimation of partially innervated or denervated NMJs. In such cases, automated analysis methods offer a promising solution, as they improve objectivity, standardise evaluation, and can decrease processing time. This provides a more reliable and reproducible alternative to manual assessment of innervation, and can aid in quantifying structural features of the NMJ.
ImageJ is a powerful tool for semi-automated image analysis, enabling users to install relevant plugins for their specific needs. However, if a suitable plugin is not available for the required analysis, users can generate custom macros by recording a series of commands, providing consistent assessments across multiple images. To write a macro, select Plugins > Macros > Record and perform the sequence of desired actions. For instance, a macro can be written to measure the post-synaptic area of the NMJ. z-stacks are “collapsed” into maximum intensity projection images (Image > Stacks > Z Project), and an appropriate threshold is applied to identify αBTX-stained post-synapses (Image > Adjust > Threshold). Endplate areas encompass the post-synaptic staining, associated perforations, and αBTX-negative areas located within the perimeter of staining, thus serving as a proxy for overall NMJ size [20]. To measure such areas, size filtering (μm2 = 1-infinity) and the include holes option are enabled (Analyze > Analyze Particles), allowing ImageJ to delineate the outer edge of the NMJ and quantify perforations as solid structures. Once an output table is generated, it is transferred into Excel, where the user can exclude values based on specific criteria, such as overlapping endplates, those situated on the image edge, or those not orientated en face.
NMJ-Analyser is a software platform providing validated methods for screening NMJ morphologies of the pre- and post-synapse. Through a random forest machine learning algorithm, this application correlates NMJ innervation status (healthy vs. degenerating) with structural features of the synapse. NMJ-Analyser generates 12 biologically relevant parameters for each NMJ component, categorised as follows:
• Integrity: cluster distance, cluster size, cluster numbers, fragmentation.
• Shape: non-compactness, shape factor, internal rugosity, external rugosity.
• Size: length (μm), surface/volume ratio, surface area, volume (μm3).
Five additional parameters describe the interaction between pre-synaptic and post-synaptic structures: coverage, intersection, average distance, mass distance, and Hausdorff distance. These metrics provide a comprehensive overview of NMJ morphology, enabling comparative analyses across different experimental conditions that can facilitate the identification of phenotypes undetectable by eye. For a detailed explanation of the analytical approach and parameter definitions, refer to Mejia Maza et al. [21].
NMJ-morph is a commonly used alternative that harnesses ImageJ to evaluate 21 pre-synaptic and post-synaptic morphological variables of the NMJ. These are categorised into core variables, derived variables, and associated nerve and muscle variables.
• Core variables: nerve terminal area (μm2), nerve terminal parameter (μm), number terminal branches, number branch points, total length branches (μm), AChR area (μm2), AChR perimeter (μm), endplate area (μm2), endplate perimeter (μm), endplate diameter (μm), number AChR clusters.
• Derived variables: average length branches (μm), complexity, average area AChR clusters (μm2), fragmentation, compactness (%), overlap (%), area of synaptic contact (μm2).
• Associated nerve and muscle variables: axon diameter (μm), muscle fibre diameter (μm), number of axonal inputs.
For a comprehensive overview of the analytical methodology and parameter definitions, refer to Jones et al. [27].
Statistical analyses
To compare experimental conditions across each category of NMJ innervation (i.e., full innervation, partial innervation, and denervation), statistical tests should be selected based on the number of experimental groups, data distribution, and equality of variance, as standard. A minimum of six biological replicates per condition is recommended.
For manual analysis of innervation status, 100 NMJs across two lumbrical muscles or separated parts of the FDB should be analysed per animal. For other types of NMJ analysis, the required number of endplates may differ. In such cases, a pilot power analysis is recommended to determine the optimal sample size for robust statistical outcomes.
Validation of protocol
This protocol or parts of it have been used and validated in the following research article(s):
• Sleigh et al. [32]. Neuromuscular junction maturation defects precede impaired lower motor neuron connectivity in Charcot-Marie-Tooth type 2D mice. Human Molecular Genetics (Figure 3A, B, C; Figure 4A, B, D; Figure 6B).
• Sleigh et al. [17]. Developmental demands contribute to early neuromuscular degeneration in CMT2D mice. Cell Death and Disease (Figure 1B, C; Figure 3A, C; Figure 4B).
• Mejia Maza et al. [21]. NMJ-Analyser identifies subtle early changes in mouse models of neuromuscular disease. Scientific Reports (Figure 3A, B; Figure 5).
• Rhymes et al. [33]. Boosting BDNF in muscle rescues impaired axonal transport in a mouse model of DI-CMTC peripheral neuropathy. Neurobiology of Disease (Supplementary Figure 3A, B; Supplementary Figure 6A, B).
• Mech et al. [20]. Morphological variability is greater at developing than mature mouse neuromuscular junctions. Journal of Anatomy (Figure 1; Figure 2; Figure 3).
• Williamson et al. [18]. Neuronal over-expression of Oxr1 is protective against ALS-associated mutant TDP-43 mislocalisation in motor neurons and neuromuscular defects in vivo. Human Molecular Genetics (Figure 3; Figure 4).
General notes and troubleshooting
General notes
1. Alternative markers for the axon and pre-synapse can be used, such as anti-2H3 (DSHB, RRID: AB_531793) and anti-SV2 (DSHB, RRID: AB_2315387). Furthermore, a rabbit anti-synaptophysin antibody (Nittobo, catalog number: MSFR105660, RRID: AB_2571842) or rabbit anti-tubulin βIII (Nittobo, catalog number: MSFR105960, RRID: AB_2571848) can be used to distinguish between pre-synaptic and axonal staining.
2. Alternative secondary antibodies or α-bungarotoxin conjugates can be used. However, Alexa Fluor 405 conjugated α-bungarotoxin (e.g., Invitrogen, catalog number: B56130) should be avoided, as it is prone to rapid photodegradation when exposed to light.
Troubleshooting
Problem 1: Damage to lumbrical and/or FDB muscles during dissection.
Possible cause: Excessive force, improper handling of dissection tools, or use of blunt/damaged instruments.
Solution: Practice fine motor control before dissection. Use sharp, clean tools suitable for intricate dissection, and regularly fix or replace damaged items.
Problem 2: Weak or uneven staining of NMJs.
Possible cause: Over-fixation of muscles, inadequate tissue permeabilisation, excessive connective tissue remaining, poor antibody/αBTX penetration, or suboptimal antibody/αBTX concentrations.
Solution: Limit fixation to <15 min and use freshly prepared 4% (w/v) PFA in 1× PBS. Thoroughly remove connective tissue. Extend antibody/αBTX incubation time or concentration as needed.
Problem 3: High background signal or non-specific antibody binding.
Possible cause: Insufficient blocking or using expired blocking solution, overconcentrated antibodies, inadequate washing, or excessive incubation with primary/secondary antibodies.
Solution: Use freshly prepared (<1 week old) blocking solution for an adequate time (≥30 min). Optimise antibody dilutions (considering muscle size and numbers, mouse age, and antibody types), increase the number of washing steps, or reduce incubation times.
Problem 4: Blurred NMJs during confocal microscopy.
Possible cause: Excessive connective tissue obstructing NMJs, trapped air bubbles during mounting, or dirt/debris remaining on the sample surface.
Solution: Remove remaining connective tissue and dirt/debris during mounting. Handle tissues with clean, sterilised tools.
Acknowledgments
We thank Prof. Thomas H. Gillingwater (University of Edinburgh) for originally sharing the muscle dissection and NMJ staining protocols, Dr. Aurélie Paulo-Ramos and Ms. Louisa Snape (UCL Queen Square Institute of Neurology) for commenting on the manuscript, and the personnel of the Denny Brown Laboratories (UCL Queen Square Institute of Neurology) for assistance in maintaining mouse colonies. This project was funded by a Medical Research Council award (MR/Y010949/1) (JNS); the UCL Therapeutic Acceleration Support scheme supported by funding from MRC IAA 2021 UCL MR/X502984/1 (JNS); the China Scholarship Council (QL); and MND Association Birsa/Oct21/976-799 (NB). The graphical abstract and Figure 1 were generated using biorender.com. This protocol was used in [33].
Competing interests
The authors have no competing interests to declare.
Ethical considerations
Experiments involving mice were performed under licence from the UK Home Office in accordance with the Animals (Scientific Procedures) Act 1986 and were approved by the University College London – Queen Square Institute of Neurology Ethics Committee.
References
- Ribchester, R. R. and Gillingwater, T. H. (2022). Neuromuscular function and transmission. Anaesth Intensive Care Med. 23(11): 727–736. https://doi.org/10.1016/j.mpaic.2022.08.015
- Burden, S. J., Huijbers, M. G. and Remedio, L. (2018). Fundamental Molecules and Mechanisms for Forming and Maintaining Neuromuscular Synapses. Int J Mol Sci. 19(2): 490. https://doi.org/10.3390/ijms19020490
- Rogers, R. S. and Nishimune, H. (2017). The role of laminins in the organization and function of neuromuscular junctions. Matrix Biol. 57–58: 86–105. https://doi.org/10.1016/j.matbio.2016.08.008
- Alhindi, A., Boehm, I. and Chaytow, H. (2022). Small junction, big problems: Neuromuscular junction pathology in mouse models of amyotrophic lateral sclerosis (ALS). J Anat. 241(5): 1089–1107. https://doi.org/10.1111/joa.13463
- Sleigh, J. N., Burgess, R. W., Gillingwater, T. H. and Cader, M. Z. (2014). Morphological analysis of neuromuscular junction development and degeneration in rodent lumbrical muscles. J Neurosci Methods. 227: 159–165. https://doi.org/10.1016/j.jneumeth.2014.02.005
- Martínez‐Hernández, R., Bernal, S., Also‐Rallo, E., Alías, L., Barceló, M., Hereu, M., Esquerda, J. E. and Tizzano, E. F. (2013). Synaptic defects in type I spinal muscular atrophy in human development. J Pathol. 229(1): 49–61. https://doi.org/10.1002/path.4080
- Murray, L. M., Comley, L. H., Thomson, D., Parkinson, N., Talbot, K. and Gillingwater, T. H. (2008). Selective vulnerability of motor neurons and dissociation of pre- and post-synaptic pathology at the neuromuscular junction in mouse models of spinal muscular atrophy. Hum Mol Genet. 17(7): 949–962. https://doi.org/10.1093/hmg/ddm367
- Rodríguez Cruz, P. M., Palace, J. and Beeson, D. (2018). The Neuromuscular Junction and Wide Heterogeneity of Congenital Myasthenic Syndromes. Int J Mol Sci. 19(6): 1677. https://doi.org/10.3390/ijms19061677
- Lang, B. and Vincent, A. (2009). Autoimmune disorders of the neuromuscular junction. Curr Opin Pharmacol. 9(3): 336–340. https://doi.org/10.1016/j.coph.2009.04.005
- Lovering, R. M., Iyer, S. R., Edwards, B. and Davies, K. E. (2020). Alterations of neuromuscular junctions in Duchenne muscular dystrophy. Neurosci Lett. 737: 135304. https://doi.org/10.1016/j.neulet.2020.135304
- Valdez, G., Tapia, J. C., Kang, H., Clemenson, G. D., Gage, F. H., Lichtman, J. W. and Sanes, J. R. (2010). Attenuation of age-related changes in mouse neuromuscular synapses by caloric restriction and exercise. Proc Natl Acad Sci USA. 107(33): 14863–14868. https://doi.org/10.1073/pnas.1002220107
- Webster, R. G., Brain, K. L., Wilson, R. H., Grem, J. L. and Vincent, A. (2005). Oxaliplatin induces hyperexcitability at motor and autonomic neuromuscular junctions through effects on voltage‐gated sodium channels. Br J Pharmacol. 146(7): 1027–1039. https://doi.org/10.1038/sj.bjp.0706407
- Burgess, R. W., Cox, G. A. and Seburn, K. L. (2016). Neuromuscular Disease Models and Analysis. Methods Mol Biol. 1438: 349–394. https://doi.org/10.1007/978-1-4939-3661-8_19
- Hsieh, Y. T. and Chen, S. L. (2024). Visualization and Analysis of Neuromuscular Junctions Using Immunofluorescence. Bio Protoc. 14(19): e5076. https://doi.org/10.21769/bioprotoc.5076
- Sleigh, J. N., Mech, A. M., Aktar, T., Zhang, Y. and Schiavo, G. (2020). Altered Sensory Neuron Development in CMT2D Mice Is Site-Specific and Linked to Increased GlyRS Levels. Front Cell Neurosci. 14: e00232. https://doi.org/10.3389/fncel.2020.00232
- Sha, R., Wang, Z., You, X., Liu, Y., Xie, Z. and Feng, Y. (2021). Whole-mount Staining of Mouse Diaphragm Neuromuscular Junctions. Bio Protoc. 11(21): e4215. https://doi.org/10.21769/bioprotoc.4215
- Sleigh, J. N., Mech, A. M. and Schiavo, G. (2020). Developmental demands contribute to early neuromuscular degeneration in CMT2D mice. Cell Death Dis. 11(7): 564. https://doi.org/10.1038/s41419-020-02798-y
- Williamson, M. G., Finelli, M. J., Sleigh, J. N., Reddington, A., Gordon, D., Talbot, K., Davies, K. E. and Oliver, P. L. (2019). Neuronal over-expression of Oxr1 is protective against ALS-associated mutant TDP-43 mislocalisation in motor neurons and neuromuscular defects in vivo. Hum Mol Genet. 28(21): 3584–3599. https://doi.org/10.1093/hmg/ddz190
- Murray, L. M., Gillingwater, T. H. and Parson, S. H. (2010). Using mouse cranial muscles to investigate neuromuscular pathology in vivo. Neuromuscul Disord. 20(11): 740–743. https://doi.org/10.1016/j.nmd.2010.06.013
- Mech, A. M., Brown, A., Schiavo, G. and Sleigh, J. N. (2020). Morphological variability is greater at developing than mature mouse neuromuscular junctions. J Anat. 237(4): 603–617. https://doi.org/10.1111/joa.13228
- Mejia Maza, A., Jarvis, S., Lee, W. C., Cunningham, T. J., Schiavo, G., Secrier, M., Fratta, P., Sleigh, J. N., Fisher, E. M. C. and Sudre, C. H. (2021). NMJ-Analyser identifies subtle early changes in mouse models of neuromuscular disease. Sci Rep. 11(1): 12251. https://doi.org/10.1038/s41598-021-91094-6
- Murray, L. M., Lee, S., Bäumer, D., Parson, S. H., Talbot, K. and Gillingwater, T. H. (2010). Pre-symptomatic development of lower motor neuron connectivity in a mouse model of severe spinal muscular atrophy. Hum Mol Genet. 19(3): 420–433. https://doi.org/10.1093/hmg/ddp506
- Strack, S., Petersen, Y., Wagner, A., Röder, I. V., Albrizio, M., Reischl, M., Wacker, I. U., Wilhelm, C. and Rudolf, R. (2011). A Novel Labeling Approach Identifies Three Stability Levels of Acetylcholine Receptors in the Mouse Neuromuscular Junction In Vivo. PLoS One. 6(6): e20524. https://doi.org/10.1371/journal.pone.0020524
- Zelada, D., Barrantes, F. J. and Henríquez, J. P. (2021). Lithium causes differential effects on postsynaptic stability in normal and denervated neuromuscular synapses. Sci Rep. 11(1): 17285. https://doi.org/10.1038/s41598-021-96708-7
- Teriakidis, A., Willshaw, D. J. and Ribchester, R. R. (2012). Prevalence and elimination of sibling neurite convergence in motor units supplying neonatal and adult mouse skeletal muscle. J Comp Neurol. 520(14): 3203–3216. https://doi.org/10.1002/cne.23091
- Murray, L. M., Beauvais, A., Bhanot, K. and Kothary, R. (2013). Defects in neuromuscular junction remodelling in the Smn2B/− mouse model of spinal muscular atrophy. Neurobiol Dis. 49: 57–67. https://doi.org/10.1016/j.nbd.2012.08.019
- Jones, R. A., Reich, C. D., Dissanayake, K. N., Kristmundsdottir, F., Findlater, G. S., Ribchester, R. R., Simmen, M. W. and Gillingwater, T. H. (2016). NMJ-morph reveals principal components of synaptic morphology influencing structure–function relationships at the neuromuscular junction. Open Biol. 6(12): 160240. https://doi.org/10.1098/rsob.160240
- Tarpey, M. D., Amorese, A. J., Balestrieri, N. P., Ryan, T. E., Schmidt, C. A., McClung, J. M. and Spangenburg, E. E. (2018). Characterization and utilization of the flexor digitorum brevis for assessing skeletal muscle function. Skelet Muscle. 8(1): 14. https://doi.org/10.1186/s13395-018-0160-3
- Betz, W. J., Caldwell, J. H. and Ribchester, R. R. (1979). The size of motor units during post‐natal development of rat lumbrical muscle. J Physiol. 297(1): 463–478. https://doi.org/10.1113/jphysiol.1979.sp013051
- Spaulding, E. L., Sleigh, J. N., Morelli, K. H., Pinter, M. J., Burgess, R. W. and Seburn, K. L. (2016). Synaptic Deficits at Neuromuscular Junctions in Two Mouse Models of Charcot–Marie–Tooth Type 2d. J Neurosci. 36(11): 3254–3267. https://doi.org/10.1523/jneurosci.1762-15.2016
- Baxter, B., Gillingwater, T. H. and Parson, S. H. (2008). Rapid loss of motor nerve terminals following hypoxia–reperfusion injury occurs via mechanisms distinct from classic Wallerian degeneration. J Anat. 212(6): 827–835. https://doi.org/10.1111/j.1469-7580.2008.00909.x
- Sleigh, J. N., Grice, S. J., Burgess, R. W., Talbot, K. and Cader, M. Z. (2014). Neuromuscular junction maturation defects precede impaired lower motor neuron connectivity in Charcot-Marie-Tooth type 2D mice. Hum Mol Genet. 23(10): 2639–2650. https://doi.org/10.1093/hmg/ddt659
- Rhymes, E. R., Simkin, R. L., Qu, J., Villarroel-Campos, D., Surana, S., Tong, Y., Shapiro, R., Burgess, R. W., Yang, X. L., Schiavo, G. and Sleigh, J. N. (2024). Boosting BDNF in muscle rescues impaired axonal transport in a mouse model of DI-CMTC peripheral neuropathy. Neurobiol Dis. 195: 106501. https://doi.org/10.1016/j.nbd.2024.106501
Article Information
Publication history
Received: Jan 30, 2025
Accepted: Apr 18, 2025
Available online: May 5, 2025
Published: May 20, 2025
Copyright
© 2025 The Author(s); This is an open access article under the CC BY-NC license (https://creativecommons.org/licenses/by-nc/4.0/).
How to cite
Simkin, R. L., Rhymes, E. R., Lang, Q., Birsa, N. and Sleigh, J. N. (2025). Dissection and Whole-Mount Immunofluorescent Staining of Mouse Hind Paw Muscles for Neuromuscular Junction Analysis. Bio-protocol 15(10): e5315. DOI: 10.21769/BioProtoc.5315.
Category
Neuroscience > Neuroanatomy and circuitry
Neuroscience > Peripheral nervous system
Cell Biology > Tissue analysis > Tissue staining
Do you have any questions about this protocol?
Post your question to gather feedback from the community. We will also invite the authors of this article to respond.