- Protocols

- Articles and Issues
- For Authors
- About
- Become a Reviewer

Electrophysiological Evaluation of a Sciatic Nerve Degree III Injury Model in Rats
Published: Vol 15, Iss 10, May 20, 2025 DOI: 10.21769/BioProtoc.5311 Views: 1860
Reviewed by: Olga KopachAnonymous reviewer(s)
Original research article
The authors used this protocol in:

Jun 2015
Advertisement


Protocol Collections
Comprehensive collections of detailed, peer-reviewed protocols focusing on specific topics


Related protocols
Abstract
Sciatic nerve injury is a prevalent traumatic condition that significantly impacts a patient's quality of life. The sciatic nerve compression injury model is among the most commonly utilized models for investigating nerve repair and regeneration. Within this context, the degree III sciatic nerve injury model is frequently employed in scientific research due to its clinical relevance and its suitability for studies focused on functional recovery. However, a standardized approach for accurately assessing the success of constructing the degree III sciatic nerve injury model remains lacking. Traditional macroscopic observation methods exhibit limitations, whereas neurophysiological testing serves as a highly sensitive and objective evaluation technique that can directly reflect changes in nerve conduction function, thus providing reliable quantitative evidence for the successful establishment of the model. This study aims to offer a comprehensive description of the application of neurophysiological techniques in evaluating the construction of the degree III sciatic nerve injury model, thereby ensuring the success of model preparation.
Key features
• Precisely simulate a degree III sciatic nerve injury.
• Conduct neurophysiological tests on the sciatic nerve 30 min after the injury.
• Use neurophysiological techniques to improve the accuracy and repeatability of scientific study results.
Keywords: Sciatic nerveGraphical overview
Background
In clinical practice, sciatic nerve injury is a prevalent traumatic disorder frequently resulting from sports injuries, industrial accidents, or traffic incidents [1]. These injuries can lead to impairments in both motor and sensory functions in the regions innervated by the affected nerve [2]. Consequently, the field of neuroscience research has focused on the rehabilitation of sciatic nerve injuries.
Investigating nerve repair and regeneration in vitro poses significant challenges, which often makes animal experiments the preferred research method. The rat sciatic nerve injury model is particularly favored due to its ease of operation and its similarity to human nerve distribution [3]. According to Sunderland's degree V nerve injury classification [4], a degree III injury involves a rupture of both the nerve axon and the intima, resulting in structural disarray and incomplete spontaneous recovery. This type of injury is commonly encountered in clinical practice, particularly those resulting from trauma [5]. In models of degree III nerve injury, hemostatic forceps are frequently utilized to induce the injury. This technique is straightforward, allowing for the preservation of the epineurium’s integrity by carefully controlling the force and duration of the clamp, thus maintaining a degree of connectivity between the proximal and distal ends of the injury site [6]. However, following compression with a hemostat, some nerve fibers may only temporarily lose their conductive function, and the subsequent recovery of nerve function may not necessarily be attributable to the regeneration of severed axons [7]. Consequently, accurately assessing the successful construction of the sciatic nerve degree III injury model remains a challenging task.
The traditional assessment method for nerve damage relies heavily on visual observation, which complicates the accurate evaluation of the true condition of nerve injury. Existing literature indicates that neuroelectrophysiological testing is an effective method for assessing the functional status of nerves by recording nerve conduction velocity and action potential amplitude. This approach directly reflects changes in nerve conduction function and offers significant advantages in determining the extent of sciatic nerve injury [8,9]. Unlike previous methods that rely exclusively on visual inspection, this methodology is more sensitive and objective, providing credible quantitative evidence for effective model creation. A classical approach involves measuring nerve conductance by placing both recording and stimulating electrodes directly on the nerve. However, an alternative method, which involves stimulating the sciatic nerve while recording from the associated muscles (e.g., the gastrocnemius muscle), has been increasingly adopted in recent studies due to its ability to assess both nerve and muscle function simultaneously. This approach provides a more comprehensive evaluation of nerve injury and recovery, particularly in models where motor function restoration is a key outcome measure. In a study performing electrophysiological testing at 30 minutes post-induction, a reduction in nerve conduction velocity below 10 m/s demonstrated axonal disruption and endoneurial damage with preserved perineurial integrity, consistent with a Sunderland degree III sciatic nerve injury model [10]. The study established several sciatic nerve injury models based on the Sunderland degree V classification, revealing a strong correlation between nerve conduction velocity and lesion severity. Morphological findings indicated a Sunderland degree III injury characterized by nerve conduction velocity of less than 10 m/s and considerable fiber disruption, while the perineurium remained intact [11]. Consequently, the successful creation of a degree III sciatic nerve injury model can be verified through nerve electrophysiological testing of conduction velocity. However, the procedure for creating and assessing a degree III sciatic nerve injury model has not yet been detailed in a study protocol. To ensure the consistency and reproducibility of the degree III sciatic nerve damage model, this study aims to provide a comprehensive explanation of the procedure for creating and evaluating the model using nerve electrophysiology.
Materials and reagents
Biological materials
1. Male specific pathogen-free (SPF) Sprague-Dawley rats (8–9 weeks, 250–300 g) (Beijing HFK Bioscience Co., Ltd.)
Reagents
1. Physiological saline (Invitrogen, catalog number: G4702), storage temperature: 4 °C
2. Povidone-iodine disinfectant solution (Lircon, catalog number: 20020059), storage temperature: room temperature (RT)
3. 75% ethanol (BOXCON, catalog number: 75DSJJ2500ML), storage temperature: 20–25 °C
4. 1% hydrochloric acid alcohol (Byxbio, catalog number: BYX1211H), storage temperature: RT
5. 10% neutral buffered formalin (Wexis, catalog number: 21062803), storage temperature: 0–40 °C
6. 0.5% immunofluorescence permeabilization buffer (TPBS) (ReportBio, catalog number: RS0050), storage temperature: RT
7. Xylene (Sigma-Aldrich, catalog number: 247642), storage temperature: 16–26 °C
8. Absolute ethanol (Sigma-Aldrich, catalog number: E111963), storage temperature: 20–25 °C
9. Hematoxylin stain (Baso, catalog number: C240907), storage temperature: RT
10. Eosin stain (Baso, catalog number: C220905), storage temperature: 15–25 °C
11. 1× phosphate buffered saline (PBS) (Servicebio, catalog number: G4207), storage temperature: 4 °C
12. Trypsin digestion solution (Solarbio, catalog number: X1020), storage temperature: -20 °C
13. Antibody diluent (ZSGB-BIO, catalog number: ZLI-9030), storage temperature: 4 °C
14. DAPI fluoromount-G (SouthernBiotech, catalog number: 0100-20), storage temperature: 4 °C
15. Anti-S100β antibody (HUABIO, catalog number: ET1610-3), dilution ratio: 1:800, storage temperature: 4 °C
16. NF200 monoclonal antibody (Proteintech, catalog number: 60331-1-Ig), dilution ratio: 1:800, storage temperature: 4 °C
17. Donkey anti-mouse IgG (H+L) highly cross-adsorbed secondary antibody (Invitrogen, catalog number: A-21202), dilution ratio: 1:400, storage temperature: 4 °C
18. Donkey anti-rabbit IgG (H+L) highly cross-adsorbed secondary antibody (Invitrogen, catalog number: A-21207), dilution ratio: 1:400, storage temperature: 4 °C
Solutions
1. 3% sodium pentobarbital solution (see Recipes)
2. 70% ethanol (see Recipes)
3. 80% ethanol (see Recipes)
4. 90% ethanol (see Recipes)
Recipes
1. 3% sodium pentobarbital solution
Store at 4 °C in the dark for up to 1 month. Maintain sterile technique throughout the preparation process. Use containers with tight seals for storage.
| Reagent | Final concentration | Quantity or volume |
|---|---|---|
| Pentobarbital sodium powder | 0.03 g/mL | 1.5 g |
| Ultrapure water | 50 mL | 50 mL |
2. 70% ethanol
Store 70% ethanol at RT (20–25 °C) in a tightly sealed container for up to 6 months. Protect it from direct sunlight and open flames due to flammability. Clearly label the container with the preparation date and concentration. Use sterile technique during handling to prevent contamination. Check for evaporation or microbial growth before use.
| Reagent | Final concentration | Quantity or volume |
|---|---|---|
| Absolute ethanol | 70% | 560 mL |
| Ultrapure water | 30% | 240 mL |
3. 80% ethanol
Follow the same storage guidelines as 70% ethanol.
| Reagent | Final concentration | Quantity or volume |
|---|---|---|
| Absolute ethanol | 80% | 640 mL |
| Ultrapure water | 20% | 160 mL |
4. 90% ethanol
Follow the same storage guidelines as 70% ethanol.
| Reagent | Final concentration | Quantity or volume |
|---|---|---|
| Absolute ethanol | 90% | 720 mL |
| Ultrapure water | 10% | 80 mL |
Laboratory supplies
1. Sterile surgical drapes (Fisherbrand, catalog number: 22-362-178)
2. Sterile gloves (Medicom, catalog number: 201898)
3. 5 mL syringe (CHEMIL s.r.l., Padova, catalog number: S01G25)
4. 50 mL conical tubes (Biosharp, catalog number: BS-500-M)
5. Double-edged blade (Baili, catalog number: BD007C)
6. Suture needles (Binxiong, catalog number: 422105262)
7. Medical ruler (XG, catalog number: 8895)
8. 8–0 non-absorbable surgical suture (Ethicon, catalog number: VCP774D)
9. 3–0 non-absorbable surgical suture (Zhenbang, catalog number: 17Z1001J)
10. Medical cotton swabs (Hongsheng, catalog number: HS637)
11. Restraint board (Haopai, catalog number: ZK-MZJP-B)
12. 1.5 mL clear microcentrifuge tubes (Corning, catalog number: MCT-150-C)
13. Embedding cassettes (CITOTEST, catalog number: 31050102W)
14. High-profile microtome blades (Leica, catalog number: 14035838383)
15. Adhesion microscope slides (CITOTEST, catalog number: 188105W)
16. Slide staining rack (Tianzixing, catalog number: RSJ-26)
17. Transfer pipette (BKMAMLAB, catalog number: 110205007)
18. Laboratory timer (Lissa, catalog number: LSK1010)
19. Microscope cover glass (CITOTEST, catalog number: 10212450C)
20. Paraffin (Leica, catalog number: 39601006)
21. Neutral balsam (Biosharp, catalog number: BL704A)
Equipment
1. Ophthalmic scissors (Jinzhong, model: Y00030)
2. Straight forceps (Jinzhong, model: JD1050)
3. Curved forceps (Jinzhong, model: JD1060)
4. Straight sharp scissors (Jinzhong, model: J21070)
5. Needle holder (Jinzhong, model: DS5002)
6. Curved hemostat (Jinzhong, model: DS4004)
7. 14 cm hemostat clamp (Jinzhong, model: J31050)
8. Electronic balance (Leqi, model: LQ-C5001)
9. Heating pad (Jiacai, model: JRD240727)
10. Refrigerator (2–8 °C)
11. Electromyography signal acquisition system (AD Instruments, model: PL3508/P)
12. Automatic tissue processor (Leica, model: ASP200S)
13. Constant temperature incubator (Lichen, model: DZF-6210AB)
14. Orbital shaker (JOANLAB, model: OS-20)
15. Tissue embedding machine (Leica, model: EG1150)
16. Microtome (Craftek, model: CR-601ST)
17. Biological microscope (Olympus, model: DP80)
18. Rotating disc laser confocal microscope (ANDOR, model: Dragonfly)
Software and datasets
1. LabChart (version 8.1.28 Chinese, 22/12/2023, https://www.adinstruments.com)
Procedure
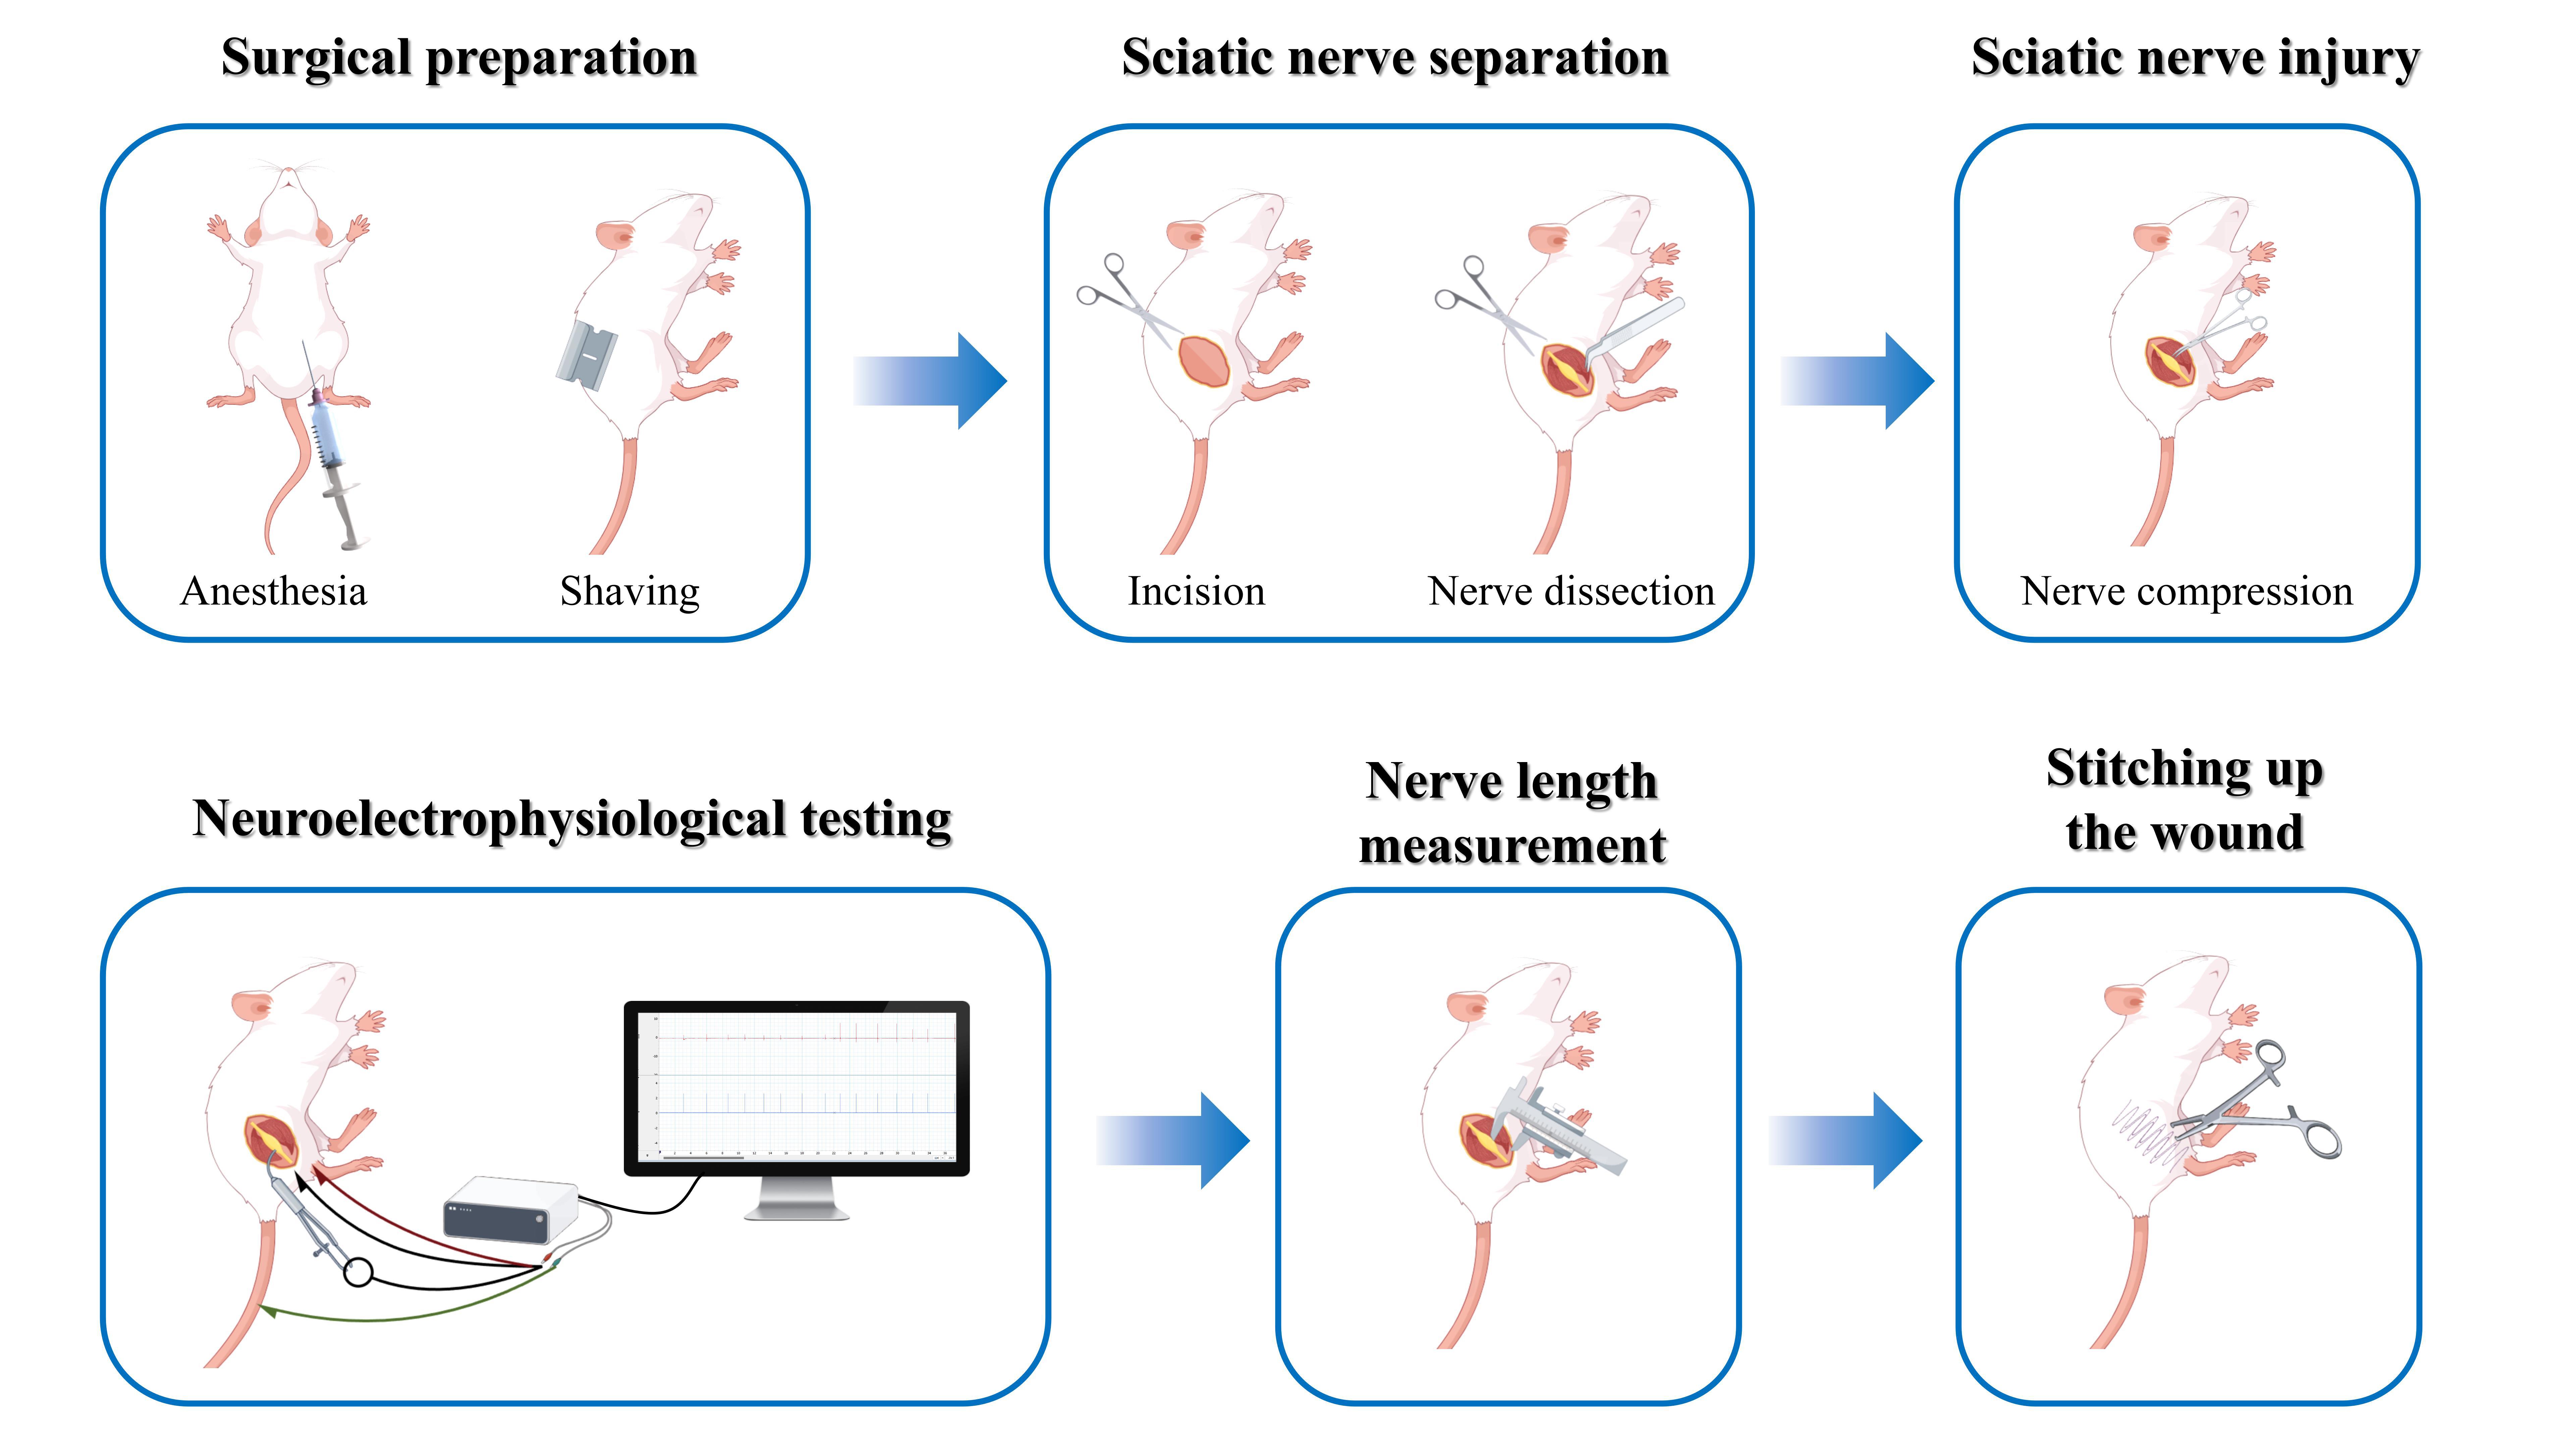
A. Surgical preparation
1. Sterilize all equipment meticulously and prepare heating pads to maintain the animal's body temperature.
2. Weigh the rat and prepare a fresh 3% sodium pentobarbital solution (50 mg/kg) for intraperitoneal injection to induce anesthesia. Proceed with subsequent experiments only after the rat reaches a surgical plane of anesthesia, confirmed by the absence of a pedal reflex (no response to toe pinch), loss of nociceptive reactions, and stable respiration and heart rate.
3. After administering anesthesia, place the rat on the restraint board.
4. Using a double-edged blade, shave the fur from the ankle to the hip on the right hind limb. Clean the surgical area three times in succession with 75% ethanol, followed by povidone-iodine disinfectant solution. Finally, cover the surgical area with a sterile surgical drape (Figure 1A).
Note: Disinfect the limb using a circular motion, starting from the center and moving outward to the margins.
B. Surgical procedure
1. Make a longitudinal incision (1–2 cm) between the ischial tuberosity and the greater trochanter on the right side of the rat's hip. Using blunt dissection, separate the gluteus superficialis and biceps femoris muscles to expose the sciatic nerve (Figure 1B).
Note: Take care to avoid injury to adjacent blood vessels and nerves.
2. Using curved forceps, carefully separate the sciatic nerve from the surrounding connective tissue (Figure 1C).
Note: Do not stretch the nerve during the procedure.
3. Employ the third click setting of a hemostat clamp to compress the sciatic nerve 2 mm from its trifurcation. The compression should last for 10 s, followed by a 10 s relaxation period. This sequence is repeated three times, resulting in a total lesion length of 6 mm. After clamping, the injured site of the nerve appears transparent, while the nerve sheath remains free of blood (Figure 1D, E).
4. Mark the nerve epineurium with an 8–0 non-absorbable surgical suture at the proximal site of the compression injury (Figure 1F).
Figure 1. Procedure for constructing a model of sciatic nerve compression injury. (A) Anesthetize the rat, remove the hair around the surgical area, disinfect the site, and cover it with a sterile surgical drape. (B) Bluntly separate the gluteus superficialis and biceps femoris muscles to expose the sciatic nerve. (C) Carefully use curved forceps to separate the sciatic nerve. (D) Apply hemostatic clamps to compress the sciatic nerve. (E) Following compression, the nerve will exhibit translucency with a total injury length of 6 mm. (F) Mark the proximal end of the epineurium injury.
5. Following the marking, the sciatic nerve should be positioned within the intermuscular space, ensuring that the exposed area remains moist with physiological saline. Neuroelectrophysiological testing is conducted 30 min post-operation to evaluate the success of the procedure.
6. During nerve electrophysiological testing, re-expose the sciatic nerve and adjust pulse intensity to 3.5 V with a pulse width of 1 ms (Figure 2A, B).
Note: This parameter was chosen based on previous studies, which demonstrated that 3.5 V effectively elicits a measurable action potential without causing additional nerve damage. Alternative settings may also be used depending on the specific experimental requirements and the sensitivity of the recording equipment.
7. Position the stimulating electrode at the proximal end of the sciatic nerve injury. The recording electrode (+) should be placed at the ipsilateral gastrocnemius tendon, while the recording electrode (-) is positioned at the ipsilateral gastrocnemius muscle belly. Additionally, the reference electrode should be placed at the rat's tail. Manually activate the stimulation button to stimulate the sciatic nerve (Figure 2C). Upon stimulation, a clear compound muscle action potential (CMAP) appears on the recording device. The CMAP displays a biphasic waveform characterized by a distinct onset latency, peak amplitude, and duration (Figure 3A).
Notes:
1. The stimulating electrode is manually held in place to ensure stable contact with the sciatic nerve without touching the surrounding skin, which is sufficient for the short duration of each measurement (≤3 min).
2. For prolonged trials, securing the electrode to the nerve with biocompatible materials may improve stability.
3. Avoid setting the stimulation interval too short to ensure effective stimulation. The recommended stimulation interval is at least 1 s (1 Hz) to ensure sufficient time for nerve repolarization (Figures 2B and 3A).
8. After stimulation, measure the distance from the sciatic nerve stimulation point to the recording point at the gastrocnemius muscle belly (Figure 2D).
Figure 2. Nerve conduction velocity measurement via neurophysiological testing. (A) Neurophysiological data acquisition and recording system. (B) Stimulation parameter interface. (C) Re-expose the sciatic nerve and position the stimulating electrode at the proximal site of the sciatic nerve injury. Place the recording electrode (−) on the belly of the gastrocnemius muscle, the recording electrode (+) on the gastrocnemius tendon, and the reference electrode on the rat's tail. (D) Measure the distance between the sciatic nerve stimulation site (proximal, indicated by yellow triangles) and the recording site on the belly of the gastrocnemius muscle (distal, indicated by yellow triangles).
9. Analyze the collected neurophysiological data using LabChart software. Calculate and document the latency, defined as the time difference between the stimulus onset and the action potential onset. The nerve conduction velocity is calculated by dividing the distance between the stimulation point and the recording location at the gastrocnemius muscle belly by the latency (t2-t1). Calculate the nerve conduction velocity for each stimulation and average the results (Figure 3A–C).
10. An average nerve conduction velocity below 10 m/s indicates damage and rupture of the axons, endoneurium, and perineurium, while the epineurium remains intact. In such cases, the sciatic nerve is classified as having a degree III injury. This finding confirms that the degree III injury model of the sciatic nerve has been successfully established (Figure 3D).
Figure 3. Calculation of average nerve conduction velocity. (A) Raw neurophysiological data. (B) Time point of stimulation for a single stimulus. (C) The onset time of an action potential during a single stimulus. (D) Calculation of nerve conduction velocity for each stimulus to derive the average conduction velocity.
11. Utilize 3–0 non-absorbable surgical sutures to securely close the muscle and skin layers. To promote optimal healing, clean the wound thoroughly and place the rat on a heating pad. Upon recovery, return the rat to its home cage and conduct daily monitoring.
Note: If the model is intended for survival studies (e.g., long-term functional recovery), animals may be maintained post-surgery. However, in this protocol, tissue sampling was performed immediately after neurophysiological testing to validate model efficacy.
C. Protocol validation procedure
1. After confirming deep anesthesia, place the rat on the restraint board, sterilize the surgical site, and re-expose the sciatic nerve through the original incision.
2. Identify the injured sciatic nerve by locating the proximal epineurial suture marker. Excise a 6 mm segment of the damaged nerve using micro-scissors. Rinse the excised nerve segment in sterile saline solution to remove debris and then place it into an embedding cassette for further processing. Administer a lethal overdose of sodium pentobarbital (150 mg/kg) via intraperitoneal injection to euthanize the rats post-tissue collection, ensuring rapid and painless death. Monitor vital signs, including heartbeat and respiration, to confirm death.
3. Fix the embedding cassette in 10% neutral buffered formalin for 24 h, then rinse it under running tap water for 12 h to remove the fixative.
4. After rinsing, dehydrate the tissue through a graded ethanol series as follows: immerse in 50% ethanol for 2 h, 70% ethanol for 6 h, 80% ethanol for 2 h, 90% ethanol for 1 h, 95% ethanol for 1 h (two changes), and absolute ethanol for 40 min (two changes). Subsequently, infiltrate the tissue with paraffin by immersing it in molten paraffin twice, each for 30 min.
5. Embed the tissue in molten paraffin within a prewarmed metal mold, ensuring the transverse cross-section of the nerve is flush against the mold bottom. Place the base of an embedding cassette on top, and allow the block to solidify on a cooling plate for 20 min. Once solidified, remove the block and store it at 4 °C until sectioning.
6. Cut 4 µm sections, transfer to slides, dry at 60 °C for 2 h, and store at room temperature.
7. Hematoxylin-eosin (H&E) staining: Deparaffinize the slides by immersing them in xylene twice for 15 min each. Rehydrate the tissue through a graded ethanol series (100%, 90%, 80%, and 70%) for 5 min each, followed by a rinse in distilled water. Stain the slides in hematoxylin for 3 min, then rinse in running tap water for 2 min. Differentiate the stain in 1% hydrochloric acid alcohol for 5 seconds, and rinse again in tap water. Counterstain in eosin for 2 min, and rinse briefly in distilled water. Dehydrate the slides through a reverse ethanol series (70%, 80%, 90%, and 100%) for 2 min each, followed by two changes of xylene for 1 min each. Coverslip the slides using a microscope cover glass and neutral balsam as the mounting medium and allow them to dry before imaging. Capture images using a biological microscope.
Notes:
1. Ensure the sections are fully immersed in the staining solution to prevent uneven staining.
2. Avoid bubble formation during mounting and ensure the mounting medium evenly covers the tissue.
8. Immunofluorescence staining: Deparaffinize and rehydrate the tissue sections following the same steps as H&E staining up to 70% ethanol. Rinse the sections in running tap water for 10 min to fully hydrate the tissue. Perform antigen retrieval by incubating the slides in 0.1% trypsin solution at 37 °C for 30 min, then rinse in distilled water. Block nonspecific binding by incubating the sections in 0.5% immunofluorescence permeabilization buffer (TPBS) at 37 °C for 2 h. Incubate the slides overnight at 4 °C with primary antibodies: rabbit anti-S100β and mouse anti-NF200, both diluted 1:800 in antibody diluent. Wash the slides three times in PBS for 5 min each to remove unbound primary antibodies. Incubate the slides with fluorophore-conjugated secondary antibodies (anti-rabbit and anti-mouse) diluted 1:400 in antibody diluent for 2 h at room temperature in the dark. Wash the slides three times in PBS for 5 min each to remove unbound secondary antibodies. Coverslip the slides directly using DAPI-containing mounting medium and store them at 4 °C in the dark until imaging. Use a rotating disc laser confocal microscope for subsequent image acquisition.
Data analysis
In LabChart software, extract the latency of 10 action potentials. To calculate the nerve conduction velocity, divide the distance between the stimulation point and the recording site at the belly of the gastrocnemius muscle by the latency. Then, calculate the average nerve conduction velocity from the 10 measurements. If the average conduction velocity is below 10 m/s, this indicates that a degree III sciatic nerve injury model has been successfully constructed, and the subsequent experiments can proceed.
Validation of protocol
Hematoxylin-eosin (H&E) staining was performed to examine the structural morphology of both normal and injured sciatic nerves. In the normal nerve, the longitudinal section revealed densely packed nerve fibers arranged in parallel, with the entire nerve encased in connective tissue and accompanied by a sparse distribution of blood vessels. The cross-sectional view demonstrated that each nerve bundle was surrounded by a well-defined layer of compact connective tissue, termed the perineurium. Within the nerve bundles, numerous circular profiles, representing the transverse sections of nerve fibers, were observed. Each nerve fiber was enveloped by a thin layer of connective tissue, known as the endoneurium. In contrast, the injured nerve exhibited significant structural alterations. The longitudinal section showed disrupted continuity of nerve fibers, characterized by axonal fragmentation and myelin disintegration, accompanied by mild endoneurial edema. The cross-sectional view revealed disorganized nerve fibers, with structural damage to both axons and myelin sheaths, resulting in blurred axonal contours. Additionally, mild interstitial edema and minimal erythrocyte extravasation were observed. Notably, despite the extensive damage to the nerve fibers, the epineurium and perineurium remained structurally intact (Figure 4).
Figure 4. Hematoxylin-eosin (H&E) staining of normal and injured sciatic nerves. Normal sciatic nerves exhibited densely aligned fibers with intact perineurium and endoneurium, whereas injured nerves demonstrated disrupted axonal and myelin continuity, mild edema, and erythrocyte extravasation despite preserved epineurium and perineurium.
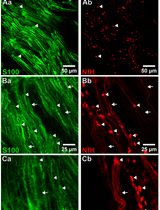
To evaluate the structural integrity of the myelin sheath and axonal organization, both normal and injured sciatic nerves were analyzed using S100β and NF200 immunofluorescence staining. In the normal nerve, NF200 staining revealed uniformly distributed circular or oval fluorescent signals, reflecting the orderly arrangement of axons, while S100β staining showed regular ring-shaped fluorescent signals corresponding to the myelin sheath formed by Schwann cells, which consistently enveloped the axons. In contrast, the injured nerve exhibited significant alterations: NF200 staining demonstrated weakened and disorganized fluorescent signals, with evidence of axonal fragmentation and partial loss, indicating substantial disruption of axonal structure. Similarly, S100β staining in the injured nerve displayed irregular and fragmented fluorescent signals, with areas of weakened intensity, suggesting compromised myelin sheath integrity (Figure 5). When combined with the observations from H&E staining, these immunofluorescence results collectively supported the conclusion that the constructed model successfully replicated a degree III sciatic nerve injury.
Figure 5. Immunofluorescence staining of S100β and NF200 in normal and injured sciatic nerves. Normal sciatic nerves exhibited orderly axonal arrangement and intact myelin sheaths, whereas injured nerves demonstrated disrupted axonal organization, fragmented myelin, and compromised structural integrity.
General notes and troubleshooting
General notes
1. House five animals per cage in conventional enclosures, providing them with free access to food and water. Maintain a 12/12 h light/dark cycle, beginning at 7:00 a.m., with temperature controlled at 23 ± 2 °C and 40%–60% humidity. All procedures should be conducted between 9:00 a.m. and 4:00 p.m.
2. This study has several limitations that need to be acknowledged. First, the use of only male Sprague-Dawley rats prevents the exploration of potential sex-specific differences in physiological responses. Second, the restricted weight range and age range may limit the generalizability of the findings to other developmental stages or body sizes. Future studies should aim to include both sexes and a wider range of weights and ages to achieve a more comprehensive understanding of the physiological outcomes being investigated.
3. This protocol was specifically developed and validated for male Sprague-Dawley rats and has not yet been experimentally tested in mice. Future studies will explore its applicability to murine models, considering anatomical and physiological differences, such as smaller nerve size, higher nerve conduction velocity, and distinct behavioral responses. Key adjustments may include the use of microsurgical tools, scaled-down injury parameters, and adapted electrophysiological and behavioral testing protocols. Pilot studies will be conducted to optimize the protocol for mice and ensure its reliability and reproducibility.
Troubleshooting
1. High background noise in electrophysiological recordings.
Possible cause: Electrical interference or poor grounding of the equipment.
Solution: Ensure proper grounding of the electrophysiology setup and minimize external electrical interference. Use shielded cables and isolate the experimental setup from other electronic devices.
2. Excessive bleeding during dissection.
Possible cause: Accidental damage to blood vessels.
Solution: Use fine dissection tools and work carefully around blood vessels. Apply gentle pressure with sterile gauze to control bleeding if necessary.
Acknowledgments
Writing—Original Draft, L.C.; Writing—Review, Z.W., C.W., N.M., and B.Z.; Laboratory assistant, W.Z., S.L., and J.L.; Funding acquisition, P.C., H.S.; Supervision, N.D. This project was supported by the Hebei Provincial Key Laboratory of Rehabilitation Engineering and Regenerative Medicine (SZX202327) and the Open Project of the Hebei Provincial Key Laboratory of Rehabilitation Engineering and Regenerative Medicine (KZS202403). We acknowledge methodological contributions from Li et al. [10] and Kong et al. [11], with technical refinements adapted to the current experimental paradigm.
Competing interests
The authors declare no competing interests.
Ethical considerations
These activities were all under the supervision and approval of the North China University of Science and Technology, and all animal experiments complied with the ARRIVE guidelines (Approval number: Beijing, SCXK 2019–0008).
References
- Liu, B., Alimi, O. A., Wang, Y., Kong, Y., Kuss, M., Krishnan, M. A., Hu, G., Xiao, Y., Dong, J., DiMaio, D. J., et al. (2024). Differentiated mesenchymal stem cells-derived exosomes immobilized in decellularized sciatic nerve hydrogels for peripheral nerve repair. J Controlled Release. 368: 24–41. https://doi.org/10.1016/j.jconrel.2024.02.019
- Wang, J., Chen, P., Han, G., Zhou, Y., Xiang, X., Bian, M., Huang, L., Wang, X., He, B., Lu, S., et al. (2024). Rab32 facilitates Schwann cell pyroptosis in rats following peripheral nerve injury by elevating ROS levels. J Transl Med. 22(1): 194. https://doi.org/10.1186/s12967-024-04999-x
- Heinzel, J. C., Oberhauser, V., Keibl, C., Swiadek, N., Längle, G., Frick, H., Kolbenschlag, J., Prahm, C., Grillari, J., Hercher, D., et al. (2021). Evaluation of Functional Recovery in Rats After Median Nerve Resection and Autograft Repair Using Computerized Gait Analysis. Front Neurosci. 14: e593545. https://doi.org/10.3389/fnins.2020.593545
- Sunderland, S. (1951). A classification of peripheral nerve injuries producing loss of function. Brain. 74(4): 491–516. https://doi.org/10.1093/brain/74.4.491
- Gordon, T. (2020). Peripheral Nerve Regeneration and Muscle Reinnervation. Int J Mol Sci. 21(22): 8652. https://doi.org/10.3390/ijms21228652
- Celen, M. C., Akkoca, A., Tuncer, S., Dalkilic, N. and Ilhan, B. (2023). Protective vs. Therapeutic Effects of Mitochondria-Targeted Antioxidant MitoTEMPO on Rat Sciatic Nerve Crush Injury: A Comprehensive Electrophysiological Analysis. Biomedicines. 11(12): 3306. https://doi.org/10.3390/biomedicines11123306
- Al-Arbeed, T. A., Renno, W. M. and Al-Hassan, J. M. (2023). Neuroregeneration of injured peripheral nerve by fraction B of catfish epidermal secretions through the reversal of the apoptotic pathway and DNA damage. Front Pharmacol. 14: e1085314. https://doi.org/10.3389/fphar.2023.1085314
- Civelek, E., Kabatas, S., Savrunlu, E. C., Diren, F., Kaplan, N., Ofluoğlu, D. and Karaöz, E. (2024). Effects of exosomes from mesenchymal stem cells on functional recovery of a patient with total radial nerve injury: A pilot study. World J Stem Cells. 16(1): 19–32. https://doi.org/10.4252/wjsc.v16.i1.19
- Choi, J. M. and Di Maria, G. (2021). Electrodiagnostic Testing for Disorders of Peripheral Nerves. Clin Geriatr Med. 37(2): 209–221. https://doi.org/10.1016/j.cger.2021.01.010
- Li, W. X., Chen, Y. R., Yi, N., Bai, Z. H., Ma, T. M. (2020). Effects of different frequencies of electroacupuncture on the expression of Bcl-2, Bax, and p53 in the spinal cord of rats with sciatic nerve injury. J Chin Integr Med. 38(08): 75–78+267–268. https://doi.org/10.13193/j.issn.1673-7717.2020.08.018
- Kong, Y. M., Yan, Y. T. (2021). Quantitative study of the sciatic nerve injury model. J Neurosci Res. 16(05): 249-252+273. https://doi.org/10.16780/j.cnki.sjssgncj.20200381
Article Information
Publication history
Received: Feb 18, 2025
Accepted: Apr 11, 2025
Available online: May 11, 2025
Published: May 20, 2025
Copyright
© 2025 The Author(s); This is an open access article under the CC BY-NC license (https://creativecommons.org/licenses/by-nc/4.0/).
How to cite
Chen, L., Wang, Z., Wang, C., Ma, N., Zhao, W., Liu, S., Lu, J., Zhao, B., Sun, H., Che, P. and Dou, N. (2025). Electrophysiological Evaluation of a Sciatic Nerve Degree III Injury Model in Rats. Bio-protocol 15(10): e5311. DOI: 10.21769/BioProtoc.5311.
Category
Neuroscience > Peripheral nervous system > Sciatic nerve
Molecular Biology > Protein > Expression
Do you have any questions about this protocol?
Post your question to gather feedback from the community. We will also invite the authors of this article to respond.