- Protocols

- Articles and Issues
- For Authors
- About
- Become a Reviewer

Visualization of F-Actin Through Expansion Microscopy (ExM) with Trifunctional Linker-Conjugated Phalloidin
Published: Vol 15, Iss 8, Apr 20, 2025 DOI: 10.21769/BioProtoc.5273 Views: 2280
Reviewed by: Tadamoto IsogaiMunenori IshibashiTejeshwar Rao
Original research article
The authors used this protocol in:

Oct 2023
Advertisement


Protocol Collections
Comprehensive collections of detailed, peer-reviewed protocols focusing on specific topics


Abstract
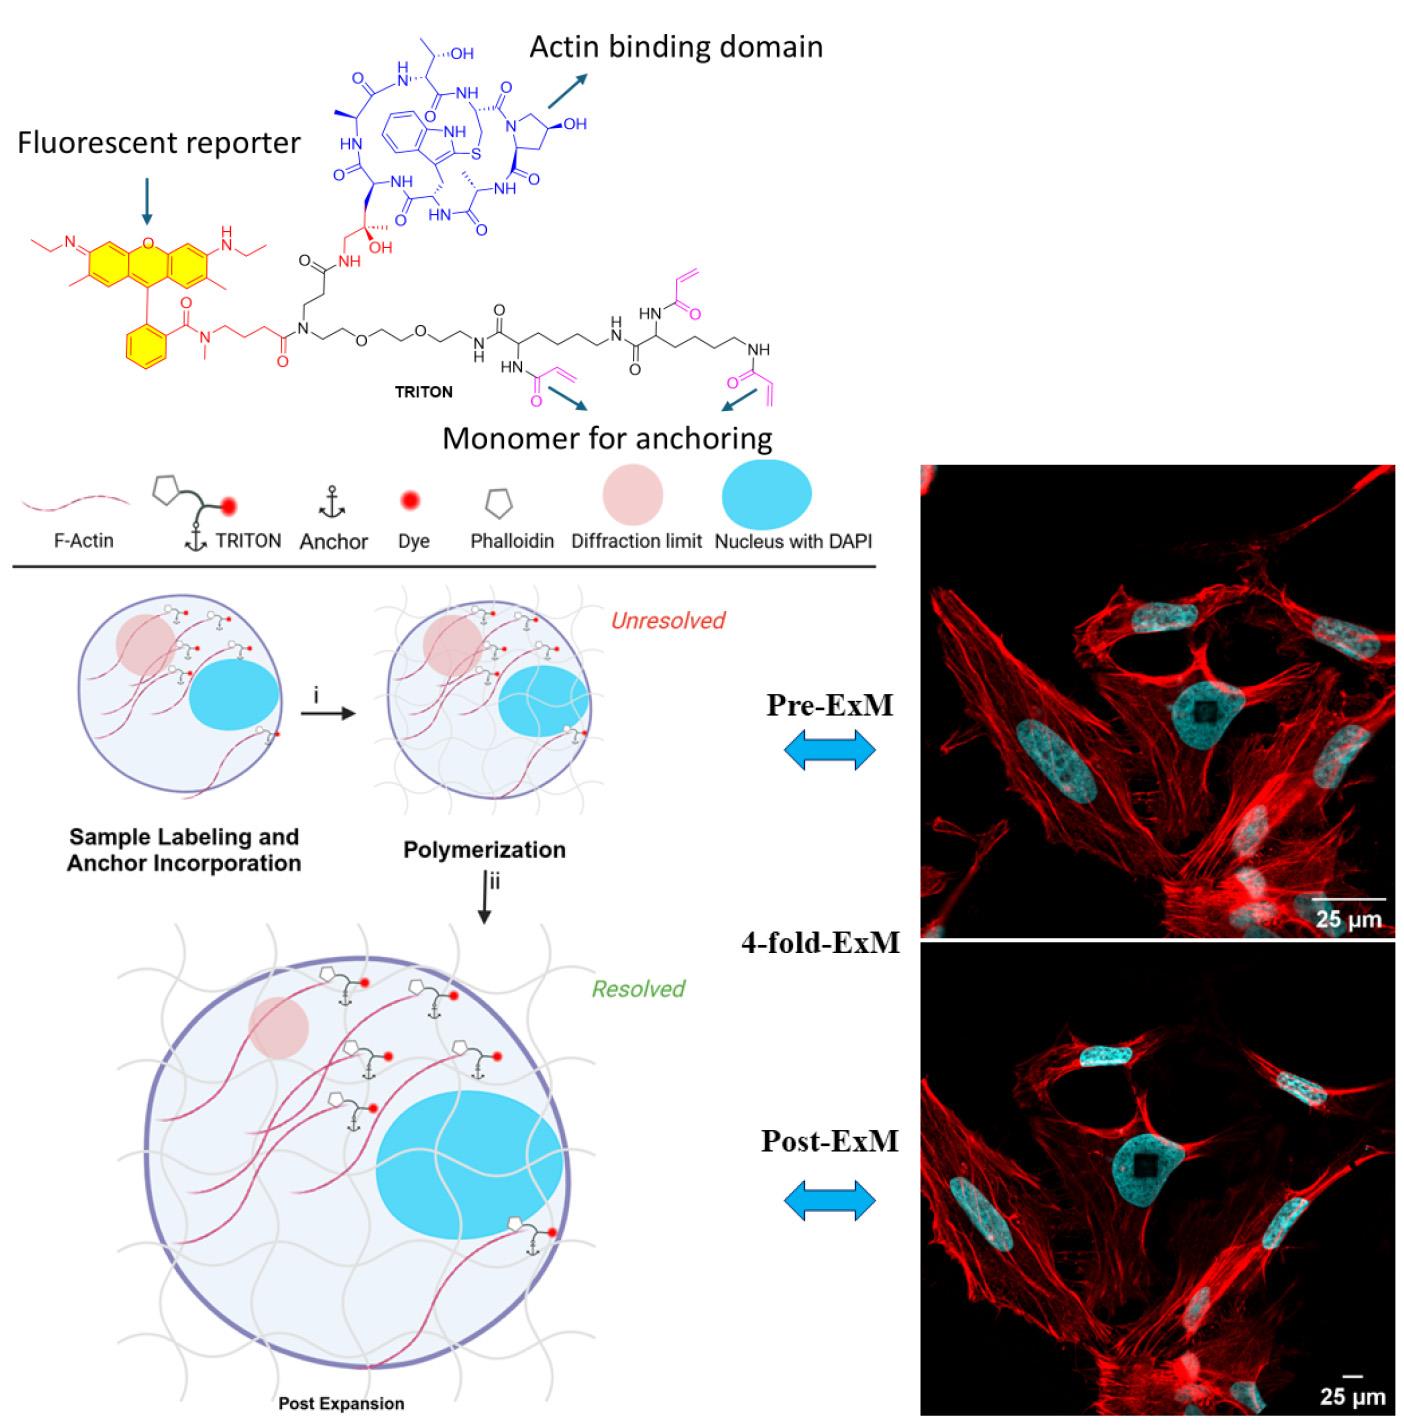
Expansion microscopy (ExM) is an imaging technique that enables super-resolution imaging of biological specimens using conventional confocal microscopy. This process entails the isotropic physical expansion of a (biomolecular) sample that has been cross-linked to a swellable polymer. The grafting of biomolecules (and the subsequent fluorescent readout) is accomplished by introducing an acryloyl group to the amine groups of lysine residues within the proteins, enabling subsequent imaging. However, visualizing actin filaments with high spatial resolution using ExM remains challenging. Herein, we report the construction of a phalloidin conjugate containing actin stains and their application in ExM. This protocol highlights the efficacy of trifunctional linker (TRITON/Actin-ExM) for F-actin imaging, demonstrating that TRITON-labeled actin allows for efficient anchoring and signal retention, enabling robust visualization of actin filaments in expansion microscopy.
Key features
• Engineered linker (TRITON) design ensures efficient fluorophore attachment, resulting in bright, stable signals during imaging.
• Performed pre-expansion and antibody-free labeling.
• Detailed and specific visualization of actin filaments in ExM experiments (4-fold expansion).
Keywords: Trifunctional phalloidin conjugatesGraphical overview
Background
Expansion microscopy (ExM) has emerged as a promising alternative technique for achieving super-resolution, offering nanoscale insights into biological samples without using dedicated super-resolution microscopy techniques. Boyden and colleagues first introduced ExM in 2015 [1], enabling confocal microscopes to achieve an effective resolution of approximately 70 nm. Since its introduction, ExM has seen substantial advancements, with efforts focused on broadening its range of applications and enhancing the achievable resolution [2–11]. In the ExM approach, rather than circumventing the diffraction limit, microscopes are employed to image physically isotropically expanded samples. Biological specimens are first embedded in a swellable polyelectrolyte hydrogel, followed by a homogenization step to eliminate structures that could impede uniform expansion. Homogenization is typically achieved via enzymatic digestion, such as with proteinase K, or through chemical denaturation by applying elevated temperatures or detergent treatments. The subsequent swelling of the hydrogel in Milli-Q (MQ) water increases the physical separation between labeled biomolecules, thereby enhancing spatial resolution. However, visualizing actin filaments using ExM remains a challenge.
Actin, one of the most abundant proteins in eukaryotic cells, plays a pivotal role in various cellular processes, including the regulation of cell motility [12], maintenance of cell morphology [13], cell division, transcriptional regulation [14], endocytosis [15], and so forth [16]. Functionalized phalloidin derivatives offer a widely employed fluorescent stain for actin filaments; however, this approach meets significant challenges within the framework of ExM, as the signal fails to graft to the hydrogel [8,17]. Consequently, improved approaches for visualizing actin filaments through ExM have attracted considerable interest [8,18,19].
To address the issue of poor grafting of actin stains in ExM, three distinct strategies for anchoring phalloidin-actin complexes have been reported [7,8]. The first involves synthesizing a trivalent phalloidin linker, called TRITON, which incorporates rhodamine B, phalloidin, and an acrylate monomer. This engineered design enables gel grafting, facilitating the post-expansion visualization of actin filaments [6,8,20]. The second strategy, proposed by Park et al., employs antifluorophore antibodies that bind to the fluorophore of phalloidin conjugates, enabling ExM imaging of actin filament organization using the original ExM protocol [18]. The third strategy, developed by Trinks and colleagues [19], uses a biotinylated phalloidin conjugate (phall-XX-biotin) followed by fluorescent streptavidin conjugation, where streptavidin introduces polymerizable moieties through the addition of lysine residues, enabling gel anchoring. In the latter two strategies, however, the large sizes of antibodies (~150 kDa) and streptavidin (~60 kDa) compared to TRITON (<2 kDa) cause linkage errors of 17.5 nm and 5 nm [21–23], respectively, which are exacerbated after expansion. Moreover, the bulkiness of antibodies and streptavidin hampers the effective binding of actin-bound phalloidin conjugates, resulting in their removal post-expansion and reduced fluorescence intensity, thus limiting the applicability of 4X ExM. Conversely, trivalent phalloidin linkers minimize linkage error, and their high gel-grafting efficiency leads to optimal imaging. As such, the protocol described here has recently been demonstrated to provide superior actin staining performance. Linear triacrylamide units are polymerized through free radical–induced polymerization, where free radicals initiate the formation of long-chain polymers by reacting with triacylamide monomers. This process enables ultrastructural imaging of actin across various expansion microscopy protocols and imaging modalities, and the method is rapidly gaining adoption in the field.
Materials and reagents
Biological materials
1. Mammalian cells in culture: HeLa (ATCC® CCL-2TM)
Reagents
1. DMEM, high glucose, no glutamine, no phenol red (Gibco, catalog number: 31053044), stored at 4 °C
2. Fetal bovine serum (FBS) (Sigma, catalog number: F7524), stored at -20 °C until use
3. GlutaMAX I, 200 mM (Gibco, catalog number: 35050038), stored at 4 °C
4. Gentamicin (50 mg/mL) (Gibco, catalog number: 15750037), stored at -20 °C until use
5. Dulbecco's phosphate-buffered saline (DPBS), without calcium and magnesium (Gibco, catalog number: 14190250), stored at 4 °C
6. Trypsin-EDTA 0.5%, no phenol red (Gibco, catalog number: 15400054), stored at 4 °C
7. Trypan blue stain 0.4% (Gibco, catalog number: 15250061), stored at 4 °C
8. Pierce 16% formaldehyde (w/v), methanol-free (Thermo Scientific, catalog number: 28908), stored at room temperature (RT)
9. Tris(hydroxymethyl)aminomethane (Tris) (Sigma, catalog number: 252859), stored at RT
10. Sodium acrylate 97% (Sigma-Aldrich, catalog number: 408220), stored at RT inside a desiccator
11. Acryloyl-X SE, >95.0% (AcX) (TCI America, catalog number: A345025MG), stored at -20 °C
12. Guanidine hydrochloride 99.5% (Thermo Scientific, catalog number: 364791000), stored at RT
13. Poly-L-lysine solution 0.1% (w/v) in H2O (Sigma-Aldrich, catalog number: P8920), stored at RT
14. Triton X-100 98%, DNAse free, RNAse free, protease free (Thermo Scientific, catalog number: 327371000) stored at 4 °C
15. Sigmacote (Sigma-Aldrich, catalog number: SLCM2185), siliconizing reagent for providing hydrophobic properties and reducing nonspecific adsorption; stored at 4 °C
16. 4-Hydroxy-TEMPO 97% (Sigma-Aldrich, catalog number: 176141), stored at RT
17. Proteinase K (New England Biolabs, catalog number: P81075), stored at -20 °C
18. Ethylenediaminetetraacetic acid (EDTA), 0.5 M) (Thermo Scientific, catalog number: J15694-AE) stored at RT
19. DAPI (4',6-diamidino-2-phenylindole, dihydrochloride, 10 μM in DMSO) (Invitrogen, catalog number: D1306) stored at -20 °C
20. Fluorescent phalloidin ExM reagent (TRITON); synthesized in-house according to [8] or commercially available as Actin ExM 532 (Chrometra Scientific, catalog number: ER-10-4-S), stored at -20 °C until use
21. Phosphate-buffered saline (PBS) 1× pH 7.4, without calcium, magnesium, and phenol red (Gibco, catalog number: 10010023)
22. Phosphate-buffered saline (PBS) 10× pH 7.4, without calcium, magnesium, and phenol red (Gibco, catalog number: P7059)
23. Ammonium persulfate (APS) (Sigma-Aldrich, catalog number: A3678)
24. Ammonium chloride (NH4Cl) (Sigma-Aldrich, catalog number: 213330)
25. Hydrochloric acid 37% (HCl) (Sigma-Aldrich, catalog number: 258148)
26. N,N,N',N'-Tetramethyl ethylenediamine (TEMED) (Sigma-Aldrich, catalog number: T7024)
27. N,N'-Methylenebisacrylamide (Sigma-Aldrich, catalog number: 146072)
28. Acrylamide (Sigma-Aldrich, catalog number: A8887)
29. Sodium chloride (Sigma-Aldrich, catalog number: S9888)
30. Dimethyl sulfoxide (DMSO) (Sigma-Aldrich, catalog number: D2650)
Solutions
1. Gelation stock (polymerization, 10 mL) (see Recipes)
2. 4-hydroxy-TEMPO stock solution (see Recipes)
3. Catalyst (see Recipes)
4. Active monomer solution (200 μL) (see Recipes)
5. Digestion solution (see Recipes)
6. AcX (acryloyl-X) (see Recipes)
7. 1 M HCl solution (see Recipes)
8. 100 mM NH4Cl solution (see Recipes)
9. 5 M NaCl solution (100 mL) (see Recipes)
10. 4 M Guanidine HCl (100 mL) (see Recipes)
11. 1 M Tris, pH 8 (100 mL) (see Recipes)
Recipes
General note: Some reagents, such as those involved in polymerization or gelation steps, should be prepared just before use to ensure optimal activity and avoid degradation.
1. Gelation stock (polymerization, 10 mL)
| Reagent | Stock concentration | Quantity or Volume | Final concentration |
|---|---|---|---|
| Sodium acrylate | 3.4 g/10 mL MQ | 2.525 mL | 8.6 g/100 mL |
| Acrylamide | 5 g/15 mL MQ | 0.75 mL | 2.5 g/100 mL |
| N,N'-methylenebisacrylamide | 0.2 g/15 mL MQ | 1.125 mL | 0.15 g/100 mL |
| Sodium chloride (Recipe 9) | 5 M (in MQ) | 4 mL | 2 M |
| PBS | 10× | 1 mL | 1× |
| MQ water | 0.6 mL | ||
| Total | 10 mL |
Note: Prepare aliquots of 188 μL (polymerization for one sample) and store at -20 °C.
2. 4-hydroxy-TEMPO stock solution
0.5 g per 100 mL of MQ water.
Prepare aliquots and store at -20 °C.
3. Catalyst
| Reagent | Quantity or Volume | Final concentration |
|---|---|---|
| APS | 0.1 g | 10% (w/v) |
| MQ water | 0.95 mL | |
| Total | 1 mL |
Prepare aliquots and store at -20 °C.
| Reagent | Quantity or Volume | Final concentration |
|---|---|---|
| TEMED | 12.9 μL | 10% (v/v) |
| MQ water | 987.1 μL | |
| Total | 1 mL |
Prepare aliquots and store at -20 °C.
4. Active monomer solution (200 μL)
| Reagent | Quantity or Volume | Final concentration |
|---|---|---|
| Gelation stock (Recipe 1) | 188 μL | 0.15% |
| 4-Hydroxy-TEMPO (Recipe 2) | 2 μL | 0.5% |
| APS | 4 μL | 10% |
| TEMED | 4 μL | 10% |
| MQ water | 2 μL | |
| Total | 200 μL |
Note: Keep the solution on ice until ready to use. Add APS and TEMED (see Recipe 3) just before use.
5. Digestion solution
| Component | Stock concentration | Quantity or Volume | Final concentration |
|---|---|---|---|
| Tris | 1 M, pH 8 (in MQ) | 2.5 mL | 0.05 M |
| EDTA | 0.5 M | 0.1 mL | 0.001 M |
| Triton X-100 | 100% | 0.25 mL | 0.5% (v/v) |
| Guanidine HCl | 4 M (in MQ) | 10 mL | 0.8 M |
| MQ water | 37.15 mL | ||
| Total | 50 mL |
Note: The 1 M stock solution of Tris was adjusted to pH 8 using 37% HCl.
6. AcX (acryloyl-X)
a. To prepare AcX stock solutions, dissolve AcX in anhydrous DMSO to a concentration of 10 mg/mL and store 10 μL aliquots at -20 °C.
b. Thaw the 10 mg/mL AcX stock to RT and dilute it 1:100 to a final concentration of 0.1 mg/mL by adding 990 μL of 1× PBS.
7. 1 M HCl solution
To prepare the desired concentration of HCl from the stock solution (typically 37%), dilute it by mixing 8.3 mL of concentrated HCl with 91.7 mL of MQ water.
8. 100 mM NH4Cl solution
a. Measure 0.534 g of NH4Cl.
b. Dissolve it in approximately 90 mL of PBS.
c. Adjust the final volume to 100 mL with PBS.
d. Store at 4 °C for short-term use or aliquot and freeze for long-term storage.
9. 5 M NaCl solution (100 mL)
a. Weigh 29.2 g of NaCl using an analytical balance.
b. Add the NaCl to approximately 80–90 mL of MQ water in a volumetric flask.
c. Once the NaCl has fully dissolved, add MQ water to bring the final volume to 100 mL.
d. Stir the solution thoroughly to ensure uniformity.
e. Store the 5 M NaCl solution at room temperature
10. 4 M guanidine HCl (100 mL)
a. Measure 38.212 g of guanidine HCl using an analytical balance.
b. Dissolve it in approximately 90 mL of MQ water in a volumetric flask.
c. Adjust the final volume by adding MQ water to 100 mL.
d. Mix the solution thoroughly and store the 4 M guanidine HCl solution a 4 °C.
11. 1 M Tris (pH 8) (100 mL)
a. Weigh out 12.1 g of Tris base using an analytical balance.
b. Add 80–90 mL of MQ water to dissolve it and stir the solution until the Tris base is completely dissolved.
c. Slowly add 1 M HCl (Recipe 7) to adjust the pH to exactly 8.0. Add the HCl drop by drop, stirring continuously to avoid overshooting the pH.
d. After adjusting the pH, transfer the solution to a 100 mL volumetric flask.
e. Swirl the solution gently to ensure it is homogeneous and store the 1 M Tris solution at 4 °C.
Laboratory supplies
1. T75 flask for cell culture (Thermo Fisher Scientific, catalog number: 156800)
2. 22 × 22 mm, #1.5H coverslips (https://www.carlroth.com/be/en/coverslips/coverslips-thickness-1-5/p/kcy1.1)
3. Microscope slides 26 × 76 mm, single concave (see Figure S2) (Pearl, catalog number: 7103)
4. Microscope slides 26 × 76 mm (https://www.galvoptics.co.uk/optical-components/microscope-slides/microscope-slides/?utm_source=google&utm_medium=cpc&utm_campaign=Galvoptics&utm_content)
5. 6-well plates (Thermo Fisher Scientific, catalog number: 150239)
6. Dumont HP crossover tweezers N7, Dumoxel 0.17 × 0.10 mm tip (Dumont, catalog number: AGT5007)
7. Microcentrifuge tubes (Eppendorf, catalog numbers: 0030121023, 0030120086)
8. Conical tube 15 mL/50 mL (Greiner Bio-One, catalog number: 188271/227261)
9. Cytosmart counting chamber with cover glass (Cytosmart, Corning, catalog number: 0699910591)
10. P1000 regular pipette tips (Thermo Scientific Finnpipette, catalog number: 94060717)
11. P200 regular pipette tips (Thermo Scientific Finnpipette, catalog number: 94060317)
12. P10 regular pipette tips (Thermo Scientific Finnpipette, catalog number: 94060117)
13. Spatula (Bochem, catalog number: 3101)
14. Parafilm (Merck, catalog number: P7793)
15. Scissors
16. 500 mL beaker
17. Photo glue (Collall, catalog number: COLFO0100)
18. 6-well glass bottom plate (confocal imaging dish) (see Figure S6) (Cellvis, catalog number: P06-1.5H-N)
Equipment
1. 37 °C incubator with 5% CO2 in a humidified environment (Thermo Scientific, model: HERACELL VIOS 160i)
2. Cytosmart cell counter (Corning, catalog number: 6749)
3. Incubator INCU-Line® IL 10 (VWR, catalog number: 390-0384)
4. Microscope (Leica Microsystems GmbH, model: TCS SP8)
5. Objective lenses HC PL APO CS2 63×/1.20 WATER and HC PL APO CS2 20×/0.75 DRY
Software and datasets
1. Fiji (ImageJ, https://imagej.net/software/fiji/) [24]
2. LAS X (https://www.leica-microsystems.com/products/microscope-software/p/leica-las-x-ls/)
3. BioRender (https://www.biorender.com/) was used for the Graphical overview: https://app.biorender.com/illustrations/66d5e6f134b972cb4b0abed5?slideId=505c1415-eac1-400b-83fe-dd8171f5f3d3
Procedure
A. Sigma-coated cover glass preparation for gelation chamber
1. Etch the slides with a diamond scribe to indicate which side has the sample (see Figure S1). After thorough cleaning, the slides can be reused approximately five times, alleviating the need to make new slides each time.
2. Prepare Sigma-coated cover glasses: apply undiluted Sigmacote solution to the cover glasses by placing them in a glass Petri dish, ensuring complete and uniform coverage. After an exposure time of 2 min, carefully remove the cover glasses and allow to air dry. This 2-min incubation period allows the coating to fully render the surface hydrophobic.
3. Pipette the Sigmacote back into the designated recycling bottle. Any excess solution can be collected and reused.
B. Coverslip glass washing
1. Soak the coverslip in 50 mL of 1 M HCl overnight.
2. Place the coverslip in a 100 mL clean beaker. Add 50 mL of MQ water to completely cover the coverslip. Gently swirl the container to rinse the coverslip, ensuring that the MQ water flows over its entire surface for 1 min. Repeat the rinsing process 2–3 times to ensure thorough cleaning.
3. Rinse the coverslip with 50 mL of ethanol in a 100 mL beaker for an additional 1 min.
4. Place the treated glass on the Parafilm and allow the treated glass surface to air dry in a fume hood.
C. Cell culture
HeLa cells were cultured in DMEM with high glucose (4.5 g/L, without glutamine and phenol red), supplemented with 10% (v/v) FBS, 50 μg/mL gentamicin, and 1% GlutaMAX, at 37 °C in a humidified incubator with 5% CO2. Upon reaching 70%–80% confluency, the cells were washed three times with 1× DPBS (without calcium and magnesium) and detached using Trypsin-EDTA. Cells were then seeded onto 22 mm × 22 mm #1.5 coverslips at a density of 4.0 × 10⁵ cells/cm2 and incubated overnight prior to fixation.
1. Growth medium: 445 mL of DMEM (1×) + 50 mL of FBS + 5 mL of GlutaMAX + 500 μL of gentamicin.
2. Remove medium from cells.
3. Wash 3× with ~10 mL of PBS (in a T75 flask).
4. Add 1.2 mL of PBS + 0.3 mL of Trypsin-EDTA 0.5% (5×).
5. Incubate at 37 °C for 1–2 min.
6. Add 8.5 mL of DMEM growth medium and detach cells by pipetting up and down.
7. Transfer to a 15 mL Falcon tube.
8. Add 10 μL of cell suspension to 10 μL of trypan blue, mix, dispense 10 μL on the counting chamber, and count cells.
9. Seed 1,200,000 cells (seeding volume = 1,200,000/count number).
10. Add DMEM growth medium to reach 10 mL.
11. Incubate cells in a 37 °C CO2 incubator (until 70%–80% confluent).
D. Fixing cells
The procedure for fixing cells is shown in Figure 1.
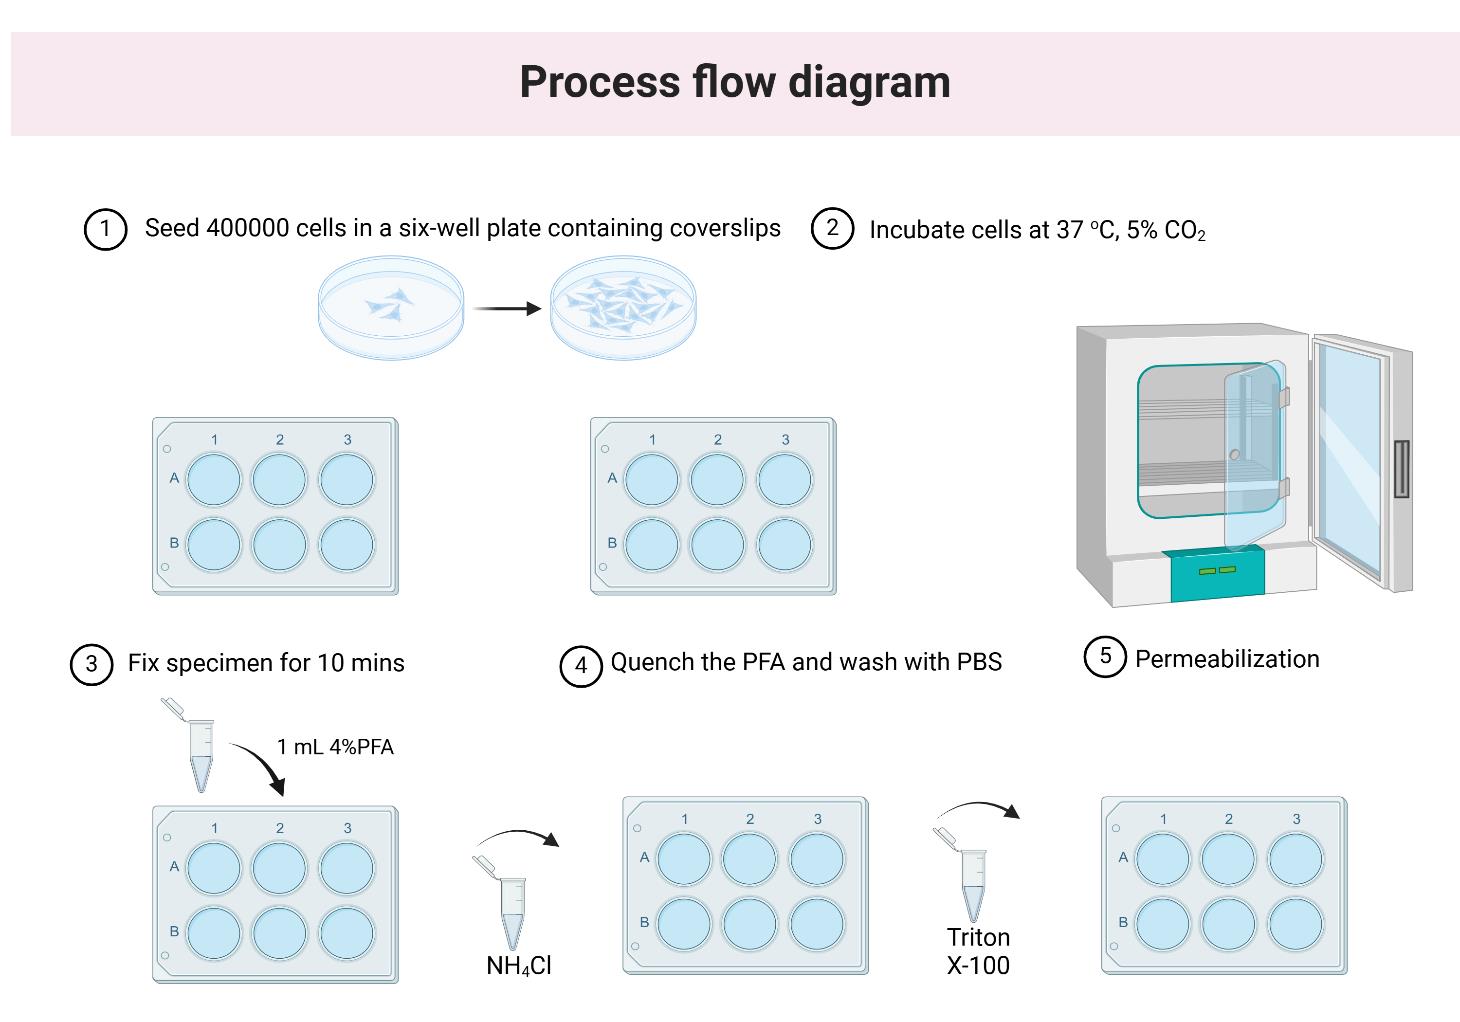
Figure 1. Workflow for fixing HeLa cells before the staining step. (1) Carefully place the clean #1.5 coverslips flat at the bottom of the 6-well plate using sterile tweezers. Seed approximately 400,000 HeLa cells per well in a total volume of 2 mL. First, add 1 mL of medium to each well, then distribute the HeLa cells evenly in droplets across the coverslip for a uniform cell layer. (2) Incubate overnight at 37 °C with 5% CO2. (3) Remove the old medium and fix the cells by adding 1 mL of 4% PFA in PBS. Incubate for 10 min at room temperature (25 °C). (4) Quench the PFA by incubating the specimen in 1 mL of 100 mM NH4Cl in PBS at room temperature for 10 min. Wash the specimen with 1 mL of PBS and repeat three times for 5 min each. Store the specimen in PBS. If needed, it can be kept at 4 °C for up to two days. (5) Permeabilize the sample by adding 1 mL of 0.2% Triton X-100 in PBS and incubating at room temperature for 15 min.
E. Staining
1. Wash the samples with 1 mL of PBS, repeating three times for 5 min each.
2. Prepare the phalloidin staining solution by diluting it to a final concentration of 0.25 μM in PBS. Use 100 μL of solution per sample, ensuring sufficient volume for three replicate samples. Combine 2.5 μL of the concentrated stock phalloidin solution (TRITON) with 97.5 μL of the diluent PBS, yielding a total volume of 100 μL of the diluted solution. Vortex the mixture for 5–10 s to ensure thorough mixing and uniform distribution of the stock solution within the diluent, resulting in a final concentration of 0.25 μM.
3. Place 100 μL of the staining solution onto a piece of parafilm (see Figure S3) and position the coverslip upside-down over the drop, ensuring the cell layer contacts the staining solution.
4. Cover the setup with aluminum foil and incubate for 1 h at RT.
5. Return the coverslip to the well dish, with the cells facing up, and wash with PBS (3× 5 min).
6. If DAPI staining is desired, prepare a 1 mg/mL DAPI stock (1,000×), then add 1 μL of DAPI to 1 mL of PBS. Incubate for 5 min, followed by washing with PBS (3× 5 min).
F. Image before ExM
1. Use a pipette tip to gently scratch a cross in the center of the coverslip, ensuring that the intersection is precisely at the center. On the side of the coverslip without cells, mark the center of the cross with a lab marker. This step is performed to create distinct markers on the sample, which serve as reference points for precise alignment during imaging.
2. For imaging preparation (see Figure S4), use a microscope slide with a single concave side. Add 85 μL of PBS into the hole, then place the coverslip upside down over it, ensuring the cell side faces the PBS. Seal the edges of the coverslip with photo glue and wait for 10 min. Once sealed, the sample is ready for imaging.
3. Photobleaching procedure: Utilize a fluorescent confocal microscope equipped with a high-power 405 nm diode laser to scan the specific cell for 1 min, until the selected nuclei darken, as shown in Figure 2A. Record the X and Y dimensions of the bleached region for subsequent calculations of the expansion factor.
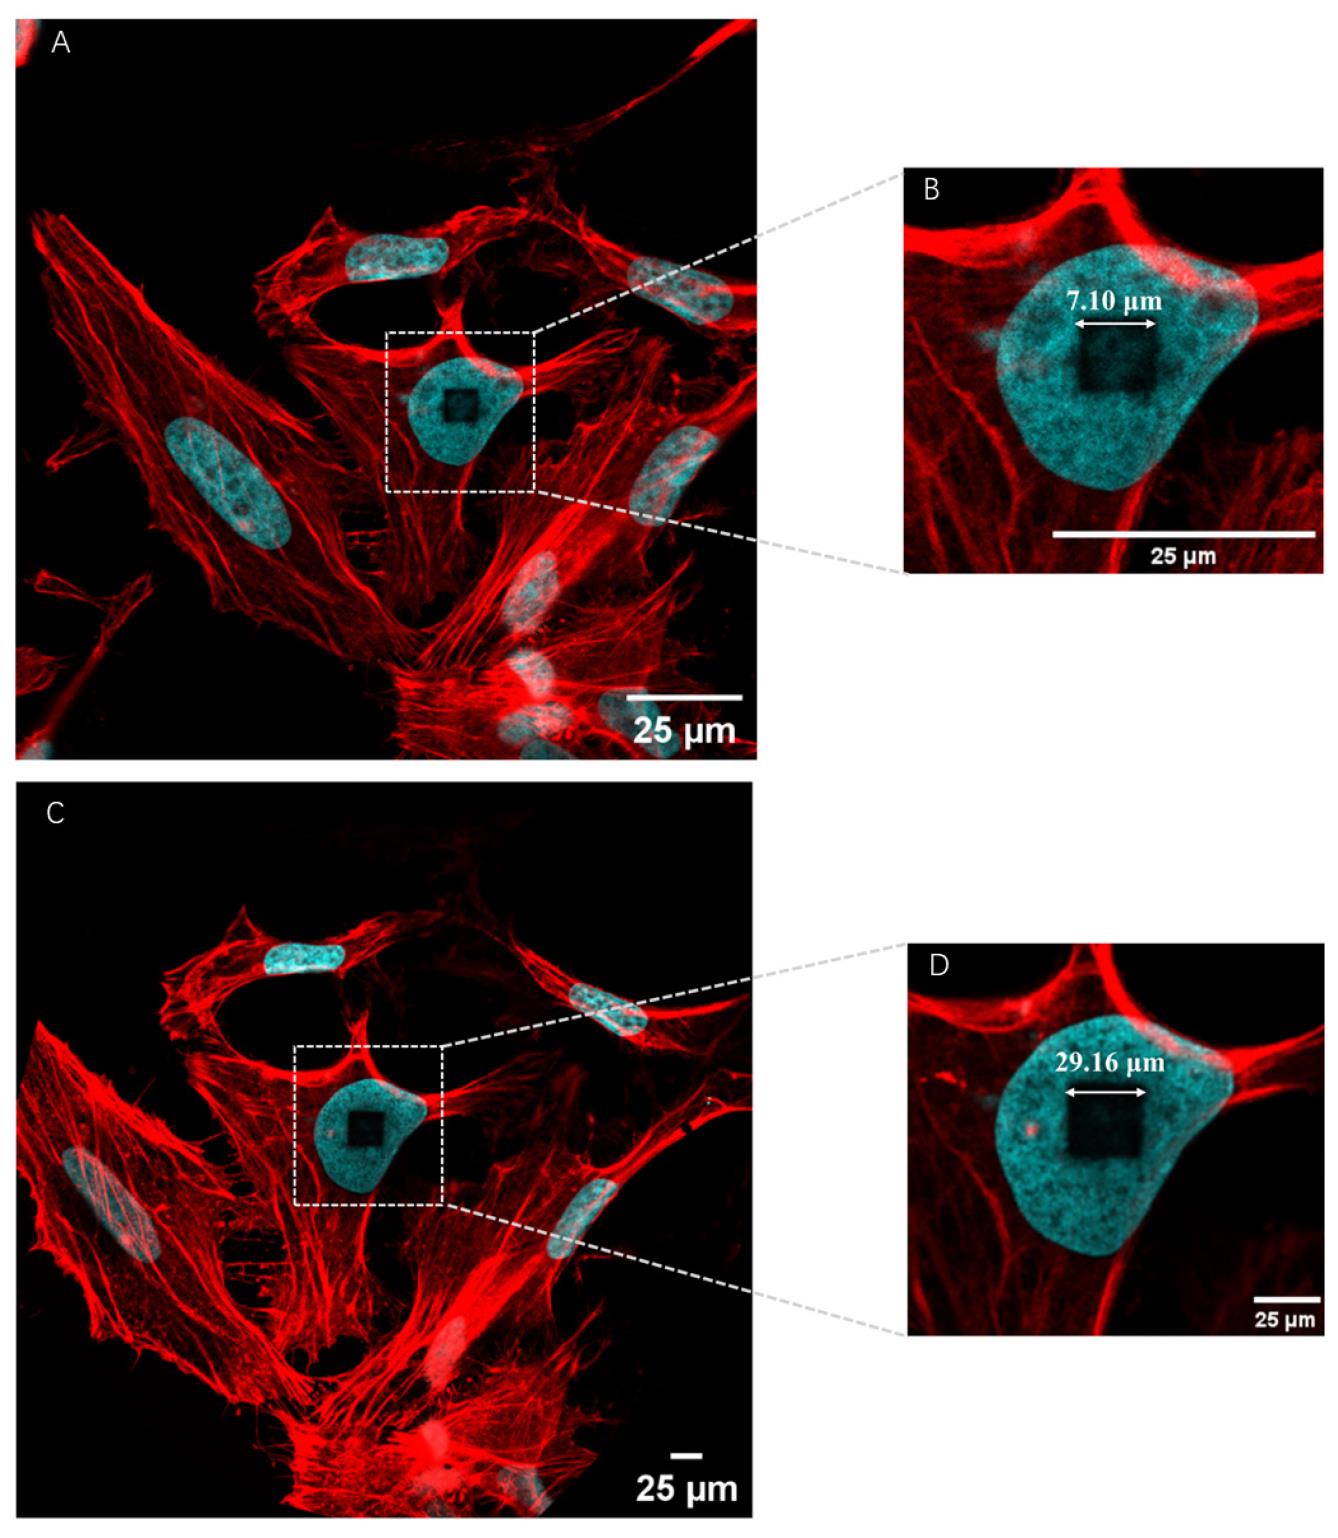
Figure 2. Representative images of pre-expansion image of actin filaments with TRITON molecule used for expansion factor calculation. (A) Pre-expansion image of actin filaments with TRITON. (B) Magnified views of the boxed region in panel (A). (C) Post-expansion image of actin filaments with TRITON. (D) Magnified views of the boxed region in panel (C).
G. General anchoring
1. Thaw the 0.1 mg/mL AcX solution (mix 10 μL of AcX with 990 μL of PBS) (see Recipes).
2. Incubate the sample in a plastic 6-well plate with 1 mL of the AcX solution at RT overnight.
3. Wash the sample in a plastic 6-well plate by gently adding 1 mL of PBS to the well. After 15 min, carefully aspirate the PBS and repeat this wash step two times to ensure complete removal of excess reagents before proceeding with gelation.
H. Gelation
1. Prepare an ice container to keep reagents chilled during the process.
2. Set up the gelation chambers by placing a #1.5 coverslip at each end of a Sigmacote-treated slide. Secure the coverslips using binder clips at both ends.
3. Prepare the active monomer solution (200 μL per sample) (see Recipes) and keep it on ice until needed. Add APS and TEMED to the solution just before use.
4. Wash the cells once with 100 μL of activated monomer solution on the coverslip surface. Then, pipette 80 μL of the solution as a drop onto the center of the Sigmacote-treated coverslip in the gelation chamber.
5. Place the coverslip with cells onto the gelation chamber (for a detailed picture, see Figure S5), ensuring the cells are positioned face down.
6. Secure the coverslip in place using binder clips, positioned only where the coverslips overlap.
7. Incubate the gels in a nitrogen-purged container (e.g., a plastic box with a lid, with two drilled holes, purged for 1 min), and incubate for 2 h at 37 °C.
8. After gelation, remove the binder clips and spacer slides (see Figure S5A). Use two razor blades to cut the gel into the desired asymmetric shape.
9. Transfer the coverslip with the cut gel directly into a 6-well plate and wash with 1 mL of digestion buffer.
10. Digest the sample overnight at RT using 1.5 mL of digestion solution (see Recipes) containing 8 units/mL Proteinase K [prepared by adding 15 μL of Proteinase K (800 units/mL) to 1.485 mL of digestion solution].
11. Wash the sample with PBS twice for 15 min at room temperature.
I. Image post-digestion (optional)
1. Transfer the cut gel to an imaging dish by using PBS and a paintbrush to gently slide the gel off the coverslip into the dish, ensuring the cells face downward.
2. Capture images to assess the quality and/or proceed with the expansion process.
J. Poly-L-lysine-coated imaging well preparation for post-ExM imaging
1. Add 1 mL of 0.01% (w/v) poly-L-lysine solution to each well for coating.
2. Incubate at RT for 30 min.
3. Remove the poly-L-lysine solution and wash the well with MQ water.
4. Remove the MQ water and allow the well to air dry.
5. Each well can be used only once for each gel.
K. Expansion and imaging
1. Incubate the gel in MQ water five times for 10 min each to ensure adequate dialysis.
2. Remove as much MQ water as possible after each incubation.
3. Gently transfer the expanded gel to a poly-L-lysine-coated imaging well and proceed with imaging.
Data analysis
Conventional confocal microscopy is constrained by the diffraction limit, typically yielding a lateral resolution of approximately 300 nm, depending on the wavelength of light and the numerical aperture of the objective lens. However, applying an expansion factor of 4.2–4.5-fold results in an effective lateral resolution of around 70 nm, as demonstrated in the original expansion microscopy protocol [1]. In this approach, HeLa cells are first stained with multifunctional molecules, followed by covalent anchoring of all proteins to a swellable hydrogel matrix. The hydrogel is then digested using proteinase K, which degrades structural proteins, allowing for isotropic swelling. After digestion, the sample undergoes dialysis in MQ water, leading to a four-fold expansion of the HeLa cells. The expanded sample is subsequently imaged using standard fluorescence microscopy, achieving a spatial resolution of approximately 70 nm. Nevertheless, in this protocol, extensive proteinase digestion (e.g., with proteinase K) is essential for achieving isotropic expansion but it also causes significant loss of target proteins, limiting the detection of protein structures. To address this limitation, linear triacrylamide units are incorporated into the linker. These units facilitate the covalent anchoring of proteins within the polymer network, which is formed through free radical–induced polymerization.
To accurately measure the expansion factor, we drew inspiration from literature methods [4]. Briefly, the appropriate DAPI-stained nucleus is selected, and photobleaching is performed using a high-powered laser during the pre-ExM stage, as shown in Figure 2A. Simultaneously, the length of a square (X = 7.10 μm) is recorded for expansion factor calculation. After expansion, as shown in Figure 2B, the same photobleached cell is identified, and the length of a cube (X = 29.16 μm) is remeasured. The expansion factor of 4.10 is then calculated from this.
Regarding image analysis, any standard software can be utilized. In our routine workflow, we employ Fiji [24], specifically the plot profile function, to assess colocalization and measure distances along a substrate. For instance, we stained the actin filaments in HeLa cells using our synthesized TRITON. The representative images shown in Figures 2, 3, and S8 illustrate the results after expansion. Our results demonstrate that phalloidin TRITON linker, combined with additional anchoring reagents (e.g., AcX), enhances fluorescence signal retention, thereby enabling the visualization of continuous actin filaments organization following 4-fold expansion.
A detailed guide to using Fiji software for image analysis:
1. Open the confocal image.
2. Preprocess the image (adjust contrast, median filter, or Z-projection).
3. Threshold the image to identify structures.
4. Analyze the selected region to measure properties like area.
5. Visualize the data by creating plots or profiles.
6. Export the results for further analysis.

Figure 3. Representative images of TRITON used for visualization of actin filaments. (A) Post-expansion image of actin filaments with TRITON. (B) Magnified view of the boxed region in panel (A). (C)–(F) Representative post-expansion confocal fluorescence images of actin filaments in HeLa cells.
Validation of protocol
This protocol was used in:
1. Wen et al. [6]. Evaluation of Direct Grafting Strategies via Trivalent Anchoring for Enabling Lipid Membrane and Cytoskeleton Staining in Expansion Microscopy. ACS Nano. 14(7): 7860–7867. https://doi.org/10.1021/acsnano.9b09259
2. Wen et al. [8]. Trifunctional Linkers Enable Improved Visualization of Actin by Expansion Microscopy. ACS Nano. 17(20): 20589–20600. https://doi.org/10.1021/acsnano.3c07510
3. Garlick et al. [25]. Simple methods for quantifying super-resolved cortical actin. Sci Rep. 12(1): 2715. https://doi.org/10.1038/s41598-022-06702-w
4. Königshausen et al. [17]. Imaging of Podocytic Proteins Nephrin, Actin, and Podocin with Expansion Microscopy. J Vis Exp. (170): e62079. https://doi.org/10.3791/62079
General notes and troubleshooting
Covalent anchoring: AcX plays a critical role in covalently anchoring fluorescent labels, proteins, and other biomolecules to the polymer matrix during the expansion microscopy process. It reacts with amine groups presented in biomolecules, forming a stable covalent bond to the hydrogel network generated during expansion. This covalent linkage is essential for preserving the spatial organization of molecules throughout the procedure.
Enhanced signal retention: By covalently linking fluorophores to the polymer matrix, AcX significantly reduces the loss of fluorescent signals that can occur during the washing and expansion steps. In the absence of AcX, fluorescent molecules may diffuse away from their original positions, leading to signal loss and diminished imaging resolution.
Improved signal-to-noise ratio: The use of AcX minimizes the diffusion of fluorescent labels, thereby enhancing the overall signal-to-noise ratio. This results in sharper, more defined images, which are particularly advantageous for visualizing delicate structures such as actin filaments.
Validation of sample preparation (see Figure S7): Ensuring proper sample preparation is crucial for achieving reliable and reproducible results. To validate the quality of the prepared gel, the following criteria should be evaluated:
1. Visual inspection for cracks: Examine the gel for the presence of any visible cracks or breaks. A properly prepared gel should be smooth and continuous without any structural disruptions. Cracks can indicate improper polymerization, dehydration, or mechanical stress during handling, which could compromise experimental outcomes.
2. Transparency and clarity: The gel should appear optically clear when viewed against a light source. Cloudiness or opaque regions suggest incomplete mixing of reagents, impurities, or uneven polymerization, which could hinder imaging quality.
3. Homogeneity: The gel should be uniform in texture and composition throughout. Nonhomogeneous gels may result from uneven distribution of reagents or inadequate mixing, leading to inconsistent expansion or signal retention during experiments.
4. Dimensional consistency: Variations in gel thickness can cause uneven expansion, which directly affects the resolution and reproducibility of results.
5. Mechanical integrity: Handle the gel gently to assess its mechanical robustness. It should not tear or deform easily under mild stress. Fragile gels may indicate insufficient crosslinking during polymerization.
Troubleshooting
Problem 1: Insufficient anchoring is observed in the form of low fluorescence intensity, ruptures, or distortions.
Possible cause: Anchoring is critical for incorporating the sample into the gel matrix.
Solution: If observed, consider diluting the AcX into an anchoring buffer instead of PBS, as this enhances NHS-coupling efficiency. Always prepare the buffer fresh and use it immediately.
Problem 2: Weak fluorescence signals post-expansion.
Potential causes: Incomplete labeling, issues with hydrogel polymerization, or suboptimal imaging conditions.
Proposed solutions: Review and optimize the labeling protocol, verify the quality and concentration of polymerization reagents, and adjust imaging parameters.
Problem 3: Sample damage during expansion.
Potential causes: Excessive expansion force or inadequate crosslinking.
Proposed solutions: Fine-tune the expansion rate and optimize the concentration of crosslinking reagents.
Supplementary information
The following supporting information can be downloaded here:
1. Figure S1. Image of the etched microscope slide.
2. Figure S2. Image of a microscope slide with a single concave.
3. Figure S3. Images of the cell staining process.
4. Figure S4. Representative images prior to ExM.
5. Figure S5. Representative images of the gelation step setup.
6. Figure S6. Representative image of the glass-bottom imaging dish.
7. Figure S7. Representative image of hydrogel formation after expansion.
8. Figure S8. Representative images of TRITON used for visualization of actin filaments.
Acknowledgments
This protocol was used in [8]: ACS Nano (2023), DOI: 10.1021/acsnano.3c07510
This work was supported by funding from the Flemish government through long-term structural funding Methusalem (CASAS2, Meth/15/04) to J.H., the European Research Council under the European Union’s Horizon 2020 research and innovation program (grant nos. 835102 and 964016) to G.W. and M.S., and from KU Leuven research fund through the ID-N project IDN/19/039.
Competing interests
V.L. holds shares in Chrometra Scientific B.V., a company developing and commercializing reagents for microscopy, including expansion microscopy and the actin staining reagents used in this manuscript. The other authors declare no competing interests.
References
- Chen, F., Tillberg, P. W. and Boyden, E. S. (2015). Expansion microscopy. Science. 347(6221): 543–548. https://doi.org/10.1126/science.1260088
- Chozinski, T. J., Halpern, A. R., Okawa, H., Kim, H. J., Tremel, G. J., Wong, R. O. L. and Vaughan, J. C. (2016). Expansion microscopy with conventional antibodies and fluorescent proteins. Nat Methods. 13(6): 485–488. https://doi.org/10.1038/nmeth.3833
- Gambarotto, D., Zwettler, F. U., Le Guennec, M., Schmidt-Cernohorska, M., Fortun, D., Borgers, S., Heine, J., Schloetel, J. G., Reuss, M., Unser, M., et al. (2019). Imaging cellular ultrastructures using expansion microscopy (U-ExM). Nat Methods. 16(1): 71–74. https://doi.org/10.1038/s41592-018-0238-1
- Vanheusden, M., Vitale, R., Camacho, R., Janssen, K. P. F., Acke, A., Rocha, S. and Hofkens, J. (2020). Fluorescence Photobleaching as an Intrinsic Tool to Quantify the 3D Expansion Factor of Biological Samples in Expansion Microscopy. ACS Omega. 5(12): 6792–6799. https://doi.org/10.1021/acsomega.0c00118
- Wassie, A. T., Zhao, Y. and Boyden, E. S. (2018). Expansion microscopy: principles and uses in biological research. Nat Methods. 16(1): 33–41. https://doi.org/10.1038/s41592-018-0219-4
- Wen, G., Vanheusden, M., Acke, A., Valli, D., Neely, R. K., Leen, V. and Hofkens, J. (2020). Evaluation of Direct Grafting Strategies via Trivalent Anchoring for Enabling Lipid Membrane and Cytoskeleton Staining in Expansion Microscopy. ACS Nano. 14(7): 7860–7867. https://doi.org/10.1021/acsnano.9b09259
- Wen, G., Leen, V., Rohand, T., Sauer, M. and Hofkens, J. (2023). Current Progress in Expansion Microscopy: Chemical Strategies and Applications. Chem Rev. 123(6): 3299–3323. https://doi.org/10.1021/acs.chemrev.2c00711
- Wen, G., Lycas, M. D., Jia, Y., Leen, V., Sauer, M. and Hofkens, J. (2023). Trifunctional Linkers Enable Improved Visualization of Actin by Expansion Microscopy. ACS Nano. 17(20): 20589–20600. https://doi.org/10.1021/acsnano.3c07510
- Acke, A., Van Belle, S., Louis, B., Vitale, R., Rocha, S., Voet, T., Debyser, Z. and Hofkens, J. (2022). Expansion microscopy allows high resolution single cell analysis of epigenetic readers. Nucleic Acids Res. 50(17): e100. https://doi.org/10.1093/nar/gkac521
- White, B. M., Kumar, P., Conwell, A. N., Wu, K. and Baskin, J. M. (2022). Lipid Expansion Microscopy. J Am Chem Soc. 144(40): 18212–18217. https://doi.org/10.1021/jacs.2c03743
- Zhao, Y., Bucur, O., Irshad, H., Chen, F., Weins, A., Stancu, A. L., Oh, E. Y., Distasio, M., Torous, V., Glass, B., et al. (2017). Nanoscale imaging of clinical specimens using pathology-optimized expansion microscopy. Nat Biotechnol. 35(8): 757–764. https://doi.org/10.1038/nbt.3892
- Pollard, T. D. and Borisy, G. G. (2003). Cellular Motility Driven by Assembly and Disassembly of Actin Filaments. Cell. 112(4): 453–465. https://doi.org/https://doi.org/10.1016/S0092-8674(03)00120-X
- Pollard, T. D. and Cooper, J. A. (2009). Actin, a Central Player in Cell Shape and Movement. Science, 326(5957): 1208–1212. https://doi.org/10.1126/science.1175862
- Miralles, F. and Visa, N. (2006). Actin in transcription and transcription regulation. Curr Opin Cell Biol. 18(3): 261–266. https://doi.org/https://doi.org/10.1016/j.ceb.2006.04.009
- Smythe, E. and Ayscough, K. R. (2006). Actin regulation in endocytosis. J Cell Sci. 119(22): 4589–4598. https://doi.org/10.1242/jcs.03247
- Rayment, I., Holden, H. M., Whittaker, M., Yohn, C. B., Lorenz, M., Holmes, K. C. and Milligan, R. A. (1993). Structure of the Actin-Myosin Complex and Its Implications for Muscle Contraction. Science. 261(5117): 58–65. https://doi.org/10.1126/science.8316858
- Königshausen, E., Schmitz, C. T., Rump, L. C. and Sellin, L. (2021). Imaging of podocytic proteins nephrin, actin, and podocin with expansion microscopy. J Vis Exp. 2021(170). https://doi.org/10.3791/62079
- Park, C. E., Cho, Y., Cho, I., Jung, H., Kim, B., Shin, J. H., Choi, S., Kwon, S.-K., Hahn, Y. K. and Chang, J.-B. (2020). Super-Resolution Three-Dimensional Imaging of Actin Filaments in Cultured Cells and the Brain via Expansion Microscopy. ACS Nano. 14(11): 14999–15010. https://doi.org/10.1021/acsnano.0c04915
- Trinks, N., Reinhard, S., Drobny, M., Heilig, L., Löffler, J., Sauer, M. and Terpitz, U. (2021). Subdiffraction-resolution fluorescence imaging of immunological synapse formation between NK cells and A. fumigatus by expansion microscopy. Commun Biol. 4(1): 1151. https://doi.org/10.1038/s42003-021-02669-y
- Wen, G., Leen, V., Jia, Y., Rohand, T. and Hofkens, J. (2022). Improved Dye Survival in Expansion Microscopy through Stabilizer-Conjugated Linkers. Chemistry. 28(66): e202202404. https://doi.org/10.1002/chem.202202404
- Früh, S. M., Matti, U., Spycher, P. R., Rubini, M., Lickert, S., Schlichthaerle, T., Jungmann, R., Vogel, V., Ries, J. and Schoen, I. (2021). Site-Specifically-Labeled Antibodies for Super-Resolution Microscopy Reveal in Situ Linkage Errors. ACS Nano. 15(7): 12161–12170. https://doi.org/10.1021/acsnano.1c03677
- Ries, J., Kaplan, C., Platonova, E., Eghlidi, H. and Ewers, H. (2012). A simple, versatile method for GFP-based super-resolution microscopy via nanobodies. Nat Methods. 9(6): 582–584. https://doi.org/10.1038/nmeth.1991
- Zwettler, F. U., Reinhard, S., Gambarotto, D., Bell, T. D. M., Hamel, V., Guichard, P. and Sauer, M. (2020). Molecular resolution imaging by post-labeling expansion single-molecule localization microscopy (Ex-SMLM). Nat Commun. 11(1): 3388. https://doi.org/10.1038/s41467-020-17086-8
- Schindelin, J., Arganda-Carreras, I., Frise, E., Kaynig, V., Longair, M., Pietzsch, T., Preibisch, S., Rueden, C., Saalfeld, S., Schmid, B., et al. (2012). Fiji: an open-source platform for biological-image analysis. Nat Methods. 9(7): 676–682. https://doi.org/10.1038/nmeth.2019
- Garlick, E., Faulkner, E. L., Briddon, S. J. and Thomas, S. G. (2022). Simple methods for quantifying super-resolved cortical actin. Sci Rep. 12(1): 2715. https://doi.org/10.1038/s41598-022-06702-w
Article Information
Publication history
Received: Oct 22, 2024
Accepted: Mar 2, 2025
Available online: Mar 27, 2025
Published: Apr 20, 2025
Copyright
© 2025 The Author(s); This is an open access article under the CC BY-NC license (https://creativecommons.org/licenses/by-nc/4.0/).
How to cite
Huang, J., Wen, G., Iven, T., Linhares, D., Koo, L., Sauer, M., Dehaen, W., Leen, V. and Hofkens, J. (2025). Visualization of F-Actin Through Expansion Microscopy (ExM) with Trifunctional Linker-Conjugated Phalloidin. Bio-protocol 15(8): e5273. DOI: 10.21769/BioProtoc.5273.
Category
Cell Biology > Cell imaging > Super resolution imaging
Biochemistry > Protein > Imaging
Do you have any questions about this protocol?
Post your question to gather feedback from the community. We will also invite the authors of this article to respond.