- Protocols

- Articles and Issues
- For Authors
- About
- Become a Reviewer

Generation, Propagation, and Titering of Dicistrovirus From an Infectious Clone

Published: Vol 15, Iss 4, Feb 20, 2025 DOI: 10.21769/BioProtoc.5216 Views: 2245
Reviewed by: Keisuke TabataChhuttan L MeenaAnonymous reviewer(s)
Original research article
The authors used this protocol in:

Dec 2022
Advertisement


Protocol Collections
Comprehensive collections of detailed, peer-reviewed protocols focusing on specific topics


Related protocols
Abstract
Cricket paralysis virus (CrPV), a member of the family Dicistroviridae, is a single-stranded positive-sense RNA virus that primarily infects arthropods. Some members of the dicistrovirus family, including the honey bee viruses Israeli acute paralysis virus and Acute bee paralysis virus and the shrimp-infecting Taura syndrome virus, pose significant threats to agricultural ecosystems and economies worldwide. Dicistrovirus infection in Drosophila is used as a model system to study fundamental insect–virus–host interactions. The availability of a CrPV infectious clone allows controlled manipulation of the viral genome at a molecular level. Effective viral propagation and titration techniques are crucial for understanding the pathogenesis and epidemiology of dicistrovirus infections. Traditional methods for assessing viral titers, such as plaque assays, are unsuitable for CrPV, since Drosophila tissue culture cells like Schneider 2 cells cannot readily form adherent plaques. Here, we present a streamlined protocol for generating a recombinant virus from a CrPV infectious clone, propagating the virus in S2 cells and titering the virus by an immunofluorescence-based focus-forming assay (FFA). This protocol offers a rapid and reliable approach for generating recombinant viruses, viral amplification, and determining CrPV titers, enabling efficient investigation into viral biology and facilitating the development of antiviral strategies.
Key features
• Generate recombinant virus from infectious clones.
• Sequential amplification protocol for scalable virus production.
• Repeated freeze-thawing for virus harvesting.
• Immunostaining focus-forming assay (FFA) for CrPV titration.
• Focus-forming units (FFU) quantified using a high-throughput microscopic screening platform.
Keywords: Cricket paralysis virusGraphical overview
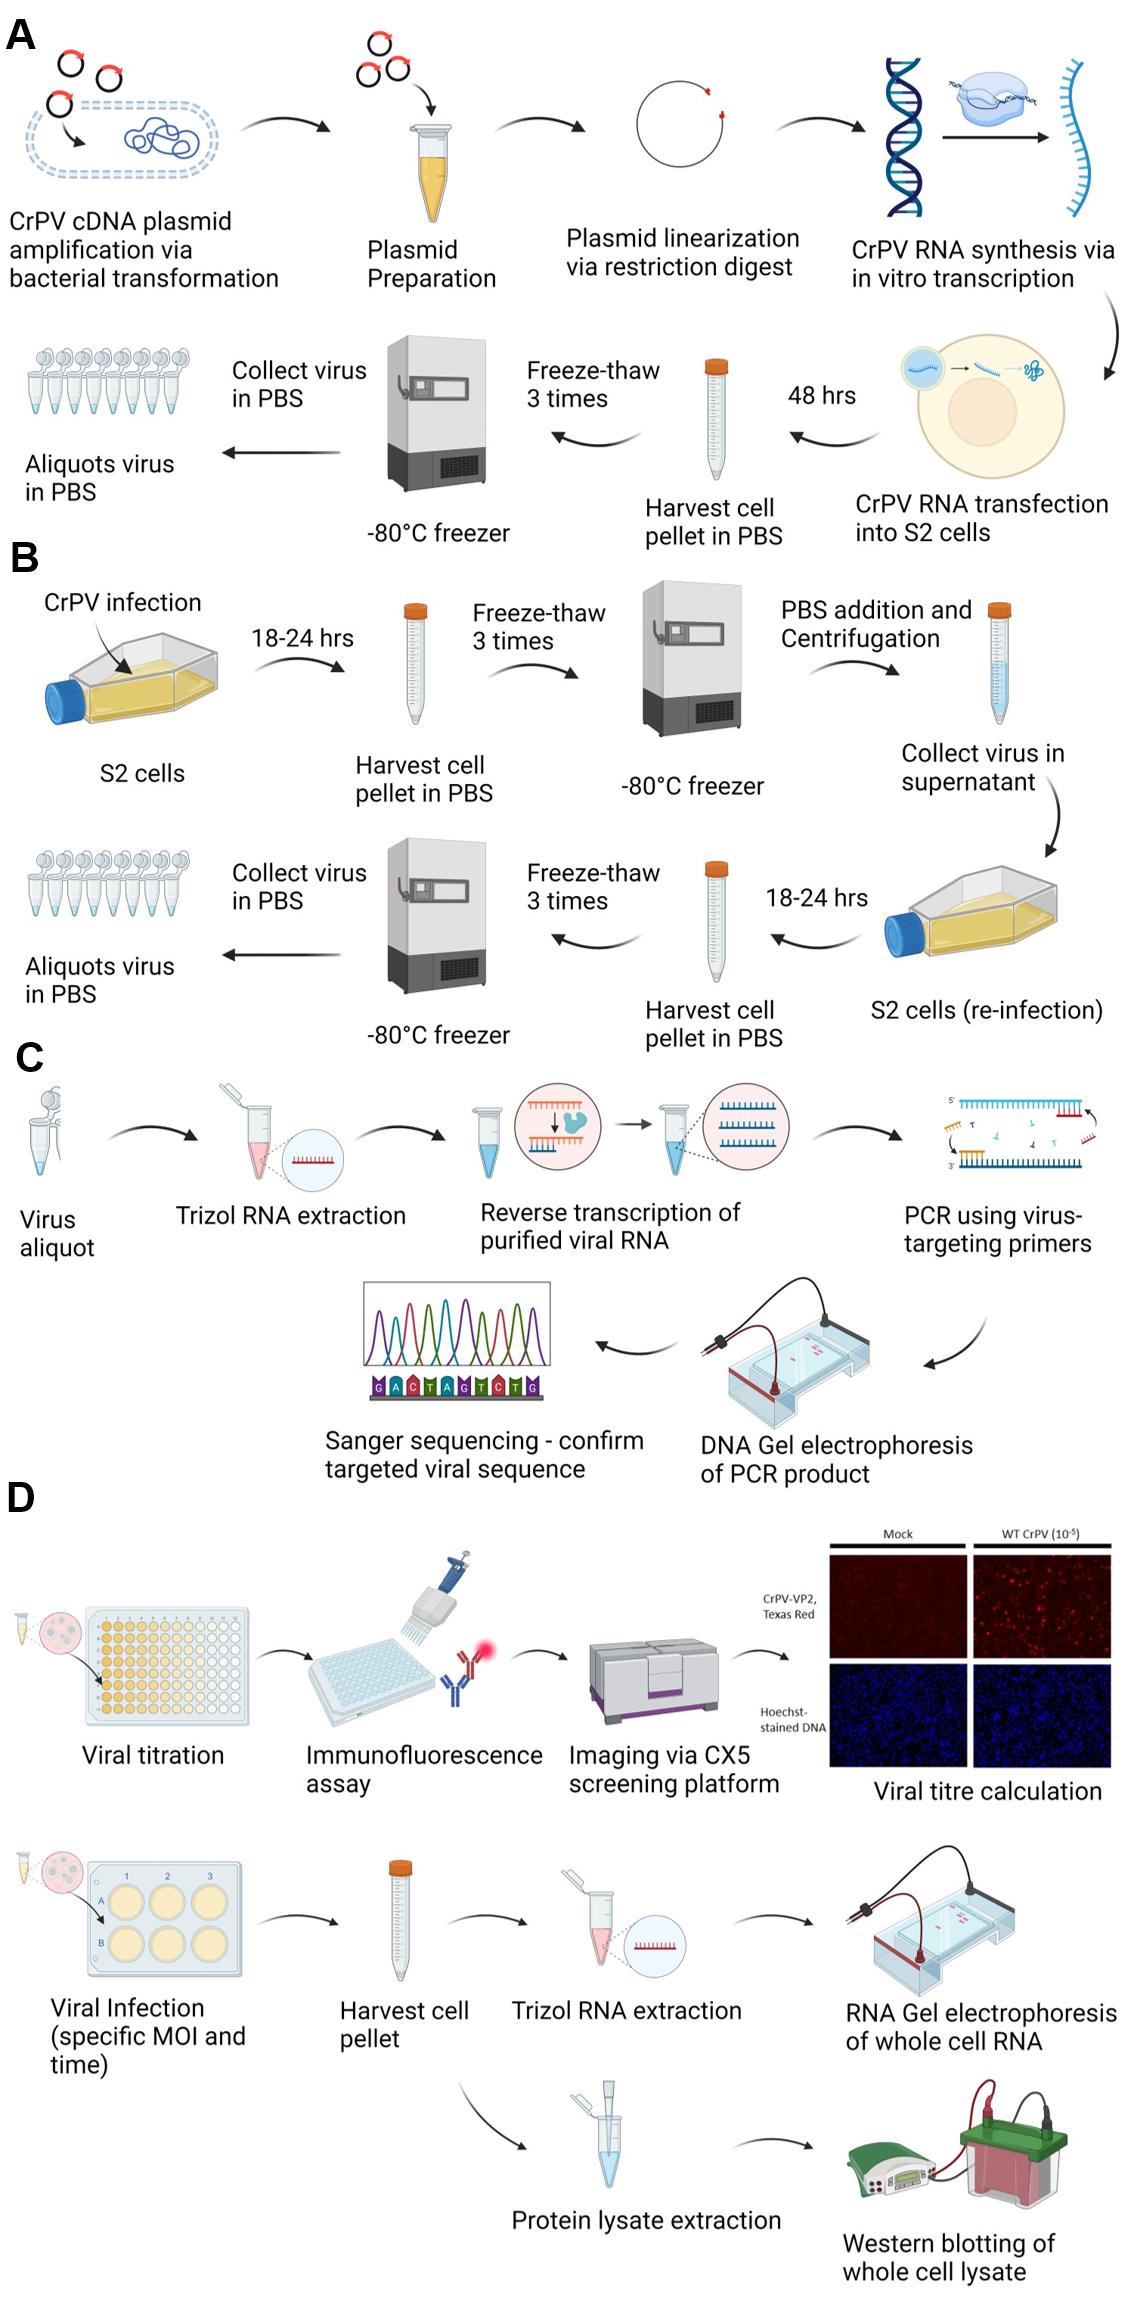
Graphical overview of cricket paralysis virus (CrPV) infectious clone generation, propagation, sequence confirmation, titering, and infection. A. CrPV infectious clone preparation and propagation. CrPV cDNA plasmid is amplified via bacterial transformation, linearized by restriction enzyme digestion, and used in an in vitro transcription reaction to produce CrPV genomic RNA. S2 cells are transfected with the CrPV RNA and then incubated for 48 h to allow viral protein synthesis and viral replication. Infected cells are harvested and subjected to three freeze-thaw cycles to release intracellular virus, and the viral stock is aliquoted and stored at -80 °C. B. Propagation of CrPV in S2 cells via sequential amplification. S2 cells are infected with CrPV and incubated for 18–24 h. After incubation, cells are harvested and subjected to three freeze-thaw cycles to release the virus. The harvested virus is used to reinfect fresh S2 cells in a sequential amplification step to increase viral yield. The virus is collected from the supernatant and aliquoted for storage at -80 °C for further experiments. C. CrPV genome validation. Viral RNA is purified from aliquots of CrPV, reverse transcribed, and then PCR amplified using CrPV-specific primers. The PCR product is analyzed by DNA gel electrophoresis and verified by Sanger sequencing. D. Titering CrPV. Serial dilutions of the virus (10-fold dilution) are used to infect S2 cells for 6 h and then immunostained with anti-CrPV capsid protein (VP2) antibody followed by secondary staining using Texas red-conjugated antibodies. The infected cells are visualized and quantified using a high-throughput microscopic screening platform. The viral titer is calculated based on the number of VP2-positive cells. D. RNA gel electrophoresis and western blotting for infection validation. S2 cells are infected with CrPV at specific multiplicity of infection (MOI) values and harvested after defined time points. RNA is extracted from the infected cells and analyzed via RNA gel electrophoresis and western blotting targeting CrPV-1A and CrPV-VP2 to assess the progression of the infection.
Background
Cricket paralysis virus (CrPV), a small RNA virus from the Dicistroviridae family, primarily infects arthropods, including economically significant pests and the model organism Drosophila melanogaster [1,2]. The genome organization of CrPV includes two internal ribosome entry sites (IRESs) that direct the translation of non-structural and structural protein-encoding open reading frames (ORF1 and ORF2), as shown in the schematic representation of the CrPV genome (Figure 1) [2]. The availability of an infectious CrPV clone has proven invaluable for introducing precise mutations into viral RNA and proteins, allowing researchers to investigate the specific roles of individual viral components during infection [3–6]. As CrPV serves as a model system for studying fundamental virus–host interactions, the development of efficient methods for propagating and quantifying the virus is critical. Traditional viral titration methods, such as plaque assays, involve counting plaques formed by the lysis of virus-infected cells. However, Drosophila S2 cells are semi-adherent and cannot form the dense monolayers required for plaque formation by CrPV. As a result, CrPV-infected cells fail to produce clear, countable plaques, making them unsuitable for standard plaque assays. This limitation highlights the need for alternative methods to accurately and efficiently quantify CrPV.
Our protocol for CrPV propagation and titration addresses these challenges. A sequential amplification approach is used, wherein an initial infection of Drosophila S2 cells (30 million) is performed. Subsequently, the intracellular virus is harvested via freeze-thaw cycles and used to infect a larger batch of cells (100 million) to amplify the virus. This step helps produce higher viral yields by harvesting the cells before lysis. Finally, infected cells are then subject to freeze-thaw to disrupt cellular membranes to release the accumulated intracellular viral particles. This method helps with the continuous amplification of the virus.
For viral titration, we use an immunostaining-based focus-forming assay (FFA), a limiting dilution assay that quantifies the number of infectious particles in a given volume. Viral stocks are serially diluted and used to infect S2 cells in a 96-well plate that has been pre-treated with Concanavalin A to enhance cell adherence [7]. After incubation, cells are fixed with paraformaldehyde, permeabilized with methanol, and stained with antibodies against the CrPV capsid protein, VP2. The fluorescence signal shows the presence of VP2 expression within cells, serving as an indicator of the infection status. Fluorescence microscopy, such as using a high-throughput imaging system (e.g., CellInsightTM CX5 High Content Screening), is used to visualize and quantify the infected cell foci, expressed as focus-forming units (FFU) per milliliter. This immunostaining-based titration method can be effectively used to determine viral titer when plaque assay is not an option. By providing a reliable method for virus propagation and titration, our protocol advances the study of insect viruses, contributing to the broader understanding of viral biology and the development of novel antiviral strategies.
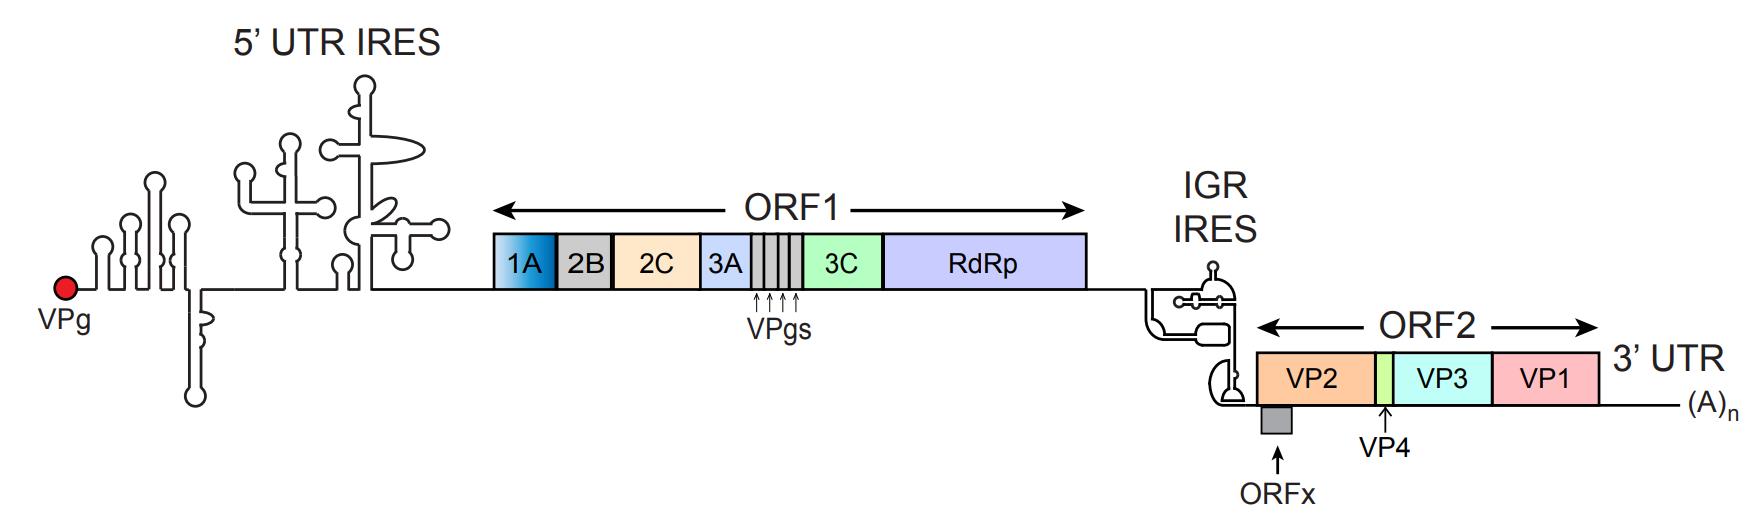
Figure 1. RNA genome of cricket paralysis virus (CrPV). CrPV is a positive-sense, single-stranded RNA. It contains two internal ribosome entry sites (IRESs) that facilitate the translation of two distinct open reading frames (ORF1 and ORF2). The 5' UTR IRES initiates translation of ORF1, which encodes non-structural proteins involved in viral replication, including 1A, 2B, 2C, 3A, 3B, 3C, and the RNA-dependent RNA polymerase (RdRp or 3D), as well as four viral protein genomes (VPgs). The intergenic region (IGR) IRES initiates the translation of ORF2, which encodes structural proteins essential for forming the viral capsid: VP2, VP3, VP1, and VP4. The CrPV genome is flanked by a 5' UTR with an IRES structure and a 3' UTR that ends with a poly(A) tail, which are both crucial for viral replication and translation efficiency. This figure is adapted from Warsaba et al. [2], Dicistrovirus-Host Molecular Interactions, Current Issues in Molecular Biology.
Materials and reagents
Biological materials
1. Cricket paralysis virus (CrPV) infectious clone, generated based on the methodology described in the Journal of Virology article titled "The 5' Untranslated Region of a Novel Infectious Molecular Clone of the Dicistrovirus Cricket Paralysis Virus Modulates Infection" by Kerr et al. [3]
2. 5-alpha competent E. coli (New England Biolabs, catalog number: C2987)
3. Drosophila Schneider 2 (S2) cells cultured in Schneider's Drosophila medium (Thermo Fisher Scientific, catalog numbers: R69007)
Reagents
1. 1 kb plus DNA ladder (New England Biolabs, catalog number: N3232)
2. 100 bp DNA ladder (New England Biolabs, catalog number: N3231)
3. Acetic acid (Sigma-Aldrich, catalog number: 45754)
4. Agar (Sigma-Aldrich, catalog number: 05040)
5. Ammonium persulfate (APS) (Sigma-Aldrich, catalog number: A3678)
6. Ampicillin sodium salt (Sigma-Aldrich, catalog number: A8351)
7. α-CrPV-1A antibody (custom protein antibody, Genscript) [5]
8. α-CrPV-VP2 antibody (custom peptide antibody, Genscript – C-ATFQDKQENSHIENE-NH2 and C-KLWIHKTYLKRPAR-NH2) [8]
9. Bleach/sodium hypochlorite solution (Sigma-Aldrich, catalog number: 1.05614)
10. Blue protein loading dye (New England Biolabs, catalog number: B7703)
11. Bovine serum albumin (BSA) (Sigma-Aldrich, catalog number: A7906)
12. Bradford protein assay dye reagent concentrate (Bio-Rad, catalog number: 5000006)
13. Chemiluminescence kit (Thermo Fisher Scientific, catalog number: 89880)
14. Chloroform (Thermo Fisher Scientific, catalog number: 043685.M6)
15. Concanavalin A (Con A) (Sigma-Aldrich, catalog number: 11028-71-0)
16. Diethyl pyrocarbonate (DEPC) (Sigma-Aldrich, catalog number: D5758)
17. Donkey anti-rabbit IgG-horseradish peroxidase (Amersham, catalog number: NA934)
18. DNase I (New England Biolabs, catalog number: M0303)
19. Ecl136II restriction enzyme (Thermo Fisher Scientific, catalog number: ER0251)
20. EDTA (ethylenediaminetetraacetic acid, disodium salt) (Sigma-Aldrich, catalog number: 798681)
21. Ethanol (Sigma-Aldrich, catalog number: 1.00974)
22. Fetal bovine serum (FBS) (Gibco, catalog number: 16-000-069)
23. Gel loading dye purple (6×) (New England Biolabs, catalog number: B7024)
24. Glacial acetic acid (Sigma-Aldrich, catalog number: 1005706)
25. Glycerol (Sigma-Aldrich, catalog number: G7893)
26. Goat anti-mouse IgG-horseradish peroxidase (Santa Cruz Biotechnology, catalog number: sc-2005)
27. Guanidine hydrochloride (Sigma-Aldrich, catalog number: G3272)
28. Halt protease and phosphatase inhibitor cocktail (100×) (Thermo Fisher Scientific, catalog number: 78444)
29. Hoechst (Invitrogen, catalog number: H21486)
30. IGEPAL CA-630 (Nonidet P-40, NP-40 substitute) (Sigma-Aldrich, catalog number: 56741)
31. Isopropanol (Thermo Fisher Scientific, catalog number: 040983.M1)
32. Lipofectamine 2000 transfection reagent (Thermo Fisher Scientific, catalog number: 11668027)
33. LunaScript RT supermix kit (New England Biolabs, catalog number: E3010)
34. Methanol (Fisher Scientific, catalog number: 67-56-1)
35. Milk powder (Sigma-Aldrich, catalog number: 1443825)
36. Molecular-grade agarose (FroggaBio, catalog number: A87-500G)
37. Monarch PCR & DNA Cleanup kit (5 μg) (New England Biolabs, catalog number: T1030)
38. MOPS [3-(N-morpholino)propanesulfonic acid] (Sigma-Aldrich, catalog number: 475898)
39. Gibco Opti-MEM reduced serum medium (Fisher Scientific, catalog number: 31985070)
40. Paraformaldehyde (Fisher Scientific, catalog number: AC416785000)
41. Penicillin G potassium salt (Sigma-Aldrich, catalog number: 113-98-4)
42. Phusion High-Fidelity PCR kit (New England Biolabs, catalog number: E0553)
43. Potassium chloride (Sigma-Aldrich, catalog number: 529552)
44. Potassium phosphate monobasic (Sigma-Aldrich, catalog number: 529568)
45. Qubit RNA High-Sensitivity (HS) Assay kit (Invitrogen, catalog number: Q32855)
46. Riboruler RNA ladder (Thermo Fisher Scientific, catalog number: SM1821)
47. RiboLock RNase inhibitor (Thermo Fisher Scientific, catalog number: EO0382)
48. Ribonucleotide solution mix (New England Biolabs, catalog number: N0466)
49. RNA Clean-Up kit (New England Biolabs, catalog number: T2040)
50. SafeView DNA stains (Applied Biological Materials, catalog number: G108)
51. SalI restriction enzyme (New England Biolabs, catalog number: R0138)
52. Schneider's Drosophila medium (Gibco, catalog number: 21720024)
53. Sodium chloride (Sigma-Aldrich, catalog number: S9888)
54. Sodium deoxycholate (Sigma-Aldrich, catalog number: 264103)
55. Sodium dodecyl sulfate (SDS) (Sigma-Aldrich, catalog number: 11667289001)
56. Sodium phosphate dibasic (Sigma-Aldrich, catalog number: 567547)
57. Streptomycin sulfate salt (Sigma-Aldrich, catalog number: 3810-74-0)
58. T7 RNA polymerase (New England Biolabs, catalog number: E2040S)
59. TEMED (Sigma-Aldrich, catalog number: T7024)
60. Texas red goat anti-rabbit IgG (H+L) secondary antibody (Invitrogen, catalog number: T-2767)
61. Tris base (Sigma-Aldrich, catalog number: 252859)
62. Tris hydrochloride (Sigma-Aldrich, catalog number: 10812846001)
63. Triton X-100 (Sigma-Aldrich, catalog number: X100RS)
64. Trizol (Thermo Fisher Scientific, catalog number: 15596026)
65. Tryptone (Sigma-Aldrich, catalog number: T2559)
66. Tween 20 (Sigma-Aldrich, catalog number: P1379)
67. Yeast extract (Sigma-Aldrich, catalog number: Y1625)
Solutions
1. Ampicillin stock solution (see Recipes)
2. Complete Schneider's Drosophila medium (see Recipes)
3. Con A solution (see Recipes)
4. DEPC-treated water (see Recipes)
5. LB-agar plate (see Recipes)
6. Liquid LB (see Recipes)
7. Penicillin and streptomycin solution (see Recipes)
8. LB-gar solution (see Recipes)
9. LB solution (see Recipes)
10. PB buffer (DNA purification) (see Recipes)
11. PE buffer (wash buffer) (see Recipes)
12. Phosphate buffered saline (PBS) solution (see Recipes)
13. 1× Tris-Acetate-EDTA (TAE) buffer(see Recipes)
14. Radio-immunoprecipitation assay (RIPA) buffer (see Recipes)
15. 10× MOPS (3-(N-morpholino)propanesulfonic acid) buffer (see Recipes)
16. 0.1% Tris-buffered saline with Tween 20 (TBST) buffer (see Recipes)
17. Resolving and stacking solutions for western blotting: made right before gel casting
18. Texas red secondary antibody in 5% BSA/PBS: it is light-sensitive; wrap with aluminum foil to prevent photobleaching
Recipes
1. Ampicillin stock solution
Dissolve ampicillin salts in DEPC-treated water to 100 mg/mL. This solution can be aliquoted to 1 mL per microfuge tube and stored at -20 °C.
2. Complete Schneider's Drosophila medium
Schneider's Drosophila medium includes 10% FBS and 1% penicillin and streptomycin solution. After mixing, filter the media using a bottle-top vacuum filter and store in an autoclaved glass bottle at 4 °C. It can be stored indefinitely if the bottle is unopened.
3. Con A solution
Con A in PBS (0.5 mg/mL), 3% paraformaldehyde, and 5% BSA in PBS. Filter by a syringe filter and store on ice.
4. DEPC-treated water
Treat Milli-Q water with 0.2% (v/v) DEPC and autoclave for 30 min in a glass bottle. Cool down the bottled water to room temperature before use. It can be stored indefinitely if the bottle is unopened.
5. LB-agar plate
Place a magnetic stir bar into the LB-agar solution and autoclave it in a glass bottle for 30 min at 121 °C. After autoclaving, stir the solution on a magnetic stir plate while allowing it to cool to approximately 50 °C. Once cooled, add ampicillin to a final concentration of 100 μg/mL and mix gently to ensure even distribution. Pour the LB-agar into Petri dishes, adding just enough to cover the bottom of each dish. Close the lids and allow the plates to cool and solidify overnight at room temperature.
6. Liquid LB
Autoclave LB solution for 30 min in a glass bottle and store at room temperature. Cool down the bottled water to room temperature before use.
7. Penicillin and streptomycin solution
Dissolve penicillin and streptomycin salts in DEPC-treated water to 6 mg/mL and 10 mg/mL, respectively. This solution can be aliquoted to 10 mL per 15 mL Falcon tube and stored at -20 °C.
9. LB-agar solution
| Reagent | Final concentration | Quantity or Volume |
|---|---|---|
| Tryptone | 1% (w/v) | 10 g |
| Yeast extract | 0.5% (w/v) | 5 g |
| Sodium chloride | 1% (w/v) | 10 g |
| Agar | 2% (w/v) | 20 g |
| Deionized water (dH2O) | n/a | To 1 L |
| Total | n/a | 1 L |
10. LB solution
| Reagent | Final concentration | Quantity or Volume |
|---|---|---|
| Tryptone | 1% (w/v) | 10 g |
| Yeast extract | 0.5% (w/v) | 5 g |
| Sodium chloride | 1% (w/v) | 10 g |
| Deionized water (dH2O) | n/a | To 1 L |
| Total | n/a | 1 L |
11. PB buffer (DNA purification)
| Reagent | Final concentration | Quantity or Volume |
|---|---|---|
| Guanidine hydrochloride (GuHCl) | 5 M | 476.6 g |
| Isopropanol | 30% (v/v) | 300 mL |
| Tris-HCl (pH 6.6) | 20 mM | 2.42 g |
| Deionized water (dH2O) | n/a | To 1 L |
| Total | n/a | 1 L |
12. PE buffer (wash buffer)
| Reagent | Final concentration | Quantity or Volume |
|---|---|---|
| Tris-HCl | 10 mM | 1.21 g |
| Ethanol | 80% (v/v) | 800 mL |
| Deionized water (dH2O) | n/a | To 1 L |
| Total | n/a | 1 L |
13. Phosphate buffered saline (PBS) solution
| Reagent | Final concentration | Quantity or Volume |
|---|---|---|
| Sodium chloride | 137 mM | 8 g |
| Potassium chloride | 2.7 mM | 0.2 g |
| Sodium phosphate dibasic | 10 mM | 1.44 g |
Potassium phosphate monobasic Deionized water (dH2O) | 1.8 mM n/a | 0.24 g To 1 L |
| Total | n/a | 1 L |
Note: Autoclave for 30 min in a 1 L glass bottle and store at room temperature.
14. 1× Tris-Acetate-EDTA (TAE) buffer
| Reagent | Final concentration | Quantity or Volume |
|---|---|---|
| Tris base | 40 mM | 4.84 g |
| Glacial acetic acid | 20 mM | 1.14 mL |
| EDTA | 1 Mm | 0.372 g |
| Deionized water (dH2O) | n/a | To 1 L |
| Total | n/a | 1 L |
Note: Store at room temperature.
15. RIPA buffer
| Reagent | Final concentration | Quantity or Volume |
|---|---|---|
| Sodium chloride | 150 mM | 0.439 g |
| IGEPAL CA-630 | 1% | 0.5 mL |
| Sodium deoxycholate | 0.5% | 0.25 g |
| SDS | 0.1% | 0.05 g |
| Glycerol | 10% | 5 mL |
| Tris-HCl (pH 8.0) Tris(hydroxymethyl)aminomethane | 50 mM | 0.3 g (adjust pH to 8) |
| Deionized water (dH2O) | n/a | To 50 mL |
| Total | n/a | 50 mL |
Note: Store at 4 °C and preferably protected from light.
16. 10× MOPS buffer
| Reagent | Final concentration | Quantity or Volume |
|---|---|---|
| MOPS | 200 mM | 41.86 g |
| Sodium acetate | 50 mM | 4.1 g |
| EDTA | 10 mM | 3.72 g |
| Deionized water (dH2O) | n/a | To 1 L |
| Total | n/a | 1 L |
17. 0.1% Tris-buffered saline with Tween 20 (TBST) buffer
| Reagent | Final concentration | Quantity or Volume |
|---|---|---|
| Tris base | 20 mM | 2.42 g |
| Sodium chloride | 150 mM | 8 g |
| Tween 20 | 0.1% | 1 mL |
| Deionized water (dH2O) | n/a | To 1 L |
| Total | n/a | 1 L |
Laboratory supplies
1. 1.5, 15, and 50 mL tube rack
2. 1.5 and 2 mL Eppendorf tubes (Thermo Fisher Scientific, catalog numbers: AM12450 and AM12475)
3. 15 and 50 mL Falcon tubes (FroggaBio, catalog numbers: TB15-500 and TB50-500)
4. 14 mL round-bottom test tubes (Sigma-Aldrich, catalog number: CLS352057)
5. 6-well TC-treated plate (Corning, catalog number: CLS353224)
6. Bottle-top vacuum filter (Corning, catalog number: CLS431097)
7. Centrifuge (Thermo Fisher Scientific, model: accuSpin 1-1R)
8. Disposable polystyrene cuvettes (Bio-Rad, catalog number: 2239955)
9. DNase/RNase-free tips (1,000, 200, 10 μL)
10. Kimwipes (Fisher Scientific, catalog number: 06-666)
11. Micropipettes (200–1,000, 20–200, 2–20, and 0.2–2 μL)
12. Multichannel micropipettes (20–200 μL)
13. PCR strip tubes (FroggaBio, catalog number: STF-A120)
14. Petri dishes (Thermo Fisher Scientific, catalog number: FB0875713)
15. Spin Miniprep columns (Qiagen, catalog number: 27115)
16. Sterile 96-well plate, surface treated (VWR, catalog number: 10062-900)
17. Sterile serological pipettes 10 mL (Fisher Scientific, catalog number: 13-678-12)
18. Sterile serological pipettes 25 mL (Fisher Scientific, catalog number: 13-678-14)
19. Syringe filter (Sigma-Aldrich, catalog number: SLMP025SS)
20. T25 and T75 TC flask (Thermo Fisher Scientific, catalog numbers: 156367 and 156499)
Equipment
1. Isotemp incubator (Thermo Fisher Scientific, catalog number: 151030513)
2. Bio-Rad Gel Doc 2000 (Bio-Rad, catalog number: 04678)
3. BioPhotometer spectrophotometer (Eppendorf, catalog number: 6131-FCP22)
4. CellInsight CX5 HCS platform (Thermo Fisher Scientific, catalog number: CX51110)
5. EVOS FLoid imaging system (Thermo Fisher Scientific, catalog number: 4471136)
6. NanoDrop spectrophotometer ND-1000 (Thermo Fisher Scientific, catalog number: 2353-30-0010)
7. Typhoon biomolecular imager (Cytiva, catalog number: 29187191)
Software and datasets
1. BioRender version 4.0 (BioRender.com, 10/2024)
2. HCS Navigator version 6.6.0 (Thermo Fisher Scientific, 12/2015)
3. ImageJ version 1.54g (National Institutes of Health, Bethesda, MD, USA, 2024)
4. Microsoft Excel for Microsoft 365 (Microsoft Corporation, 2024)
5. SnapGene version 6.0 (GSL Biotech, 2024)
Procedure
A. Standard culture and passaging of S2 cells
1. Warm complete S2 cell media to room temperature in a biological safety cabinet (BSC).
2. Ensure all solutions and equipment that contact the cells are sterile. Work inside a BSC using proper sterile techniques.
3. Check the culture flask under a microscope to confirm the cells are healthy, actively growing, and at an appropriate density for passaging (log to mid-log phase, approximately 0.5 × 10 to 5 × 10 cells/mL).
4. Tap the flask gently to dislodge the loosely adherent cells into the media.
5. Using a serological pipette, gently pipette the media up and down several times to rinse the flask surface and break up any visible cell clumps.
6. Transfer an appropriate volume of the cell suspension into a new cell culture flask to achieve the desired dilution ratio (e.g., 1:2 to 1:5 dilution).
7. Add fresh, prewarmed complete media to top up to the final volume:
a. T175 flask: Add up to 30 mL of media.
b. T75 flask: Add up to 15 mL of media.
c. T25 flask: Add up to 5 mL of media.
8. Place the flask in a 25 °C incubator without CO2. Ensure the cap is loosened slightly for gas exchange.
9. Monitor the culture regularly for signs of healthy growth and proper density.
10. Backup culture (Optional): Retain the old flask as a backup until the newly passaged cells are confirmed to be growing well and appear healthy under the microscope.
B. Generation of CrPV from an infectious clone
B1. Amplification of the CrPV cDNA plasmid via bacterial transformation
1. In a microfuge tube, thaw E. coli DH5α competent cells (50 μL per transformation reaction) on ice for 5 min.
2. Add 1 μL of plasmid DNA (approximately 100 ng) to the competent cells. The CrPV cDNA plasmid (pCrPV-2 or -3) is described in Kerr et al. [3].
3. Mix by gently pipetting the DNA through the cells while moving the pipette tip through the suspension. Tap tubes gently to mix.
4. Incubate the cells on ice for 30 min to allow DNA uptake.
5. Heat shock the cells at 42 °C for 45 s. Do not shake during this step.
6. Immediately transfer the cells on ice after heat shock.
7. Add 200 μL of room-temperature LB (without antibiotics) to the cells immediately after heat shock.
8. Incubate the cells in a shaking incubator at 30 °C and 225 rpm for 1 h.
9. Plate transformation mixture onto LB agar plates containing 100 μg/mL ampicillin. Spread evenly using a sterile spreader.
10. Incubate the plates overnight at 30 °C.
11. Select the smaller colonies on the plate and culture them in a sterile test tube containing 5 mL of LB media with 100 μg/mL ampicillin.
12. Incubate the culture in a shaking incubator at 30 °C and 225 rpm overnight.
Note: Incubation at 37 °C or choosing larger colonies may lead to plasmids with random DNA insertions and deletions.
B2. CrPV cDNA plasmid purification
1. Harvest 5 mL of E. coli culture grown in LB by centrifuging at 4000× g for 10 min at 4 °C.
2. Extract the plasmid using the NEB Miniprep kit.
3. The plasmid can be validated via a SalI restriction digest and confirming its size by DNA gel electrophoresis.
a. Combine the following components in a sterile 1.5 mL microcentrifuge tube: 10 μg of plasmid DNA, 5 μL of restriction enzyme, 10 μL of 10× reaction buffer, and sterile water to a final volume of 200 μL (adjust volume depending on enzyme and manufacturer’s recommendations).
b. Gently mix the reaction components by pipetting up and down or flicking the tube.
c. Briefly spin the tube to collect the contents at the bottom.
d. Incubate the reaction overnight at 37 °C to allow complete linearization of the plasmid DNA.
e. Cast 1% agarose gel (0.5 g of agarose in 50 mL of 1× TAE buffer) with 1.5 μL of SafeView DNA stain.
f. Add loading dye to 300 ng of samples and load the gel with 1 kb plus DNA ladder.
g. Image the DNA gel using the gel doc to confirm the expected product length.
4. The plasmid should be verified with Sanger sequencing.
B3. CrPV RNA synthesis via in vitro transcription
1. Linearize the CrPV cDNA plasmid by Ecl136II restriction digest, according to the manufacturer’s protocol.
2. Perform DNA clean-up (e.g., Qiagen):
a. In a microfuge tube, add 5× volume of PB buffer to the digested DNA (linearized plasmid).
b. Load the mixture onto a spin column and centrifuge at 13,000× g for 1 min.
c. Wash the column twice with 700 μL of PE wash buffer, spinning at 13,000× g for 1 min after each wash.
d. Elute the cleaned DNA by adding 30–50 μL of DEPC-treated water directly to the column membrane.
e. Centrifuge at 13,000× g for 1 min to collect the eluted DNA.
f. Measure the DNA concentration using a spectrophotometer (e.g., NanoDrop).
3. Verify DNA integrity by running 200–300 ng of DNA on a 1% agarose gel in 1× TAE buffer, as described in step B2.
4. For the in vitro transcription reaction, combine the following components in a sterile 1.5 mL microcentrifuge tube on ice (adjust volumes proportionally for larger reactions): 1 μg of linear DNA, 5 μL of rNTP mix (containing ATP, CTP, GTP, and UTP at 10 mM each), 2 μL of 10× T7 transcription buffer, 0.5 μL of RNase inhibitor (e.g., Ribolock), 0.3 μL of T7 RNA polymerase, and 0.4 μL of YIPP phosphatase.
5. Add DEPC-treated water to bring the final volume to 20 μL.
6. Incubate the reaction at 30 °C for 4 h for RNA synthesis.
7. Perform DNase treatment to remove template DNA:
a. To the completed transcription reaction, add 2.4 μL of DNase buffer and 1 μL of DNase I.
b. Incubate at 37 °C for 1 h to digest the linear DNA template.
8. Confirm RNA production by RNA gel electrophoresis analysis.
a. Prepare 1% agarose gel by adding 0.5 g of agarose to 35 mL of deionized water in a microwave-safe flask or beaker.
i. Heat the mixture until it is almost boiling and the agarose is completely dissolved (using a microwave or hot plate).
ii. Once the agarose solution has cooled slightly (to approximately 60 °C), add 1 μL of Safe-View stain to the gel solution and mix thoroughly by swirling the flask.
iii. Add 5 mL of 10× MOPS buffer to the agarose solution.
iv. In a fume hood, measure and add 10 mL of paraformaldehyde to the solution and mix well.
v. Immediately pour the mixture into the gel mold and insert the comb to create wells.
vi. Allow the gel to solidify at room temperature in the fume hood.
b. Prepare RNA ladder by mixing 1 μL of RiboRuler RNA Ladder with 2 μL of loading dye. For each RNA sample, mix the appropriate volume of RNA (200–300 ng) with loading dye.
c. Heat the RNA samples at 65 °C for 3 min to denature any secondary structures. Increase heating time if secondary structures were observed in previous gels.
d. To load the gel, place the solidified gel in the electrophoresis tank filled with 1× MOPS running buffer.
e. Load the prepared RNA ladder and RNA samples into the wells of the gel.
f. Run the gel at an appropriate voltage (e.g., 100–120 V) until the dye front has migrated sufficiently (typically 1–2 h).
g. Once the run is complete, carefully remove the gel from the tank.
h. Visualize the RNA bands using a gel imaging system (Bio-Rad Gel Doc 2000) to confirm the expected size of the RNA product.
9. Perform RNA purification using a column-based NEB RNA Clean-Up kit.
10. Measure the RNA concentration using a spectrophotometer (e.g., NanoDrop) to determine yield and quality.
B4. CrPV RNA transfection into S2 cells
1. On day 1, using a serological pipette, resuspend Drosophila S2 cells in complete Schneider’s medium in a flask.
2. Count the cells using a hemocytometer or automated cell counter.
3. Seed the S2 cells by plating 2 × 10 cells per well in a 6-well plate.
4. Allow cells to settle by incubating the plate at 25 °C overnight to allow the cells to adhere and settle.
5. On day 2, check under the microscope to ensure that the S2 cells are settled and adherent to the plate.
6. In the biosafety cabinet, prepare transfection solutions.
a. For each transfection, prepare the following solutions in sterile microfuge tubes separately: Solution A (per sample) contains 125 μL of Opti-MEM and 2.5 μL of Lipofectamine 2000. Solution B (per sample) contains 125 μL of Opti-MEM and 3 μg of CrPV RNA.
b. Mix both solutions gently by pipetting up and down.
c. Incubate both solutions separately for 5 min at room temperature.
d. Combine the transfection mixture by adding Solution A to Solution B.
e. Mix gently by pipetting up and down (do not vortex).
f. Incubate the combined solution for 15 min at room temperature to allow complexes to form.
7. After the 15 min incubation, carefully aspirate all of the media from each well containing S2 cells.
8. Pipette to the side of the well to avoid disturbing the cell monolayer during media removal.
9. Gently add the transfection mixture (250 μL) dropwise to each well.
10. Rock the plate gently at room temperature for 15 min to distribute the complexes evenly.
11. Add 2 mL of complete Schneider’s medium (with serum) per well to dilute the transfection mixture.
12. Incubate the plate at 25 °C for 48 h.
13. Observe the S2 cells over time to check for signs of infection, such as membrane blebbing, cell detachment, clumping, or lysis, as described in Kerr et al. [3].
14. When cell lysis is observed, using a serological pipette, detach cells by gently tapping the flask and collect the entire culture in a 15 mL Falcon tube.
15. Centrifuge at 500× g for 5 min to pellet cells, carefully remove the supernatant, and discard it in 10% bleach.
16. Resuspend the cell pellet in 500 μL of sterile PBS.
17. Subject the cell suspension to three freeze-thaw cycles (in a -80 °C freezer followed by a 37 °C water bath) to lyse cells and release virus particles.
18. Centrifuge the lysate at 1,000× g for 10 min at 4 °C to pellet cell debris and collect the supernatant.
19. Aliquot 50 μL of the virus-containing supernatant into PCR strip tubes and store at -80 °C for virus propagation.
C. CrPV propagation in S2 cells
Note: All procedures should be performed in a biosafety cabinet using aseptic techniques.
1. On Day 1, transfer 30 million S2 cells to a 15 mL Falcon tube and centrifuge at 500× g for 5 min.
2. Wash the cell pellet with 5 mL of sterile PBS, centrifuge again, and remove the supernatant.
3. Add the 50 μL virus stock obtained in the previous section to the cell pellet and gently resuspend with a micropipette. Transfer the virus–cell mixture to a microfuge tube.
4. Incubate the mixture at room temperature for 30 min.
5. Optional: During incubation, the microfuge tube can be placed on a rocking platform with gentle rocking (speed at 500× g and angle at 10°) to ensure even distribution of the virus.
6. Transfer the virus–cell mixture to a new T25 flask containing 5 mL of complete S2 cell media.
7. Incubate the flask at 28 °C for 18–24 h to allow virus propagation.
8. On Day 2, detach cells by gently tapping the flask and collect the entire culture in a 15 mL Falcon tube.
9. Centrifuge at 500× g for 5 min to pellet cells, carefully remove the supernatant, and discard it in 10% bleach.
10. Resuspend the cell pellet in 1 mL of sterile PBS.
11. Subject the cell suspension to three freeze-thaw cycles (in a -80 °C freezer followed by a 37 °C water bath) to lyse cells and release virus particles. Option: Freezing the cell suspension in liquid N2 is also appropriate if available.
12. Centrifuge the lysate at 1,000× g for 10 min at 4 °C to pellet cell debris.
13. Collect the virus-containing supernatant and add it to a T75 flask containing S2 cells at 80% confluency.
14. Incubate the flask at 28 °C for 18–24 h to amplify the virus.
15. On Day 3, detach cells and transfer the entire culture to a 50 mL Falcon tube.
16. Centrifuge at 500× g for 5 min to pellet cells, carefully remove the supernatant, and discard it in 10% bleach.
17. Resuspend the cell pellet in 2 mL of sterile PBS.
18. Perform three freeze-thaw cycles as described previously to release virus particles.
19. Centrifuge the lysate at 1,000× g for 10 min at 4 °C and collect the supernatant.
20. Aliquot 10–30 μL of the virus-containing supernatant into PCR strip tubes and store at -80 °C.
D. Confirmation of CrPV genome via Sanger sequencing
1. In the chemical fume hood, add 500 μL of Trizol to 20 μL of virus stock. Transfer all volume into a 1.5 mL microfuge tube.
2. In the fume hood, add 200 μL of chloroform to the sample. Mix well by vortexing and incubate at room temperature for 2 min.
3. Centrifuge at 13,000× g for 15 min at 4 °C.
4. Transfer 400 μL of the top aqueous layer to a new 1.5 mL microfuge tube (around 80% of the top layer).
5. Add 400 μL of isopropanol to the sample. Mix well by vortexing and incubate at room temperature for 10 min.
6. Spin down the RNA at 13,000× g for 30 min at 4 °C (a small white RNA pellet may be visualized).
7. Remove the supernatant without disturbing the pellet.
8. Rinse the pellet by pipetting up and down with >200 μL of 75% ethanol and then centrifuge at 13,000× g for 5 min.
9. Air dry the pellet for 2 min (do not completely dry).
10. Resuspend in 20 μL of RNase-free water.
11. Measure the concentration of the RNA using the RNA Qubit Quantification kit.
12. Reverse transcribe 500 ng of viral RNA to cDNA using the LunaScript RT SuperMix kit.
13. Purify cDNA using the Monarch PCR & DNA Cleanup kit.
14. Measure cDNA concentration using a nanodrop.
15. Using primers specifically covering the region of interest (Figure 2A), perform PCR using the Phusion High-Fidelity PCR kit. Primers, CrPV-Seq2, and CrPV-Seq26R are used in this demonstration (Figure 2B).

Figure 2. PCR amplification of cricket paralysis virus CrPV-1A region for wildtype (WT) and a mutant CrPV-1A (R146A). A. Schematic representation of the CrPV genome, highlighting the positions of primers used for amplifying specific regions. CrPV-Seq1 to CrPV-Seq28R target various segments of the CrPV genome, ensuring complete coverage for sequencing and validation. B. PCR product analysis for the CrPV-1A region from WT and R146A virus. The CrPV-1A region, which is critical for viral replication, is amplified in both the WT CrPV and the R146A mutant. Gel electrophoresis shows the successful amplification of a ~1 kb product from both WT CrPV and the R146A mutant, using CrPV-Seq2 and CrPV-Seq26R, confirming that the mutation does not interfere with the amplification of the targeted region. This PCR product is used for further validation via Sanger sequencing.
16. Purify the PCR product using the Monarch PCR & DNA Cleanup kit.
17. Measure the amplicon concentration using a nanodrop.
18. Run DNA gel electrophoresis to validate the size of the PCR product (Figure 2B).
a. Cast 1% agarose gel (0.5 g of agarose in 50 mL of 1× TAE buffer) with 1.5 μL of SafeView DNA stain.
b. Add loading dye to 300 ng of PCR samples and load the gel with either 1 kb or 100 bp DNA ladder based on the size of the targeted region.
c. Image the DNA gel using the gel doc to confirm the expected product length.
19. Verify the sequence through Sanger sequencing.
20. Align sequencing results to CrPV genome on SnapGene.
E. Determination of CrPV viral titer via immunofluorescence-based focus-forming unit (FFU) assay
1. Prepare serial dilutions of the viral stock from 100 to 10-8 in 1× PBS (90 μL of PBS, 10 μL of virus).
2. Coat a 96-well plate with 50 μL of ConA (0.5 mg/mL in PBS, filter-sterilized) per well and incubate for at least 60 min at room temperature in the biological safety cabinet.
3. Aspirate the ConA solution and allow the plate to air dry.
4. Prepare microfuge tubes containing 1.8 × 10⁶ S2 cells each and pellet cells by centrifugation (500× g for 30 s).
5. Add 10 μL of each virus dilution (or PBS for mock) to the cell pellets and mix gently to resuspend.
6. Incubate the virus–cell mixtures for 30 min at 25 °C and then add 600 μL of media to each tube.
7. Following the map in Figure 3, transfer 100 μL of infected cells to each well of the ConA-coated plate and incubate for 8 h at 28 °C (plate 300,000 cells per well).
8. Aspirate the media and wash the cells with 1× PBS.
9. Fix cells with 50 μL of 3% paraformaldehyde in FBS for 15 min at room temperature, then wash with 100 μL of 1× PBS. The plates can be stored at 4 °C for up to a week.
10. Permeabilize cells with 50 μL of methanol for 10 min at room temperature, then wash with 100 μL of 1× PBS.
11. Incubate cells with 50 μL of primary antibody against ORF2 (anti-VP2, 1:500 in 5% BSA/PBS) for 1 h at room temperature.
12. Wash cells three times with 100 μL of 1× PBS.
13. Incubate cells with 50 μL of Texas red goat anti-rabbit secondary antibody (1:500 in 5% BSA/PBS) for 1 h at room temperature in the dark.
14. Wash cells twice with 100 μL of 1× PBS.
15. Stain nuclei with 50 μL of Hoechst dye (1:20,000 in PBS) for 15 min at room temperature.
16. Wash once with 100 μL of 1× PBS and store the plate at 4 °C in 100 μL of 1× PBS, protected from light by covering the plate with aluminum foil.
17. For storage, fill the outer circle of wells labeled with the blue box (Figure 3) with 100 μL of water in each well to prevent sample evaporation.
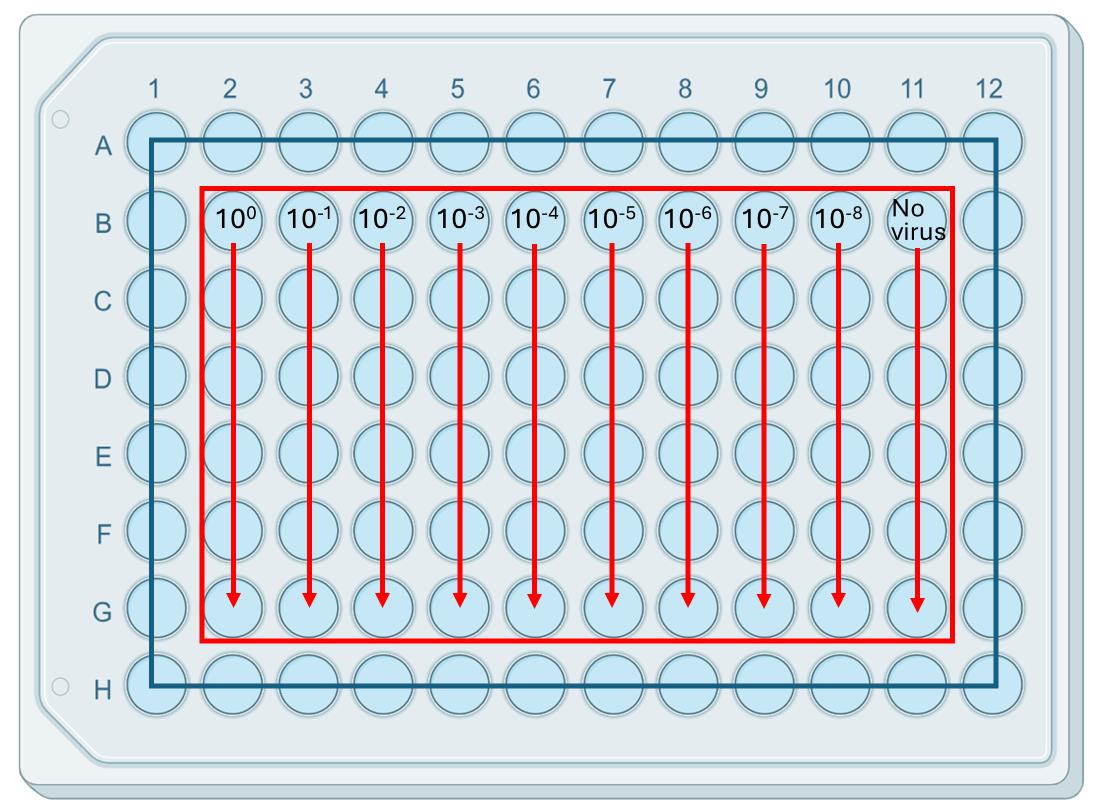
Figure 3. Serial dilution of cricket paralysis virus (CrPV) for focus-forming assay (FFA). A 96-well plate layout illustrating the serial dilutions of CrPV used for the focus-forming assay (FFA). The virus stock is serially diluted from 100 to 10-8 across columns 1 to 9, with each dilution plated in quadruplicate. Column 10 contains mock-infected wells (no virus control), used to ensure the absence of contamination and background signal. This setup allows for the quantification of CrPV titers by counting the number of focus-forming units (FFU) in each well after staining with Texas red-conjugated antibodies against CrPV capsid protein (VP2) and performing immunofluorescence imaging.
F. Imaging and cell counting via fluorescence microscopy (i.e., CX5 HCS platform)
Note: Any high-quality fluorescence microscopy, such as an automated fluorescence microscope or standard fluorescence microscope equipped with appropriate filters, can be used. At the UBC Life Sciences Institute, we have access to a CellInsight CX5 HCS platform for imaging and cell counting. As such, we describe procedures specific to this equipment.
1. Prior to imaging, confirm immunofluorescence on an EVOS microscopic imaging system or equivalent (Figure 4A).
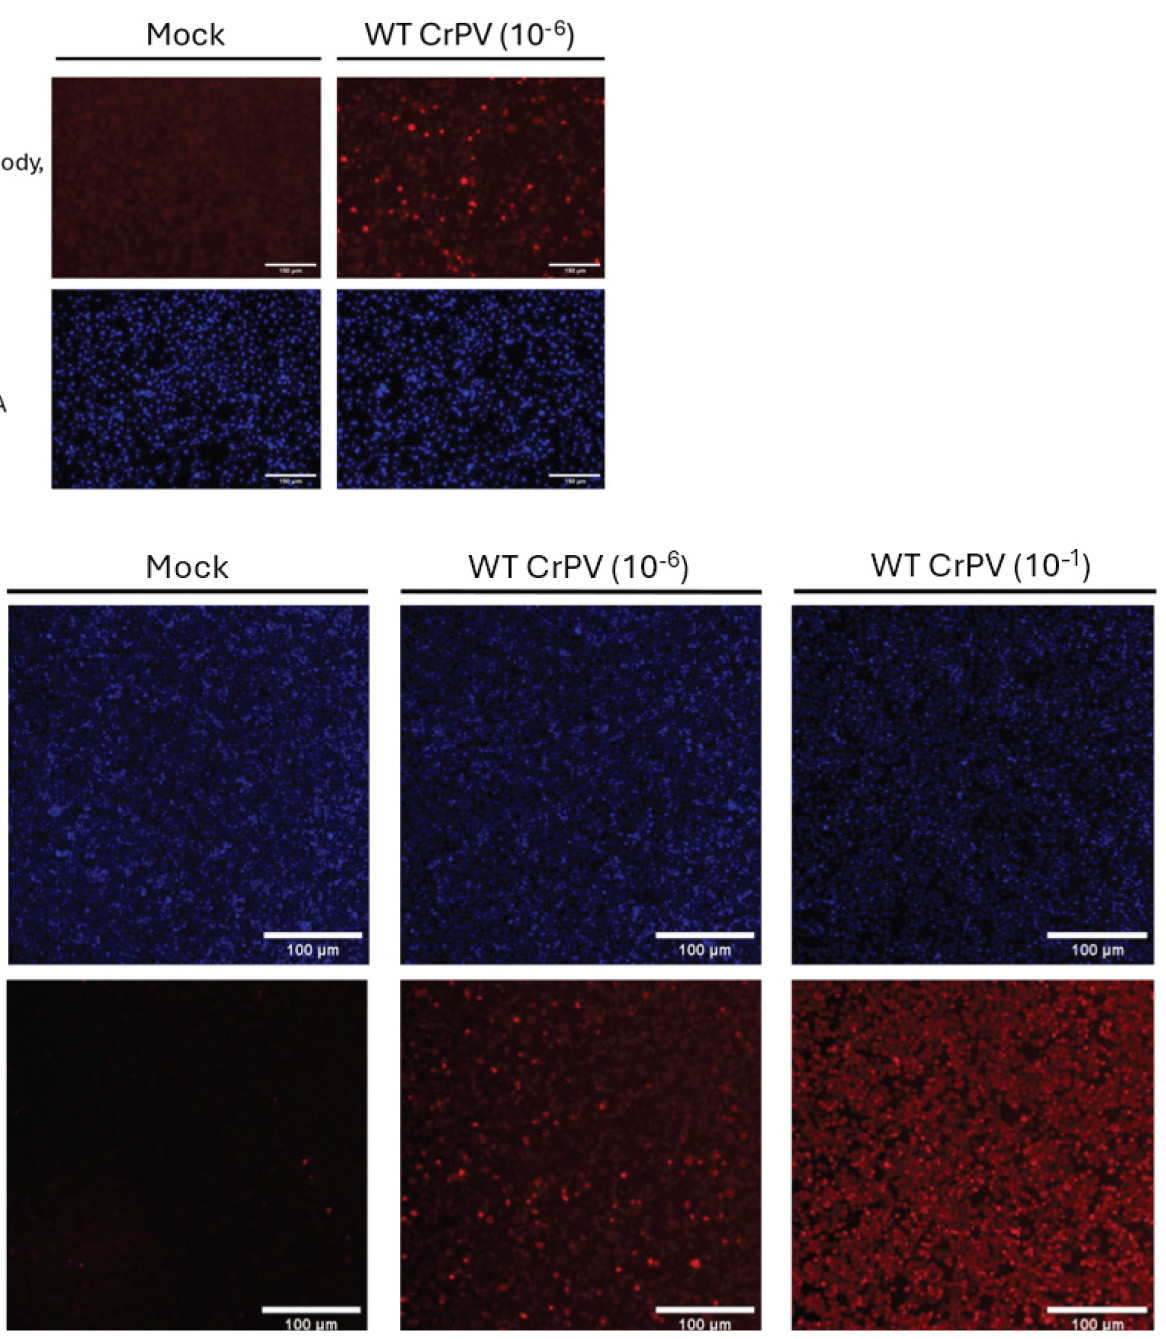
Figure 4. Immunofluorescence detection of cricket paralysis virus (CrPV) capsid protein (VP2) in infected S2 cells. A. Immunofluorescence EVOS images of S2 cells infected with wildtype (WT) CrPV at a dilution of 10-1, compared to mock-infected control (no CrPV infection), with the scale bar set to 150 μm. The CrPV VP2 capsid protein is detected using Texas red-conjugated antibodies, and the cell nuclei are stained with Hoechst dye (blue). WT CrPV-infected cells show significant VP2 expression (red), while the mock-infected cells show no VP2 signal. B. Immunofluorescence CX5 images of S2 cells infected with WT CrPV at two different dilutions, 10-1 and 10-4, compared to mock-infected cells, with the scale bar set to 100 μm. The Hoechst-stained nuclei (blue) are consistent across all conditions. CrPV VP2 (Texas red) expression increases with higher viral loads, as seen in the 10-1 infected cells, whereas the mock-infected cells show no capsid protein expression. The figure demonstrates the progression of CrPV infection and viral protein expression as a function of viral dilution.
2. Acquire images on the CellInsignt CX5 HCS Platform. The following steps are specific to the 2015 version of the HCS Navigator system.
3. On the CellInsight CX5 HCS Platform, power on the HCS Navigator system and ensure proper connection to the microscope and camera.
4. Launch HCS Navigator and select the scan plate on the connected computer.
5. Choose Fluorescence as the imaging mode and select 96-well plate format as the plate layout.
6. To configure fluorescence channels, keep channel 1 configured for white light illumination to help identify areas with an optimal density of cells for imaging. For channel 2 configuration, select an excitation of 350 nm and emission around 461 nm for Hoechst. For channel 3 configuration, select an excitation of 595 nm and emission around 615 nm for Texas red.
7. Adjust the exposure times for each channel to optimize the signal-to-noise ratio.
8. Perform a test capture on a sample well to ensure correct exposure for both the Texas red and Hoechst channels. Sample images are shown in Figure 4B.
9. Maintain a consistent exposure time throughout the entire imaging process.
10. Use the software’s auto-focus function to focus on the cells in each of the wells.
11. Create a scan plan to capture three fields per well and define four wells per dilution for imaging (this yields a technical replicate of three in four biological replicates, collecting 12 images for each virus sample).
12. Begin the imaging run by starting the scan plan.
13. Monitor the initial images to ensure proper focus and exposure.
14. Review the acquired images for any anomalies or focus issues.
15. If needed, select different fields and re-image specific wells.
16. Open the captured images from the Hoechst channel in the analysis platform.
17. Select the cell counting tool and set counting parameters by selecting the radius of the size of the nuclei.
18. Execute the cell counting analysis on the entire dataset to obtain the total number of cells per image field.
19. Save the image data and metadata to the designated storage location.
20. Export images as TIFF and record data from the analysis for downstream titer calculation.
Note: Selecting a dilution of 10-5 or less ensures that the virus concentration is within a manageable range for detection, counting, and accurate determination. Using a dilution that is too low (high virus concentration) can cause overcrowding, multiple infections per cell, signal saturation, inaccurate titer estimation, and difficulty determining the endpoint of infection (Figure 4B).
G. Viral titer calculation
1. Open the Texas red images from CX5 in ImageJ and adjust the brightness and contrast to count the number of “red cells” in the image. The red cells are the ones that are CrPV-positive.
2. Record the number of positive cells.
3. Follow the sample calculation on the attached viral titer calculation Excel sheet.
4. Calculate the percentage of positive cells by dividing the red cell count (infected cells stained with Texas red) by the total cell count (stained with Hoechst). Keep this value as a decimal.
Formula: = Viral-infected Cell#/Total Cell#
5. Determine the total number of positive cells in the well by multiplying the percentage of positive cells by the total number of cells plated in the well (e.g., 300,000 cells).
Formula: =Percentage_Positive_Cells * 300000
6. Adjust for infection volume by multiplying the total number of positive cells by the inverse of the infection volume (e.g., for 10 μL infection volume, multiply by 1/10).
Formula: =Total_Positive_Cells * (1/Infection_Volume)
7. Account for the dilution factor by multiplying the adjusted positive cell count by the dilution factor used during the experiment.
Formula: =Adjusted_Positive_Cells * Dilution_Factor
8. Convert the final value to scientific notation to obtain the viral titer in FFU/μL (focus forming units per microliter).
H. Validation of CrPV infection by RNA gel electrophoresis and western blotting
H1. CrPV infection
1. Using the calculated viral titer, infect S2 cells at MOI = 10 for the desired amount of time.
2. Prepare microfuge tubes containing 3 × 10⁶ S2 cells each and pellet cells by centrifugation (500× g for 30 s).
3. Add the calculated volume of virus to the cell pellets and mix gently to resuspend.
4. Incubate the virus–cell mixtures for 30 min at 25 °C for absorption; then, add 500 μL of media to each tube.
5. Split the total volume of infected cells equally to two wells of a 6-well plate (2 mL media per well) and incubate at 25 °C for the desired amount of time.
6. Monitor the cytopathic effect under a microscope (Figure 5A).
7. Transfer all cells from those two wells, combining them into a 15 mL tube, and pellet cells by centrifugation (500× g for 3 min).
8. Aspirate media and wash cells with 5 mL of 1× PBS buffer.
9. Pellet cells by centrifugation in a tabletop centrifuge (e.g., microfuge) (500× g for 3 min) and aspirate the PBS.
H2. Sample preparation (whole-cell RNA extraction)
1. Follow the Trizol RNA isolation procedure as described in Section D.
H3. Sample preparation (whole-cell protein extraction)
1. Mix the cell pellet in 50 μL of RIPA buffer containing 1× protease inhibitor cocktail (50 μL of RIPA buffer per 5 million cells).
2. Store samples in Eppendorf tubes at -80 °C until ready to proceed.
3. Freeze-thaw samples three times at -80 °C and 37 °C to fully lyse cells.
4. Centrifuge at 13,000× g for 30 min at 4 °C to pellet cell debris.
5. Transfer the aqueous layer to the new tubes, being careful to avoid the cell pellet (it will be sticky and goopy).
6. Proceed with the Bradford assay to measure protein concentration.
a. Prepare a BSA standard curve with concentrations of 0, 2, 4, 6, 8, and 10 μg/μL in distilled water.
b. Make a 1:5 dilution of protein assay dye in water.
c. Prepare cuvettes with 1 mL of diluted dye (1 cuvette per sample, plus 1 for each BSA standard and 1 for the blank).
d. Add 2–5 μL of BSA standards or protein lysate to each cuvette and mix by pipetting with a P1000.
e. Measure the OD at 595 nm using the spectrophotometer set to Bradford Assay.
f. Plot the BSA standard curve to determine the relationship between OD and protein concentration.
g. Use the standard curve to determine the protein concentration of the samples and calculate the amount needed for 10 μg of protein.
7. Add 2× blue protein loading dye to the protein lysate and mix well.
8. Boil samples at 95 °C for 5 min.
9. Samples are ready for loading on an SDS-PAGE gel for western blotting or can be stored in the -20 °C freezer until ready to proceed.
H4. RNA gel electrophoresis
1. Prepare 1% agarose gel as described in the previous section.
2. Prepare the RNA ladder by mixing 1 μL of RiboRuler RNA ladder with 2 μL of loading dye. For each RNA sample, mix the appropriate volume of RNA (200–300 ng) with loading dye.
3. Heat the RNA samples at 65 °C for 3 min to denature any secondary structures. Increase heating time if secondary structures were observed in previous gels.
4. To load the gel, place the solidified gel in the electrophoresis tank filled with 1× MOPS running buffer.
5. Load the prepared RNA ladder and RNA samples into the wells of the gel.
6. Run the gel at an appropriate voltage (e.g., 100–120 V) until the dye front has migrated sufficiently (typically 1–2 h).
7. Once the run is complete, carefully remove the gel from the tank.
8. Visualize the RNA bands using a gel imaging system (Bio-Rad Gel Doc 2000). Use appropriate filters/settings for Safe-View stain (Figure 5B). Figure 5B shows an example RNA gel electrophoresis image of total RNA extracted from S2 cells infected with wildtype (WT) CrPV and the CrPV mutant R146A at different time points. Clear bands of CrPV RNA are visible in both WT and R146A-infected cells, confirming active viral replication. The mock-infected sample serves as a control, displaying only S2 ribosomal RNA and transfer RNA bands, without any CrPV RNA, indicating no infection.
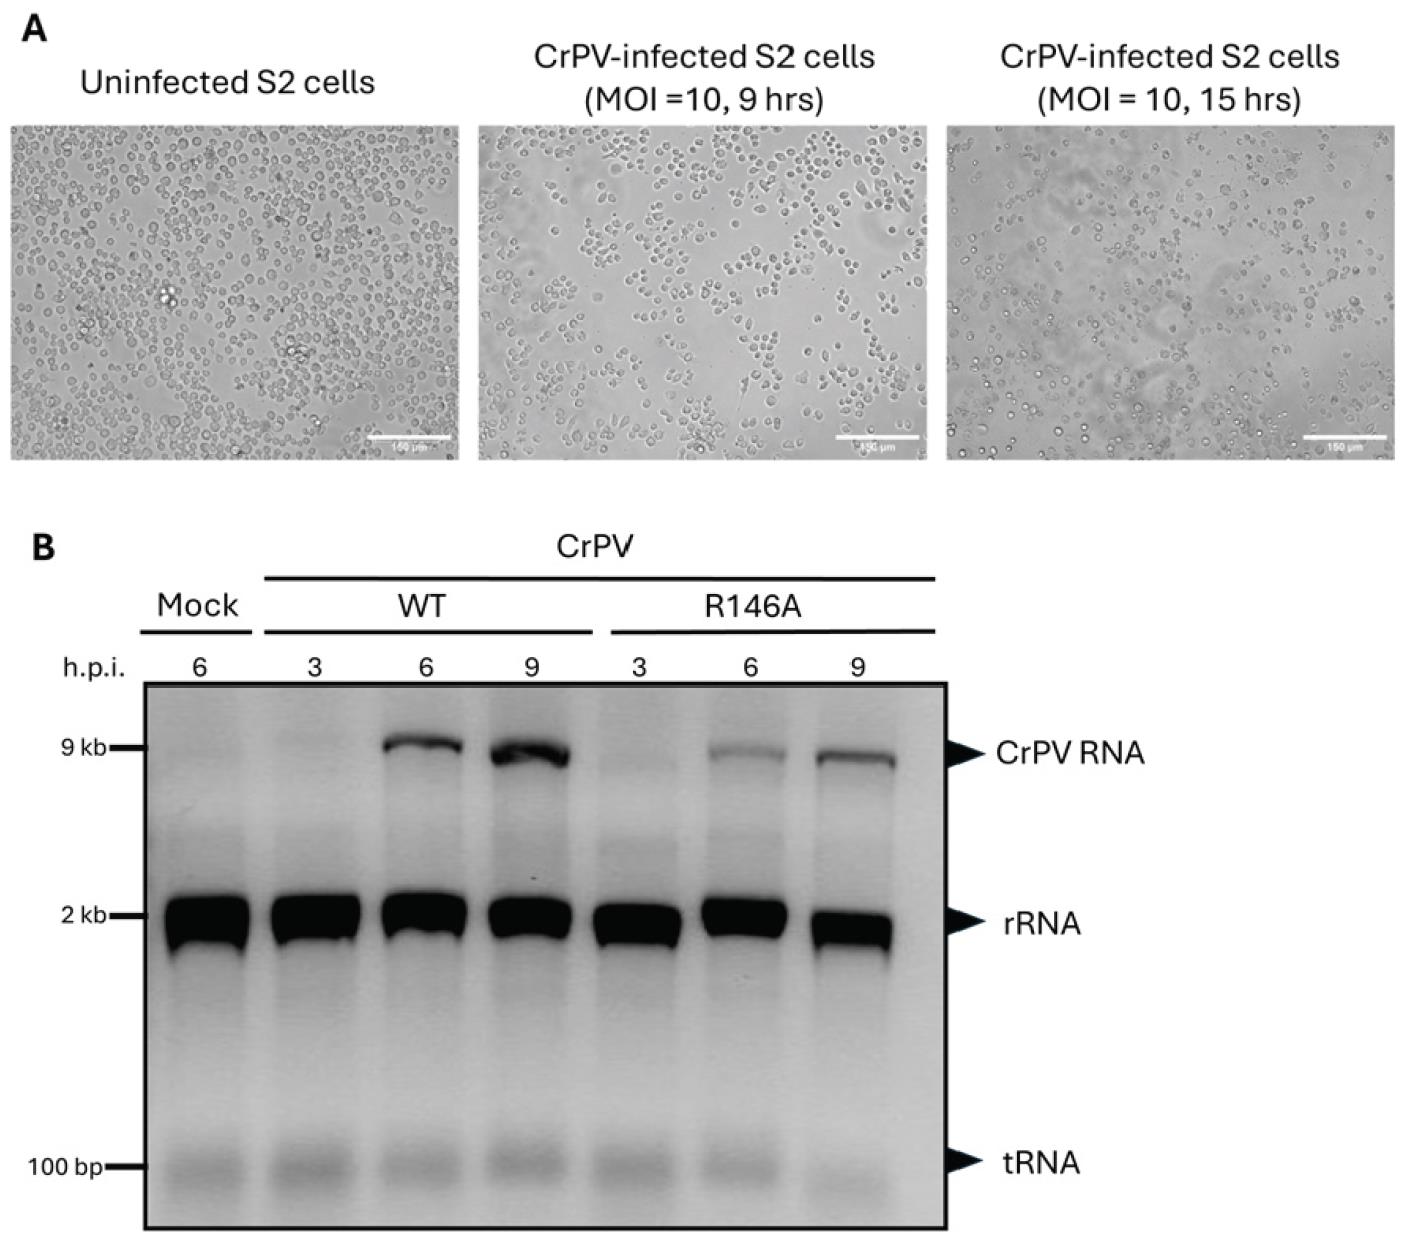
Figure 5. Infection and RNA analysis of cricket paralysis virus (CrPV)-infected and mutant CrPV-1A (R146A)-infected S2 cells. A. EVOS brightfield images of S2 cells showing the progression of CrPV infection, with scale bars set to 150 μm. Uninfected S2 cells are shown as a control. Cells infected with CrPV at a multiplicity of infection (MOI) of 10 for 9 h show early cytopathic effects, while cells infected for 15 h display more pronounced cell death and morphological changes due to viral infection. B. RNA gel electrophoresis of total RNA extracted from S2 cells infected with WT CrPV and CrPV 1A (R146A) mutant at MOI of 10, at different time points (3, 6, and 9 h post-infection, h.p.i.). The gel shows clear CrPV RNA bands in both WT CrPV and mutant CrPV (R146A)-infected cells, confirming active viral replication. The mock-infected sample serves as a negative control, showing only S2 ribosomal RNA (rRNA) and transfer RNA (tRNA) bands. The absence of viral RNA bands in the mock sample indicates no viral infection. The CrPV RNA bands demonstrate similar levels of viral replication in both WT CrPV and CrPV (R146A) mutants over time.
H5. Western blotting
1. In separate 50 mL Falcon tubes, prepare the resolving (12%) and stacking (4%) gel solutions.
2. Assemble the gel plates in the casting frame and ensure they are tightly sealed.
3. Place the frame vertically into the gel casting stand.
4. Mix the prepared resolving gel solution by adding APS and TEMED last to initiate polymerization.
5. Pour the resolving gel solution into the gap between the gel plates, leaving about 1.5 cm of space at the top for the stacking gel.
6. Gently overlay the gel with isopropanol to ensure a flat surface and prevent air bubbles.
7. Allow the gel to polymerize for 20–30 min at room temperature.
8. After the resolving gel has polymerized, carefully remove the isopropanol by tilting the gel plates and drying the surface with filter paper.
9. Mix the stacking gel solution by adding APS and TEMED last.
10. Pour the stacking gel on top of the polymerized resolving gel.
11. Insert the gel comb gently into the stacking gel to create wells.
12. Allow the stacking gel to polymerize at room temperature for 15–20 min.
13. Once the stacking gel has polymerized, carefully remove the comb by pulling it straight up.
14. Assemble the gel cassette and fill both the inner and outer chambers with 1× SDS running buffer.
15. Rinse the wells with the running buffer to remove any unpolymerized acrylamide.
16. The gel is now ready to load protein samples and perform electrophoresis.
17. Mix 10–20 μg of protein sample with protein loading dye and heat at 95 °C for 5 min to denature proteins.
18. Load the protein samples and a protein ladder into the wells of the gel.
19. Run the gel at 60 mA until the dye front reaches the bottom (approximately 50 min).
20. Once completed, remove the gel and wash with distilled water to remove the excess buffer.
21. Prepare 1× transfer buffer (with 15% methanol) and soak the PVDF membrane in methanol for 30 s before transferring to cold transfer buffer.
22. Assemble the transfer stack by the order of a sponge, two sheets of Whatman paper, gel (gently remove bubbles), PVDF membrane (gently remove bubbles), two sheets of Whatman paper, and a sponge.
23. Transfer proteins at 100 V for 1.5 h in the cold room.
24. After the transfer, block the membrane in 0.1% TBST with 5% milk for 1 h at room temperature to prevent non-specific binding.
25. Incubate the membrane with the primary antibody specific to CrPV-VP2 (1:500 dilution in 5% milk-TBST) or CrPV-1A (1:1,000 in 5% milk-TBST) or α-Tubulin (1:1,000 in 5% milk-TBST) for 1 h at room temperature or overnight at 4 °C.
26. Wash the membrane three times with 0.1% TBST for 10 min each.
27. Incubate the membrane with the secondary antibody (1:5,000 dilution in 5% milk-TBST) for 1 h.
28. Wash the membrane three times with 0.1% TBST for 5 min each.
29. Pour out the 0.1% TBST, dab the side of the membrane with a Kimwipe to draw off the remaining TBST, then lay flat back in the empty dish.
30. Add ECL (from the chemiluminescence kit) mix on the membrane. Move left-to-right, front-to-back a couple of times to spread it out. Let it sit for 3–4 min at room temperature.
31. Follow the manufacturer's protocol to detect proteins by enhanced chemiluminescence (Figure 6).
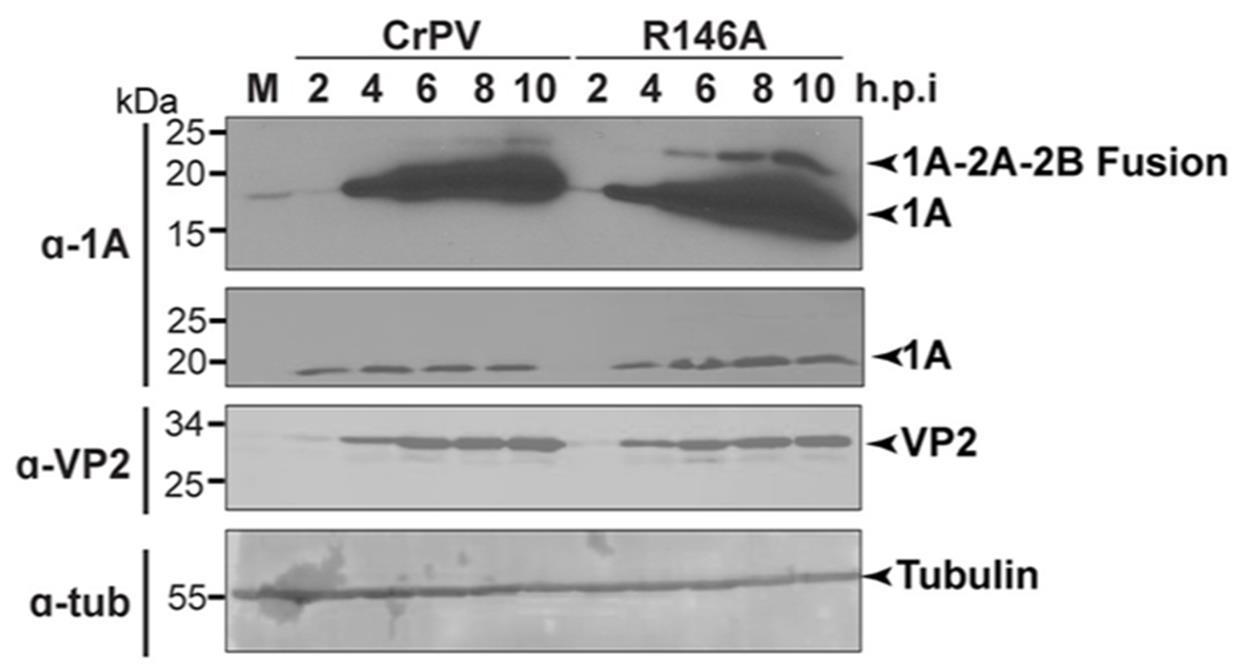
Figure 6. Immunoblots of S2 cell lysates infected with cricket paralysis virus (CrPV) and mutant CrPV (R146A). Western blot analysis of lysates from S2 cells infected with either mock (M), wildtype CrPV, or CrPV mutant (R146A) at a multiplicity of infection (MOI) of 10, collected at indicated time points. The detection of viral protein expression in the infected cell lysates confirmed that the propagated virus is infectious. This figure is adapted from Sadasivan et al. [5].
Validation of protocol
This protocol or parts of it has been used and validated in the following research article(s):
• Sadasivan et al. [5]. Targeting Nup358/RanBP2 by a viral protein disrupts stress granule formation. PLoS Pathogens.
• Warsaba et al. [17]. Multiple Viral Protein Genome-Linked Proteins Compensate for Viral Translation in a Positive-Sense Single-Stranded RNA Virus Infection. Journal of Virology.
• Kirby et al. [9]. The Hinge Region of the Israeli Acute Paralysis Virus Internal Ribosome Entry Site Directs Ribosomal Positioning, Translational Activity, and Virus Infection. Journal of Virology.
• Wang et al. [10]. Resurrection of a viral internal ribosome entry site from a 700-year-old ancient Northwest Territories Cripavirus. Viruses.
• Kerr et al. [11]. Transmission of Cricket paralysis virus via exosome-like vesicles during infection of Drosophila cells. Scientific Reports.
• Kerr et al. [12]. IRES-dependent ribosome repositioning directs translation of a +1 overlapping ORF that enhances viral infection. Nucleic Acids Research.
• Nayak et al. [13]. A viral protein restricts Drosophila RNAi immunity by regulating argonaute activity and stability. Cell Host & Microbe.
• Au et al. [14]. Functional insights into the adjacent stem-loop in honey bee dicistroviruses that promotes IRES-mediated translation and viral infection. Journal of Virology.
• Khong et al. [4]. Disruption of stress granule formation by the multifunctional cricket paralysis virus 1A protein. Journal of Virology.
• Kerr et al. [15]. Molecular analysis of the factorless internal ribosome entry site in Cricket Paralysis virus infection. Scientific Reports.
• Khong et al. [16]. Temporal regulation of distinct internal ribosome entry sites of the dicistrovirus cricket paralysis virus. Viruses.
• Kerr et al. [3]. The 5' untranslated region of a novel infectious molecular clone of the dicistrovirus cricket paralysis virus modulates infection. Journal of Virology.
General notes and troubleshooting
1. Work with cricket paralysis virus (CrPV) in our lab is performed under Biosafety Level 2 (BSL-2) conditions, as CrPV is not pathogenic to humans. However, safety regulations may vary among countries and institutions. Researchers intending to work with this virus should consult their local biosafety office to determine the appropriate safety requirements before starting any experiments.
2. For S2 cell maintenance, avoid splitting cells below a density of 0.5 × 10 cells/mL, as under-confluent cells may take an extended time to recover or fail to recover entirely. Passaging cells regularly (every 2–4 days) maintains them in the logarithmic growth phase and ensures a doubling time of approximately 24 h.
3. To increase the yield during CrPV cDNA plasmid extraction using the NEB Miniprep Kit, preheat the elution buffer to 50 °C before use.
4. To acquire fluorescence images using the CellInsight CX5 HCS platform, general instructions are available through Thermo Fisher Scientific support or built-in help features within the HCS Navigator software. Additionally, instructions can be found on the Thermo Fisher Scientific website:
We are using the 2015 version of the system, which is no longer available for installation. Therefore, we recommend that users refer to online resources or contact the manufacturer for the most up-to-date instructions and support.
5. If immunofluorescence images of mock-infected CX5 samples show high background noise in the CrPV-VP2 channel, ensure that S2 cells are at approximately 70%–80% confluency before infection. If the issue persists, perform additional wash steps using PBS buffer after antibody incubation, and carefully pipette from the side of the wells in the 96-well plate to avoid disturbing the cell monolayer.
Acknowledgments
This study was supported by the Canadian Institutes of Health Research (PJT-178342 to E.J.), the National Sciences and Engineering Research Council of Canada (RGPIN-2023-03658 to E.J.) and the SERB-UBC PhD award to J.S.
We acknowledge the authors of the previously published work from which Figure 2 is adapted, Warsaba et al. [2], and the authors of the previously published work from which Figure 7 is adapted, Sadasivan et al. [5].
Competing interests
Dr. Jibin Sadasivan is an Associate Editor for Bio-protocol but did not participate in the editorial and peer review process of this article, except as an author. The authors declare no other conflict of interest.
References
- Bonning, B. C. and Miller, W. A. (2010). Dicistroviruses. Annu Rev Entomol. 55(1): 129–150.
- Warsaba, R., Sadasivan, J. and Jan, E. (2020). Dicistrovirus-Host Molecular Interactions. Curr Issues Mol Biol. 34: 83–112.
- Kerr, C. H., Wang, Q. S., Keatings, K., Khong, A., Allan, D., Yip, C. K., Foster, L. J. and Jan, E. (2015). The 5′ Untranslated Region of a Novel Infectious Molecular Clone of the Dicistrovirus Cricket Paralysis Virus Modulates Infection. J Virol. 89(11): 5919–5934.
- Khong, A., Kerr, C. H., Yeung, C. H. L., Keatings, K., Nayak, A., Allan, D. W. and Jan, E. (2017). Disruption of Stress Granule Formation by the Multifunctional Cricket Paralysis Virus 1A Protein. J Virol. 91(5): e01779–16.
- Sadasivan, J., Vlok, M., Wang, X., Nayak, A., Andino, R. and Jan, E. (2022). Targeting Nup358/RanBP2 by a viral protein disrupts stress granule formation. PLoS Pathog. 18(12): e1010598.
- Sadasivan, J., Hyrina, A., DaSilva, R. and Jan, E. (2023). An Insect Viral Protein Disrupts Stress Granule Formation in Mammalian Cells. J Mol Biol. 435(16): 168042.
- Nonis, S. G., Haywood, J., Schmidberger, J. W., Mackie, E. R. R., Soares da Costa, T. P., Bond, C. S. and Mylne, J. S. (2021). Structural and biochemical analyses of concanavalin A circular permutation by jack bean asparaginyl endopeptidase. Plant Cell. 33(8): 2794–2811.
- Garrey, J. L., Lee, Y. Y., Au, H. H. T., Bushell, M. and Jan, E. (2010). Host and Viral Translational Mechanisms during Cricket Paralysis Virus Infection. J Virol. 84(2): 1124–1138.
- Kirby, M. P., Stevenson, C., Worrall, L. J., Chen, Y., Young, C., Youm, J., Strynadka, N. C. J., Allan, D. W. and Jan, E. (2022). The Hinge Region of the Israeli Acute Paralysis Virus Internal Ribosome Entry Site Directs Ribosomal Positioning, Translational Activity, and Virus Infection. J Virol. 96(5): e01330–21.
- Wang, X. and Jan, E. (2021). Resurrection of a viral internal ribosome entry site from a 700-year-old ancient Northwest Territories cripavirus. Viruses. e428736.
- Kerr, C. H., Dalwadi, U., Scott, N. E., Yip, C. K., Foster, L. J. and Jan, E. (2018). Transmission of Cricket paralysis virus via exosome-like vesicles during infection of Drosophila cells. Sci Rep. 8(1): 17353.
- Kerr, C. H., Wang, Q. S., Moon, K. M., Keatings, K., Allan, D. W., Foster, L. J. and Jan, E. (2018). IRES-dependent ribosome repositioning directs translation of a +1 overlapping ORF that enhances viral infection. Nucleic Acids Res. 46(22): 11952–11967.
- Nayak et al. (2018). A Viral Protein Restricts Drosophila RNAi Immunity by Regulating Argonaute Activity and Stability. Cell Host Microbe. 24(4): 542–557.e9.
- Au, H. H. T., Elspass, V. M. and Jan, E. (2018). Functional Insights into the Adjacent Stem-Loop in Honey Bee Dicistroviruses That Promotes Internal Ribosome Entry Site-Mediated Translation and Viral Infection. J Virol. 92(2): e01725–17.
- Kerr, C. H., Ma, Z. W., Jang, C. J., Thompson, S. R. and Jan, E. (2016). Molecular analysis of the factorless internal ribosome entry site in Cricket Paralysis virus infection. Sci Rep. 6(1): e1038/srep37319.
- Khong, A., Bonderoff, J., Spriggs, R., Tammpere, E., Kerr, C., Jackson, T., Willis, A. and Jan, E. (2016). Temporal Regulation of Distinct Internal Ribosome Entry Sites of the Dicistroviridae Cricket Paralysis Virus. Viruses. 8(1): 25.
- Warsaba, R., Stoynov, N., Moon, K. M., Flibotte, S., Foster, L. and Jan, E. (2022). Multiple Viral Protein Genome-Linked Proteins Compensate for Viral Translation in a Positive-Sense Single-Stranded RNA Virus Infection. J Virol. 96(17): e00699–22.
Article Information
Publication history
Received: Nov 1, 2024
Accepted: Jan 8, 2025
Available online: Jan 22, 2025
Published: Feb 20, 2025
Copyright
© 2025 The Author(s); This is an open access article under the CC BY-NC license (https://creativecommons.org/licenses/by-nc/4.0/).
How to cite
Shen, J., Sadasivan, J. and Jan, E. (2025). Generation, Propagation, and Titering of Dicistrovirus From an Infectious Clone. Bio-protocol 15(4): e5216. DOI: 10.21769/BioProtoc.5216.
Category
Microbiology > Microbe-host interactions > Virus
Biochemistry > Virus > Isolation and purification
Microbiology > Microbial cell biology > Virus propagation
Do you have any questions about this protocol?
Post your question to gather feedback from the community. We will also invite the authors of this article to respond.