- Protocols

- Articles and Issues
- For Authors
- About
- Become a Reviewer

Preparing Chamber Slides With Pressed Collagen for Live Imaging Monolayers of Primary Human Intestinal Stem Cells
Published: Vol 14, Iss 22, Nov 20, 2024 DOI: 10.21769/BioProtoc.5116 Views: 2065
Reviewed by: Laxmi Narayan MishraSarah ShortAnu Thomas
Original research article
The authors used this protocol in:

Jul 2024
Advertisement


Protocol Collections
Comprehensive collections of detailed, peer-reviewed protocols focusing on specific topics


Abstract
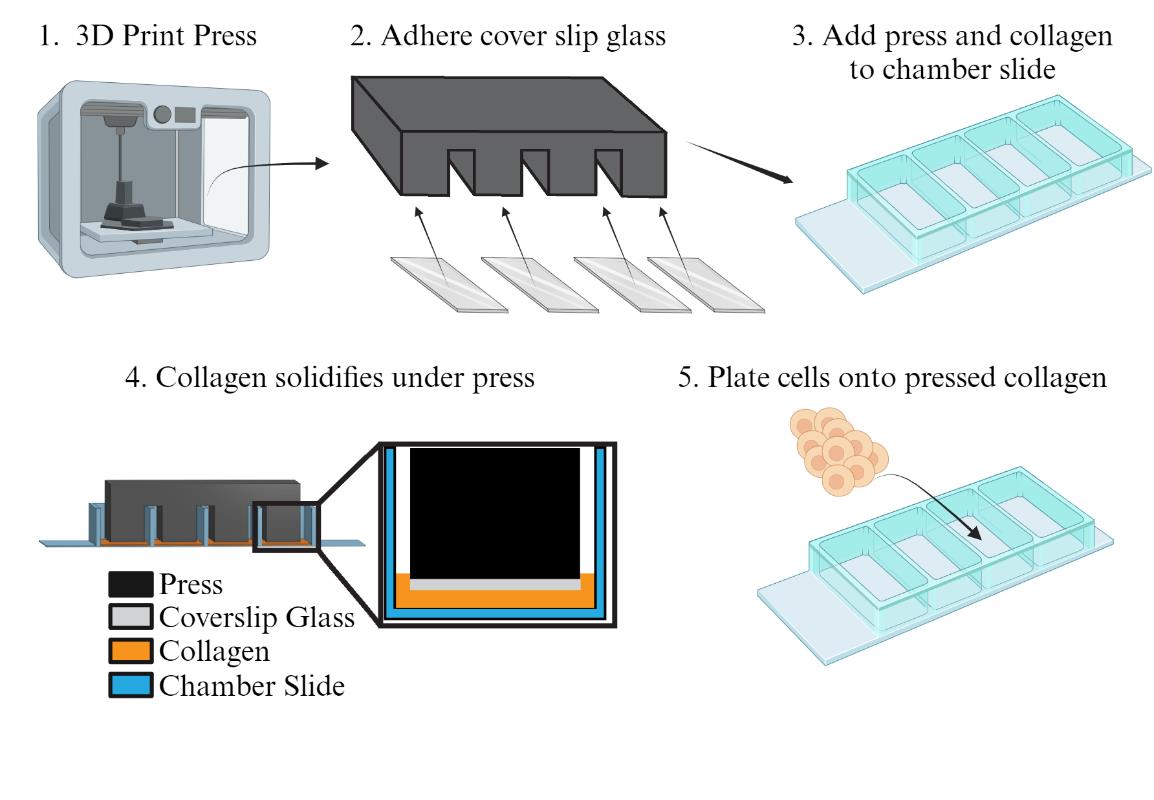
Primary human intestinal stem cells (ISCs) can be cultured and passaged indefinitely as two-dimensional monolayers grown on soft collagen. Culturing ISCs as monolayers enables easy access to the luminal side for chemical treatments and provides a simpler topology for high-resolution imaging compared to cells cultured as three-dimensional organoids. However, the soft collagen required to support primary ISC growth can pose a challenge for live imaging with an inverted microscope, as the collagen creates a steep meniscus when poured into wells. This may lead to uneven growth toward the center of the well, with cells at the edges often extending beyond the working distance of confocal microscopes. We have engineered a 3D-printed collagen mold that enables the preparation of chamber slides with flat, smooth, and reproducible thin collagen layers. These layers are adequate to support ISC growth while being thin enough to optimize live imaging with an inverted microscope. We present methods for constructing the collagen press, preparing chamber slides with pressed collagen, and plating primary human ISCs for growth and analysis.
Key features
• This protocol describes how to construct and use collagen presses for chamber slides, as demonstrated in Cotton et al. [1].
• The soft collagen and culture media presented are optimized for primary human intestinal stem cells.
• The full protocol, including 3D printing, preparing collagen-coated chamber slides, and plating cells can be completed in under one week.
• This protocol requires access to a 3D printer.
Keywords: Collagen pressGraphical overview
Preparing the collagen press and chamber slide for culturing human intestinal stem cells
Background
The intestinal epithelium is a dynamic tissue with differentiated cell types arising from a common crypt base columnar intestinal stem cell (ISC) [2]. Cells of the intestinal epithelium serve many roles, including absorbing nutrients, secreting mucus and hormones, providing a selectively permeable barrier between the body and luminal contents, and managing the microbiota. While much knowledge has been gleaned about the mammalian intestine using model organisms such as rodents, differences between the human intestine and those of model organisms are becoming increasingly known [3,4]. This makes it important to design systems for studying primary human intestinal cells. A common strategy for studying the human intestinal epithelium is to culture ISCs in a soft matrix and allow growth into 3-dimensional organoids (also referred to as enteroids) [5]. Organoids can be derived from primary crypts from donor epithelia [6] or via induced differentiation of pluripotent stem cells [7]. While organoids have greatly advanced our ability to study the human intestinal epithelium, they have limitations, such as an enclosed luminal compartment that is difficult to access and imaging challenges, as the cells grow in a spherical shape rather than in a flat plane. In 2017, a novel method for cultivating human small intestinal [8] or colon ISCs [9] as a self-replicating monolayer was introduced. We showed that primary cells grown on a soft collagen substrate (~9 kPa) in a growth medium rich in stem cell factors could be continuously propagated and passaged indefinitely [8]. Our recent work analyzes single-cell transcriptomic data to demonstrate that these growing monolayers largely consist of proliferating stem and progenitor cells, with minimal differentiated cells present [1]. Our optimized method for genetically modifying these primary human ISCs [10] to incorporate fluorescent reporter genes has enabled high-resolution analysis of various cell functions, including stemness [10], tight junctions [11], and the cell cycle [1]. However, we found that the thick collagen needed for maintaining primary ISC proliferation and stemness can also negatively affect high-resolution live imaging by adding distance between the growing cells and the microscope objective. When we used less collagen in a chamber slide to address this issue, we observed that the formation of a collagen meniscus at the edges of the chamber slides (Figure 1A) made consistent and clear imaging unfeasible. Cells in the thin central region of the well mostly exited the cell cycle and exhibited phenotypes indicative of auto-differentiation, while those in the thicker areas near the well walls proliferated but often risked growing beyond the working distance of our microscope (Figure 1B) [1]. To resolve this issue, we designed a collagen press that creates a flat, smooth collagen layer with a controlled and uniform thickness (Figure 1C). This innovation led to significantly more consistent cell growth and maintenance of stemness (Figure 1D). In this protocol, we describe how to design and construct collagen presses, how to pour reproducibly coated chamber slides, and how to culture and image primary human ISCs.
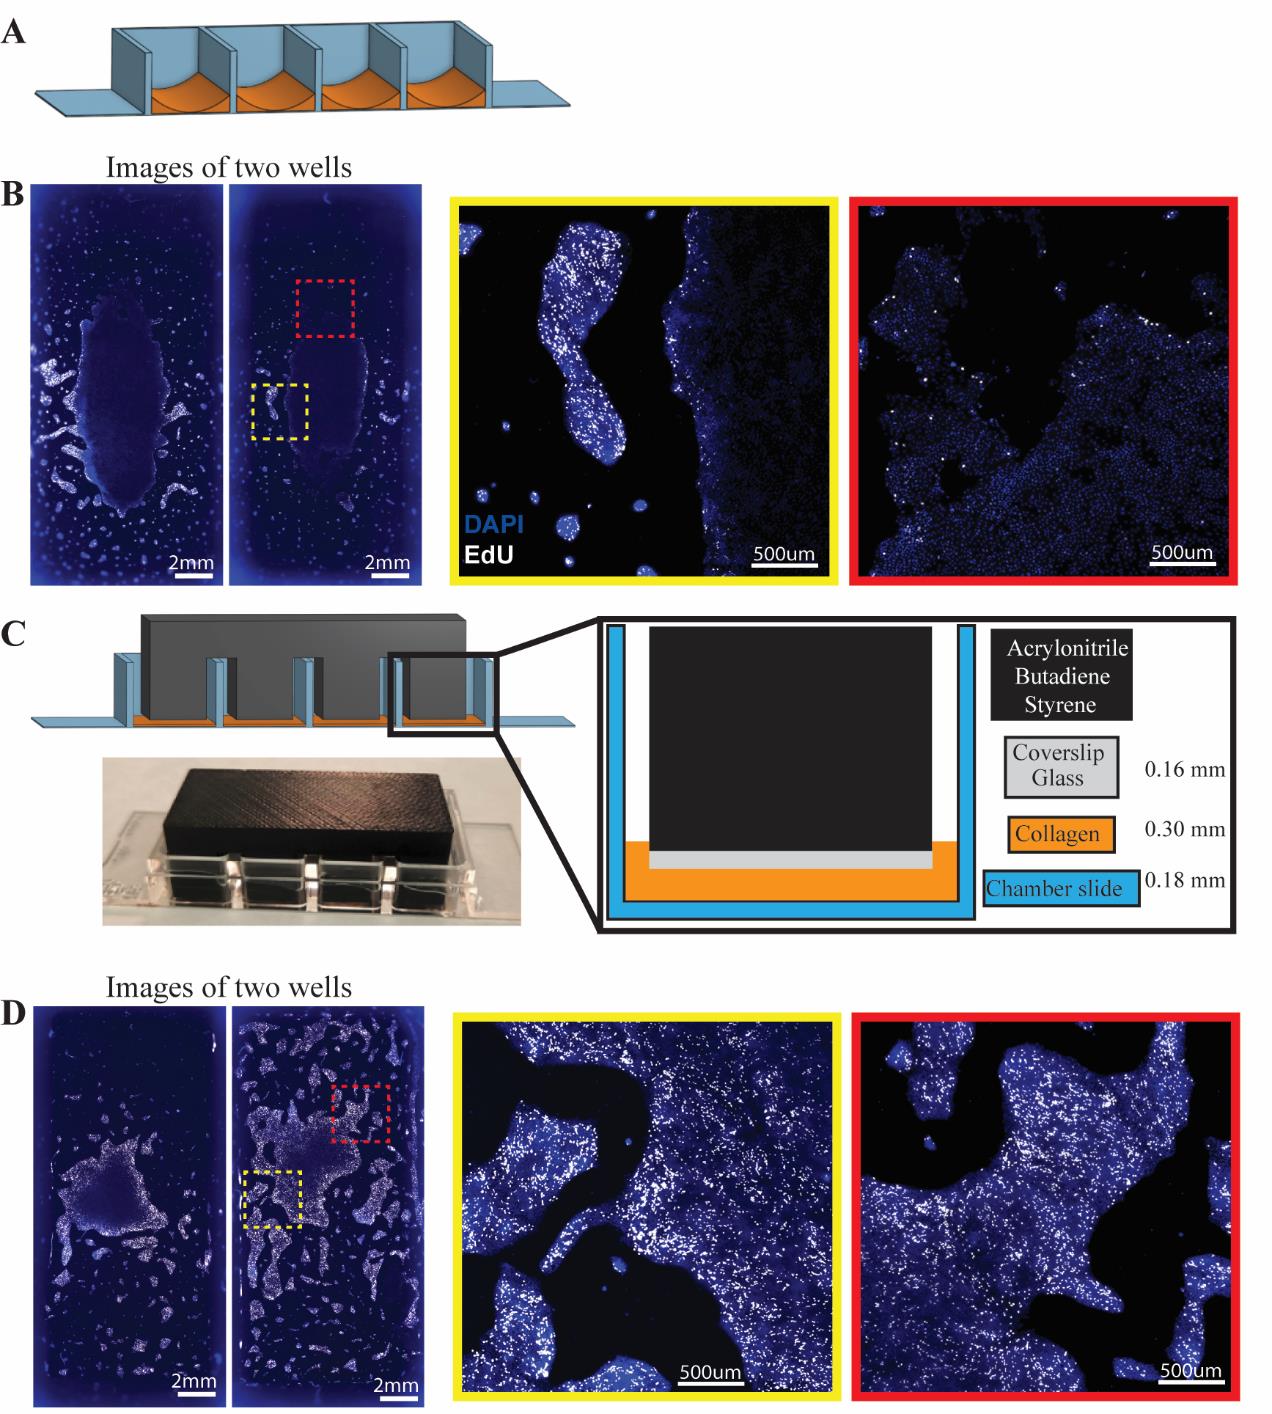
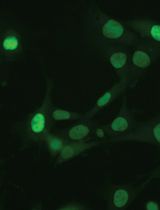
Figure 1. Effect of the collagen press on cell growth in chamber slide. A) Model of meniscus formation following freely poured collagen (orange) setting in chamber slides. B) Immunofluorescence of nuclei (DAPI, blue) and proliferation (EdU uptake, white) in two separate wells of intestinal stem cells (ISCs) in chamber slides poured with no press. Insets show differences in proliferative capacity and cellular spacing across areas of the same chamber well after three days of culture. C) Model for 3D-printed collagen press designed to sit across chamber slide walls and reach into wells to prevent meniscus formation. Coverslip glass glued to the leg bottoms forms a smooth surface. Photograph of a collagen press on a chamber slide. D) Immunofluorescence of nuclei (DAPI, blue) and proliferation (EdU uptake, white) in ISCs grown in two separate wells of a chamber slide using the 3D-printed collagen press. Insets indicate uniform proliferation across colonies. Adapted from Cotton et al. Scientific Reports [1]. © The Authors, some rights reserved; exclusive licensee, Springer Nature. Distributed under a Creative Commons Attribution NonCommercial License 4.0 (CC BY-NC) http://creativecommons.org/licenses/by-nc/4.0/.
Materials and reagents
Biological materials
LWRN Cells (ATCC, catalog number: CRL-3276)
Reagents
N-acetylcholine (NAC) (Sigma-Aldrich, catalog number: A9165)
Dulbecco's phosphate-buffered saline (dPBS) (Gibco, catalog number: 14190-144)
Na2HPO4 (Sigma, catalog number: S7907)
KH2PO4 (Sigma, catalog number: P5655)
NaCl (Sigma, catalog number: S5886)
KCl (Sigma, catalog number: P5405)
Sucrose (Fisher BP, catalog number: 220-1)
D-sorbitol (Fisher BP, catalog number: 439-500)
Y27632 (Selleck Chemical, catalog number: S6390)
DPBS (10×) (Gibco, catalog number: 14200-075)
Sodium bicarbonate (7.5%) (Gibco, catalog number: 25080-094)
Ethylenediaminetetraacetic acid (EDTA) (Corning, catalog number: 46-034-Cl)
Dithiothreitol (DTT) (Fisher Scientific BP, catalog number: 172-5)
Protease VIII (Sigma, catalog number: P5380)
Advanced DMEM/F12 (Gibco, catalog number: 12634-010)
Bovine serum albumin (Fisher Scientific, catalog number: BP1600-1)
Fetal bovine serum tetracycline negative (Gemini, catalog number: 100-800)
Primocin (InvivoGen, catalog number: ant-pm-05)
Gentamycin (Sigma-Aldrich, catalog number: G1914)
Amphotericin B (Sigma-Aldrich, catalog number: A2942)
Collagenase IV (Thermo Fisher, catalog number: LS004189)
TrypLE Express (Gibco, catalog number: 12605-010)
GlutaMAX (Thermo Fisher, catalog number: 35050061)
HEPES (Corning, catalog number: 25-060-CI)
Primocin (InvivoGen, VWR, catalog number: mspp-ant-pm2)
Pen/Strep (Thermo Fisher, catalog number: 15070063)
N-acetylcysteine (Sigma-Aldrich, catalog number: A9165)
EGF, murine (PeproTech, catalog number: 315-09)
Nicotinamide (Sigma-Aldrich, catalog number: N0636)
B27 supplement (Thermo Fisher, catalog number: 12587001)
Gastrin (Sigma-Aldrich, catalog number: G9145)
Prostaglandin E2 (PeproTech, catalog number: 3632464)
A 83-01 (Sigma-Aldrich, catalog number: SML0788)
SB202190 (PeproTech, catalog number: 1523072)
5-ethynyl-2'-deoxyuridine (EdU) (Molecular Probes, catalog number: C10634)
CuSO4 (Fisher Scientific, catalog number: S25286)
Sulfo-CY5-Azide (Lumiprobe, catalog number: A3330)
Ascorbic acid (Fisher Scientific, catalog number: AC352681000)
Cultrex rat collagen I (R&D Systems, catalog number: 3443-100-01)
Paraformaldehyde (Acros Organics, catalog number: 41678-0010)
DAPI (Invitrogen, catalog number: D3571)
NaOH (Thermo Fisher, catalog number: 12426)
NaHCO3 (Sigma-Aldrich, catalog number: S6014)
DPBS, 10× (Gibco, catalog number: 14200075)
Triton X-100 (MP Biomedicals, catalog number 02194854-CF)
Solutions
Collagen solution (see Recipes)
Neutralization buffer (see Recipes)
Small intestine (SI) maintenance media (see Recipes)
4% paraformaldehyde fixative (See Recipes)
EdU reaction buffer (see Recipes)
Sulfo-Cyanine5-azide (see Recipes)
Permeabilization solution (see Recipes)
EdU staining solution (see Recipes)
DAPI solution (see Recipes)
Recipes
Collagen solution
Note: Neutralization buffer can be made in advance and stored at 4 °C for up to one month.
Reagent Final concentration Volume for 12 mL total Rat collagen I (3 mg/mL) 1 mg/mL 4 mL Neutralization buffer (Recipe 2) - 8 mL Neutralization buffer
Note: NaOH is added to neutralize the acetic acid in the Collagen I solution. The values here are for using Cultrex rat collagen supplied at 3 mg/mL in 20 mM acetic acid. The amount of NaOH will vary if collagen stocks with other concentrations are used. NaOH should be used at a 1.15 molar equivalent to the acetic acid added with the collagen.
Reagent Final concentration Volume for 8 mL total 10× dPBS 1× 1.2 mL HEPES (1 M) 0.02 M 0.24 mL NaHCO3 (7.5%) 0.45% w/v 0.72 mL NaOH (1 N) see note 0.092 mL DI water 50% total volume 6 mL Small intestine (SI) maintenance media
Note: All reagents, except the conditioned media and mEGF, can be mixed together separately to make a “Basal Media” that can be kept at 4 °C for up to one month. Then, to make SI maintenance media, use basal media and conditioned media at a 1:1 ratio, with mEGF added at 1:20,000.
*Note: The protocol for preparing L-WRN conditioned media has been described previously [12,13]
Reagent Final concentration Volume for 50 mL total L-WRN conditioned media* 50% 25 mL Adv DMEM/F12 - 22.5 mL B-27 (without Vit A) 1× 1 mL Nicotinamide (1 M) 10 mM 0.5 mL HEPES (1 M) 10 mM 0.5 mL GlutaMAX (100×) 0.5× 0.25 mL Pen/Strep (100×) 0.5× 0.25 mL N-acetyl cysteine (NAC, 0.5 M) 1.25 mM 0.125 mL Primocin (50 mg/mL) 50 µg/mL 0.05 mL SB202190 (30 mM) 3 µM 5 µL Gastrin I, human (100 μM) 10 nM 5 µL Prostaglandin E2 (PGE2, 1 mM) 10 nM 0.05 µL Murine EGF (1 mg/mL) 50 ng/mL 2.5 µL 4% paraformaldehyde fixative
Note: Add paraformaldehyde powder to 800 mL of PBS, start a stir bar spinning, then warm to just below 70 °C. Once all solids have dissolved, turn off the heat, allow to cool, filter the solution, and then bring to 1 L with PBS.
The final product can be stored at -20 °C indefinitely; the thawed solution should be used within two weeks.
Reagent Final concentration Volume for 1 L total Paraformaldehyde 4% 40 g PBS - To 1 L EdU reaction buffer
Note: Can be stored at 4 °C indefinitely.
Reagent Final concentration Volume for 38 mL total 10× dPBS 2.6× 10 mL DI water - 28 mL Sulfo-Cyanine5-azide (0.8 mM)
Note: Can be stored at -20°C indefinitely.
Reagent Final concentration Volume Sulfo-Cyanine5-azide 0.8 mM 1 mg DI water - 1.318 mL Permeabilization solution
Note: Can be stored at 4°C indefinitely.
Reagent Final concentration Volume Triton-X100 0.5% 1 mL DI water - 200 mL EdU staining solution
Reagent Final concentration Volume for 1 mL total EdU reaction buffer (2.63× PBS) 2× 760 µL CuSO4 (100 mM) 0.02 M 40 µL Sulfo-Cyanine5-azide (0.8 mM) 0.45% w/v 2.5 µL L-ascorbic acid (1 M) 0.2 M 200 µL DAPI solution
Note: 5 mg/mL DAPI can be stored at -20 °C indefinitely. Avoid repeated freeze/thaws. Make the final product fresh on the day of use.
Reagent Final concentration Volume for 38 mL total DAPI (5 mg/mL in DI water) 5 µM 1 µL PBS - 10 mL
Laboratory supplies
Chlorinated polyethylene
Cover glass thickness 1, 18 × 18 mm (Corning, catalog number: 2845-18)
Glass glue (Loctite)
15 mL conical tube (Corning, catalog number: CLS430790)
Costar Stripette, 5 mL (Corning, catalog number: 4487)
µ-Slide 4 Well ibiTreat chamber slides (Ibidi, catalog number: 80426)
Rain-X glass water repellent (Rain-X, catalog number: 800002250)
Equipment
Ultimaker S3 3D printer (Ultimaker)
Engraving pen (Millipore Sigma, catalog number: Z225568)
Incubator set to 37 °C and 5% CO2
Water bath set to 37 °C
Clinical centrifuge capable of spinning 15 mL conical tubes at least 800× g
Confocal microscope with environmental chamber
For fluorescence live imaging of PIP-H2A cell cycle reporter lines [1], we used an Andor Dragonfly spinning disk confocal microscope mounted on a Leica DMi8 microscope stand, using a Leica HC PL APO 20×/0.75 LWD air objective with pinhole size set to 40 μm. Light was collected with a 593/43 Semrock emission filter using a HC Fluotar L 25×/0.95 W 0.17 VISIR objective or a 514 nm laser was used for excitation using a 538/20 Semrock emission filter.
Procedure
Construct the collagen presses
3D-print the bodies of the collagen press using chlorinated polyethylene, following the specifications shown in Figure 2 or the design file included as File S1 (see General note 1).
Only µ-Slide 4-well ibiTreat chamber slides have been used for this protocol. If slides are used with different dimensions, the dimensions of the collagen press may need to be altered accordingly.
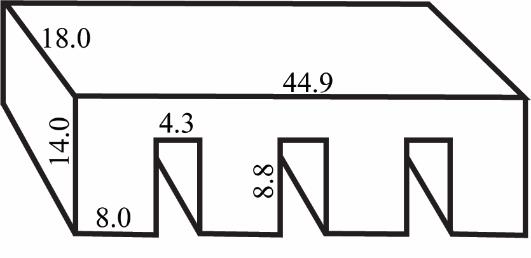
Figure 2. Collagen press specifications. Side lengths (in mm) shown for 3D-printing a collagen press designed to press collagen to a thickness of 0.3 mm in an Ibidi µ-slide 4-well ibiTreat chamber slide.Prepare coverslip glass covers for each leg of the press.
Use a diamond-tipped engraving pen to cut 18 × 18 mm square coverslips to fit the downward face of each leg of the collagen press (see Video 1).
i. Working on a clean surface, overlay a leg of the collagen press onto the coverslip, aligning three of the sides.
ii. Use a fine-tipped marker to trace immediately outside the leg onto the glass. Remove the collagen press.
iii. Lay a flat, straight edge onto the coverslip and use a diamond-tipped engraving pen to cut just inside (on the side where the leg was) of the marked line. Pass the engraving pen along the full line with very light pressure and then again with slightly heavier pressure until the glass snaps off. No marker should remain on the final piece and the resulting edge should be straight.
iv. Discard any pieces that break in any way other than the intended straight line.
v. Check that the cut piece fits entirely within the base of the collagen press leg, with no glass protruding beyond the edges of the press leg.
 Video 1. Cutting coverslips to cover the legs of the collagen press. Demonstration of step A2a showing how to use the collagen press to mark where to cut on the coverslip and then how to use a diamond-tipped engraving pen with a straight edge to cut a flat edge.
Glue the trimmed coverslips onto the legs of the collagen press using Glass Glue (Locktite).
i. Carefully align the edges of coverslips exactly with the sides of the press. Glass protruding beyond the wall of the press leg often disrupts the collagen when removing the press in the next step.
ii. Allow to air dry for 1 h at room temperature.
Make collagen presses hydrophobic.
Coat the collagen press with Rain-X glass treatment, following the manufacturer’s instructions. Only coat the coverslip glass adhered to the bottoms of the legs and the sides of the legs; the top of the press that rests on the chamber walls does not need to be coated.
Wipe the press (with attached glass coverslips) clean before starting. Apply Rain-X onto a small dry cloth. Wipe onto the press using small circular motions, taking care to contact all sides of the legs. Allow to dry. Repeat. Allow to dry. Clean the final product with a gentle spray of water, then dry with a paper towel.
Prepare collagen-coated chamber slides
Sterilize collagen presses.
Do not autoclave collagen presses as this can cause them to warp.
On the day of use, spray collagen presses generously with 70% ethanol. Then, set in a laminar flow hood under ultraviolet light for 1 h, turning 90° every 15 min.
Keep collagen presses in the laminar flow hood until use. No pre-warming is necessary.
Prepare collagen solutions on ice.
Prepared neutralization buffer can be stored in a sealed container at 4 °C for over a month without an obvious effect on collagen quality.
Add the desired amount of neutralization buffer to a 15 mL conical tube. Store neutralization buffer and the bottle of rat collagen I on ice for 10 min to allow everything to become ice cold. Per well, 250 µL of final neutralized collagen solution is needed, resulting in 1 mL of collagen per full chamber slide. As the collagen solution is viscous, we regularly prepare ~20% more solution than needed to avoid running out before the last chamber.
Add collagen to the neutralization buffer.
i. For 3 mg/mL collagen stock, use neutralization buffer and collagen at a 2:1 ratio to reach a final concentration of 1 mg/mL collagen.
For example, if pouring four chamber slides, prepare 5 mL of total solution (1.66 mL of collagen + 3.33 mL of neutralization buffer) to have 1 mL per slide with 20% excess.
ii. The collagen solution is viscous; use a 5 mL stripette and pipette up/down multiple times in the tube of neutralization buffer to wash out all collagen from the stripette.
iii. Cap the tube tightly and gently invert 10 times. Return the tube to ice and use as quickly as possible.
We recommend using the neutralized collagen solution within 10 min post-mixing.
Add collagen and press to the chamber slide.
Open µ-slide 4-well ibiTreat chamber slides inside of a clean laminar flow hood. Place the chamber slide on the floor of the hood and remove the cover.
Add collagen to each well.
i. Mix tube of final collagen solution (pre-chilled solutions) and then store on ice. Add 250 µL of collagen solution to each well. Use a pipette tip and/or tilting and tapping the slide to cover the whole bottom of all four wells with collagen solution with no dry spots (Video 2).
ii. Once no dry spots remain, gently lower the collagen press onto the inner walls of the chamber slide (as shown in Figure 1C). Adjust so the legs are freely floating into the middle of the wells and not pressing against any of the walls of the wells.
iii. Transfer the chamber slide and collagen press to a 37 °C incubator for 90 min.
iv. Work quickly; prepare only 1–2 chamber slides side-by-side before transferring to the incubator.
We recommend moving plates to the incubator within 2 min after adding liquid collagen.
Video 2. Pouring collagen with the press. Demonstration of step B3b showing how to add collagen to each chamber of the slide, tap to remove any bubbles and cover the full base of each chamber, then place the collagen press on top so it is not pressing against any wall of the chamber.
Remove the collagen press and store the finished collagen-coated chamber slide.
Remove the collagen press.
i. After 90 min incubation at 37 °C, remove the chamber slide and collagen press from the incubator and transfer back into the laminar flow hood.
ii. Carefully remove the press following the technique shown in Video 3.
a). With the slide turned perpendicular to your field of vision, carefully tilt the collagen press toward you, then lift up and out of the well.
b). Watch for any wells that show any movement of collagen. If any part of the final patty is pulled up by the collagen press, such as being stuck on a glass overhang (see note in step A2b), mark the outside of the well with a marker and refrain from using that well.
Video 3. Removing collagen press. Demonstration of step B4a showing how to carefully remove the press, check for any large bubbles or gaps in the coverage, and then add PBS for storage of the coated slide. The small bubbles seen following the removal of the press are normal and not expected to have any downstream impact.iii. Once the press is removed, visually inspect all wells for full collagen coating.
a). Tiny bubbles trapped around the collagen base are normal and have not been seen to affect cell growth.
b). Watch for wells with large bubbles, dry spots, or any areas where the collagen is visibly pulled off or folding over. Mark the outside of these wells with a marker and refrain from using them.
Add 700 µL of room-temperature, sterile dPBS to each chamber. Pipette the dPBS gently to avoid disrupting the collagen coating. Cover each chamber slide tightly with the supplied covers.
Store collagen-coated chamber slides in a sealed zip-top bag at room temperature and protected from light until use.
Note: Collagen-coated plates have been used up to 6 months post-coating with no apparent effect on cell growth as long as they are protected from evaporation.
Seeding cells
Prepare primary human ISCs for seeding.
Primary human ISC monolayers should be expanded on thick collagen patties, as previously described [8,9]. Cells are grown in SI maintenance media as described in a recent protocol paper [14]. One day prior to passaging, add Y-27632 to the media at a final concentration of 10 µM.
Grow cells at least two days prior to passaging; 3–6 days is generally desired. Weaker growth has been noted for cells passaged after only one day or beyond 7 days.
Passage cells onto chamber slides.
Use a pipette to transfer the collagen patty and 1 mL of culture medium to a conical tube. Add 150 µL of 5,000 U/mL collagenase IV. Cap and incubate in a 37 °C water bath for ~25 min, swirling occasionally, until all collagen is dissolved and cells fall to the bottom of the tube.
i. During this incubation, wash the collagen-coated chamber slide by incubating three times for 5 min each with 700 µL of dPBS at room temperature. No shaking is necessary.
ii. Be careful not to touch the collagen with the pipette/aspirator tip when removing the dPBS as it can easily be pulled off of the chamber slide.
Centrifuge at 800 RCF for 2 min.
Aspirate out the media and wash pellet with 3 mL of sterile dPBS.
Centrifuge at 800 RCF for 2 min.
Aspirate out the dPBS and resuspend the pellet in 1 mL of pre-warmed TrypLE. Incubate in a 37 °C water bath for 5 min. Break up the pellet by pipetting, then quench by adding an equal volume of pre-warmed advanced DMEM/F12 + 10% fetal bovine serum.
Centrifuge at 800 RCF for 2 min, aspirate out the liquid, then resuspend the pellet in SI maintenance media.
Add the desired number of cells to each chamber in 700 µL of total media (see General note 2).
Incubate at 37 °C, changing media every 1–2 days until live imaging.
Immunofluorescence staining for EdU
The easiest way to validate that the pressed collagen is supporting ISC growth is to stain for EdU to mark active proliferation following 3+ days of culture in SI maintenance media.
Fix cells following growth on the pressed chamber slides.
i. Aspirate maintenance media, add 500 µL of room-temperature 4% paraformaldehyde fixative to each chamber, incubate at room temperature for 20 min, aspirate off fixative, and wash twice in dPBS.
ii. Store fixed slides with PBS in each chamber in a zip-top bag at 4 °C until staining.
On the day of staining, wash fixed chambers three times with PBS.
Add enough permeabilization solution to cover the full base of the well. Incubate for 20 min at room temperature.
Wash two times with PBS, 5 min each.
Add EdU staining solution. Incubate for 1 h at room temperature, protected from light.
Wash with PBS for 5 min, protected from light.
Add DAPI staining solution for 3 min, protected from light.
Wash three times with PBS, 5 min each, protected from light.
Store in PBS in a sealed zip-top bag at 4 °C until imaging. Image within two weeks to avoid fluorescent signal fading.
Validation of protocol
The major readout of a properly functioning collagen patty in this format is that primary human ISCs maintain growth and proliferation for multiple days when cultured in the wells. Since primary human ISC monolayers require a soft surface (~9 kPa) to preserve stemness, ISCs cease to proliferate if the collagen hydrogel is too thin. Figure 1B illustrates the phenotypic and growth differences observed when ISCs are cultured on a collagen layer that is too thin and uneven. In contrast, Figure 1D shows optimal ISC growth, with thick bands of proliferating ISCs evenly distributed along the edges of all monolayers after three days of growth, regardless of their position within the chamber well.
This protocol, or components of it, has been employed and validated in the following research article(s): Cotton et al. [1]. An in vitro platform for quantifying cell cycle phase lengths in primary human intestinal epithelial cells. Scientific Reports (Figures 3, 4, 6). In this publication, collagen-pressed chamber slides from various preparation batches were utilized with multiple cell cycle reporter lines of primary human ISCs. All assays confirmed sustained ISC proliferation, with the cell cycles of hundreds of control cells closely matching the 12–21 h cell cycle lengths observed in mouse models (Figure 3) [15,16]. This demonstrates that the collagen press protocol reliably produces collagen-coated chamber slides optimized for maintaining ISC growth and enabling live imaging of fluorescence reporters over multiple days. Specifics regarding cell cycle reporter ISC lines and their corresponding live imaging and analysis parameters can be found in this previous publication.

Figure 3. Cell cycle phases directly quantified from human intestinal stem cells (ISCs) grown on chamber slides with pressed collagen. Violin plots denoting cell cycle phase lengths (in hours) across 284 primary human ISCs from n = 2 wells using our novel PIP-H2A reporter. Reprinted from Cotton et al. Scientific Reports [1]. © The Authors, some rights reserved; exclusive licensee, Springer Nature. Distributed under a Creative Commons Attribution NonCommercial License 4.0 (CC BY-NC) http://creativecommons.org/licenses/by-nc/4.0/.
General notes and troubleshooting
General notes
Collagen presses can be 3D printed from a variety of materials with no expected effect on function. Our group has used presses printed using chlorinated polyethylene and acrylonitrile butadiene styrene and both worked equivalently. A potential issue may arise with sterilizing presses before use, so it is suggested to avoid materials that are easily degraded by moderate exposure to ethanol.
The number of cells passaged to the chamber slides will depend on the assay being run. Primary human intestinal monolayers are generally passed at ratios between 1:3 and 1:5 from a confluent well for normal passaging. Ibidi µ-slide 4-well chamber slides have 2.5 cm2 of growth area per well, ~25% higher than a typical well of a 24-well culture plate, which has 1.9 cm surface per well. For applications such as monitoring cell cycles, we passage cells intentionally thin to avoid contact inhibition. However, higher coverage and larger colonies may be desired for other assays, such as those looking at tight junctions or cell differentiation. We recommend trialing passaging density on collagen-coated 24-well plates prior to using the chamber slides if cost is an issue.
While we maintain our ISCs as monolayers for routine expansion prior to imaging assays, previous studies demonstrate that primary human ISCs cultured as 3-dimensional organoids can also be plated onto collagen patties to form monolayers [9]. Therefore, it is not necessary for a lab that routinely cultures primary human ISCs as organoids to establish separate lines as monolayers; the cells grown as organoids can be plated directly onto pressed collagen chamber slides.
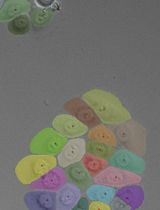
We recommend testing different lengths of legs for the collagen press to ascertain that the thickness of the resulting collagen coating maintains the cellular properties to be analyzed over several days. For example, we made a collagen press with staggered leg lengths to find whether thin collagen layers support primary human ISC growth (Figure 4A). We saw sustained EdU uptake in all four wells after three days of growth (Figure 4B), indicating that thicknesses from 0.3 to 0.9 mm were all sufficient to support growth and stemness, so we chose the thinnest collagen tested to optimize imaging. We suggest that each group starts with a similar analysis to determine that their properties of interest (stemness markers, growth rate, -omics analyses, etc.) are similar between the pressed chamber slide and their original platform. Also, biological differences can arise between platforms, especially if the original platform is notably different such as 3D organoids. For this reason, controls and experimental groups should be run side-by-side on the pressed chamber slides to avoid platform-derived differences in the analysis.
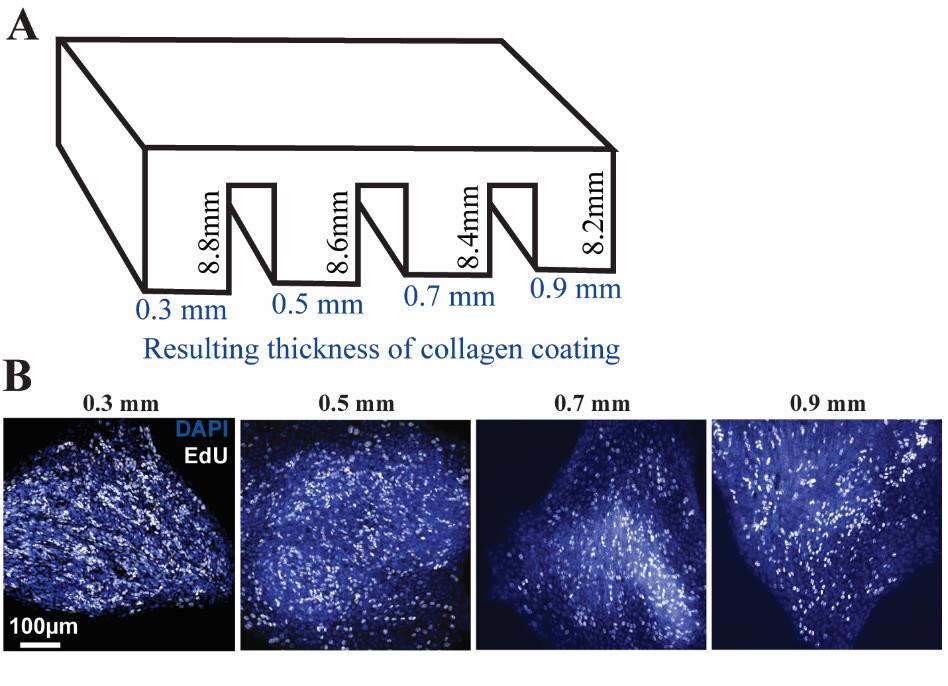
Figure 4. Designing a collagen press with staggered leg lengths to test different thicknesses of collagen coating. A) Leg lengths shown are measured from the bottom of the horizontal base, not including the portion of the press that sits atop the chamber slide walls. Values in blue are the calculated thickness of collagen expected after accounting for the lengths of the legs and the attached cover slip-thickness glass. B) Representative images of cells cultured on collagen patties with thicknesses ranging from 0.3 to 0.9 mm stained for nuclei (DAPI, blue) and proliferation (EdU uptake, white).While we have only used these chamber slides with pressed collagen for primary human intestinal stem cells, they can likely be used for other cell and tissue types as well, especially those already known to grow on a collagen matrix. If using this collagen press for a different cell type, we recommend testing different thicknesses of collagen, as in General note 4 and Figure 4, to check that the platform is optimized for supporting your cell type before beginning analysis.
It should be noted that a comprehensive survey of the capabilities and limitations of this platform has not been done. As discussed in General note 4, the major intended readout of this platform for the original study was tracking cell cycle, so all analyses by our group pertained to proliferation over time. We have not tested sustained cell culture past 5 days on the pressed slides, passaged cells from pressed slides for further culturing, or analyzed our cells for properties other than cell cycle. As cells appear to proliferate normally in days 3–5, we expect that they would continue to act equivalently to cells grown on typical collagen-coated wells, but researchers will need to test further biological properties individually.
Troubleshooting
Problem 1: Collagen coatings on each well appear uneven.
Possible cause: The collagen press is warped due to autoclaving or exposure to high heat.
Solution: Re-make the collagen presses and sterilize with a gentle method such as ultraviolet light and ethanol.
Problem 2: Glass panes coating the legs of the collagen press detach into the wells.
Possible cause: Many common super-glue brands are not made for glass.
Solution: Use Locktite glue glass instead of a general super glue.
Problem 3: The collagen press pulls up the collagen patty upon removal after incubation.
Possible cause: Any amount of overhang from the glass pane will easily get caught in the solidifying collagen.
Solution: Re-cut the coverslips to better fit the legs. Slightly less glass is better than too much. Test each leg of the collagen press for overhangs before first use. After adhering the panes to the collagen press legs and allowing time to dry, take a small tool such as a metal spatula and rub it along the sides of the collagen press, moving from the base toward the glass. If the tool hits the glass pane, pry it off and reattach the glass with no overhang.
Problem 4: The full layer of cells moves downward (in the Z direction) outside of the frame of imaging during extended live imaging.
Possible cause: We often see a small amount of settling (10–20 µm) during a 48-h live image, but exaggerated sinking could be due to evaporation.
Solution: All live imaging should image across a z-stack to account for small changes in collagen thickness and cell movement. We use up to 60 µm when possible. To avoid evaporation, make sure that the cover of the chamber slide is firmly attached during imaging, fill a humidity chamber in the air input line if available, and add open water to the environmental chamber by filling any moats or adding conical tube caps filled with water to buffer the amount of evaporation that occurs.
Acknowledgments
The authors thank the human donor for the gift of tissue. We thank Steven Emanual and Michael Cotton for 3D printing the collagen presses and Henry Taylor for helping film the videos. The Microscopy Services Laboratory, Department of Pathology and Laboratory Medicine, is supported in part by the P30 CA016086 Cancer Center Core Support Grant to the UNC Lineberger Comprehensive Cancer Center. The Andor Dragonfly microscope was funded with support from National Institutes of Health grant S10OD030223. This research was supported by the AGA-Bristol Myers Squibb Research Scholar Award in IBD (J.B.), R01DK115806 and R01DK109559 (S.T.M.), by CGIBD support through funding from the National Institutes of Health, P30 DK034987, and the Katherine E. Bullard Charitable Trust for Gastrointestinal Stem Cell and Regenerative Research.
Competing interests
S.T.M has a financial interest in Altis Biosystems Inc., which licenses technology used in this study.
References
- Cotton, M. J., Ariel, P., Chen, K., Walcott, V. A., Dixit, M., Breau, K. A., Hinesley, C. M., Kedziora, K. M., Tang, C. Y. and Zheng, A. (2024). An in vitro platform for quantifying cell cycle phase lengths in primary human intestinal epithelial cells. Sci Rep. 14(1): 15195.
- Barker, N., (2013). Adult intestinal stem cells: critical drivers of epithelial homeostasis and regeneration. Nat Rev Mol Cell Biol. 15(1): 19–33.
- Burclaff, J., Bliton, R. J., Breau, K. A., Ok, M. T., Gomez-Martinez, I., Ranek, J. S., Bhatt, A. P., Purvis, J. E., Woosley, J. T. and Magness, S. T. (2022). A Proximal-to-Distal Survey of Healthy Adult Human Small Intestine and Colon Epithelium by Single-Cell Transcriptomics. CMGH Cell Mol Gastroenterol Hepatol. 13(5): 1554–1589.
- Malonga, T., Vialaneix, N. and Beaumont, M. (2024). BEST4+ cells in the intestinal epithelium. Am J Physiol, Cell Physiol. 326(5): C1345–C1352.
- Stelzner, M., Helmrath, M., Dunn, J. C. Y., Henning, S. J., Houchen, C. W., Kuo, C., Lynch, J., Li, L., Magness, S. T. and Martin, M. G. (2012). A nomenclature for intestinal in vitro cultures. Am J Physiol Gastrointest Liver Physiol. 302(12): G1359–G1363.
- Zachos, N. C., Kovbasnjuk, O., Foulke-Abel, J., In, J., Blutt, S. E., de Jonge, H. R., Estes, M. K. and Donowitz, M. (2016). Human Enteroids/Colonoids and Intestinal Organoids Functionally Recapitulate Normal Intestinal Physiology and Pathophysiology. J Biol Chem. 291(8): 3759–3766.
- Spence, J. R., Mayhew, C. N., Rankin, S. A., Kuhar, M. F., Vallance, J. E., Tolle, K., Hoskins, E. E., Kalinichenko, V. V., Wells, S. I. and Zorn, A. M. (2010). Directed differentiation of human pluripotent stem cells into intestinal tissue in vitro. Nature. 470(7332): 105–109.
- Wang, Y., Gunasekara, D. B., Reed, M. I., DiSalvo, M., Bultman, S. J., Sims, C. E., Magness, S. T. and Allbritton, N. L. (2017). A microengineered collagen scaffold for generating a polarized crypt-villus architecture of human small intestinal epithelium. Biomaterials. 12844–55.
- Wang, Y., DiSalvo, M., Gunasekara, D. B., Dutton, J., Proctor, A., Lebhar, M. S., Williamson, I. A., Speer, J., Howard, R. L. and Smiddy, N. M. (2017). Self-renewing Monolayer of Primary Colonic or Rectal Epithelial Cells. CMGH Cell Mol Gastroenterol Hepatol. 4(1): 165–182.e7..
- Breau, K. A., Ok, M. T., Gomez-Martinez, I., Burclaff, J., Kohn, N. P. and Magness, S. T. (2022). Efficient transgenesis and homology-directed gene targeting in monolayers of primary human small intestinal and colonic epithelial stem cells. Stem Cell Rep. 17(6): 1493–1506.
- Ok, M. T., Liu, J., Bliton, R. J., Hinesley, C. M., San Pedro, E. E. T., Breau, K. A., Gomez-Martinez, I., Burclaff, J. and Magness, S. T. (2023). A leaky human colon model reveals uncoupled apical/basal cytotoxicity in early Clostridioides difficile toxin exposure. Am J Physiol Gastrointest Liver Physiol. 324(4): G262–G280.
- Miyoshi, H. and Stappenbeck, T. S. (2013). In vitro expansion and genetic modification of gastrointestinal stem cells in spheroid culture. Nat Protoc. 8(12): 2471–2482.
- VanDussen, K. L., Sonnek, N. M. and Stappenbeck, T. S. (2019). L-WRN conditioned medium for gastrointestinal epithelial stem cell culture shows replicable batch-to-batch activity levels across multiple research teams. Stem Cell Res. 37101430.
- Hinman, S. S., Wang, Y., Kim, R. and Allbritton, N. L. (2020). In vitro generation of self-renewing human intestinal epithelia over planar and shaped collagen hydrogels. Nat Protoc. 16(1): 352–382.
- Schepers, A. G., Vries, R., van den Born, M., van de Wetering, M. and Clevers, H. (2011). Lgr5 intestinal stem cells have high telomerase activity and randomly segregate their chromosomes. EMBO J. 30(6): 1104–1109.
- Matsu-ura, T., Dovzhenok, A., Aihara, E., Rood, J., Le, H., Ren, Y., Rosselot, A. E., Zhang, T., Lee, C. and Obrietan, K. (2016). Intercellular Coupling of the Cell Cycle and Circadian Clock in Adult Stem Cell Culture. Mol Cell. 64(5): 900–912.
Supplementary information
The following supporting information can be downloaded here:
- File S1: Collagen Press Design File.
Article Information
Publication history
Received: Aug 14, 2024
Accepted: Sep 27, 2024
Available online: Oct 15, 2024
Published: Nov 20, 2024
Copyright
© 2024 The Author(s); This is an open access article under the CC BY-NC license (https://creativecommons.org/licenses/by-nc/4.0/).
How to cite
Readers should cite both the Bio-protocol article and the original research article where this protocol was used:
- Burclaff, J. and Magness, S. T. (2024). Preparing Chamber Slides With Pressed Collagen for Live Imaging Monolayers of Primary Human Intestinal Stem Cells. Bio-protocol 14(22): e5116. DOI: 10.21769/BioProtoc.5116.
- Cotton, M. J., Ariel, P., Chen, K., Walcott, V. A., Dixit, M., Breau, K. A., Hinesley, C. M., Kedziora, K. M., Tang, C. Y. and Zheng, A. (2024). An in vitro platform for quantifying cell cycle phase lengths in primary human intestinal epithelial cells. Sci Rep. 14(1): 15195.
Category
Stem Cell > Adult stem cell > Intestinal stem cell
Cell Biology > Cell imaging > Live-cell imaging
Do you have any questions about this protocol?
Post your question to gather feedback from the community. We will also invite the authors of this article to respond.