- Protocols

- Articles and Issues
- For Authors
- About
- Become a Reviewer

Protocol for the Implantation of Scaffolds in a Humanized Mouse Cutaneous Excisional Wound Healing Model
Published: Vol 14, Iss 18, Sep 20, 2024 DOI: 10.21769/BioProtoc.4974 Views: 1496
Reviewed by: Vivien J. Coulson-ThomasSudhir VermaTarsis Gesteira Ferreira
Original research article
The authors used this protocol in:
Sep 2024
Advertisement


Protocol Collections
Comprehensive collections of detailed, peer-reviewed protocols focusing on specific topics


Related protocols
Abstract
Tissue-engineered constructs combine the mechanical properties of biomaterials with biological agents to serve as scaffolds that direct the wound-healing process and promote tissue regeneration. A limitation to studying wound healing in vivo is that mouse skin contracts to heal rather than exhibiting granulation tissue formation and epithelialization like human skin. Therefore, it became necessary to develop a mouse model to better recapitulate human wound healing. The first splinted excisional wound healing model in mice, described in 2004, utilized silicone splints to prevent skin contracture. This model has been used to test a variety of wound healing strategies; however, to our knowledge, this model has not been adapted to test the effect of implants on wound healing. In our established protocol, circular bilateral excisional wounds are made on the mouse’s dorsum. A circular implant made of porous polyethylene is sutured to the skin within the wound. A thin, donut-shaped silicone splint is secured to the skin surrounding the wound, and a thick, donut-shaped splint is placed on top to tent the wound dressing. Finally, the mouse’s abdomen is wrapped in a bandage and tape to protect the implants. Our protocol offers a significant enhancement to the existing model by enabling the testing of implants for wound healing, as well as using an additional splint that prevents direct contact between the wound dressing and the wound bed. This model can be used to study tissue-engineered implant designs in a relatively low-cost, simple, and high-throughput manner before advancing to larger animal studies.
Key features
• Builds upon methods developed by Galiano et al. [1] and extends their application to include scaffold testing.
• Utilizes a construct that protects wounds, thereby enabling unaffected wound healing.
• Can be adapted to test a wide variety of biomaterials for wound healing.
• Describes dressing details and exact methodologies that prevent animals from interfering with wound healing.
Keywords: Wound healingBackground
Non-healing wounds, chronic ulcers, and significant anatomical defects pose important challenges to both healthcare providers and scientists. Current wound healing research encompasses a range of innovative strategies, including tissue-engineered constructs, laser therapy, cell therapy, and platelet therapy [2]. These investigations are driven by the recognition that interactions between various cell types within the wound microenvironment demand a shift from in vitro to more complex animal models.
Although rabbits and pigs have historically served as valuable subjects in wound healing research, rodents have emerged as the most commonly utilized animal models due to their relatively low cost and small size [3]. Rodent and human skin differ in several ways, but the most significant is the presence of the rodent subcutaneous panniculus carnosus, which promotes healing through contraction [4]. In contrast, human skin relies on granulation and proliferation for healing [4]. Therefore, extensive efforts have been devoted to replicating human physiology in rodent models.
The current murine excisional wound model, first introduced in 2004, addressed the issue of contraction by incorporating a splint [1]. In this model, circular excisional wounds are created on the mouse dorsum, and donut-shaped silicone splints are centered around the wounds and secured to the skin. The addition of the splint prolongs wound healing by preventing contraction while yielding neo-epithelization that more closely resembles native tissue. Researchers have employed this model in a variety of settings including ischemic wounds, chronic ulcers, and hypertrophic scarring [5–10]. In 2023, Fischer et al. highlighted data analysis and splint troubleshooting; however, this publication still does not describe how to perform implant placement in the wound [11].
Although the existing model has been used successfully, there is a noticeable absence of publications demonstrating its applicability in testing a tissue-engineered, 3D implant that promotes wound healing. In this paper, we present two modifications to the splinted excisional wound model that enable the testing of a rigid polymer implant. The first modification adds sutures that secure the implant within the wound while limiting its manipulation and ensuring complete coverage by the wound edge. The second modification introduces a second, thicker splint on top of the first splint to create a tenting effect for the wound dressing, thereby protecting the implant.
The major contribution of this protocol is its ability to assess physical implants or tissue engineering and regenerative medicine research. We have successfully used this model to evaluate a polyethylene implant, augmented with an electrospun polymer layer soaked in a protein mixture. Importantly, this approach can be adapted to test a diverse array of scaffolds and can potentially extend its application to organ repair beyond the skin.
Materials and reagents
Reagents
Sodium chloride injection 0.9%, USP (Hospira, NDC, catalog number: 0409 -4888-02)
TerrellTM isoflurane, USP (Piramal Critical Care, NDC, catalog number: 66794-019-25)
Buprenorphine extended release 1.3 mg/mL (Fidelis Animal Health, NDC, catalog number: 86084-100-30)
Laboratory supplies
FisherbrandTM sterile alcohol prep pads (Fisher Scientific, catalog number: 22-363-750)
Prolene 6–0 suture (Ethicon, catalog number: 8617G) (Figure 1iii)
Ethilon 8–0 suture (Ethicon, catalog number: 2808G) (Figure 1iv)
C57BL/6 mice (The Jackson Laboratory, catalog number: 000664)
FlexWrap E-Z Tear® bandage 4 in. vet wrap (Aspen Veterinary Resources, catalog number: 14100122)
TegadermTM film dressing (3M, catalog number: 1626W)
Depilatory cream (Veet gel cream hair remover, catalog number: 3116875)
Triple antibiotic ointment (Padagis, NDC, catalog number: 45802-143-01)
Sterile cotton-tipped applicators (Medline, catalog number: MDS202000H)
LubriFreshTM lubricant eye ointment (Major, NDC, catalog number: 0904-6488-38)
Coach athletic tape (Johnson & Johnson, catalog number: JJ5188)
DuraporeTM surgical tape (3M, catalog number: B00042420)
Cyanoacrylate brush-on glue (Krazy Glue, catalog number: KG92548R)
Model MEDPOR® implant (Stryker, catalog number: 83020)
Betadine swab sticks (Emerson Healthcare, catalog number: 6761815301)
Insulin syringe with needle 1 mL 27G (Becton Dickinson, catalog number: 329412)
Syringe with attached needle 1 mL 25G (Becton Dickinson, catalog number: 309626)
Instant sealing sterilization pouches (Fisher Scientific, catalog number: 01-812-54)
Non-sterile woven gauze sponges (Medline, NON25212H) (Figure 1ii)
Towel drapes (Dynarex, catalog number: 4410)
Disposable dissection board (Mopec, catalog number: 22-444-314) (Figure 1i)
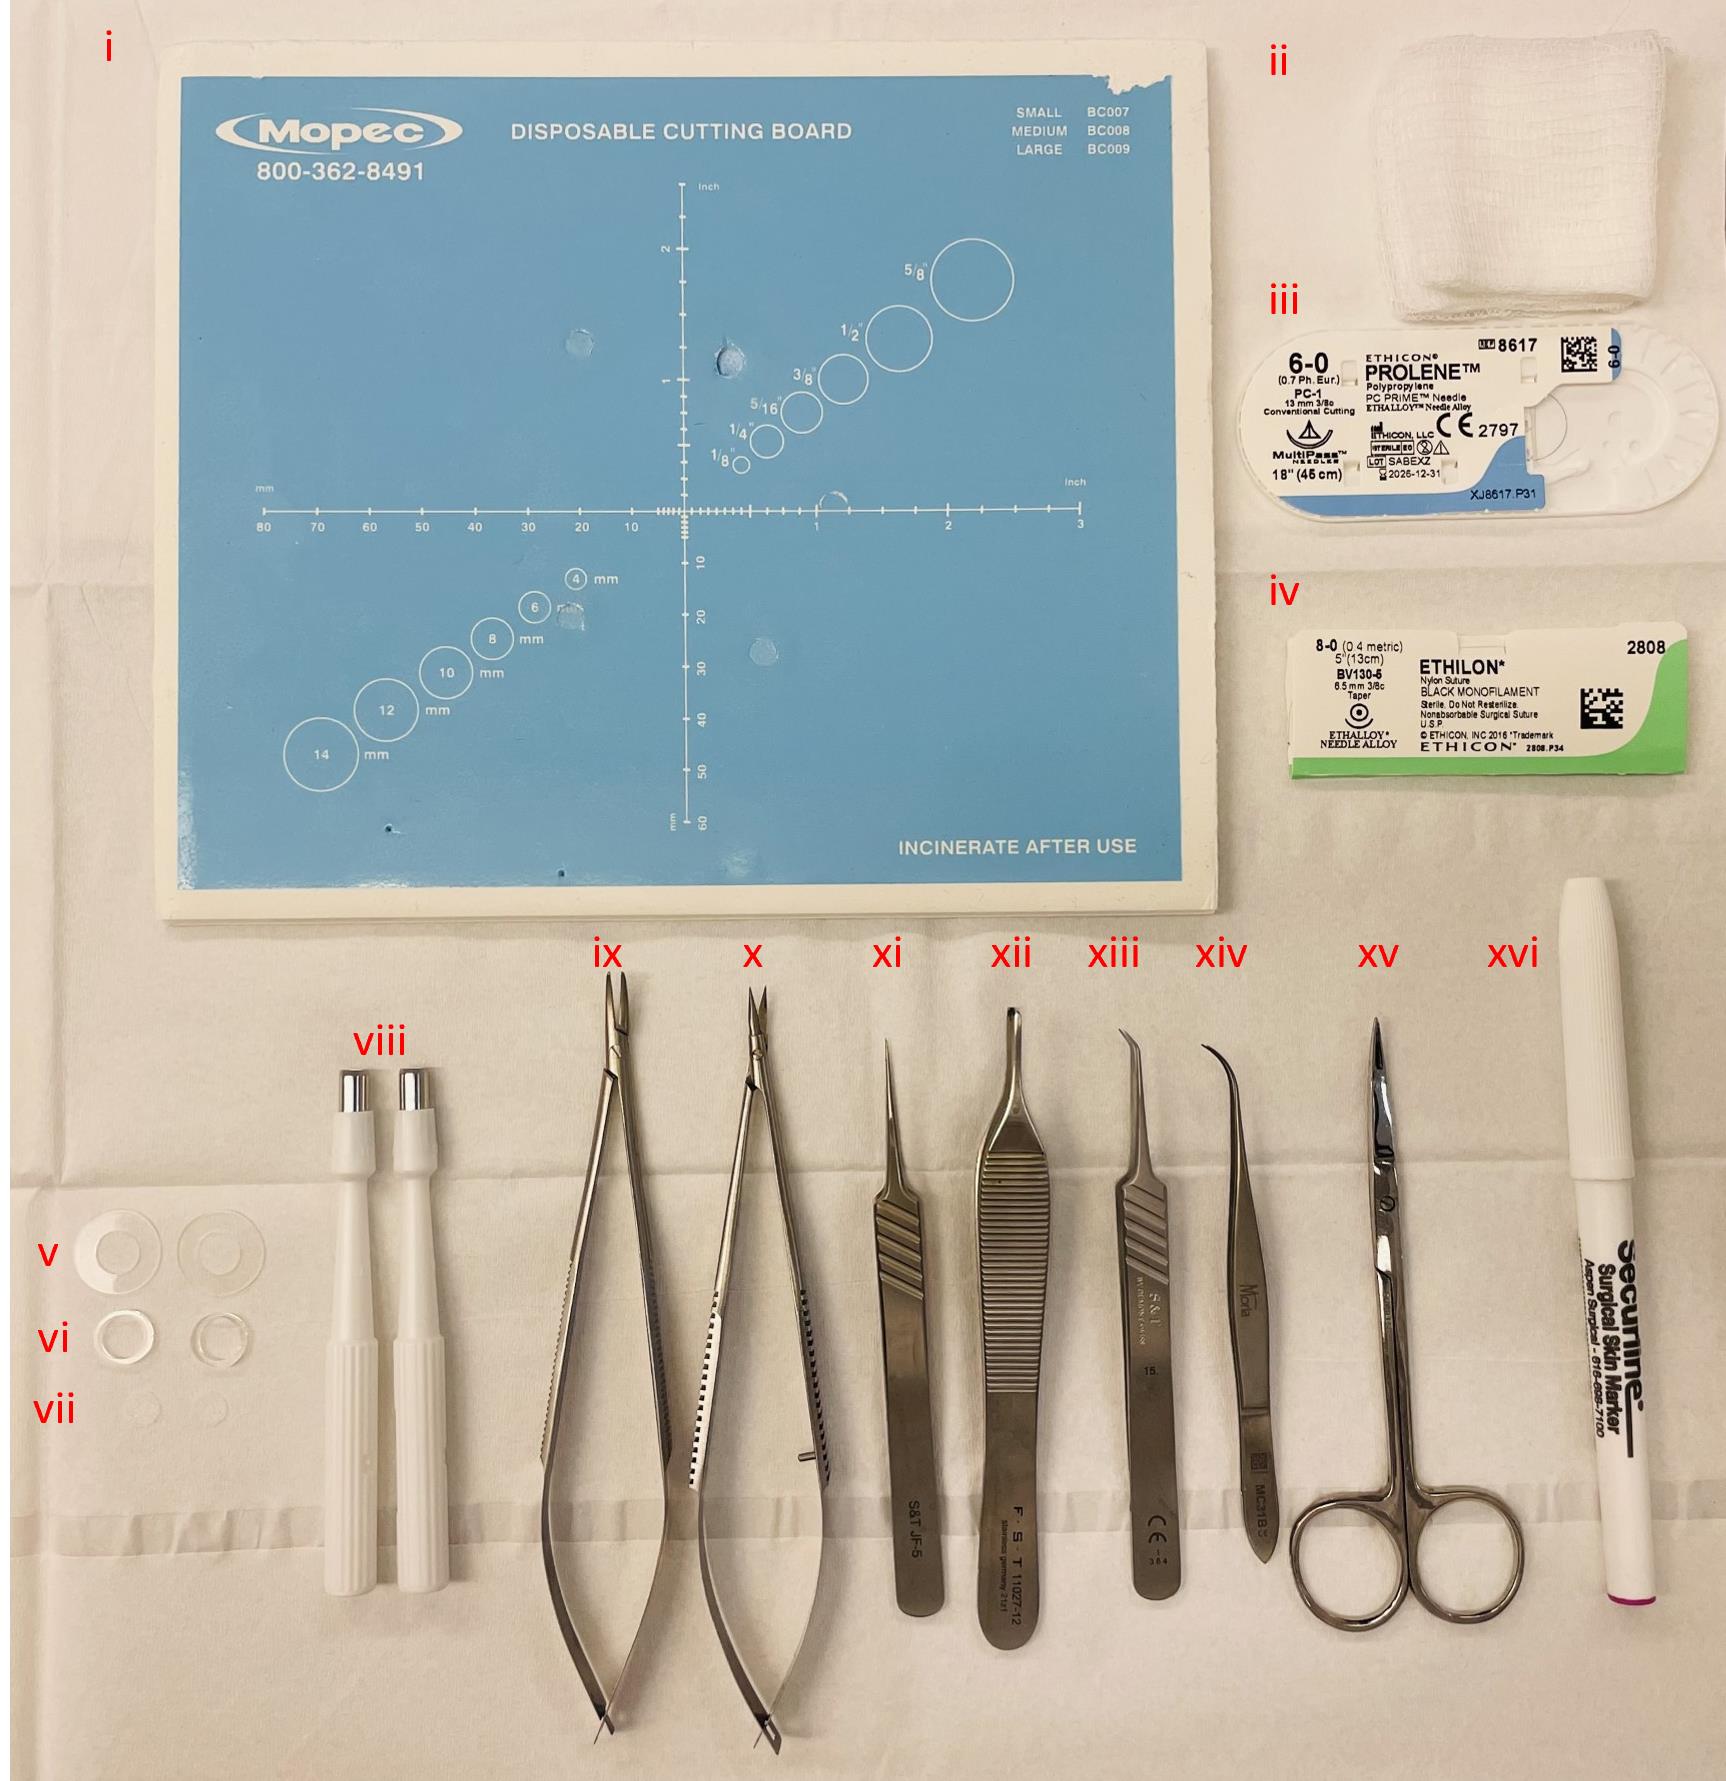
Figure 1. Instruments utilized during surgery. (i) Sterile dissection board, (ii) autoclaved gauze sponges, (iii) 6–0 Prolene suture, (iv) 8–0 Ethilon suture, (v) 0.5 mm thin silicone splints, (vi) 1.6 mm thick silicone splints, (vii) 6 mm diameter model MEDPOR® implants, (viii) 5 mm disposable biopsy punches to create wounds, (ix) needle holder, (x) spring scissors, (xi) straight tip forceps, (xii) Adson forceps, (xiii) angled tip forceps, (xiv) Moria forceps, (xv) fine scissors, and (xvi) sterile surgical marker.
Equipment
Research stereomicroscope system (Olympus, model number: SZX16)
Dino-lite digital microscope (Dino-Lite Digital Microscope, catalog number: AF4915ZTL)
Tuttnauer digital autoclave (Tuttnauer, model number: 2340E-B/L)
Anesthesia system (Veterinary Anesthesia Systems, catalog number: VAS 2001R)
Vetiva® mini trimmer (Wahl, catalog number: 88420)
Premium king-size heating pad (Sunbeam, catalog number: 938-511-000R)
Disposable biopsy punches 5 mm (Acuderm Inc, model: P550) (Figure 1viii)
Disposable biopsy punches 6 mm (Acuderm Inc, model: P625)
Disposable biopsy punches 8 mm (Acuderm Inc, model: P825) (Figure 2Bii)
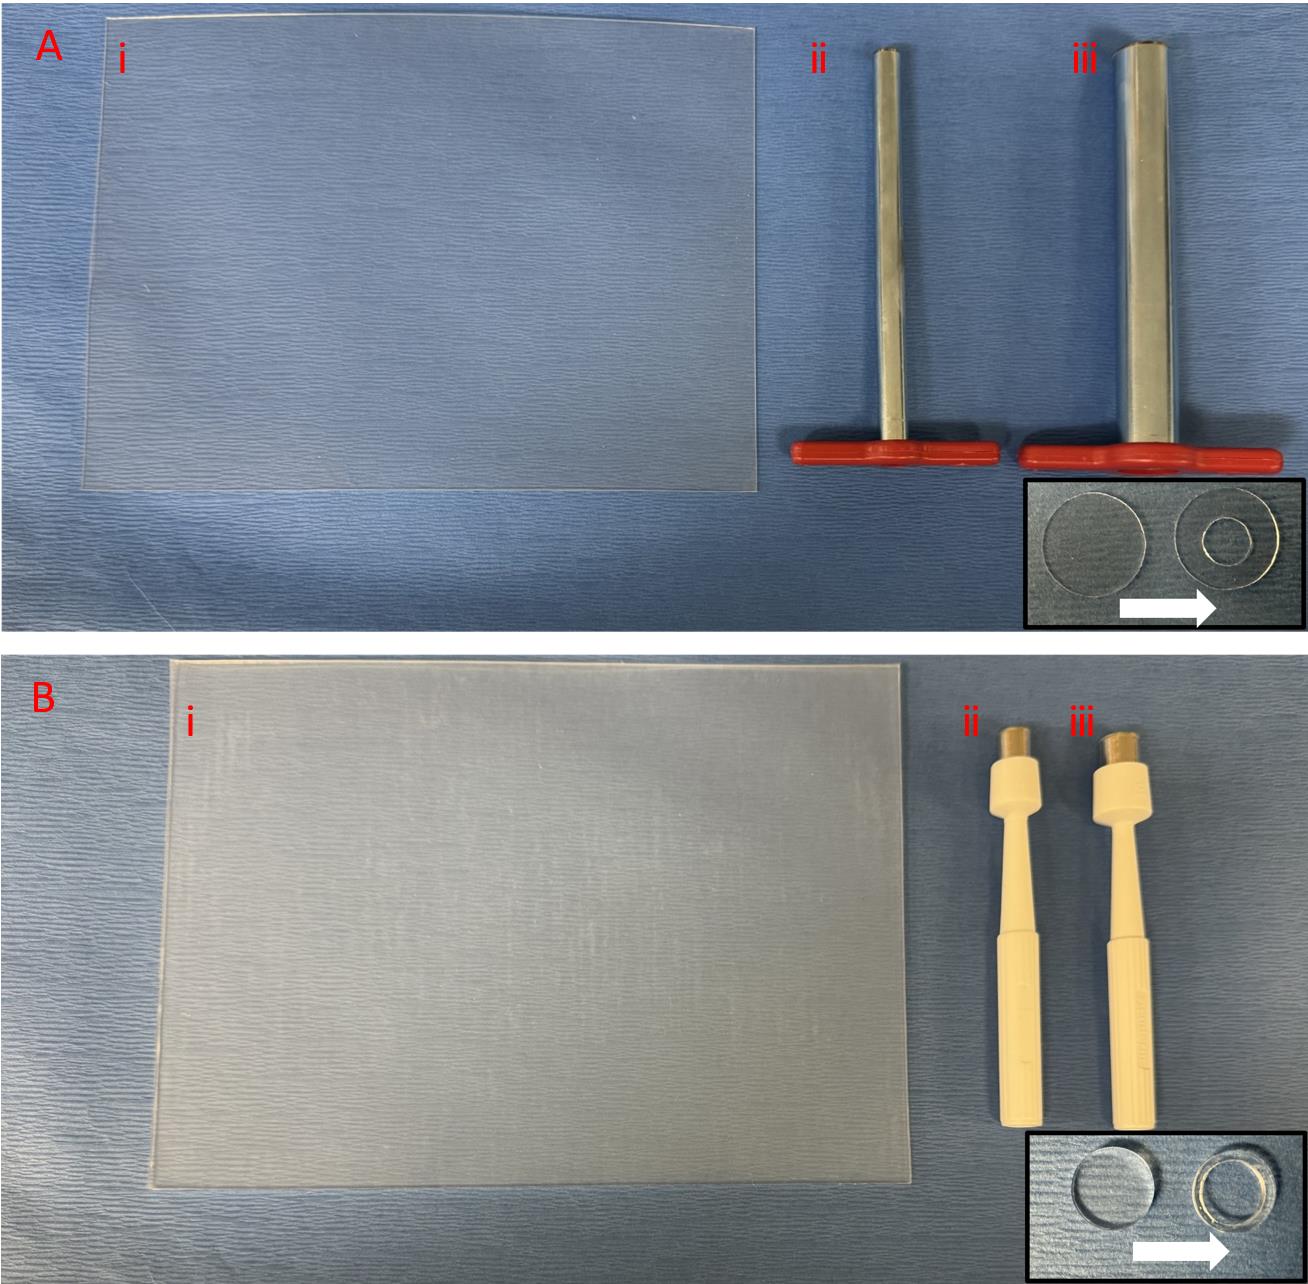
Figure 2. Splint preparation. A. Thin 0.5 mm silicone sheet with 15 mm cork borer to punch the outer circle and 7 mm cork borer to punch the inner circle. B. Thick 1.6 mm silicone sheet with 10 mm punch to punch the outer circle and 8 mm punch to punch the inner circle.Disposable biopsy punches 10 mm (Acuderm Inc, P1050) (Figure 2Biii)
Cork borer set (Humboldt, catalog number: H-9665)
Spring scissors 6 mm cutting edge (Fine Science Tools, catalog number: 15021-15) (Figure 1x)
Adson forceps 1.5 mm tip width (Fine Science Tools, catalog number: 11027-12) (Figure 1xii)
Moria iris forceps 0.5 mm tip width (Fine Science Tools, catalog number: 11373-12) (Figure 1xiv)
S&T needle holder without lock (Fine Science Tools, catalog number: C-14W; 00088-11) (Figure 1ix)
S&T forceps 0.3 × 0.25 mm angled tip (Fine Science Tools, catalog number: 00109-11) (Figure 1xiii)
S&T forceps 0.3 × 0.25 mm straight tip (Fine Science Tools, catalog number: 00108-11) (Figure 1xi)
Fine scissors (Fine Science Tools, catalog number: 14029-10) (Figure 1xv)
Sterile surgical marker (Aspen Surgical Products, catalog number: 1002-00-PDG) (Figure 1xvi)
BambooTM pad (Wacom, catalog number: CTH300U/U0-AX)
Non-adhesive silicone sheet, 0.5 mm (Sigma-Aldrich, Grace Bio-Labs CultureWellTM, GBL664571-5EA) (Figure 2Ai)
Non-adhesive silicone sheet, 1.6 mm (Sigma-Aldrich, Grace Bio-Labs CultureWellTM, GBL664273-5EA) (Figure 2Bi)
Dino-lite adjustable precision mount (Dino-Lite Digital Microscope, catalog number: RK-06A)
Software
DinoCapture 2.0 (Dino-Lite Digital Microscope, dino-lite.com)
ImageJ (National Institutes of Health, imagej.nih.gov)
Excel (Microsoft, microsoft.com)
StatPlus LE (AnalystSoft, analystsoft.com)
Procedure
Materials preparation pre-surgery
Make donut-shaped splints.
Remove the sticky wrappers from each side of the thin 0.5 mm and thick 1.6 mm silicone sheets.
To make thin splints, press firmly the thin 0.5 mm silicone sheet on a soft surface using the 15 mm cork borer to punch out the outer circle followed by the inner circle using the 7 mm cork borer (center punch in the middle of the 15 mm circle) (Figure 2A and Figure 1v).
To make thick splints, press firmly the thick 1.6 mm silicone sheet on a soft surface to punch out the outer circle using the 10 mm punch followed by the inner circle using the 8 mm punch (center punch in the middle of the 10 mm circle) (Figure 2B and Figure 1vi).
Place two thin and two thick splints in each sterilization pouch (1 pouch/animal surgery).
Prepare Tegaderm squares.
Draw a 2 cm × 2 cm grid over Tegaderm sheets using a pen or marker.
Cut Tegaderm sheets along the grid tracings into 2 cm × 2 cm squares.
Prepare vet wraps.
Cut FlexWrap vet wraps into 2 cm wide and 8 cm long pieces (Figure 3K insert).
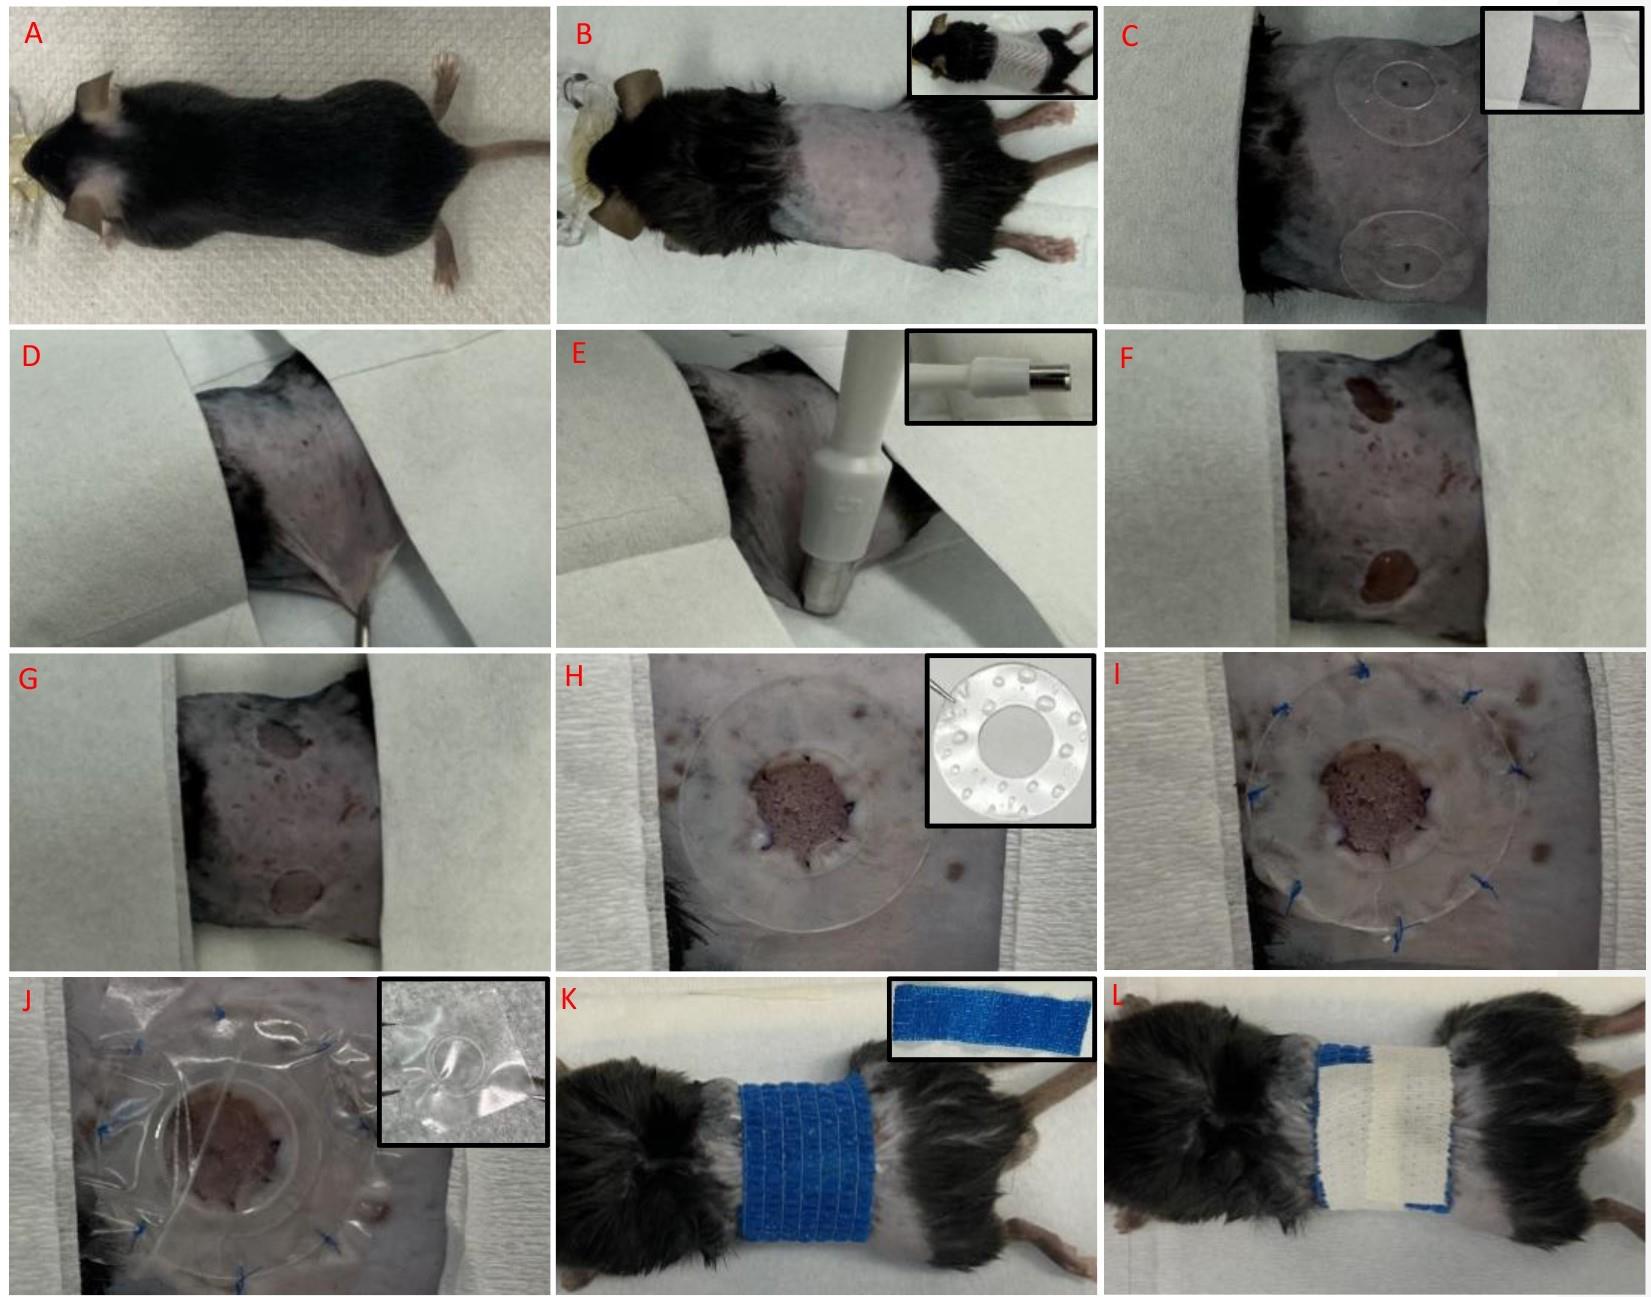
Figure 3. Excisional wounding. A. Mouse anesthetized. B. Mouse dorsum shaved, depilated, and wiped. C. Splints placed on each side of the mouse dorsum to mark the location of the two wound centers. D. Marked location of the wound center pinched with forceps and skin fold pulled parallel to the board. E. Marked lines on biopsy punch aligned with skinfold edges. F. Wounds created on either side of the mouse dorsum. G. Implant placed over each wound bed. H. Outer ring of implant sutured to surrounding skin and splint-glued to the perimeter. I. Outer ring of the splint sutured to surrounding skin. J. Tegaderm-thick splint construct applied centered to wound. K. Cut vet wrap wrapped around mouse abdomen. L. Vet wrap secured with athletic tape.
Punch out 6 mm diameter circular implants using the 6 mm punch (Figure 1vii).
Sterilize all non-sterile instruments and tools required for surgery by autoclaving at 135 °C for 25 min sterilization and 25 min drying time.
Place surgical tools required per animal in one sterilization pouch and into the autoclave machine.
Place four pieces of gauze per sterilization pouch (1 gauze pouch/animal) and into the autoclave machine.
Place the prepared sterilization pouch with splints into the autoclave machine.
Preparation of wound site
Weigh the mouse.
Briefly anesthetize the mouse with 3% isoflurane in 1 L/min oxygen flow in an induction chamber.
Note: Continuously monitor the mouse throughout and every time it is under anesthesia by observing its breathing pattern and using the toe pinch check. The mouse’s chest should be moving up and down in a slow and regular rhythm. Pinching the mouse’s foot pad assesses the pedal withdrawal reflex; if it causes a response, this means additional anesthesia must be supplied.
Administer a single dose of buprenorphine (3.25 mg/kg body weight) subcutaneously to control postoperative pain.
Turn off the anesthesia machine by setting it to 0% isoflurane at 0 L/min oxygen flow and wait at least 30 min for the buprenorphine to take effect.
Reinduce anesthesia in the induction chamber with 3% isoflurane at 1 L/min oxygen flow.
Remove the fully anesthetized mouse from the induction chamber and apply eye ointment to both eyes of the mouse.
Transfer the mouse from the induction chamber to the shaving area placing it in the prone position and reduce maintenance anesthesia to 1.5% isoflurane at 1 L/min oxygen flow delivered via face mask (Figure 3A).
Confirm anesthesia with a firm toe pinch (described in step B2).
Shave the dorsum of the mouse, making sure that the shaved area will fit the thin 15 mm splint on each side of the midline.
Note: Make sure to shave the sides of the abdomen so that there is no hair visible around the circumference of the abdomen that is visible while the mouse is in the prone position.
Apply depilatory cream to the shaved area using the cotton-tipped applicators for 30 s; then, wipe it off using a gauze pad.
Note: It is important not to keep the cream on for longer than 1 min as skin irritation will likely occur.
Apply sterile water to a gauze pad; then, wipe the mouse’s shaved skin to remove any remaining cream and fur (Figure 3B).
Cut a piece of Durapore tape and put it over the shaved area; then, gently peel it off (Figure 3B insert).
Note: The adherence capacity of the tape ensures the removal of any shaved hair that is stuck to the skin.
Wipe off the shaved area with an alcohol pad.
Prepare the surgical table with a surgical drape and all the required sterilized instruments and materials (Figure 1).
Transfer the mouse to the prepared surgical table over the cutting board and maintain anesthesia with 1.5% isoflurane at 1 L/min oxygen flow delivered via face mask.
Sterilize the skin for surgery. Use a betadine swab to coat the surgical field, moving in a concentric circle motion starting in the center and moving outward. Follow this with an alcohol prep pad using the same motion. Repeat this process two more times for a total of three rounds.
Apply another sterile drape over the mouse to expose only the surgical field (Figure 3C insert).
Excisional wounding
Plan the location of each of the two wound centers to be created bilaterally on each side of the mouse’s midline and mark with the surgical marker as a reference point (Figure 3C).
Note: You can temporarily place a thin splint on each side of the dorsum to help locate the center of the wounds to be created.
On the outer side of the metallic part of the 5 mm punches, use the surgical marker to make reference lines exactly across from each other as if marking a semi-circle (Figure 3E insert).
Note: When punching the skinfold, this will ensure that if both lines are visualized, then the wound will be a perfect circle.
Pinch the skin on the marked location of the wound center using the Adson forceps to create a skinfold. Use the forceps to place the skinfold parallel to the surgical board so that punching can take place on a flat surface (Figure 3D).
Note: The mouse might rotate on its side as the skin is pulled onto the flat board; adjust the mouse on the face mask as needed.
Carefully align the two marked lines on the biopsy punch with the skin fold edges and its center with the marked wound center location (Figure 3E).
Note: The center of the marked wound location and the two lines on the punch should all be in parallel and create a line along the diameter of the punch.
Excise the skin by pressing down with the punch and slightly twisting or rocking the punch as needed.
Note: This punches a semi-circle on the skinfold, a full 5 mm circle once the skin is unfolded back natively (Figure 3F).
Check that the created wound is 5 mm by gently placing the punch against the wound once the skin is back in place and comparing it to the wound size.
Ensure the removal of epidermis, dermis, hypodermis, and panniculus carnosus from each wound using the spring scissors as needed.
Note: Punched skin can be saved and used as control tissue in wound healing analysis.
Repeat steps C3–C7 for the wound on the other side using a new biopsy punch.
Note: This punching method is used in place of the common method where the skin at the mouse’s midline is pulled and a full circle punch is made at the skin folds to generate a full wound punch on each side of the midline, as this common method tends to create wounds that are too close to each other and not allow enough skin surface area for two splints.
Implant and thin splint placement
Gently place a 6 mm diameter implant over each wound bed (Figure 3G).
Note: Implant size is larger than the wound punch size, as wounds tend to stretch and become slightly larger than their original sizes. You can use control implant on one side in the same animal based on experimental objectives.
Suture the outer edge of the implant to the adjoining wound edge skin using six interrupted 8–0 sutures (Figure 3H).
Proceed to splint placement. Hold one edge of the thin splint with forceps and ask the surgical assistant to apply glue to it by spreading many small glue droplets all around on one side of the splint (Figure 3H insert).
Note: Avoid having bigger droplets to ensure that the glue does not seep through and disturb the wound/implant site.
Place the splint, glue side down, centered around the wound/implant perimeter (Figure 3H).
Gently press down on different areas of the splint using the sides of forceps.
Note: Allow the splint to adhere to the skin for at least 10 min and ensure adequate adherence by gently pulling the outer splint edges away from the skin prior to suturing it to the surrounding skin.
Whilst waiting for the splint to adhere to the skin, repeat steps D2–D5 for the wound on the other side of the midline.
Suture the outer edge of each splint to the surrounding skin using eight interrupted 6–0 sutures (Figure 3I).
Begin by suturing the splint that was adhered to the skin first and has had longer time to dry.
Take a picture of each wound using the Dino-lite microscope secured to its stand.
Place the microscope in the plane parallel to the plane of the implant.
Center implant in the middle of the image.
Note: The wound area measurement from these images taken on the day of surgery will be used as the wound baseline areas (at day 0).
Dressings
Carefully remove the backing from a Tegaderm square using forceps and place a thick splint in the center of the square on the sticky side (Figure 3J insert).
Flip this construct, apply it centered on top of each thin splint with the thick splint facing down, and press the Tegaderm down to stick on the surrounding skin (Figure 3J). The order of materials from bottom to top should be mouse skin, thin splint, thick splint, and Tegaderm.
Note: This is very important and unique to this protocol because this construct creates a tent like structure that protects the implant whilst providing a moist environment to prevent the wound from drying out.
Wrap a cut vet wrap (Figure 3K insert) around the mouse’s abdomen somewhat tightly (Figure 3K) and secure with athletic tape.
Make sure that the tape covers most of the wrap area to create a more rigid structure that prevents mice from pulling on flexible vet wrap (Figure 3L).
Note: Securing the tape in this specific manner is very important as it prevents mice from reaching, biting, and pulling on thin splints underneath the vet wrap, thus allowing thin splints to remain adhered to the skin during the study period.
Inject the mouse with 1 mL of warm sodium chloride injection subcutaneously to account for fluid loss during surgery.
Turn off the anesthesia machine, place the mouse in its cage on top of the heating pad, and monitor it until it is fully recovered.
Note: Mice are individually housed to minimize wound disruption.
Keep the mouse in a temperature- and light-controlled animal facility with free access to food and water for the duration of the study.
Save taken images from Dino Capture in Windows Bitmap (.bmp) format with a scale bar.
Note: The day of wounding is day 0 and images should be named and saved accordingly.
Observation and wound assessments
Monitor mice daily for general ambulatory ability, signs of distress, and behavioral changes.
Take wound images and change dressing every other day as described in the next steps.
Note: Imaging time points should be adjusted based on the experimental plan and research objectives.
Anesthetize the mouse with 3% isoflurane in 1 L/min oxygen flow in an induction chamber.
Transfer the mouse from the induction chamber to the table, placing it in the prone position, and reduce anesthesia to 1.5% isoflurane at 1 L/min oxygen flow delivered via face mask.
Carefully cut through vet wrap and tape at the mouse midline to remove them.
Carefully peel off each Tegaderm square from the skin surrounding the thin splints using forceps.
Note: Thick splint will also come off attached to Tegaderm.
Discard Tegaderm and place thick splints on an alcohol pad. Wipe to reuse them when reapplying dressing.
Take a photo of each wound using the Dino-lite microscope secured to its stand as described in step D8.
Reapply new dressing as described in steps E1–E3.
Turn off anesthesia.
Weigh the mouse.
Place the mouse in its cage over the heating pad and monitor it until it is fully recovered.
Save taken images from Dino Capture in Windows Bitmap (.bmp) format with a scale bar.
Note: Name and save images according to the day of study.
Explantation
Euthanize mice via carbon dioxide inhalation at the end of the desired study time point post-wounding.
Note: This can be done at different time points for different animals based on the experimental design.
Carefully remove the dressing as described in steps F5–F6.
Mark the area to be excised with a surgical marker, ensuring that an outer ring of native, unwounded tissue is also removed with the implant.
Remove the thin splint by carefully cutting through the sutures with scissors and peeling it off using forceps.
Carefully excise marked skin regions of the implant/wound using fine scissors whilst using forceps to peel the cut skin from the underlying tissue.
Process excised tissue according to desired analysis and subsequent studies (mechanical testing, histological and immunofluorescent staining, etc.).
Data analysis
Open wound image taken on day 0 (surgery day) on ImageJ.
Trace a line on the scale bar of the image (automatically generated from Dino Capture 2.0) using ImageJ straight-line drawing tool.
Set scale to that line according to scale bar.
Set scale is under the Analyze toolbar.
Enter the distance (of scale bar) corresponding to the pixels of the drawn line.
Trace the outer perimeter of the wound with the digital stylus of the pad using the ImageJ freehand drawing tool.
Record the wound area (the sketched region) with the ImageJ Measure tool under the Analyze toolbar.
Note: The wound area has a value of zero if the wound is completely covered with tissue.
Transfer the value to an Excel sheet.
Repeat steps 1–6 for wound images taken on all days post-wounding.
Calculate the wound area as a percentage on day x as follows:
Create a wound healing curve using a standard X-Y plot [wound area (%) vs day post-wounding].
Analyze statistical differences on StatPlus LE using 3–5 animals for each time point being analyzed.
Transfer wound area (%) values from Excel to StatPlus LE.
Perform ANOVA test using Tukey’s HSD post-hoc test.
Consider p < 0.05 as statistically significant.
Note: Exclusion criteria were wounds in which the splint partially or completely detached prior to hair growth.
Validation of protocol
This protocol or parts of it has been used and validated in the following research article:
Gadalla et al. [12]. Polycaprolactone Fiber and Laminin and Collagen IV Protein Incorporation in Implants Enhances Wound Healing in a Novel Mouse Skin Splint Model. J Tissue Eng Regener Med.
Acknowledgments
We would like to acknowledge Galiano et al. (2004) for the wound splint methods first developed, which we built upon for the development of this protocol. This work was supported by the National Institute on Deafness and Other Communication Disorders of the National Institute of Health under award number RO1 DC019114-01.
Competing interests
The authors declare that there is no conflict of interest.
Ethical considerations
Animal studies were conducted in accordance with Mayo Clinic Institutional Animal Care and Use Committee (IACUC) under IACUC protocol number A00005810-21.
References
- Galiano, R. D., Michaels, V, J., Dobryansky, M., Levine, J. P. and Gurtner, G. C. (2004). Quantitative and reproducible murine model of excisional wound healing. Wound Repair Regener. 12(4): 485–492. https://doi.org/10.1111/j.1067-1927.2004.12404.x
- Mirhaj, M., Labbaf, S., Tavakoli, M. and Seifalian, A. M. (2022). Emerging treatment strategies in wound care. Int Wound J. 19(7): 1934–1954. https://doi.org/10.1111/iwj.13786
- Sami, D. G., Heiba, H. H. and Abdellatif, A. (2019). Wound healing models: A systematic review of animal and non-animal models. Wound Med. 24(1): 8–17. https://doi.org/10.1016/j.wndm.2018.12.001
- Zomer, H. D. and Trentin, A. G. (2018). Skin wound healing in humans and mice: Challenges in translational research. J Dermatol Sci. 90(1): 3–12. https://doi.org/10.1016/j.jdermsci.2017.12.009
- Son, D. O. and Hinz, B. (2021). A Rodent Model of Hypertrophic Scarring: Splinting of Rat Wounds. Methods Mol Biol. 405–417. https://doi.org/10.1007/978-1-0716-1382-5_27
- Chen, L., Tredget, E. E., Liu, C. and Wu, Y. (2009). Analysis of Allogenicity of Mesenchymal Stem Cells in Engraftment and Wound Healing in Mice. PLoS One. 4(9): e7119. https://doi.org/10.1371/journal.pone.0007119
- Chen, L., Tredget, E. E., Wu, P. Y. G. and Wu, Y. (2008). Paracrine Factors of Mesenchymal Stem Cells Recruit Macrophages and Endothelial Lineage Cells and Enhance Wound Healing. PLoS One. 3(4): e1886. https://doi.org/10.1371/journal.pone.0001886
- Park, D. J., Duggan, E., Ho, K., Dorschner, R. A., Dobke, M., Nolan, J. P. and Eliceiri, B. P. (2022). Serpin-loaded extracellular vesicles promote tissue repair in a mouse model of impaired wound healing. J. Nanobiotechnol. 20(1): e1186/s12951–022–01656–7. https://doi.org/10.1186/s12951-022-01656-7
- Vuerich, R., Groppa, E., Vodret, S., Ring, N. A. R., Stocco, C., Bossi, F., Agostinis, C., Cauteruccio, M., Colliva, A., Ramadan, M., et al. (2023). Ischemic wound revascularization by the stromal vascular fraction relies on host-donor hybrid vessels. npj Regener Med. 8(1): e1038/s41536–023–00283–6. https://doi.org/10.1038/s41536-023-00283-6
- Wu, Y., Chen, L., Scott, P. G. and Tredget, E. E. (2007). Mesenchymal Stem Cells Enhance Wound Healing Through Differentiation and Angiogenesis. Stem Cells. 25(10): 2648–2659. https://doi.org/10.1634/stemcells.2007-0226
- Fischer, K., Litmanovich, B., Sivaraj, D., Kussie, H., Hahn, W., Hostler, A., Chen, K. and Gurtner, G. (2023). Protocol for the Splinted, Human-like Excisional Wound Model in Mice. Bio Protoc. 13(3): e4606. https://doi.org/10.21769/bioprotoc.4606
- Gadalla, D., Kennedy, M., Ganem, J., Suppah, M., Schmitt, A. and Lott, D. G. (2024). Polycaprolactone Fiber and Laminin and Collagen IV Protein Incorporation in Implants Enhances Wound Healing in a Novel Mouse Skin Splint Model. J Tissue Eng Regener Med. 2024(1): e1155/2024/2515383. https://doi.org/10.1155/2024/2515383
Article Information
Publication history
Received: Oct 1, 2023
Accepted: Mar 11, 2024
Available online: Sep 20, 2024
Published: Sep 20, 2024
Copyright
© 2024 The Author(s); This is an open access article under the CC BY-NC license (https://creativecommons.org/licenses/by-nc/4.0/).
How to cite
Gadalla, D., Kennedy, M. and Lott, D. (2024). Protocol for the Implantation of Scaffolds in a Humanized Mouse Cutaneous Excisional Wound Healing Model. Bio-protocol 14(18): e4974. DOI: 10.21769/BioProtoc.4974.
Category
Biological Engineering > Biomedical engineering
Cell Biology > Tissue analysis > Tissue staining
Medicine
Do you have any questions about this protocol?
Post your question to gather feedback from the community. We will also invite the authors of this article to respond.