- Protocols

- Articles and Issues
- For Authors
- About
- Become a Reviewer

Nerve Preparation and Recordings for Pharmacological Tests of Sensory and Nociceptive Fiber Conduction Ex Vivo

Published: Vol 14, Iss 7, Apr 5, 2024 DOI: 10.21769/BioProtoc.4969 Views: 1912
Reviewed by: Willy R Carrasquel-UrsulaezSalim GasmiMarco Pagliusi Jr.
Original research article
The authors used this protocol in:

Jan 2023
Advertisement


Protocol Collections
Comprehensive collections of detailed, peer-reviewed protocols focusing on specific topics


Abstract
Measuring signal propagation through nerves is a classical electrophysiological technique established decades ago to evaluate sensory and motor functions in the nervous system. The whole-nerve preparation provides a valuable model to investigate nerve function ex vivo; however, it requires specific knowledge to ensure successful and stable measurements. Although the methodology for sciatic nerve recordings has long existed, a method for reliable and long-lasting recordings from myelinated and non-myelinated (nociceptive) fibers still needs to be adapted for pharmacological testing. This protocol takes benefits from epineurium sheath removal for pharmacological tests and provides a detailed description of how to make accurate nerve preparations, from the dissection and handling of nerves to epineurium cleaning, fabrication of adaptable suction electrodes for appropriate fiber stimulation and recordings, setting of electrophysiological protocols for compound action potential (CAP) recordings to distinguish between myelinated and non-myelinated (nociceptive) fibers, and finally to the analysis of the datasets of CAP components. We also demonstrate the feasibility of CAP recordings from individual branches in epineurium-free nerve preparations and provide clues to help retain nerve viability and maintain stable recordings over time. Although a sciatic nerve preparation was used here, the methodology can be applied to other nerve-type preparations.
Key features
• Detailed and simplified protocol for peripheral nerve preparation for recording sensory inputs ex vivo.
• Recordings from myelinated and non-myelinated (nociceptive) fibers can be performed hours after nerve preparation.
• The protocol involves the epineurium removal to facilitate drug permeability into nerve tissue for pharmacological tests.
• The protocol allows physiological and pathological studies (pain/chronic pain conditions).
Graphical overview
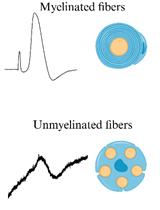
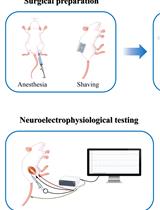
Preparation and recordings from the sciatic nerve, including myelinated and non-myelinated (nociceptive) fibers
Background
It is estimated that more than 1.5 billion people worldwide suffer from pain, with hundreds of millions experiencing chronic pain that remains untreated. As a result, there is a need for new therapeutic options to be developed and new therapeutics are actively being searched [1]. Although there is consensus that a wide range of ex vivo nervous system models provide a valuable tool for studying pain and the mechanisms of nervous system pathologies, whole-nerve models are the only ones that can directly assess nerve conduction in both physiological and pathological conditions. The sciatic nerve is the largest and longest nerve in the body, making it the preferred nerve for many peripheral nerve models [2]. Despite the variety of rodent models that have been established in the past for in vivo and ex vivo recordings [3–7], the methodology for sciatic nerve recordings remains challenging and requires a detailed step-by-step description. Furthermore, detailed protocols for long-lasting readouts from both myelinated and non-myelinated (nociceptive) fibers, especially in the context of pharmacological testing, are still lacking. Stable and reliable recordings are critical to determine the effectiveness of any treatment being tested. This protocol provides a step-by-step description of how to accurately make reliable nerve preparations from rodents, which can be used to monitor nerve conduction over an extended period of time, in physiological conditions, and under pharmacological treatment. The distinctive feature of our protocol is nerve preparation with epineural sheath removal to facilitate pharmacological tests, including recordings from individual nerve branches. We describe electrophysiological protocols for recording compound action potential (CAP), which reflects action potentials (APs) generated by peripheral fibers, both afferents and efferents. In a bundle of nerve fibers, each fiber generates APs, resulting in a current flowing through the surface of the nerve bundle, which has high resistance and can be measured as a potential difference, i.e., CAP, using two electrodes placed on the nerve.
The protocol results in accurate measurements from myelinated and non-myelinated (nociceptive) fibers for a few hours. Additionally, we have demonstrated the effect of lidocaine, a widely used classical local anesthetic, on the nerve as a proof-of-concept to validate the model’s applicability for testing pharmacological treatment.
Materials and reagents
Biological materials
Sprague-Dowley rats 3–6 months old (Charles River, strain code: 001)
Reagents
Glucose (Sigma-Aldrich, catalog number: G8270)
Sodium chloride (Sigma-Aldrich, catalog number: S9888)
Sodium bicarbonate (Sigma-Aldrich, catalog number: S0751)
Sodium monophosphate (Sigma-Aldrich, catalog number: S6040)
Potassium chloride (Sigma-Aldrich, catalog number: P9333)
Magnesium chloride (Sigma-Aldrich, catalog number: M2670)
Calcium chloride (Sigma-Aldrich, catalog number: C7902)
Solutions
Krebs bicarbonate solution (see Recipes)
Recipes
Krebs bicarbonate solution (final volume 0.5 L in ddH2O)
Reagent Final concentration (mM) Quantity or Volume Sodium chloride 125 3,653 mg Glucose 10 901 mg Sodium bicarbonate 26 1,092 mg Sodium monophosphate 1.25 75 mg Potassium chloride 2.5 93 mg Magnesium chloride 1 102 mg Calcium chloride 2 147 mg Total n/a 500 mL Note: To avoid precipitation, the solution should be bubbled with 95% O2 and 5% CO2 before adding calcium chloride.
Laboratory supplies
Isoflurane (Abbvie, catalog number: B506; also, Henry Schein, catalog number: 1182097 or any available)
Spray bottle with 70% ethanol (Fisher Scientific, catalog number: BP82031GAL)
Petri dish 100 mm × 15 mm (Corning, catalog number: 351029)
Glass capillaries with filament O.D. 1.5 mm, I.D. 0.86 mm (e.g., Sutter Instruments, catalog number: BF-150-86-10 or Harvard Apparatus, catalog number: GC150F-10)
Butane blow torch
95% O2 and 5% CO2 gas mixture
Equipment
Dissection and preparation
Anesthesia induction chamber (VetEquip, US) or any other available
Standard scissors (Fine Science Tools, catalog number: 14002-12)
Blunt surgical scissors (Fine Science Tools, product number: 14003-12). Alternatively, hemostat (Fine Science Tools, catalog number: 13003-10)
Coarse forceps (Fine Science Tools, catalog number: 11652-10)
Spring scissors (Fine Science Tools, catalog number: 15025-10)
Fine forceps (Fine Science Tools, catalog number: 11412-11)
Fine forceps (Fine Science Tools, catalog number: 11413-11)
Cordless trimmer for rodents (Bioseb, model: Bio-1584)
Electrophysiology and visualization
Stereomicroscope (Olympus, model: SZX7)
Light source (AmScope, model: 6 W LED Dual Gooseneck Illuminator or any available)
Upright microscope (Olympus, model: BX50WI)
4× objective (Olympus, PLN)
Camera (any equipped with the microscope)
Patch clamp amplifier with headstage (Molecular Devices, model: Multiclamp 700B)
Digitizer (Molecular Devices, model: Digidata 1440)
Micromanipulators (Scientifica, model: PatchStar)
Constant current stimulator (Digitimer, model: DS3)
Pipette holders (Molecular Devices, model: 1-HL-U)
Faraday cage (Sutter Instruments, model: AT-36FC)
Silver wire AWG 26 for electrodes (WPI, catalog number: AGW1510)
Ag/AgCl pellets (WPI, catalog number: EP1)
BNC cables
PC computer
Software and datasets
pClamp (version 10.7, Molecular Devices)
Clampfit (version 10.7, Molecular Devices)
Procedure
Initial preparations
Prior to beginning any procedures, warm up the Krebs bicarbonate solution to room temperature and bubble the solution with a mixture of 95% O2 and 5% CO2 gas. We recommend oxygenating the solution for 15 min.
Collect all surgical tools (Figure 1) and disinfect them and the working areas with 70% ethanol.
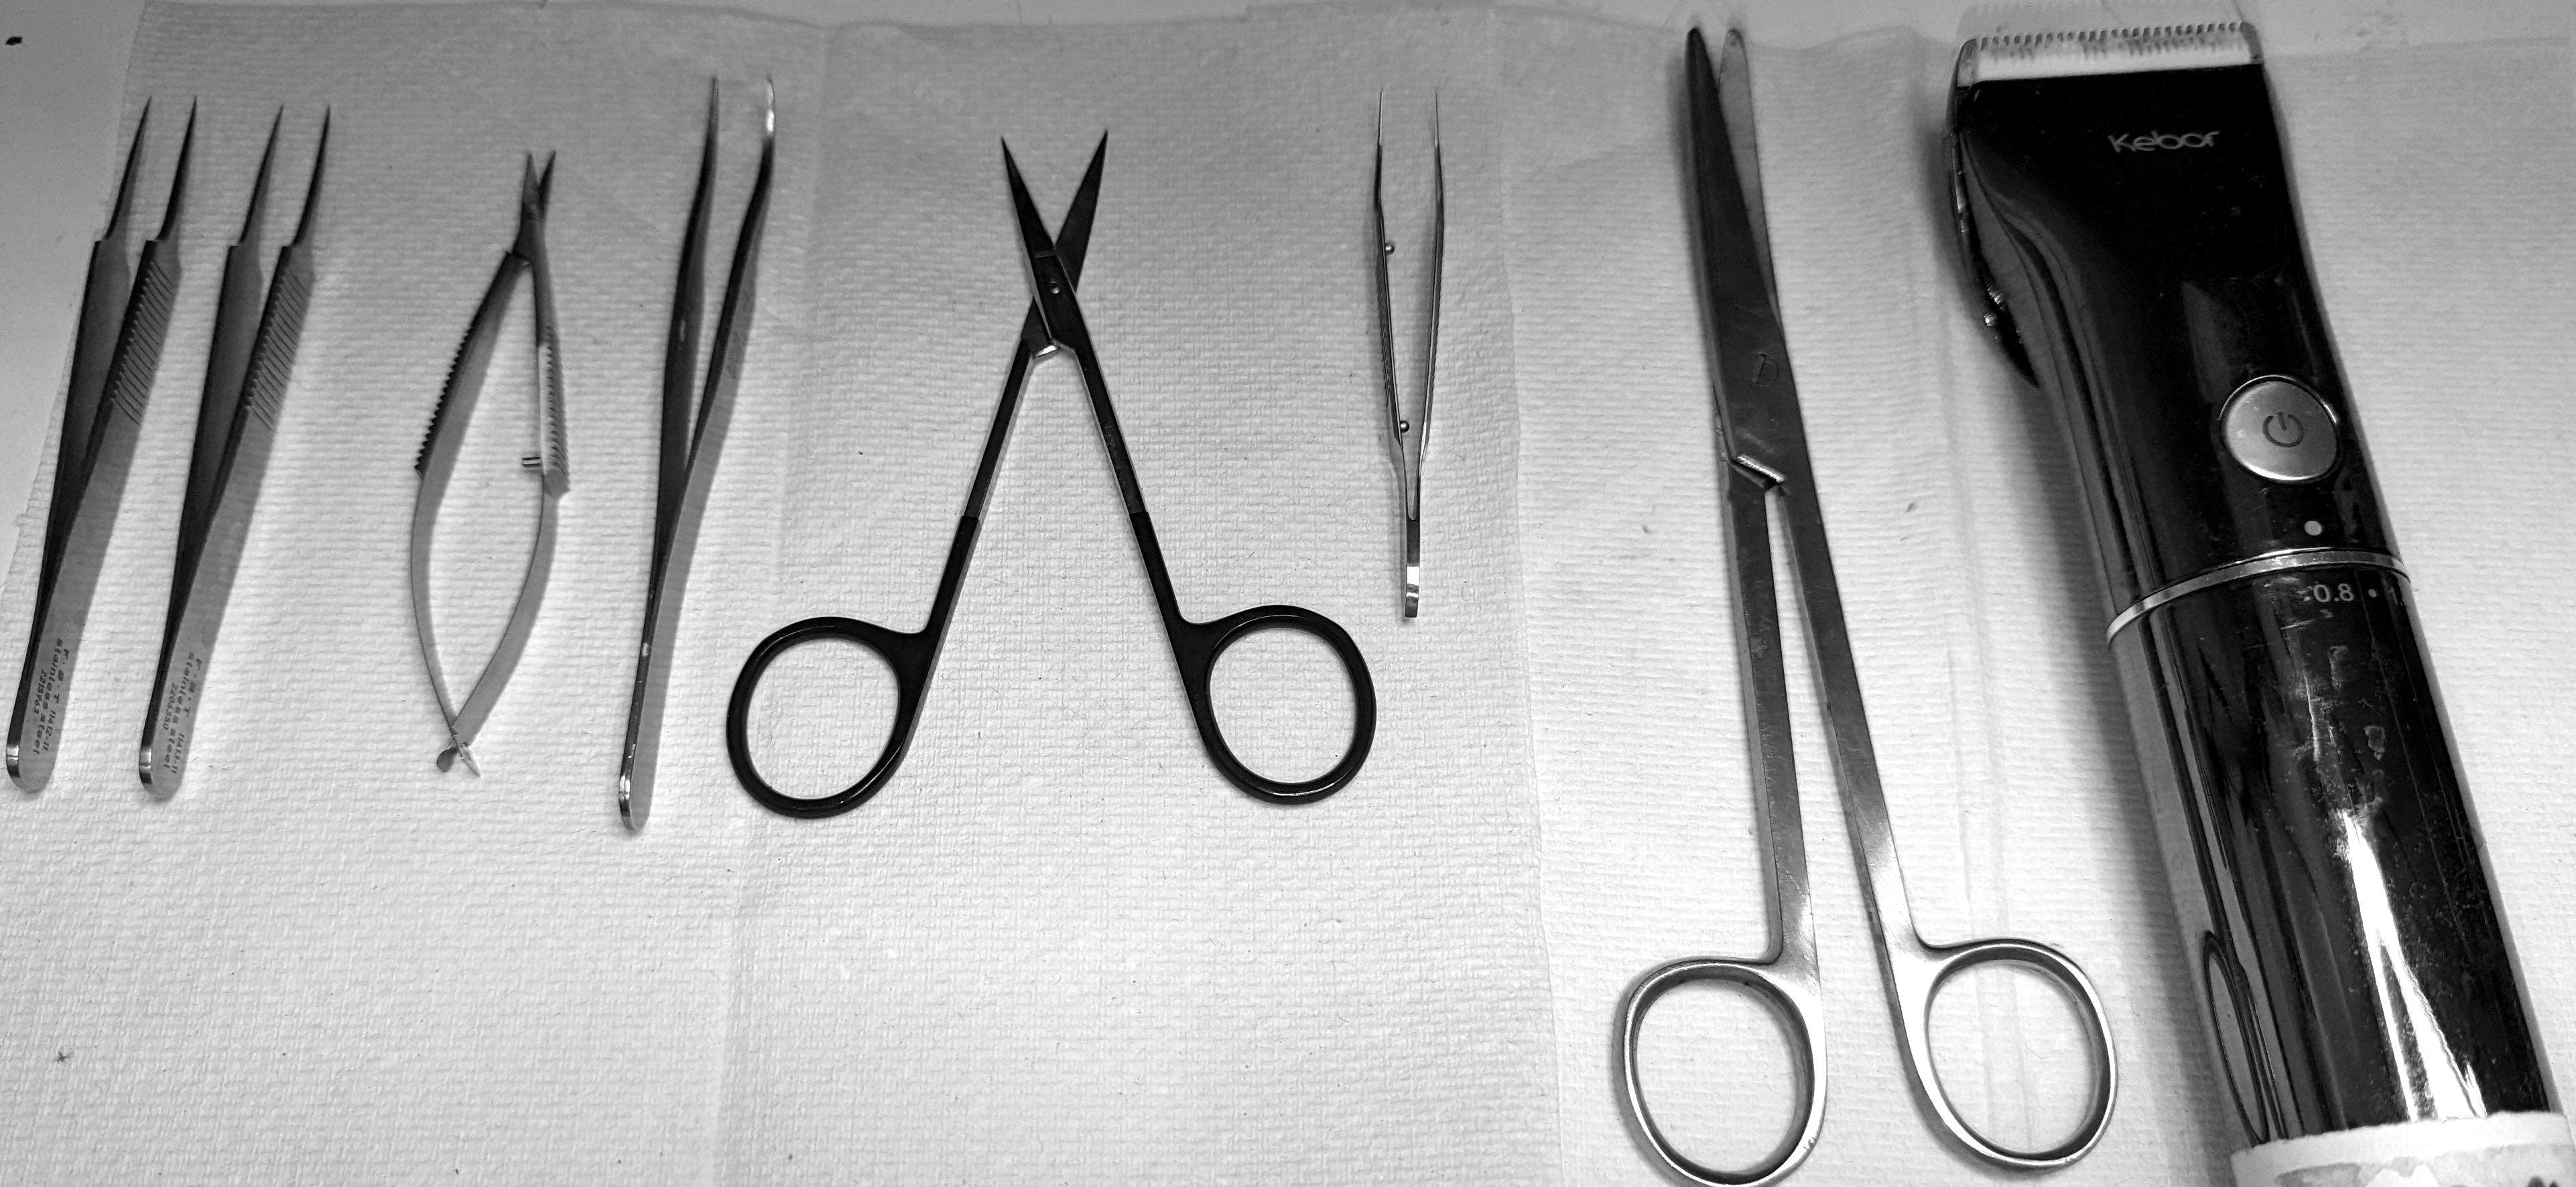
Figure 1. Preparation of surgical tools for nerve isolationBefore starting the dissection, prepare a large Petri dish for the initial collection of the dissected nerves and fill it with Krebs bicarbonate solution. Prepare another Petri dish with Krebs bicarbonate solution to where the cleaned nerves will be transferred. After dissection, the nerves can be kept in a Petri dish at room temperature.
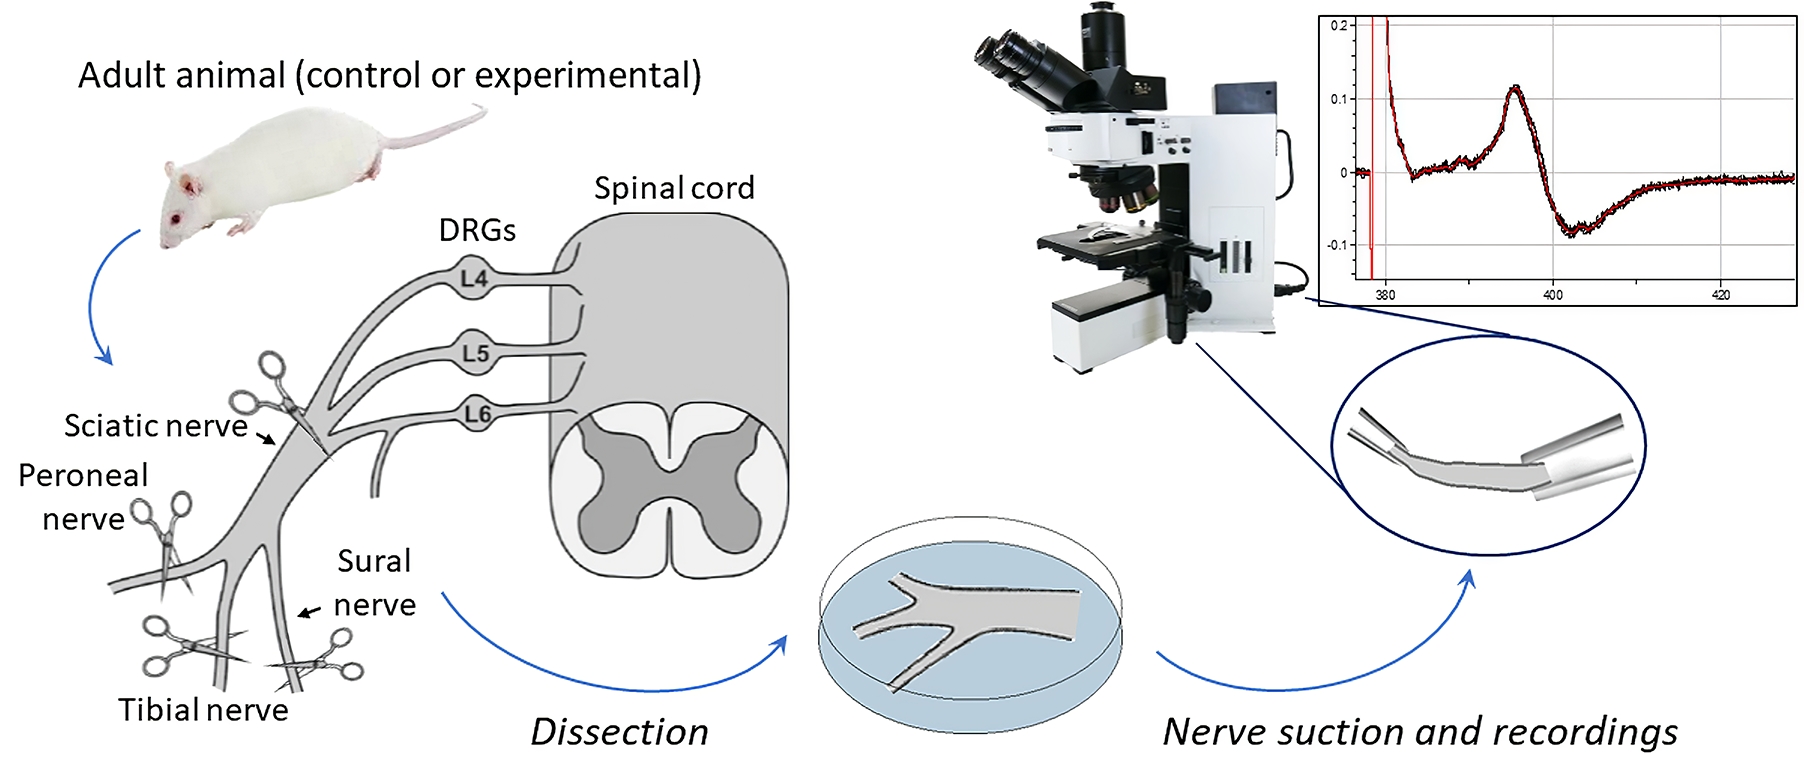
Terminally anesthetize an animal with isoflurane (4%–5%) in a chamber for anesthesia. Ensure complete anesthesia by the loss of pedal reflection (pinch the hind paw) and/or corneal reflexes (gently touch the eye) and cull the animal (decapitation).
Place the animal in a designed tissue dissection area. Remove the fur from the outer surface of the leg using clippers. Repeat for the other leg if both sciatic nerves are to be harvested.
Nerve isolation
Before opening the tissues, spray the skin with 70% ethanol.
Position the animal on its side so that the spine faces the experimenter. Pull up the skin on the proximal part of the thigh and make a long posterolateral incision on the animal side to expose the biceps femoris muscle.
Locate the mid-thigh point. Holding blunt surgical scissors or course forceps vertically, penetrate the muscle at midpoint by approximately 10 mm and spread the branches in a rostrocaudal direction. Pulling the muscle away exposes the sciatic nerve and its branches (Figure 2, top left).
Note: It takes some effort to penetrate the muscle, and force should be applied to open it.
Using scissors and forceps, cut the muscles along the whole span of the sciatic nerve and beyond its trifurcation to the point where the branches are about to be cut (Figure 2, top right).
Use the hemostat or self-retaining retractor to keep the sciatic nerve and its branches open. The sciatic nerves in Sprague Dawley rats are relatively long and divide distally into branches (> 1 cm proximally). Using two retractors to expose the nerve with its branches might be helpful for careful dissection. We attempt to expose approximately 2 cm of nerve to the trifurcation into the tibial, common peroneal, and sural nerves. Exposing each branch will depend on the nerve of interest and the experimental aims.
Use curved forceps and spring scissors to gently separate the sciatic nerve from the surrounding fascia and large adipose tissue pieces. Insert the curved forceps underneath the proximal part of the nerve and move the forceps along the whole span of the nerve to ensure it is fully separated from the surrounding tissue.
Note: Older rats have more adipose tissue surrounding the nerves, especially at the point of trifurcation, making dissection more challenging.
Using spring scissors, cut the sciatic nerve branches to the desired length. Start from the lumbosacral region to maximize the length of the sciatic nerve and move distally to the anterior end of the nerve, cutting from side to side while lifting the top of the nerve to avoid nerve damage. Typically, the length of the cut sciatic nerve is approximately 20–30 mm.
Note: Careful nerve excision is critical in producing high-quality nerve preparation. We recommend cutting to the trifurcation point even if only the sciatic nerve is to be used, as it makes further manipulations easier.
Once the nerve has been cut to its desired length, grab it by the tip of the tibial nerve (the thickest branch) using coarse forceps to transfer the dissected nerve into the prepared Petri dish with Krebs bicarbonate solution (Figure 2).
Note: Never pinch or stretch the nerve, as it damages it.
Repeat the procedure for dissecting the nerve from the other side. After completing, gently transfer the second nerve to the Petri dish.
Note: Try to keep time for nerve dissection to the minimum possible and dissect both sciatic nerves within half an hour after euthanasia (10–15 min for each nerve).
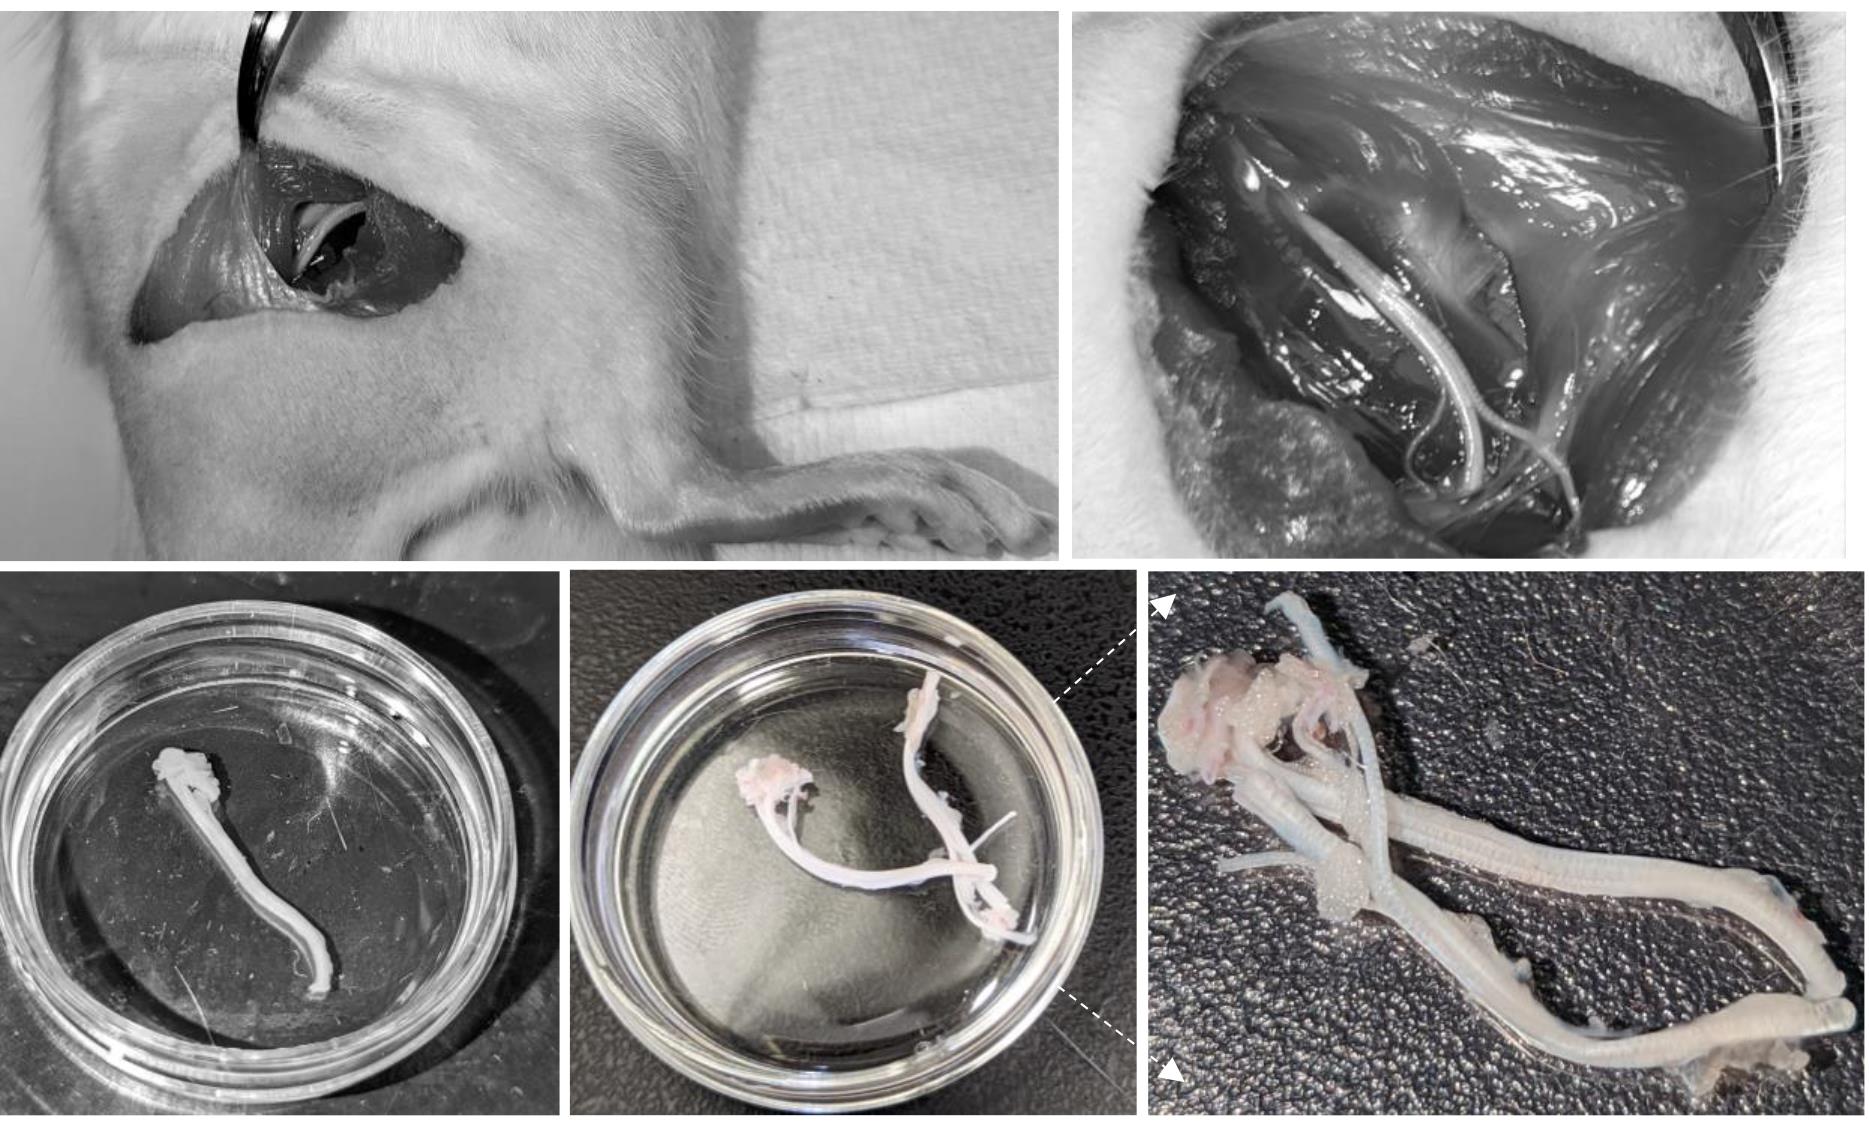
Figure 2. Sciatic nerve dissection, showing various stages of nerve isolation from immediate exposure of the nerve (top left image) and its whole opening (top right) to both isolated nerves (bottom images). Notice connective and adipose tissues surrounding the nerves on the enlarged snapshot (bottom right).
Epineural sheath removal
Under visual control with a binocular or stereomicroscope, use a pair of spring scissors and fine forceps to carefully remove all surrounding tissue, such as fats and connective or fascia tissues, from the nerve on all sides (Figure 2, right bottom).
Note: Nerves must be very carefully handled during the procedure to avoid stretching them or producing accidental trauma to the tissue. If it is necessary to hold the nerve, do it by holding its tip.
Gently remove the epineurium, the sheath covering the nerve that significantly obstructs the drug permeability of nerve fibers [8], using two fine forceps. For this, tear the epineurium, starting from the trifurcation and further along the nerve, and gently pull the sheath along the nerve, taking care to minimize nerve stretching as much as possible. During this process, the sciatic nerve typically splits into its branches (Figure 3). Basically, the common peroneal branch could be separated along the whole span of the nerve. Splitting tibial and sural branches is more complicated, especially in the proximal part of the nerve.
Clean each nerve branch from which the recordings will be made, always maintaining the tissue in the Krebs solution (Figure 3 right). Once the epineurium has been removed, cut off the nerve ends that were held with the forceps during manipulation to ensure high-quality recordings from the nerve.
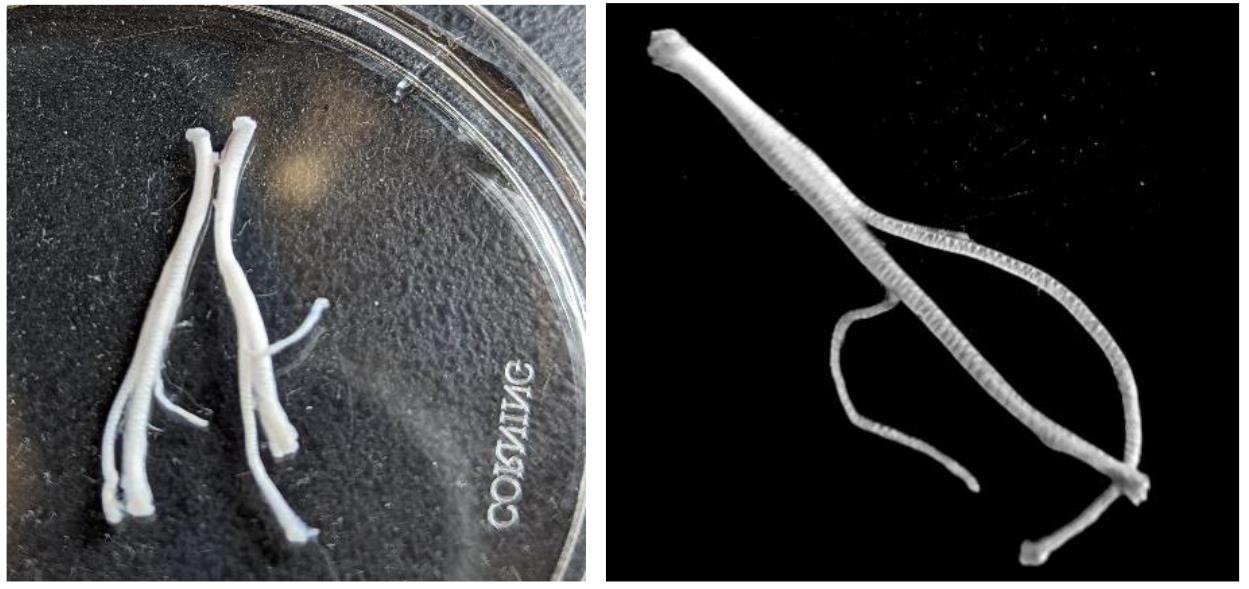
Figure 3. Nerve cleaning and epineurium removal. Left image, sciatic nerves after removal of connective and adipose tissue. Right image, the sciatic nerve split into separate branches after half of the nerve was stripped of the epineurium.Transfer the cleaned nerve to a Petri dish with fresh and oxygenated medium.
Perform cleaning of the second nerve.
Measure the length of each nerve for further analysis (Figure 4).
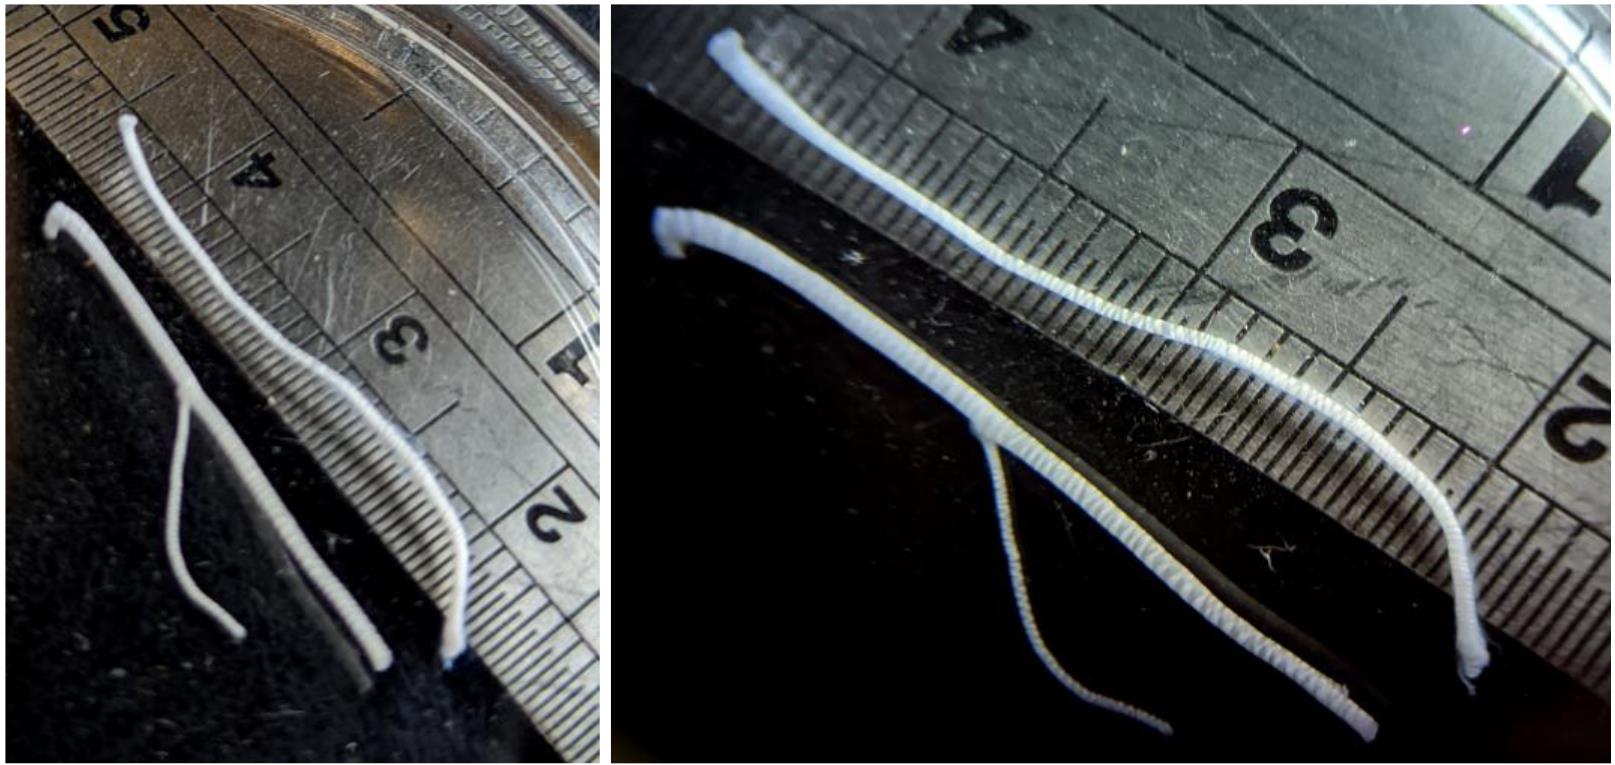
Figure 4. Separate nerve branches after epineurium removal and cleaning. Notice the nerve length.
Fabrication of suction pipettes and nerve suction
A suction electrode is a valuable tool in electrophysiology experiments, and we use suction electrodes for both stimulating and recording the nerve.
Fabricate suction pipettes using a butane blow torch and glass capillaries to fire polish pipettes to a tip diameter close to the size of the nerve. Although suction electrodes are fabricated for each nerve individually, we recommend fabricating a set of pipettes with different tip diameters beforehand, as shown in Figure 5. Use the camera or the ocular to assess the tip diameter and choose the pipettes whose tips best fit the nerve end size.
Note: Fabrication of pipettes with various tip diameters allows for the accommodation of the nerve, depending on its diameter, and ensures that the nerve is held securely.
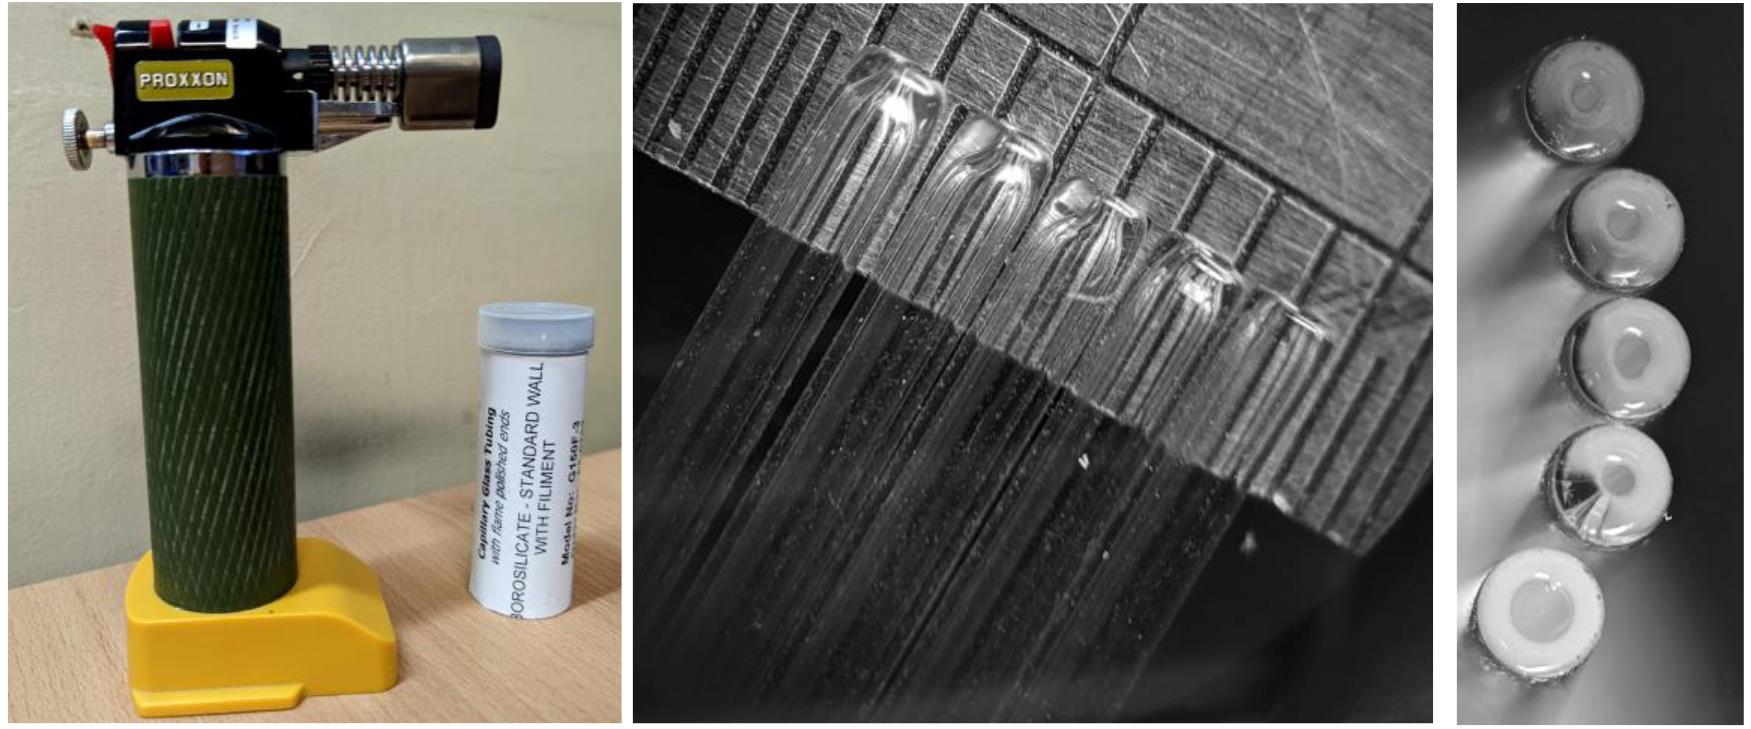
Figure 5. Glass pipettes fire-polished to various tip diameters for appropriate nerve suctionPrepare the electrophysiological rig, filling in the perfusion system with continuously oxygenated Krebs bicarbonate solution (95% O2 and 5% CO2) and circulating oxygenated medium through a recording chamber with a peristaltic pump. It is essential to circulate an oxygenated medium through the chamber to maintain the health of nerve tissue during prolonged recordings.
Note 1: We recommend using a Petri dish as a recording chamber. The flow rate of the medium will vary based on the design of the perfusion system, but it should be enough to maintain a consistent superfusion flow and provide adequate oxygen and nutrient levels to support the tissue. Excessive flow should be avoided as it may affect the recordings.
Note 2: The peristaltic pumps connected to the power supply typically produce electrical noise and should be ideally placed outside the Faraday cage.
Position two reference Ag/AgCl electrodes (one for the stimulator and one for the recording headstage) inside the chamber and connect suction pipettes to their wires. Let the pipettes fill with the medium.
Note: The medium should not reach the pipette holder, as it produces a substantial electrical noise that can be eliminated only by replacing the pipette holder. We recommend using a long-length suction pipette and a matching electrode wire.
Transfer one of the nerves to the recording chamber using closed forceps.
Note: Never grab the nerve with the forceps.
Focus on the nerve and assess the width of its distal and proximal ends using low magnification (e.g., objective 4×). Using closed forceps, push the distal end of the nerve to the very opening of the suction pipette connected to the wire and stimulator. Apply negative pressure to suck the tip of the nerve inside the pipette. Ensure the contact between the pipette tip and the nerve is tight. In particular, the nerve should not move further inside the pipette when the negative pressure is applied and should not slip out of the pipette once the negative pressure is released (Figure 6, bottom image).
Note: If the nerve does not fit inside the pipette, use a suction pipette with a broader or narrower tip diameter (see step D2).
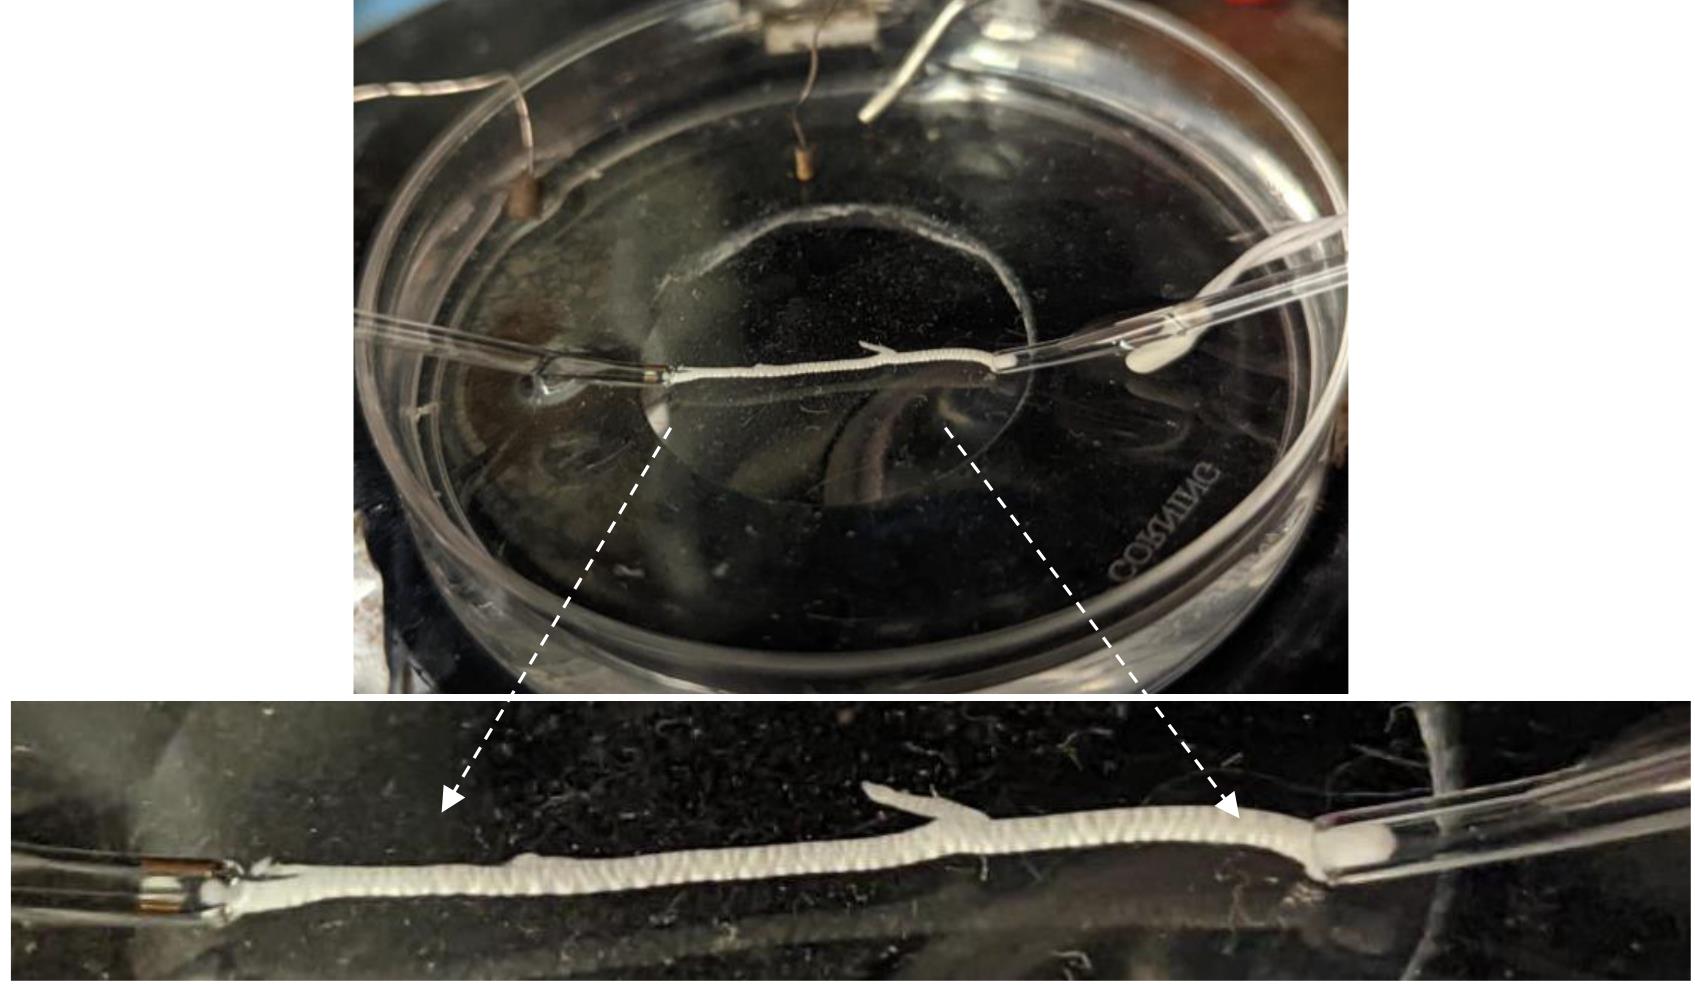
Figure 6. Stimulating and recording suction electrodes with the nerve in for stable recordingsRepeat the previous step to proceed with the proximal end of the nerve for the recording pipette. Once both nerve ends are inside the suction pipettes, place the recording and stimulating electrodes in front of each other, avoiding stretching the nerve (Figure 6), which may affect the CAP recordings [9,10].
Note: Securing the nerve in the suction electrodes is critical for stable recordings, especially over a long time and under pharmacological applications.
Ensure that the stimulator is connected and ground electrodes are in place. Start testing the protocol by stimulating the nerve with a single pulse (1–2 mA, 1 ms duration) to initiate CAP generation by both myelinated (A-fibers) and non-myelinated C-fibers. Once the typical CAP is obtained (see section E), allow the nerve to settle for 15–20 min. This further improves the contact between the nerve and the pipettes and, hence, the stability of CAP recordings over time. Record at room temperature.
Nerve stimulation and recordings
Set the amplifier to the current clamp mode. As the recorded signals do not typically exceed 10 mV, we recommend using a 5 GOhms input resistor and digitizing the signals at 10–20 kHz. Set the Bessel filter signals at ≥ 2 kHz for the recordings from non-myelinated C-fibers. The Bessel filter should be increased to 5–10 kHz for recordings from the A-fibers, which are faster-conducting myelinated fibers.
Stimulate nerve fibers with square current pulses of positive polarity ranging from 0.1 to 2 mA. To activate the high-threshold C-fibers, pulses should be of 1 ms duration.
Note: This protocol also activates A-fibers, whose fast responses, however, overlap with the stimulation artifact. Activating C-fibers exclusively is possible by using 0.8–1.2 ms stimuli of negative polarity. In that case, A-fiber-driven CAPs do not appear due to an anodal block of conductance in A-fibers, while C-fiber-driven CAPs are delayed by several milliseconds.
Run multiple trials of CAPs generated with the above protocol (Figure 7).
Note: The CAPs are very reproducible; however, they may be prone to time- and use-dependent rundown of amplitudes and slowing down of conduction. Therefore, we recommend running 5–10 trials for each time point of interest with a gap of at least 10 s between trials.
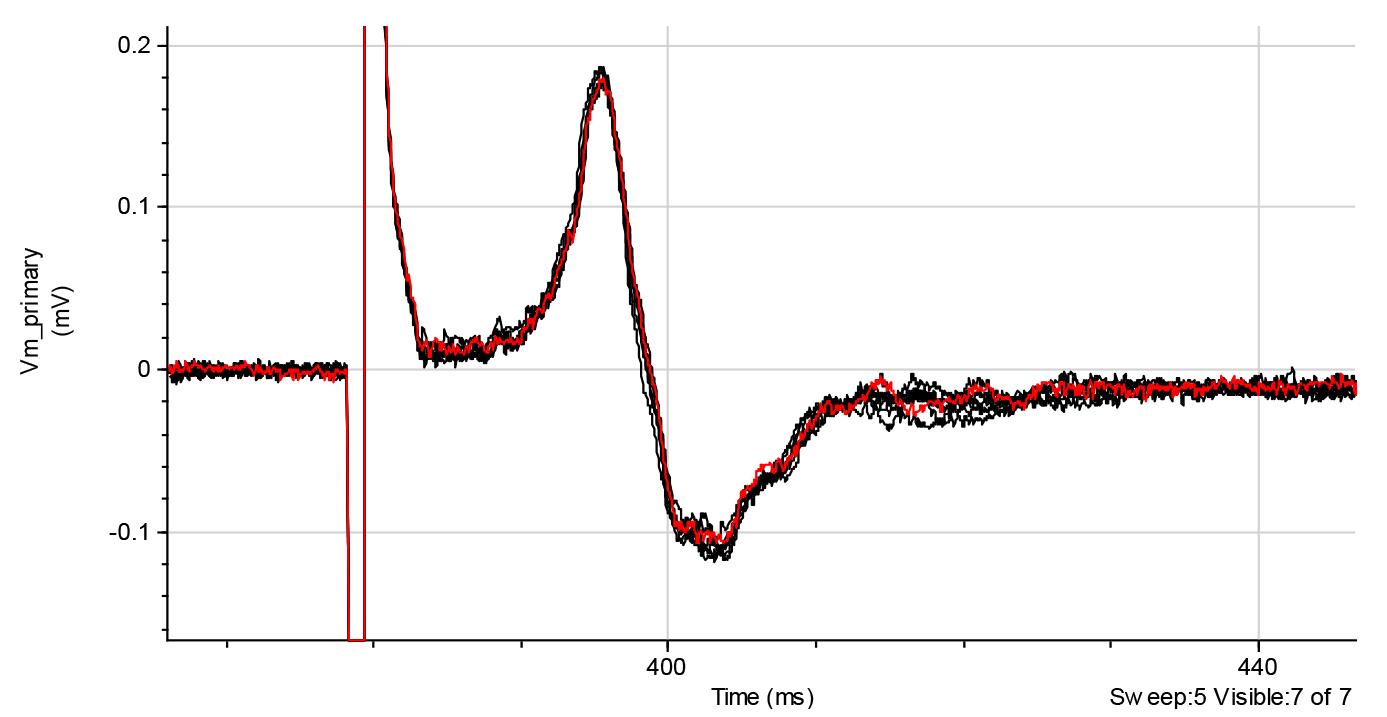
Figure 7. Representative recordings of compound action potential (CAPs) generated by C-fibers (1 ms pulse duration). Red line shows the average trace of eight trials. Recordings are raw data collected using the Clampfit software.For the recordings of the A-fiber-driven CAPs, we recommend using the protocols of 50 μs duration of stimuli (Figure 8).
Note: At high stimulus intensities, 50 μs pulses may also activate a substantial percentage of C-fibers (Figure 8, right bottom).
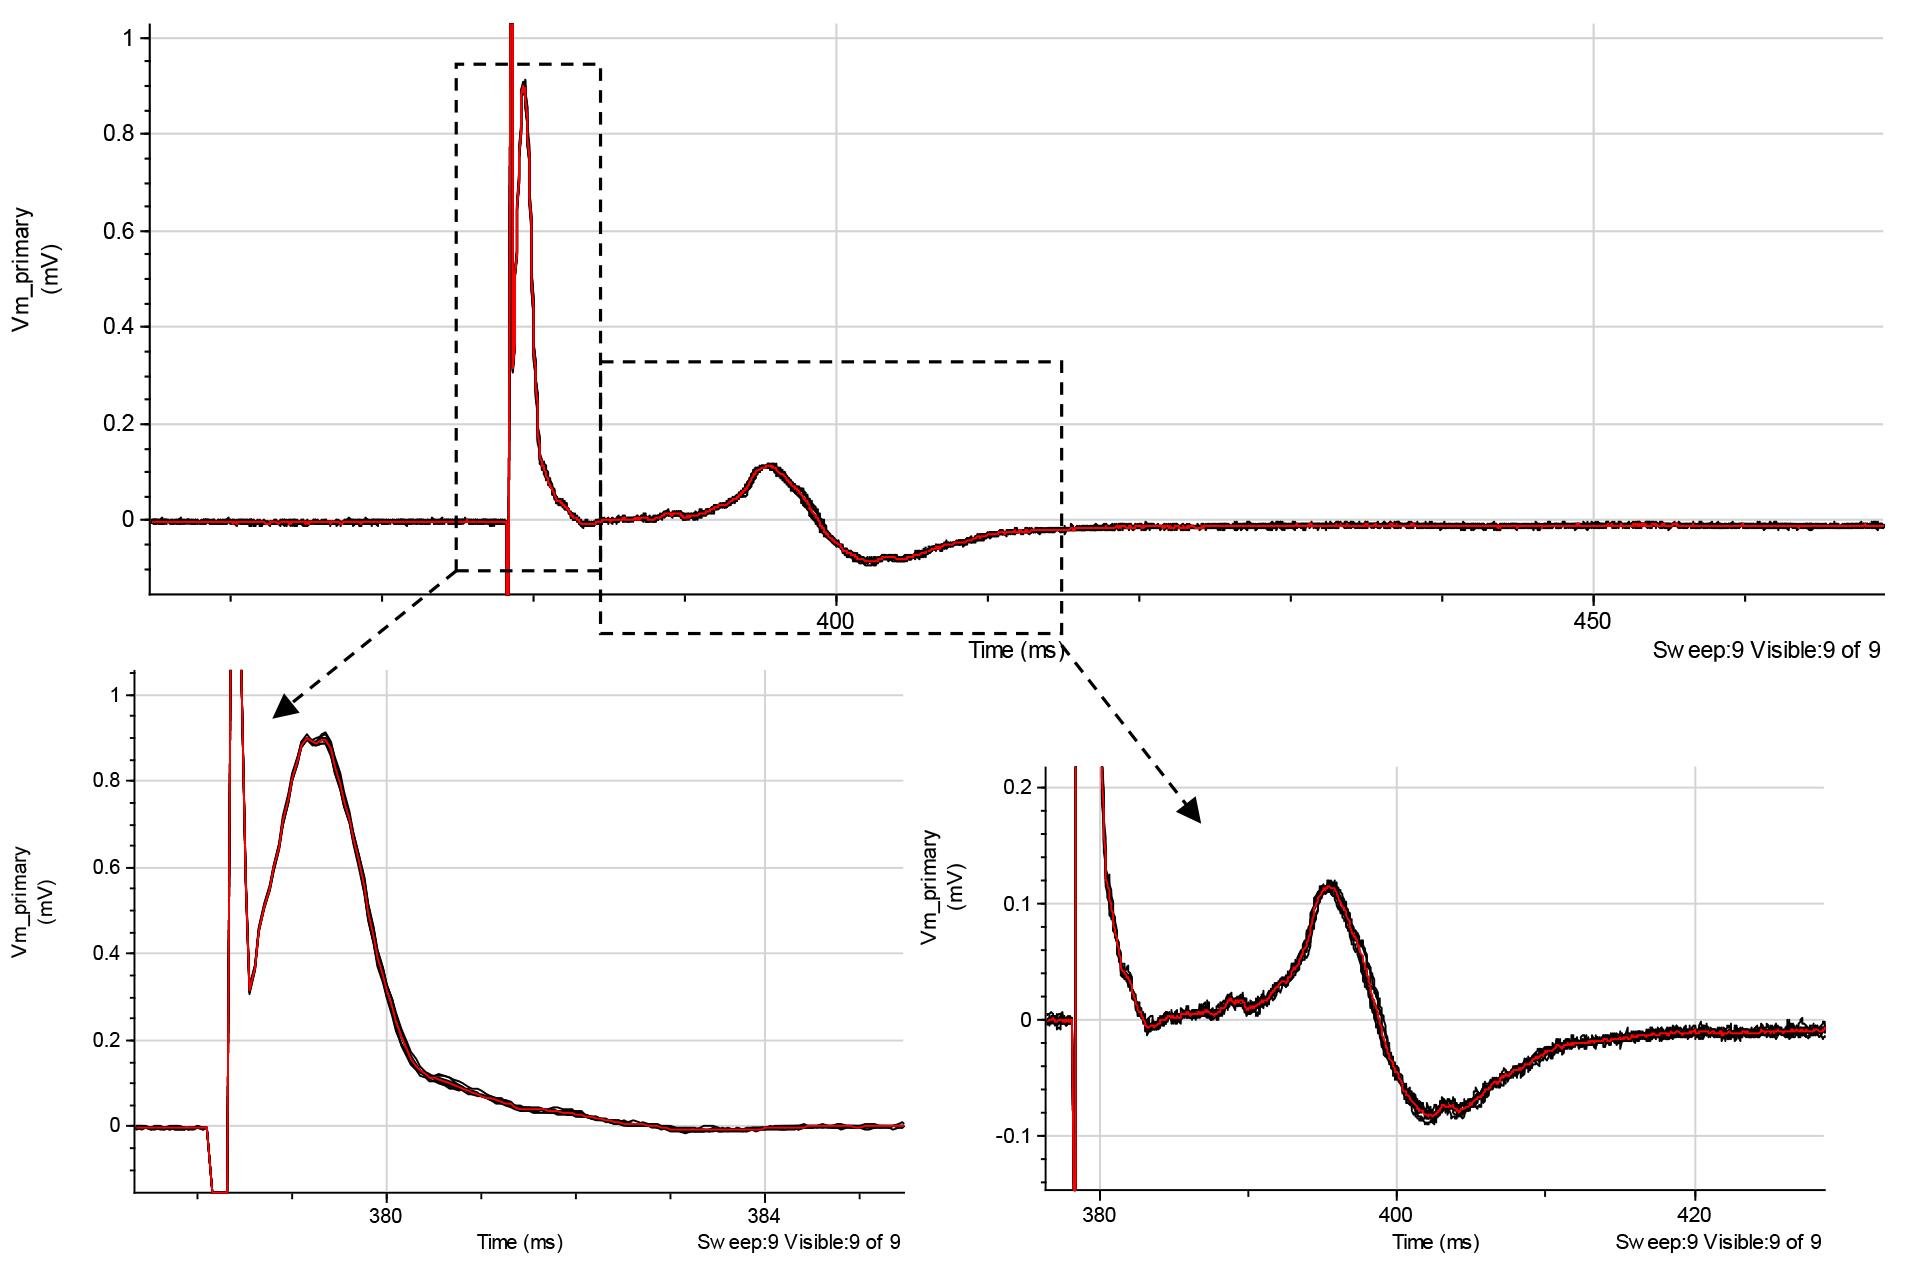
Figure 8. Representative recordings of mixed fiber stimulation (top traces) show A-type fiber response (lower left traces) and C-fiber stimulation (lower right traces). Red line shows the average of eight trials. Recordings are raw data collected using the Clampfit software.Stimulus intensities required to elicit CAPs vary greatly between the nerves and their branches. It is, therefore, necessary to determine the minimum stimulus that produces CAP and the stimulus at which further increase in stimulating current does not produce any changes (i.e., saturating stimulus). For this, at the beginning of each experiment, start testing with stimuli of 1–2 mA (1 ms pulse duration) by incrementally increasing stimulus intensity to establish both the minimum and saturating currents for A-fiber-driven CAPs using 50 μs pulse protocol (Figure 9, left). The CAP magnitude increases nonlinearly with the stimulus (Figure 9, right).
Note: The typical amplitude of A-fiber-mediated CAPs driven by saturating stimulus ranges from 0.5 mV to several millivolts.
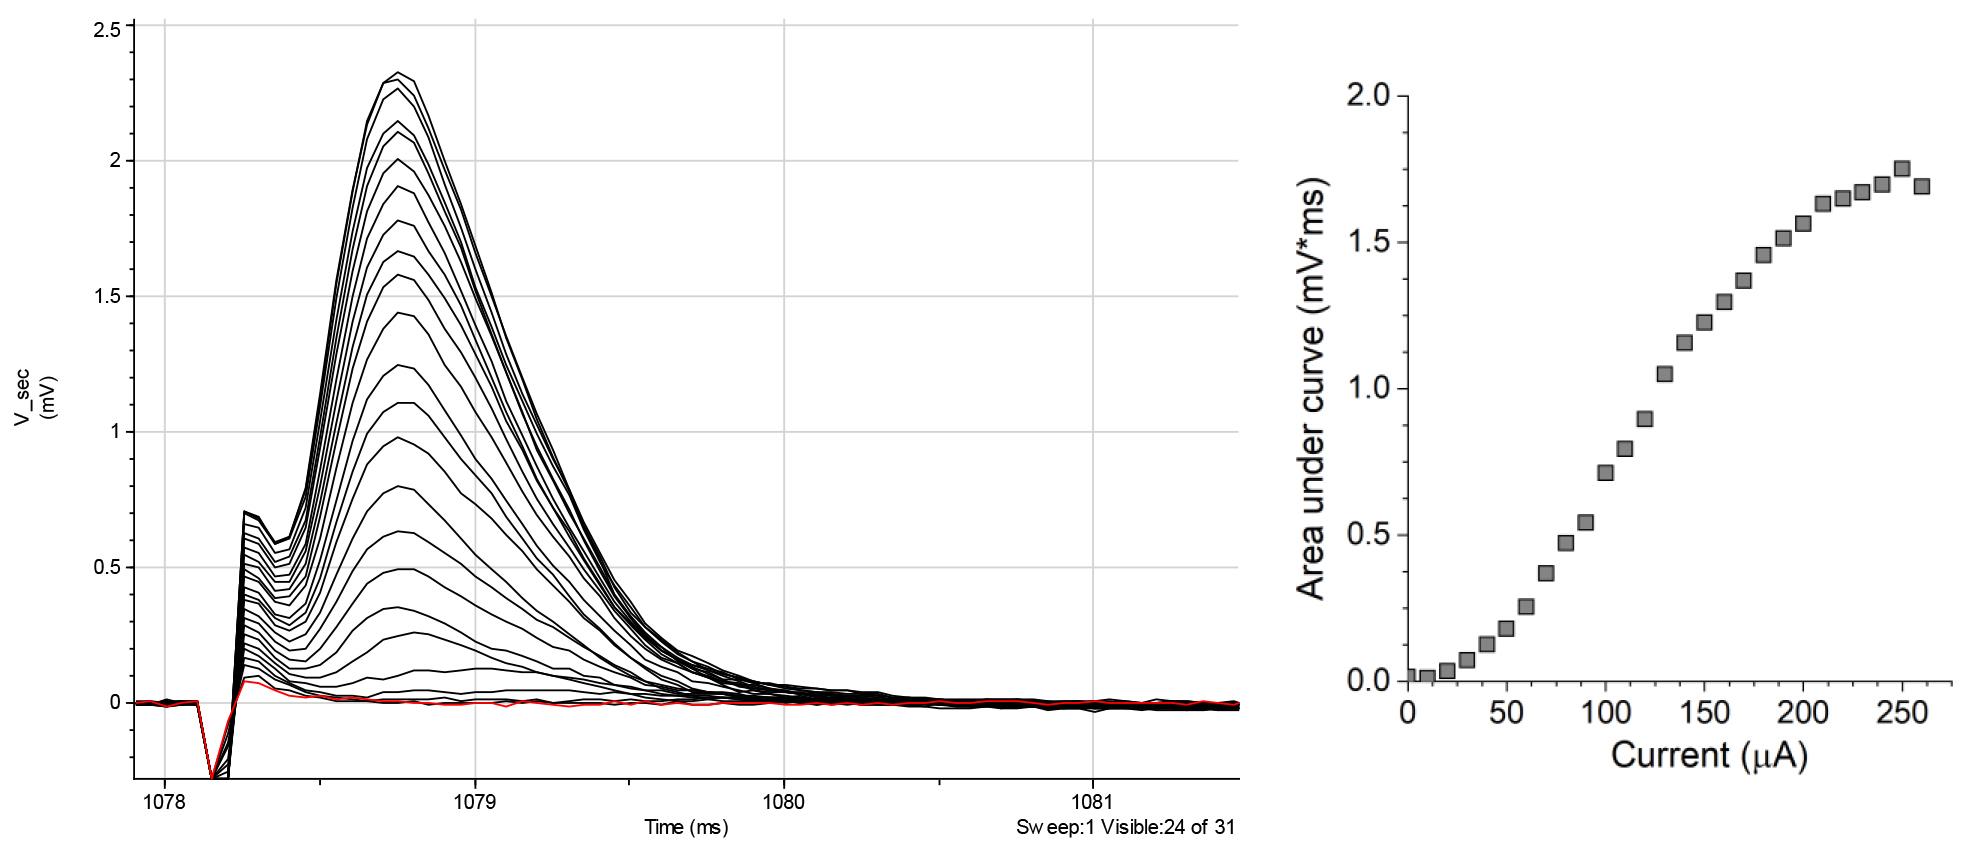
Figure 9. Representative recordings of A-type fiber response (left traces), showing the stimulus-intensity dependence (right graph)Repeat the same for C-fiber-driven CAPs using 1 ms pulse protocol.
Note: The C-fiber-mediated CAPs driven by the saturating stimulus are smaller than for A-fibers, ranging between 0.05 and 0.5 mV.
After the minimum and the saturating stimuli are established, the following experimental protocols may test the A-fiber- and C-fiber-driven CAPs evoked by saturating currents before and after pharmacological treatment.
Note 1: The magnitude and signal profile of the CAP can vary between different nerves or even its branches or when recorded on the right or left nerve of the same rat.
Note 2: To expedite the process, stimulus intensity dependence can be excluded after gaining some experimental experience, and the optimal stimulus intensity can be found empirically by coarsely increased stimuli until it reaches the saturation level.
After completing the recordings, save the data for offline analysis.
At the end of the experiment, measure the distance between the tips of the suction electrodes to assess the conduction velocities of nerve fibers.
Note: C-fibers show substantial variability in their conduction velocities, and the CAP amplitude depends on the length of the nerve and the distance between two recording electrode tips [11]. We recommend using ~2 cm of nerve length for maximal quality recordings.
Data analysis
The shape and amplitude of CAPs depend on the nerve length and the quality of contacts (the resistance) between the suction electrodes and the nerve. These parameters vary significantly from preparation to preparation and, therefore, should be normalized for paired analysis. Also, CAPs may have complex shapes, including several peaks and variable profiles; thus, determining the amplitude might be challenging. We recommend using the normalized area under the curve as the primary signal readout for statistical analysis. Among other parameters to estimate, it may be the fiber conduction velocity, for either A- or C-fibers, calculated by dividing the distance between the tip of the suction electrodes by the latency between the onset of the stimulus and the start of the CAP. Data analysis may be performed using the Clampfit and/or Origin software.
Validation of protocol
To validate the protocol, we followed the steps above for electrophysiological recordings from the nerve, aiming to test the effect of lidocaine, a common local anesthetic used in clinics [12,13]. Also, a part of this protocol has been used and validated in the recently published research article (Figure 1 from Krotov et al. [14]).
Using two suction electrodes, we assessed both A- and C-fiber CAPs before and after applying lidocaine at a concentration of 2%. The pharmacological effect was prompt—we noticed a gradual decline in the magnitude of CAPs, which disappeared completely after 1–2 min of drug superfusion. The onset of the effect depends on the perfusion rate. Figure 10 displays an overlay of the two A-fiber conductance recordings to show the effect of lidocaine through paired recordings (from the same nerve before and after drug application). The statistical summary indicates the same therapeutic effect observed in several nerve preparations from different animals. This served as a proof-of-concept for the reliability of the method and its applicability to pharmacological testing.
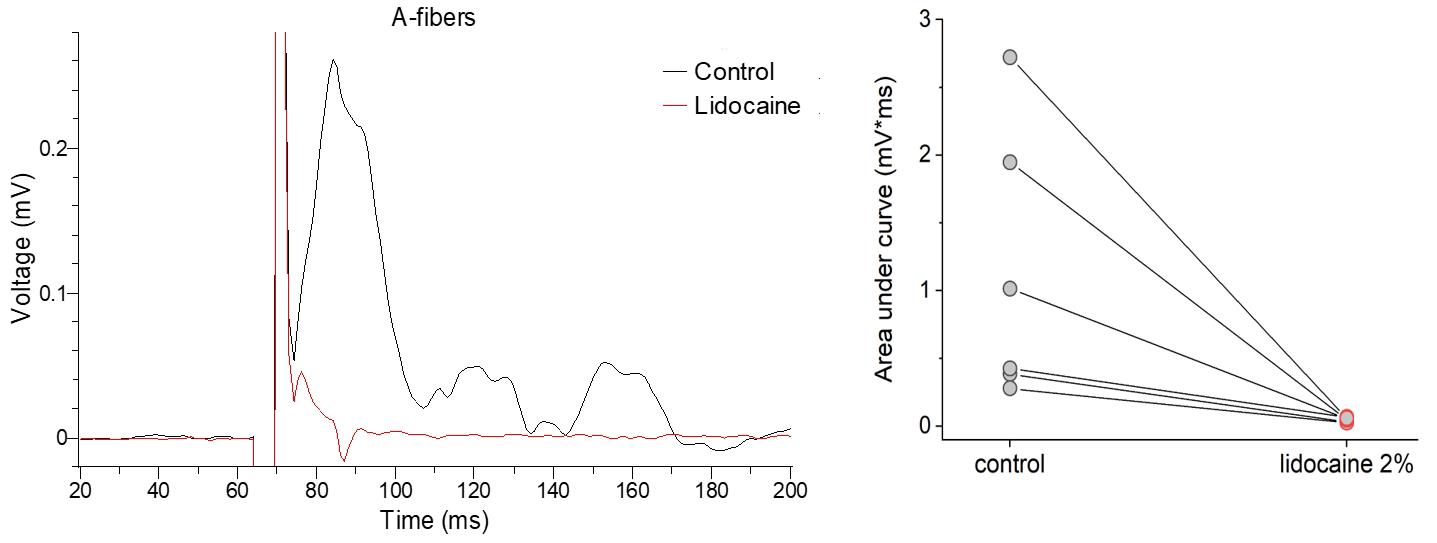
Figure 10. Pharmacological treatment with lidocaine results in a complete block of A-fiber conductance. Left, representative recordings from the A-fibers before (control) and shortly after application of lidocaine at the concentration of 2% (1–2 min after superfusion). Right, quantification of the compound action potential (CAP) area under curve in different experimental conditions. n = 6 nerve samples independently tested.
Figure 11 demonstrates that the protocol allows for accurate measurements of the therapeutic effect of 2% lidocaine on the function of C-fibers. Similar to the A-fiber conductance, lidocaine completely blocked the CAP generated by nociceptive fibers within 1–2 min after drug superfusion. Previous research showed that lidocaine effectively blocks sensory and motor fibers by preventing the AP initiation and conduction along the nerve by blocking sodium ion channels, resulting in anesthetic effects [15,16].
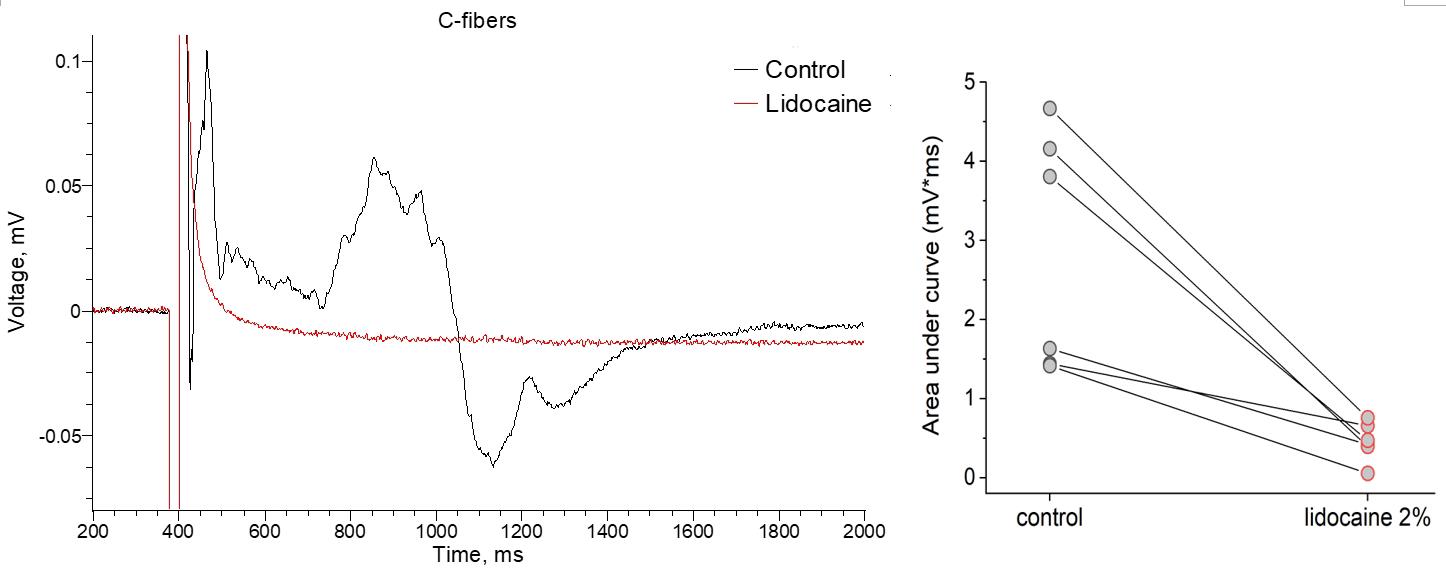
Figure 11. Pharmacological treatment with lidocaine results in a complete block of C-fiber conductance. Representative recordings before (control) and shortly after the bath application of lidocaine (2%). Quantification of compound action potential (CAP) peak amplitude in different experimental conditions. N = 6 nerve samples pharmacologically tested.
Our findings provide functional evidence that the protocol we used is effective and reliable in examining nerve function in both physiological conditions and under pharmacological treatments. This model can be utilized in future studies to evaluate the effectiveness of pain-relieving drugs and other pharmacological treatments for various pathological conditions.
General notes and troubleshooting
The peripheral nerves have been considered important therapeutic targets for the treatment of pain, including chronic pain. However, accurately measuring nerve function is critical to assessing the efficacy of any therapeutic approach. Also, the readings on nerve function should be robust, reliable, and reproducible to examine the effects of pharmacological treatments. Here, we provide a detailed, step-by-step protocol for measuring nerve conductance in adult rats for sensory, motor, and nociceptive fibers. In summary:
After harvesting, sciatic nerves should always remain in a well-oxygenated fresh solution at room temperature. Tissues should not be kept on ice. Dissected nerves can be maintained for several hours.
While the protocol is relatively straightforward to implement, it requires practice. It generally takes approximately 2 h to complete nerve preparation. The most challenging and time-consuming steps of this protocol are removing epineurium and creating a tight contact between suction electrodes and the nerves. It is possible to omit the epineurium removal and record from the whole nerve rather than from individual branches, which might be a practical tool for studying the conduction of injured nerves. However, that would require higher intensities of electric stimuli necessary to activate nerve fibers and would impact wash-in and especially wash-off times of any pharmacological intervention.
We recommend using a Petri dish instead of a standard recording chamber coupled with a conventional perfusion system for the following reasons:
Standard recording chamber might be too small to accommodate long nerve preparations.
The use of a peristaltic pump for perfusion substantially increases the electrical noise of the recordings.
Vacuum-driven outflow requires large volumes of solutions that may not be suitable for pharmacological studies.
Electrophysiological recordings might be performed up to 12 h after dissection. However, a time-dependent rundown of the amplitudes of the responses should be considered. We recommend recording within 4 h after dissection and implementing experimental protocols of 0.5–1.5 h duration to avoid possible rundown.
Ensure temperature stability, as changes in 1–2 °C can affect the fiber conduction velocities, thereby changing the CAP shape.
Typically, in one rat, the right and left nerves are dissected, and the following measurements are recorded in control and testing conditions.
The protocol has been effective in using animals of different ages.
This protocol can be used for mouse nerve preparations. Due to their small size, we recommend using a stereomicroscope at higher magnifications to ensure better visualization of nerves and branches. Additionally, it is critical to handle the nerves with extra care throughout the procedure.
Depending on the research interests, the protocol is also adaptive to different genetic backgrounds and treatments.
Acknowledgments
This work was funded by the UCL-Welcome Trust Translational Partnership Pilot Award RM-TIN #178973 (O.K.).
Competing interests
Dr. Olga Kopach is an Associate Editor for Bio-protocol but did not participate in the editorial and peer review process of this article, except as an author. The authors declare no other conflict of interest.
Ethical considerations
Animals were used in accordance with the European Commission Directive (86/609/EEC) and the United Kingdom Home Office (Scientific Procedures) Act (1986).
References
- Kopach, O. and Voitenko, N. (2021). Spinal AMPA receptors: Amenable players in central sensitization for chronic pain therapy? Channels 15(1): 284–297.
- Rigaud, M., Gemes, G., Barabas, M. E., Chernoff, D. I., Abram, S. E., Stucky, C. L. and Hogan, Q. H. (2008). Species and strain differences in rodent sciatic nerve anatomy: Implications for studies of neuropathic pain. Pain 136(1): 188–201.
- Kotamraju, B. P., Eggers, T. E., McCallum, G. A. and Durand, D. M. (2023). Selective chronic recording in small nerve fascicles of sciatic nerve with carbon nanotube yarns in rats. J. Neural Eng. 20(6): 066041.
- Sun, S., Delgado, J., Behzadian, N., Yeomans, D. and Anderson, T. A. (2020). Ex Vivo Whole Nerve Electrophysiology Setup, Action Potential Recording, and Data Analyses in a Rodent Model. Curr. Protoc. Neurosci. 93(1): e99.
- Zhao, D., Behzadian, N., Yeomans, D. and Anderson, T. A. (2021). In Vivo Whole‐Nerve Electrophysiology Setup, Action Potential Recording, and Data Analyses in a Rodent Model. Curr. Protocol. 1(11): e285.
- Serra, J., Bostock, H. and Navarro, X. (2010). Microneurography in rats: A minimally invasive method to record single C-fiber action potentials from peripheral nerves in vivo. Neurosci. Lett. 470(3): 168–174.
- Schulz, A., Walther, C., Morrison, H. and Bauer, R. (2014). In Vivo Electrophysiological Measurements on Mouse Sciatic Nerves. J. Visualized Exp.: (86). DOI: 10.3791/51181-v.
- Kagiava, A. and Theophilidis, G. (2013). Assessing the permeability of the rat sciatic nerve epineural sheath against compounds with local anesthetic activity: anex vivoelectrophysiological study. Toxicol. Mech. Methods 23(8): 634–640.
- Heimburg, T. (2022). The effect of stretching on nerve excitability. Hum. Mov. Sci. 86: 103000.
- Li, J. and Shi, R. (2007). Stretch-induced nerve conduction deficits in guinea pig ex vivo nerve. J. Biomech. 40(3): 569–578.
- Lao, J., Li, Y., Zhao, X., Tian, D., Zhu, Y. and Wei, X. (2014). The optimal distance between two electrode tips during recording of compound nerve action potentials in the rat median nerve. Neural Regener. Res. 9(2): 171.
- Cohen, S. P., Larkin, T. M., Weitzner, A. S., Dolomisiewicz, E., Wang, E. J., Hsu, A., Anderson-White, M., Smith, M. S. and Zhao, Z. (2023). Multicenter, Randomized, Placebo-controlled Crossover Trial Evaluating Topical Lidocaine for Mechanical Cervical Pain. Anesthesiology 140(3): 513–523.
- Kalajian, T. A., Cannella, J. A., Vasudevan, A., Mizelle, J., Rendon, L. F., Nozari, A. and Ortega, R. (2023). An overview of local anesthetics in over‐the‐counter products. Pain Pract. 24(2): 364–373.
- Krotov, V., Agashkov, K., Romanenko, S., Halaidych, O., Andrianov, Y., Safronov, B. V., Belan, P. and Voitenko, N. (2023). Elucidating afferent-driven presynaptic inhibition of primary afferent input to spinal laminae I and X. Front. Cell. Neurosci. 16: e1029799.
- Gokin, A. P., Philip, B. and Strichartz, G. R. (2001). Preferential Block of Small Myelinated Sensory and Motor Fibers by Lidocaine. Anesthesiology 95(6): 1441–1454.
- Huang, J. H., Thalhammer, J. G., Raymond, S. A. and Strichartz, G. R. (1997). Susceptibility to lidocaine of impulses in different somatosensory afferent fibers of rat sciatic nerve. J. Pharmacol. Exp. Ther. 282(2): 802–811.
Article Information
Copyright
© 2024 The Author(s); This is an open access article under the CC BY-NC license (https://creativecommons.org/licenses/by-nc/4.0/).
How to cite
Krotov, V. and Kopach, O. (2024). Nerve Preparation and Recordings for Pharmacological Tests of Sensory and Nociceptive Fiber Conduction Ex Vivo. Bio-protocol 14(7): e4969. DOI: 10.21769/BioProtoc.4969.
Category
Neuroscience > Peripheral nervous system > Sciatic nerve
Do you have any questions about this protocol?
Post your question to gather feedback from the community. We will also invite the authors of this article to respond.