- Protocols

- Articles and Issues
- For Authors
- About
- Become a Reviewer

Simplifying Barley Leaf Rust Research: An Easy and Reproducible Infection Protocol for Puccinia hordei on a Small Laboratory Scale
(*contributed equally to this work, § Technical contact) Published: Vol 13, Iss 14, Jul 20, 2023 DOI: 10.21769/BioProtoc.4721 Views: 1738
Reviewed by: Zhibing LaiAnonymous reviewer(s)
Original research article
The authors used this protocol in:
Feb 2022
Advertisement


Protocol Collections
Comprehensive collections of detailed, peer-reviewed protocols focusing on specific topics


Related protocols

Abstract
Barley (Hordeum vulgare) is one of the most important agricultural crops in the world, but pathogen infections regularly limit its annual yield. A major threat is the infection with the biotrophic leaf rust fungus, Puccinia hordei. Rust fungi have a complex life cycle, and existing resistances can be easily overcome. To address this problem, it is crucial to develop barley varieties with improved and durable resistance mechanisms. An essential step towards this goal is a simple and reproducible infection protocol to evaluate potential resistance phenotypes in the lab. However, available protocols sometimes lack detailed procedure or equipment information, use spore application methods that are not suitable for uniform spore dispersion, or require special mineral oils or engineered fluids. In addition, they are often optimized for pathogen-dedicated greenhouses or phytochambers, which may not be available to every research institute. Here, we describe an easy and user-friendly procedure to infect barley with Puccinia hordei on a small laboratory scale. This procedure utilizes inexpensive and simple tools to evenly split and apply spores to barley leaves. The treated plants are incubated in affordable and small phytocabinets. Our protocol enables a quick and reproducible infection of barley with leaf rust, a method that can easily be transferred to other rust fungi, including stripe rust, or to other plant species.
Key features
• Step-by-step infection protocol established for barley cv. Golden Promise, the gold standard genotype for genetic transformation
• Plant age–independent protocol
• Precise spore application by using inexpensive pipe cleaners for uniform symptom formation and increased reproducibility
• No specialized equipment needed
• Includes simple spore harvesting method
• Protocol is applicable to other biotrophic pathogens (stripe rust or powdery mildew) and other plants (e.g., wheat)
• Protocol is also applicable for a detached leaf assay
Graphical overview

Background
In 2050, agriculture will have to feed more than nine billion people (FAO, 2009). This is an enormous challenge, especially in times of climate change, shortage of arable land, and spread of plant diseases. To secure future food supply, the development of high-yielding and stress-tolerant crops is urgently needed. Barley (Hordeum vulgare) is among the most important cereals in the world, needed as fodder and to brew beverages. However, infections with biotrophic fungal pathogens, such as rust or powdery mildew, severely threaten its annual yield, and existing resistance strategies can easily be overcome (König et al., 2012; Dinh et al., 2020). There is an ongoing arms race between pathogens and their host plants that necessitates the constant development of new and more durable resistance mechanisms. In the past decade, biotechnological breakthroughs such as the use of programmable DNA-binding proteins have revolutionized the precise targeting of genes to study their function (Miladinovic et al., 2021). In the future, this will allow the development of plants with potentially new resistance mechanisms. Consequently, reliable plant–pathogen infection protocols are a critical prerequisite to evaluate the infection phenotypes of the resulting plants in the lab. Working with biotrophic fungal pathogens can be particularly challenging because they require a living host and cannot be easily cultivated on plates. Here, we describe a comprehensive step-by-step protocol for reproducible rust infection assays in barley on a small lab scale. The protocol was established for Puccinia hordei infection of the barley cultivar Golden Promise (Skoppek et al., 2022). It includes a pre-propagation and easy harvesting protocol to produce a sufficient number of fresh spores for an infection trial. The detailed process information, uniform spore dispersal, and ease of handling allow a rapid establishment of the method. The equipment required is commonly available and inexpensive. In addition, we demonstrate that our infection protocol can easily be combined with macroscopic and microscopic evaluation methods to assess a certain resistance phenotype. Finally, the protocol can be easily transferred to other host plants and to other fungal pathogens, such as other rust fungi or powdery mildew.
Materials and reagents
Biological materials
Barley Golden Promise seeds
Urediniospores of leaf rust (Puccinia hordei; Ph) isolate I-80
Reagents and solutions for infection procedure
Tween 20 (Carl Roth, catalog number: 9127.1)
Sodium hypochlorite solution (NaClO + H2O) (Carl Roth, catalog number: 9062.3)
6% NaClO solution (see Recipe 1)
0.01% Tween 20 solution (see Recipe 2)
Optional: Reagents and solutions for fungal staining and microscopy
Wheat germ agglutinin, Alexa fluor 488TM conjugate (WGA AF488) (Thermo Fisher, catalog number: W11261)
Potassium hydroxide (KOH) (Carl Roth, catalog number: 6751.1)
Sodium chloride (NaCl) (Carl Roth, catalog number: 3957.2)
Potassium chloride (KCl) (AppliChem, catalog number: A1039.1000)
Disodium hydrogen orthophosphate (Na2HPO4) (Carl Roth, catalog number: 6751.1)
Potassium dihydrogen phosphate (KH2PO4) (Duchefa, catalog number: P0574.1000)
Acetic acid (CH3COOH) 100% (Carl Roth, catalog number: 3738.1)
Glycerol (C3H8O3) 86% (Carl Roth, catalog number: 4043.3)
Bleaching solution (see Recipe 3)
1 M KOH (see Recipe 4)
10× phosphate buffered saline (PBS) buffer pH 7.4 (see Recipe 5)
1× phosphate buffered saline (PBS) (see Recipe 6)
WGA AF488 stock solution (see Recipe 7)
WGA AF488 staining solution (see Recipe 8)
30% Glycerol solution (see Recipe 9)
Recipes
6% NaClO Solution
Reagent Final concentration Amount NaClO (12%) 6% 50 mL ddH2O n/a Ad 100 mL Caution: Dilute under fume hood, wear protective gear. Store at 4 °C in the dark (use brown bottle or wrap bottle in aluminum foil)
0.01% Tween 20 Solution
Reagent Final concentration Amount Tween 20 (100%) 0.01% 20 μL ddH2O n/a 199.98 mL Autoclave and store at room temperature (RT)
(Optional) Recipes for staining:
Bleaching solution
Reagent Final concentration Amount Ethanol (absolute) 75% 75 mL CH3COOH 100% 15% 15 mL ddH2O n/a Ad 100 mL Caution: Dilute under fume hood, wear protective gear. Store at RT
1 M KOH
Reagent Final concentration Amount KOH 1 M 5,611 g ddH2O n/a Ad 100 mL Store at RT.
10× PBS Buffer
Reagent Final concentration Amount NaCl 1.4 M 40.91g Na2HPO4·2H2O 10 mM 0.89 g KCl 27 mM 1.013 g KH2PO4 18 mM 1.23 g Dissolved in ddH2O n/a 500 mL Adjust to pH 7.4 with 10% KOH. For 1× PBS, dilute 10× PBS 1:10 with ddH2O (Recipe 6)
1× PBS Buffer
Reagent Final concentration Amount 10× PBS Buffer 1× 10 mL ddH2O n/a Ad 100 mL Store at RT.
WGA AF488 stock solution
Reagent Final concentration WGA AF488 1 mg/mL in H2O Prepare aliquots and store at -20 °C. Protect from light.
WGA AF488 staining solution
Reagent Final concentration Amount WGA AF488 stock solution 10 μg/mL in 1× PBS 10 μL/mL Always prepare fresh before use.
30% glycerol solution
Reagent Final concentration Amount Glycerol (86%) 30% 34,88 mL ddH2O n/a Ad 100 mL Store at RT
Laboratory supplies
Pots, 9–10 (maximum) cm diameter
Soil (Einheitserde classic; Profisubstrat, e.g., 814510; Meyer-Shop.de)
Metal trays (50 cm × 29.5 cm)
1.5 mL reaction tubes (Sarstedt, catalog number: 72.690.550)
Medical clay (Drug store)
Black ceramic tile (Hardware store)
Small spatula
Razor blade (Wilkinson)
Pipe cleaners, cotton, flexible, 6 mm diameter, 15–20 cm length (Carl Roth, catalog number: YC35.1 or Amazon e.g., VAUEN Cotton pipe cleaners)
Plastic cups (Plastikbecher.de, PP Becher 560/500 g natur A’50)
Parafilm (Carl Roth, catalog number: H666.1)
Lighter
Filtered tips 1 mL (Sarstedt, Biosphere plus, catalog number: 70.3050.255)
Silica beads (Carl Roth, catalog number: 1779.2)
Flexible tube for vacuum pump (0.8 cm diameter)
Scissor
Exsiccator with lid
Disposable gloves
Small plastic labels
2.0 mL reaction tubes (Sarstedt, catalog number: 72.695.500)
Object slides (Carl Roth, catalog number: 0656.1)
Cover slides (Carl Roth, catalog number: 1871.2)
Equipment
Precision balance (e.g., Sartorius)
Poly klima cabinet, true daylight (Poly klima GmbH, PK 520)
Vacuum pump (Welch, model: 2522C-02A)
Airbrush (GANZTON SP180K airbrush system, e.g., Amazon)
Water bath
4 °C refrigerator
-80 °C freezer
Scanner
Fluorescence microscope (Nikon, Nikon Ti Eclipse)
Software and datasets
NIS Element Software (Nikon)
Procedure
Pre-propagation of Puccinia hordei (Ph) on barley plants
Preparation of plants for pre-propagation
A pre-propagation step is recommended to generate fresh spores.
Note: A pre-propagation step is recommended if a new rust isolate will be established in the lab, if the rust spores have been stored at -80 °C for more than four months, or if the number of freshly stored spores is not sufficient for the planned infection experiment. In the pre-propagation step, a susceptible cultivar should be used to generate a sufficient number of fresh spores for upcoming infection experiments. For new rust isolates, the pre-propagation step allows to estimate the infection strength of the new isolate and, if needed, can be the basis for adapting parameters of the planned infection experiment (for example the number of spores required for a sufficient infection). For Ph isolate I-80, the pre-propagation is usually performed with the barley cultivar Großklappige, but from our experience, Golden Promise is also suitable.
Depending on the number of spores required for subsequent infection trials, select the number of seeds. In our hands, 50 plants for pre-propagation are sufficient to yield spores for infection of 1,000 plants.
If necessary, sterilize seeds before putting them into the soil.
Note: We prefer to sterilize our seeds with 6% NaClO prior to sowing them into soil. This reduces the risk of transmitting any pests by the seeds that might occur due to pre-harvest infections in the greenhouse or during storage. It is very important to keep the plants free of any secondary infection, as this will contaminate the propagated rust spores and might influence the outcome of the infection, for example due to priming of the plants’ resistance mechanisms. However, if the seeds were produced and stored under clean conditions, this step is not required.
Fill 10 pots [9–10 cm (maximum) diameter] with soil.
Plant five seeds per pot.
Note: The pots have a small diameter (maximum 10 cm); five plants per pot are easy to infect and handle. However, it is also possible to add up to 10 plants, but this makes the handling of the individual plants a bit more difficult.
Grow the plants under controlled conditions either in the greenhouse, phytochambers, or phytocabinet (day/night temperature 18 °C/16 °C, light 16 h/8 h).
Crucial: It is very important that the plants show NO secondary infections with other pathogens or pests.
In this protocol: use 10-day-old plants (beginning 2nd leaf stage) for infection.
Note: In principle, it is possible to infect older plants. The limiting factor here is the size of the plastic cups used to cover the pots. For older plants, bigger plastic cups have to be used.
Assembling plastic cup covers for pots
Note: An elementary feature of this protocol is the homemade plastic cup covers, which are placed over each individual pot. This generates a high humidity that is required for the efficient germination of the spores in the first 48 h after infection. The Poly klima cabinet PK 520 that was used in this protocol has a certain size limitation. Therefore, this method is more suitable than covering all the plants on the metal tray with one single cover. In addition, the individual pot covers allow an easy watering of the plants from the bottom by simply pouring water in the metal tray. For this, the covers do not need to be lifted and the humidity stays stable in the first 48 h after infection. Furthermore, we recommend reusing the pot covers. Therefore, after finishing the infection experiments, we spray the pots with 70% EtOH, rinse them in tap water to remove traces of soil or spores, and let them dry before the next use. However, if more space is available, a big plastic cover can be used to cover the whole tray, but it is very important to ensure that the cover is tight enough to keep a sufficient humidity.
One cover is needed for one pot.
One cover is assembled from two plastic cups (Figure 1A).
With the help of scissors, cut off the bottom of one of the two cups (this new opening will later be inserted into the soil, Figure 1B).
Place the two regular openings of the two cups together and close them using parafilm (Figure 1C).
Prepare as many pot covers as needed for the propagation or infection experiment (the maximum number of pots in the PK 520 is 54).
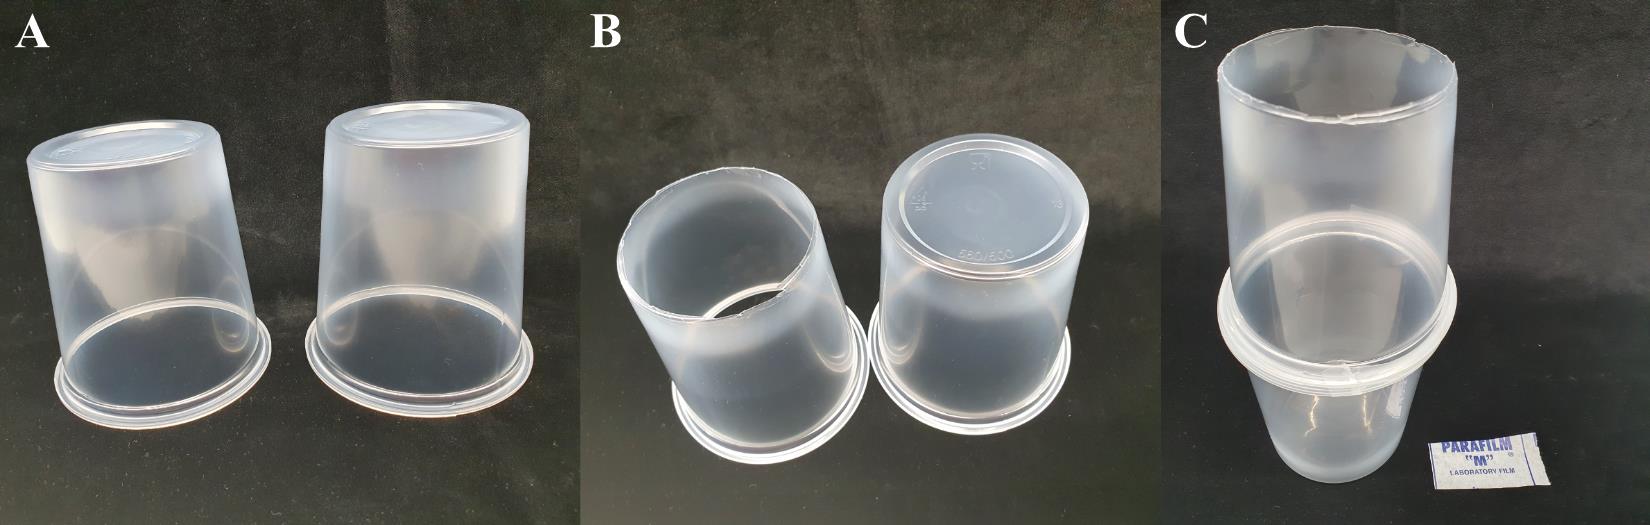
Figure 1. Preparation of pot covers. A. Take two plastic cups. B. Cut the bottom of one plastic cup. C. Connect and seal the two original openings of the plastic cups by using parafilm. The pot cover now has one opened and one closed side.Spore preparation and infection
If the spores were frozen at -80 °C, follow steps b–s. For fresh spores, follow steps c and f–s.
Preheat water bath to 45 °C.
Weigh 6 mg of spores per 50 plants into a 1.5 mL reaction tube using a precision balance.
Note: In our experience, the use of 6 mg of Ph I-80 spores per 50 plants leads to a very strong infection pattern.
Activate the spores for 10 min by placing the tube in a water bath at 45 °C. Ensure that no water runs into the tube.
Remove reaction tube from water bath and store spores in the dark at RT for 1 h.
In the meantime, assemble the airbrush under the fume hood and prepare 0.01% Tween 20 solution according to the Recipe 2 (Figure 2A).
Spray the plants uniformly with Tween 20 solution using the airbrush (0.3 mm nozzle, 0.3 mm needle, spray from a distance of at least 10 cm; Figure 2B and 2C).
Notes:
i. It is important to avoid drop formation on the leaves. The Airbrush is able to apply a very fine film on the leaf surface. The Tween 20 solution ensures a better adhesion of the spores on the surface by reducing the surface tension.
ii. It is also possible to apply the spores dissolved in mineral oil or engineered fluids (e.g., Soltrol or Novec 7100) with an airbrush as shown for stripe rust in Sørensen et al. (2016). In our hands, the use of mineral oil caused spore clumps and the spores did not germinate well. In addition, the mineral oil or engineered fluid can cause unwanted reactions (burns) on the leaf surface.
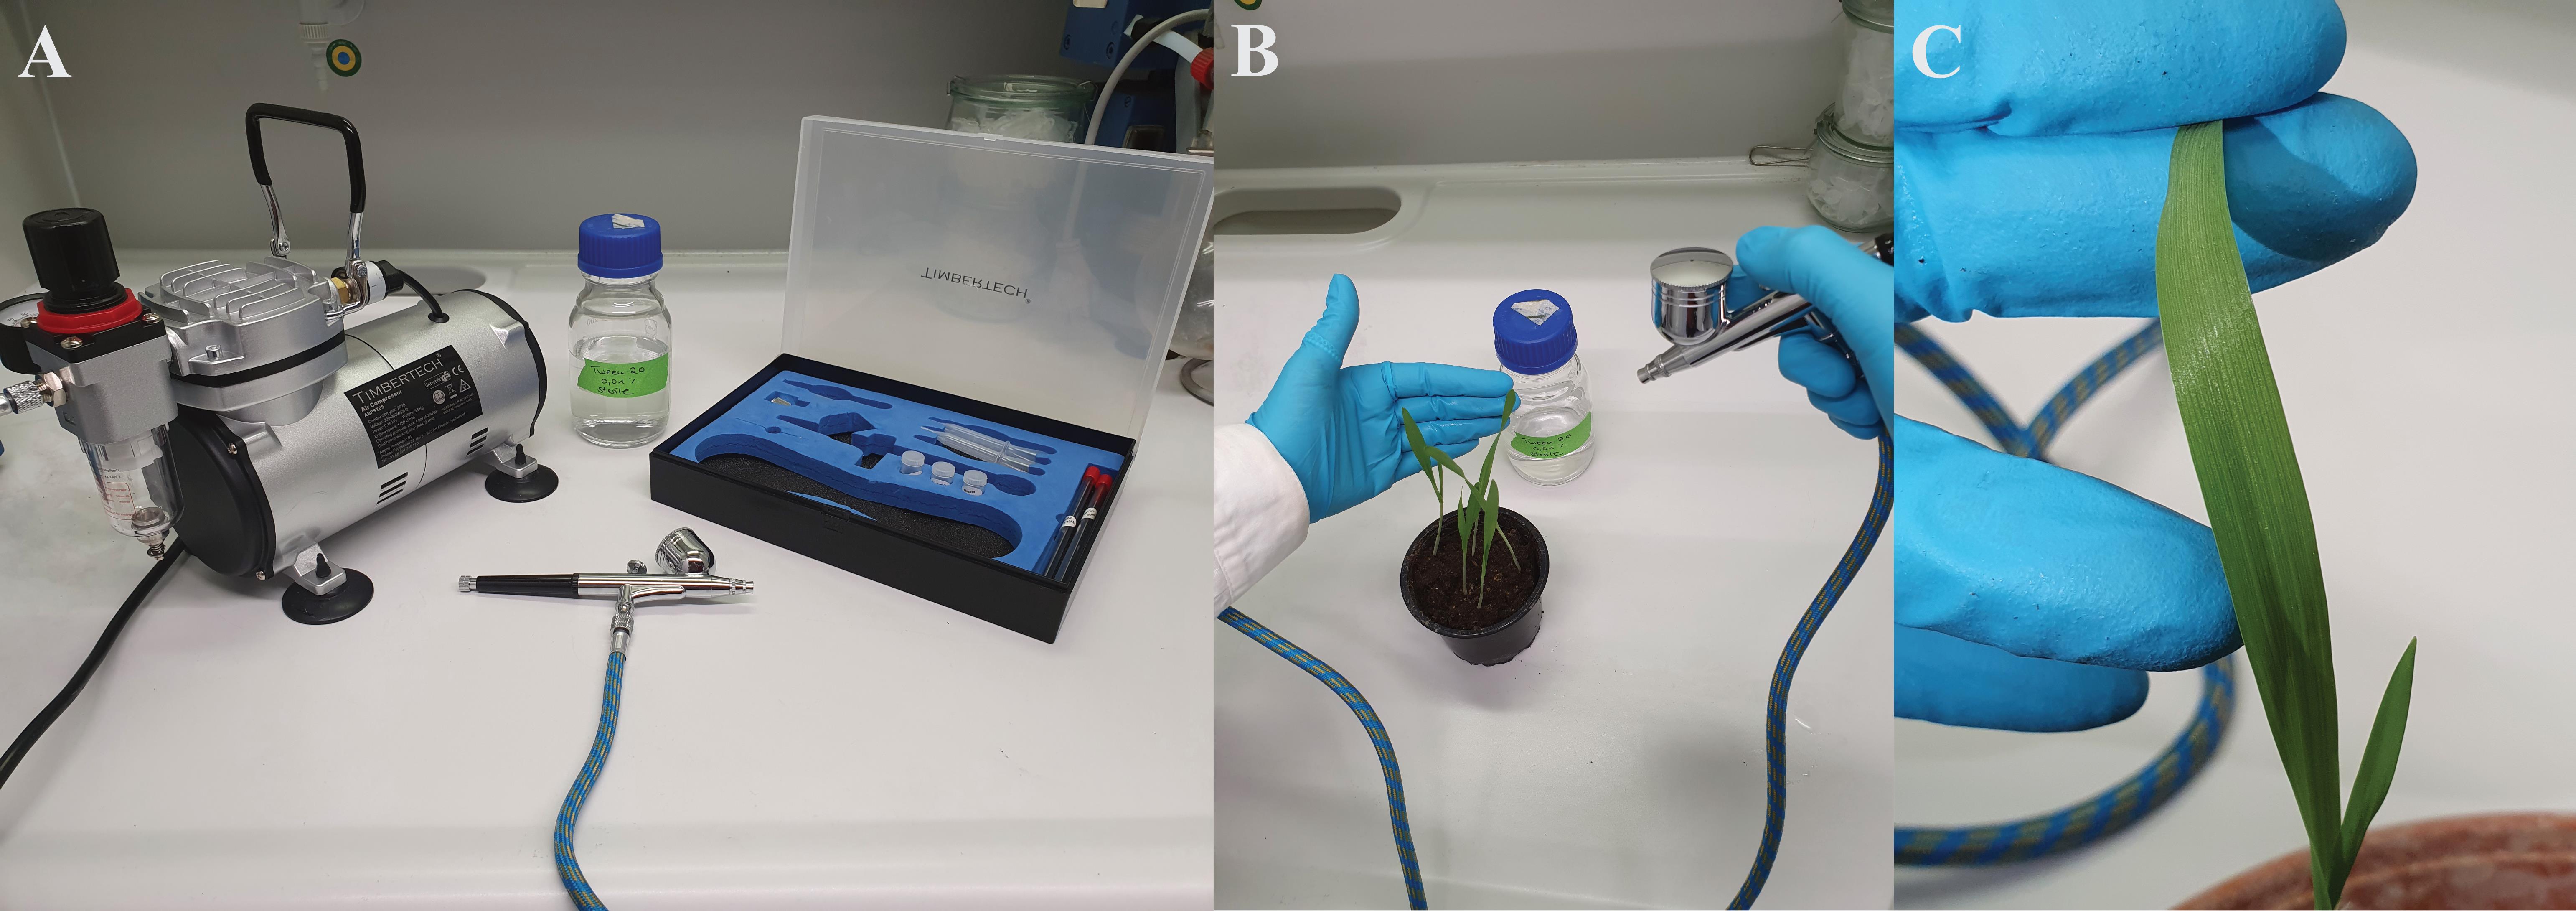
Figure 2. Spraying leaves with the airbrush. A. Assembled GANZTON airbrush set with compressor (0.3 mm nozzle and 0.3 mm needle). B. Spraying the barley leaves. C. Slightly moisturized leaves after spraying.Prepare the required material for the infection procedure (Figure 3A and 3B). Bend the pipe cleaner at the tip (approximately 1 cm) to form a slight angle (Figure 3A).
Add the medical clay to the spores in a ratio of 3:1 (Figure 3C) and mix well by shaking the reaction tube vigorously (Figure 3D).
Pour the spore-clay mix onto a black tile (Figure 3E).
Carefully dip the bent pipe cleaner into the spore clay mix and spread the mixture evenly over the primary leaf, moving the pipe cleaner over the leaf from top to bottom and back again with a little pressure (Figure 3F). If a secondary leaf is present, you can infect it too.
Note: For pre-propagation, the number of spores applied does not need to be as precisely defined as for a phenotyping experiment. So, it is sufficient here to gently dip the pipe cleaner into the spore medical clay mix but ensure that enough spores are available to infect all plants.
Repeat the procedure until all plants are infected.
Spray the inside of the prepared cover cups with 0.01% Tween 20 solution using the airbrush to moisturize the inside of the cover cups before putting them over the plants (Figure 3G).
Crucial: This is a very important step, to ensure a moisturized environment for the spores to germinate.
Carefully place the now moisturized cover cups over the plants and press them into the soil (Figure 3H).
Place the covered pots on a metal tray and make sure that the pots have a firm stand. Incubate them in a Poly klima PK520 cabinet or other phytocabinet.
Incubate the plants in the dark, at 20 °C/18 °C for 16 h/8 h.
Twenty-four hours after infection: turn on the light and further incubate the plants in a 16:8 h day/night rhythm at 20 °C/18 °C.
Water the plants regularly and make sure that the soil in the pots is always slightly moisturized.
Forty-eight hours after infection: remove the plastic cups.
Four days after infection, the first small lighter spots should be visible on the leaves.
Seven days after infection, clear symptoms are visible.
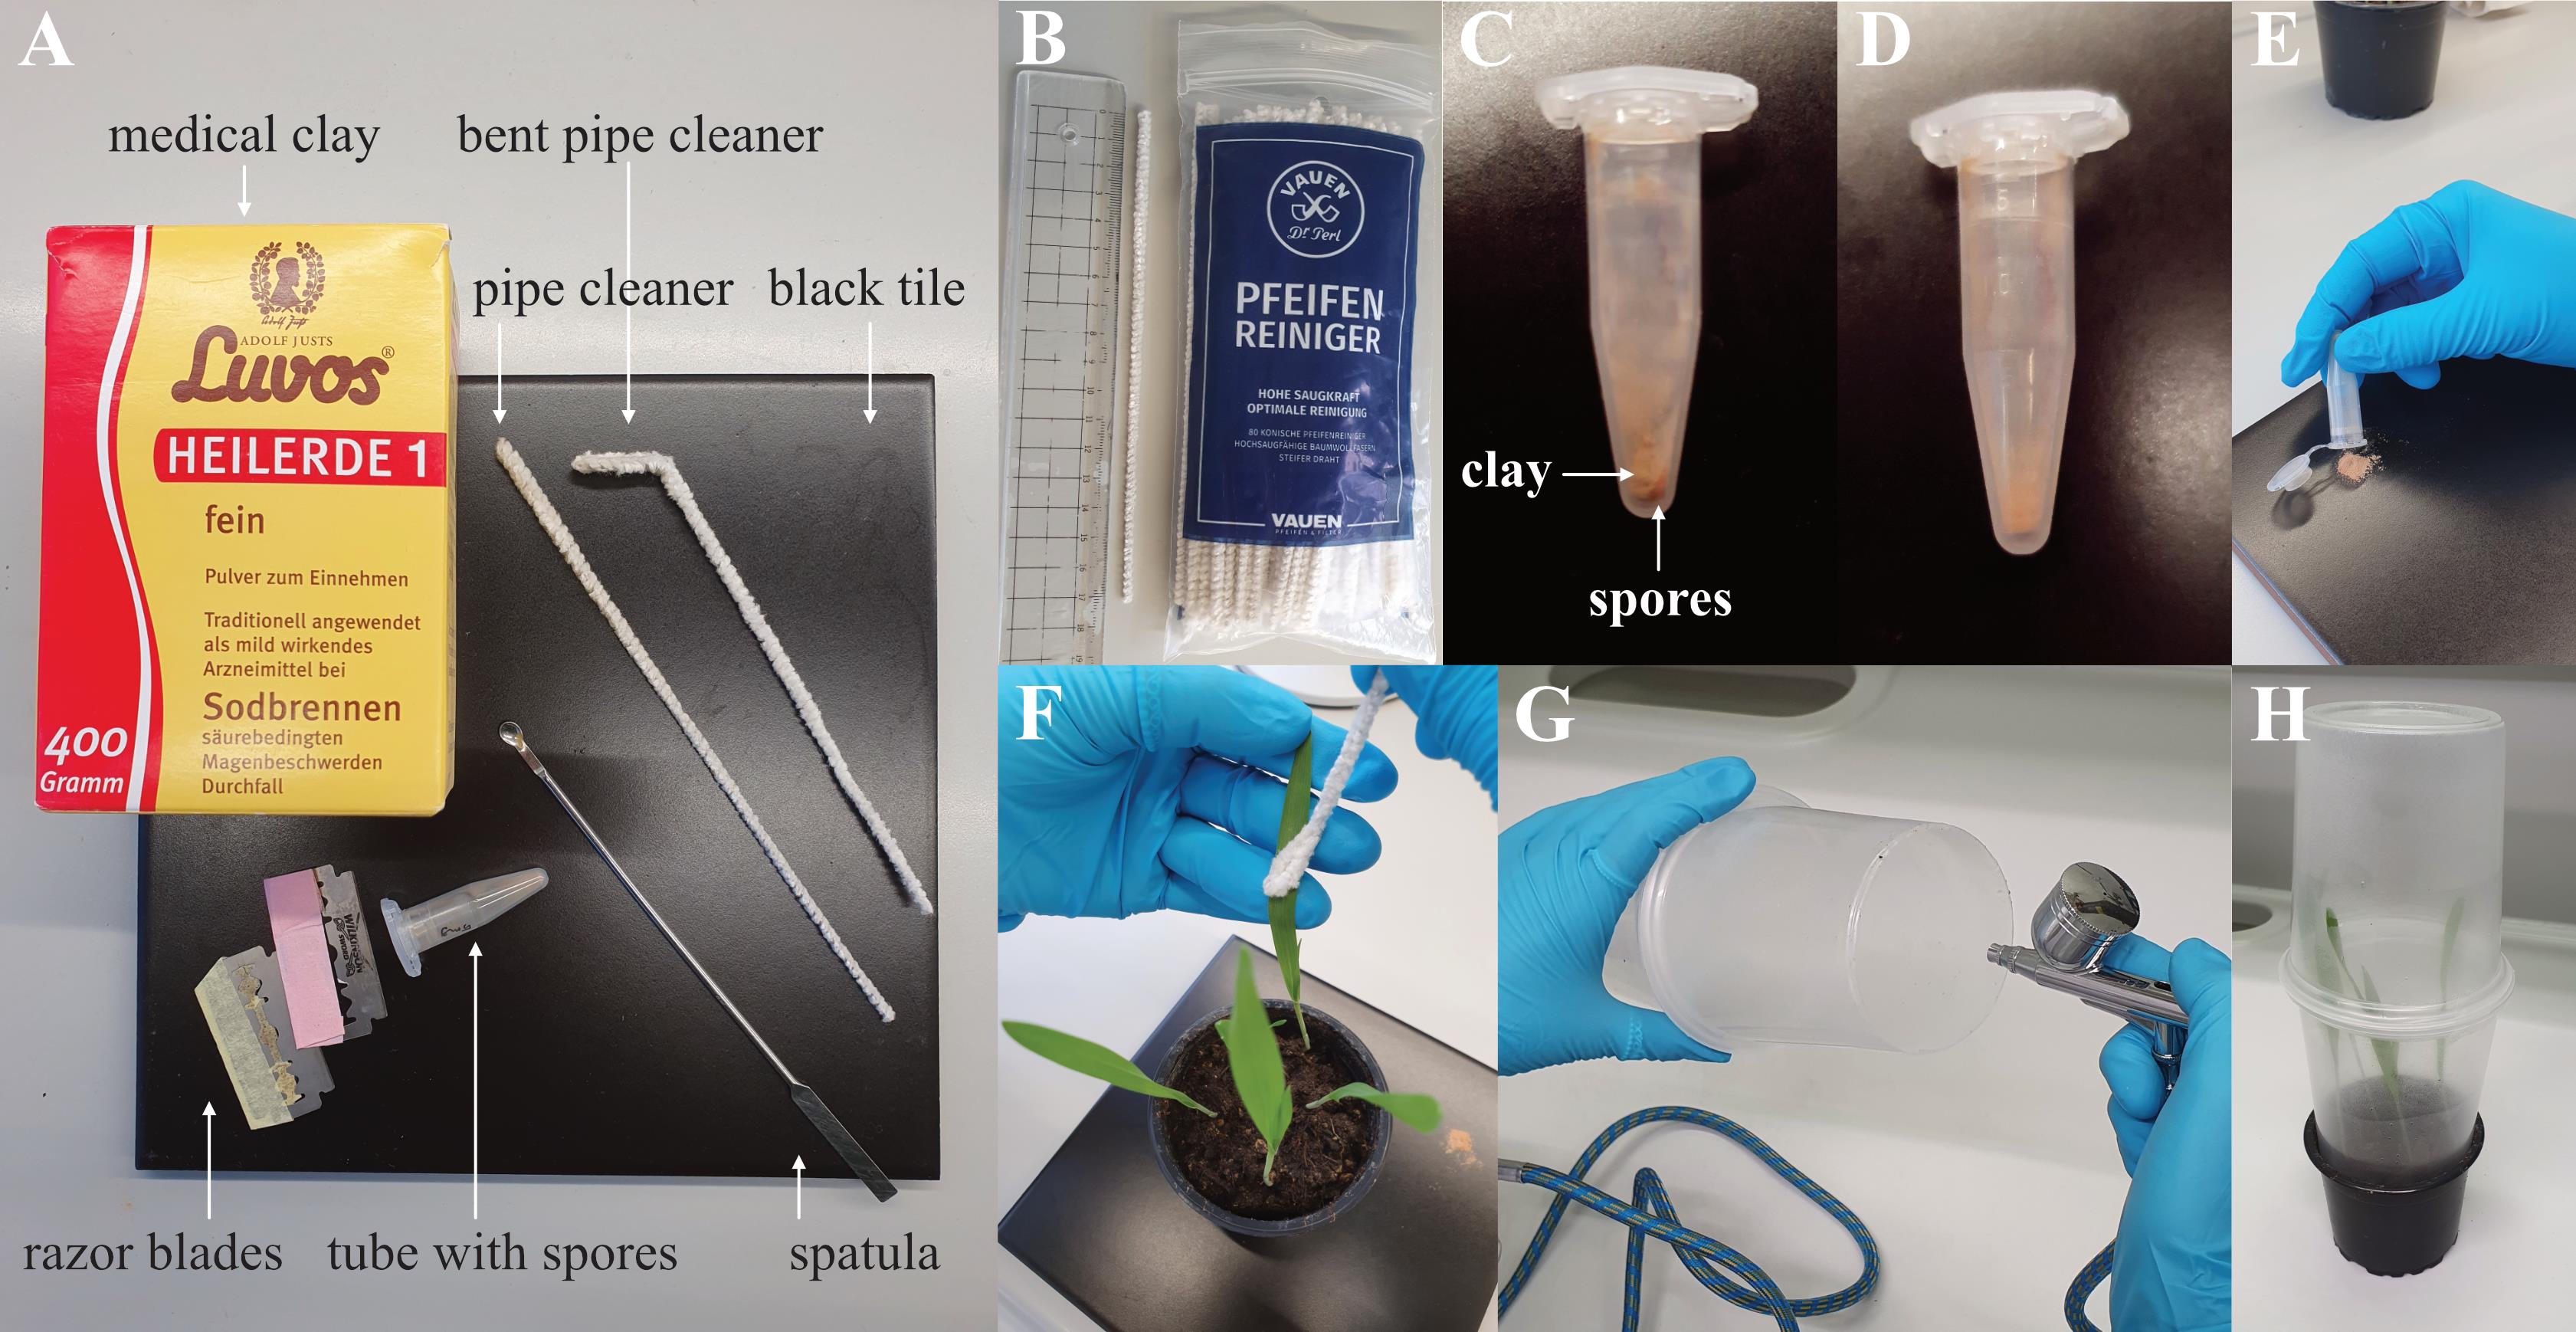
Figure 3. Infection procedure. A. Material needed for infection procedure. B. Image of the size and packaging of the cotton pipe cleaner. C. The medical clay is added to the spores in an approximately 3:1 ratio. D. The clay is mixed with the spores by shaking the tube. E. The spore clay mix is poured on a black tile and picked up with the pipe cleaner. F. The barley plant is infected by carefully rubbing the pipe cleaner over the surface of the adaxial side of the leaf. G. The inner side of the pot covers is sprayed with Tween 20 solution. H. The moisturized cover cups are placed over the plants and fixed by pressing them slightly into the soil.Spore harvesting and storage
After 12–14 days, the emerging pre-propagated spores are mature for harvesting; harvesting can be done on several consecutive days. We recommend using the described spore hoover to harvest as much clean spores as possible; this will reduce the spilling of the spores in the room and avoid contamination with soil.
Prepare the equipment for the vacuum spore hoover.
Carefully heat the tip of a 1 mL filter tip by using a lighter. Press scissors or forceps on the warm tip to flatten the opening (Figure 4A).
Cut the flattened tip by another 3 mm to re-open (Figure 4A).
Prepare 3–5 of these tips for spore harvesting.
Note: The prepared tips are used to easily harvest, dry, and store the pre-propagated spores. In the harvesting procedure, we typically exchange the tips every 8–10 leaves. With this procedure, it is possible to achieve between 3 and 10 mg of spores per tip, depending on the infection strength in the infected leaves. To remove the spores from the tips, simply cut the tip open and pour the spores into a reaction tube.
We recommend marking each tip with a number. This will help to identify the batch of harvested spores after storage.
Weigh the prepared tips before harvesting using a precision balance.
Write down the weight of each tip and the harvesting date.
Assemble the spore hoover: attach a long rubber tube (inner diameter 8 mm) to the vacuum pump and attach the prepared filter tip to the other opening (Figure 4B).
Start the vacuum pump (500–700 mbar), carefully hold the tip of a leaf, and harvest the mature spores by gently running the hoover over the leaf surface. Adjust the vacuum if it is too strong or not strong enough (Figure 4C; Video 1).
We recommend harvesting 8–10 nicely infected leaves in one tip and then changing to the next tip.
For changing the tip or finishing the harvesting procedure, turn off the vacuum pump and carefully remove the filtered tip. It is recommended to store or transport the tips upright in a reaction tube rack.
Carefully place the filled tips on the precision balance and weigh again; the difference in weight determined before harvesting (steps g–h) gives the number of harvested spores. Note the number of harvested spores for each tip.
Drying of the spores: place the tips in an exsiccator filled with silica beads (Figure 4D), close the lid, seal with parafilm, and store in the dark at 4 °C for 48 h (Figure 4E). Instead of an exsiccator, any other jar or vessel that can be tightly closed can be used.
After the 48 h drying period of the spores, place two silica beads behind the filter of the tip and seal the opening with parafilm (Figure 4F). Also seal the tip of the tip with parafilm.
Note: It is important that the harvested spores are not exposed to moisture during storage, because this can cause clumps. Therefore, silica beads should be added to the tip.
The prepared spores can be directly used for the planned infection experiments or stored at -80 °C for long-term storage.
Note: The spores can be stored in a refrigerator at 4 °C for maximum 14 d before they should be used in an infection experiment or transferred to a -80 °C freezer for long-term storage.
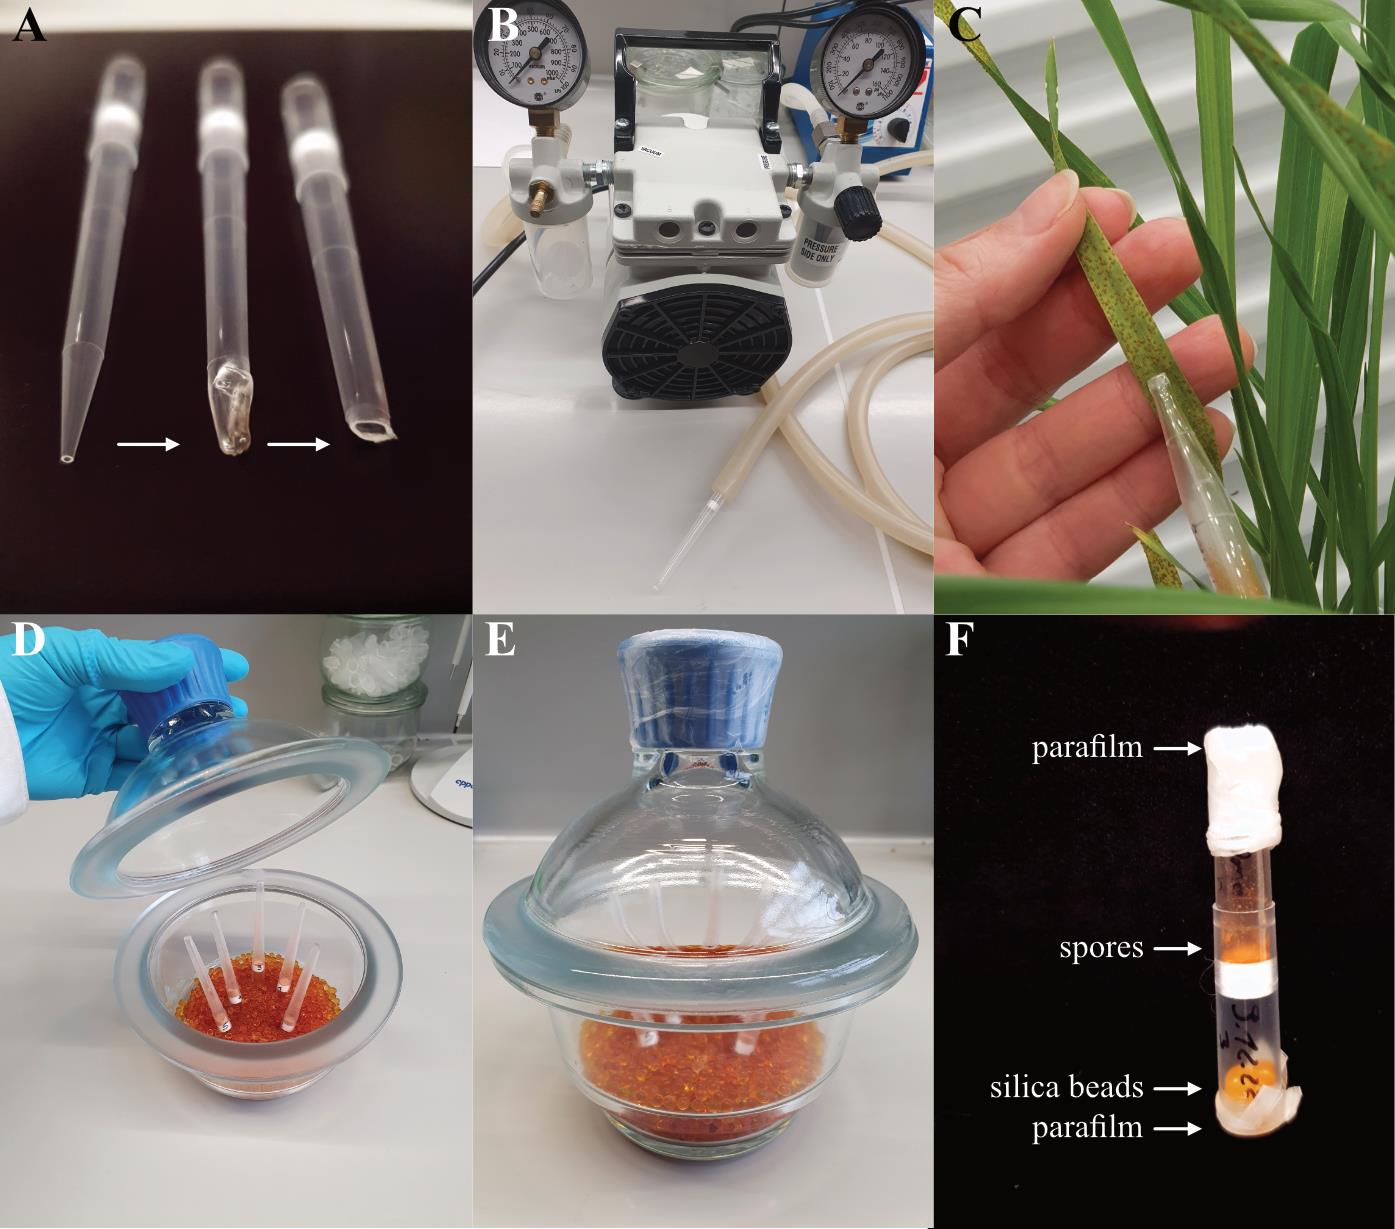
Figure 4. Spore harvesting procedure. A. Prepare the 1 mL filter tips. Carefully heat and flatten the tip. Cut the flattened part of the tip to generate a flattened opening. B. Attach a tube with an inner diameter of approximately 8 mm to the vacuum pump and insert the tip at the end of the tube. C. Start the vacuum (between 500 and 700 mbar is normally sufficient). Carefully move the spore hoover over the leaf surface to collect the spores in the filter tip. D. For drying, store the collected spores in the tips in an exsiccator filled with silica beads. E. Tightly close the lid of the exsiccator with parafilm during storage at 4 °C. F. 1 mL filter tip with harvested spores and silica beads, closed with parafilm. Video 1. Spore hoover. Application of the spore hoover to harvest rust spores.
Infection experiment for phenotyping of mutants or cultivars
Sow the plants required for the infection experiment.
Notes:
i. With the standard protocol, 270 plants can be analyzed per experimental series (five plants per pot, nine pots per metal tray, six metal trays distributed on the three levels of the Poly klima PK250 cabinet). This number can be increased if more than five plants per pot are sown.
ii. For experiments with plants that need to be analyzed with additional methods, like PCR, it is recommended to attach small labels to the individual plants to identify them later.
After 10 days, the plants should be of good size for infections as described before.
Note: Infections of younger or older plants are possible; however, the number of spores should be adjusted.
Make sure that the plants have not acquired infections or damage from predators in the rearing process, as this may affect the results of the infection experiment.
Make sure that sufficient plastic cup covers are available.
Spore preparation
We recommend using 10 mg of Ph I-80 spores per 100 plants.
Weigh the required number of fresh, dried spores into a 1.5 mL reaction tube.
Add medical clay in the ratio of 3:1 and mix by shaking vigorously.
Note: If there are not enough fresh spores to perform the experiment, it is possible to use a proportion of frozen spores from the -80 °C. From our experience, a spore mix in the ratio 1:5 of frozen and fresh spores can be used. The frozen spores must be activated before infection, as described in A3. Depending on the barley genotype or Ph isolate, adjust the number of spores if necessary.
Infection procedure
Spray the plants with 0.01% Tween 20 solution using the airbrush as described in A3.
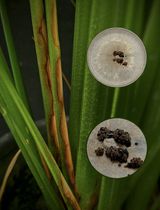
Carefully pour the spore-clay mix onto a black tile (Figure 5A).
Divide the spore pile in subfractions. Calculate the required subfractions according to the metal trays, pots, and plants. For example, if you use six metal trays, prepare six subfractions; if there are nine pots on each metal tray, further split one of the six piles into nine smaller piles. If there are five plants in one pot, divide one pile in five smaller piles (Figure 5B). Each of these small piles represents one plant in the pot.
Bend the pipe cleaner at the thick end and shape it into a slight angle.
With the bent end, pick up one of the five spore piles with some pressure (Figure 5C) and circular movements and apply it to the first plant previously wetted with Tween 20.
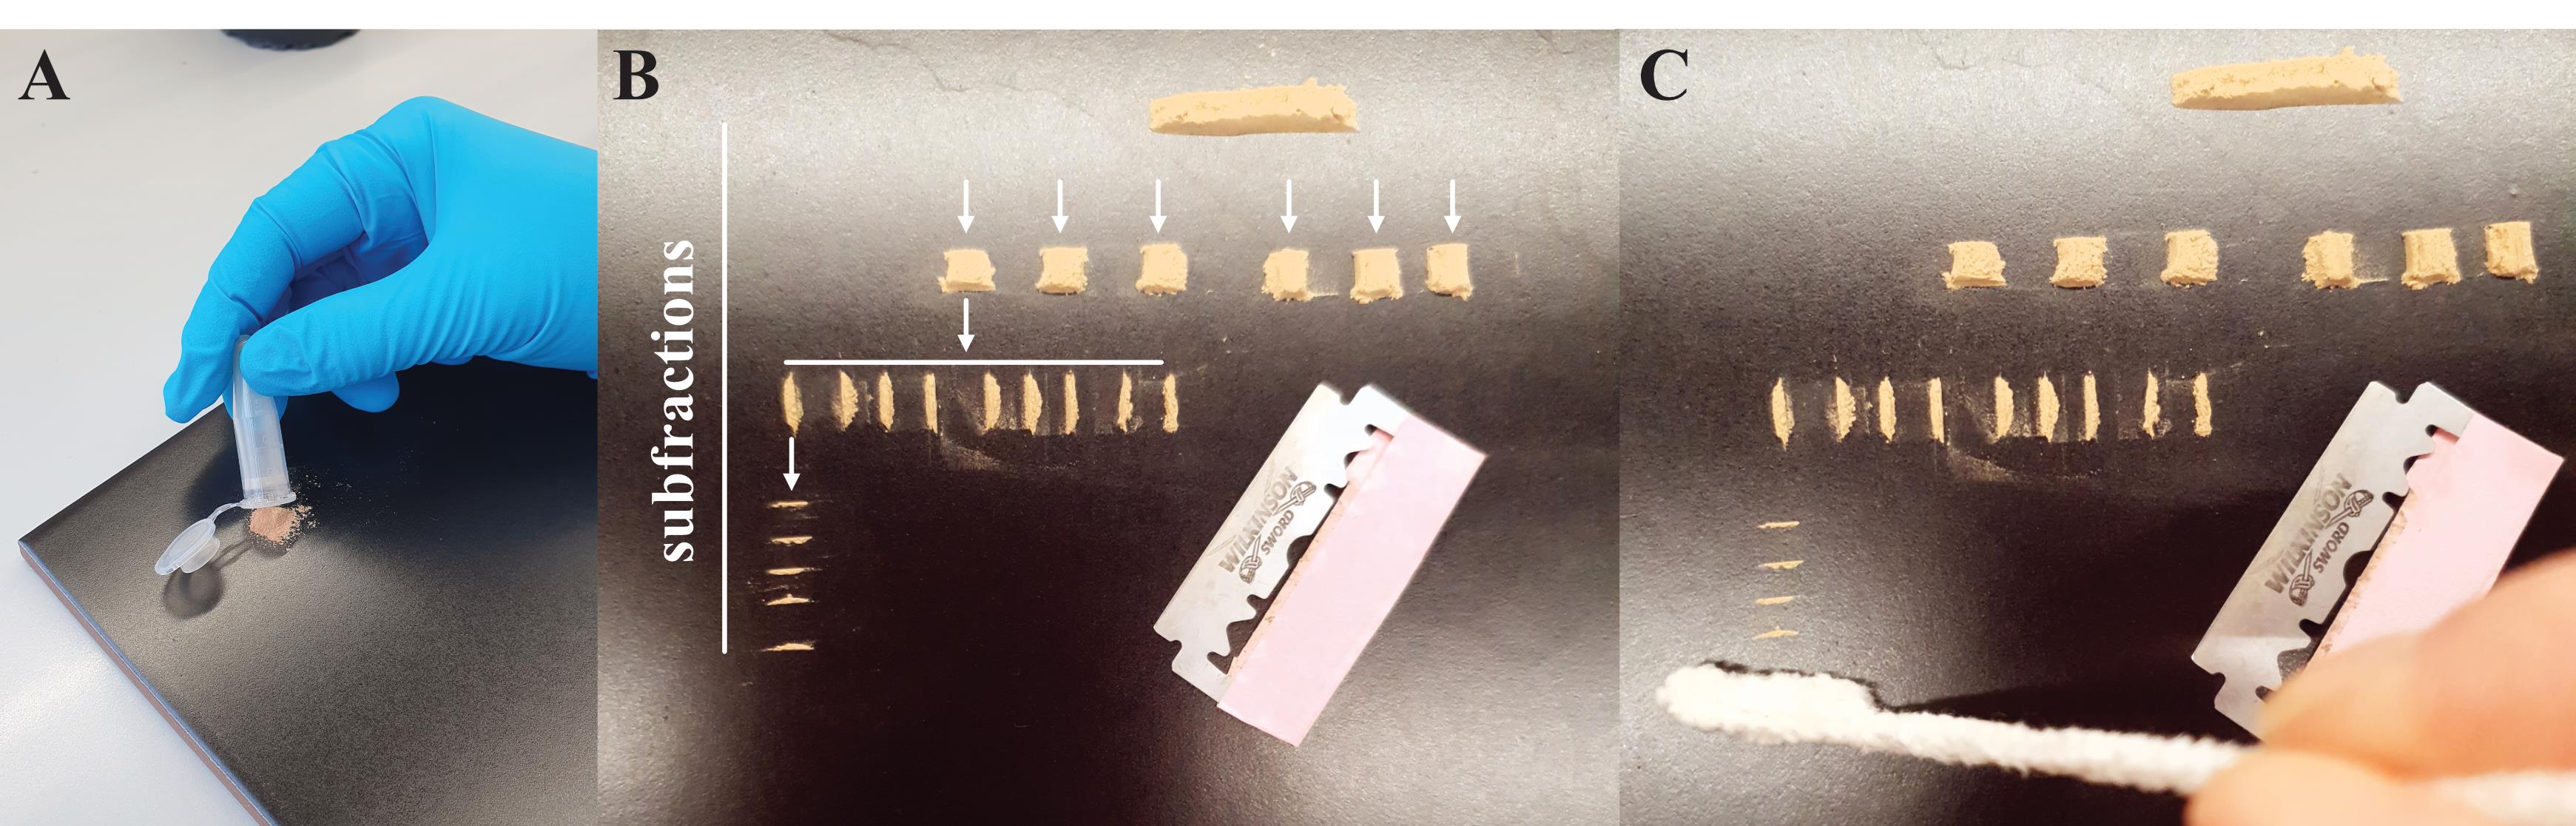
Figure 5. Preparation of spores for infection. A. Pour the spore clay mix on a black tile. B. Divide the spore-clay mix into subfractions, according to the number of trays (six), the number of pots (nine), and the number of plants in each pot (five), by using a razor blade. C. Pick up one pile per plant using the bent end of the pipe cleaner. Note that for picture B and C, only clay was used to visualize the different steps of the subfractions.Hold the leaf carefully with one hand and move the pipe cleaner from the tip of the leaf to the stem and back.
Crucial: Exchange the pipe cleaner if it gets wet; otherwise, the spores will clump and stick to the pipe cleaner.
Repeat steps e and f until all plants are infected.
Spray the inside of the plastic pot covers with the 0.01% Tween 20 solution using the airbrush and carefully place the covers over the infected plants.
Place the covered pots on a metal tray and make sure that the pots have a firm stand. Incubate them in a Poly klima PK520 cabinet with day and night settings of 20 °C/18 °C and 16/8 h light.
Incubate the plants for 24 h in the dark; then, turn on the light.
Forty-eight hours after infection, remove the plastic cups.
Four days after infection, light spots should be visible on the leaves.
Seven days after infection, clear symptoms are visible.
Scoring can be done at 10 and 13 days post-inoculation (dpi) for example, according to Levine and Cherewick (1952).
In this protocol, the leaf samples were harvested at 10 dpi.
Carefully separate the infected primary leaves close to the stem and fix them on a black cardboard (DIN A4) at the top and bottom of the leaf with a thin strip of tape.
Carefully place the cardboard with the leaf samples on a scanner and perform a scan with the highest possible resolution (Figure 6).
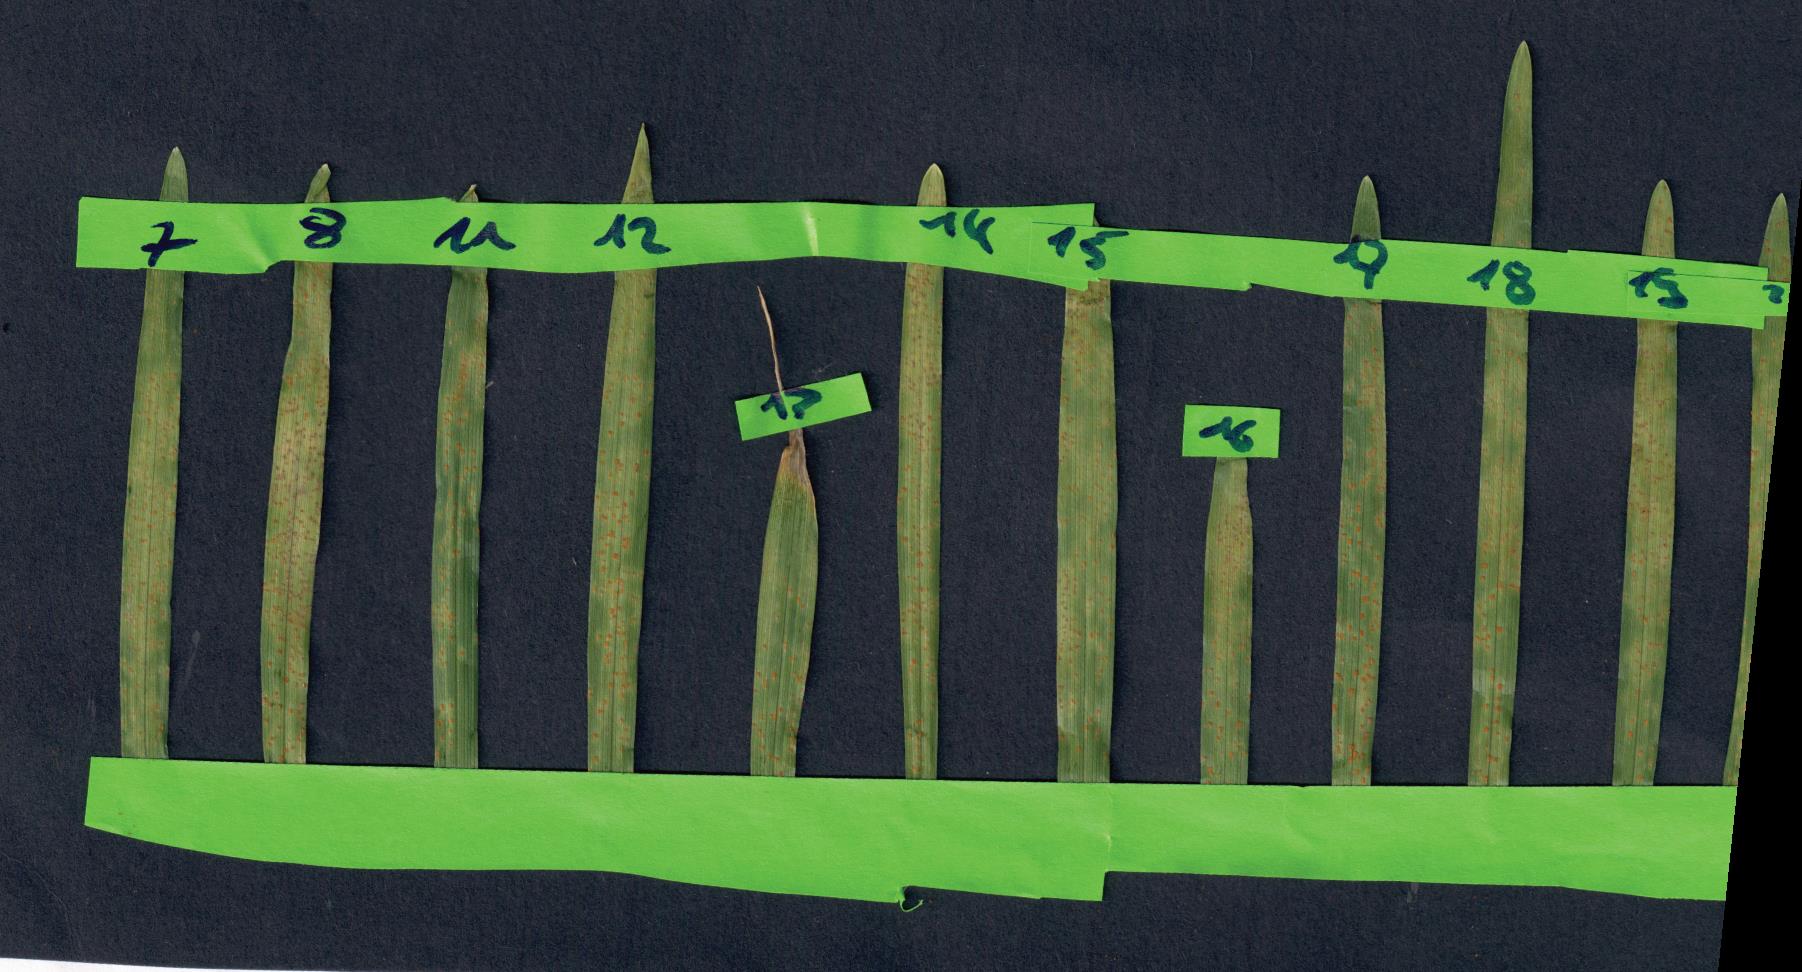
Figure 6. Example scan of infected barley plants from one infection experiment (raw scan). Eleven individual plants of a susceptible barley line infected with Puccinia hordei I-80 are shown at 10 dpi.
Histological analysis of fungal growth via WGA AF488 staining
Sample harvesting and staining
Harvest samples at the desired time point. For analyzing the fungal development via microscopy, harvesting time points between 2 and 6 dpi are recommended, depending on the cultivar and isolate used.
Perform WGA AF488 staining as described in Redkar et al. (2018), with the following modifications for barley:
Prepare the solutions described above as Optional Recipes for staining.
Harvest approximately 2 cm × 2 cm leaf segments per plant.
Bleach the leaves until they are completely decolorized. Instead of 100% ethanol, use the bleaching solution (Recipe 3, Figure 7A). The samples can be stored in this solution until needed.
Treat the leaves with 1 M KOH (Recipe 4). KOH treatment should be reduced to 1 h at RT.
Note: Depending on the genotype and age of the leaf, this process might be optimized.
Crucial: After KOH treatment the samples will get very soft; handle them with care.
A vacuum infiltration step is not necessary.
Wash the samples at least three times with water.
Wash the samples once with 1× PBS (for 10× PBS stock, see Recipe 5; for 1× PBS see Recipe 6).
Dilute the WGA AF488 stock in sterile ddH2O (1 mg/mL; see Recipe 7). Prepare aliquots and store at -20 °C in the dark (e.g., wrapped in aluminum foil).
Samples should be incubated in WGA AF488 staining solution (10 μL per 1 mL 1× PBS; see Recipe 8) for 24 h in the dark (e.g., wrapped in aluminum foil or stored in a closed drawer). Remove the staining solution and wash with 1× PBS. Store the sample in 1× PBS.
Note: The WGA AF488 staining is light-sensitive; therefore, always protect your samples from the light. For example, avoid direct sunlight during handling and store the samples in a drawer or cover them with aluminum foil or black paper.
Histological analysis
Carefully transfer the samples stored in 1× PBS onto an object slide with the bottom side of the leaf facing down.
Add a few drops of 30% glycerol solution (Recipe 9) to the slide before carefully placing the coverslip without air bubbles (Figure 7B). Protect from light.
Note: The staining of the fungal structures on the leaf samples is stable for several months if the slides are stored in the dark, e.g., in a drawer, wrapped in aluminum foil, or placed in a folder for microscopy slides.
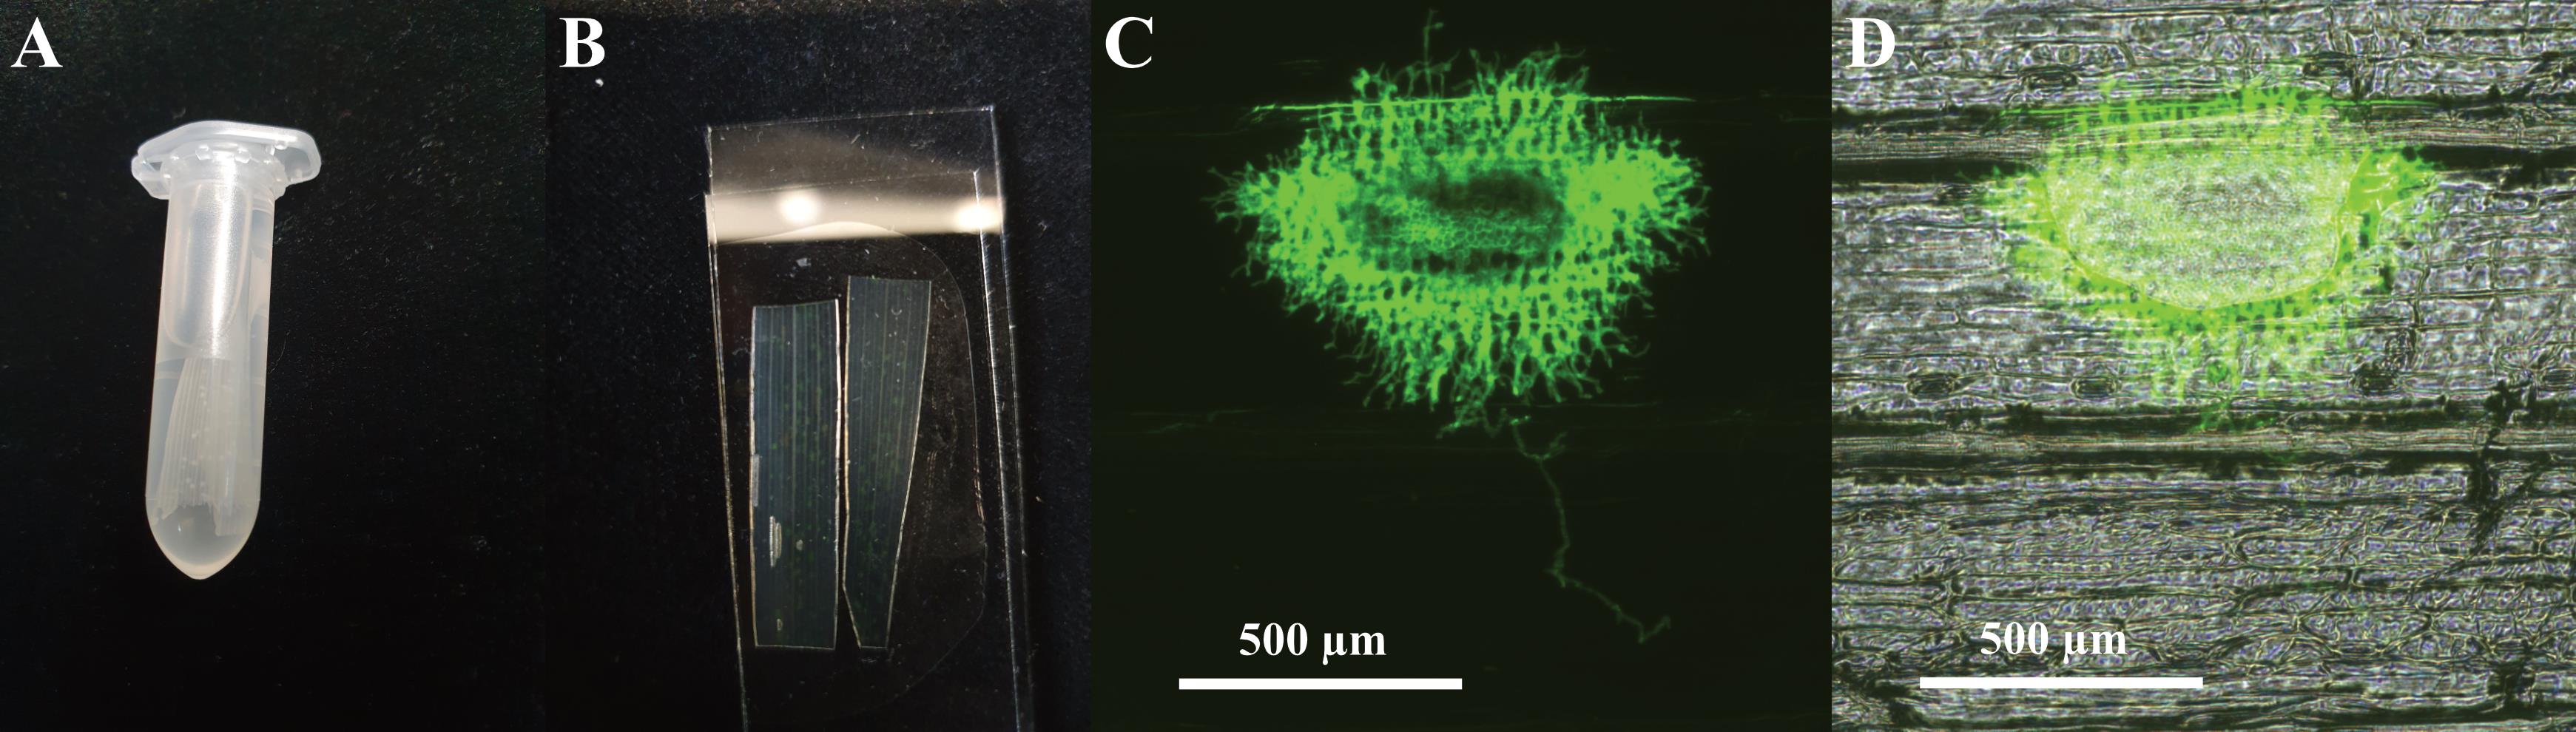
Figure 7. Preparation and microscopy of infected leaf samples. A. Leaf samples in bleaching solution, harvested at 6 dpi. B. Leaf samples on the object slide after staining with WGA AF488. C. Histological analysis of infected leaf sample at 6 dpi with 10× magnification using the channel for GFP. D. Merged picture of the brightfield and GFP channel at 10× magnification.Analyze the fungal development using a fluorescence microscope (in this protocol, Nikon Ti fluorescence microscope).
Note: For microscopy, the samples should be harvested between 2 and 6 dpi; otherwise, the infection sites in susceptible genotypes are usually too large to determine their size at 10× magnification. In our hands, 4 dpi is most suitable.
It is possible to calculate the size of the infection sites using the object count function of the NIS Elements software.
Note: The calculation with the NIS software is based on a one-point threshold definition. With the GFP filter and 10× magnification, the hue of a characteristic fluorescence signal in the respective infection site is selected to define the threshold for object detection. Based on this calibration, the software calculates the fluorescing area in μm2. For very detailed images, it is advisable to examine the samples with a confocal microscope.
Validation of protocol
The protocol was used for the infection analysis presented in Skoppek et al. (2022).
General notes and troubleshooting
General notes
Always work very clean. Exchange used material if you change the fungal pathogen to avoid cross contamination.
If you are using a different fungal isolate or plant genotype than described here, always pre-define the settings again.
You can also transfer this protocol to stripe rust or to powdery mildew as well as to other plants.
The protocol is also applicable for a detached leaf assay.
Acknowledgments
This work was funded by university core funding only. We thank Gwendolin Wehner and Frank Ordon from the Julius Kühn Institute in Quedlinburg for Ph isolate I-80. We thank Jens Boch for general support.
This protocol was derived from Skoppek et al. (2022). The staining method was adapted for barley from Redkar et al. (2018).
Competing interests
The authors declare to have no competing interests.
References
- Dinh, H. X., Singh, D., Periyannan, S., Park, R. F. and Pourkheirandish, M. (2020). Molecular genetics of leaf rust resistance in wheat and barley. Theor Appl Genet 133(7): 2035-2050.
- FAO (Food and Agriculture Organization of the United Nations). (2009). How to Feed the World in 2050. Rome. https://www.fao.org/fileadmin/templates/wsfs/docs/expert_paper/How_to_Feed_the_World_in_2050.pdf
- König, J., Kopahnke, D., Steffenson, B. J., Przulj, N., Romeis, T., Röder, M. S., Ordon, F. and Perovic, D. (2012). Genetic mapping of a leaf rust resistance gene in the former Yugoslavian barley landrace MBR1012.Mol Breed 30: 1253-1264.
- Levine, M. N. and Cherewick, W. J. (1952). Studies on dwarf leaf rust of barley. USDA Tech Bull.
- Miladinovic, D., Antunes, D., Yildirim, K., Bakhsh, A., Cvejić, S., Kondić-Špika, A., Marjanovic Jeromela, A., Opsahl-Sorteberg, H. G., Zambounis, A. and Hilioti, Z. (2021). Targeted plant improvement through genome editing: from laboratory to field.Plant Cell Rep 40: 935-951.
- Redkar, A., Jaeger, E. and Doehlemann, G. (2018). Visualization of growth and morphology of fungal hyphae in planta using WGA-AF488 and Propidium Iodide co-staining.Bio-101: e2942.
- Skoppek, C. I., Punt, W., Heinrichs, M., Ordon, F., Wehner, G., Boch, J. and Streubel, J. (2022). The barley HvSTP13GR mutant triggers resistance against biotrophic fungi.Mol Plant Pathol 23(2): 278-290.
- Sørensen, C. K., Thach, T. and Hovmøller, M. S. (2016). Evaluation of spray and point inoculation methods for the phenotyping of Puccinia striiformis on wheat. Plant Dis 100(6): 1064-1070.
Article Information
Copyright
© 2023 The Author(s); This is an open access article under the CC BY-NC license (https://creativecommons.org/licenses/by-nc/4.0/).
How to cite
Skoppek, C. I. and Streubel, J. (2023). Simplifying Barley Leaf Rust Research: An Easy and Reproducible Infection Protocol for Puccinia hordei on a Small Laboratory Scale. Bio-protocol 13(14): e4721. DOI: 10.21769/BioProtoc.4721.
Category
Microbiology > Microbe-host interactions > Fungus
Plant Science > Plant immunity > Host-microbe interactions
Biological Sciences > Microbiology
Do you have any questions about this protocol?
Post your question to gather feedback from the community. We will also invite the authors of this article to respond.