- Protocols

- Articles and Issues
- For Authors
- About
- Become a Reviewer

Analysis of Mouse Brain Sections by Live-cell Time-lapse Confocal Microscopy
Published: Vol 13, Iss 7, Apr 5, 2023 DOI: 10.21769/BioProtoc.4648 Views: 1986
Reviewed by: Miao HeAnonymous reviewer(s)
Original research article
The authors used this protocol in:
Jun 2022
Advertisement


Protocol Collections
Comprehensive collections of detailed, peer-reviewed protocols focusing on specific topics


Abstract
The developing cerebral cortex of mammals is generated from nascent pyramidal neurons, which radially migrate from their birthplace in the ventral part of the neural tube to the cortical surface. Subtle aberrations in this process may cause significant changes in cortical structure and lead to developmental neurological disorders. During pyramidal neuron migration, we recently showed that the migrating neuron, which bypasses its last preceding neuron, is critical for its proper positioning and contributes to cerebral cortex thickness. Studying this process requires an imaging system with single-cell resolution and a prolonged observation window. Therefore, we built a system to maintain an organotypic brain slice on the stage of a Leica SP5 confocal microscope, which facilitated high-resolution imaging over a 12-hour time-lapse observation period of cellular events during neuron migration. Here, we share our protocol along with guidelines for overcoming difficulties during the setup. This protocol facilitates the observation of, but is not limited to, neurodevelopmental and pathological processes occurring during neuron migration.
Keywords: OrganotypicBackground
Cortical development is a highly dynamic and precisely orchestrated process (Rakic and Caviness, 1995; Kolk and Rakic, 2022). During development, neural progenitor cells from the dorsal telencephalon proliferate to sequentially generate neurons in the deeper cortical layers, neurons in the upper cortical layers, and then glial cells (Gao et al., 2014). Nascent pyramidal neurons migrate radially to the external border of the developing cortex and generate new cortical layers in an inside-out fashion. How the migrating neurons stop their radial migration and consequently locate at their proper positions in the cerebral cortex is poorly understood (Rakic, 1974; Gongidi et al., 2004; Ohtaka-Maruyama and Okado, 2015). Ex vivo time-lapse imaging can directly reveal the cellular processes occurring during cortical development (Yang et al., 2012). Compared with radial migration and proliferation, which continuously occur during neural development and only require 2–3 h of imaging, terminating radial migration takes much longer. Monitoring termination requires prolonged (≥12 h) time-lapse imaging of neuronal migration at single-cell resolution in well-maintained developing brain slices. However, the stage of a standard microscope is not specifically designed to maintain a living organotypic slice, rendering it less feasible to monitor a highly active live brain slice over a long period of time. Previously published methods of time-lapse imaging can extend several hours (Tsai et al., 2007), which is not sufficient to observe the whole process of radial migration termination.
In our recent paper, Migrating pyramidal neurons require DSCAM to bypass the border of the developing cortical plate, we described the termination process of neuron radial migration and reported a molecular mechanism that underlies this process (Yang et al., 2022). We found that the nascent pyramidal neuron bypassing the last preceding neuron is important for expanding the cortex and thus determines the thickness of the upper cortical layers. Down syndrome cell adhesion molecule (DSCAM) was involved in this process by reducing the strength of N-cadherin-mediated cell-to-cell adhesion in the upper cortical plate, which allowed migrating neurons to traverse the cortical plate border and terminate at the outermost position of the developing cortical plate. Since DSCAM aberrations have been associated with autism spectrum disorder (Wang et al., 2016; Turner et al., 2016; Narita et al., 2020) and Down syndrome (Yamakawa et al., 1998; Agarwala et al., 2000), DSCAM may contribute to these brain disorders by impairing normal cortical development.
In our study, we applied live cell time-lapse imaging on organotypic brain-slice cultures to observe the termination of radial migration in detail (Yang et al., 2022). Organotypic brain slice cultures preserve brain development within an ex vivo environment. The confocal microscope is necessary for imaging fluorescently labeled neurons at single-cell resolution in thick brain slices. Since the brain slice is 300 µm in thickness, 50–100 z-frames of confocal scanning are needed to cover 100–150 µm of tissue in depth to collect z-axis information. Confocal microscopes equipped with high-speed scanners, such as the resonance scanner of Leica SP5 confocal systems, can overcome the speed limit of regular confocal microscopes and minimize laser damage. Together, this system generates single-cell resolution images for long-term (≥12 h) observations.
As we realized that our approach could be used as a standard method for studying cortical development and be extended to other brain regions or tissues, we decided to report our protocol in detail here, so that other researchers can reference, modify, and optimize their own imaging system. For the sake of completeness, we include brief protocols for neuronal labeling and brain slice sectioning in the “animal preparation” section, although these techniques have been previously described (Yang et al., 2022).
Materials and Reagents
15 mL Falcon tube for melting the agarose II (Corning, Falcon, catalog number: 14-959-53A)
3.5 × 1.0 cm Petri dish for mounting the fresh brain (Thermo Fisher Scientific, Nunc Petri Dish, catalog number: 150318)
Extra thick filter paper, precut (Bio-Rad, catalog number: 1703967)
10 cm Petri dish for carrying the new brain dissection (Thermo Fisher Scientific, Nunc Petri Dish, catalog number: 263991)
1/16’’, 3/16’’ inner diameter (i.d.) tubing to connect medium syringe to the sample chamber in the heater (ValveBank 4 II)
5/16’’ i.d. silicone tubing for bubbling
4 mm with medium-grit sandpaper (3M, catalog number: 9002NA-20-CC)
60 mL syringe
Transgenic mouse (Ai14, JAX, catalog number: 007914)
Agarose II (low melting point) (Amresco, catalog number: 17856)
2 L flask for carrying 1× artificial cerebral spinal fluid (ACSF)
Gas cylinder of 95% O2/5% CO2 gas
D-(+)-Glucose monohydrate (Millipore, catalog number: 49159)
NaCl (Fisher, catalog number: BP358-10)
KCl (Fisher, catalog number: BP366-1)
MgCl2·6H2O (Fisher, catalog number: BP214-500)
CaCl2·2H2O (Sigma, catalog number: 223506)
NaH2PO4·H2O (Sigma, catalog number: S9638)
NaHCO3 (Sigma, catalog number: S6014)
Deionized water (Millipore Milli-Q® Integral 5 Water Purification System, catalog number: ZRXQ005US)
Dulbecco’s modified Eagle medium (DMEM), high glucose (Sigma, catalog number: D0822)
Matrigel membrane matrix (Corning, Matrigel, catalog number: 356234)
10× ACSF solution I (see Recipes)
10× ACSF solution II (see Recipes)
1× ACSF (see Recipes)
Equipment
Electroporation (Harvard Apparatus, ECM 830)
Vibratome (Leica VT 1000)
ValveBank 4 II perfusion system (or similar systems)
Tissue culture incubator (37 °C, 5% CO2)
High pressure gas cylinder of 95% O2/5% CO2
Homemade sample dish modified from a 3.5 × 1.0 cm Petri dish. The height of the wall of the dish was reduced from 10 to 4 mm by grinding on a medium-grit sandpaper (e.g., 100 grit). The bottom of the dish was thinned by grinding on a fine-grit sandpaper (e.g., 600 grit).
Stage sample dish heater (Bioscience Tools, TC-E35)
Temperature controller (Bioscience Tools, TC-1-100)
Temperature fiber, miniature 0.87 mm (Bioscience Tools, TC-TP)
Silicon lid for the sample dish (Bioscience Tools, CSC-10P)
Vacuum oil pump (Fisher, VLP-200-115)
Confocal microscope (Leica SP5)
Software
ImageJ (NIH, https://imagej.nih.gov/ij/)
LAS X (Leica Microsystems, https://www.leica-microsystems.com/products/microscope-software/p/leica-las-x-ls/)
Procedure
Animal preparation
The migrating pyramidal neurons can be labeled by in utero electroporation (IUE) or induced by tamoxifen injection, which activates nestin-CreERt2 and tdTomato expression in transgenic mouse. IUE can be performed at 14.5 embryonic (E) days to label the upper cortical pyramidal neurons. The IUE electroporation protocol has been published previously (Yang et al., 2022), and is briefly described below:
A timed pregnant mouse is anesthetized.
An incision is made on the belly cavity to expose the uterus.
1–2 µL of DNA solution (plasmids for RFP or GFP expression) is injected into the lateral ventricle of the embryonic head, which can be seen easily across the transparent uterus wall.
Five electric pulses (35–50 V) are delivered across the pup brain, whose neural progenitor cells along the lateral ventricle take up the DNA.
The offspring of these progenitors have fluorescently labeled pyramidal neurons.
Alternatively, the upper cortical pyramidal neurons can also be labeled in an inducible transgenic mouse. At E14.5, intraperitoneal tamoxifen injection into the pregnant mouse induces Cre expression in nestin-CreERt2;Ai14 embryos, which, in turn, induces tdTomato expression in neural progenitor cells and their progeny.
Time-lapse imaging
Embedding and sectioning the brain (Video 1)
Before dissecting the embryonic brain out, prepare 1 L of fresh 1× ACSF from 100 mL of 10× ACSF solution I, 100 mL of 10× ACSF solution II, and 800 mL of deionized water. Some precipitation will occur along with a decrease in transparency. Bubble 95% O2/5% CO2 gas into 1× ACSF on ice until the solution becomes transparent. Before use, add 5–10 g of D-(+)-Glucose monohydrate (glucose) to the 1 L of freshly prepared 1× ACSF and agitate to dissolve.
Add 0.4–0.5 g of agarose II to 12 mL of 1× ACSF and microwave the suspension 4–5 times for 5 s, to melt the agarose without boiling the 1× ACSF solution. Then, let the agarose cool down to 40–45 °C.
During the agarose cooling period, dissect the embryonic brain and keep it in 1× ACSF on ice.
When the temperature of the agarose solution has reached 40–45 °C, pour it into a 3.5 cm Petri dish and transfer the brain into the agarose solution. Use a spatula to stir the agarose around the brain. This step replaces the 1× ACSF surrounding the brain with agarose solution, which permits the agarose to thoroughly attach to the surface of the brain. There is no particular orientation or position in which the brain should be placed in the Petri dish.
Add the lid to the dish and bury the entire dish in ice for 5 min to solidify the agarose quickly.
Trim the brain out of the Petri dish in trapezoid shape gel with the olfactory bulb facing the short side. Glue the long side of the trapezoid onto the ice-cold steel stage of a vibratome. Keep the steel stage on ice.
Prepare the vibratome by filling the space between the inner and outer chambers with ice. Add ice-cold 1× ACSF to the inner chamber. Insert the steel stage to the slot in the inner chamber and ensure the ice-cold 1× ACSF covers the whole brain sample.
Section the brain coronally into 300 µm slices and keep them in ice-cold 1× ACSF until the next step.
Tip 1: For the brain slice to survive, the whole sectioning process should be handled at ice-cold temperatures.
Tip 2: The 1× ACSF should be freshly prepared and always bubbled with 95% O2/5% CO2.
 Video 1. Embedding the brain in agarose and sectioning it with a vibratome
Mounting the brain slice into a chamber specially fit for the microscope stage heater
The custom homemade chamber should be prepared ahead of time. Take a 3.5 cm Petri dish and reduce the height of the side wall to approximately 4 mm with medium-grit sandpaper (Figure 1A, middle). Then, use fine-grit sandpaper (Lot Fancy, 600 grit) to grind the bottom to remove 50% thickness. This facilitates heat penetration through the chamber bottom.
Thaw Matrigel on ice before the brain is dissected and dilute it with an equal volume of ice-cold DMEM.
Select the two best labeled brain slices using a fluorescent stereomicroscope.
Cut a thick filter paper into a 0.5 × 1.0 cm rectangle and soak it in ice-cold 1× ACSF. Scoop the filter paper under the brain slices to attach them to the filter paper and lift them out from the 1× ACSF.
Place the filter paper–supported brain slice on the middle of the homemade chamber and then remove the agarose surrounding the brain slice with a spatula (Figure 1A, middle).
Mount the brain slice/filter paper with the DMEM-diluted Matrigel in the middle of the 3.5 cm chamber (Figure 1B). Place the chamber in the tissue culture incubator (37 °C, 5% CO2) to solidify the Matrigel.
Tip 1: The mounting agarose II gel is removed because it may block cortical outgrowth.
Tip 2: Diluted Matrigel is softer and provides the developing brain slice with enough support but more flexibility.
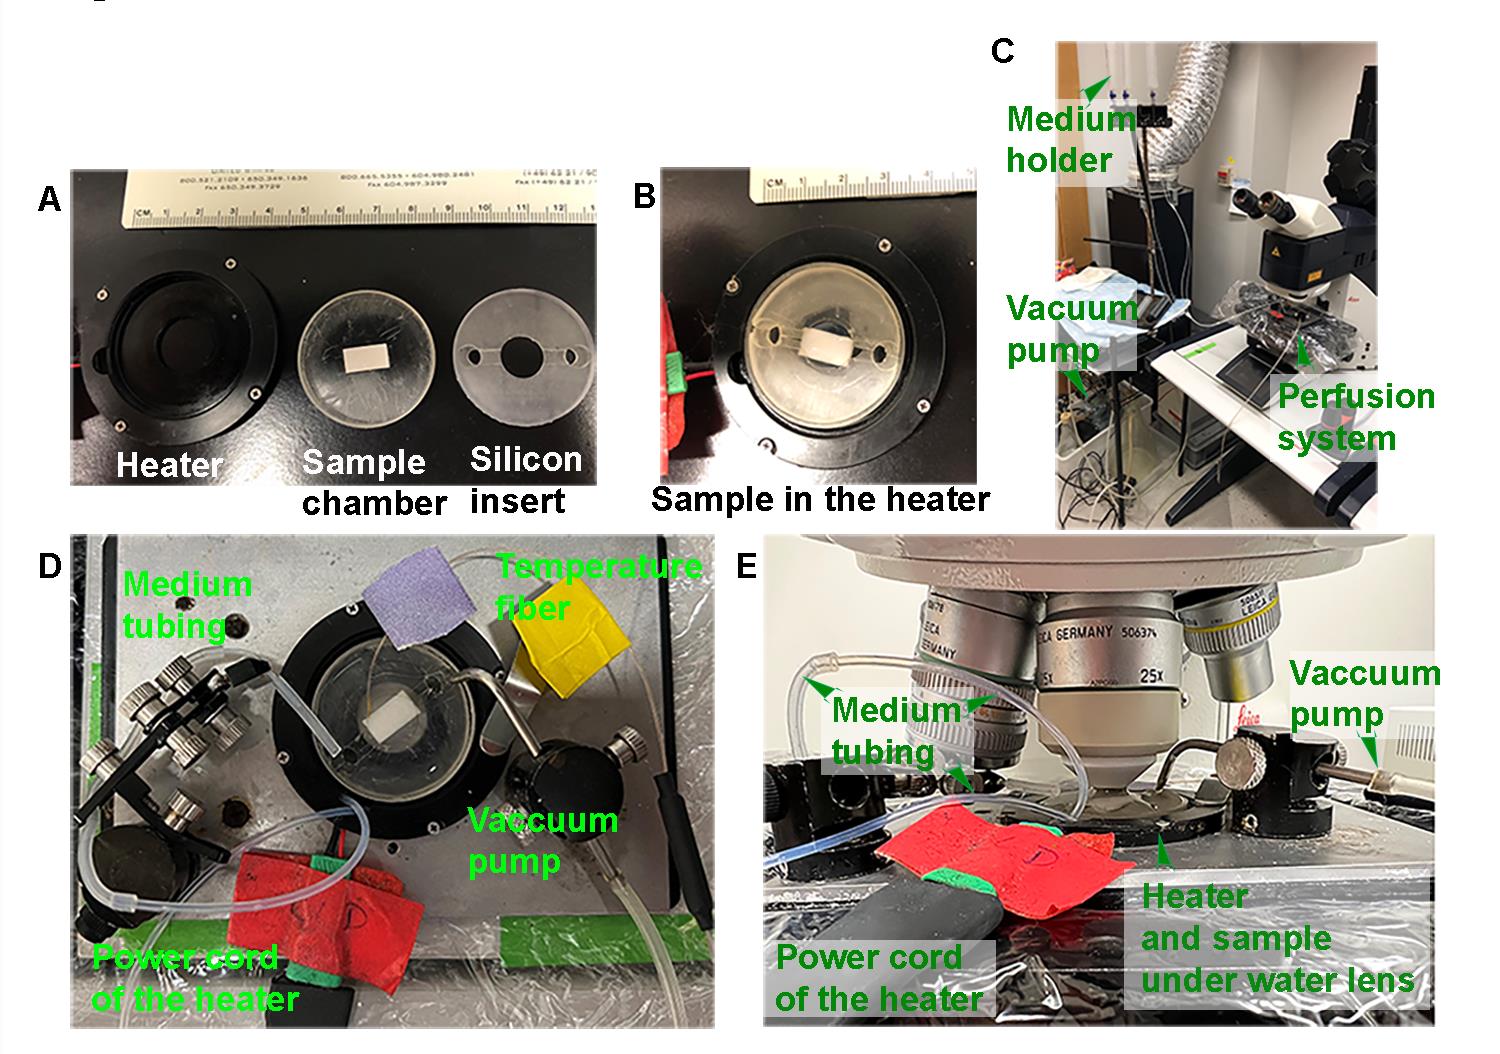
Figure 1. Assembly of the brain slice and maintenance on a Leica SP5 confocal stage. (A) Size of the stage sample heater, sample chamber, and silicon lid. The brain slice on the filter paper is mounted in Matrigel in the middle of the sample chamber. (B) Cover the brain slice with the silicon lid and place the sample chamber into the stage heater. (C) A picture of the perfusion system. (D) Top view of the assembly for imaging the brain slice. (E) Side view of the assembly for imaging the brain slice. The media tubing, which flows DMEM over the brain slice, and temperature fiber, which records the DMEM (brain slice) temperature, are inserted into the sample chamber through openings in the silicon lid. The vacuum pump removes excess media and is inserted into the sample chamber through an opening in the silicon lid. The power cord connects the stage sample heater to the temperature controller.Setting up the perfusion system
Turn on the Leica SP5 confocal microscope and software (make sure to choose resonance when turning on the software). Manually move all the lens out of position and adjust the stage to the lowest position. This step protects the lens and makes more space for the setup.
Install the heater on the stage and place a regular 3.5 cm Petri dish on it. Turn on the heater to increase the temperature of the Petri dish to 37 °C; the temperature of dish and stage will equilibrate with the confocal microscope lens, which will affect the focus and x-y position. Therefore, the focus and x-y position must be adjusted once the lens equilibrate with the stage temperature.
Add DMEM to a 60 mL syringe held upright and 1 m above the confocal stage (Figure 1C). Bubble the syringe DMEM with 95% O2/5% CO2 and let the media flow down the tubing by gravity into the Petri dish. The tubing is inserted into an opening in the silicon lid covering the Petri dish.
Insert the tubing to the vacuum pump in another opening in the silicon lid (Figures 1D and 1E, see the vacuum pump position). The height of the tubing to the vacuum pump is adjusted to maintain a depth of 5–7 mm of DMEM in the 3.5 cm Petri dish. All the extra media should be removed by the vacuum pump.
Connect the temperature fiber (Figure 1D, see the temperature fiber) to the temperature controller. The detector readout should match the room temperature if it is functioning normally. The temperature fiber is fragile; therefore, it is necessary to confirm it is functioning correctly before proceeding.
Insert the temperature fiber into the DMEM media in the Petri dish (Figure 1D, see the temperature fiber). It is necessary to measure the temperature in the core of the media, where the brain slice will be placed. Adjust the heater to maintain a core temperature of 34–39 °C.
Once the core temperature stabilizes to 34–39 °C, remove the temperature fiber, stop the flow of DMEM, remove the tubing to the vacuum pump, remove the regular 3.5 mm Petri dish, and insert the homemade chamber containing the brain slice/filter paper in Matrigel into the stage heater.
Resume the flow of DMEM, manually move the 25× water lens into position, and adjust the lens to touch the flowing DMEM media. Next, adjust the lens meticulously to focus on the sample.
Reinsert the temperature fiber into the DMEM media between the lens and brain slice to monitor the temperature and adjust the heater output to maintain the DMEM (sample) temperature between 34–39 °C. Reinsert the tubing to the vacuum pump and adjust to maintain a DMEM depth of 5–7 mm, which should completely cover the brain slice.
Tip 1: Bubbling the DMEM with 95% O2/5% CO2 mixed gas helps the brain slice to survive.
Tip 2: The DMEM temperature should be adjusted between 34 and 39 °C to maintain high activity in the brain slice.
Tip 3: The heater’s setting temperature is not the same as the DMEM (sample) temperature; use the temperature fiber to measure the DMEM temperature directly.
Setting up the Leica SP5 confocal microscope and recording images
Switch on the confocal microscope, turn on the confocal software, and check the Resonance box.
Adjust the focus of the 25× water lens to find the right z-position and adjust the x/y-axis to find the best position for imaging.
Confocal settings:
In Configuration, check the box of Line Average during Live Acquisition.
In Acquisition, set Line Average to 5 and Frame Average to 2.
Format (resolution): 512 × 512 pixels; Z-step (optical section thickness): 1.469 µm.
Use bidirectional scanning, which saves 50% scanning time.
Choose z-stack, set the scanning area along the z-axis, and ensure the scanning depth covers all the signal. The scanning depth should also cover 10 µm of extra space above and under the signal area. Total scanning depth is approximately 120 µm.
Choose time-lapse on the software and select a frequency for imaging anywhere between 2 and 30 min. We chose to image once every 5 min, which means scanning duration must be shorter than 5 min.
Ensure the DMEM in the syringe is continuously bubbled with 95% O2/5% CO2 gas. Adjust the flow of the DMEM from the 60 mL syringe into the Petri dish to maintain a flow of perfusion at 50–60 mL/h. Check the level of DMEM in the syringe every hour and refill to keep the flow continuous. It is critical not to allow the culturing system to run out of DMEM during recording.
Monitor the culturing dish on the stage to avoid flooding. Wrap the confocal stage with plastic wrap to protect the confocal microscope from DMEM flooding.
Monitor the sample temperature using the temperature fiber. Maintain the sample temperature at 34–39 °C.
Monitor and adjust the z-scanning, as the confocal microscope may lose focus gradually during long-term time-lapse imaging.
During imaging, the x-y position may change as the stage may drift in various directions, resulting in the sample moving out of focus or view. If imaging for over an hour, adjust the x-y-z axes every hour to prevent compromising the image acquisition. Whenever a problem occurs, e.g., loss of focus or x-y position drift, stop the time-lapse imaging, adjust, and resume time-lapse imaging. This will create another file. Start a new file every 2–3 h; otherwise, the file will become too large to process.
Tip 1: The syringe holds 60 mL of DMEM; adjust the flow speed such that the 60 mL of DMEM can last an hour. Refill the syringe with fresh DMEM every hour.
Tip 2: Since the x-y-z positions must be adjusted to image the brain slice, the images are not consecutive during the whole time-lapse imaging. Images need to be aligned using ImageJ.
Data analysis
Combine the files into one
Export all the images of multiple files from the Leica LAS X software. Rename all the images with a serial number to reflect their sequential time point. Save all these images into one folder. Open ImageJ (or FIJI). Choose Input files and select all these images in the folder. Based on the serial number, ImageJ automatically organizes all the images into one time-lapse file. This file is the original time-lapse file. Save the file.
Image alignment
The original time-lapse file is derived from several different Leica files. During time-lapse imaging, the imaging field may consistently move in one direction, so it is common to stop the program and move the image field back. Therefore, it is important to run image alignment to adjust the position to make the time-lapse imaging consistent. There are multiple plugins designed to improve the file’s consistency and new plugins are published based on different mechanisms. You may try multiple plugins, such as StackReg (http://bigwww.epfl.ch/thevenaz/stackreg/), to improve the continuum of the file.
Montage
To analyze an individual neuron’s behavior, select the area containing a neuron’s entire trajectory (see Video 1 for a migrating wild-type neuron). Right click and choose Duplicate to duplicate the selected area.
Choose Image → Stacks → Make Montage (Movie and Figure 2). Then, a window of Make Montage will pop up. Input a proper number of columns, rows, and the scale factor. Then click OK and ImageJ will create a montage image (Figure 2). The montage image in Figure 2 contains six rows, which represent each 5-min interval, starting from the bottom (+0:00) to the top (+0:25). Therefore, it took 30 min to record all six images in a column. In Figure 2, the second row was chosen to represent the whole process with a time interval of 30 min (labeled in green) between two images.
Equations
Migratory distance (pixels) can be measured based on the start and end position of the neuron based on the montage image. Migratory distance = Migratory distance pixels × Known distance per pixel. Known distance per pixel can be found from the confocal microscope.
Migratory duration = (end serial number – start serial number) × time between two images.
Speed = Migratory distance/Migratory duration (Figure 2, right panel).
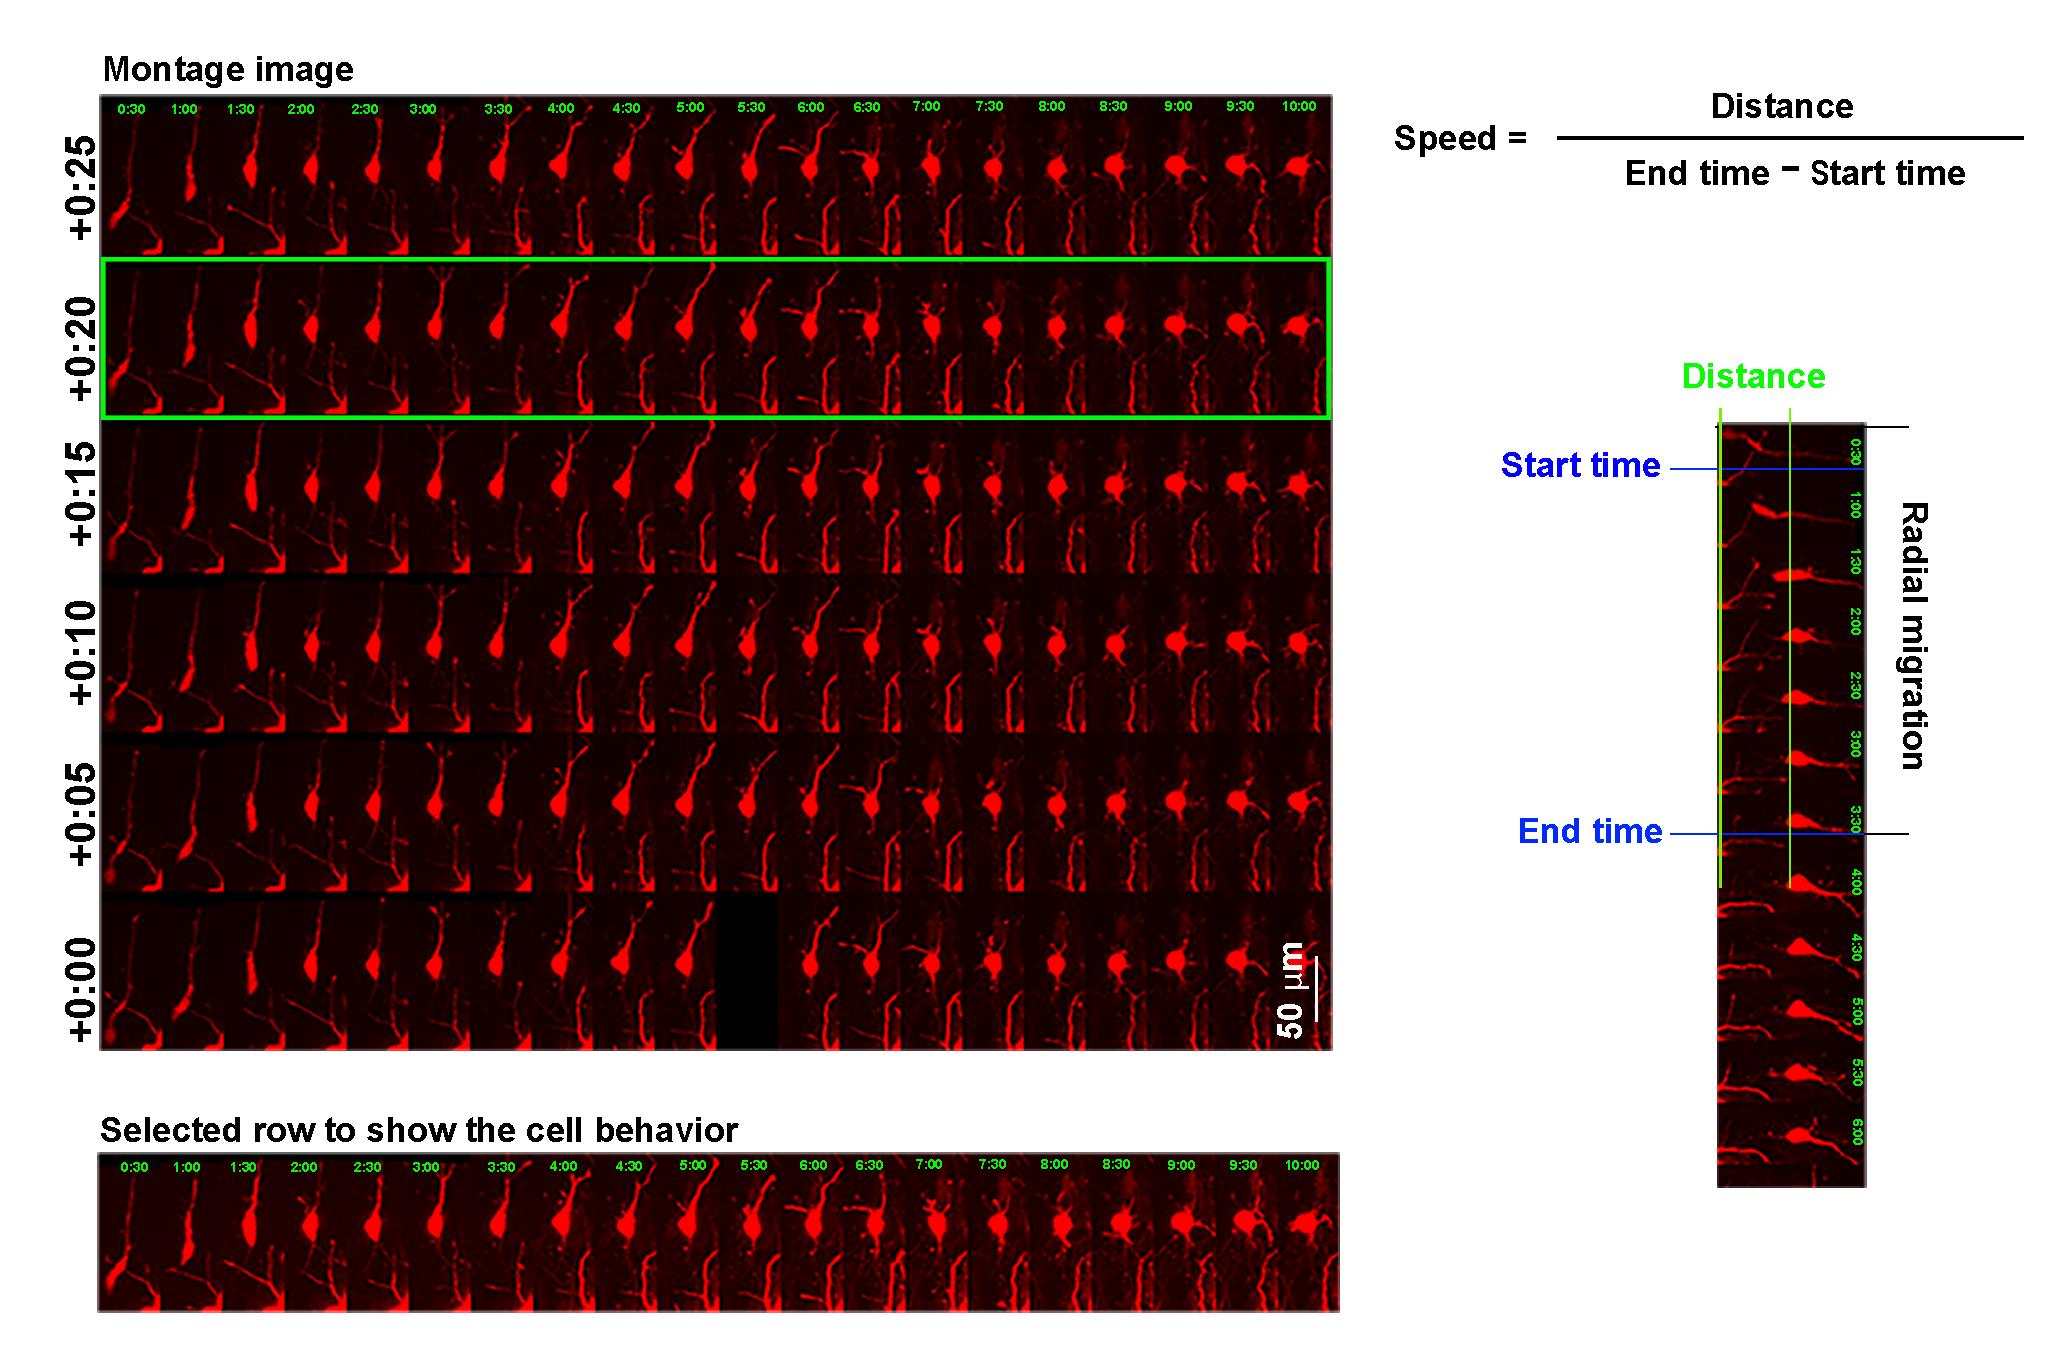
Figure 2. Representative data. Download of a wild-type neuron .avi file. Open the file with ImageJ. Select Image on the ImageJ tool bar, choose z-stack, then choose Make Montage. Input the proper number of rows and columns, then click OK. ImageJ will create a montage file like the upper panel. The first image recorded is in the left bottom corner, the second recorded image is in the second row from the bottom and in the first column, the third recorded image is in the third row from the bottom and in the first column, etc. Because the imaging interval is 5 min, each column contains six images that took 30 min to record. Therefore, the columns from left to right can be labeled from 0:00 to 10:00 hours. Then, use rectangle selection to choose the best row (see the area selected in the green rectangle in the upper panel) and copy it in the lower panel to represent the cell behavior process. The right panel shows how to measure the migratory distance and speed. The black lines mark the start and end points of radial migration; the green lines show the distance of the radial migration from the start to the end; the blue lines label the start and end time. The original figure was published previously (Yang et al., 2022).
Recipes
10× ACSF solution I (1 L)
NaCl 73.05 g 1.25 M
KCl 1.86 g 0.025 M
MgCl2·6H2O 2.03 g 0.01 M
CaCl2·2H2O 2.94 g 0.02 M
NaH2PO4·H2O 1.73 g 0.125 M
Dissolve in deionized water to a final volume of 1 L. Store at room temperature.
10× ACSF solution II (1 L)
NaHCO3 21 g 0.25 M
Dissolve in deionized water to a final volume of 1 L. Store at room temperature.
1× ACSF (1 L)
100 mL of 10× ACSF solution I
100 mL of 10× ACSF solution II
Add deionized water to a final volume of 1 L. The final solution should be 310 mOsm, pH 7.4. The solution will be cloudy but will turn clear after 30 min of bubbling with 95% O2/5% CO2. Add 5–10 g of glucose; then, filter before use. 1× ACSF cannot be stored for extended periods after adding glucose.
Acknowledgments
This study was supported by NIH grants (R01EB028159 and R21NS094091), a Seed Grant from the Brain Research Foundation, the Protein Folding Disease Initiative of the University of Michigan to B.Y. The content is solely the responsibility of the authors and does not necessarily represent the official views of the NIH. The current protocol is tested in our published work (Yang et al., 2022).
Competing interests
The authors declare no competing financial interests.
Ethics
All animals were handled based on a protocol approved by the Institutional Animal Care & Use Committee (IACUC) committee at the University of Michigan. Animals were housed in groups no larger than the cage limit ordered by IACUC and provided regular chow and water ad libitum. The mice were housed in a dedicated temperature-controlled (20 °C) animal facility with a 12:12 h light/dark cycle. The facility is run by the Unit for Laboratory Animal Medicine, which provides veterinarian staff to monitor the health of the animals onsite daily.
References
Agarwala, K. L., Nakamura, S., Tsutsumi, Y. and Yamakawa, K. (2000). Down syndrome cell adhesion molecule DSCAM mediates homophilic intercellular adhesion. Brain Res Mol Brain Res 79(1-2): 118-126.
- Gao, P., Postiglione, M. P., Krieger, T. G., Hernandez, L., Wang, C., Han, Z., Streicher, C., Papusheva, E., Insolera, R., Chugh, K., et al. (2014). Deterministic progenitor behavior and unitary production of neurons in the neocortex. Cell 159(4): 775-788.
- Gongidi, V., Ring, C., Moody, M., Brekken, R., Sage, E. H., Rakic, P. and Anton, E. S. (2004). SPARC-like 1 regulates the terminal phase of radial glia-guided migration in the cerebral cortex. Neuron 41(1): 57-69.
- Kolk, S. M. and Rakic, P. (2022). Development of prefrontal cortex. Neuropsychopharmacology 47(1): 41-57.
- Narita, A., Nagai, M., Mizuno, S., Ogishima, S., Tamiya, G., Ueki, M., Sakurai, R., Makino, S., Obara, T., Ishikuro, M., et al. (2020). Clustering by phenotype and genome-wide association study in autism. Transl Psychiatry 10(1): 290.
- Ohtaka-Maruyama, C. and Okado, H. (2015). Molecular Pathways Underlying Projection Neuron Production and Migration during Cerebral Cortical Development. Front Neurosci 9: 447.
- Rakic, P. (1974). Neurons in rhesus monkey visual cortex: systematic relation between time of origin and eventual disposition. Science 183(4123): 425-427.
- Rakic, P. and Caviness, V. S., Jr. (1995). Cortical development: view from neurological mutants two decades later. Neuron 14(6): 1101-1104.
- Tsai, J. W., Bremner, K. H. and Vallee, R. B. (2007). Dual subcellular roles for LIS1 and dynein in radial neuronal migration in live brain tissue. Nat Neurosci 10(8): 970-979.
- Turner, T. N., Hormozdiari, F., Duyzend, M. H., McClymont, S. A., Hook, P. W., Iossifov, I., Raja, A., Baker, C., Hoekzema, K., Stessman, H. A., et al. (2016). Genome Sequencing of Autism-Affected Families Reveals Disruption of Putative Noncoding Regulatory DNA. Am J Hum Genet 98(1): 58-74.
- Wang, T., Guo, H., Xiong, B., Stessman, H. A., Wu, H., Coe, B. P., Turner, T. N., Liu, Y., Zhao, W., Hoekzema, K., et al. (2016). De novo genic mutations among a Chinese autism spectrum disorder cohort. Nat Commun 7: 13316.
- Yamakawa, K., Huot, Y. K., Haendelt, M. A., Hubert, R., Chen, X. N., Lyons, G. E. and Korenberg, J. R. (1998). DSCAM: a novel member of the immunoglobulin superfamily maps in a Down syndrome region and is involved in the development of the nervous system. Hum Mol Genet 7(2): 227-237.
- Yang, T., Sun, Y., Zhang, F., Zhu, Y., Shi, L., Li, H. and Xu, Z. (2012). POSH localizes activated Rac1 to control the formation of cytoplasmic dilation of the leading process and neuronal migration. Cell Rep 2(3): 640-651.
- Yang, T., Veling, M. W., Zhao, X. F., Prin, N. P., Zhu, L., Hergenreder, T., Liu, H., Liu, L., Rane, Z., Savelieff, M. G., et al. (2022). Migrating pyramidal neurons require DSCAM to bypass the border of the developing cortical plate. J Neurosci 42(28): 5510-5521.
Article Information
Copyright
© 2023 The Author(s); This is an open access article under the CC BY-NC license (https://creativecommons.org/licenses/by-nc/4.0/).
How to cite
Readers should cite both the Bio-protocol article and the original research article where this protocol was used:
- Yang, T., Hergenreder, T. and Ye, B. (2023). Analysis of Mouse Brain Sections by Live-cell Time-lapse Confocal Microscopy. Bio-protocol 13(7): e4648. DOI: 10.21769/BioProtoc.4648.
- Yang, T., Veling, M. W., Zhao, X. F., Prin, N. P., Zhu, L., Hergenreder, T., Liu, H., Liu, L., Rane, Z., Savelieff, M. G., et al. (2022). Migrating pyramidal neurons require DSCAM to bypass the border of the developing cortical plate. J Neurosci 42(28): 5510-5521.
Category
Developmental Biology > Morphogenesis
Neuroscience > Development > Morphogenesis
Cell Biology > Cell movement > Cell migration
Do you have any questions about this protocol?
Post your question to gather feedback from the community. We will also invite the authors of this article to respond.