- Protocols

- Articles and Issues
- For Authors
- About
- Become a Reviewer

A Fast and Efficient Decellularization Method for Tissue Slices
Published: Vol 12, Iss 22, Nov 20, 2022 DOI: 10.21769/BioProtoc.4550 Views: 2714
Reviewed by: Alessandro DidonnaEmilie ViennoisRAMESH KUDIRA
Original research article
The authors used this protocol in:

Mar 2022
Advertisement


Protocol Collections
Comprehensive collections of detailed, peer-reviewed protocols focusing on specific topics


Related protocols
Abstract
The study and use of decellularized extracellular matrix (dECM) in tissue engineering, regenerative medicine, and pathophysiology have become more prevalent in recent years. To obtain dECM, numerous decellularization procedures have been developed for the entire organ or tissue blocks, employing either perfusion of decellularizing agents through the tissue’s vessels or submersion of large sections in decellularizing solutions. However, none of these protocols are suitable for thin tissue slices (less than 100 µm) or allow side-by-side analysis of native and dECM consecutive tissue slices. Here, we present a detailed protocol to decellularize tissue sections while maintaining the sample attached to a glass slide. This protocol consists of consecutive washes and incubations of simple decellularizing agents: ultrapure water, sodium deoxycholate (SD) 2%, and deoxyribonuclease I solution 0.3 mg/mL (DNase I). This novel method has been optimized for a faster decellularization time (2–3 h) and a better correlation between dECM properties and native tissue-specific biomarkers, and has been tested in different types of tissues and species, obtaining similar results. Furthermore, this method can be used for scarce and valuable samples such as clinical biopsies.
Keywords: DecellularizationBackground
The extracellular matrix (ECM) is composed of more than 300 core structural components (Burgstaller et al., 2017), whose physical and chemical features regulate crucial cellular mechanisms (Gattazzo et al., 2014) including differentiation, migration, and proliferation. Thus, the study of the ECM is essential for understanding some pathological conditions and diseases including cancer and fibrosis (Elowsson Rendin et al., 2019, Wishart et al., 2020, Júnior et al., 2021). Also, decellularized extracellular matrix (dECM) scaffolds have many potential applications in tissue engineering and regenerative medicine. In fact, dECM has been used for the generation of ECM hydrogels (Marhuenda et al., 2022) and the recellularization of whole previously decellularized organs (Ohata and Ott, 2020), as well as several applications in the regeneration of tissues (Zhu et al., 2019). Therefore, it is not surprising the increased interest in physiomimetic tissue scaffolds by producing decellularized tissue samples (Mendibil et al., 2020).
The elimination of cells from tissue to obtain the ECM is possible by using physical, chemical, enzymatic, or a combination of these approaches (Mendibil et al., 2020). Physical strategies include freeze/thawing cycles, which induce ice crystals in the matrix, disrupting the cell membrane. Chemical strategies include detergents that solubilize the cell membrane and hypertonic or hypotonic solutions causing cell disruption by osmotic shock. Finally, enzymatic approaches can target the cell’s nuclear material, such as with deoxyribonuclease (DNase), or the cell-ECM adhesion, such as with trypsin. However, the available decellularization protocols have important limitations. Many of them can take up to several days (Wishart et al., 2020, Wüthrich et al., 2020) and are still not particularly flexible or accessible since they are designed for the decellularization of full organs or thick sections (tissue blocks). This type of protocol would not suit the decellularization of many tissue samples, as is the case for clinical biopsies. In fact, clinical biopsies are scarce and cannot be decellularized by accessing the tissue’s vasculature. Since no current protocols have explored the decellularization of glass-attached tissue sections, a method that allows for the study of the exact location before and after decellularization is needed to fill this gap.
The method presented here is significantly faster and less wasteful (i.e., can produce a single acellular tissue slice, instead of requiring a large sample portion) than other available methods, while maintaining the sample’s mechanical properties and being suited for cell culture applications (Narciso et al., 2022). Additionally, it provides the option for studying the same tissue section before and after decellularization, which is invaluable for studies of certain pathologies and of scarce or valuable clinical samples. Patient biopsies, for example, are tested for several markers and histopathological features; hence, the entire sample cannot be decellularized. This method allows for studies of both native tissue and dECM to be carried out in the same sample. For early-stage tumors especially, this is of paramount importance as cancer cells are removed during decellularization and their location cannot be pinpointed. Furthermore, the tissue's architecture is preserved throughout decellularization by pre-attaching the samples to a glass slide. For tissues like bladder and lung, where organ inflation is required to emulate different conditions, this inflation can be performed on the native tissue, guaranteeing a more physiological result.
Materials and Reagents
Nail polish
Coverslips (Labbox, catalog number: COVN-050-100)
Blades (Ted Pella, Inc. St/Steel, Single Edge, 38 mm, catalog number: 121.4)
Slide tray (Histoline, Tray Slide Staining System, catalog number: M920-1)
250 mL glass beaker (VWR, catalog number: 213-1124)
Pasteur pipettes 3 mL (Deltalab, catalog number: 200006.C.)
Hydrophobic pen (Sigma-Aldrich, catalog number: Z377821-1EA), storage: room temperature (RT)
SuperFrost Plus glass slides (ThermoFisher, EprediaTM SuperFrost PlusTM Adhesion slides, catalog number: 10149870), storage: RT
SuperFrost Gold glass slides (ThermoFisher, EprediaTM SuperFrost Ultra PlusTM GOLD Adhesion Slides, catalog number: 11976299), storage: RT
Deoxyribonuclease I from bovine pancreas (Sigma-Aldrich, catalog number: DN25-1G), storage: -20 °C
MgCl2 (Sigma-Aldrich, catalog number: M8266-1KG), storage: RT
CaCl2 (Sigma-Aldrich, catalog number: C1016-500G), storage: RT
1 M Tris-HCl, pH 7.5 (ThermoFisher, Invitrogen, catalog number: 15567027), storage: 2–8 °C
Sodium deoxycholate (Sigma-Aldrich, catalog number: D6750-500G), storage: RT
Ultrapure water/Milli-Q water (obtained via Equipment #6), storage: RT
PBS 10× (ThermoFisher, catalog number: 70011-036), storage: RT
Optimum cutting temperature (OCT) compound (Sakura, Tissue-Tek®, catalog number: 4583), storage: RT
Cryomolds (Sakura, Tissue-Tek® Cryomold® Standard 25 × 20 × 5 mm, catalog number: 4557)
Paraformaldehyde, 4% in PBS (ThermoFisher, catalog number: J61899.AK), storage: 2–8 °C
Corning® 50 mL centrifuge tubes (Sigma-Aldrich, catalog number: CLS430290-500EA), storage: RT
Hoechst 33342 staining (ThermoFisher, Invitrogen, NucblueTM Live Cell Stain ReadyProbesTM reagent, catalog number: R37605), storage: 2–30 °C
Fluoromount (Southern Biotech, catalog number: 0100-01), storage: RT
Lint-free paper (KIMTECH Science Precision, catalog number: 7551), storage: RT
Fresh tissue sample (protocol tested on heart, lungs, bladder, and kidneys. Origins tested: murine and porcine)
DNase solution (see Recipes)
SD 2% solution (see Recipes)
Equipment
Tweezers (rubisTech, catalog number: 1-SA)
Scale (Sartorius Lab Instruments, ENTRIS124l-1S, catalog number: 31603742)
Cryostat (Leica, model: CM3050S)
Vortex (Scientific Industries Inc., Vortex Genie 2, model: G-560E)
Orbital shaker (IKA, Model: KS 130 basic, catalog number: 0002980000)
Milli-Q Gradient (Millipore, catalog number: ZMQ55V001)
Inverted microscope (Leica, SP5) equipped with a CCD camera (Hamamatsu Photonics C9100) and using a 10× Plan Fluor objective (Nikon, Tokyo, Japan)
Incubator (Nuaire, model: NU-4750)
Software
ImageJ (National Institutes of Health, LOCI, University of Wisconsin, https://imagej.nih.gov/ij/)
Procedure
Sample preparation and OCT embedding
Tip: Work near a -80 °C freezer.
After tissue retrieval from the animal/patient, place the sample in an appropriate container and keep refrigerated on ice for up to 2 h. For longer periods of time, freeze the sample at -80 °C and remove it from the freezer before OCT embedding until the sample is completely thawed.
Choose the appropriate size of cryomold for your sample so that the sample has at least 0.5 cm between the sample and the walls of the cryomold.
Place a single drop of OCT compound in the center of the cryomold.
With the help of tweezers, position your fresh tissue sample in the center.
Note: For some applications, the tissue can also be positioned in a specific orientation in relation to the blade.
Cover the whole tissue sample with OCT, without overflowing the cryomold.
Tip: Pour the OCT compound without squeezing the tube to avoid air bubbles, which can interfere with cryosectioning. Make sure there is a thick layer of OCT on top of the sample in a way that the surface of the OCT is as smooth as possible. If any bubbles have formed, gently remove them by slowly aspirating with a pipette.
Place the cryomold with the sample in the freezer on a flat surface.
Tip: Depending on the type of tissue used, the sample will tend to float on the OCT, so it is important to freeze as soon as possible.
Note: Other freezing procedures, such as snap freezing with liquid nitrogen, dry ice, liquid nitrogen vapors, or freezing at -20 °C, are also compatible with this protocol.
Let the samples freeze overnight.
Tissue sectioning
Set the appropriate cryostat temperature for the tissue sample to be sliced.
Note: The cryostat temperature will have to be optimized depending on the device used and the tissue to be sliced. In the setup described, the temperature that produces the best tissue sections for lungs and heart is -18 °C to -20 °C, for bladder is -20 °C to -22 °C, and for liver is -15 °C to -18 °C.
Place the blade inside the cryostat at least 20 min before use.
Withdraw the sample from the freezer and place it inside the cryostat for 30 min before sectioning.
Trim the beginning of the cryoblock until reaching the sample.
Select the desired thickness.
Note: For mechanical testing we suggest 20–30 µm sections, while for tissue staining and imaging we suggest 10 µm.
Section the samples.
Carefully make contact between the positive area of the glass slide and the tissue section (depending on the size of your sample, you can place 1–3 consecutive tissue sections in one glass slide).
Note: For thicker sections (50 µm and higher) consider using a more adhesive glass slide, like Superfrost Gold.
Allow the samples to dry at RT for 10–20 min.
Store the samples at -80 °C.
Tissue section decellularization (10–70 μm sample thickness)
Withdraw samples from the freezer and place them on the slide tray (sample side up).
Allow samples to thaw at room temperature for 20 min.
Trace the edges of the sample with a hydrophobic pen and allow the ink to completely dry for 1 min.
Using a Pasteur pipette, cover the sample in PBS 1× for 20 min (RT) to remove the OCT compound. Please note that depending on the tissue size, the volume required to cover the sample could vary from 100 µL to up to 1 mL.
Tip: When pouring liquid during decellularization, never pour it directly on top of the sample to avoid damaging or detaching the tissue. Also avoid adding the liquid as droplets, as that might also create too much turbulence. Instead, approach the tip of the pipette to a nearby bare glass region of the sample and slowly deposit the liquid in a continuous flow.
Remove the PBS (and all other incubations throughout the decellularization) by inverting the glass slide over the glass beaker.
Warning: Be quick in between washes so as to never let the sample completely dry.
Cover the sample in Milli-Q water for 10 min to provoke cell lysis.
Remove the Milli-Q water by inversion and repeat step C6.
Remove the Milli-Q water by inversion.
Cover the sample in SD 2% solution for 15 min.
Remove the SD 2% solution by inversion.
Cover the sample again in SD 2% solution for 15 min.
Remove the SD 2% solution by inversion.
Tip: In the following steps, be careful when inverting the glass slide over the glass beaker, as the SD solution with cell remnants is extremely viscous and could damage the sample if done too quickly.
Incubate with PBS 1× for 5 min and remove it by inverting the sample.
Repeat step C13 three times.
With the Pasteur pipette, aspirate and release the solution of DNase to ensure it is homogeneous (and that the DNase does not sink to the bottom).
Cover the sample in DNase solution and incubate at RT for 20 min.
Remove the DNase by inversion and repeat step C13 three times.
Leave the sample in PBS until further staining or testing. Do not allow to dry.
Tissue section decellularization (70–100 μm sample thickness)
For the decellularization of thicker tissue sections, follow section C with these alterations to the following steps:
(Instead of step C2)—Allow samples to thaw at RT for 40 min.
(Instead of step C4)—To remove the OCT compound from the sample, cover the sample in PBS 1× and incubate for 30 min.
(Instead of step C16)—Cover the sample in the DNase solution and incubate at 37 °C for 40 min.
For short-term storage (<24 h), non-fixed decellularized samples can be left in PBS at 4 °C. For long-term storage (1–10 days), we advise fixing samples in PFA for 15 min, removing the PFA with PBS, and leaving the samples in 50 mL PBS-filled tubes at 4 °C. Do not freeze thin decellularized samples to avoid ice crystal formation and structural damage to the samples.
Nuclear staining and mounting
Note: Any nuclear stain like DAPI or Hoechst 33342 would work for decellularization quantification.
Thaw consecutive tissue sections for 20 min at RT.
Trace the edges of the sample with a hydrophobic pen and allow the ink to completely dry for 1 min.
Remove the OCT compound from the native sample by covering it in PBS 1× for 20 min.
Prepare the Nucblue Hoechst 33342 staining solution according to the manufacturer’s instructions (2 drops per mL of PBS).
Cover both the native and decellularized sample in Nucblue solution and protect the slide tray from light.
Incubate for 20 min at 80 rpm using an orbital shaker at RT.
Remove the Nucblue solution by inversion and wash the samples three times with PBS for 5 min each wash.
Note: Keep your samples protected from light as much as possible in between washes. If no opaque slide tray lid is available, aluminum foil paper will suffice.
Remove the excess PBS from the glass slide by inversion.
Add a drop of fluoromount from the container and place it on top of your samples so as not to touch it directly.
Tip: Do this step by using a yellow pipette tip to avoid bubble formation.
With the tweezers, remove the coverslip from the container and very carefully place one edge of the coverslip on one of the sides of the sample. Slowly lower the other edge until it covers the sample. Avoid dropping the coverslip on top of the sample as this will create bubbles on the sample.
With nail polish, trace the edges of your coverslip and secure the coverslip to the glass slide.
Wait for it to dry and store at 4 °C protected from light.
Image acquisition and decellularization quantification
Tip: Use a low magnification objective to image as much tissue area as possible (5×–20×).
Place the samples at room temperature 30 min before imaging.
Clean the glass slides with lint-free paper and ethanol 70%.
Image the native tissue sample and set the UV (420 nm) exposure as high as possible without causing pixel saturation (Figure 1B).
Acquire 5–10 image sets of phase contrast and UV fluorescence (Figure 1A and 1B).
Image decellularized samples using the same exposure settings (Figure 1C and 1D).

Figure 1. Representative images of the decellularization of mice bladder (20 µm). Phase contrast images of a native (A) and decellularized (C) 20 µm mice bladder tissue section and corresponding UV images (B and D, respectively). Contrast was increased in phase contrast images for the sake of readability.
Data analysis
Open ImageJ.
Drag the phase contrast image and its corresponding UV image to ImageJ.
Using the Freehand selections tool, trace the edges of the sample in the phase-contrast photo.
Edit > Selections > Create mask, to obtain Figure 2B.
Edit > Selections > Create selection.
On the UV image: Shift+E to apply the selection (Figure 2C).
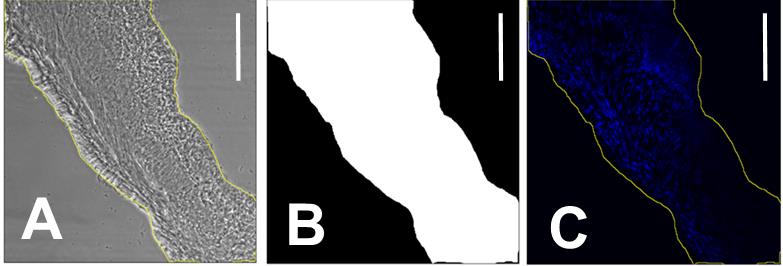
Figure 2. Decellularization quantification. A. Phase contrast image of a 20 µm mice bladder tissue section with the freehand outline in yellow. B. Mask of the outline of A. C. Area of interest selection of the corresponding UV image. Scale bar = 200 µm.Analyze > Set Measurements > Mean gray value > OK.
Analyze > Measure.
Repeat this procedure for all native and decellularized images to obtain the mean signal intensity of the nuclear staining for both groups (Figure 3).
Tip: The approach described in this protocol is manual. For an automatic approach, you can use the previously described algorithm for decellularization quantification (Narciso et al., 2021).
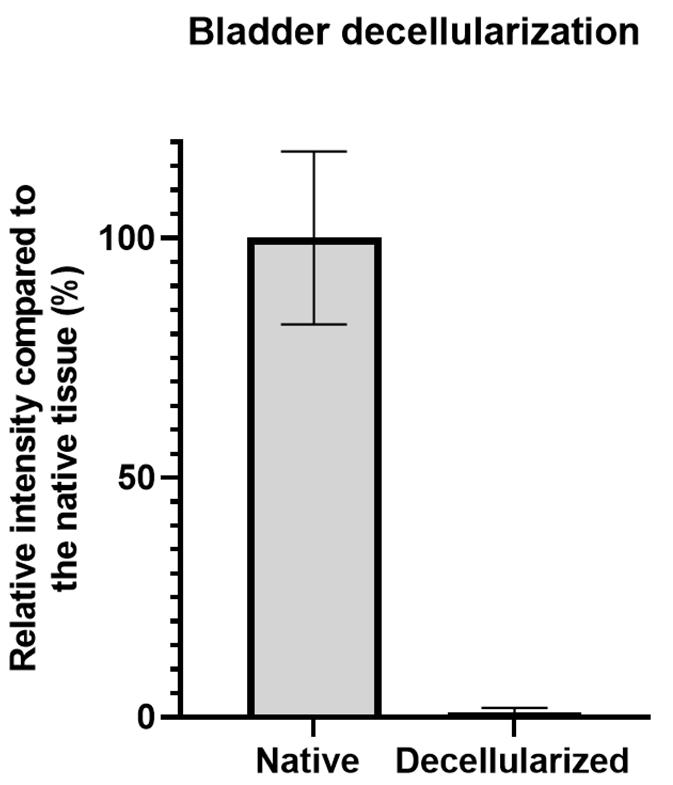
Figure 3. Representative signal quantification results of bladder decellularization. The left bar represents the mean UV intensity signal (± SD) for native bladder samples stained with Hoechst 33342 that was normalized to 100%, while the right bar represents the mean intensity signal of the decellularized bladder sections.
Recipes
DNase solution
Reagent Final concentration Amount Deoxyribonuclease I from bovine pancreas 0.3 mg/mL 3 mg Tris-HCl (1 M, pH 8.0) 10% 100 µL MgCl2 10 mM 9.5 mg CaCl2 10 mM 11 mg H2O (ultrapure) n/a 9.9 mL Total n/a 10 mL SD 2% solution
Reagent Final concentration Amount Sodium deoxycholate 2% 0.2g H2O (Ultrapure) n/a (until reaching a total of 10 mL) Total n/a 10 mL
Acknowledgments
This protocol was derived from the previously published work “Novel Decellularization Method for Tissue Slices” in Frontiers in Bioengineering and Biotechnology in March 2022 (Narciso et al., 2022).
The authors acknowledge the funding received: IA is funded by Ministerio de Ciencia e Innovación (PID2019-108958RB-I00 / AEI/ 10.13039/501100011033) and SEPAR (900-2019). MN and CJ were funded by the H2020 European Research and Innovation Programme under the Marie Skłodowska-Curie grant agreement “Phys2BioMed” contract no. 812772. The Spanish Ministry of Sciences funded RF, JO, and NG, Innovation and Universities, PID2020-113910RB-I00-AEI/10.13039/501100011033, PGC2018-097323-A-I00, and PID2020-116808RB-I00 AEI-Retos, respectively.
Competing interests
There are no conflicts of interest or competing interests.
Ethics
All animal procedures were approved by the Institutional Committee of Universitat de Barcelona and the Animal Experimentation Committee of regional authorities (Generalitat de Catalunya, OB 168/19 and 10972).
References
- Burgstaller, G., Oehrle, B., Gerckens, M., White, E. S., Schiller, H. B. and Eickelberg, O. (2017). The instructive extracellular matrix of the lung: basic composition and alterations in chronic lung disease. Eur Respir J 50(1): 1601805.
- Elowsson Rendin, L., Lofdahl, A., Ahrman, E., Muller, C., Notermans, T., Michalikova, B., Rosmark, O., Zhou, X. H., Dellgren, G., Silverborn, M., et al. (2019). Matrisome Properties of Scaffolds Direct Fibroblasts in Idiopathic Pulmonary Fibrosis. Int J Mol Sci 20(16): 4013.
- Gattazzo, F., Urciuolo, A. and Bonaldo, P. (2014). Extracellular matrix: a dynamic microenvironment for stem cell niche. Biochim Biophys Acta 1840(8): 2506-2519.
- Junior, C., Narciso, M., Marhuenda, E., Almendros, I., Farre, R., Navajas, D., Otero, J. and Gavara, N. (2021). Baseline Stiffness Modulates the Non-Linear Response to Stretch of the Extracellular Matrix in Pulmonary Fibrosis. Int J Mol Sci 22(23): 12928.
- Marhuenda, E., Villarino, A., Narciso, M. L., Camprubi-Rimblas, M., Farre, R., Gavara, N., Artigas, A., Almendros, I. and Otero, J. (2022). Lung Extracellular Matrix Hydrogels Enhance Preservation of Type II Phenotype in Primary Alveolar Epithelial Cells. Int J Mol Sci 23(9): 4888.
- Mendibil, U., Ruiz-Hernandez, R., Retegi-Carrion, S., Garcia-Urquia, N., Olalde-Graells, B. and Abarrategi, A. (2020). Tissue-Specific Decellularization Methods: Rationale and Strategies to Achieve Regenerative Compounds. Int J Mol Sci 21(15): 5447.
- Narciso, M., Otero, J., Navajas, D., Farre, R., Almendros, I. and Gavara, N. (2021). Image-Based Method to Quantify Decellularization of Tissue Sections. Int J Mol Sci 22(16): 8399.
- Narciso, M., Ulldemolins, A., Junior, C., Otero, J., Navajas, D., Farre, R., Gavara, N. and Almendros, I. (2022). Novel Decellularization Method for Tissue Slices. Front Bioeng Biotechnol 10: 832178.
- Ohata, K. and Ott, H. C. (2020). Human-scale lung regeneration based on decellularized matrix scaffolds as a biologic platform. Surg Today 50(7): 633-643.
- Wishart, A. L., Conner, S. J., Guarin, J. R., Fatherree, J. P., Peng, Y., McGinn, R. A., Crews, R., Naber, S. P., Hunter, M., Greenberg, A. S., et al. (2020). Decellularized extracellular matrix scaffolds identify full-length collagen VI as a driver of breast cancer cell invasion in obesity and metastasis. Sci Adv 6(43): eabc3175.
- Wüthrich, T., Lese, I., Haberthur, D., Zubler, C., Hlushchuk, R., Hewer, E., Maistriaux, L., Gianello, P., Lengele, B., Rieben, R., et al. (2020). Development of vascularized nerve scaffold using perfusion-decellularization and recellularization. Mater Sci Eng C Mater Biol Appl 117: 111311.
- Zhu, M., Li, W., Dong, X., Yuan, X., Midgley, A. C., Chang, H., Wang, Y., Wang, H., Wang, K., Ma, P. X., et al. (2019). In vivo engineered extracellular matrix scaffolds with instructive niches for oriented tissue regeneration. Nat Commun 10(1): 4620.
Article Information
Copyright
© 2022 The Authors; exclusive licensee Bio-protocol LLC.
How to cite
Narciso, M., Ulldemolins, A., Júnior, C., Otero, J., Navajas, D., Farré, R., Gavara, N. and Almendros, I. (2022). A Fast and Efficient Decellularization Method for Tissue Slices. Bio-protocol 12(22): e4550. DOI: 10.21769/BioProtoc.4550.
Category
Biological Engineering > Biomedical engineering
Biophysics > Bioengineering > Medical biomaterials
Biological Sciences > Biological techniques
Do you have any questions about this protocol?
Post your question to gather feedback from the community. We will also invite the authors of this article to respond.