- Protocols

- Articles and Issues
- For Authors
- About
- Become a Reviewer

A Semi-quantitative Scoring System for Green Histopathological Evaluation of Large Animal Models of Acute Lung Injury
Published: Vol 12, Iss 16, Aug 20, 2022 DOI: 10.21769/BioProtoc.4493 Views: 4716
Reviewed by: Meenal SinhaJohnatas Dutra SilvaJulie WeidnerJennifer L. Larson-Casey
Original research article
The authors used this protocol in:
Mar 2020
Advertisement


Protocol Collections
Comprehensive collections of detailed, peer-reviewed protocols focusing on specific topics


Abstract
Acute respiratory distress syndrome (ARDS) is a life-threatening, high mortality pulmonary condition characterized by acute lung injury (ALI) resulting in diffuse alveolar damage. Despite progress regarding the understanding of ARDS pathophysiology, there are presently no effective pharmacotherapies. Due to the complexity and multiorgan involvement typically associated with ARDS, animal models remain the most commonly used research tool for investigating potential new therapies. Experimental models of ALI/ARDS use different methods of injury to acutely induce lung damage in both small and large animals. These models have historically played an important role in the development of new clinical interventions, such as fluid therapy and the use of supportive mechanical ventilation (MV). However, failures in recent clinical trials have highlighted the potential inadequacy of small animal models due to major anatomical and physiological differences, as well as technical challenges associated with the use of clinical co-interventions [e.g., MV and extracorporeal membrane oxygenation (ECMO)]. Thus, there is a need for larger animal models of ALI/ARDS, to allow the incorporation of clinically relevant measurements and co-interventions, hopefully leading to improved rates of clinical translation. However, one of the main challenges in using large animal models of preclinical research is that fewer species-specific experimental tools and metrics are available for evaluating the extent of lung injury, as compared to rodent models. One of the most relevant indicators of ALI in all animal models is evidence of histological tissue damage, and while histological scoring systems exist for small animal models, these cannot frequently be readily applied to large animal models. Histological injury in these models differs due to the type and severity of the injury being modeled. Additionally, the incorporation of other clinical support devices such as MV and ECMO in large animal models can lead to further lung damage and appearance of features absent in the small animal models. Therefore, semi-quantitative histological scoring systems designed to evaluate tissue-level injury in large animal models of ALI/ARDS are needed. Here we describe a semi-quantitative scoring system to evaluate histological injury using a previously established porcine model of ALI via intratracheal and intravascular lipopolysaccharide (LPS) administration. Additionally, and owing to the higher number of samples generated from large animal models, we worked to implement a more sustainable and greener histopathological workflow throughout the entire process.
Keywords: Green histologyBackground
Acute respiratory distress syndrome (ARDS) is a highly heterogeneous and life-threatening disease with reported mortality rates ranging from 30%–50% worldwide (Gonzales et al., 2015; Maca et al., 2017; Potere et al., 2020). Caused by a variety of infectious and non-infectious injuries (e.g., trauma, surgery, burn wounds, gastric aspiration, or inhalation of highly toxic substances), ARDS is characterized by diffuse alveolar damage that causes a rapid decline in lung function (Matthay et al., 2019). Infectious causes of ARDS may be direct lung injury through different pathogens, including viral (e.g., SARS-CoV-2), bacterial (e.g., Streptococcus pneumoniae), and fungal colonization (e.g., aspergillosis in mechanically ventilated patients). Additionally, ARDS also commonly results from indirect lung injury through systemic infection (e.g., urinary tract and soft tissue or skin infections), fragments of pathogens [e.g., lipopolysaccharide (LPS)], and inflammatory cytokines in sepsis patients (Lee, 2017).
The clinical diagnosis of ARDS uses the Berlin criteria, which consists of four main characteristics (ARDS Definition Task Force et al., 2012; Ferguson et al., 2012): 1) timing within one week of known injury or new/worsening respiratory symptoms; 2) presence of bilateral opacities consistent with pulmonary edema visible on chest imaging (X-ray or CT scan), which are not fully justified by lobar/lung collapse or nodules; 3) respiratory failure not fully justified by heart failure or fluid overload (hydrostatic edema has to be excluded); and 4) hypoxemia [partial pressure of arterial oxygen/fraction of inspired oxygen (PaO2/FiO2) ≤ 300mm Hg with positive end expiratory pressure (PEEP) or continuous positive airway pressure (CPAP) ≥ 5 cm H2O]. Compromised oxygenation levels can be further divided into three levels: Mild, Moderate, and Severe. Despite this improved classification system, ARDS remains a disease with high clinical heterogeneity, with no effective pharmacologic treatments.
While in vitro models recapitulating some features of ARDS exist, the use of both small and large animal models remains the main experimental tool for preclinical research. Several different models have been used to mimic the onset and development of acute lung injury (ALI), with the major factor differentiating them being the manner or source of injury. Different agents, such as oleic acid, lipopolysaccharide (LPS), gastric contents (or hydrochloric acid directly), hyperoxia, and bacterial or viral administration have all been shown to be capable of inducing acute lung injury as well as the use of high tidal volumes and low PEEP to induce ventilator induced lung injury (Ballard-Croft et al., 2012; Matute-Bello et al., 2008; Arora et al., 2019; Tiba et al., 2021). The choice of injury method and species used depends on the features to be investigated as well as the treatment modalities to be evaluated. As for many other diseases, small animal models using rodents have been widely explored due to their versatility, reproducibility, ease in model standardization, and use of genetically manipulated strains to help uncover disease pathomechanisms. However, the incorporation of clinical standard of care, such as mechanical ventilation, or more subspecialized care, such as extracorporeal membrane oxygenation (ECMO), is extremely challenging in rodent models; therefore, large animal models are most commonly used in these cases (Matute-Bello et al., 2011; Kulkarni et al., 2022).
Porcine models of ARDS have attracted interest because their size and general anatomy is similar to humans, allowing for clinically relevant interventions and measurement techniques (Ballard-Croft et al., 2012; Moodley et al., 2016). Furthermore, the Berlin criteria can be used to evaluate and confirm large animal models due to the fact that a) the timing and type of injury is known, b) the origin of edema can be confirmed by monitoring cardiac parameters and fluid support intake before injury onset, and c) oxygenation levels can be readily measured through serial blood gases. However, chest imaging using CT can be challenging to incorporate due to the short duration of injury models utilized for ARDS, lack of available equipment, or challenges with transport logistics (Hellbach et al., 2018). Therefore, the current gold standard to compensate for the absence of high-resolution chest imaging and to exclude other differential diagnoses is to confirm tissue level injury in animal models by examining the extent of histological tissue damage (Matute-Bello et al., 2008; Wang et al., 2008; Leiphrakpam et al., 2021).
In order to evaluate tissue level injury, histological sections across different time points are required. As artifacts arising from improper preparation can convolute the interpretation of histological findings, careful histological processing of tissue is required to achieve proper insight into the pathological state of the injured tissue (Hsia et al., 2010). The most widely used histopathological processing technique for ALI across species utilizes formalin-fixation and paraffin embedding (FFPE), which provides high morphological and cellular level resolution. In order to generate FFPE samples, the biopsied pieces of tissue need to be properly fixed, followed by tissue processing and paraffin embedding. Next, thin sections are generated and placed on microscopic slides, followed by staining, and finally, microscopy and image analysis. All of these steps are time-consuming and labor intensive, and can thus be prone to variability (Hsia et al., 2010).
As large animal models often generate considerable sample numbers, efficient and reproducible workflows are needed for processing and analyzing histological sections. Furthermore, traditional histological processing uses toxic chemicals for both the environment and the end-user (de Aquino et al., 2016; Kandyala et al., 2010; Purdie et al., 2011). This provided a secondary motivation to the development and implementation of a more sustainable and greener histological workflow, achieving several of the sustainability goals in Agenda 2030 (United Nations, 2015). We focused on goal 3—good health and well-being—and goal 12—responsible consumption and production. Xylene removal from the clearing steps can dramatically reduce the overall amount of xylene used (goal 12) and improve the health and well-being of the histopathologist (goal 3). Therefore, we replaced xylene with isopropanol, which is environmentally and occupationally safer (Falkeholm et al., 2001). When possible, we also used revitalized histological equipment or repurposed commonly available items to make histological processing more accessible to laboratories lacking the resources for some of the high-end and specialized equipment used for histological processing.
Once histological sections are generated, they can be used to validate the extent of injury. As histological analysis can be subjective, the use of semi-quantitative scoring systems is viewed as highly relevant for confirming ARDS in animal models and for evaluating potential therapies (Meyerholz and Beck, 2018). The development of a validated histological score system of ALI in large animal models has been deemed a priority in the field (Kulkarni et al., 2022). Objectively comparing histological injury is known to be challenging, even for highly trained pathologists. Previous histological scoring systems for small animal models relied on the use of scoring multiple randomized fields of view in bright-field microscopy. However, slide scanning technology is becoming more common and accessible to more laboratories. Slide scanning technology therefore opens up new possibilities for histological scoring in a digital format. Therefore, we developed a new histological scoring system for assessing the extent of pulmonary tissue damage in hematoxylin and eosin-stained sections generated from porcine models of ARDS, which could be used by researchers with varying degrees of histological experience. While histological scoring of specific biomarkers can be useful, this becomes challenging in large animal models where molecular tools are not always available. Furthermore, the presence or absence of certain biomarkers may change depending on the source of injury. Therefore, to simultaneously achieve our abovementioned goals, we chose to implement our histological scoring system with hematoxylin and eosin-stained sections generated using green histological processing techniques.
Materials and Reagents
15 mL conical tube (Sarstedt, catalog number: 62.554.502)
Glass petri dish, 12 cm diameter (Thermo Scientific, catalog number: 41042030)
Scalpel blade, no. 21 (Heraco AB, catalog number: 7978)
Scalpel, no. 4, (Heraco AB, catalog number: 7972)
Forceps curved, 2 mm Tip, 12 cm (Agnthos, catalog number: 11003-12)
Paraffin (Histolab, Histowax; catalog number: 00403)
Stainless steel base molds 1.5 × 1.5 × 0.5 cm (VWR International AB, catalog number: 89498-710)
Glass slides (Microscopic slides, Fisher Scientific; catalog number:10149870)
Wheaton Coplin staining jars (Sigma-Aldrich, catalog number: S5766-6EA)
Cover slips 24 × 50 mm (Histolab, Thermo Scientific; catalog number: 06660)
10% neutral-buffered formalin (Sigma-Aldrich, catalog number: HT501128-4L)
Phosphate buffered solution (PBS) (Thermo Scientific, catalog number: 18912014)
Tissue processing/embedding cassettes (Histolab, catalog number: 41701)
Absolute ethanol (VWR International AB; catalog number: BAKR3406.5000)
Isopropanol (Fisher Scientific, catalog number: 15518744)
Xylene (Merck, catalog number: 1330-20-7)
Hematoxylin (Merck, catalog number: 105175)
Glacial acetic acid (Sigma-Aldrich, catalog number: 64-19-7)
Pertex mounting media (Histolab, Thermo Scientific; catalog number: 00871.0500)
Eosin Y solution 0.5% aqueous (Working Solution) (see Recipe 1) (VWR International AB, catalog number: 1098441000)
Graded ethanol solutions and ethanol-isopropanol mixtures (Recipe 2)
Equipment
Tissue processor (Myr, Automated Spin Tissue Processor, model: STP 120) (Figure 1)
Microtome (Leitz, model: 1516 Automated) (Figure 2A)
Slide heater (Wealtec Corp., model: HB-1, catalog number: 1092001) (Figure 2B)
Water bath (JP Selecta, model: N291451, catalog number: 12027874) (Figure 2C)
Cooling tray stored at -20 °C (33 × 27 × 5 cm) (Menuett, model: 009551) (Figure 2D)
Custom-made Paraffin Dispensing Tank (ROYAL Catering, catalog number: 317320191080) retrofitted with a 16 mm diameter and 55 mm external length stainless steel spigot (The Kitchen Lab, Sweden; AM-SIGNSTEK304) (Figure 2E)
Natural convection oven (BINDER, catalog number: ED56 8012-1018)
VS120-S6-096 virtual microscopy slide scanning system (Olympus, Tokyo, Japan)

Figure 1. Spin Tissue Processor (STP 120) showing individual containers numbered 1-12 and the programmable interface.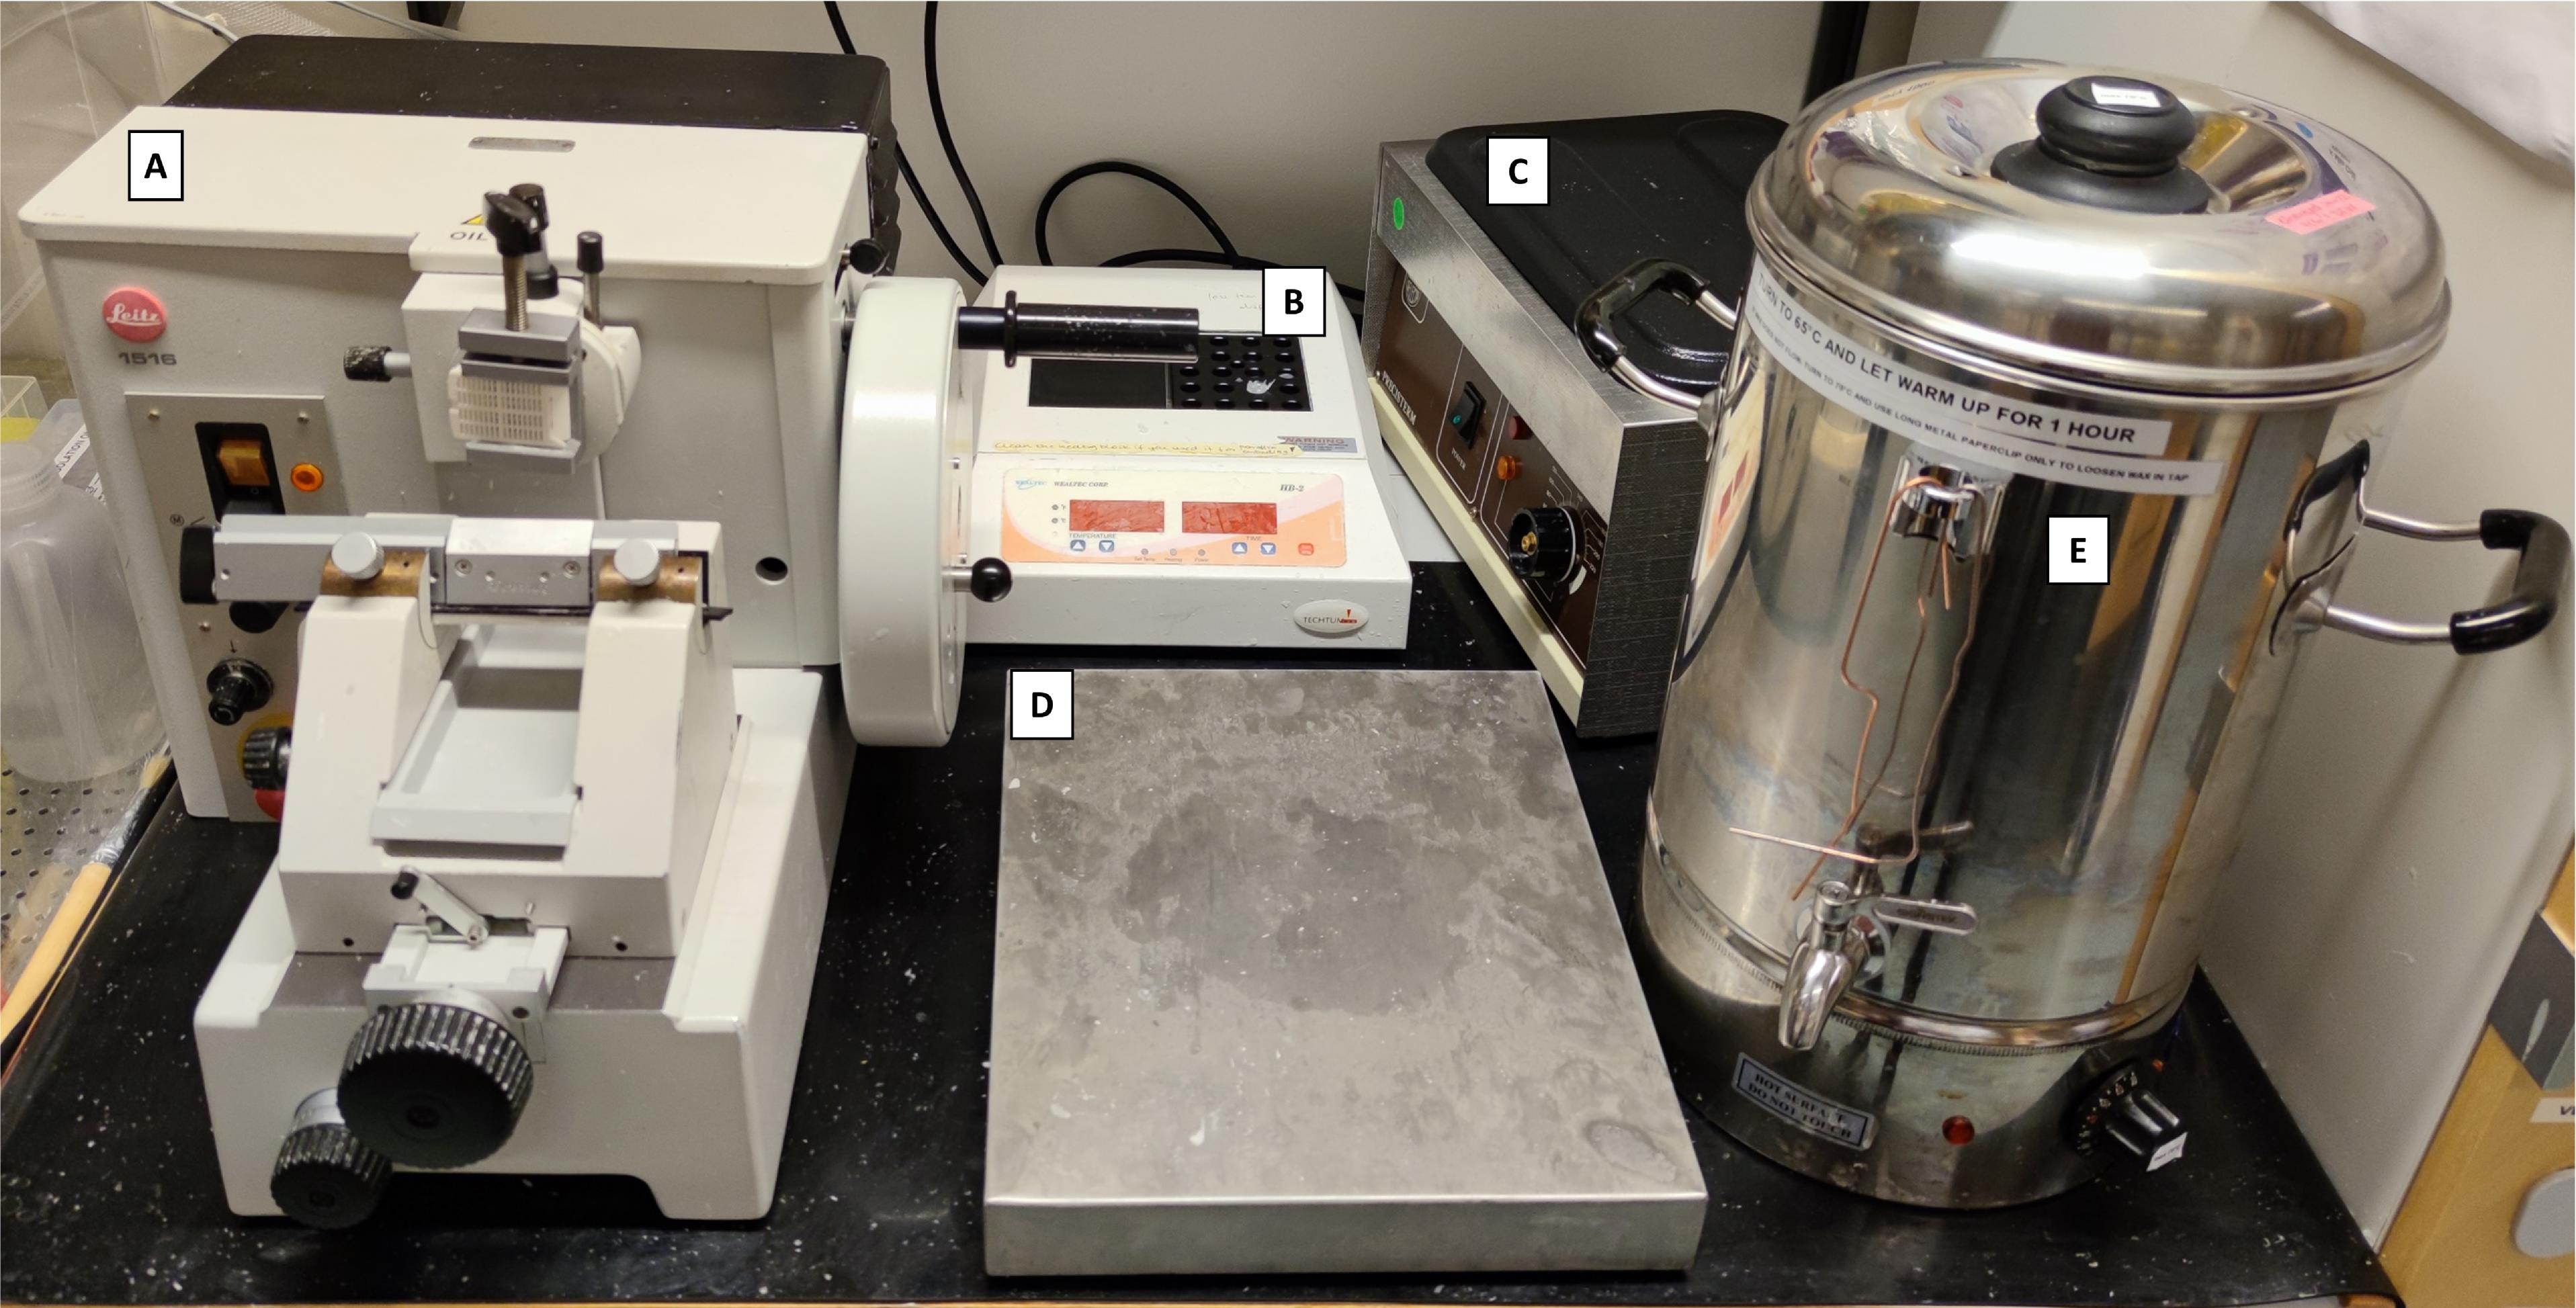
Figure 2. Histopathology area, developed with revitalized, refurbished, and repurposed equipment. A) Manual microtome (revitalized); B) Block heater (refurbished); C) Water bath (revitalized); D) Cooling tray (repurposed); E) Paraffin tank dispenser (water boiler retrofitted with a stainless-steel spigot).
Software
OlyVIA 3.8 (Olympus)
Graphpad Prism 9 (La Jolla, CA)
Optional: Microsoft® PowerPoint® and Microsoft Excel® for Microsoft 365 MSO (Version 2201 Build 16.0.14827.20158) 64-bit
Adobe Acrobat Pro DC version: 21.011.20039.0
Procedure
Tissue collection
All biopsies should be randomly sampled from the same anatomical location from anesthetized and mechanically ventilated pigs, as previously described (Stenlo et al., 2020, 2021). Samples should be taken by the same surgeon across all animals and timepoints to minimize differences in the sampling procedure. Prior to administering any injurious agents or sham treatment controls (e.g., saline), baseline samples are obtained. A small wedge resection is taken from the right lower lobe through a small thoracotomy and used for baseline samples. Endpoint samples from both the right and left lungs (upper and lower lobes) are taken as small wedge resections through a sternotomy. Wedge resections for biopsies are sampled randomly within the same anatomical location within each lobe to decrease bias. For scoring, biopsies from similar lobes are compared against one another, as different lobes have different susceptibilities to severe lung injury in these models. See Note 1 for details on tissue sampling in porcine models.
Immediately after the samples are taken, biopsies of 0.5–1.0 cm3 should be placed in a sterile 15 mL conical tube, with 10% neutral buffered formalin solution, with at least two times the volume of the tissue for fixation. Leave at 4 °C overnight (at least 12 h and up to 48 h).
After fixation, replace formalin with fresh and sterile PBS solution. The tissue can be stored at 4 °C in PBS until processing. See Note 2 for details on longer term storage in these conditions.
Prepare the workspace for sectioning tissue biopsies (Figure 3A).
The tissue should be stabilized with the help of forceps and sectioned into multiple small pieces in a glass petri dish with a sterilized scalpel (Figure 3B). Prepare segments of approximately 5 mm in the longest dimension and no smaller than 3 mm thick (or the thickness of the slots in the cassettes). Using forceps, place them in the tissue processing/embedding cassettes (Figure 3C).
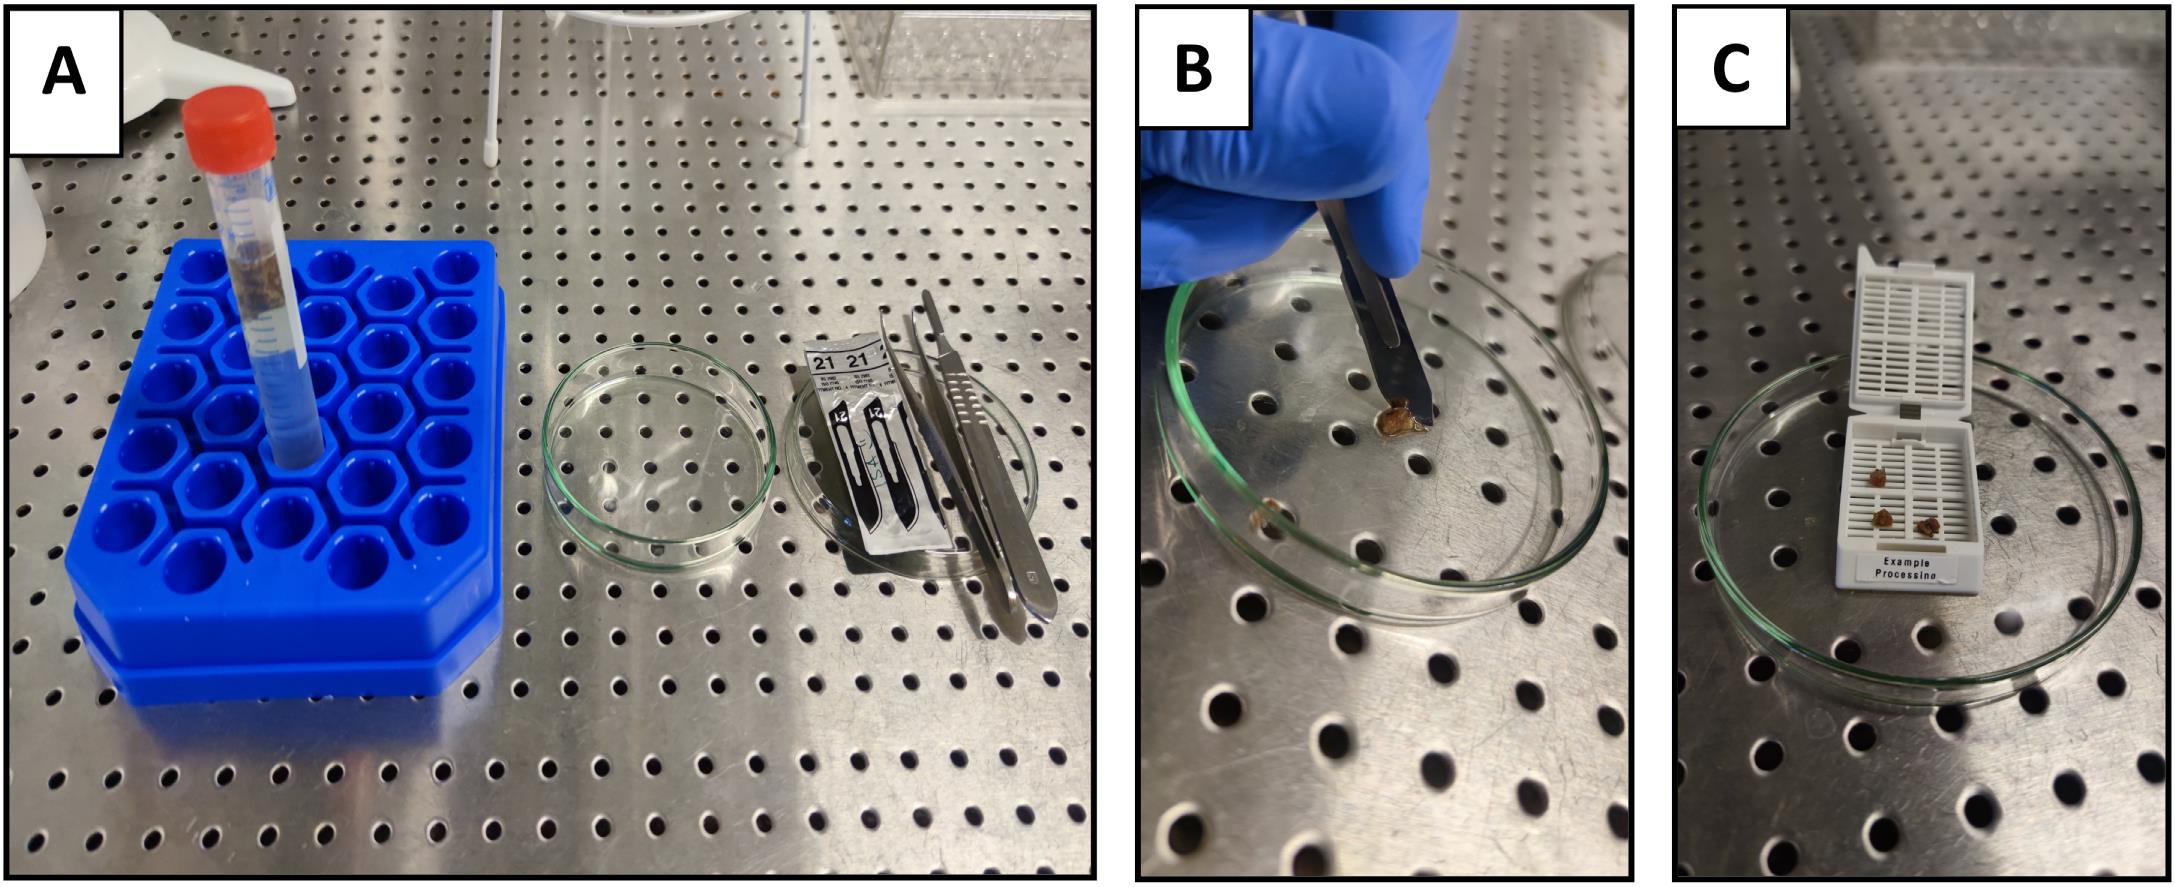
Figure 3. Tissue sectioning from biopsies prior to tissue processing. A) Preparation for tissue sectioning; B) Sectioning of the tissue with a scalpel; C) Transfer of the tissue sections into a pre-labeled cassette.Up to 80 cassettes containing tissue should be placed into the first container (container 1) of an Automated Spin Tissue Processor STP-120 (Figure 1), or equivalent, for subsequent tissue processing (dehydration and clearing) and paraffin infiltration, according to the protocol described in the next sections. The steps outlined in Sections B–D should be programmed into the tissue processor. See Notes 3 and 4 for details on programming the tissue processor.
Waste formalin solutions, and all subsequently described solutions should be discarded according to local chemical and biohazardous waste regulations (see Note 5 for further details).
Dehydration (graded ethanol series and isopropanol)
Solutions of graded ethanol should be prepared ahead of time in deionized water or isopropanol as described below (step B3) and placed into the tissue processor containers. See Recipe 2 for further details.
The basket containing the cassettes should be slowly immersed into the lowest concentration ethanol container (container 1), stirring at 60 rotations per minute with changes in rotational direction every 60 seconds. The rotational agitation helps to achieve a more homogenous and complete infiltration of tissue with the dehydration and ethanol mixtures, due to increased diffusion as compared to immersion based protocols (Ostrander, 1996; Suvarna et al., 2018).
Set the automatic tissue processor for each of the solutions and incubation times:
Container 1: ethanol 30% – 1.5 h
Container 2: ethanol 50% – 1.5 h
Container 3: ethanol 70% – 1.5 h
Container 4: ethanol 80% – 1.5 h
Container 5: ethanol 80% – 1.5 h
Container 6: ethanol–isopropanol 80–20% – 1.5 h
Container 7: ethanol–isopropanol 80–20% – 1.5 h
Clearing (Diaphanization)
Since xylene is associated with health hazards and an unfavorable environmental profile, isopropanol can be used to replace xylene as both a dehydrating and a clearing agent. The following steps occur immediately after Section B.
Container 8: isopropanol 100% – 1.5 h
Container 9: isopropanol 100% – 1.5 h
Container 10: isopropanol 100% – 1.5 h
Paraffin wax infiltration
To ensure complete infiltration of the paraffin into the full tissue thickness, the dehydrated and cleared tissue segments in the cassettes are automatically moved to the final containers in the tissue processor, which contain molten paraffin, in two different steps at 65 °C controlled temperature.
Container 11: Paraffin – 6 h
Container 12: Paraffin – 12 h
Paraffin embedding
Place 5–10 pieces of paraffin infiltrated tissue into the metal base mold with the lung parenchyma facing down (or according to the orientation needed); fill the bottom portion of the histology cassette and mold with molten paraffin, covering the tissue (Figure 4A–C).
Quickly place the bottom portion of the histology cassette on top of the molten paraffin. Let the entire assembly cool down for at least 10 min on the cooling tray, until the paraffin has completely solidified (Figure 4D).
After the solidification is complete, the paraffin block and cassette case can be easily removed for subsequent sectioning.
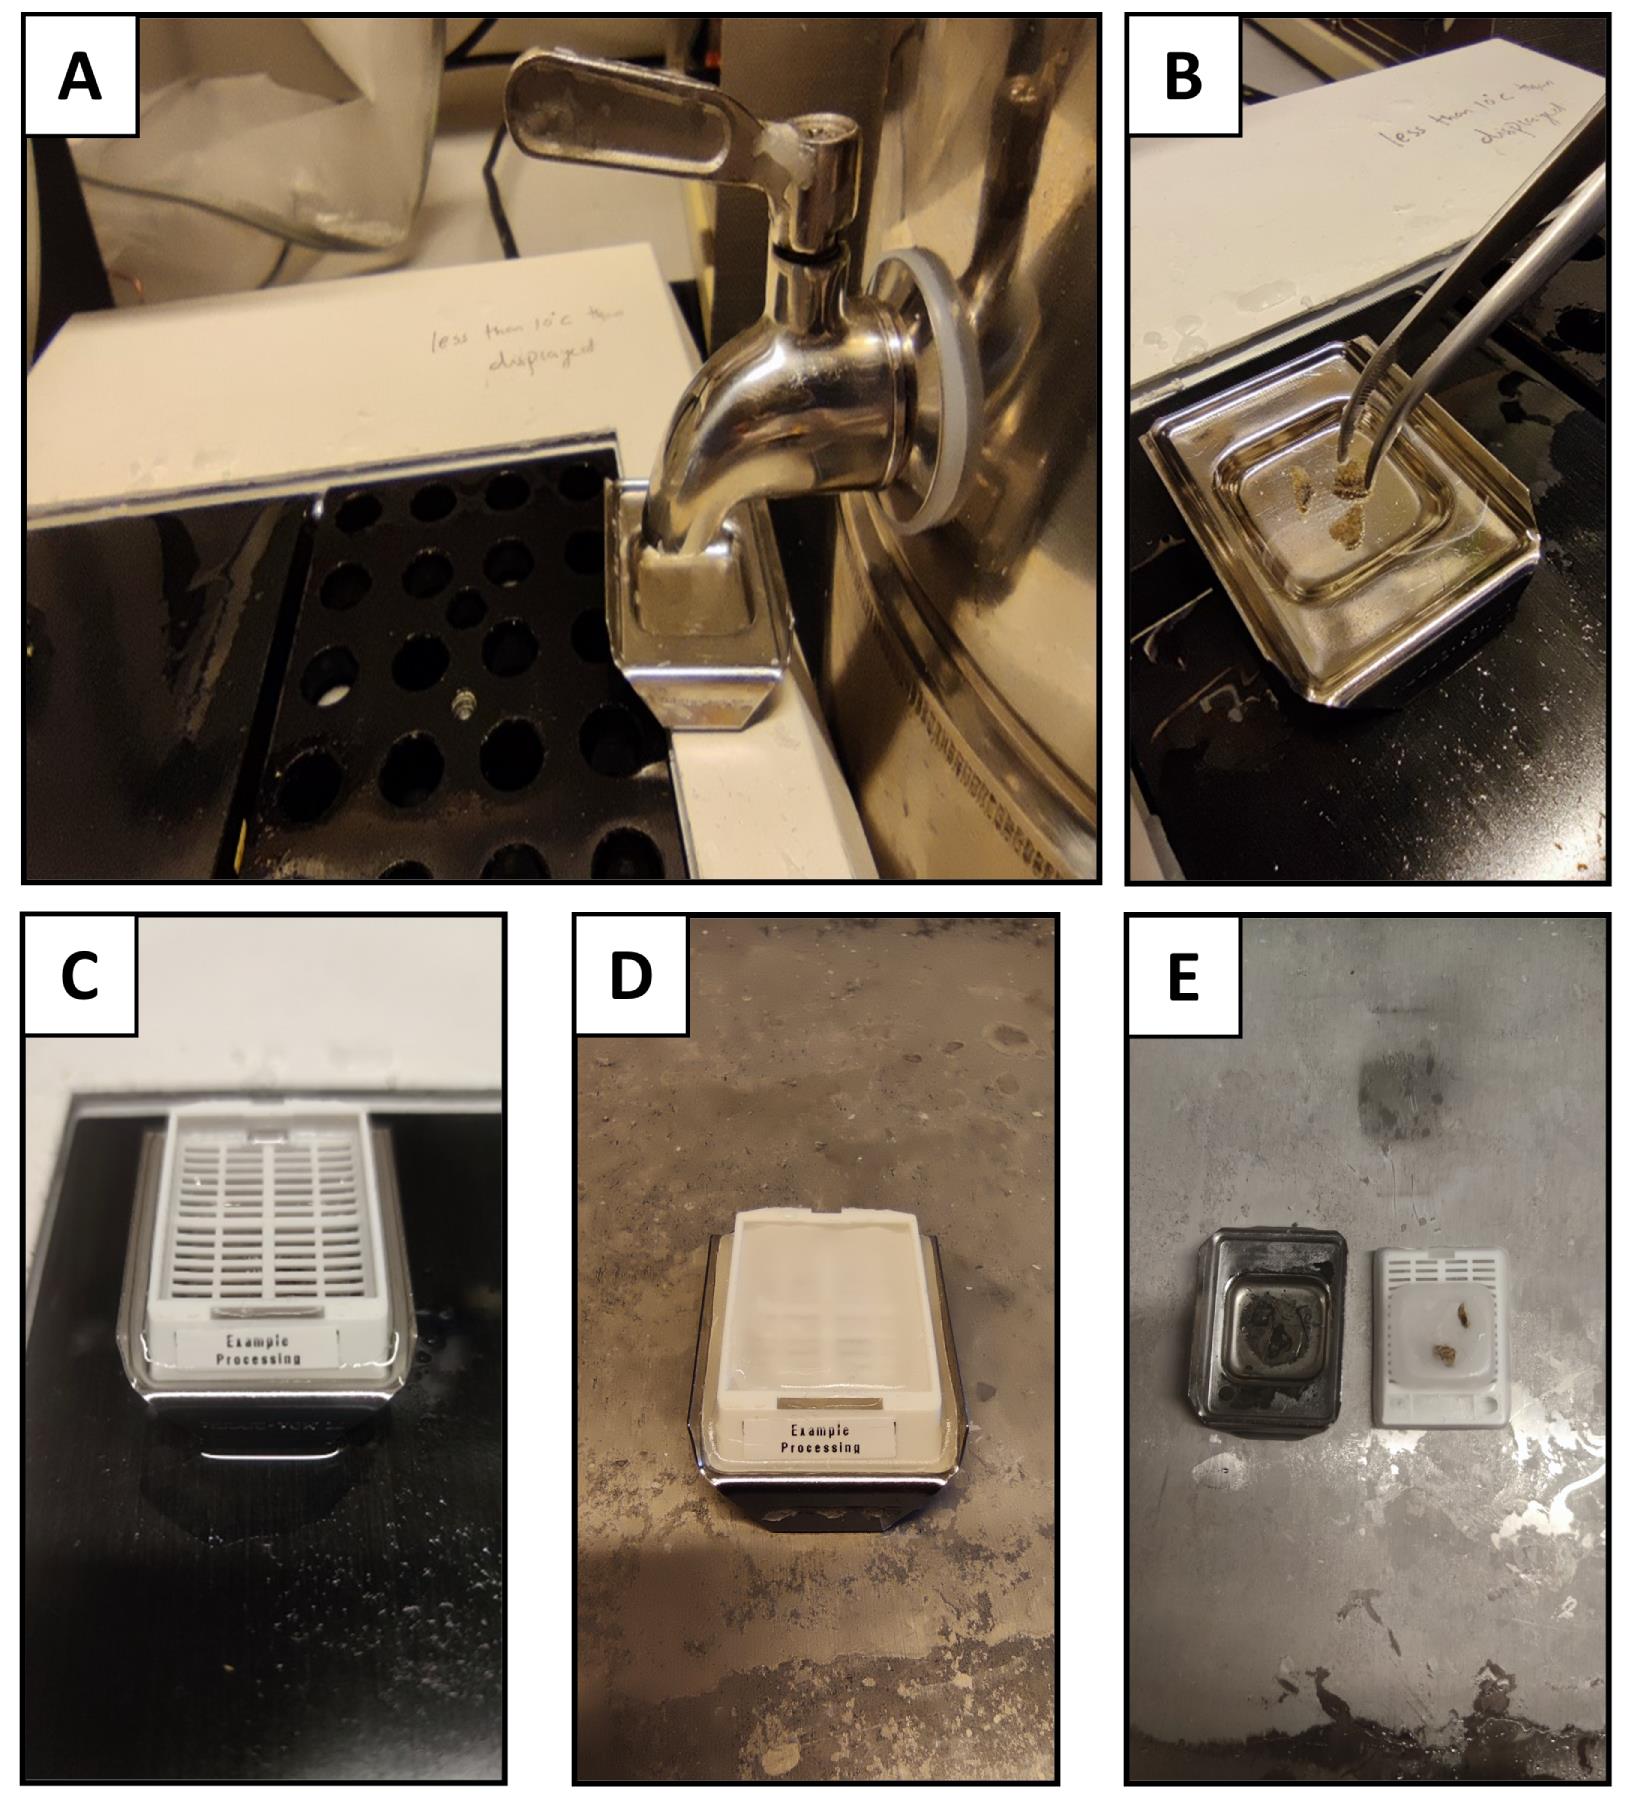
Figure 4. Paraffin embedding of the tissue. A) Pour molten paraffin into the pre-warmed mold; B) Transfer the specimens and orient in the appropriate direction, considering that the blocks should be cut parallel to the base of the mold; C) Place the bottom of the cassette on top of the mold filled with paraffin, ensuring that the paraffin fills the grates in the cassette; D) Representative image of the process to cool down and solidify the paraffin-infiltrated tissue and liquid paraffin on the pre-chilled cooling tray; E) Representative image of solidified, paraffin-infiltrated tissue after cooling.Sectioning of paraffin-embedded tissue
Place the wax block on the microtome specimen holder with the surface parallel to the blade.
Set the microtome to cut 5 µm thick sections (Figure 5A–B). See Note 6 for more details on section thickness.
Use forceps to pick up the sectioned tissue, and transfer to a pre-warmed water bath at 40 °C. Allow the tissue to float flat on the water surface (Figure 5C) until no visible creases can be seen in the paraffin (Figure 5D). (See Notes 7–9 for further details on the water bath).
Carefully place the floating sections onto the histological glass slides as desired for subsequent staining and imaging.
Slides containing tissue sections should be allowed to dry overnight on the glass slides. For long-term storage, keep them covered at room temperature until staining (see Note 10 for more details).
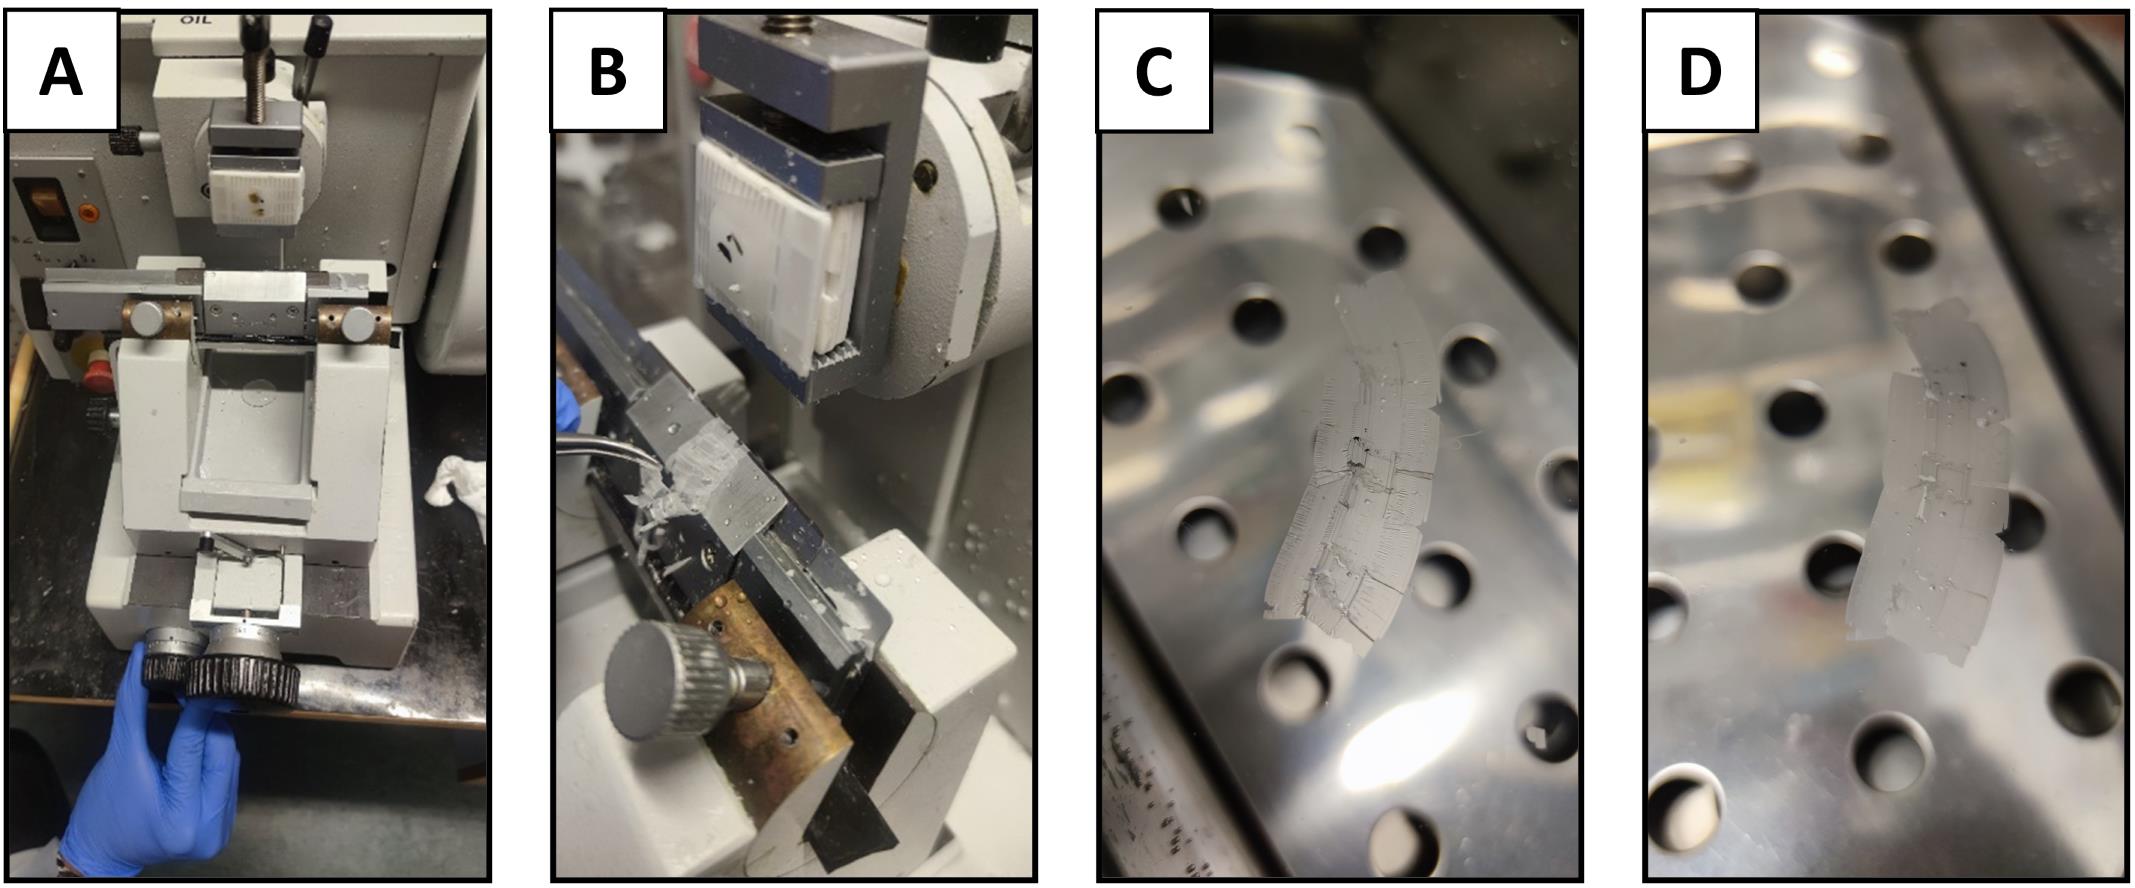
Figure 5. Sectioning of the paraffin block. A) Microtome set up for sectioning paraffin blocks; B) Sectioning of the tissue; C) Transfer of the sectioned tissue with wrinkles to a water bath; D) Relaxation of the paraffin ribbon in the water bath prior to mounting on microscope slides.Hematoxylin and eosin (H&E) staining
Slides should be placed overnight in an oven at 65 °C in horizontal slide racks to allow the excess paraffin to melt away prior to deparaffinization and staining (Figure 6A).
For all the steps below, place slides into Coplin jars filled with the following solutions and for the designated incubation times. Each step below is listed according to a new solution into which it is placed (i.e., if the same solution is listed for two subsequent steps, the slides should be placed into a new container with fresh solution). Coplin jars may be reused throughout the protocol if sufficiently rinsed and dried between steps.
Deparaffinization
Coplin Jar 1: Xylene – 3 min (see Notes 11 and 12 regarding potential xylene substitution)
Coplin Jar 2: Xylene – 3 min
Rehydration
Coplin Jar 3: Ethanol 100% – 3 min
Coplin Jar 4: Ethanol 100% – 3 min
Coplin Jar 5: Ethanol 90% – 3 min
Coplin Jar 6: Ethanol 70% – 3 min
Coplin Jar 7: Rinse in deionized water – 1 min
Staining
Coplin Jar 8: Stain with hematoxylin solution – 7 min
Coplin Jar 9: Rinse once in deionized water
Wash in running tap water, ensuring water flow is not directly on the slides (see Figure 6C) – 15 min
Coplin Jar 10: Incubate/wash in distilled water – 2 min
Coplin Jar 11: Immerse the sections in Eosin Y (0.5%) – 10 min
Wash in running tap water, ensuring water flow is not directly on the slides (see Figure 6C) – 5 min
Dehydration and mounting
Coplin Jar 12: Ethanol 80% – 3 min
Coplin Jar 13: Ethanol 100% – 3 min
Coplin Jar 14: Ethanol 100% – 3 min
Coplin Jar 15: Xylene – 3 min (see Notes 11 and 12 regarding potential xylene substitution)
Coplin Jar 16: Xylene – 3 min
Add 2–3 drops of mounting media to the slide and carefully add the cover slip on top, ensuring there are no bubbles
Let the sections dry overnight in the fume hood/suction bench (Figure 6D).
See Note 5 for details on waste removal procedures.
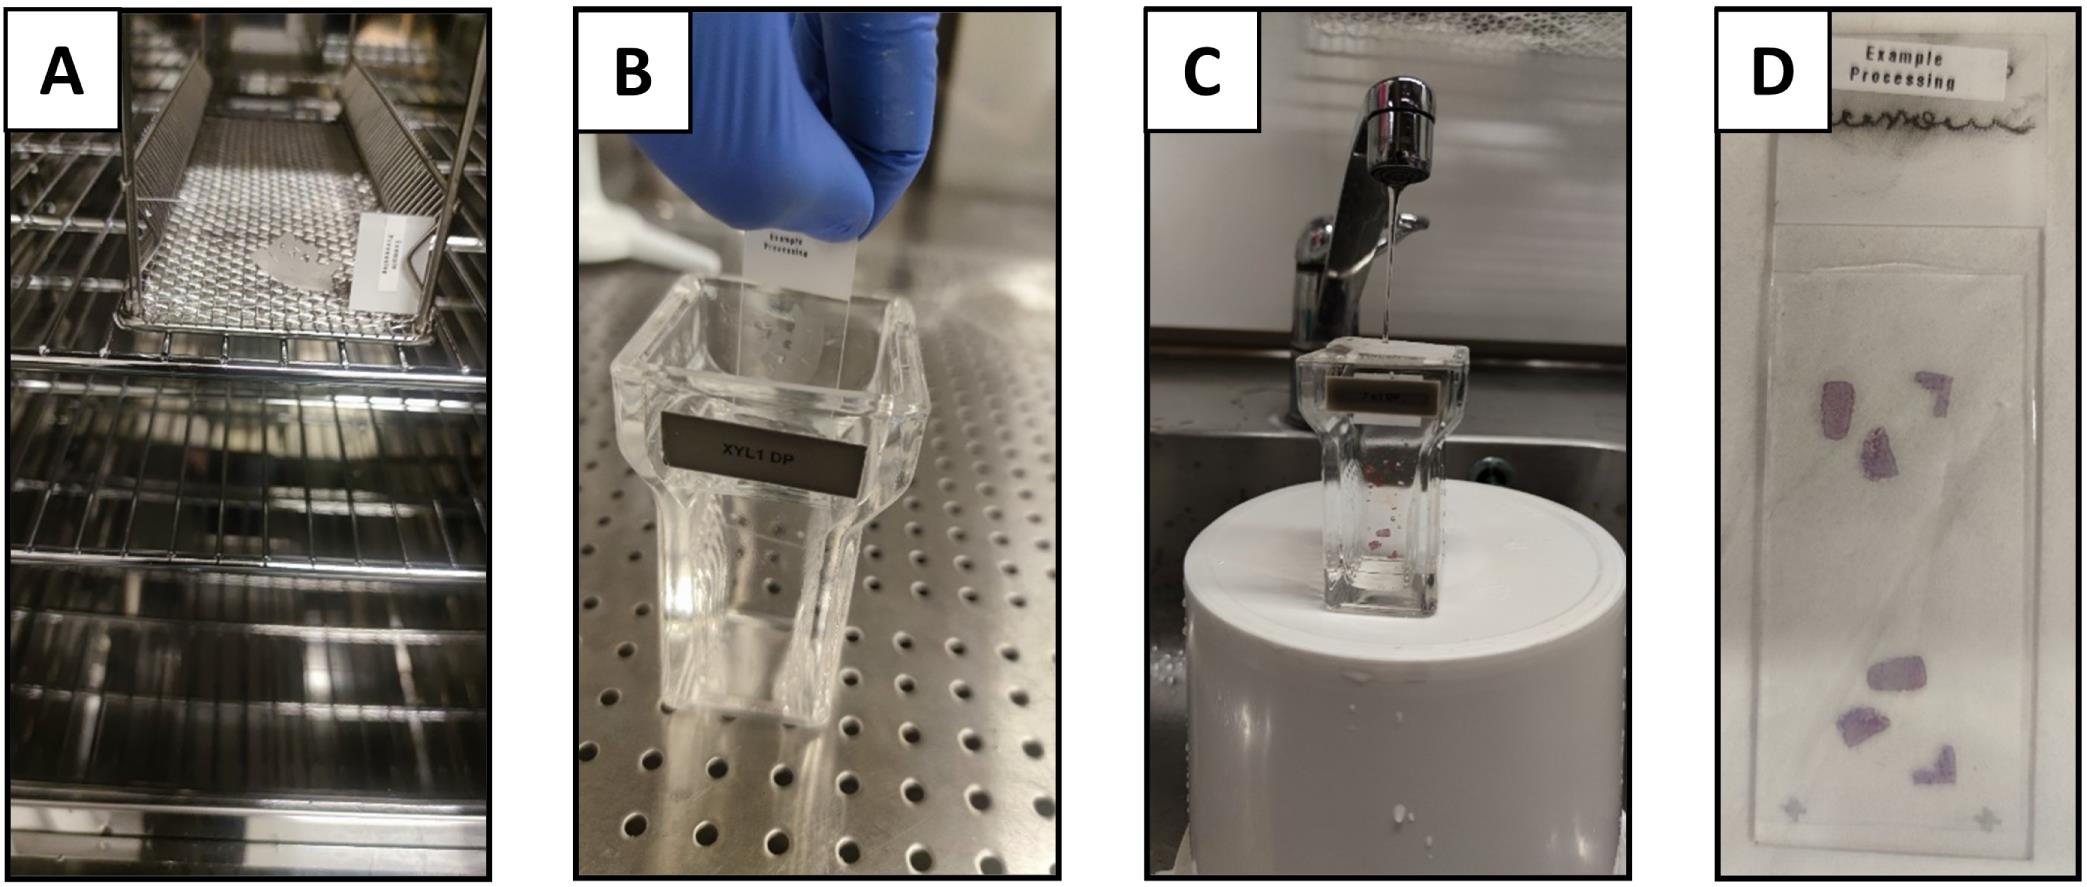
Figure 6. Deparaffinization and H&E staining. A) Example slide placed horizontally into the oven for paraffin removal overnight; B) Slide placed into Coplin jar; C) Wash in running tap water, ensuring that the water flow is gentle enough to slowly exchange the water without disturbing tissue sections on the slides; D) Stained and mounted slide.Image collection via automated slide scanning
Bright field images are obtained with a VS120 virtual microscopy slide scanning system (Olympus, Tokyo, Japan), using 20× and 40× objectives. Images for each slide should be extracted at three different digital magnifications (4×, 10×, and 20×) in the OlyVIA Olympus Software viewer, and assembled per slide into a Microsoft PowerPoint presentation containing a small scoring box (Table 1) for subsequent digital scoring by blinded scorers, as described below (see Figure 7 for example score sheets). Randomize the slides using a random number generator in Microsoft Excel (see Note 13 for further details). Identical acquisition settings and image brightness adjustments must be used for all the conditions (see Note 14 for further details).
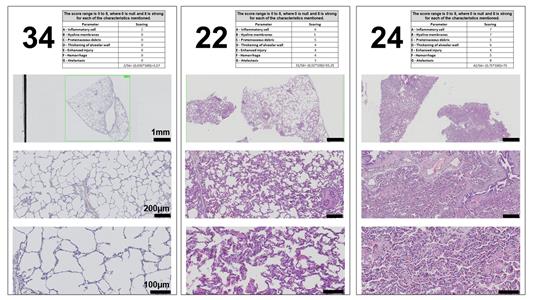
Figure 7. Representative examples of three different scoring sheets supplied to reviewers for the histological scoring system. Three different examples of the photomicrographs at three digital magnifications (4×, 10×, and 20× to provide representative views across magnifications). The score sheet uses a modified version of Table 1 on each page to collect information.Scoring
As evident in the literature (Rosenthal et al., 1998; Martin and Matute-Bello, 2011; Ballard-Croft et al., 2012; Engel et al., 2020), the porcine model of ALI can have different features than those of small animal models (Wang et al., 2008). Therefore, and based on our previous experience in small and large animal models of ALI, we selected seven histological features for our porcine scoring system (inflammatory cells, hyaline membranes, proteinaceous debris, thickening of alveolar wall, hemorrhage, atelectasis, and a general injury score entitled ‘enhanced injury’) (see Figure 8). The selection of these main features has been recently and independently confirmed by an international panel of experts to be present and relevant in animal models of ARDS (Matute-Bello et al., 2011; Kulkarni et al., 2022) (see Note 15 for further details on the selection of the relevant features for large animal models). Previous histological scoring systems for lung and other organs have been developed, prior to the more widespread use of slide scanning technology, for use with manual microscopy methods (Gibson-Corley et al., 2013). Therefore, previous scoring methods have used randomization of multiple, high magnification regions and scoring of features utilizing a binary or three-point system (Guenthart et al., 2019; Frick et al., 2021; Leiphrakpam et al., 2021). However, scoring systems in small animal lung injury models have evolved to have larger score ranges to increase their sensitivity (e.g., for pulmonary fibrosis) (Ashcroft et al., 1988; Hubner et al., 2008). Therefore, we opted for a range of 0 (no damage)—8 (extensive damage) for each of the seven features selected as relevant (see Figure 8).

Figure 8. Representative photomicrographs of H&E stained sections demonstrating the different features selected for development of the lung tissue injury score system in low and high magnification. Black arrowheads demonstrate examples of features.Scorers should be given a standardized training form with example histological images not contained in their scoring set. These images should contain text describing each feature, as well as arrows demonstrating each feature, as some animals with severe injury can contain multiple features in one image. The scorers should then be instructed to give scores depending on the severity of injury of these features on the scanned slides. Figure 8 presents an example of an overview of the features to be scored. See Notes 16 and 17 for details on the number of scorers and expertise.
Table 1. Features of acute lung injury to score in H&E stained histological sections of porcine lung tissue. The score range is 0 (null) to 8 (severe) for each of the features mentioned.
Features Scoring Feature Description A – Inflammatory cell Visible inflammatory cells in air and interstitial spaces B – Hyaline membranes Acellular deposit (i.e., devoid of hematoxylin staining) in the alveolar region and stained with eosin
C – Proteinaceous debris Acellular debris in airspaces
D – Thickening of alveolar wall Alveolar wall thickening (i.e., at least >1 cell layer thick) E – Enhanced injury
Overall impression of tissue level injury F – Hemorrhage
Visible red blood cells in the interstitium or airspaces
G – Atelectasis
Complete or partial collapse of distal airspaces
Total Score = (Sum/56) × 100
Data analysis
Once all the scores are received, slides should be unblinded and organized in a data processing software, such as Microsoft Excel. The total score is then calculated for each scorer and slide (see Table 1). The maximum score per scanned slide is 56. This total score can then be transformed to a total score range of 0–100, as shown in Table 1. Then, based on the fact that the raw scoring data is often comprised of low numbers of scorers, where normality cannot formally be tested for, the median of all scores for each slide is used for further analysis (Gibson-Corley et al., 2013). The use of the median total score of each feature or slide across all scorers also helps to reduce the potential impact of outliers. Data is then visualized and analyzed using GraphPad Prism 9 (GraphPad Software Inc, La Jolla, CA, USA). Examples of scoring by researchers with different experience levels are shown in Figure 9. Values can be compared between all the features or scores and between experimental groups using one- or two-way ANOVA for repeated measures with Kruskal–Wallis test or Mann–Whitney U, with p-values of ≤ 0.05 considered significant. Non-parametric testing and presentation of median for central tendency is the most appropriate statistical analysis and representation because semi-quantitative scoring systems are ordinal, and therefore the differences between different scores cannot be assumed to be linear. Examples of slides identified with no damage (Minimum), mild damage (2/3), moderate damage (4), pronounced damage (5/6), and extensive damage (Maximum) for each feature are shown in Figure 10.

Figure 9. Scoring outcomes and relative reproducibility across different independent scorers with different levels of experience (novice, moderate, and expert). Representative total scores from the three example sheets shown in Figure 7 and transformed to a scale of 0–100. The total score and the ability of users to distinguish between different severities of injuries did not differ dramatically based on experience (see Note 17 for classification based on experience). These samples were selected to represent a range of the scores our system detected (low, mild, and extensive level of lung injury), as judged by the blinded scorers. See Figure 7 (score sheet 34 as an example for low level of lung injury, sheet 22 for mild level of injury, and sheet 24 for high level of lung injury). The horizonal line represents the median of all scorers for each slide.
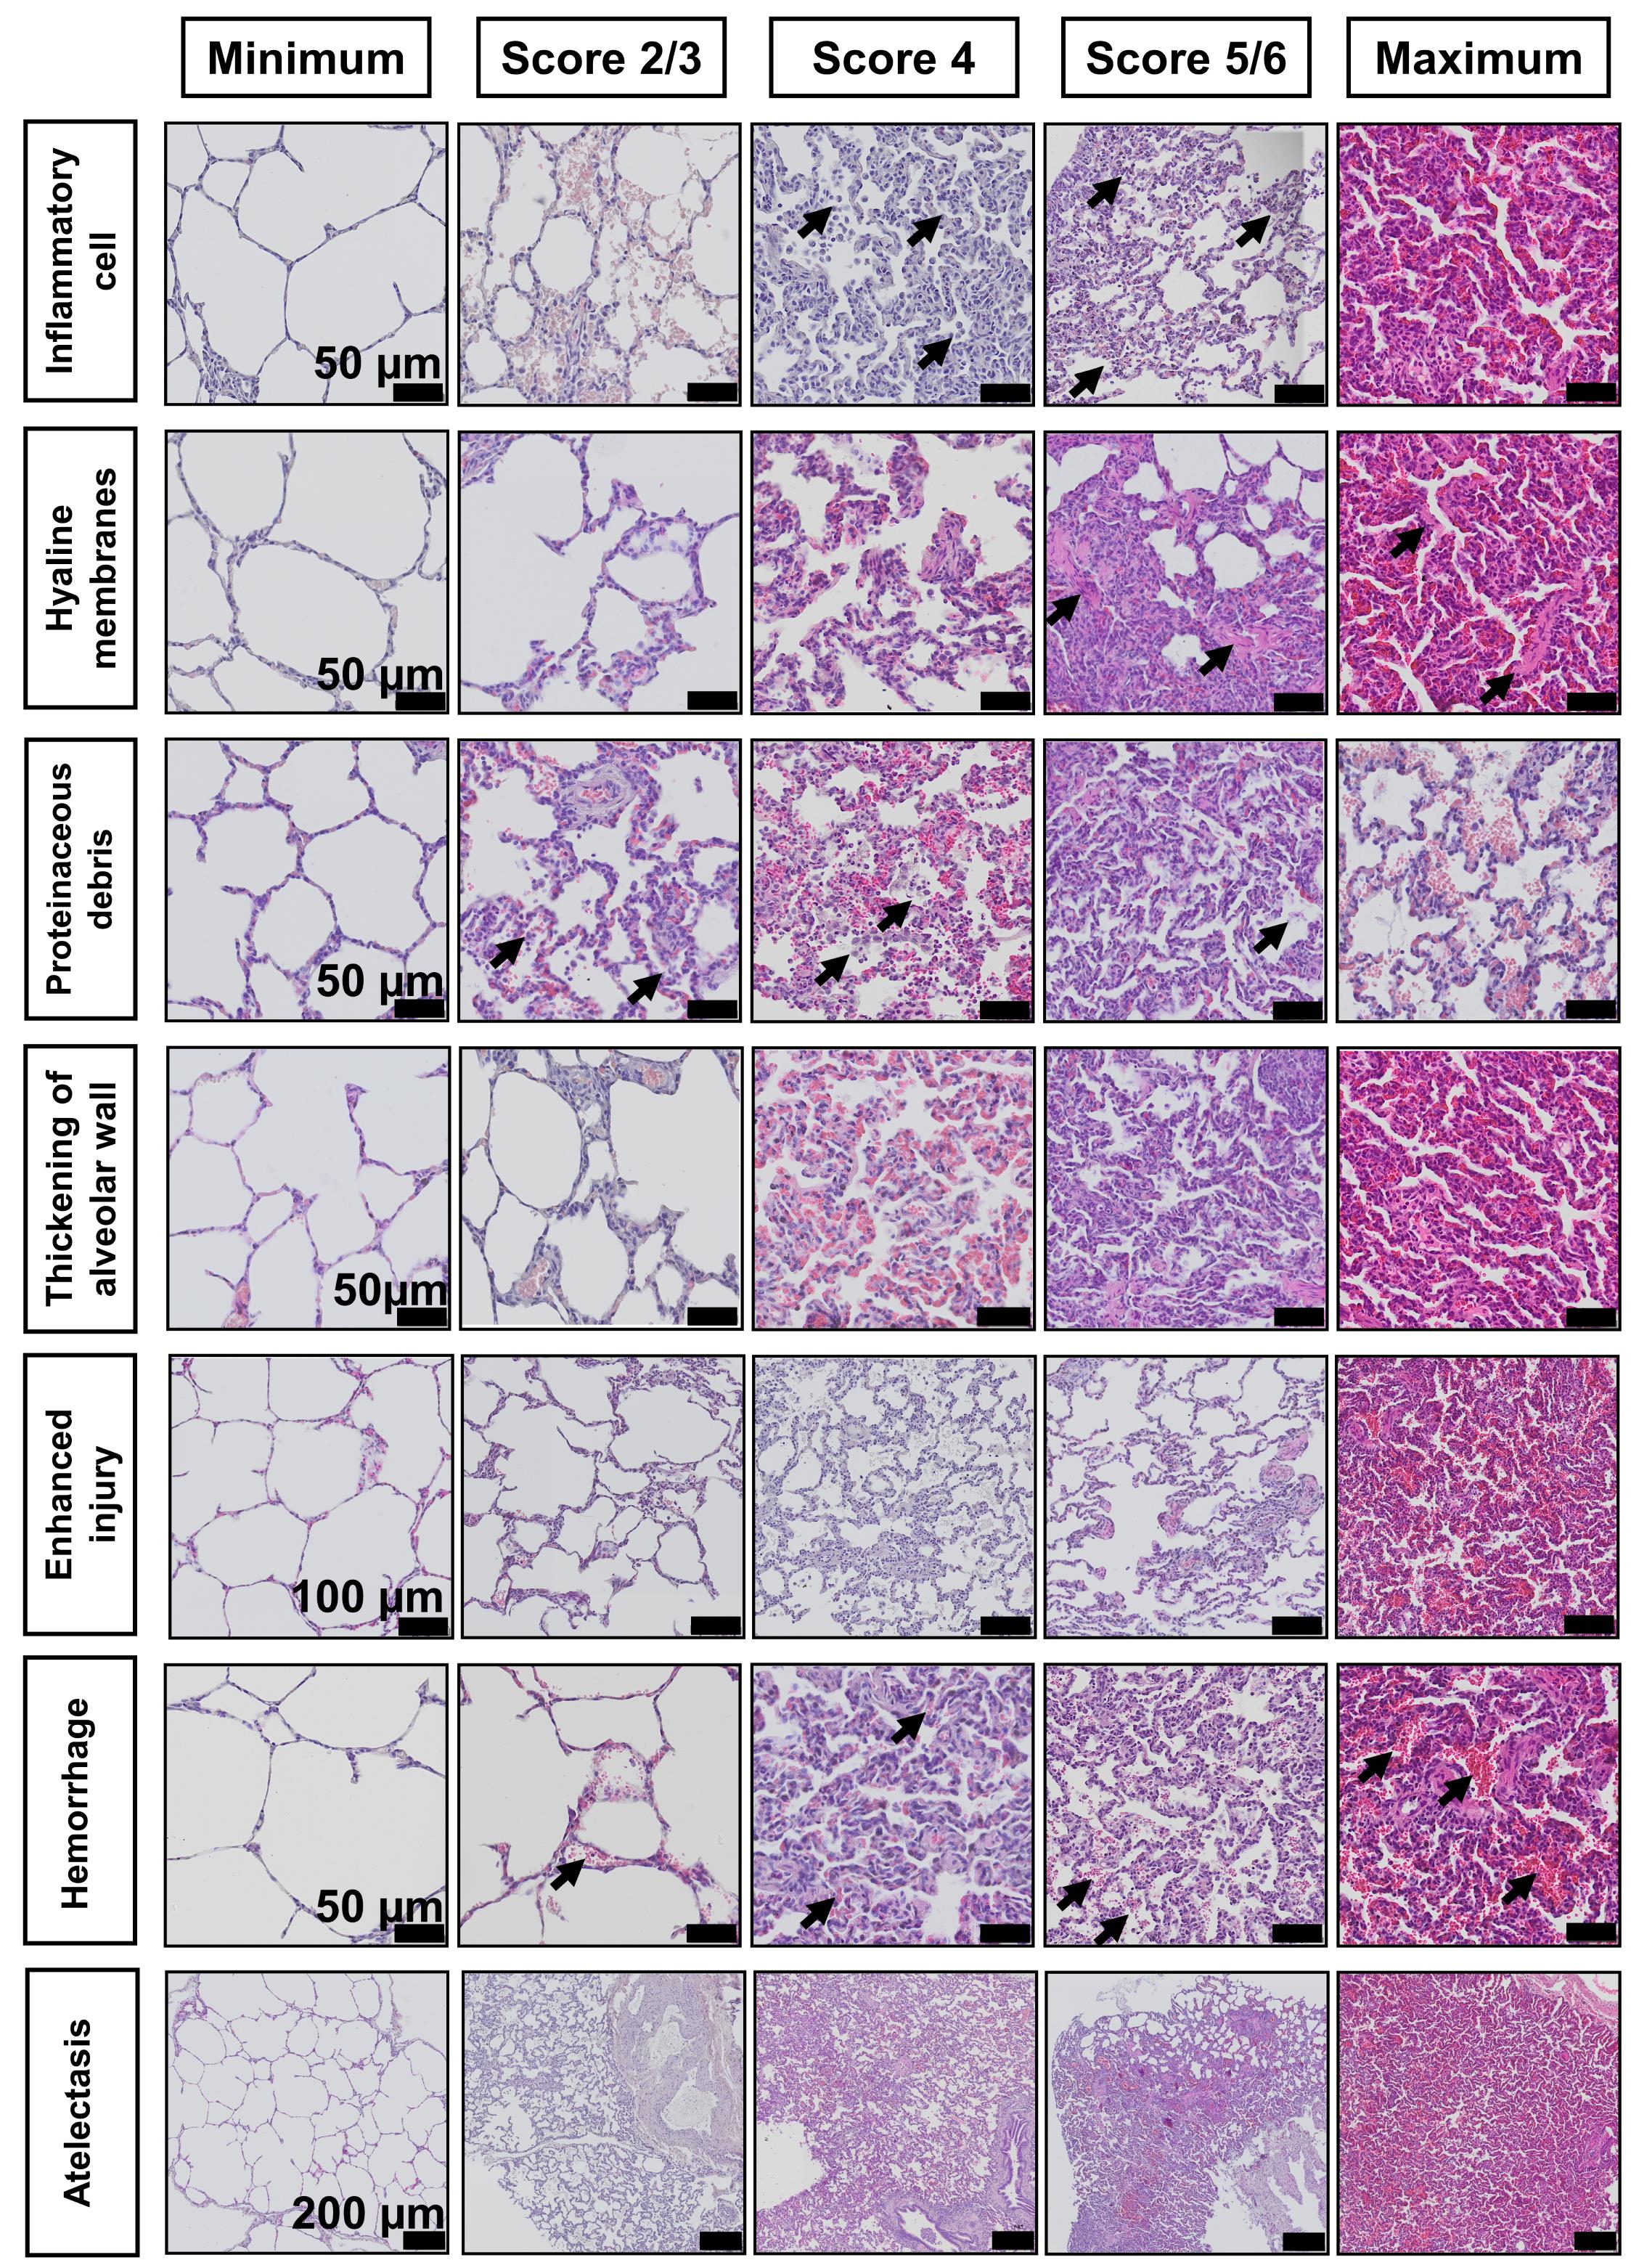
Figure 10. Photomicrographs of sections stained with H&E demonstrating a range of scores across all features. Score ‘Minimum: absence of injury’; ‘Score 2/3’: mild injury; ‘Score 4’: moderate injury; ‘Score 5/6’: pronounced injury; and ‘Maximum’: extensive damage and highest score given. Arrows demonstrate examples of features.
Notes
The selection of an appropriate tissue sampling method, such as the number of samples and randomization method, must be defined prior to the onset of the experiment. In large animals, this is preferably done according to the gross anatomical location of structures of interest for the specific model. Systematic, randomized approaches for obtaining representative samples help to avoid systemic bias and guarantee consistency across the different steps of histological processing (Albl et al., 2016; Blutke and Wanke, 2018).
The maximum time that we have stored tissue in PBS at 4 °C and subsequently successfully used this protocol for tissue processing, and H&E staining was 18 months.
Most automatic tissue processors do not come with pre-set programs validated for different tissue types and protocols. Therefore, it is important to validate all protocols (e.g., manually or with a small sample set) before the utilization of new protocols in different automatic tissue processors.
For some steps in our protocol, the same solution is used in two sequential containers (or similar for staining steps). This occurs when incubation of the tissue or sections with high purity solutions is needed. As an example, some residual isopropanol is initially transferred to the first paraffin container. Therefore, a second paraffin container of the same type of molten paraffin is used, for a longer time, to ensure complete infiltration of tissue.
This protocol generates both chemical and biohazardous waste products that should be disposed of in accordance with local waste regulations.
Section thicknesses from 3–5 µm can be used. We have found 5 µm sections to be preferable for porcine lung studies.
The water bath should be cleaned frequently, and a lid should be kept on it at all times to avoid contamination. Just prior to sectioning and pre-warming, the lid should be removed to visually inspect the water bath, looking for particles or signs of turbidity in the water. If there are any signs of particulate matter, the bath should be changed to fresh deionized water.
Prior to sectioning, the water bath should be pre-warmed to 40 °C. Sections should then be carefully transferred to the water bath (individual sections or ribbon of serial sections). If serial sections are needed, we recommend transferring one section or ribbon at a time, so that the user can keep track when placing sections on glass slides (either individual paraffin sections or multiple sections per slide).
Sections are allowed to float until there are no more visible folds/wrinkles in the paraffin, indicating that the paraffin is warmed and that the section can lay flat on the glass microscope slide. As long as the water bath is not too warm and does not melt the paraffin sections, the sections are stable for as long as needed to section. In our normal protocol, this takes no longer than 30 min per paraffin block. We adhere sections to glass sides per block before moving to the next block to ensure that there is no mixing of samples between blocks.
Microscopic slides containing paraffin tissue sections can be stored long term at room temperature, covered to protect from dust, prior to staining.
While the images above and those used in our previously reported papers (Stenlo et al., 2020, 2021) were obtained following a procedure in which xylene was used for the deparaffinization steps, several more sustainable, environmentally-friendly alternatives exist. In particular, we have used a commercially available compound containing d-limonene (Histo-Clear, National Diagnostics) for deparaffinization (step G3) using 3 × 10 min incubations, and for the final clearing (steps G4d and G4e) 3 × 10 min prior to mounting. We have successfully used this protocol for porcine lung tissue (Figure 11) following the above-described xylene-free tissue processing protocol. Additionally, we have used this protocol for normal, IPF, and long-term COVID-19 human lung tissues (Lindstedt et al., 2021).
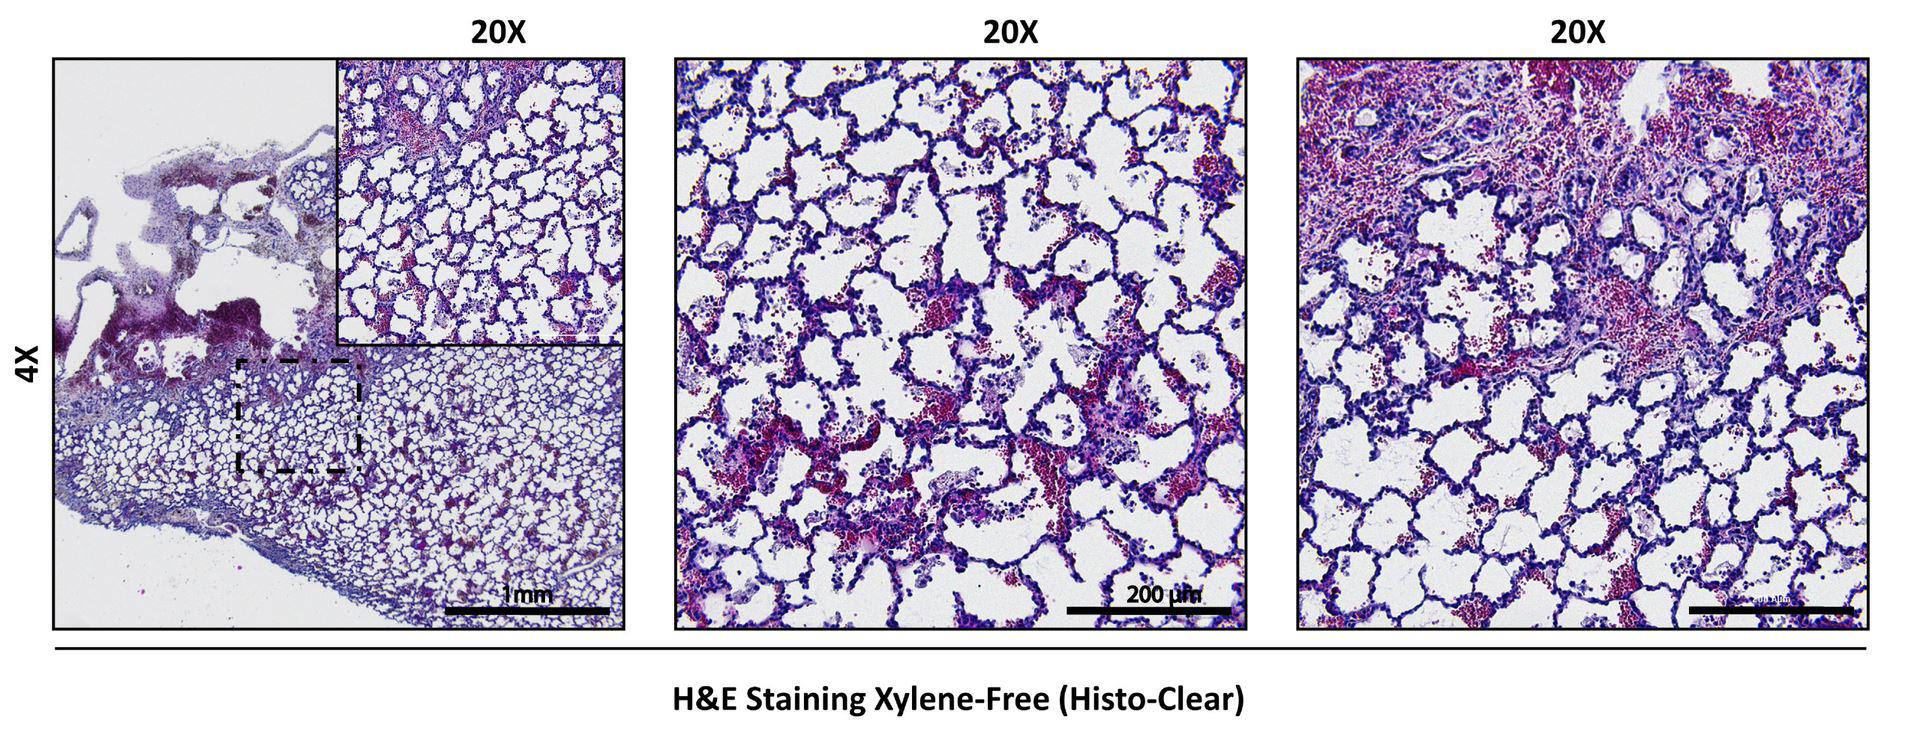
Figure 11. Example of H&E staining of porcine lung tissue using xylene-free tissue processing, deparaffinization, and final clearing protocols.The xylene-free tissue processing and staining protocol described here is also compatible with tissue processing and evaluation of bioengineered hydrogel materials, such as bioinks and bioprinted constructs containing extracellular matrix components and/or alginate (De Santis et al., 2021). Aggressive solvents, such as xylene, can cause dissolution of engineered materials during processing.
To implement randomization, repeated slides were used as distractors, as well as regions not scored for the present study (e.g., upper lobes) (Gibson-Corley et al., 2013).
High resolution images and corresponding example scores are available at the EMBL BioImage Archive Accession Number S-BIAD419 with corresponding acquisition settings. However, image acquisition settings must be determined according to the end user’s equipment, since there may be a difference between images obtained from different microscopes and capture software. We used Brightness: 50%, Contrast: 50%, and Gamma: 1% for the images presented in this protocol.
It is widely acknowledged that the lungs need to be perfusion-fixed through the vessels, or gravity-fixed through the airways, to quantitatively measure the degree of atelectasis (Hsia et al., 2010; Kulkarni et al., 2022). However, we have regularly found that we are able to differentiate between baseline and animals receiving saline controls or LPS administration if samples are fixed immediately after excision (with greater extent of atelectasis in pigs receiving LPS). Therefore, while this method of tissue fixation is not sufficient for quantitative morphology, it allows a comparative assessment from baseline samples and biopsies taken serially from the same pig, thus making it a reproducible and reliable parameter to use for semi-quantitative scoring.
To minimize the effect of scoring outliers, more than three researchers should perform scoring.
We have found that this scoring system is robust, and even those with limited prior knowledge are able to score similarly to those with prior and extensive training (i.e., >10 years) in preclinical pulmonary histology. Novice: very limited to no experience; Moderate: some experience with histology (>1 year); and expert: high experience with acute and chronic preclinical models of pulmonary histology (e.g., >10 years).
Recipes
Eosin Y solution 0.5% aqueous (working solution)
Activate the eosin in the working solution by adding 50 µL of glacial acetic acid per 100 mL of the eosin and shake vigorously before use. Working solution should be used within 1–2 weeks.
Graded ethanol solutions and ethanol-isopropanol mixtures
Dilute the absolute ethanol in deionized water or isopropanol at room temperature according to the concentration needed for each step. Solutions can be prepared ahead of time and stored in closed containers to ensure that the alcohol concentrations do not change over time.
Acknowledgments
The authors thank all the members of the Lung Bioengineering and Regeneration (LBR) Laboratory (Lund University, Lund, Sweden) for helpful discussions throughout the manuscript preparation and for critical reading of the final manuscript. The authors would also like to thank the scoring reviewers, Oskar Hallgren and Sinem Tas, and colleagues that performed the pilot training, Emil Rehnberg, Victoria Ptasinski, and Martina de Santis, for their help in improving and developing this project. The authors are particularly grateful to the StemTherapy Imaging Core Facility and especially to Emanuela Monni for helpful discussions, training in slide scanning, and technical assistance in capturing the images. This work was funded by a Wallenberg Molecular Medicine Fellowship from the Knut and Alice Wallenberg Foundation.
Competing interests
There are no competing interests to report from any of the authors.
Ethics
The methods used for the animal model are described in detail in Stenlo et al. (2020 and 2021). All animals received standard care according to local and international regulations. This study was approved by the Ethics Committee (Dnr 8401/2017) for Animal Research and followed the Principles of Laboratory Animal Care of the National Society for Medical Research, USA and the Guide for the Care and Use of Laboratory Animals, published by the National Academies Press (1996).
References
- Albl, B., Haesner, S., Braun-Reichhart, C., Streckel, E., Renner, S., Seeliger, F., Wolf, E., Wanke, R. and Blutke, A. (2016). Tissue Sampling Guides for Porcine Biomedical Models. Toxicol Pathol 44(3): 414-420.
- ARDS Definition Task Force, Ranieri, V. M., Rubenfeld, G. D., Thompson, B. T., Ferguson, N. D., Caldwell, E., Fan, E., Camporota, L. and Slutsky, A. S. (2012). Acute respiratory distress syndrome: the Berlin Definition. JAMA 307(23): 2526-2533.
- Arora, S., Ahmad, S., Irshad, R., Goyal, Y., Rafat, S., Siddiqui, N., Dev, K., Husain, M., Ali, S., Mohan, A. and Syed, M. A. (2019). TLRs in pulmonary diseases. Life Sci 233: 116671.
- Ashcroft, T., Simpson, J. M. and Timbrell, V. (1988). Simple method of estimating severity of pulmonary fibrosis on a numerical scale. J Clin Pathol 41(4): 467-470.
- Ballard-Croft, C., Wang, D., Sumpter, L. R., Zhou, X. and Zwischenberger, J. B. (2012). Large-animal models of acute respiratory distress syndrome. Ann Thorac Surg 93(4): 1331-1339.
- Blutke, A. and Wanke, R. (2018). Sampling Strategies and Processing of Biobank Tissue Samples from Porcine Biomedical Models. J Vis Exp(133). doi:10.3791/57276.
- de Aquino, T., Zenkner, F. F., Ellwanger, J. H., Pra, D. and Rieger, A. (2016). DNA damage and cytotoxicity in pathology laboratory technicians exposed to organic solvents. An Acad Bras Cienc 88(1): 227-236.
- De Santis, M. M., Alsafadi, H. N., Tas, S., Bolukbas, D. A., Prithiviraj, S., Da Silva, I. A. N., Mittendorfer, M., Ota, C., Stegmayr, J., Daoud, F., et al. (2021). Extracellular-Matrix-Reinforced Bioinks for 3D Bioprinting Human Tissue. Adv Mater 33(3): e2005476.
- Engel, M., Nowacki, R. M. E., Jonker, E. M., Ophelders, D., Nikiforou, M., Kloosterboer, N., Zimmermann, L. J. I., van Waardenburg, D. A. and Kramer, B. W. (2020). A comparison of four different models of acute respiratory distress syndrome in sheep. Respir Res 21(1): 209.
- Falkeholm, L., Grant, C. A., Magnusson, A. and Moller, E. (2001). Xylene-free method for histological preparation: a multicentre evaluation. Lab Invest 81(9): 1213-1221.
- Ferguson, N. D., Fan, E., Camporota, L., Antonelli, M., Anzueto, A., Beale, R., Brochard, L., Brower, R., Esteban, A., Gattinoni, L., et al. (2012). The Berlin definition of ARDS: an expanded rationale, justification, and supplementary material. Intensive Care Med 38(10): 1573-1582.
- Frick, A. E., Orlitova, M., Vanstapel, A., Ordies, S., Claes, S., Schols, D., Heigl, T., Kaes, J., Saez-Gimenez, B., Vos, R., et al. (2021). A novel experimental porcine model to assess the impact of differential pulmonary blood flow on ischemia-reperfusion injury after unilateral lung transplantation. Intensive Care Med Exp 9(1): 4.
- Gibson-Corley, K. N., Olivier, A. K. and Meyerholz, D. K. (2013). Principles for valid histopathologic scoring in research. Vet Pathol 50(6): 1007-1015.
- Gonzales, J. N., Lucas, R. and Verin, A. D. (2015). The Acute Respiratory Distress Syndrome: Mechanisms and Perspective Therapeutic Approaches. Austin J Vasc Med 2(1): 1009.
- Guenthart BA, O'Neill JD, Kim J, Queen D, Chicotka S, Fung K, Simpson M, Donocoff R, Salna M, Marboe CC, et al. (2019). Regeneration of severely damaged lungs using an interventional cross-circulation platform. Nat Commun 10(1): 1985.
- Hellbach, K., Baehr, A., De Marco, F., Willer, K., Gromann, L. B., Herzen, J., Dmochewitz, M., Auweter, S., Fingerle, A. A., Noel, P. B., et al. (2018). Depiction of pneumothoraces in a large animal model using x-ray dark-field radiography. Sci Rep 8(1): 2602.
- Hsia, C. C., Hyde, D. M., Ochs, M., Weibel, E. R. and Structure, A. E. J. T. F. o. Q. A. o. L. (2010). An official research policy statement of the American Thoracic Society/European Respiratory Society: standards for quantitative assessment of lung structure. Am J Respir Crit Care Med 181(4): 394-418.
- Hubner, R. H., Gitter, W., El Mokhtari, N. E., Mathiak, M., Both, M., Bolte, H., Freitag-Wolf, S. and Bewig, B. (2008). Standardized quantification of pulmonary fibrosis in histological samples. Biotechniques 44(4): 507-511, 514-507.
- Kandyala, R., Raghavendra, S. P. and Rajasekharan, S. T. (2010). Xylene: An overview of its health hazards and preventive measures. J Oral Maxillofac Pathol 14(1): 1-5.
- Kulkarni, H. S., Lee, J. S., Bastarache, J. A., Kuebler, W. M., Downey, G. P., Albaiceta, G. M., Altemeier, W. A., Artigas, A., Bates, J. H. T., Calfee, C. S., et al. (2022). Update on the Features and Measurements of Experimental Acute Lung Injury in Animals: An Official American Thoracic Society Workshop Report. Am J Respir Cell Mol Biol 66(2): e1-e14.
- Lee, K. Y. (2017). Pneumonia, Acute Respiratory Distress Syndrome, and Early Immune-Modulator Therapy. Int J Mol Sci 18(2): 388.
- Leiphrakpam, P. D., Weber, H. R., McCain, A., Matas, R. R., Duarte, E. M. and Buesing, K. L. (2021). A novel large animal model of smoke inhalation-induced acute respiratory distress syndrome. Respir Res 22(1): 198.
- Lindstedt, S., Grins, E., Larsson, H., Nilsson, J., Akbarshahi, H., Silva, I., Hyllen, S., Wagner, D., Sjogren, J., Hansson, L., et al. (2021). Lung transplant after 6 months on ECMO support for SARS-CoV-2-induced ARDS complicated by severe antibody-mediated rejection. BMJ Open Respir Res 8(1): e001036.
- Maca, J., Jor, O., Holub, M., Sklienka, P., Bursa, F., Burda, M., Janout, V. and Sevcik, P. (2017). Past and Present ARDS Mortality Rates: A Systematic Review. Respir Care 62(1): 113-122.
- Martin, T. R. and Matute-Bello, G. (2011). Experimental models and emerging hypotheses for acute lung injury. Crit Care Clin 27(3): 735-752.
- Matthay, M. A., Zemans, R. L., Zimmerman, G. A., Arabi, Y. M., Beitler, J. R., Mercat, A., Herridge, M., Randolph, A. G. and Calfee, C. S. (2019). Acute respiratory distress syndrome. Nat Rev Dis Primers 5(1): 18.
- Matute-Bello, G., Downey, G., Moore, B. B., Groshong, S. D., Matthay, M. A., Slutsky, A. S., Kuebler, W. M. and Acute Lung Injury in Animals Study, G. (2011). An official American Thoracic Society workshop report: features and measurements of experimental acute lung injury in animals. Am J Respir Cell Mol Biol 44(5): 725-738.
- Matute-Bello, G., Frevert, C. W. and Martin, T. R. (2008). Animal models of acute lung injury. Am J Physiol Lung Cell Mol Physiol 295(3): L379-399.
- Meyerholz, D. K. and Beck, A. P. (2018). Fundamental Concepts for Semiquantitative Tissue Scoring in Translational Research. ILAR J 59(1): 13-17.
- Moodley, Y., Sturm, M., Shaw, K., Shimbori, C., Tan, D. B., Kolb, M. and Graham, R. (2016). Human mesenchymal stem cells attenuate early damage in a ventilated pig model of acute lung injury. Stem Cell Res 17(1): 25-31.
- Ostrander, G. K. (1996). Techniques in aquatic toxicology. CRC/Lewis Publishers.
- Potere, N., Valeriani, E., Candeloro, M., Tana, M., Porreca, E., Abbate, A., Spoto, S., Rutjes, A. W. S. and Di Nisio, M. (2020). Acute complications and mortality in hospitalized patients with coronavirus disease 2019: a systematic review and meta-analysis. Crit Care 24(1): 389.
- Purdie, G. L., Purdie, D. J. and Harrison, A. A. (2011). Raynaud's phenomenon in medical laboratory workers who work with solvents. J Rheumatol 38(9): 1940-1946.
- Rosenthal, C., Caronia, C., Quinn, C., Lugo, N. and Sagy, M. (1998). A comparison among animal models of acute lung injury.Crit Care Med 26(5): 912-916.
- Stenlo, M., Hyllen, S., Silva, I. A. N., Bolukbas, D. A., Pierre, L., Hallgren, O., Wagner, D. E. and Lindstedt, S. (2020). Increased particle flow rate from airways precedes clinical signs of ARDS in a porcine model of LPS-induced acute lung injury. Am J Physiol Lung Cell Mol Physiol 318(3): L510-L517.
- Stenlo, M., Silva, I. A. N., Hyllen, S., Bolukbas, D. A., Niroomand, A., Grins, E., Ederoth, P., Hallgren, O., Pierre, L., Wagner, D. E., et al. (2021). Monitoring lung injury with particle flow rate in LPS- and COVID-19-induced ARDS. Physiol Rep 9(13): e14802.
- Suvarna, K. S., Layton, C. and Bancroft, J. D. (2018). Bancroft's theory and practice of histological techniques E-Book: Elsevier health sciences.
- Tiba, M. H., McCracken, B. M., Leander, D. C., Colmenero, C. I., Nemzek, J. A., Sjoding, M. W., Konopka, K. E., Flott, T. L., VanEpps, J. S., Daniels, R. C., et al. (2021). A novel swine model of the acute respiratory distress syndrome using clinically relevant injury exposures. Physiol Rep 9(9): e14871.
- United Nations. (2015). Transforming our World: The 2030 Agenda for Sustainable Development. A/RES/70/1. New York, NY, USA. Retrieved from sustainabledevelopment.un.org
- Wang, H. M., Bodenstein, M. and Markstaller, K. (2008). Overview of the pathology of three widely used animal models of acute lung injury. Eur Surg Res 40(4): 305-316.
Article Information
Copyright
© 2022 The Authors; exclusive licensee Bio-protocol LLC.
How to cite
Silva, I. A. N., Gvazava, N., Bölükbas, D. A., Stenlo, M., Dong, J., Hyllen, S., Pierre, L., Lindstedt, S. and Wagner, D. E. (2022). A Semi-quantitative Scoring System for Green Histopathological Evaluation of Large Animal Models of Acute Lung Injury. Bio-protocol 12(16): e4493. DOI: 10.21769/BioProtoc.4493.
Category
Cell Biology > Tissue analysis > Histomorphology
Cell Biology > Tissue analysis > Tissue staining
Environmental science
Do you have any questions about this protocol?
Post your question to gather feedback from the community. We will also invite the authors of this article to respond.