- Protocols

- Articles and Issues
- For Authors
- About
- Become a Reviewer

Fluorescence Imaging of 3D Cell Models with Subcellular Resolution
Published: Vol 12, Iss 14, Jul 20, 2022 DOI: 10.21769/BioProtoc.4469 Views: 5140
Reviewed by: Gal HaimovichPradeep Kumar BhaskarSarajo Mohanta
Original research article
The authors used this protocol in:

Aug 2019
Advertisement


Protocol Collections
Comprehensive collections of detailed, peer-reviewed protocols focusing on specific topics


Abstract
Over the past years, research has made impressive breakthroughs towards the development and implementation of 3D cell models for a wide range of applications, such as drug development and testing, organogenesis, cancer biology, and personalized medicine. Opposed to 2D cell monolayer culture systems, advanced 3D cell models better represent the in vivo physiology. However, for these models to deliver scientific insights, appropriate investigation techniques are required. Despite the potential of fluorescence microscopy to visualize these models with high spatial resolution, sample preparation and imaging assays are not straightforward. Here, we provide different protocols of sample preparation for fluorescence imaging, for both matrix-embedded and matrix-free models (e.g., organoids and spheroids, respectively). Additionally, we provide detailed guidelines for imaging 3D cell models via confocal multi-photon fluorescence microscopy. We show that using these protocols, images of 3D cell culture systems can be obtained with sub-cellular resolution.
Graphical abstract:
Background
In recent years, 3D cell models have gained increasing attention in a wide variety of research areas. By mimicking physiological conditions, 3D cell models enabled obtaining more detailed information on several biological processes, from general human biology to disease progression and drug delivery. One of the most popular 3D cell models is spheroids, which are usually formed from small cell aggregates that proliferate further into dense cell clusters (Lazzari et al., 2017; Van Zundert et al., 2020). The spheroids primarily used in cancer research are obtained from cancer cells lines and are often referred to as multicellular tumor spheroids. These models have been proven to be more physiologically relevant than 2D monolayer culture systems, as they present key features of solid tumor tissue (Pinto et al., 2020).
The formation of spheroids is relatively straightforward as they require standard growth medium, and several well-established methods are available (Souza et al., 2010; Foty, 2011; Velasco et al., 2020). The growth of organoids, on the other hand, requires special growth factors and the support of a hydrogel scaffold. Organoids are grown from stem cells that are encapsulated in a supporting matrix, usually Matrigel®, and represent a more complex 3D model. When provided with a specific conditioned medium, stem cells encapsulated in biomimetic hydrogels self-organize into miniature organ-like structures (Boretto et al., 2017; Schutgens and Clevers, 2020).
Both organoids and spheroids are relatively large three-dimensional structures (ranging from 200 to 1,000 μm in diameter), which hampers direct imaging of (sub-)cellular organization, especially in optical microscopy, where the mismatch of the refractive indices between the different cellular compartments, causes a high level of scattering in dense multicellular structures. Together with the light absorption by living matter, this implies a limited penetration of the excitation light and reduced signal from the inside the 3D cell models (Edwards et al., 2020). Although optical clearing methods (DISCO, CUBIC, CLARITY, etc.) can significantly enhance the fluorescence signal obtained from thick samples by improving light penetration, they are usually performed under harsh conditions, which often result in loss of cell morphology or sample damage (Ertürk et al., 2012; Tomer et al., 2014; Dekkers et al., 2019). Alternatively, thick samples can be physically sectioned, and the images acquired from each consecutive section can be used to reconstruct the 3D model. However, this method is time-consuming, and artifacts are easily introduced upon sample cutting (Erickson et al., 2011; Bolduan et al., 2020).
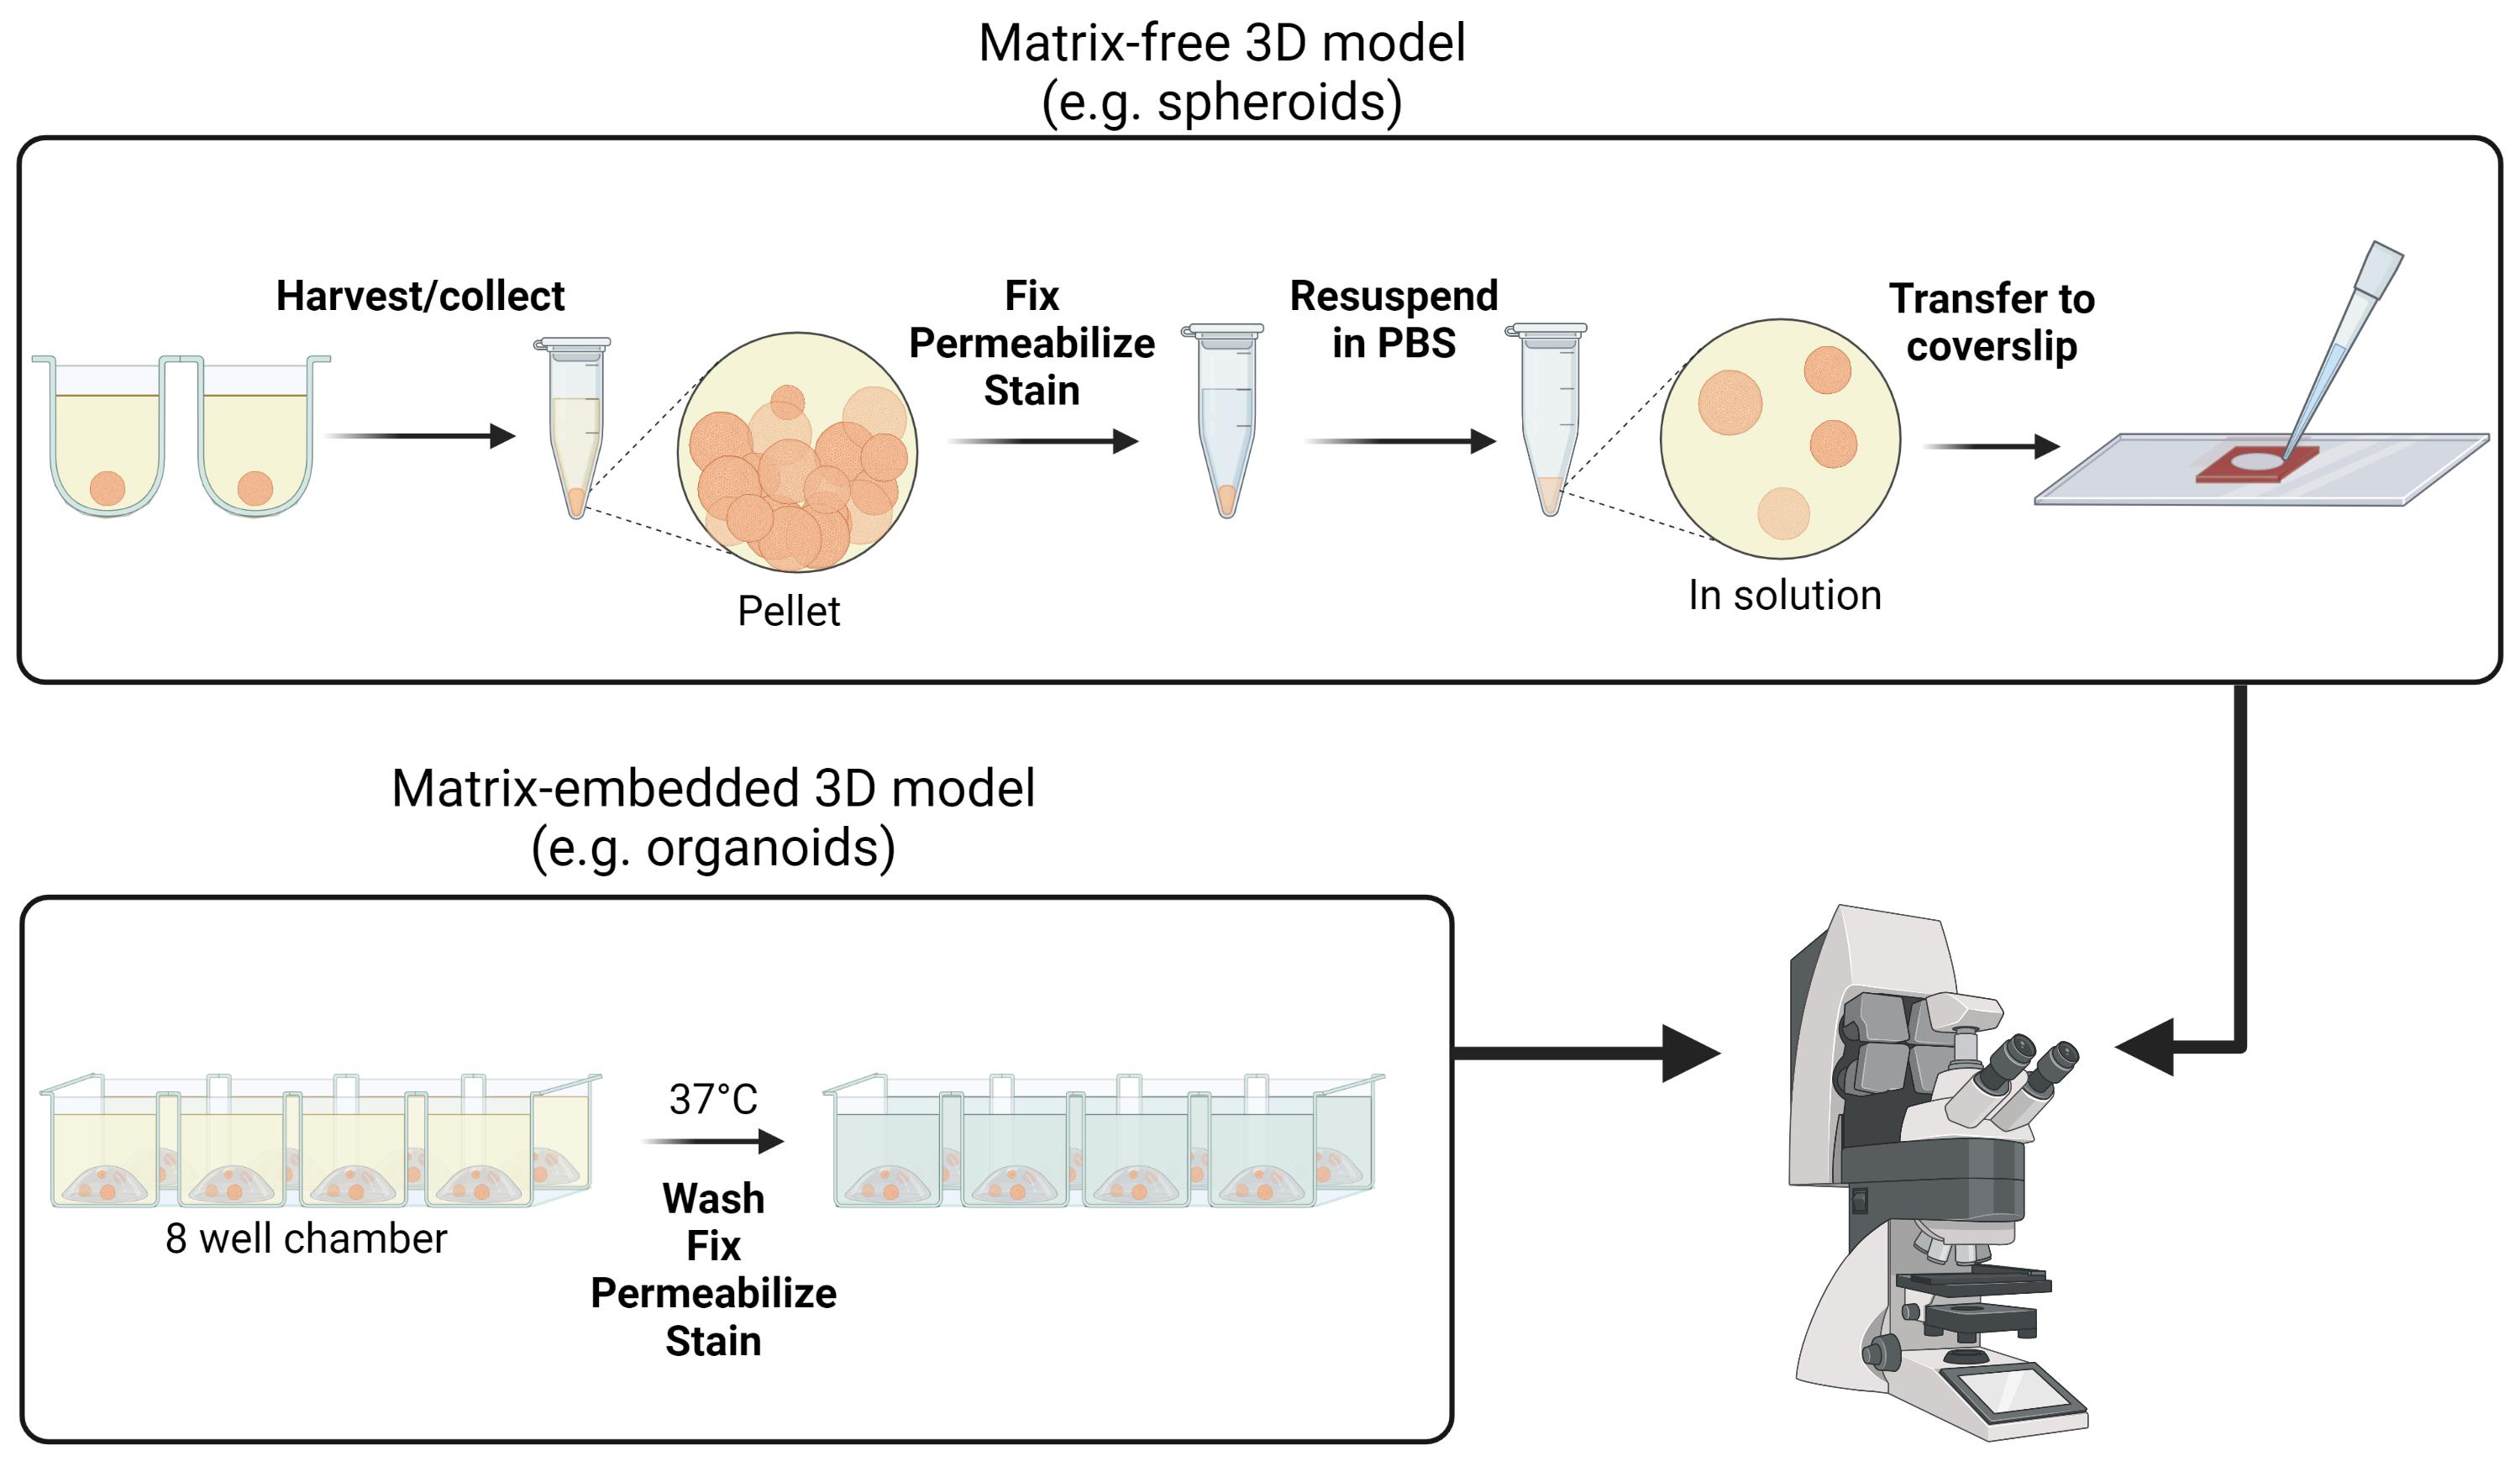
Here, we propose a method for performing fluorescence microscopy on 3D cell culture samples without invasive sample processing. Although samples are prepared without optical clearing or sectioning, fluorescence images with sub-cellular resolution can still be achieved by using multi-photon microscopy. We illustrate both an immunofluorescence staining and a staining with small organic molecules, and provide optimized staining protocols for both scaffold-free and scaffold embedded 3D models. The 3D cell culture systems maintain their native morphology and cellular composition, thereby avoiding biased observations. While in these protocols the samples are imaged using two-photon microscopy, the same sample preparation can also be used for single-photon excitation (albeit with reduced light penetration). After performing the 3D reconstruction of the collected images, a detailed three-dimensional view of the whole spheroid or organoid model can be achieved.
Materials and Reagents
Common for both protocols
1.5 mL microcentrifuge tubes (Eppendorf, catalog number: 0030125150)
Aluminum foil
Dulbecco’s phosphate-buffered saline (DPBS) 1× (ThermoFisher Scientific, GibcoTM, catalog number: 14190144)
Formaldehyde (w/v) 16%, methanol-free (ThermoFisher Scientific, Pierce, catalog number: 28908)
Triton X-100 (Sigma-Aldrich, catalog number: T8787)
Bovine serum albumin (BSA; Sigma-Aldrich, catalog number: A2058)
Fixation buffer (see Recipes)
Permeabilization buffer (see Recipes)
Blocking buffer (see Recipes)
Primary antibodies:
Mouse Anti-E-cadherin (Biosciences, catalog number: 610182)
Rabbit Anti-FOXA2 (Abcam, catalog number: ab108422)
Primary antibody solution (see Recipes)
Secondary antibodies:
Donkey anti-Rabbit IgG (H+L) Highly Cross-Adsorbed Secondary Antibody, Alexa Fluor 555 (ThermoFisher Scientific, catalog number: A31572)
Donkey anti-Mouse IgG (H+L) Highly Cross-Adsorbed Secondary Antibody, Alexa Fluor 488 (ThermoFisher Scientific, catalog number: A21202)
Secondary antibody solution (see Recipes)
Fluorescent probes:
Nuclear staining: Hoechst33342 (Sigma-Aldrich, catalog number: 14533)
Cytoskeleton staining: Phalloidin CruzFluorTM 647 Conjugate (Santa Cruz, catalog number: sc363797)
Nuclear staining solution (see Recipes)
Cytoskeleton staining solution (see Recipes)
Specific for Matrix-embedded 3D model
8-well chambers, #1.5 coverglass (e.g., Cellvis, catalog number: C8-1.5H-N; Ibidi, catalog number: 80807; or NuncTM Lab-TekTM II, Thermo Fisher Scientific, catalog number: 155360)
48-well culture plate (e.g., VWR®, catalog number: 10062-898)
Matrigel® Growth Factor Reduced (GFR) Basement Membrane Matrix, Phenol Red-free, LDEV-free, 10 mL, (Corning, catalog number: 356231) or other suitable, thermo-responsive hydrogels
Dulbecco’s Modified Eagle Medium-F12 mixture (DMEM/F12) with L-glutamine, HEPES, and Phenol Red (GibcoTM, catalog number: 11320032)
TrypLE express (GibcoTM, catalog number: 12604013)
Rock Inhibitor, Y-27632 (Tocris, catalog number: 1254)
Recombinant Human R-Spondin-1 (RSPO-1) (PreproTech, catalog number: 120-38)
Recombinant Human Noggin (NOG) (PreproTech, catalog number: 120-10C)
B27 supplement (50×), minus vitamin A (Life Technologies, catalog number: 12587010)
N-2 supplement (100×) (Life Technologies, catalog number: 17502048)
Insulin Transferrin Selenium (Life Technologies, catalog number: 41400045)
Penicillin/Streptomycin (Life Technologies, catalog number: 15140122)
Nicotinamide (Sigma-Aldrich, catalog number: 73240-100G)
A83-01 (Sigma-Aldrich, catalog number: SML0788-5MG)
N-Acetyl-L-Cystein (Sigma-Aldrich, catalog number: A7250-50G)EGF (R&D Systems, catalog number: 236-EG-01M)
Basic Fibroblast Growth Factor (bFGF) (R&D Systems, catalog number: 233-FB-025)
Fibroblast Growth Factor 10 (FGF-10) (PreproTech, catalog number: 100-26)
P38 Mitogen Activated Protein Kinase inhibitor, SB 202190 (Sigma-Aldrich, catalog number: S7067-5MG)
β Estradiol (Sigma-Aldrich, catalog number: E8750-100MG)
Organoid medium (for endometrial organoids) (see Recipes)
Organoid dissociation solution (see Recipes)
Grace Bio-Labs CoverWellTM perfusion chambers, chamber diam. × thickness: 9 mm × 1.7 mm (Grace Bio-Labs, distributed by Sigma-Aldrich, Merck, catalog number: GBL622205)
Culture plate (e.g., 6-well Sarstedt® cell culture plate, catalog number: 83.3920.500)
Glass coverslips #1.5, 24 × 50 mm (e.g., ThorLabs, catalog number: CG15KH)
Transparent scotch tape
BIOFLOATTM FLEX coating solution for 3D cell culture (faCellitate, catalog number: F202005)
Trypsin/EDTA solution (ThermoFisher Scientific, Invitrogen, catalog number: 15400054)
3D Petri Dish® micro-mold (MicroTissues, Inc., catalog number: 12-256)
Ultra-pure agarose powder (ThermoFisher Scientific, Invitrogen, catalog number: 16500100)
NaCl (Sigma-Aldrich, catalog number: S9888)
Agarose solution (see Recipes)
T25 culture flask (e.g., Sigma-Aldrich, Corning®, catalog number: CLS430639)
Dulbecco’s Modified Eagle Medium (DMEM) (GibcoTM, catalog number: 31053028)
Fetal Bovine Serum (GibcoTM, catalog number: 11533387)
Glutamax (GibcoTM, catalog number: 35050061)
Culture medium (for A549 cells) (see Recipes)
Equipment
Humidified CO2 incubator (ThermoFisher Scientific)
Fridge and freezer (4°C and -20°C)
Table-top centrifuge (ThermoFisher Scientific, Fisher Scientific, catalog number: 12-006-901)
Micropipettes
Leica TCS SP8 dive microscope (Leica microsystems) or other confocal microscope setup with multiphoton excitation
Sterile flow cabinet
Software
Leica application suite (LAS X, Leica microsystems)
LAS X 3D viewer or other image analysis tool such as Fiji/ImageJ (Schindelin et al., 2012)
Procedure
PART I: SAMPLE PREPARATION OF MATRIX-EMBEDDED 3D MODELS
Preparation of matrix-embedded 3D models (e.g., Organoids)
Important points
In this protocol, endometrial organoids (derived from patient biopsies), cultured and embedded in Matrigel are used as an example. However, the following protocol can be applied to any cell model embedded in thermo-responsive hydrogels that gelate between 20 and 30°C. If other organoids are used, the recipe for the organoid medium will be different. The endometrial organoid culture was performed as previously described by Vankelecom et al. (Boretto et al., 2019).
The preparation of the imaging sample starts from already mature organoids or from single cells (during the passage of organoids).
Keep the Matrigel on ice for at least 2 h before use.
During the entire protocol, it is important to respect the indicated temperatures.
This procedure should be carried out under a sterile flow cabinet.
All the centrifugation steps are performed for 5 min at 200 × g.
When organoids are grown immediately on a glass bottom substrate, suitable for fluorescence imaging, the last section can be skipped (Organoid transfer to glass bottom dishes).
Step-by-step protocol
Dissociation of organoids into single cells
Remove the organoid medium from the wells with matrix-embedded organoids.
Add 400 µL of ice-cold DMEM/F12 and pipet up and down multiple times to release the organoids from the Matrigel.
Transfer the solution into a 1.5 mL microcentrifuge tube and place it on ice.
Wash the wells once with 400 µL of ice-cold DMEM/F12 to collect the remaining organoids.
Transfer the solution into another 1.5 mL microcentrifuge tube and place it on ice.
Centrifuge at 4°C and discard the supernatant.
Add 500 µL of pre-warmed (37°C) organoid dissociation solution (see Recipe 2) to each 1.5 mL microcentrifuge tube containing the organoid pellet.
Mix by pipetting up and down multiple times.
Incubate in a 37°C water bath for 5 min.
Add 500 µL of ice-cold DMEM/F12 to inactivate the TrypLE Express.
Centrifuge at 4°C and discard the supernatant.
Resuspend the pellet in 700 µL of ice-cold DMEM/F12.
Put a P200 tip (no filter) over a P1000 tip (with filter) and pipet up and down 25–30 times to mechanically dissociate the organoids into single cells.
Centrifuge at 4°C and discard the supernatant until ~30 μL (30%) of dissociated organoids/DMEM/F12 is left in the 1.5 mL tube. The volume of 30 μL can be measured by comparing it with another 1.5 mL tube with 30 μL of water.
Resuspend the 30 μL (30%) of pellet with 70 μL (70%) of ice-cold Matrigel.
Note: The volumes of the organoid pellet and the added Matrigel should always be adjusted to have a ratio of 30%/70%.
Organoid seeding
Dispense 25 µL droplets in a pre-warmed 48-well culture plate or 8-well glass bottom dish.
Incubate the plate/dish upside down in a humidified CO2 incubator at 37°C for 2030 min.
Pre-warm organoid medium in a 37°C water bath.
Add 250 µL of pre-warmed organoid medium to each well.
Keep in culture at 37°C in a 5% CO2 incubator until the organoids reach the desired size or morphology.
Note: The medium should be refreshed every 2 to 3 days.
Remove the medium from the well (48-well culture plate) containing the organoids to be imaged.
Add 400 μL of ice-cold DMEM/F12 and pipette up and down multiple times to release the organoids from the Matrigel.
Centrifuge and remove the supernatant until ~30 μL (30%) of organoids/DMEM/F12 is left in the 1.5 mL tube. The volume of 30 μL can be measured by comparing with another 1.5 mL tube with 30 μL of water.
Resuspend the 30 μL (30%) of pellet with 70 μL (70%) of ice-cold Matrigel.
Note: The volumes of the organoid pellet and the added Matrigel should always be adjusted to have a ratio of 30%/70%.
Dispense 25 μL of droplets in the middle of the well of an 8-well glass bottom dish.
Note: Other glass bottom dishes can be used.
Incubate the glass bottom dish upside down in the humidified CO2 incubator for 20–30 min.
Add 250 μL pre-warmed DPBS (1×) around the Matrigel drop.
Note: It is important that solutions are always added and removed with the pipet tip placed at a corner of the well to avoid touching the Matrigel drop (Figure 1).

Figure 1. Handling of Organoids in Matrigel. (A) Organoid droplets (25 μL) in solid Matrigel are added to the center of each well. (B) Solutions are added or retrieved carefully by placing the pipet tip at the corner of the well.
Fixation and permeabilization
Important points
Both the fixation and permeabilization buffers should be pre-warmed at 37°C.
When organoids were grown immediately on a glass bottom substrate, carefully remove the organoid medium and wash three times with 250 μL of pre-warmed DPBS (1×).
Step-by-step protocol
Discard the DPBS solution.
Add 250 μL of pre-warmed fixation buffer to each well.
Incubate for 1 h at 37°C in a humidified CO2 incubator.
Wash the fixed organoids three times with pre-warmed DPBS (1×) and discard the solution.
Add 250 μL of pre-warmed permeabilization buffer to the Matrigel embedded organoids and incubate for 30 min at 3°C.
Wash the Matrigel embedded organoids three times with 250 μL of pre-warmed DPBS (1×).
Immunofluorescence staining
Important points
During the entire protocol, it is important to respect the indicated temperatures of the solutions. Solutions are pre-warmed to 37°C.
Here, a combined immunofluorescence staining is performed using a FOXA2 and E-Cadherin antibody (see Recipe 7). However, the protocol is easily adapted to other antibodies.
When staining is performed using small organic molecules, proceed directly to section D.
Samples are kept in the dark by covering them with aluminum foil.
Step-by-step protocol
Discard the DPBS solution.
Add 250 μL of pre-warmed blocking buffer to the Matrigel embedded organoids (see Recipe 6).
Incubate with blocking buffer for 2 h at 37°C.
Remove the blocking buffer.
Add 250 μL of primary antibody solution (see Recipe 7).
Incubate with primary antibody overnight at room temperature.
Remove the primary antibody solution.
Wash three times with pre-warmed DPBS (1×) and discard the solution.
Add 250 μL of secondary antibody solution (see Recipe 8).
Incubate for 2 h at room temperature (22–25°C), in the dark.
Add 250 µL of pre-warmed DPBS (1×) and incubate for 10 min at 37°C.
Remove the solution.
Repeat steps 11) and 12) two times.
Add 250 µL of pre-warmed DPBS and store the sample at 37°C until the next staining or imaging.
Fluorescence staining with small organic molecules
Important points
Here, a staining of the cytoskeleton and nucleus is performed, using Phalloidin CruzFluor647 and Hoechst33342, respectively. The incubation with the two fluorophores is performed consecutively, to obtain an optimal fluorescence staining.
Samples are kept in the dark by covering them with aluminum foil.
Step-by-step protocol
Discard the DPBS solution.
Add 250 μL of pre-warmed nuclear staining solution (see Recipe 9).
Incubate the sample for 4 h at 37°C.
Add 250 µL of pre-warmed DPBS (1×) and incubate for 10 min at 37°C.
Discard the solution.
Repeat steps 4) and 5) two times.
Add 250 μL of pre-warmed cytoskeleton staining solution (see Recipe 10).
Incubate the organoids with the cytoskeleton staining solution overnight at room temperature (22–25°C), in the dark.
Add 250 µL of pre-warmed DPBS (1×) and incubate for 10 min at 37°C.
Discard the solution.
Repeat steps 9) and 10) two times.
Add 250 µL of pre-warmed DPBS and store the sample at 37°C until the next staining or imaging.
PART II: SAMPLE PREPARATION OF MATRIX-FREE 3D MODELS
Preparation of matrix-free 3D models (e.g., Spheroids)
Important points
The cells used in this protocol are grown in T25 cell culture flasks and are confluent at the start of the protocol. We used A549 cells, but any other adherent cell line can be used.
Here, we use Trypsin/EDTA solution, but any other method to resuspend the cells can be used.
Although in this protocol, spheroids are prepared by the liquid overlay method (using 3D Petri Dishes® micro-molds, see Materials), other spheroid preparation methods can also be used.
The procedure described here for the preparation of the spheroids is adapted from the protocol of the microtissue supplier (MicroTissues Inc., https://www.microtissues.com/protocols).
This procedure should be carried out under a sterile flow cabinet.
Step-by-step protocol
Casting of the agarose microtissues
Rinse the 3D Petri Dishes® micro-molds with MilliQ water.
Place the micro-molds under UV light for 20 min for sterilization.
When sterile, rinse the micro-molds with DPBS (1×) and subsequently remove all the DPBS (1×).
Microwave the agarose at 900 W and swirl it around each 10 s until the solution is completely liquid (see Recipe 11).
Add 500 μL of agarose solution into the micro-mold (Figure 2A).
Let the agarose solidify for 20 min.
After the agarose has solidified, carefully bend the micro-molds to remove the formed agarose microtissue. Do not bend it too much to avoid rupture of the agarose microtissue. A sterile pipet tip can be used to help remove the microtissue (Figure 2B).
Transfer the microtissue into a culture dish (e.g., a 6-well culture plate, Figure 2C).
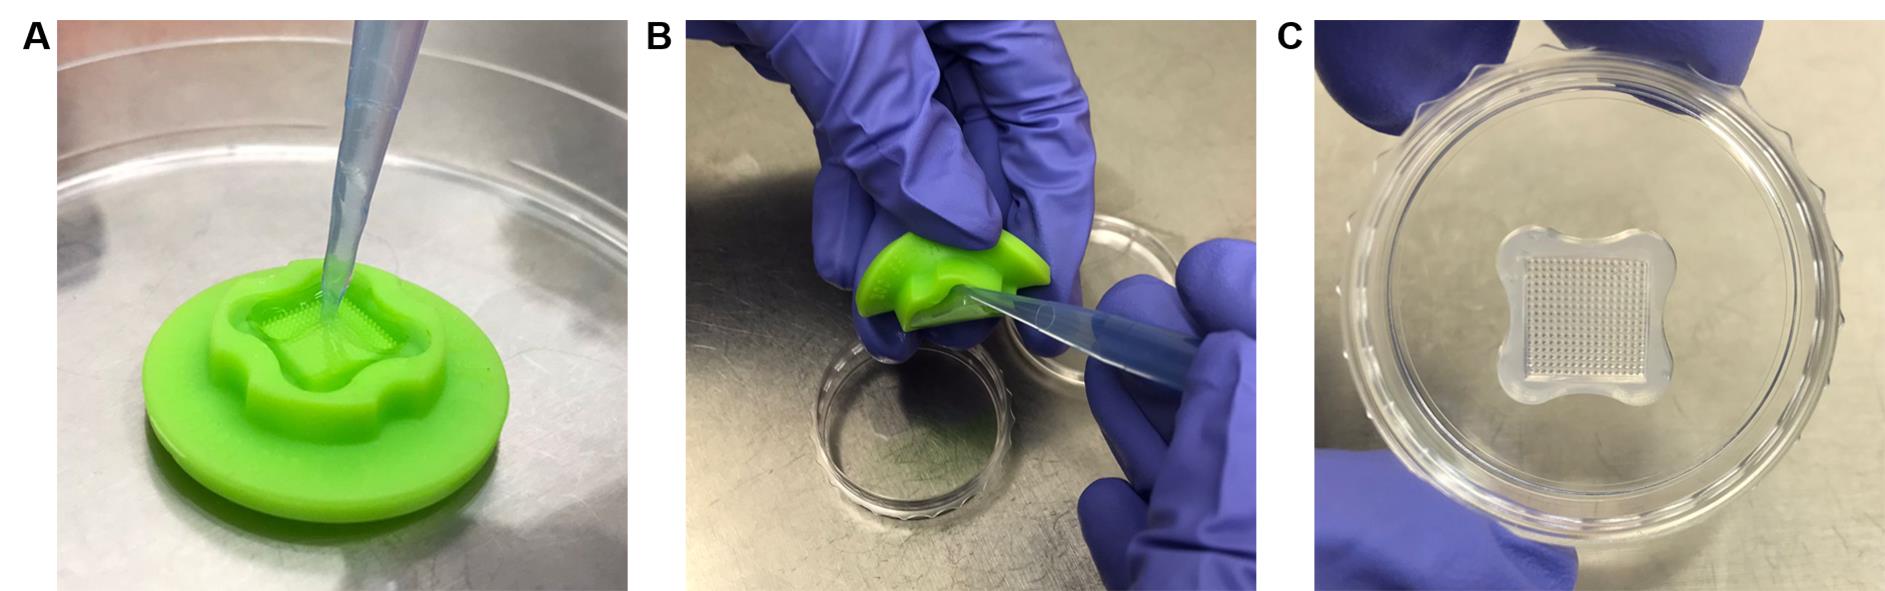
Figure 2. Preparation of agarose microtissues. (A) Add 500 μL of liquid agarose into the micro-mold. (B) After solidification, carefully remove the agarose microtissue from the micro-mold (a tip can be used). (C) Transfer the microtissue into a cell culture dish.
Equilibration of the agarose microtissue
Completely submerge the agarose microtissue in culture medium (see Recipe 3).
Incubate the microtissue in culture medium for 15 min.
Remove the culture medium.
Repeat steps 10) to 11) two more times.
Remove the medium from the T25 cell culture flask.
Wash the adherent cells three times with 4 mL of DPBS (1×) and discard the solution.
Add 50 µL of Trypsin/EDTA solution plus 450 μL of DPBS (1×).
Incubate for 5 min at 37°C in the humidified CO2 incubators.
Add 3.5 mL of culture medium to inactivate the Trypsin/EDTA and pipette up and down multiple times to resuspend the cells.
Count the cells.
Remove all the medium in and around the microtissue.
Seed 190 μL of cell suspension with the appropriate cell concentration in a dropwise manner inside the microtissue (here, 500,000 cells per microtissue were seeded to obtain spheroids with a diameter of around 250 μm).
Note: The number of cells used will depend on the cell type and the desired spheroid diameter.
Allow the cells to sink into the wells of the microtissue for 10 min.
Add culture medium around the microtissue.
Keep in culture at 37°C in a 5% CO2 humidified incubator until the spheroids reach the desired size or morphology.
Note: The culture medium should be refreshed every 2 to 3 days; the incubation time will depend on the cell type.
Spheroid harvesting (once the spheroids reach the desired morphology)
Remove the medium surrounding and inside the microtissue.
Vigorously pipet 1 mL of DPBS (1×) on the wells of the microtissue to release the spheroids from the wells. Repeat this multiple times (until all spheroids are free from the wells).
Transfer the spheroid-containing solution into a 1.5 mL microcentrifuge tube.
Fixation and permeabilization
Important points
All the centrifugation steps are performed for 5 s at 2,000 × g.
During the incubation steps the microcentrifuge tube should be placed horizontally on a shaking plate. In this way, the area where the spheroids will sink is increased, allowing the spheroids to be less dense (more distributed) and, therefore, avoiding incomplete fixation or permeabilization. If no shaking plate is available, place the 1.5 mL microcentrifuge tube horizontally on the bench (or in the fridge).
Step-by-step protocol
Centrifuge the harvested spheroids and discard the supernatant.
Add 1 mL of DPBS (1×) and mix gently by flicking the tube to resuspend the spheroids.
Centrifuge and discard the supernatant.
Repeat steps 2) and 3) two more times.
Add 500 μL of fixation buffer (see Recipe 4) and mix gently by flicking the 1.5 mL microcentrifuge tube.
Incubate for 20 min at room temperature.
Centrifuge and discard the supernatant (fixation buffer).
Add 1 mL of DPBS (1×) and mix gently by flicking the tube to wash the spheroids.
Centrifuge and discard the supernatant.
Repeat steps 8) and 9) two more times.
Add 500 μL of permeabilization buffer (see Recipe 5) and mix gently by flicking the 1.5 mL microcentrifuge tube.
Incubate for 20 min at room temperature.
Centrifuge and remove the supernatant (permeabilization buffer).
Add 1 mL DPBS (1×) and mix gently by flicking the tube to wash the spheroids.
Centrifuge and discard the supernatant.
Repeat steps 14) and 15) two more times.
Immunofluorescence staining
Important points
During the incubation steps the microcentrifuge tube should be placed horizontally on a shaking plate. In this way, the area where the spheroids will sink is increased, allowing the spheroids to be less dense (more distributed), and, therefore, better staining will be achieved. If no shaking plate is available, place the 1.5 mL microcentrifuge tube horizontally on the bench (or in the fridge).
When staining is performed using small organic molecules, proceed directly to section D.
Samples are kept in the dark by covering them with aluminum foil.
All the centrifugation steps are performed for 5 s at 2,000 × g.
Step-by-step protocol
Add 200 μL of blocking buffer (see Recipe 6) to the spheroid pellet and mix gently by flicking the 1.5 mL microcentrifuge tube.
Incubate for 2 h at room temperature.
Centrifuge and discard the supernatant (blocking buffer).
Add 200 μL of primary antibody solution (see Recipe 7).
Incubate overnight at 4°C.
Centrifuge and remove the supernatant (primary antibody solution).
Add 1 mL of DPBS (1×) and mix gently by flicking the tube to wash the spheroids.
Centrifuge and discard the supernatant.
Repeat steps 7) and 8) two more times.
Add 200 µL of secondary antibody solution (see Recipe 8).
Incubate for 2 h at room temperature, in the dark.
Centrifuge and discard the supernatant (secondary antibody solution).
Add 1 mL of DPBS (1×) and mix gently by flicking the tube to wash the spheroids.
Centrifuge and discard the supernatant.
Repeat steps 13) and 14) two more times.
Optional: If no other staining will be performed, add 100 µL of DPBS (1×) and mix gently by flicking the tube.
Fluorescence staining using small organic molecules
Important points
During the incubation steps, the microcentrifuge tube should be placed horizontally on a shaking plate. In this way, the area where the spheroids will sink is increased, allowing the spheroids to be less dense (more distributed), and, therefore, better staining will be achieved. If no shaking plate is available, place the 1.5 mL microcentrifuge tube horizontally on the bench (or in the fridge).
Here, a staining of the cytoskeleton and nucleus is performed, using Phalloidin CruzFluor647 and Hoechst33342, respectively. The incubation with the two fluorophores is performed consecutively to obtain an optimal fluorescence staining.
Samples are kept in the dark by covering them with aluminum folium.
All the centrifugation steps are performed for 5 s at 2,000 × g.
Step-by-step protocol
Add 200 μL of nuclear staining solution (see Recipe 9).
Incubate for 4 h at room temperature, in the dark covered with aluminum foil.
Centrifuge and discard the supernatant (nuclear staining solution).
Add 1 mL of DPBS (1×) and mix gently by flicking the tube to wash the spheroids.
Centrifuge and discard the supernatant.
Repeat steps 4) and 5) two more times.
Add 200 μL of cytoskeleton staining solution (see Recipe 10).
Incubate overnight at room temperature in the dark.
Centrifuge and discard the supernatant (cytoskeleton staining solution).
Add 1 mL of DPBS (1×) and mix gently by flicking the tube to wash the spheroids.
Centrifuge and discard the supernatant.
Repeat steps 10) and 11) two more times.
Add 100 µL of DPBS (1×) and mix gently by flicking the tube.
Mounting of stained spheroids
Important points
Here, we used a 24 ×50 mm #1.5 glass coverslip but other formats can be used.
Spheroids are prone to sticking to the pipette tip. If this is a problem, before transferring the spheroids to the perfusion chamber, draw 200 μL of BIOFLOATTM FLEX coating solution into a P200 pipette, leave it in the pipette tip for 10 s and discard. Use this pipette tip to transfer the spheroid-containing solution into the perfusion chamber.
Note: Alternatively, ice-cold 1% BSA in DPBS (1×) solution can be used for coating the tip.
Step-by-step protocol
Glue a CoverWell perfusion chamber onto a glass coverslip.
Take 50 μL of stained spheroids and pipet the necessary volume into the perfusion chamber until full; the remaining spheroids can be transferred again to the 1.5 mL microcentrifuge tube (Figure 3A).
Cover the two openings of the perfusion chamber with transparent scotch tape to avoid sample evaporation during imaging (Figure 3B).
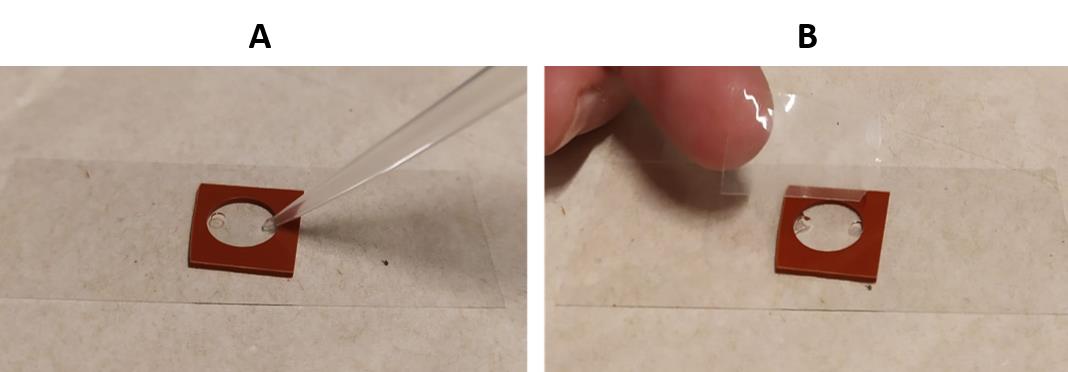
Figure 3. Mounting spheroid sample for imaging. (A) Take 50 μL of stained spheroids and pipet the necessary volume into the perfusion chamber until full. (B) Cover the two openings of the perfusion chamber with transparent scotch tape to prevent sample evaporation.
PART III: IMAGING OF MATRIX-EMBEDDED AND MATRIX-FREE 3D MODELS
Data acquisition and 3D reconstruction
Important points
The Leica TCS SP8 dive microscope used for the visualization of the samples prepared in PART I and PART II is equipped with a multi-photon Insight X3 laser (range 680–1,300 nm), a FLUOTAR VISIR 25× water objective (NA 0.95), a HC PL IRAPO 40× water objective (NA 1.1), and two HyD hybrid detectors.
To capture a complete spheroid/organoid, the objectives used to image 3D cell models need to have a long working distance (WD), preferentially longer than 0.6 mm. The FLUOTAR VISIR 25× objective used has a WD of 2.4 mm and is therefore used for larger spheroid/organoid diameters, while the HC PL IRAPO 40× objective has a WD of 0.65 mm and can be used for smaller spheroids/organoids.
Here, two-photon excitation is used to visualize the spheroids/organoids. Two-photon excitation requires simultaneous excitation by two photons with longer wavelength than the emission light. This longer wavelength (usually near-infrared) is less scattered by cellular compartments, thereby enhancing light penetration. Standard single-photon excitation can also be used to visualize the samples but will imply reduced light penetration into the spheroid/organoid, resulting in a reduced fluorescence signal.
When in live mode (fast-scanning), scanning speed is set at 600 Hz and the image format at 512 × 512 pixels. During data acquisition the speed is set at 400 Hz and the image format at 1,024 × 1,024 pixels format, to enhance image quality.
The step size for the acquisition of a z-stack is typically set to 1 μm.
In this protocol, image reconstruction is carried out using the LASX 3D viewer. However, other image analysis programs, such as ImageJ or Fiji, can also be used.
Often, the light penetration, thus fluorescent signal, decreases when moving the z-position up. This effect can be reduced by using the z-compensation tool (incorporated in the LASX software). With this tool, the power of the excitation light and/or the excitation gain can be increased in a linear fashion during the z-stack (adjusted for each xy plane).
Step-by-step protocol
After starting up the microscope, place the sample onto the sample holding stage of the microscope.
Adjust the microscope parameters depending on the fluorescent dyes used to stain the sample (Table 1). When multiple dyes are used in one sample, a sequential scan is carried out. Here, we performed a sequential scan between stacks; accordingly, the complete stack is acquired for 1st channel, and next, the complete stack is acquired for the 2nd channel.
Table 1. Excitation wavelength and detector parameters used for the fluorescence stainings.
Phalloidin Cruzfluor647 Hoechst33342 Foxa2 (AF488) E-Cadherin(AF555) single photon excitation (nm) 647 350 488 555 two-photon excitation (nm) 1,294 700 976 1,110 hyD detector range (nm) 650–750 400–450 500–550 570–650 Bring the spheroid or organoid in focus via the eyepiece using the transmission light.
Center the spheroid/organoid in the field of view using the sample stage.
Start the live mode to check the fluorescence signal in the spheroid/organoid.
Move the z-position all the way to the bottom of the spheroid/organoid.
Define this location as the beginning of the stack.
Move the z-position to the top of the spheroid/organoid.
Define this location as the end position of the stack.
Start the acquisition of the stack.
Open the stack in the LASX 3D viewer software.
Adjust the colors, brightness, contrast, and gamma as desired for each channel.
Set the background to black by checking the box “black” instead of “grey”.
Optional: Change the orientation of the spheroid/organoid as desired by holding and dragging the left mouse button.
Optional: Using the clipping tool, the spheroid/organoid can be sectioned into planes. Parts can be cut out to have a better view inside the spheroid/organoid (Figures 4–6).
Add the scale bar and orientation inset to the 3D reconstruction by checking the boxes “scale bar” and “draw frame”.
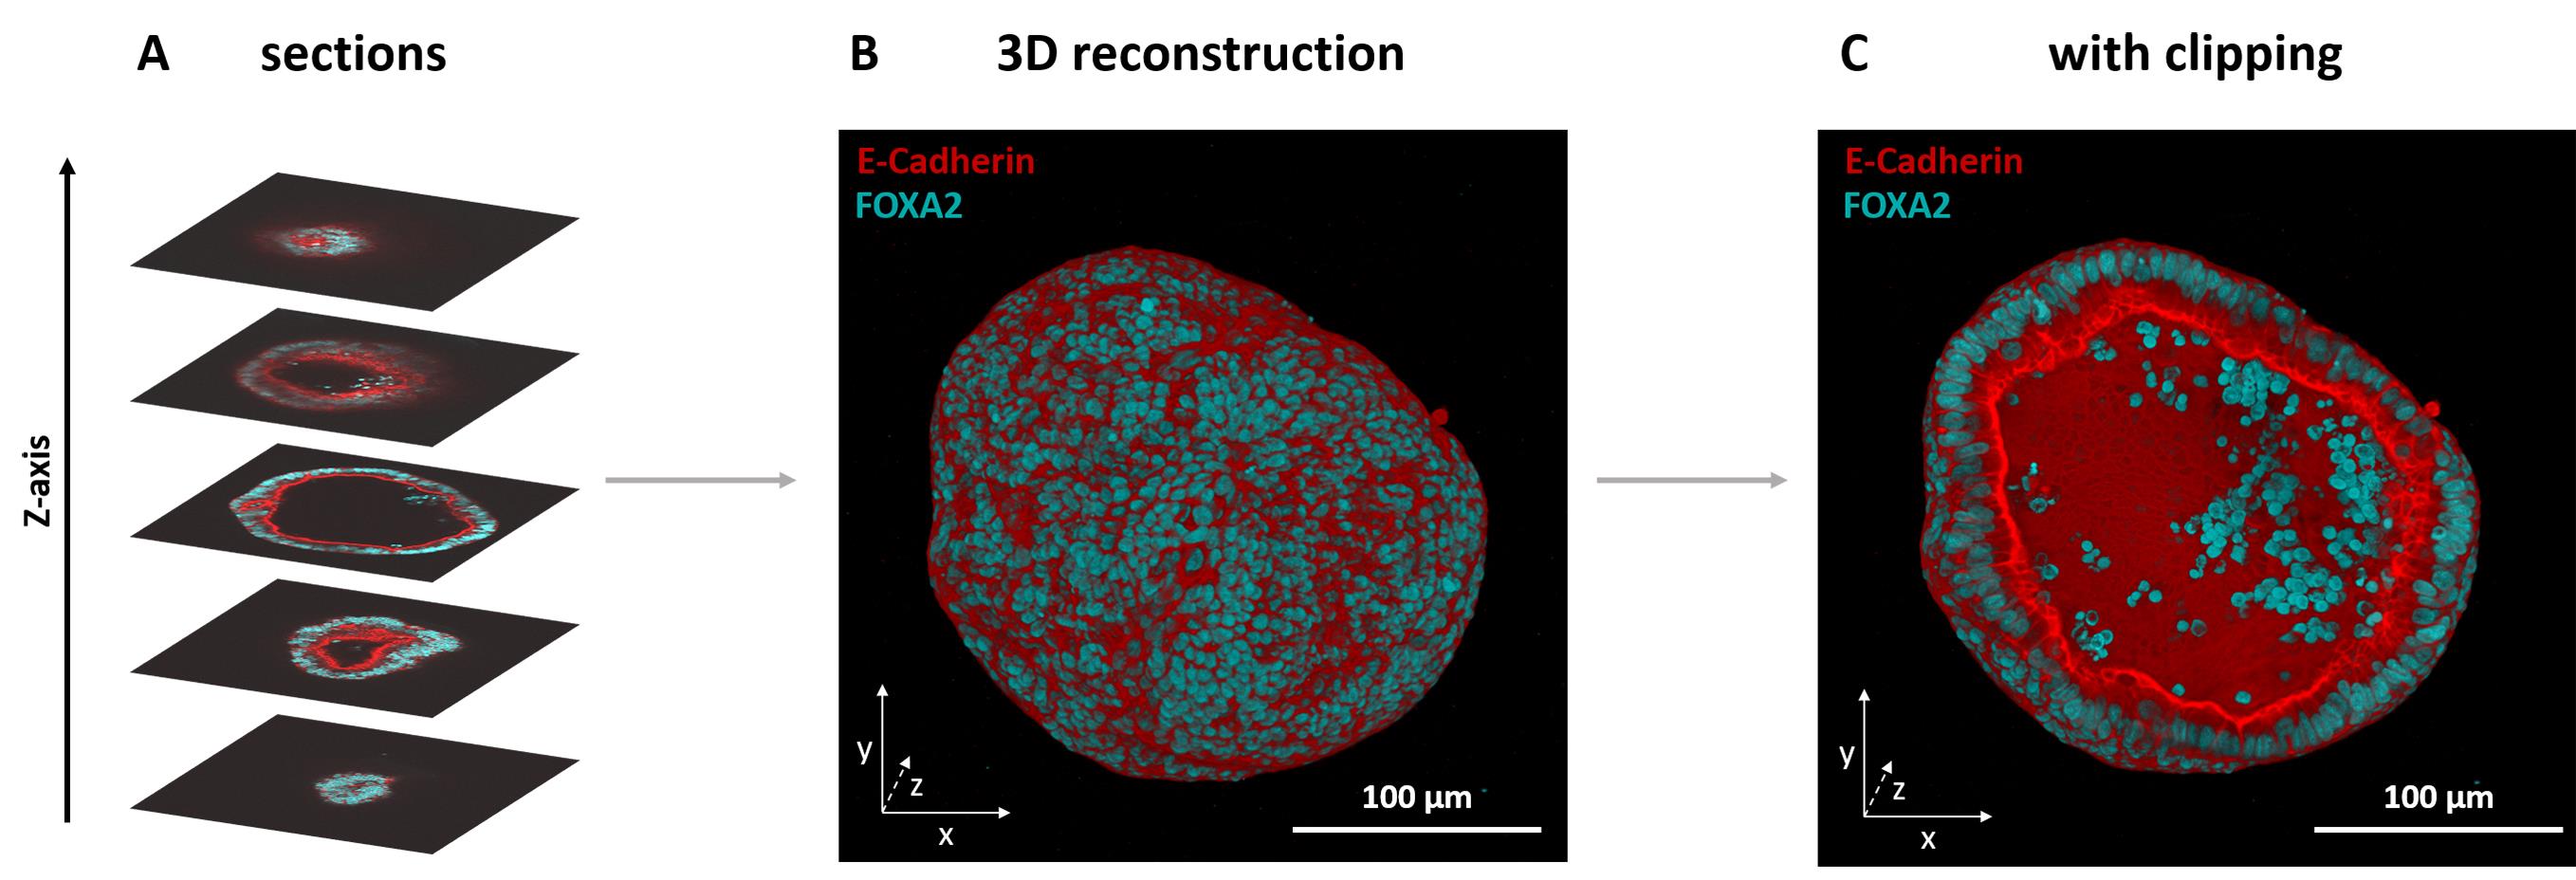
Figure 4. 3D reconstruction of an endometrial organoid stack stained with antibodies against E-Cadherin and FOXA2. (A) Immunofluorescence of FOXA2 (cyan) and E-Cadherin (red) in an endometrial organoid; different frames in various positions in the stack are displayed. (B) 3D reconstruction of the complete z-stack. (C) 3D view with the bottom half clipped, exposing the inside of the organoid.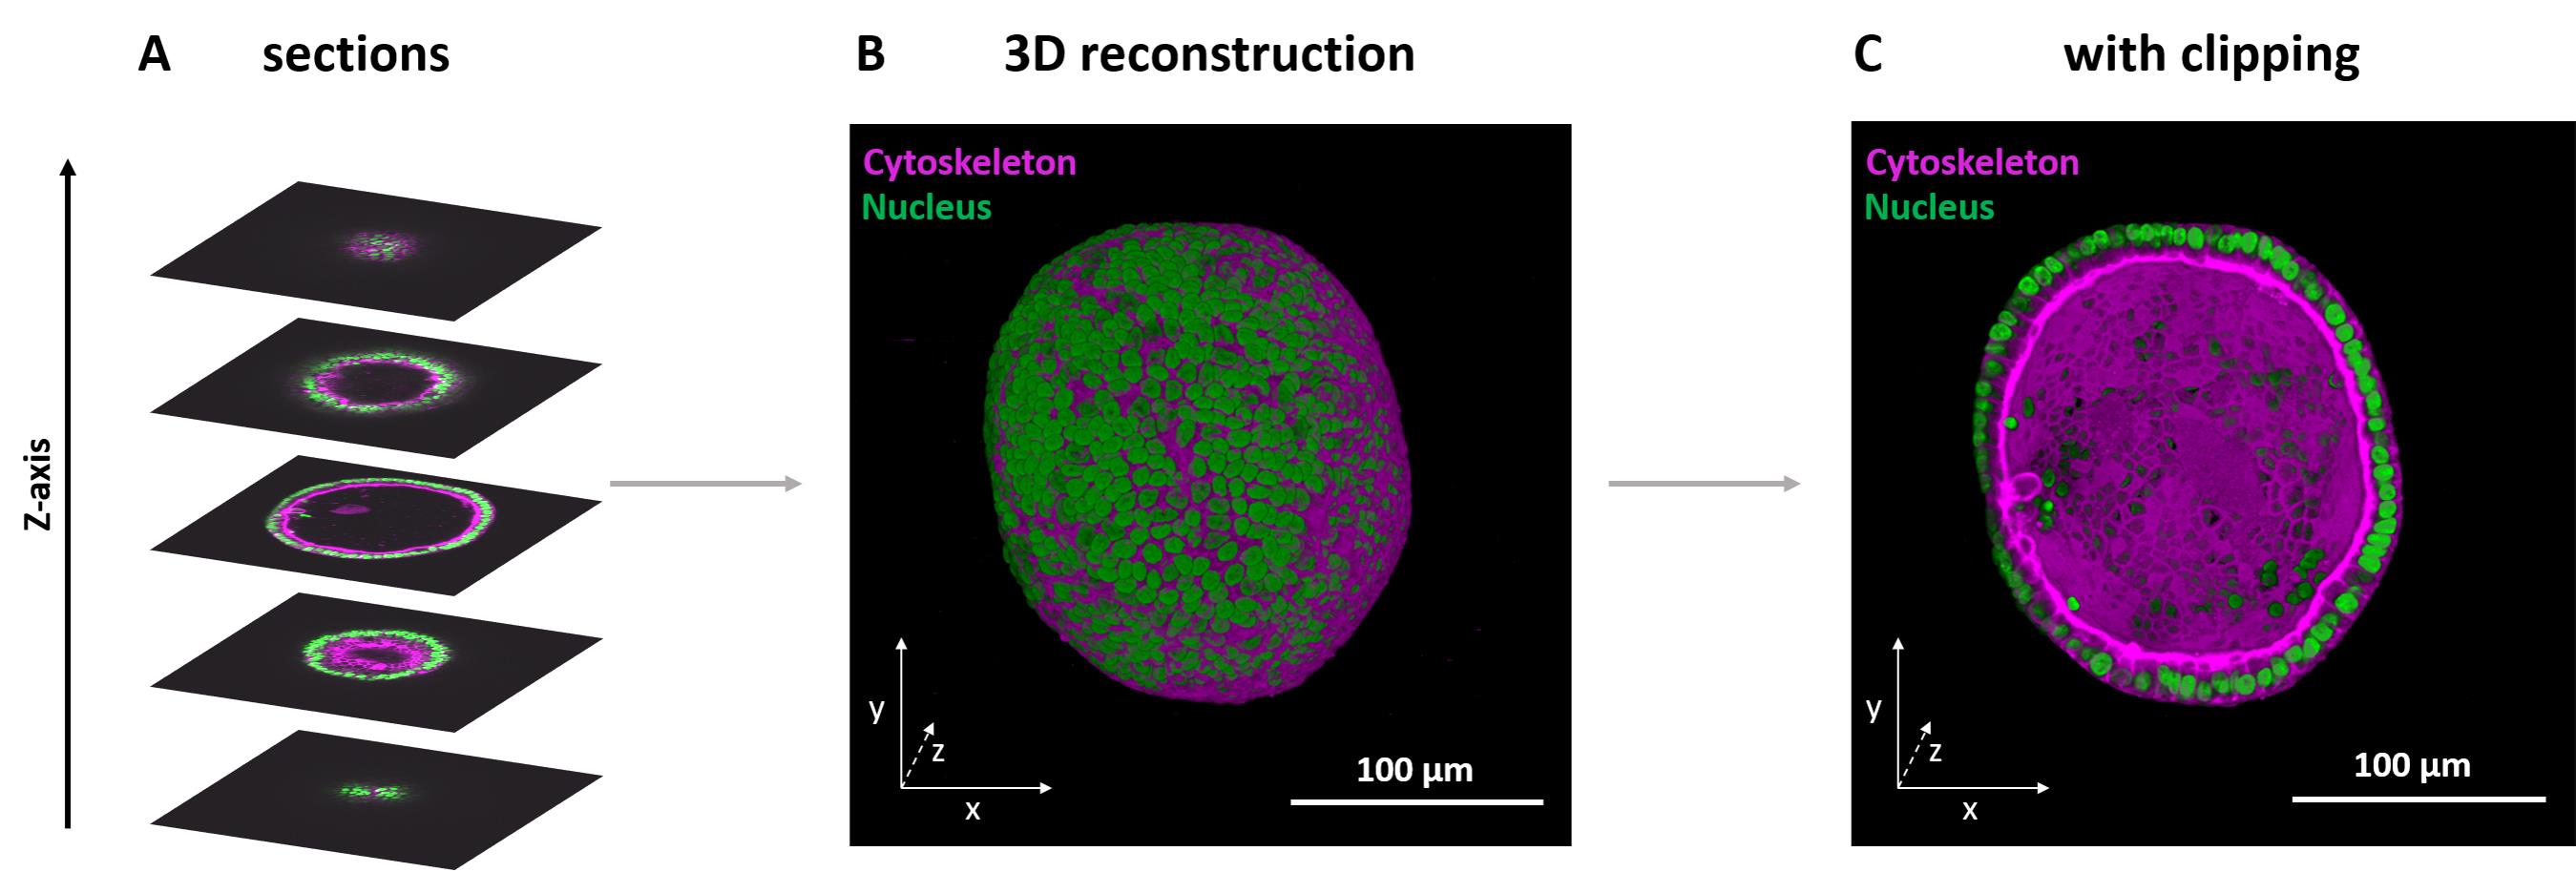
Figure 5. 3D reconstruction of an endometrial organoid stack with labeled nucleus and actin filaments. (A) Staining with Hoechst (nucleus, green) and Phalloidin647 (cytoskeleton, magenta), different frames in various positions in the stack are displayed. (B) 3D reconstruction of the complete zstack. (C) 3D view with the bottom half clipped, exposing the inside of the organoid.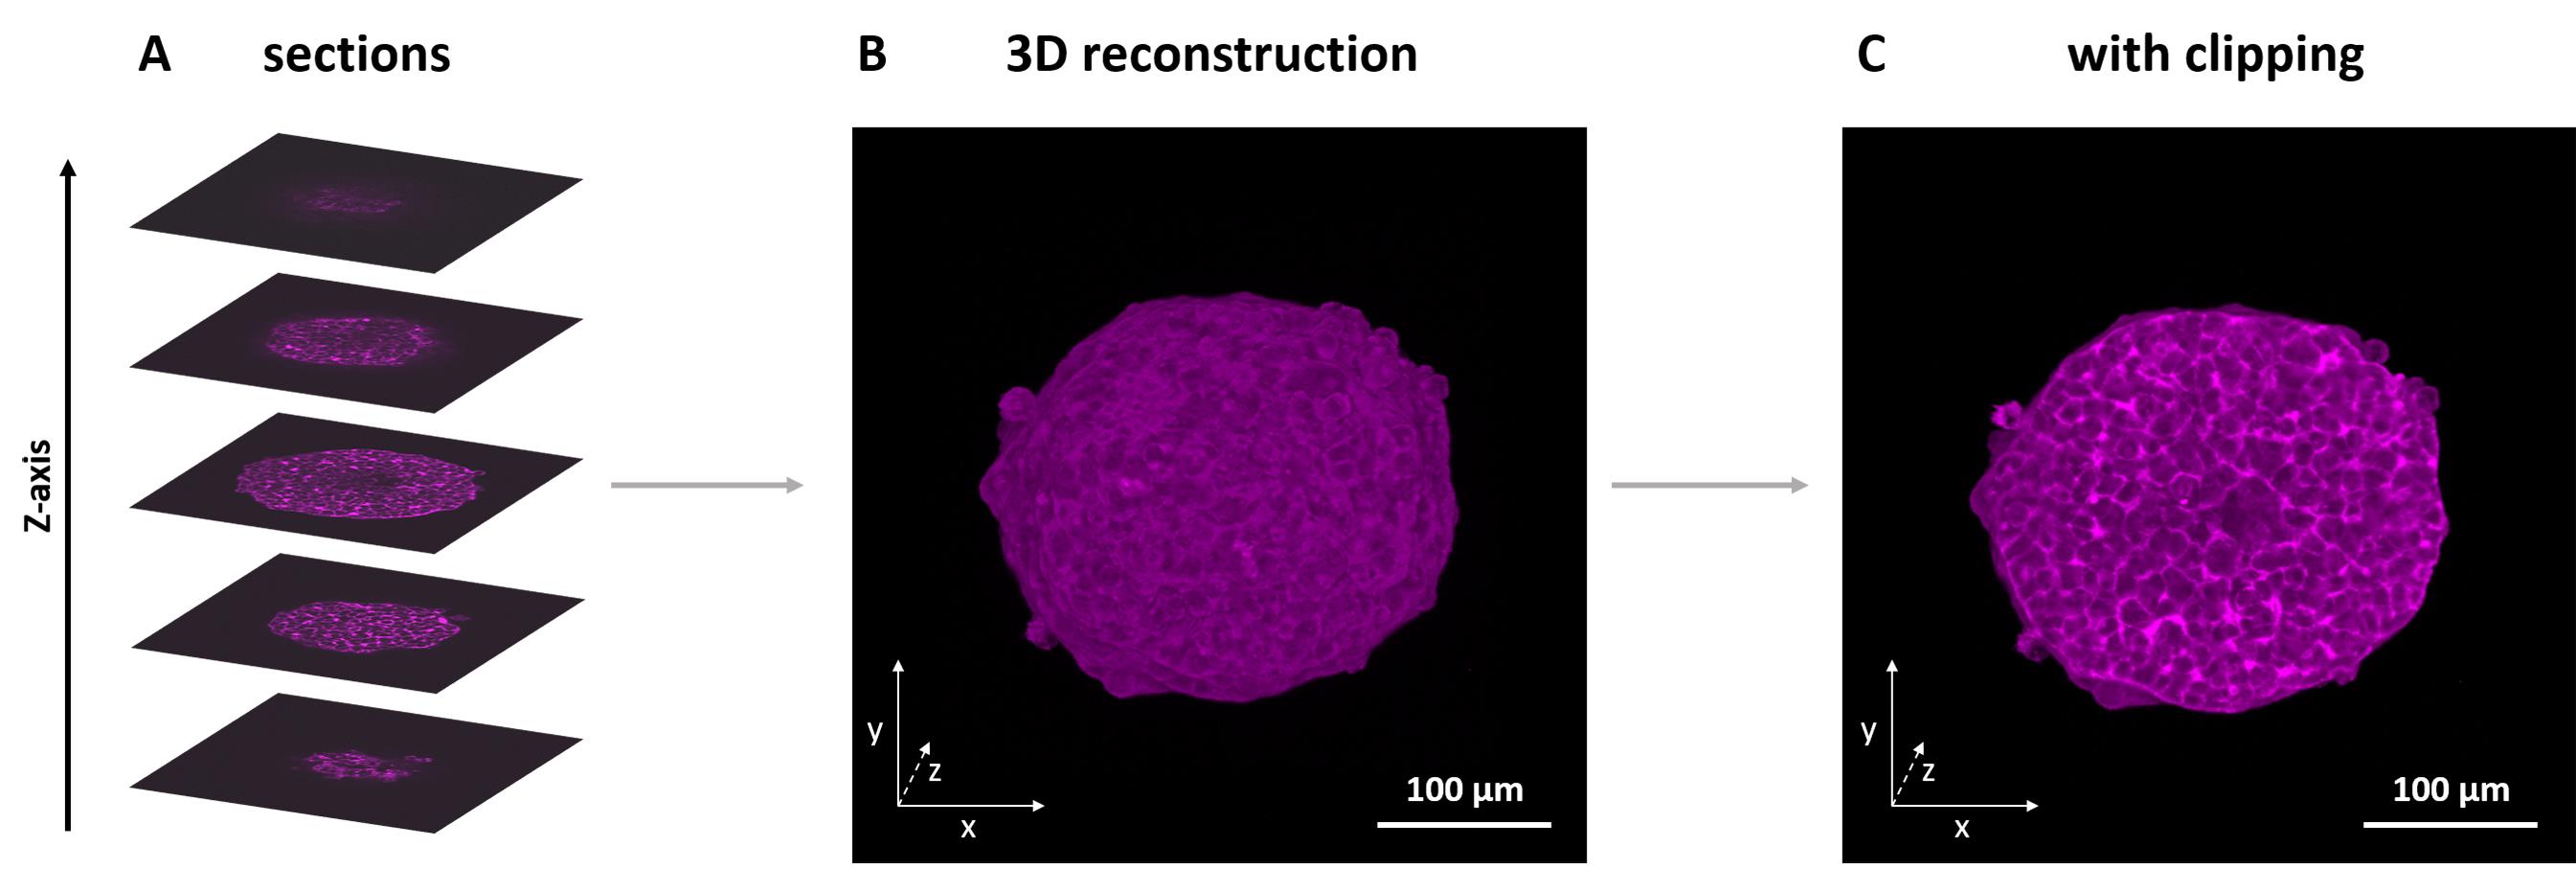
Figure 6. 3D reconstruction of a spheroid stack stained with labeled actin filaments. (A) Different sections in various positions of the stack. (B) 3D reconstruction of the complete z-stack. (C) 3D view with the bottom half clipped, exposing the inside of the spheroid.
Troubleshooting
Table 2.Troubleshooting
| Problem | Potential reason(s) | Solution (s) |
| Loss of spheroids | 1. Spheroids are not fully pelleted during centrifugation cycles 2. Spheroids stick to the pipet tip | 1. Pre-coat the tip with a BIOFLOATTM FLEX coating solution or with ice cold 1% BSA in DPBS |
| Matrigel collapsed | 1. Solution was not pre-heated to 37°C | 1. Keep all solutions in a warm water bath for at least 20 min |
| Spheroids disintegrate/fall apart during protocol | 1. Spheroids were not fully formed when harvested 2. Too fast centrifugation 3. Severe mixing during washing steps | 1. Before harvesting the spheroids, check under an optical microscope that dense coherent spheroids are formed. 2. When spheroids are prone to disintegration (weaker cell-cell interactions, instead of centrifugation to pellet the spheroids, leave them in the microcentrifuge tube until they sink to the bottom. 3. Do not pipet into the spheroid solution, but mix the spheroids by flicking the tube. |
| No fluorescent signal in the middle of the spheroids/organoids | 1. Antibodies/dyes did not penetrate into the organoid/spheroid core 2. Necrosis in the spheroid/organoid core. 3. Excitation light is not able to penetrate the middle of the spheroid/organoid. | 1. Prolong the permeabilization and/or antibody incubation times. 2. Avoid growing spheroids too long without changing the medium before harvesting. 3. Use red/far-red dyes as the excitation light for these dyes have better penetration into larger samples |
Recipes
Organoid medium (for endometrial organoids)
DMEM/F12 (with L-glutamine and HEPES), supplemented with 10% (v/v) RSPO1, 10% (v/v) NOG), 2 % (v/v) B27, 1% (v/v) N2, 1% (v/v) Glutamax, 1% (v/v) Insulin Transferrin Selenium, 1% (v/v) Penicilin/Streptomycin, 2 mM Nicotinamide, 0.5 µM A83-01, 1.25 mM N-acetyl L-cysteine, 50 ng/mL EGF 50 ng/mL, 2 ng/mL bFGF, 10 ng/mL FGF-10, 10 µM SB202190, 1 nM β Estradiol, and 10 µM Rock Inhibitor (Y-27632b)
Organoid dissociation solution
TrypLE Express with 10 μM Rock Inhibitor (Y-27632b)
Culture medium (for A549 cells)
DMEM with 10% (v/v) Fetal Bovine Serum, 5% (v/v) Glutamax, and 0.1% (v/v) Gentamycin
Fixation buffer
4% Formaldehyde in DPBS (1×)
Permeabilization buffer
0.1% Triton X-100 in DPBS (1×)
Blocking buffer
3% BSA in DPBS (1×)
Primary antibody solution
Mouse Anti-E-cadherin (1:200, 1.25 μg/mL) and Rabbit Anti-FOXA2 (1:150, 13.5 μg/mL) in blocking buffer (3% BSA in DPBS 1×)
Secondary antibody solution
Anti-Rabbit IgG AF555 (1:500, 4 μg/mL) and Anti-Mouse IgG AF488 (1:500, 4 μg/mL) in blocking buffer (3% BSA in DPBS 1×)
Nuclear staining solution
Hoechst 33342 (1:1,000, 5 μg/mL) in DPBS 1×
Cytoskeleton staining solution
Phalloidin CruzFluor647 (1:1,000 of stock solution in DMSO) in blocking buffer (3% BSA in DPBS 1×)
Agarose solution
2% (w/v) Ultra-pure agarose powder dissolved in 0.9% (w/v) NaCl in Milli-Q water. Autoclave before use.
Acknowledgments
This work was supported by the Research Foundation—Flanders (FWO, projects G0A5817N, G0D4519N, 1529418N, G081916N, and G094717N), by KU Leuven (C14/16/053, C14/18/061, and KA/20/026). I.V.Z., N.M., and B.F. acknowledge the support from FWO for their Ph.D. and Postdoctoral fellowships, respectively (11F5419N, 11A1120N, and 12X1419N). The protocol for spheroid preparation was adapted from the protocol provided by the supplier of the microtissues (Microtissues, Inc.).
Competing interests
There are no competing interests.
Ethics
Endometrial biopsies were obtained from patients undergoing laparoscopy for benign gynecological conditions after informed written consent. The study was approved by the Ethics Committee Research UZ/KU Leuven (S59006; S59177).
References
- Bolduan, F., Grosser, S. and Vida, I. (2020). Minimizing shrinkage of acute brain slices using metal spacers during histological embedding. Brain Struct Funct 225(8): 2577-2589.
- Boretto, M., Cox, B., Noben, M., Hendriks, N., Fassbender, A., Roose, H., Amant, F., Timmerman, D., Tomassetti, C., Vanhie, A., et al. (2017). Development of organoids from mouse and human endometrium showing endometrial epithelium physiology and long-term expandability. Development 144(10): 1775-1786.
- Boretto, M., Maenhoudt, N., Luo, X., Hennes, A., Boeckx, B., Bui, B., Heremans, R., Perneel, L., Kobayashi, H., Van Zundert, I., et al. (2019). Patient-derived organoids from endometrial disease capture clinical heterogeneity and are amenable to drug screening. Nat Cell Biol 21(8): 1041-1051.
- Dekkers, J. F., Alieva, M., Wellens, L. M., Ariese, H. C. R., Jamieson, P. R., Vonk, A. M., Amatngalim, G. D., Hu, H., Oost, K. C., Snippert, H. J. G., et al. (2019). High-resolution 3D imaging of fixed and cleared organoids. Nat Protoc 14(6): 1756-1771.
- Edwards, S. J., Carannante, V., Kuhnigk, K., Ring, H., Tararuk, T., Hallbook, F., Blom, H., Onfelt, B. and Brismar, H. (2020). High-Resolution Imaging of Tumor Spheroids and Organoids Enabled by Expansion Microscopy. Front Mol Biosci 7: 208.
- Erickson, Q. L., Clark, T., Larson, K. and Minsue Chen, T. (2011). Flash freezing of Mohs micrographic surgery tissue can minimize freeze artifact and speed slide preparation. Dermatol Surg 37(4): 503-509.
- Ertürk, A., Becker, K., Jahrling, N., Mauch, C. P., Hojer, C. D., Egen, J. G., Hellal, F., Bradke, F., Sheng, M. and Dodt, H. U. (2012). Three-dimensional imaging of solvent-cleared organs using 3DISCO. Nat Protoc 7(11): 1983-1995.
- Foty, R. (2011). A simple hanging drop cell culture protocol for generation of 3D spheroids. J Vis Exp (51).
- Lazzari, G., Couvreur, P. and Mura, S. (2017). Multicellular tumor spheroids: a relevant 3D model for the in vitro preclinical investigation of polymer nanomedicines. Polymer Chemistry 8(34): 4947-4969.
- Pinto, B., Henriques, A. C., Silva, P. M. A. and Bousbaa, H. (2020). Three-Dimensional Spheroids as In Vitro Preclinical Models for Cancer Research. Pharmaceutics 12(12).
- Schindelin, J., Arganda-Carreras, I., Frise, E., Kaynig, V., Longair, M., Pietzsch, T., Preibisch, S., Rueden, C., Saalfeld, S., Schmid, B., et al. (2012). Fiji: an open-source platform for biological-image analysis. Nat Methods 9(7): 676-682.
- Schutgens, F. and Clevers, H. (2020). Human Organoids: Tools for Understanding Biology and Treating Diseases. Annu Rev Pathol 15: 211-234.
- Souza, G. R., Molina, J. R., Raphael, R. M., Ozawa, M. G., Stark, D. J., Levin, C. S., Bronk, L. F., Ananta, J. S., Mandelin, J., Georgescu, M. M., et al. (2010). Three-dimensional tissue culture based on magnetic cell levitation. Nat Nanotechnol 5(4): 291-296.
- Tomer, R., Ye, L., Hsueh, B. and Deisseroth, K. (2014). Advanced CLARITY for rapid and high-resolution imaging of intact tissues. Nat Protoc 9(7): 1682-1697.
- Van Zundert, I., Fortuni, B. and Rocha, S. (2020). From 2D to 3D Cancer Cell Models-The Enigmas of Drug Delivery Research. Nanomaterials (Basel) 10(11).
- Velasco, V., Shariati, S. A. and Esfandyarpour, R. (2020). Microtechnology-based methods for organoid models. Microsyst Nanoeng 6: 76.
Article Information
Copyright
© 2022 The Authors; exclusive licensee Bio-protocol LLC.
How to cite
Van Zundert, I., Maenhoudt, N., De Vriendt, S., Vankelecom, H., Fortuni, B. and Rocha, S. (2022). Fluorescence Imaging of 3D Cell Models with Subcellular Resolution. Bio-protocol 12(14): e4469. DOI: 10.21769/BioProtoc.4469.
Category
Developmental Biology > Cell growth and fate
Cancer Biology > General technique > Cell biology assays
Cell Biology > Cell imaging > Two-photon microscopy
Do you have any questions about this protocol?
Post your question to gather feedback from the community. We will also invite the authors of this article to respond.