- Protocols

- Articles and Issues
- For Authors
- About
- Become a Reviewer

Rapid in vitro and in vivo Evaluation of Antimicrobial Formulations Using Bioluminescent Pathogenic Bacteria
Published: Vol 12, Iss 2, Jan 20, 2022 DOI: 10.21769/BioProtoc.4302 Views: 3823
Reviewed by: Aftab NadeemSaumik BasuAnonymous reviewer(s)
Original research article
The authors used this protocol in:
Jan 2020
Advertisement


Protocol Collections
Comprehensive collections of detailed, peer-reviewed protocols focusing on specific topics


Related protocols

Abstract
Basic and translational research needs rapid methods to test antimicrobial formulations. Bioluminescent bacteria and advanced imaging systems capable of acquiring bioluminescence enable us to quickly and longitudinally evaluate the efficacy of antimicrobials. Conventional approaches, such as radial diffusion and viable count assays, are time-consuming and do not allow for longitudinal analysis. Bioluminescence imaging is sensitive and gives vital spatial and temporal information on the infection status in the body. Here, using bioluminescent Pseudomonas aeruginosa, we describe an in vitro and an in vivo approach to rapidly evaluate the antimicrobial efficacy of the host-defense peptide TCP-25.
Graphic abstract:
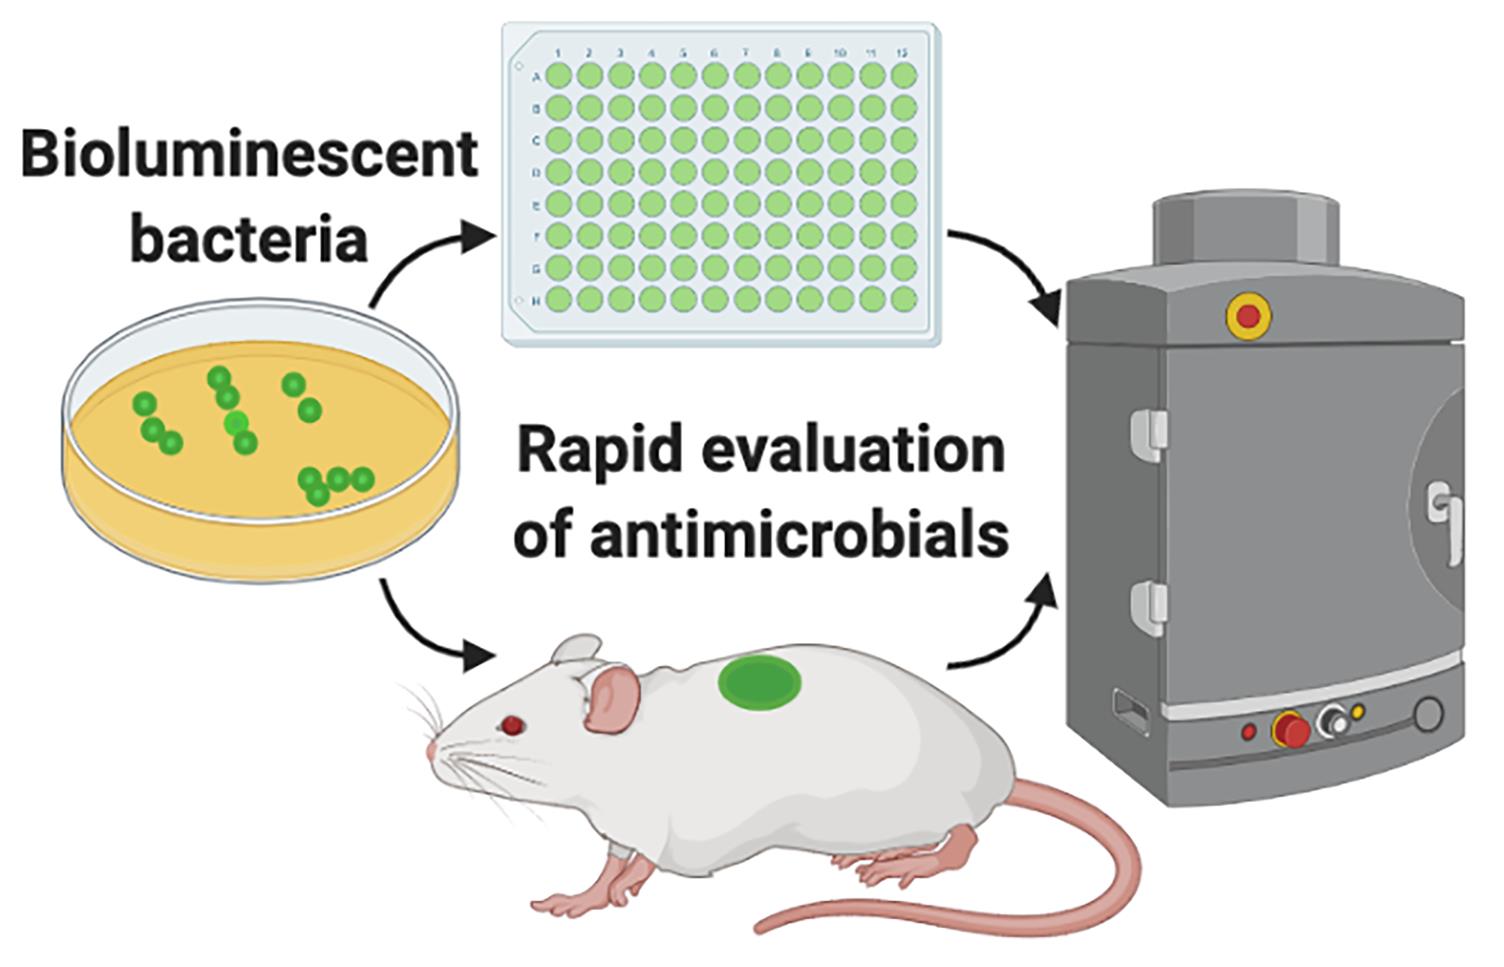
Evaluation of antimicrobials using bioluminescent bacteria.
Background
Both in basic research and in the pharmaceutical industry, there is a high demand for in vitro and in vivo models that can provide quick and reproducible results when testing antimicrobial formulations. Availability of bioluminescent bacteria and advanced imaging systems capable of acquiring bioluminescence originating from in vitro experiments or experimental animal models enable us to quickly and longitudinally evaluate the efficacy of antimicrobials. Conventional in vitro approaches, among many others, include radial diffusion and viable count assays (Balouiri et al., 2016). For in vivo evaluation, CFU (colony-forming unit) enumeration of the animal tissue is the standard practice. Although all these approaches have their own advantages, they are time-consuming as microbiological culturing protocols require 24 to 72 h before results are known. In particular, in vivo evaluation requires that animals be sacrificed for each experimental time point, which renders this process laborious and longitudinal analysis unattainable.
Bioluminescence imaging does not require an external excitation light source. Therefore, for in vivo applications, it is preferred over fluorescence imaging, which often generates a high background, as tissues in the body produce autofluorescence upon excitation with an external source (Choy et al., 2003).
The additional significant advantage is that in vivo bioluminescence imaging gives vital information on spatial distribution of the infection throughout the body (Karimi et al., 2016). Infection development from the original inoculation site can be tracked and its spread can be visualized and quantified. If required, this method can also be combined with fluorescently labeled drugs, so that signals from bioluminescent bacteria and fluorescent drugs can be acquired simultaneously and co-registered, to study their interactions (van Oosten et al., 2013; Puthia et al., 2020). This method can easily be adapted for different antimicrobial products such as gels, aqueous solutions, dressings, and implants. We have successfully used bioluminescent versions of the clinically important pathogenic bacteria Staphylococcus aureus and Pseudomonas aeruginosa for the initial in vitro screening of antimicrobial formulations (Puthia et al., 2020). Employing IVIS imaging, these bioluminescent bacteria were further used by us to evaluate the in vivo efficacy of an antimicrobial formulation in a mouse model of infection using a subcutaneous implant (Strömdahl et al., 2021).
Here, using bioluminescent P. aeruginosa, we describe an in vitro and an in vivo approach to rapidly evaluate the antimicrobial efficacy of the host-defense peptide TCP-25 (thrombin-derived C-terminal peptide). TCP-25 is a thrombin-derived C-terminal peptide (TCP-25, GKYGFYTHVFRLKKWIQKVIDQFGE) that shows strong antimicrobial (Puthia et al., 2020) and antiendotoxic properties (Saravanan et al., 2018). In vivo, TCP-25 protects against P. aeruginosa-induced sepsis and LPS-mediated shock (Papareddy et al., 2010; Kalle et al., 2012). Bioluminescent P. aeruginosa (P. aeruginosa Xen41) is derived from the isolate PAO1 and contains the luxCDABE operon of Photorhabdus luminescens, which is constitutively expressed (Winson et al., 1998; Dusane et al., 2017). Using bioluminescence imaging, we performed longitudinal analysis in both in vitro and in vivo assays, to obtain rapid and valuable results.
Materials and Reagents
Bacterial inoculation loop (Copan, catalog number: 8177CS20H)
Bacterial culture tube, Screw cap, 12 mL (Sarstedt, catalog number: 60.9922.937)
Clear flat bottom 96 well microplate (Greiner Bio-One, catalog number: 655101)
Mepilex® Transfer (Mölnlycke Heath Care, catalog number: 294800)
Biopsy punch, 6 mm (Kai, catalog number: BP-60F)
Petri dish (Sigma-Aldrich, catalog number: P5981)
Alcohol wipes (Cutisoft wipes, BSN Medical, catalog number: 204364)
Gauze swab (SELEFA, ONRMED, Finlan, catalog number: 222002)
BALB/c mice, 8-12 weeks old, male or female (JANVIER LABS, France, BALB/cJRj)
P. aeruginosa Xen41 (PerkinElmer, catalog number: 119229)
BD Bacto Todd Hewitt Broth (Fisher Scientific, catalog number: 249210)
TCP-25 (GKYGFYTHVFRLKKWIQKVIDQFGE)
As an antimicrobial drug, we used the thrombin-derived peptide TCP-25 (synthesized by Biopeptide, San Diego, CA, USA).
VICRYL suture (Johnson & Johnson, Belgium, catalog number: V452H)
Endotoxin free water (Sigma, catalog number: TMS-011-A)
Isoflurane gas (Forane, Baxter, catalog number: CA2L9100)
Tris buffer (10 mM, pH 7.4)
Ketamine (Ketaminol, Intervet, catalog number: 511519)
Xylazine (Rompun vet, BAYER, catalog number: 023572)
Depilatory cream (Veet Hair removal Cream, Reckitt Benckiser, catalog number: 5701092103888)
TCP-25 solution (see Recipes)
TH broth (see Recipes)
Equipment
Surgical scissors (Aesculap, catalog number: BC162R)
Tweezers (Aesculap, catalog number: BD217R)
Shaking incubator (Innova 42, Fisher Scientific, catalog number: 11330025)
In vivo imaging system (IVIS spectrum, PerkinElmer, catalog number: 124262)
Cordless hair clipper (Aesculap, catalog number: GT416)
Spectrophotometer (Genesys 20, Thermo Scientific)
Centrifuge (Sigma 1-6 compact centrifuge, Sigma)
Software
Living Image 4.5.5 Software (PerkinElmer)
Prism, version 8.3.0 (GraphPad Software, LLC.)
Procedure
Preparation of bacteria for in vitro and in vivo experiments
Using a bacterial inoculation loop, pick a colony of P. aeruginosa Xen41 from a stock culture plate and inoculate it in 5 mL of TH broth held in a bacterial culture tube. Keep the cap of the tube loose and incubate in a shaking incubator at 37°C overnight.
The next morning, to refresh the culture, take 100 μL from the overnight culture and add to a new bacterial culture tube with 5 mL of TH broth. Keep the cap of the tube loose and incubate in a shaking incubator at 37°C.
After 1 h of incubation, take the tube and measure OD at 620 nm in a spectrophotometer. The aim is to achieve an OD of 0.4 so, if its less, place the tube back in the incubator and measure the OD after every 15 min, until it reaches 0.4. Then, take the tube and prepare for washing.
Note: The use of a spectrophotometer that accepts 10-15 mL culture tubes helps, as OD can be measured without taking a separate sample.
Centrifuge for 10 min (3,000 × g, room temperature) and remove the supernatant. Add 500 μL of Tris buffer (10 mM Tris, pH 7.4) to the pellet and dissolve by mixing with a pipette. Centrifuge again for 10 min (3,000 × g, room temperature). Remove the supernatant, add 300 μL of Tris buffer to the pellet, and mix with a pipette to obtain a ~109 CFU/mL bacterial suspension.
Note: For each bacterial strain, the OD vs. CFU relationship may be different. Thus, growth curves should be prepared for each bacterial strain.
In vitro assay to determine antimicrobial efficacy
Figure 1 illustrates the experimental set-up and workflow of the in vitro assay.
Note: We use the IVIS imaging system for data acquisition of the in vitro assay with bioluminescent bacteria in a 96-well plate format. Any other luminometer can be used for the plate format assay. The added advantage of the IVIS imaging is that it can also produce a heat map image of each well representing the total flux emitted by the bacteria.
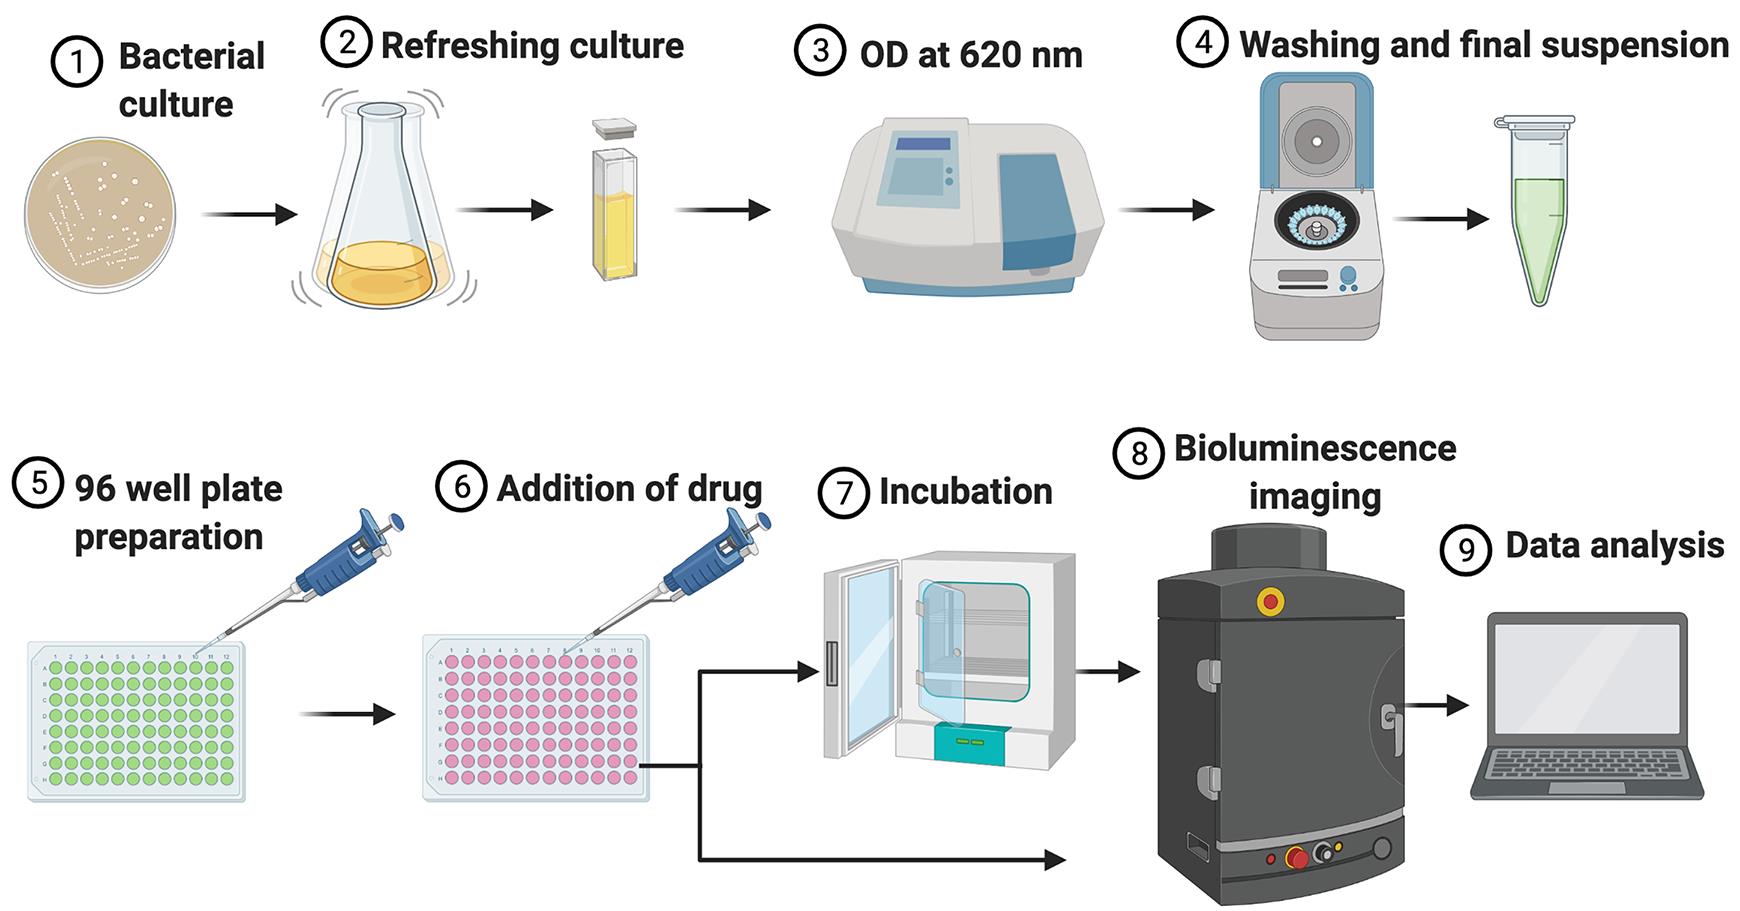
Figure 1. Illustration of the experimental set-up and workflow for the in vitro assay.From the bacterial suspension obtained in Step A4, prepare a suspension of 2 × 10⁸ cfu/mL in Tris buffer.
Add 50 µL (i.e., 107 CFU/mL) of the suspension to each well of a clear 96-well plate.
Note: Use duplicates or triplicates for each condition according to the experimental plan.
Add 250 µL of TCP-25 solution prepared in Tris buffer. Here, to study dose response, we use 5 µM, 10 µM, 20 µM, 50 µM, and 100 µM final concentrations of TCP-25. For controls, add 250 µL of Tris buffer. Mix with a pipette gently to avoid bubble formation.
Note: At this step, in place of the TCP-25 solution, 100 to 250 µL of any other test formulation can be added. If a drug is solubilized in a different buffer than Tris, include the relevant buffer control group in the experimental plan. Use a multichannel pipettor to add the formulation, as this will allow for quick data acquisition to study rapid antimicrobial activity of the drug.
Transfer the plate to the IVIS imaging system. Keep plate aligned with the horizontal ‘field of view’ lines on the stage.
Note: Read the IVIS spectrum user manual before using the IVIS. Start the Living Image software at least 15-20 min prior to imaging and initialize it. The initialization process brings the camera temperature down to -90°C. Stage heating should be set to 37°C.
Set parameters in the IVIS acquisition control panel. Select luminescent (imaging mode), auto (exposure), and C (field of view). Click ‘Acquire’ to start imaging. Immediately after imaging, keep the plate in the incubator (37°C). For kinetic analysis, the plate can be left on the stage too.
Note: We do imaging for 2, 5, 15, 30, 60, and 120 min. As most buffers do not support bacterial growth, additional supplements or growth mediums should be tested and used for experiments requiring longer incubation periods.
Move to data analysis.
Preparation of PU discs for subcutaneous implantation
Figure 2 illustrates the experimental set-up and workflow of the in vivo assay.
Note: Perform this step in a class II biosafety cabinet or use sterile conditions. Discs can be coated with other peptides or drugs as well. Optimize and test the coating method for each compound.
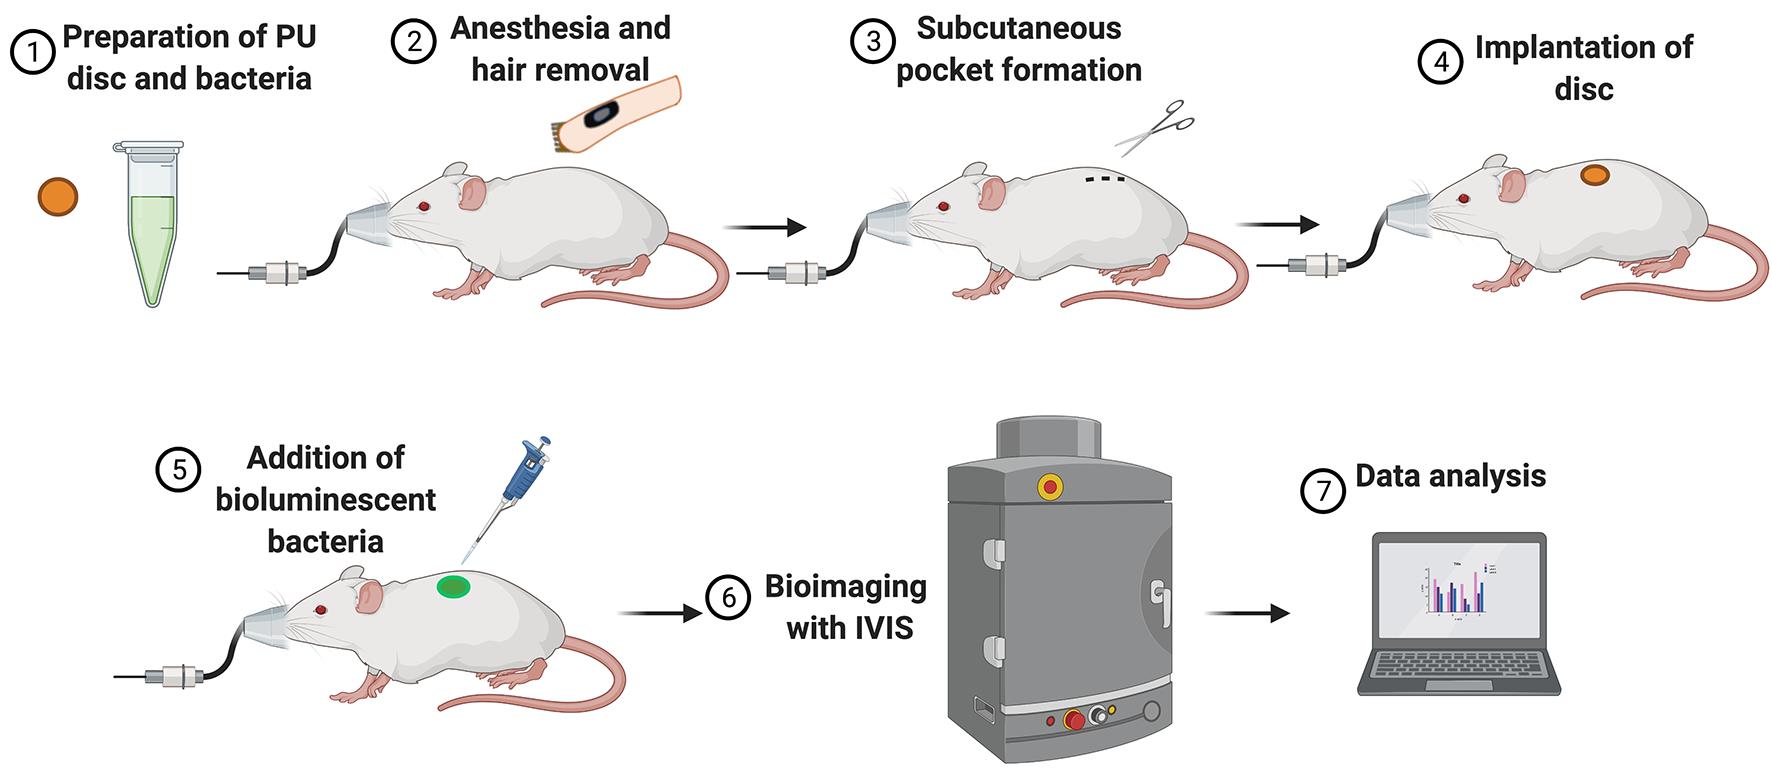
Figure 2. Illustration of the experimental set-up and workflow for the in vivo assay.
Remove the protective plastic coverings from the polyurethane (PU) dressing (Mepilex Transfer). Cut PU discs of 6 mm in diameter with a biopsy punch.
Solubilize the TCP-25 in sterile water to prepare stock solutions (5.0 and 0.5 mg/mL). Use 20 μL of each stock solution to prepare discs with 100 μg and 10 μg TCP-25, respectively.
Keep PU discs in a petri dish and add 20 μL of the stock solution to each PU disc. Add only 20 μL of sterile water to the control discs. Leave the petri dish in a biosafety cabinet and air dry them at room temperature (20°C ± 1°C) for 12 h.
After coating, store discs immediately at -80°C in a moisture free box.
Subcutaneous implantation of PU disc in mice
Note: Disc implantation can be performed under general anesthesia either via parenteral (e.g., ketamine and xylazine cocktail) or inhalation routes (e.g., isoflurane gas). Since this procedure requires a short time (3-5 min), anesthesia with isoflurane is preferable and safer for the animal. Anesthesia with isoflurane requires an anesthesia system capable of delivering isoflurane to the mouse through a mouse nose cone.
In an induction chamber, anesthetize BALB/c mice (8-10 weeks old) with a mixture of 4% isoflurane and oxygen (flow rate: 1.5 L/min). Once anesthetized, remove the mice from the induction chamber and place on the table. Immediately adjust the nose cone to the mouse and maintain anesthesia with 2% isoflurane and oxygen mixture.
Note: Induction of anesthesia can be achieved in the induction chamber of the IVIS or in any other isoflurane-oxygen delivery system. BALB/c mice are preferred for bioluminescence imaging as dark pigments interfere with emitted signals. If unavoidable, C57BL/6 or mice with darker coat color can be used with optimized protocols. Isoflurane is toxic and its use requires following standard safety protocols for your facility.
Using hair clippers, shave hair from the back of the mouse, in an area slightly below the interscapular region. Clean the skin with an alcohol wipe and dry it with sterile gauze.
Note: Fur removal is necessary, as mouse hair can interfere with luminescence signals during imaging. Hair removal can also be achieved with depilatory creams. Depilatory creams should be used at least 2-3 days prior to the disc implantation. If using mice with darker coat color, hair removal with depilatory creams gives better results.
Using scissors, under aseptic conditions, make a 5-10 mm long cut on the skin of the mouse’s back. Use the tip of the scissors to create a small subcutaneous pocket under the skin. With the help of a tweezer, insert a PU disc in the subcutaneous pocket.
Grasp the wound edge with a tweezer and, with the help of a pipettor, add 50 µL of P. aeruginosa Xen41 bacterial suspension (1 × 10⁷ CFU) to the PU disc. Close the skin wound with two simple interrupted sutures using Vicryl.
Note: In our experience, an inoculum of 1 × 10⁶ to 1 × 10⁷ CFU of P. aeruginosa Xen41 gives a good detectable signal during imaging. Factors such as luminescent bacterial strain, mice strain, and mice coat color may affect the signal intensity and, therefore, inoculum size should be optimized in pilot experiments. Skin wounds can also be closed with mouse skin staples or with tissue glue. Use a fresh bacterial suspension. After preparation of the bacterial suspension, keep it on ice for a maximum of 1-2 h.
Return the mice to the cages.
Note: If using general anesthesia or if the procedure takes longer, a heating pad underneath the mice should be used to maintain their body temperature.
In vivo imaging with IVIS
Note: Read the IVIS spectrum user manual before using the IVIS. Start the Living Image software at least 15-20 min prior to imaging and initialize it. The initialization process brings the camera temperature down to -90°C. Stage heating should be set to 37°C.
In the induction chamber, anesthetize mice using 4% isoflurane-mixed oxygen.
Note: Read the IVIS spectrum user manual before using the IVIS.
Transfer the mice to the IVIS imaging chamber. Position them in a prone position and ensure that their noses are inside the nose cones. Immediately start 2% isoflurane supply to the chamber to maintain anesthesia.
Note: A maximum of five mice can be imaged at once. Unless imaging one mouse at a time, including mice from different experimental groups in a single imaging snapshot is appropriate.
Select appropriate parameters for imaging. On the IVIS acquisition control panel, set luminescent (imaging mode), auto (exposure), and D (field of view for 5 mice), or C (field of view for 3 mice).
Note: The ‘imaging wizard’ option can be used to change imaging mode or other parameters.
Click ‘acquire’ in the IVIS acquisition control panel to start imaging.
Note: Increase exposure time to acquire weak bioluminescent signals. In vivo imaging time points should be determined according to the need of the project. In this model, we usually image 15 min, 3, 6, 24, and 48 h after disc implantation. Frequency of imaging should be kept to the minimum, as anesthesia has adverse effect on the health of mice.
Data analysis
Note: For both in vitro and in vivo experiments, data acquired by IVIS is analyzed and quantified using the Living Image Software. Data acquired from IVIS should be saved for subsequent analysis. Depending on the Living Image Software availability, data can be analyzed later in another computer.
Start the Living Image program and open the saved file. Each image, along with its metadata is saved in an individual folder. Open the raw (.txt file) to see an overlay image which is generated from a photographic image and a bioluminescence image. From the tool palette, select a region of interest (ROI) on each well of the plate, for the in vitro experiment, and on each mouse, for the in vivo experiment. The ROI is in an area where luminescent signals are observed or expected. Pick a circle ROI for each well of the 96 well plate. For mice, we chose a circle ROI covering the implanted disc area, but larger than the implanted disc diameter. More than one ROI can be selected in one image. The shape and size of the ROI from one area can be copied and applied to other areas or images.
To obtain the bioluminescence data, select radiance (photons) as units on the main image view and in the ROI measurements window. Click measure ROIs and the measurement data will appear in a new window.
Copy raw data to GraphPad Prism or Excel for statistical analysis. Figure 3 shows results from bioluminescence imaging of a microplate. Figure 4 shows results from in vivo bioluminescence imaging.
Data are presented as means ± SEM or SD. Compare the means between two groups with a Mann-Whitney test. Compare means between more than two groups with a Kruskal-Wallis test. Depending on the experimental plan, other appropriate statistical methods can also be used.
Note: Read the Living Image Software User’s Manual for details on ROI, data measurement, and data display.
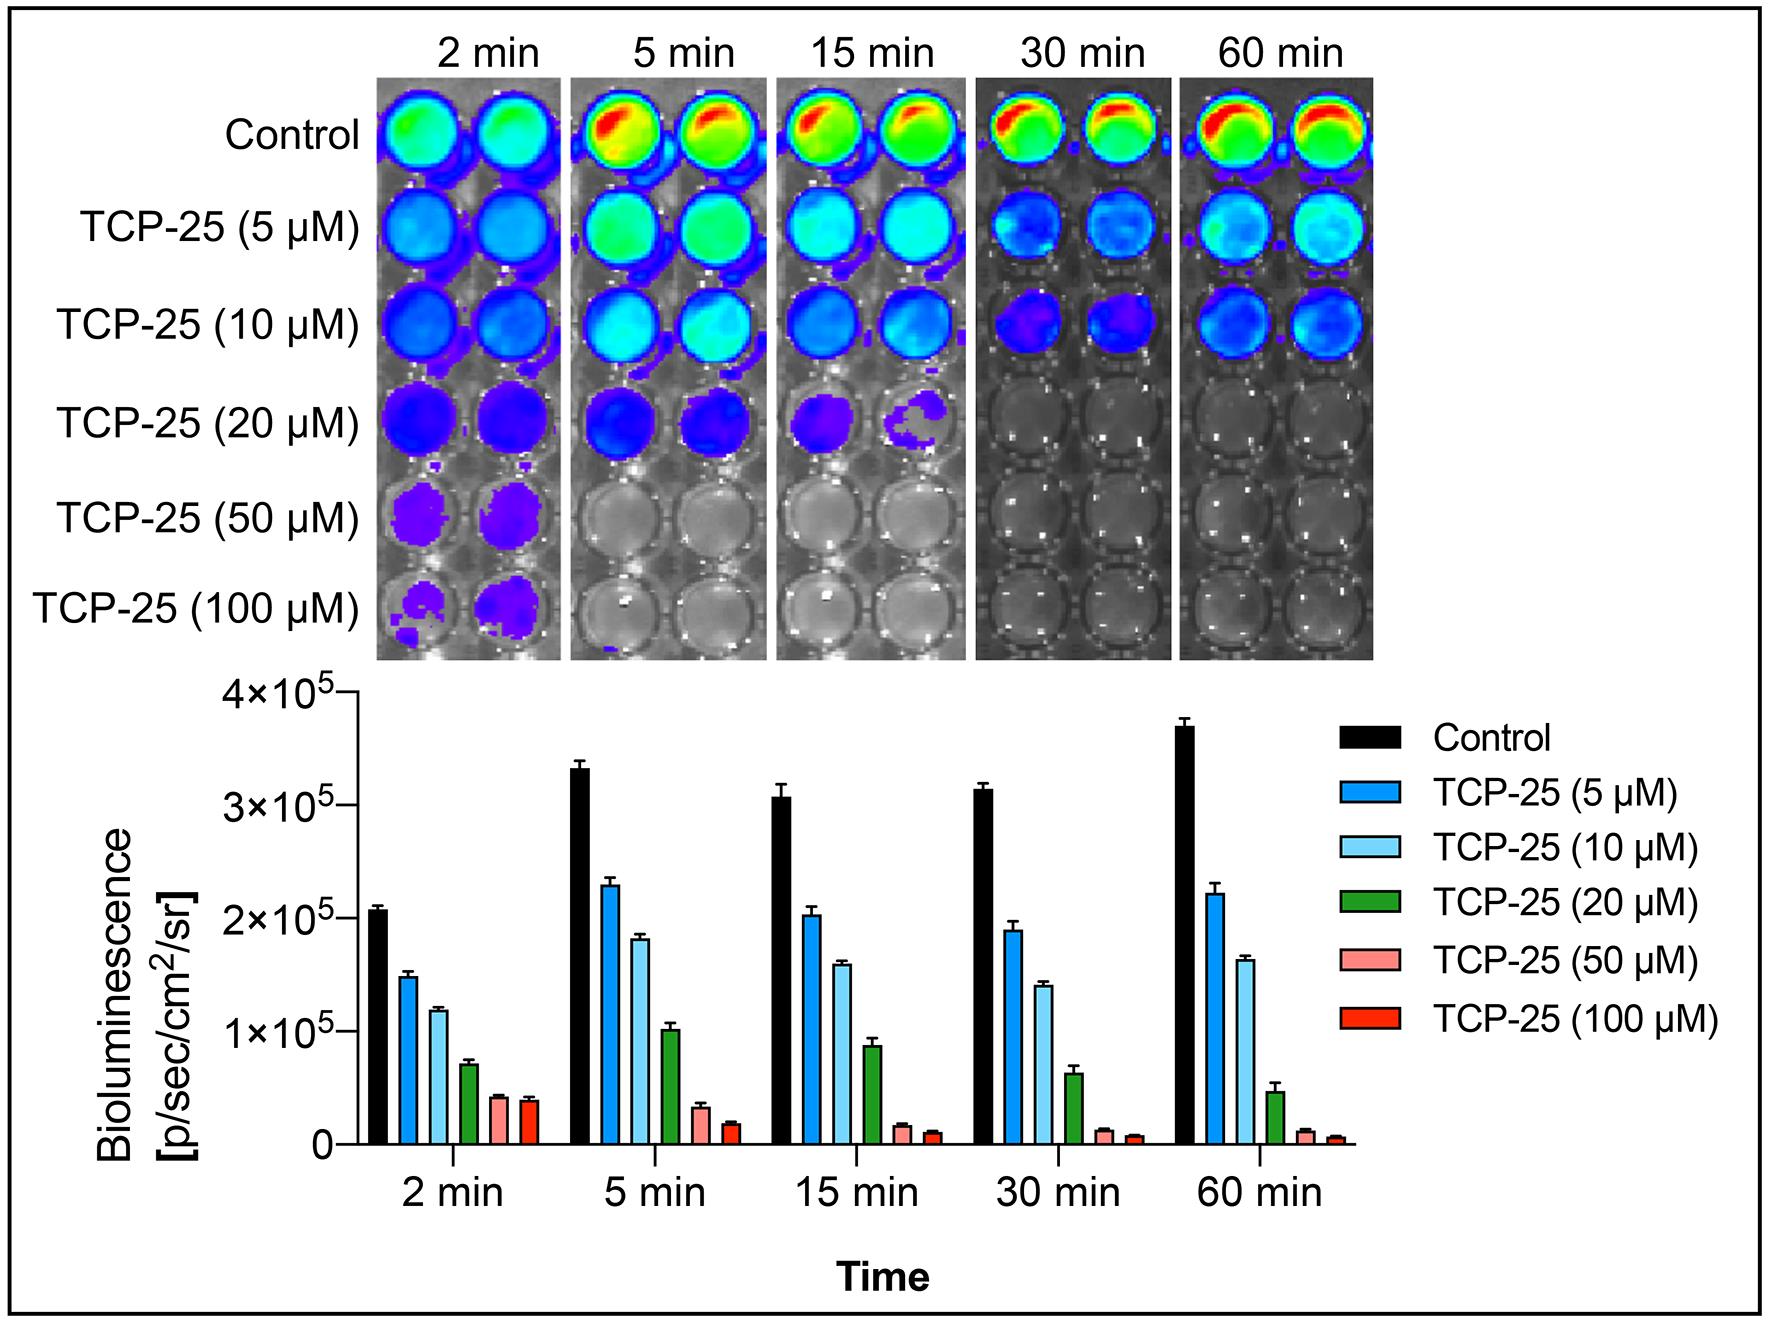
Figure 3. In vitro evaluation of antimicrobial efficacy of TCP-25. In a microplate, bioluminescent P. aeruginosa Xen41 was incubated with increasing concentrations of TCP-25 for various time points and the bioluminescence emission imaged using IVIS. Representative light emission intensity heat-map shows the total flux emitted by the bacteria in each well. The bar chart shows quantification of the bioluminescence intensity emitted by the bacteria.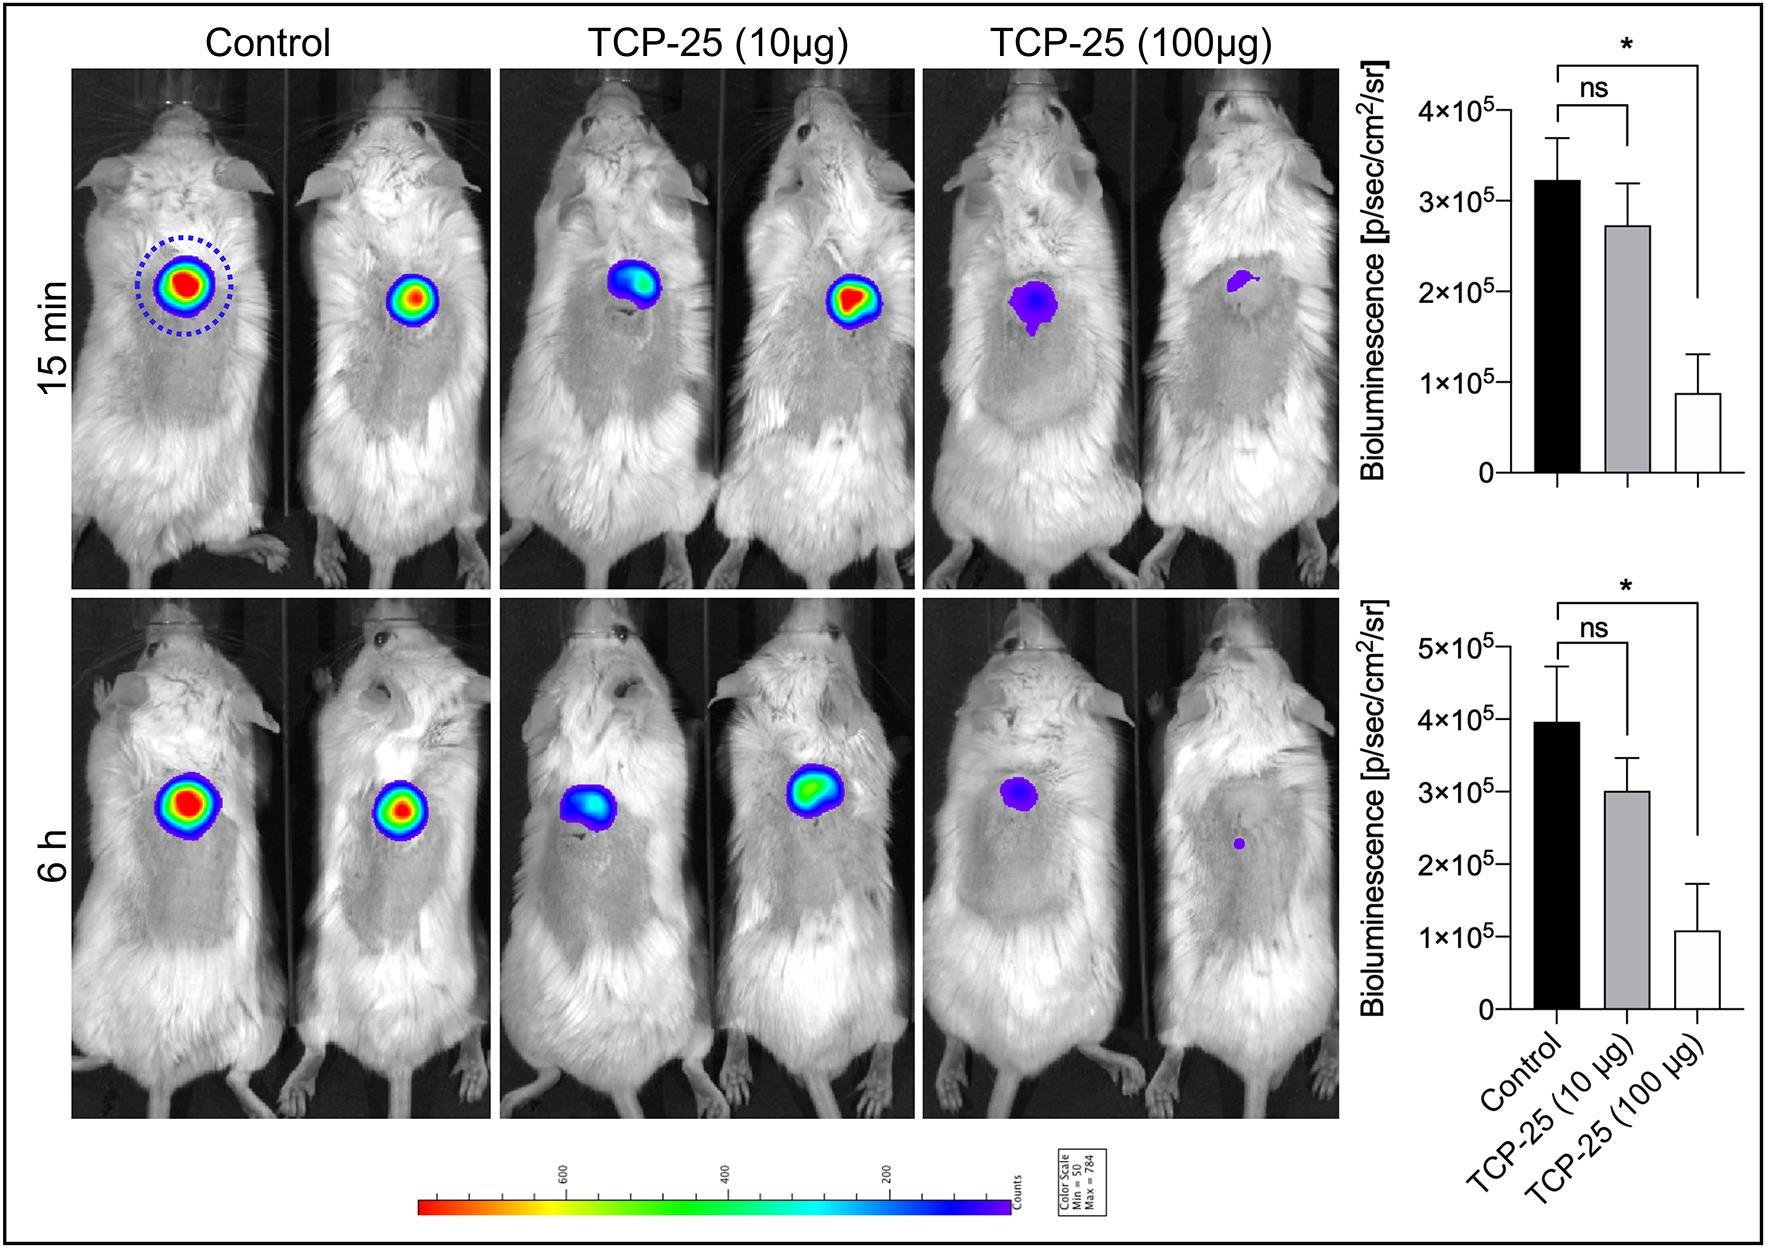
Figure 4. In vivo evaluation of TCP-25 coated PU disc in a mouse model of subcutaneous implant infection. TCP-25 coated PU discs were subcutaneously implanted and infected with bioluminescent P. aeruginosa Xen41. Intensity of the emitted bioluminescence was visualized using IVIS. Representative light emission intensity heat-map overlays are shown for time points 15 min and 6 h. The blue dotted line denotes the region of interest for the quantification. The bar chart shows quantification of the bioluminescence intensity emitted by bacteria. Data are presented as the mean ± SEM (n = 4). P values were determined using a Kruskal-Wallis test followed by Dunn’s post test. *P ≤ 0.05; ns, not-significant.
Notes
Experiments described here using bioluminescent bacteria are reproducible. Sometimes, there can be issues with low luminescent emission from the bacteria. The experimenter should check if the bacterial culture is maintained in a selective media. In addition, results might vary with different strains of mice, thu the in vivo assay should be optimized in pilot experiments with new mice strains.
Recipes
TH broth
Dissolve 30 g of BD Bacto Todd Hewitt Broth powder in 1 L of purified water.
Autoclave at 121°C for 15 min.
Cool to room temperature before use.
TCP-25 solution
Add required amount of TCP-25 in an Eppendorf tube.
Note: We usually make 1 mg/mL or 5 mg/mL fresh stock solutions.
Add Tris buffer (10 mM, pH 7.4).
Vortex the solution briefly.
Centrifuge for 1 min (2,575 × g, room temperature) to remove air bubbles.
Acknowledgments
We thank Drs. Kristina Hamberg and Sofia Almqvist, Mölnlycke Health Care AB (Göteborg, Sweden) for providing the Mepilex PU material. The authors thank Ann-Charlotte Strömdahl for excellent technical assistance We acknowledge BioRender’s assistance in creating cartoons. We have received grants from the Swedish Research Council (project 2017-02341, 2020-02016), Edvard Welanders Stiftelse and Finsenstiftelsen (Hudfonden), the Torsten Söderberg, Crafoord, and Österlund Foundations, Stiftelsen Lars Hiertas Minne, the Royal Physiographic Society of Lund, and the Swedish Government Funds for Clinical Research (ALF). This protocol is derived from the original research paper (Strömdahl et al., 2021).
This protocol is adapted from our previous work (Puthia et al., 2020; doi: 10.1126/scitranslmed.aax6601).
Competing interests
Dr. Schmidtchen is a founder of in2cure AB, a company developing anti-inflammatory peptides for therapeutic applications.
Ethics
Animal experiments were performed according to Swedish Animal Welfare Act SFS 1988:534 and were approved by the Animal Ethics Committee of Malmö/Lund, Sweden.
References
- Balouiri, M., Sadiki, M. and Ibnsouda, S. K. (2016). Methods for in vitro evaluating antimicrobial activity: A review. J Pharm Anal 6(2): 71-79.
- Choy, G., O'Connor, S., Diehn, F. E., Costouros, N., Alexander, H. R., Choyke, P. and Libutti, S. K. (2003). Comparison of noninvasive fluorescent and bioluminescent small animal optical imaging. Biotechniques 35(5): 1022-1026, 1028-1030.
- Dusane, D. H., Diamond, S. M., Knecht, C. S., Farrar, N. R., Peters, C. W., Howlin, R. P., Swearingen, M. C., Calhoun, J. H., Plaut, R. D., Nocera, T. M., Granger, J. F. and Stoodley, P. (2017). Effects of loading concentration, blood and synovial fluid on antibiotic release and anti-biofilm activity of bone cement beads. J Control Release 248: 24-32.
- Kalle, M., Papareddy, P., Kasetty, G., Morgelin, M., van der Plas, M. J., Rydengard, V., Malmsten, M., Albiger, B. and Schmidtchen, A. (2012). Host defense peptides of thrombin modulate inflammation and coagulation in endotoxin-mediated shock and Pseudomonas aeruginosa sepsis. PLoS One 7(12): e51313.
- Karimi, S., Ahl, D., Vagesjo, E., Holm, L., Phillipson, M., Jonsson, H. and Roos, S. (2016). In Vivo and In Vitro Detection of Luminescent and Fluorescent Lactobacillus reuteri and Application of Red Fluorescent mCherry for Assessing Plasmid Persistence. PLoS One 11(3): e0151969.
- Papareddy, P., Rydengard, V., Pasupuleti, M., Walse, B., Morgelin, M., Chalupka, A., Malmsten, M. and Schmidtchen, A. (2010). Proteolysis of human thrombin generates novel host defense peptides. PLoS Pathog 6(4): e1000857.
- Puthia, M., Butrym, M., Petrlova, J., Stromdahl, A. C., Andersson, M. A., Kjellstrom, S. and Schmidtchen, A. (2020). A dual-action peptide-containing hydrogel targets wound infection and inflammation. Sci Transl Med 12(524): eaax6601.
- Saravanan, R., Holdbrook, D. A., Petrlova, J., Singh, S., Berglund, N. A., Choong, Y. K., Kjellstrom, S., Bond, P. J., Malmsten, M. and Schmidtchen, A. (2018). Structural basis for endotoxin neutralisation and anti-inflammatory activity of thrombin-derived C-terminal peptides. Nat Commun 9(1): 2762.
- Strömdahl, A. C., Ignatowicz, L., Petruk, G., Butrym, M., Wasserstrom, S., Schmidtchen, A. and Puthia, M. (2021). Peptide-coated polyurethane material reduces wound infection and inflammation. Acta Biomater 128: 314-331.
- van Oosten, M., Schafer, T., Gazendam, J. A., Ohlsen, K., Tsompanidou, E., de Goffau, M. C., Harmsen, H. J., Crane, L. M., Lim, E., Francis, K. P., et al. (2013). Real-time in vivo imaging of invasive- and biomaterial-associated bacterial infections using fluorescently labelled vancomycin. Nat Commun 4: 2584.
- Winson, M. K., Swift, S., Hill, P. J., Sims, C. M., Griesmayr, G., Bycroft, B. W., Williams, P. and Stewart, G. S. (1998). Engineering the luxCDABE genes from Photorhabdus luminescens to provide a bioluminescent reporter for constitutive and promoter probe plasmids and mini-Tn5 constructs. FEMS Microbiol Lett 163(2): 193-202.
Article Information
Copyright
© 2022 The Authors; exclusive licensee Bio-protocol LLC.
How to cite
Readers should cite both the Bio-protocol article and the original research article where this protocol was used:
- Schmidtchen, A. and Puthia, M. (2022). Rapid in vitro and in vivo Evaluation of Antimicrobial Formulations Using Bioluminescent Pathogenic Bacteria . Bio-protocol 12(2): e4302. DOI: 10.21769/BioProtoc.4302.
- Puthia, M., Butrym, M., Petrlova, J., Stromdahl, A. C., Andersson, M. A., Kjellstrom, S. and Schmidtchen, A. (2020). A dual-action peptide-containing hydrogel targets wound infection and inflammation. Sci Transl Med 12(524): eaax6601.
Category
Drug Discovery > Drug Design
Microbiology > in vivo model > Bacterium
Biological Sciences > Microbiology
Do you have any questions about this protocol?
Post your question to gather feedback from the community. We will also invite the authors of this article to respond.