- Protocols

- Articles and Issues
- For Authors
- About
- Become a Reviewer

Micrografting in Arabidopsis Using a Silicone Chip
(*contributed equally to this work) Published: Vol 11, Iss 12, Jun 20, 2021 DOI: 10.21769/BioProtoc.4053 Views: 8018
Reviewed by: Masashi AsahinaDaisuke TodakaDaniel F. Caddell
Original research article
The authors used this protocol in:
Aug 2020
Advertisement


Protocol Collections
Comprehensive collections of detailed, peer-reviewed protocols focusing on specific topics


Related protocols
Abstract
The micrografting technique in the model plant Arabidopsis has been widely used in the field of plant science. Grafting experiments have demonstrated that signal transductions are systematically regulated in many plant characteristics, including defense mechanisms and responses to surrounding environments such as soil and light conditions. Hypocotyl micrografting is a powerful tool for the analysis of signal transduction between shoots and roots; however, the requirement for a high level of skill for micrografting, during which small seedlings are microdissected and micromanipulated, has limited its use. Here, we developed a silicone-made microdevice, called a micrografting chip, to perform Arabidopsis micrografting easily and uniformly. The micrografting chip has tandemly arrayed units, each of which consists of a seed pocket for seed germination and a micro-path to hold hypocotyl. All micrografting procedures are performed on the chip. This method using a micrografting chip will avoid the need for training and promote studies of systemic signaling in plants.
Graphic abstract:
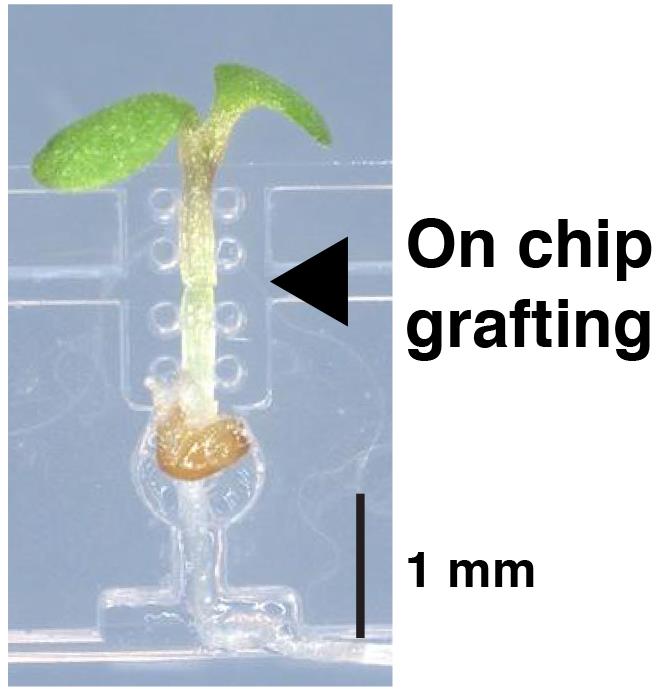
A silicone chip for easy grafting
Background
Grafting has served as a method to assemble two different types of plants, not only in agriculture but also in the field of plant science. Although plants do not have a nervous system, many studies using grafting experiments have demonstrated that plants properly integrate information from the entire body (Wang, 2011; Goldschmidt, 2014; Notaguchi and Okamoto, 2015; Thomas and Frank, 2019). In response to changes in their surrounding environments, plants generate information signals locally at the site of reception and transport signaling molecules systemically to transmit information. Inside plants, organ-to-organ communication is achieved via vascular tissues using a wide variety of molecules such as phytohormones, small RNAs, mRNAs, and proteins.
To study systemic signaling, especially between shoots and roots, micrografting, also known as seedling grafting, has been used. Micrografting is a method for assembling a scion and a rootstock that are cut out of seedlings from different plants. Since the first micrografting technique in the model plant Arabidopsis was demonstrated by Turnbull et al. (2002), micrografting has been widely used in a great number of studies and has contributed to the identification of molecules involved in systemic signaling such as flowering, defense against biotic infection, nutrient absorption and allocation, and drought stress response (Tsutsui and Notaguchi, 2017).
However, the micrografting technique requires dexterous operation and practice to achieve a high rate of success. Several papers have developed improved methods using modified procedures and equipment (Notaguchi et al., 2009), an agar-base support (Marsch-Martínez et al., 2013), and a fine pin to align the scion and the stock (Huang and Yu, 2015); nevertheless, micrografting remains challenging for beginners. To overcome the difficulties in conventional micrografting methods and make this technique accessible to those who study systemic signaling, we recently developed a microdevice made of silicone rubber, called a micrografting chip (Tsutsui et al., 2020). The device was fabricated by Micro-Electro Mechanical Systems using poly(dimethylsiloxane) (PDMS). The micrografting chip supports the manipulation of entire micrografting processes and facilitates the generation of uniformly grafted plants. This method has been applied in studies on plant biology using Arabidopsis mutants (Tsutsui et al., 2020; Shinozaki et al., 2020; Kurotani et al., 2020) and molecular mechanisms of grafting (Notaguchi et al., 2020). Here, we show the procedure for micrografting using a micrografting chip, which is slightly modified in its structure from Tsutsui et al. (2020) (Figure 1).
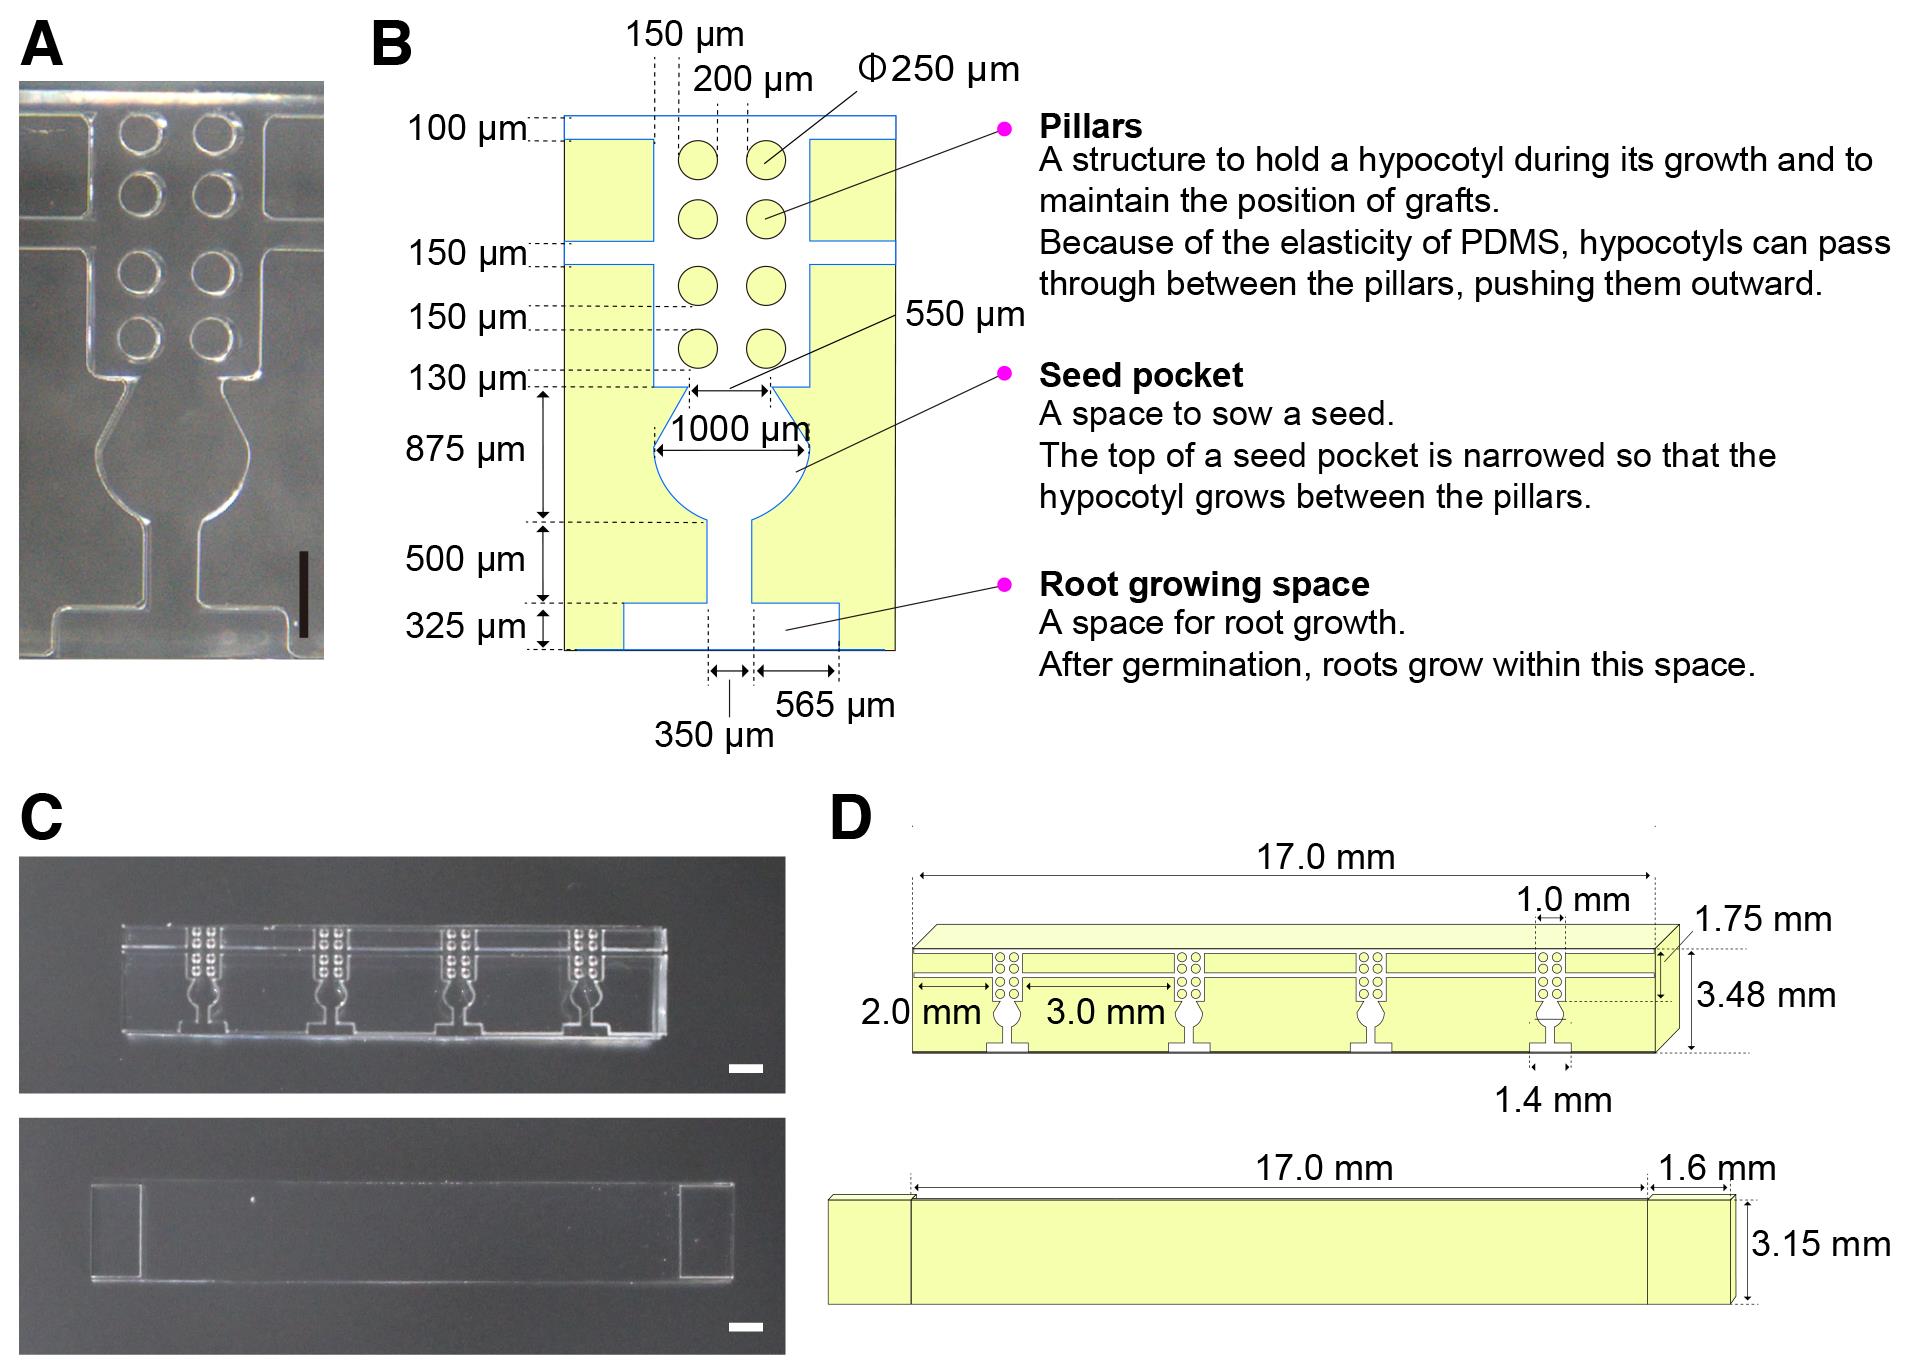
Figure 1. Structure of a micrografting chip. A. Image of one unit of the micrografting chip. B. Layout of the unit of the micrografting chip. C. Images of the micrografting chip (top) and its cover (bottom). D. Layouts of the micrografting chip (top) and its cover (bottom).
Materials and Reagents
Disposable gloves (Kimberly-Clark, catalog number: 52816)
Square Petri dishes with grid (Simport Scientific, catalog number: D210-16)
Petri dishes (ASNOL, catalog number: GD90-15)
1.5 ml tubes (Trefflab, catalog number: 96.07246.9.01)
Disposable surgical scalpel No.11 (KAI, catalog number: 511-A)
Disposable dropper 2 ml (Maruemu, catalog number: 0806-03)
Filter paper No.1, 70 mm (ADVANTEC, catalog number: 00011070)
Hybond-N+ membrane (GE Healthcare, catalog number: RPN119B)
Dissecting needle
Surgical tape (3M, catalog number: 1530-0)
Aluminum foil (UACJ)
KimWipes (CRECIA, catalog number: S-200)
Seeds of Arabidopsis thaliana
Note: Fresh seeds must be used. For successful micrografting, a scion and a stock at the same developmental stage are required. Old seeds show variation in the timing of seed germination and subsequent growth, hampering graft establishment. We used Arabidopsis thaliana ecotype Col-0 mainly, but other ecotypes can also be used.
Murashige-Skoog medium (Duchefa Biochemie, catalog number: M0221)
Sucrose (WAKO, catalog number: 190-00013)
Agar powder (Nacalai tesque, catalog number: 01028-85)
MES hydrate (Sigma-aldrich, catalog number: M2933)
76.9-81.4%(v/v) ethanol (KANEICHI, catalog number: 4987556210311)
Potassium hydroxide (WAKO, catalog number: 168-21815)
Bleach (KAO, catalog number: 017598)
1 N KOH (see Recipes)
1% agar plates (see Recipes)
2% agar plates (see Recipes)
Hybond-N+ membrane (GE Healthcare, catalog number: RPN119B)
0.4% agar for resuspension of sterilized seeds (see Recipes)
Filter paper (see Recipes)
Sterilized water (see Recipes)
Bleach solution (see Recipes)
Sterilized seeds (see Recipes)
Equipment
pH meter (HORIBA, catalog number: F-51)
Pipette P20 (INMEDIAM, catalog number: FA10003P)
Micrografting chip (Bio Medical Science Inc., catalog number: BGA-GRC020) (Figure 1)
Note: We used the micrografting chips as disposable. The purchased chips are sterilized and ready to use after opening the package.
Super clean zone creator (Koken, catalog number: KOACH T 500-F)
Dissecting microscope (OLYMPUS, catalog number: SZX10)
Precision tweezers (Inox-biology, catalog number: 11252-00)
Vannas spring scissors (Fine Science Tools, catalog number: 15019-10)
Plant growth chamber (Biotron, catalog number: LPH-411S)
Bio-clean bench (AIRTECH, BLB-1306)
Procedure
Note: All procedures using a microscope should be performed under sterile conditions. We use a super clean zone creator KOACH T 500-F (Koken) that provides flow of filtered air (Figure 2A). A bio-clean bench can be its substitute. In all procedures, an experimenter must wear gloves and sterilize all equipment and areas by wiping with tissue paper saturated with 70% ethanol.
In the case that it is difficult to perform grafting under sterile conditions, the sucrose content of the agar media needs to be reduced to 0.2% or less. Even if it is difficult to prepare entirely sterile conditions, seed sterilization, wiping equipment with ethanol, and cleaning experimental spaces as much as possible are still preferred.
Seed sterilizing
Place dozens of seeds into a 1.5-ml tube, resuspend them in 1 ml 10% bleach solution (the effective chlorine concentration is 0.6%) for 5 min, and wash with 1 ml sterilized water 5 times.
After sterilization, resuspend the seeds in 0.4% agar and place them in dark at 4°C for at least three days before sowing, but do not exceed 1 week.
Note: To synchronize the timing of seed germination, incubation at 4°C for more than three days is important.
Seed sowing (Day 1)
Leave 1% agar plates at room temperature.
Separate Hybond-N+ membrane from its mat and place the membrane on the 1% agar plate (Figure 2B).
Place several micrografting chips on the membrane.
Sow a seed (that has been stratified at 4°C for more than 3 days in 0.4% agar) onto a seed pocket and load 0.4% agar onto the pocket and a root path using a Pipette P20 (Figure 2C).
Steps B4-B6 are demonstrated in Video 1.
Note: To avoid confusion, the seeds for scions and stocks must be sown separately on different chips.
 Video 1. Seed sowing on a micrografting chip
Cover the chip with the chip cover (Figure 2C).
Place the chip upright on the membrane (Figure 2B).
Seal the plate with surgical tape.
Wrap the plate in aluminum foil.
Note: To ensure that the seedlings get etiolated, wrap the plate doubly. Otherwise, a crack of light will prevent the seedlings from being etiolated and the cotyledons cannot pass through a micro-path in the chip during incubation.
Incubate the plate at 22°C in a growth chamber for about 48-58 h.
Note: From Steps B7 to B9, handle the plates with care; do not lay the chips down.
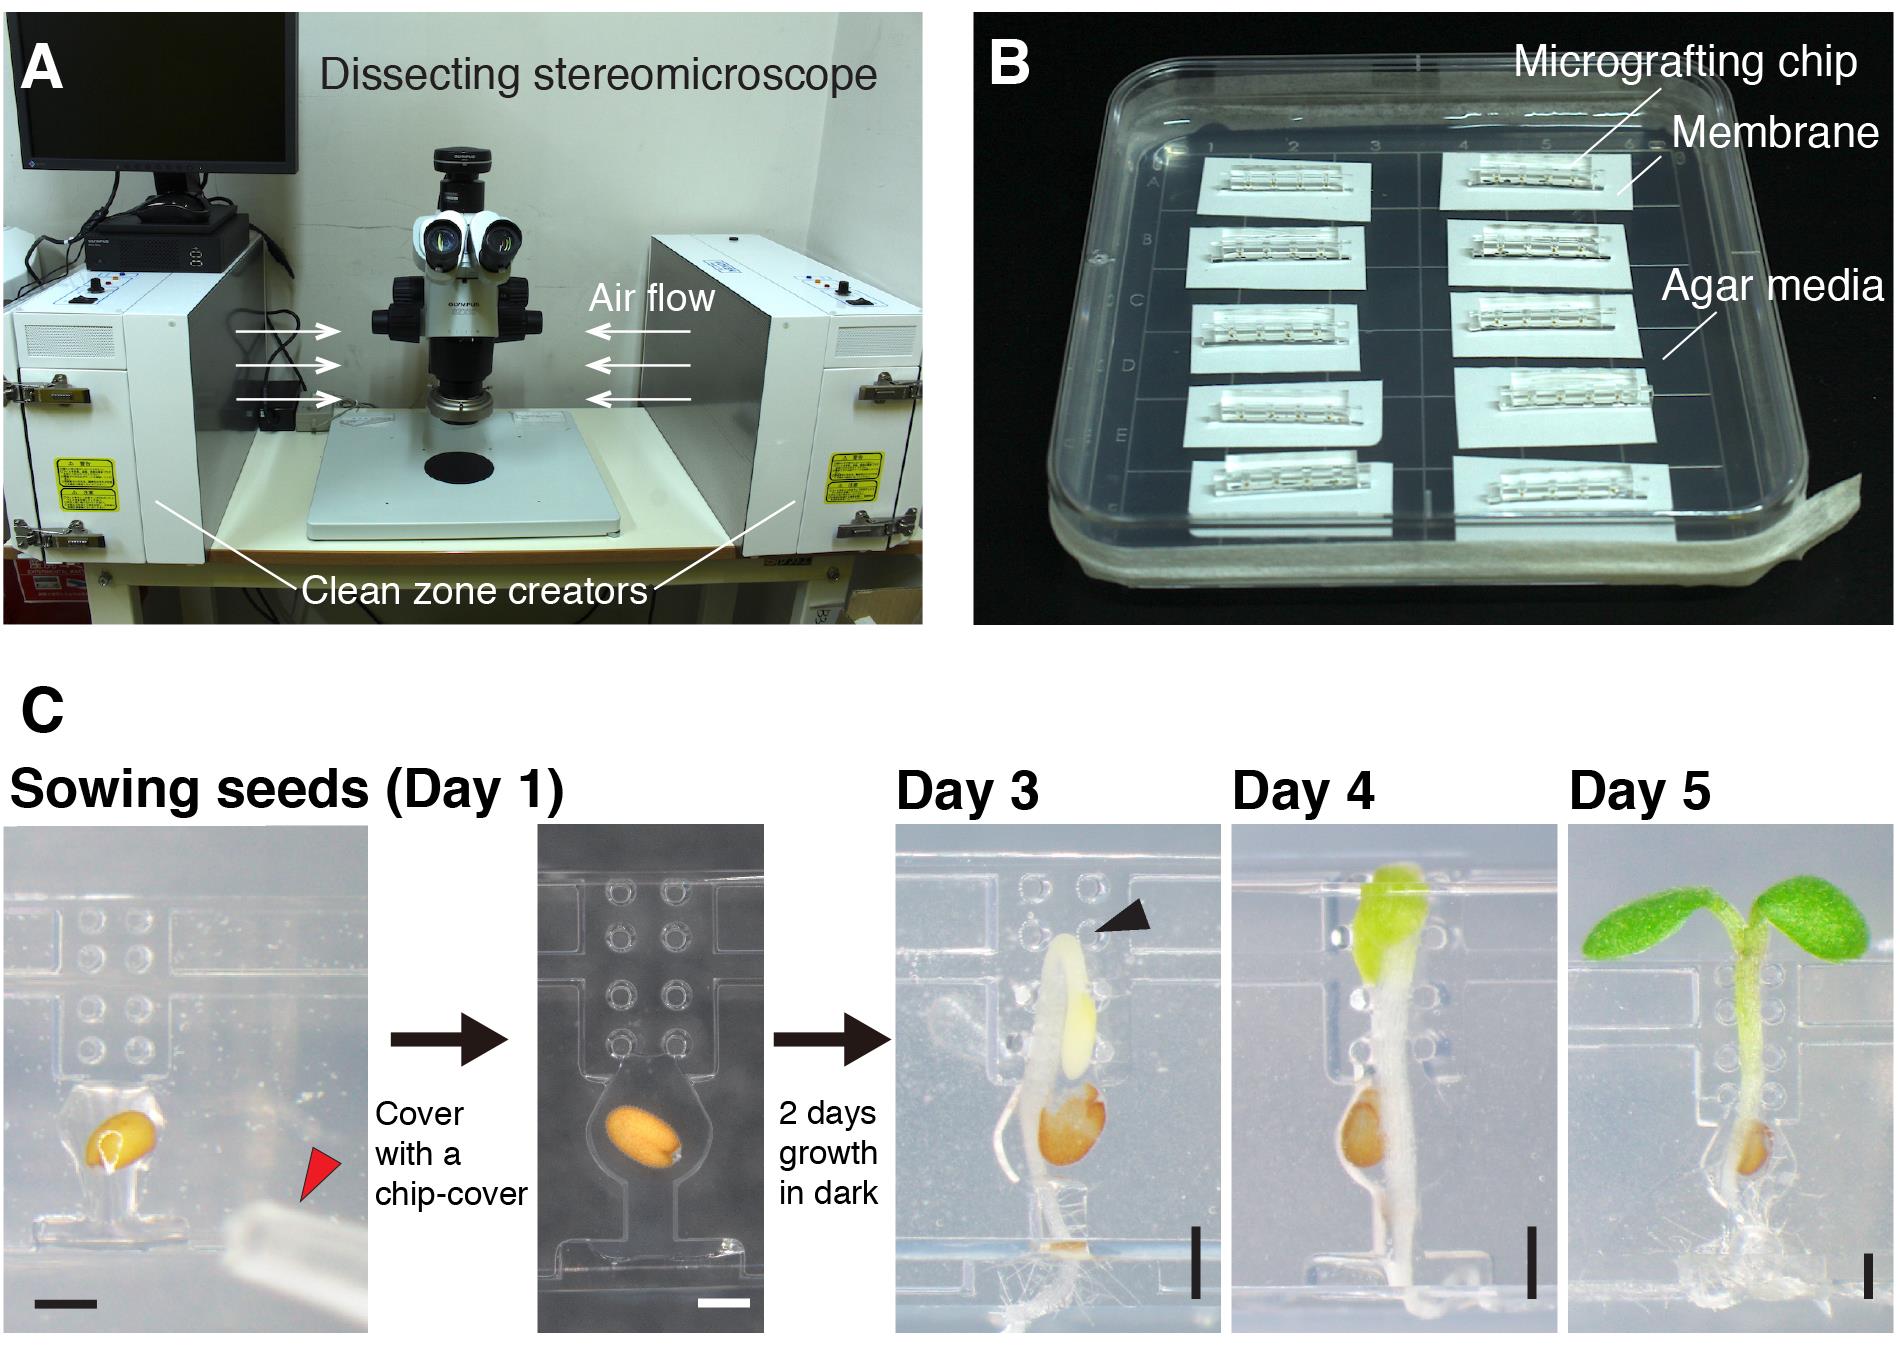
Figure 2. Overview of micrografting procedures. A. A workbench for micrografting. B. Micrografting chips were placed on 1% agar media after sowing seeds. Up to 10 chips (40 seedlings) can be placed on a single plate. C. The steps of micrografting. The red arrowhead on Day 1 indicates the end of a pipette tip for seed sowing. The black arrowhead on Day 3 indicates a hook of the seedling incubated under dark conditions. Scale bars: 500 µm.
Transferring to light conditions (Day 3)
Take the plates from the growth chamber and unwrap the aluminum foil.
Place the plate at 22°C under continuous light for about 48 h.
Note: Since the timing of germination and the growth speed of germinated Arabidopsis seedlings depend on seed freshness, genetic strains, and experimental environmental conditions, it is important for each experimenter to find the optimal incubation period in the dark by initially observing the growth of etiolated seedlings. When the hook is passing by the second top pillars, it is the best timing to unwrap the foil for that seedling (Figure 2C, Day 3). In our case, we opened the lids of the dishes temporally and observed the plant growth using a stereomicroscope under sterile conditions. More practically, we also observed the seedling growth with the naked eye. Since the timing of seed germination and the growth pace of seedlings vary among seedlings, the foil should be removed at the time when the hooks of the “majority” of the seedlings are passing by the second top pillars as described above. In our case, we obtained around 60-90% of seedlings growing properly at the grafting step. Waiting for slow-growing seedlings is not advised, since the hypocotyls of the remaining seedlings will elongate too much. As another indicator of optimal timing to uncover the foil, we used the emergence of cotyledons from the top of the chips. When we saw a couple of etiolated seedlings in the dishes start to expand their cotyledons above the chip, it was good timing. If you see none of the seedlings appearing from the chip, cover the plate again and extend the incubation.
Micrografting (Day 5)
After four days of incubation (two days in the dark and two days in the light), a seedling passes through the chip and the cotyledons expand over the chip as shown in Figure 2C, Day 5.
Note: The following procedures must be performed quickly to avoid desiccation; within 5 min for each chip. Desiccation, especially at the graft junction, significantly hampers graft establishment.
Leave 2% agar plates at room temperature and place Hybond-N+ membrane on them.
Notes:
The 2% agar plates are used for post-grafting growth to prevent too high a humidity in the plates.
The Hybond-N+ membrane is used to avoid root growth into the medium and make transplanting easy. In our tests of several kinds of filter membrane, the Hybond-N+ and cellulose nitrate filter membranes did not inhibit plant growth.
Place an autoclaved filter paper onto a Petri dish and wet the paper slightly with sterilized water using a disposal dropper (Figure 3A). Before use, wash the inside of the dropper a few times with sterilized water.
Note: Excessive amounts of water inhibit graft establishment. The recommended amount of water is around 1.1-1.2 ml per filter paper.
Transfer the chip onto the wet filter paper and lay down it (Figure 3B).
Remove the chip cover (Figure 3B, Video 2).
Note: Chip covers will not be used in the following process.
Video 2. Removal of a chip coverFor Steps D5-D10, the procedures are shown in Video 3.
Video 3. Micrografting procedureCut the hypocotyl along the slit using the tip of a disposable surgical scalpel for the preparation of both stock and scion parts (Figures 3C and 3D).
Notes:
A sharp scalpel is essential for successful grafting. If the scalpel is blunt, use a new one; otherwise, a deformed cut end caused by a blunt scalpel will markedly decrease the success rate of micrografting.
If the seedlings are not well secured in the chips, push the hypocotyls gently into the micro-paths with tweezers and then perform grafting.
For stock preparation, remove its cut shoot (Figure 3C).
Pick up a scion, a shoot, from a chip by grabbing one of the cotyledons with precision tweezers and transfer it onto the stock placed on another chip (Figures 3C and 3D).
Note: Do not grab the scion forcefully with the tweezers. Large damage causes failure of grafting.
Align the hypocotyl of the scion with that of the stock with tweezers by gently touching the scion and the stock to adjust their positions (Figures 3C and 3D).
If required, remove the water around the graft junction using a twisted KimWipe.
Note: Residual water on the surface of grafted seedlings, especially at the graft junction, inhibits graft formation and increases the frequency of adventitious root formation. Here, there is no need to cover the grafted plants with a chip cover because it keeps the graft junction humid and inhibits graft establishment.
Place the chip upright.
Transfer the chip carefully onto the membrane on the 2% agar plate prepared in Step D1, so that the grafted plants are not misaligned.
Seal the plate with surgical tape.
Place the plates in the growth chamber at 27°C under continuous light conditions for four days.
Note: In the case that the light intensity is high in the growth chamber, cover the plates with a KimWipe to reduce the intensity and decrease photodamage to the grafted seedlings. In our case, we set the growth chamber at 100-140 μmol·m-2·s-1 continuous light conditions and cover the plates with a sheet of Kimwipe, reducing the intensity to 60-80 μmol·m-2·s-1.
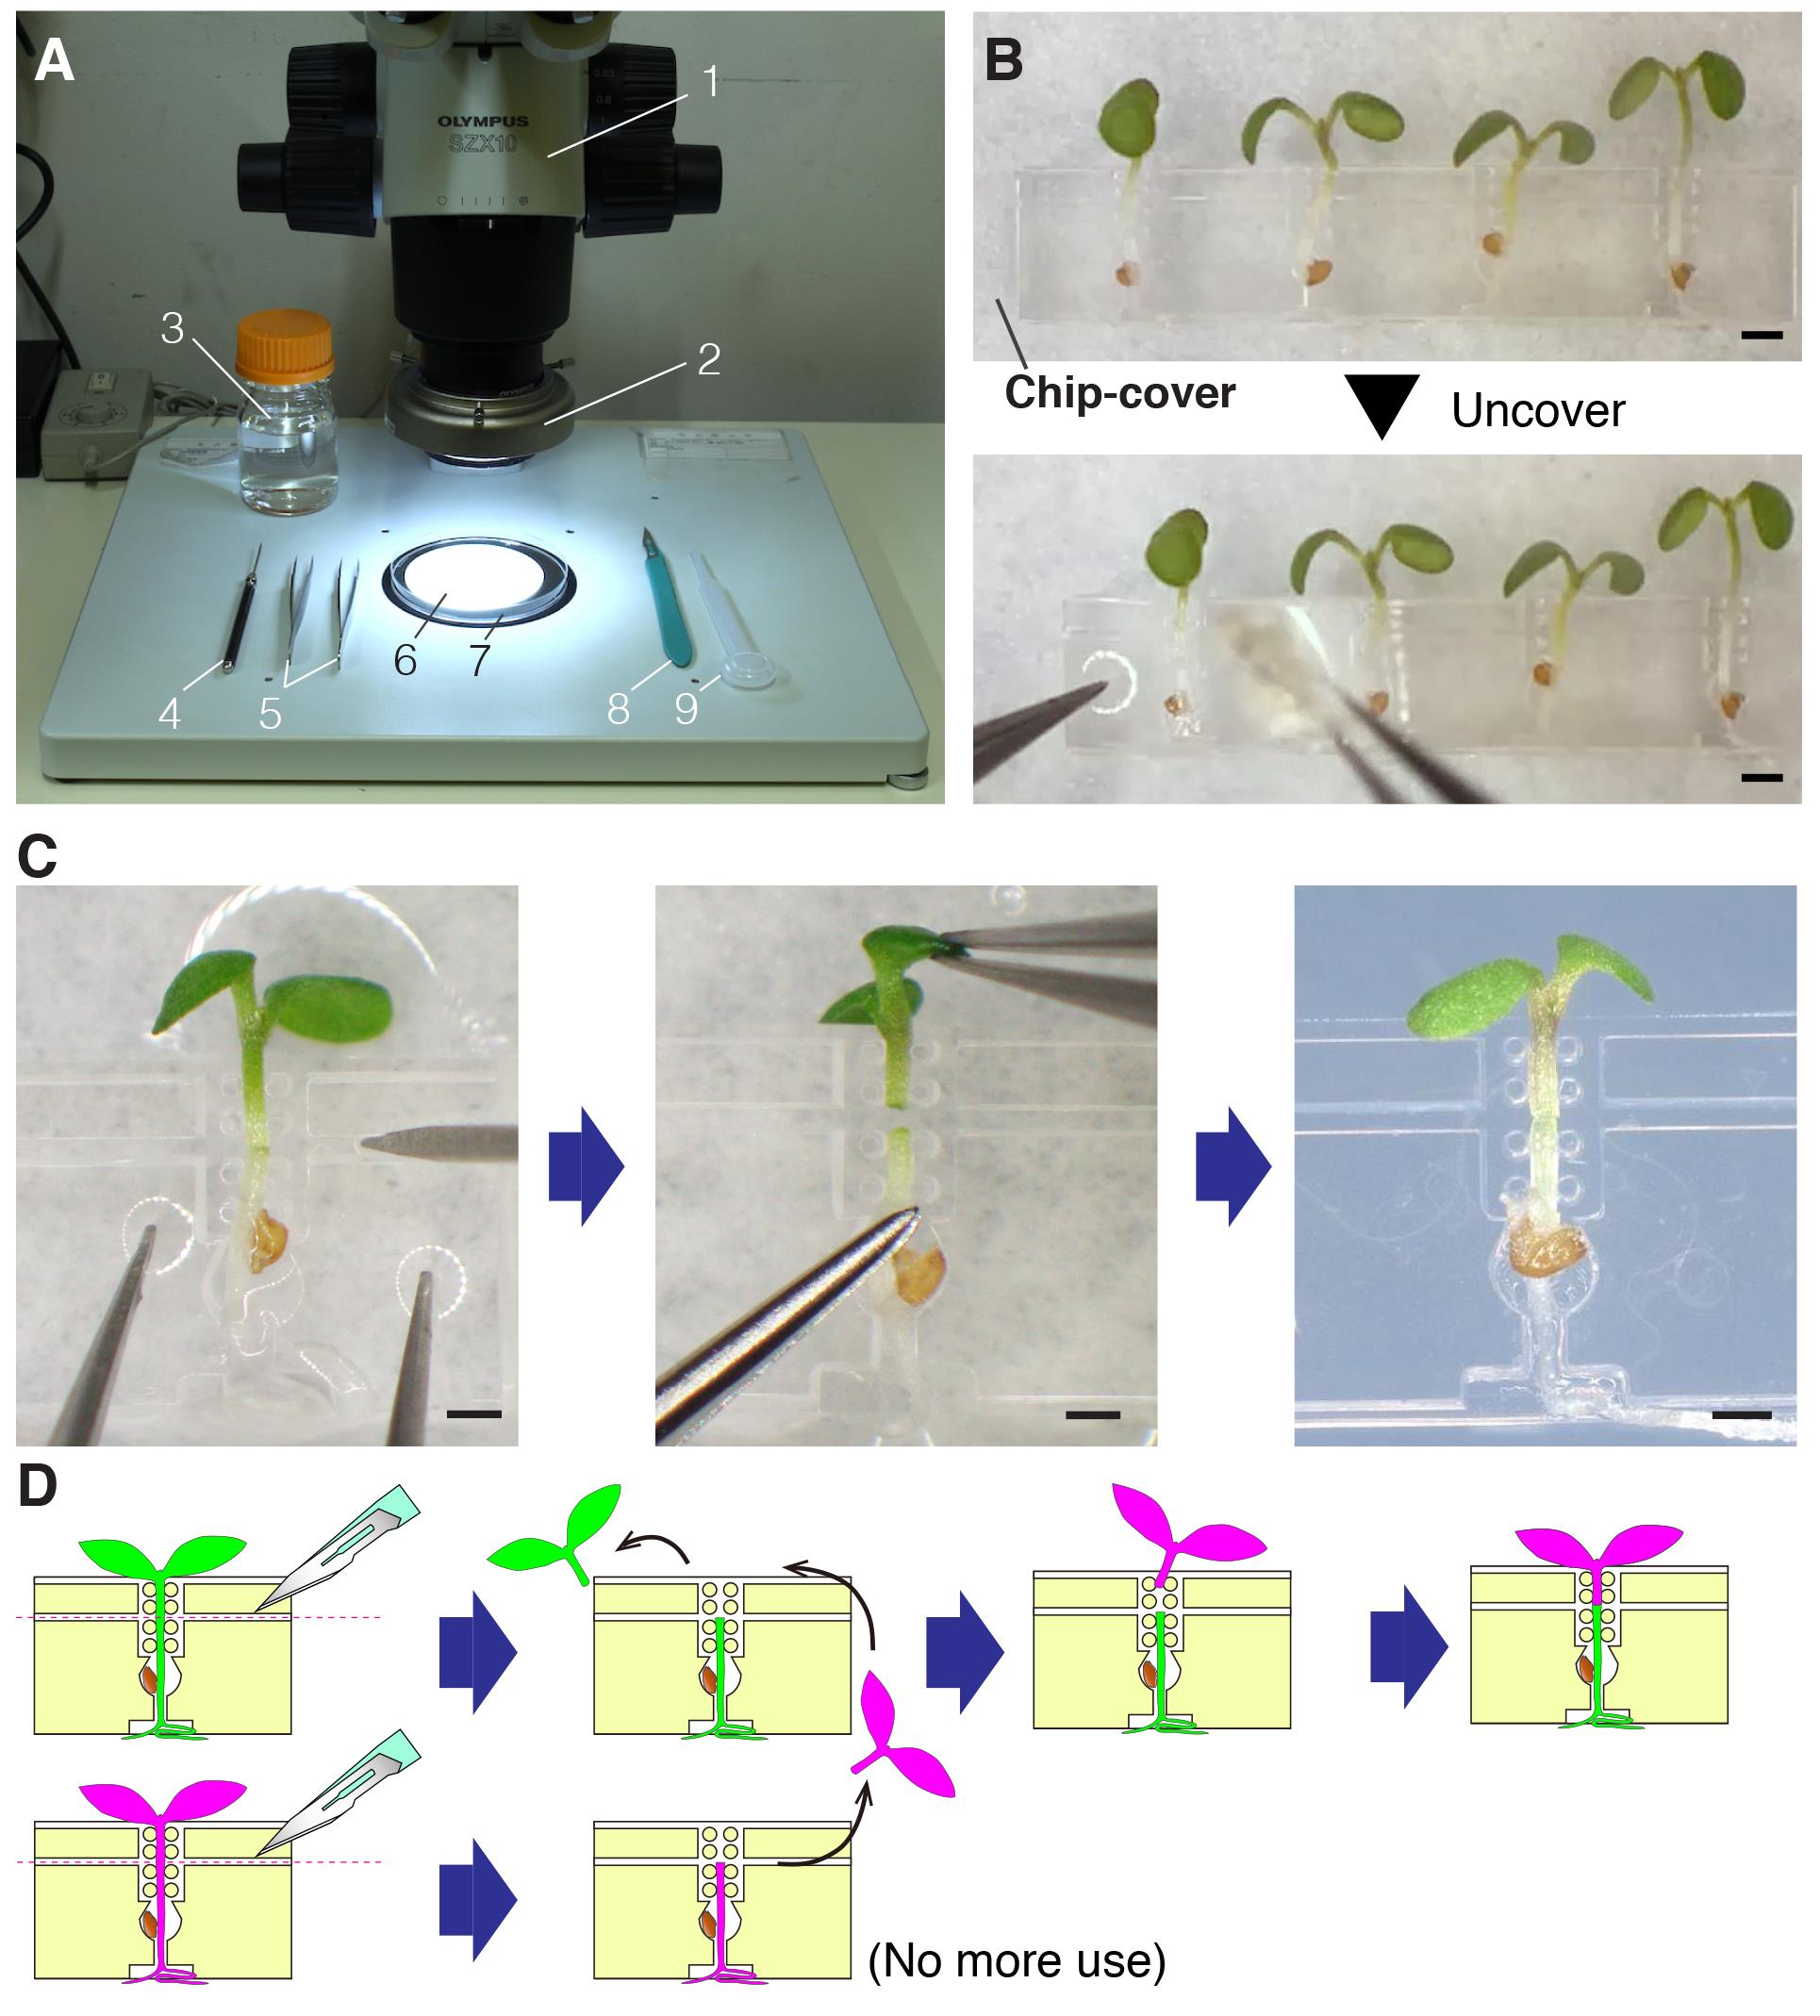
Figure 3. Micrografting. A. The workbench setting for micrografting. 1, a dissecting microscope; 2, an LED light; 3, a bottle of sterilized deionized water; 4, a dissecting needle; 5, precision tweezers; 6, an autoclaved filter paper; 7, a Petri dish; 8, a disposable surgical scalpel; 9, a disposable dropper. B. A micrografting chip before (top) and during (bottom) removal of the chip cover. C. The detailed procedures for the micrografting steps on Day 5. Scale bars: 500 µm. D. Illustration of the micrografting procedures.
Removal of adventitious roots (Day 9, 4 days after grafting)
Adventitious roots frequently emerge on the scion hypocotyls. The following steps are designed to remove them and we strongly recommend performing these because adventitious roots hamper graft formation.
Note: The following procedures must be performed quickly to avoid desiccation; within 5 min for each chip.
Take the plates from the growth chamber and sterilize them by wiping the surface with ethanol and tissue paper.
Place the plates under the stereomicroscope and open the lid.
For Steps E3 to E5, the procedures are shown in Video 4.
Video 4. Removal of adventitious roots from scionsLay the micrografting chips down using tweezers and check whether adventitious roots are formed on the hypocotyl of the scion.
If adventitious roots are growing on the scion, cut and remove them using Vannas spring scissors or smash them with the tip of the tweezers (Figure 4A).
Place the micrografting chip upright.
Seal the plate with surgical tape.
Wrap the plates in a KimWipe to protect the grafted plants from strong light and place them in the growth chamber at 27°C under continuous light for two days.
Pulling the grafted plants out of the micrografting chip (Day 11, 6 days after grafting)
Leave the new 1% agar plates at room temperature.
Take the plates from the growth chamber and sterilize them by wiping the surface with ethanol and tissue paper.
Place the plates on the stereomicroscope and open the lid.
For Steps F4 to F6, the procedures are shown in Video 5.
Pull the grafted plants from the micrografting chip carefully using a dissecting needle or tweezers.
Video 5. The transfer of grafted plants onto a new plateObserve the grafted plants. If you see adventitious roots in the scion, remove them using Vannas spring scissors or tweezers.
Transfer the grafted plants onto the new 1% agar plate (Figure 4B).
Seal the plate with surgical tape.
Place the plates vertically in the growth chamber at 22°C under continuous light.
Confirmation of graft establishment (Day 15, 10 days after grafting)
If you observe healthy root growth on the rootstock and true leaf expansion on the scion without further adventitious root formation (Figure 4C), the grafting is judged to be established, and the grafted plants can be transferred onto the soil/media for subsequent experiments.
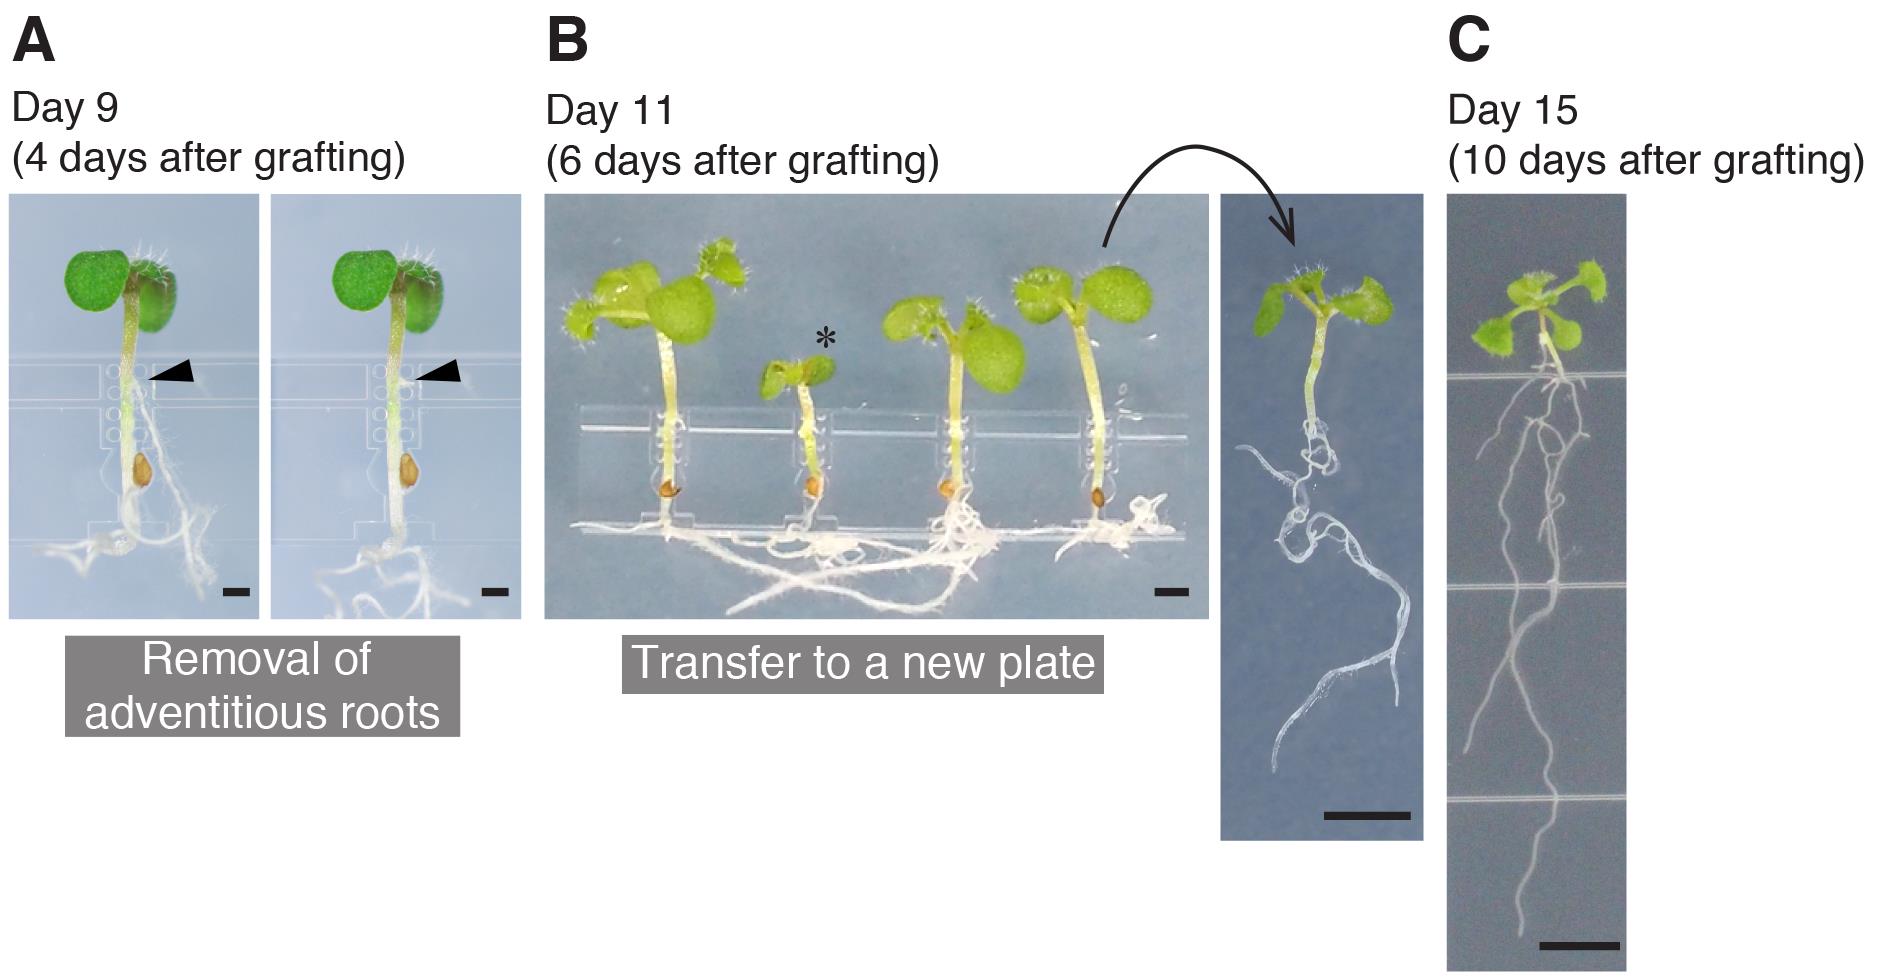
Figure 4. The procedures performed until graft establishment. A. A grafted seedling at 4 days after grafting, before and after removal of adventitious roots. The arrowheads indicate the position of an emerged adventitious root. B. Grafted seedlings at 6 days after grafting. The successful grafts were transferred to a new plate. The asterisk indicates an unsuccessful graft. C. The grafted seedling at 10 days after grafting showing vigorous growth of true leaves and roots. Scale bars: 500 µm (A); 1 mm (B) and (C); 5 mm.
Data analysis
We described the protocol for our micrografting chip. We previously reported that the success rate of micrografting using our chip was around 48-88% (Tsutsui et al., 2020), and this success rate bears comparison with that of conventional micrografting methods in Arabidopsis (Turnbull et al., 2002; Yin et al., 2012; Marsch-Martínez et al., 2013). Using this system, we demonstrated the utility of the chip by testing the effect of grafting conditions and investigating the role of genes using the mutant lines (Tsutsui et al., 2020).
Notes
During all processes until the grafted plants are pulled out of the chip (Day 11, 6 days after grafting), the plates should always be kept horizontal and handled carefully to prevent laying the micrografting chips down.
To obtain seedlings growing through the micropath of the micrografting chip, use enough grown large-sized seeds. To obtain well-grown large-sized seeds, the plants for seed propagation must be grown with adequate water, serving to form a robust root system and thick stalks. Arabidopsis grows well under dry conditions rather than wet conditions. In addition, keep watering until most of the seeds are mature; otherwise, immature seeds are formed and mixed in the seed pool.
When sowing seeds in seed pockets, completely fill the spaces in the pocket and the root path with 0.4% agar. Too little a supply of 0.4% agar causes incomplete seedling growth, and too much a supply of 0.4% agar induces floating of the seeds from the pocket when covering with a chip cover.
Sometimes 0.4% agar turns into a solid. After 0.4% agar is autoclaved and cooled at room temperature while stirring, it will be in liquid form. If 0.4% agar still becomes solid, it can be used after stirring or reducing the agar concentration.
Sometimes the chips are lifted up or fall backward as a result of the force of seedling growth. In these cases, the roots are detached from the media and the seedling growth is arrested. Moreover, the hypocotyls start to bend toward the outside of the micropath by gravitropism. These seedlings are not suitable for grafting. If the chips only lay down for a short period and there are no such problems, it is possible to continue the grafting procedures.
The chip cover should be aligned with the line of the top edge of the micrografting chip. When removing the chip cover, seedlings may come off the micrografting chip by attaching themselves to the cover. To avoid this, remove the chip cover gently from one side. Even if the seedlings come off, place the hypocotyls back into the micropaths of the chips and perform grafting.
To minimize damage to the seedlings, try not to touch the hypocotyls, especially around the grafting area and do not pluck the seedlings. When manipulating and adjusting the position of the seedlings, grab only one of the cotyledons, hook the seedling with the tweezers or gently push the seedlings to adjust their position using the side of the tweezers, not the tip.
After grafting, the scions sometimes float due to static electricity on the Petri dishes and attach to the lids. Such scions cannot be restored. To avoid these accidents, it is effective to rinse the inside of the lids with sterile water before use.
Recipes
1 N KOH
Dissolve 2.8 g potassium hydroxide in 50 ml deionized water.
1% agar plate
Dissolve 2.3 g Murashige-Skoog medium, 5 g sucrose, and 0.5 g MES hydrate in 1 L deionized water.
Adjust pH to 5.7 using 1 N KOH.
Add 10 g agar powder and autoclave.
Cool the medium to around 60°C and pour 33 ml into a square Petri dish under a bio-clean bench.
To remove the excess moisture from the plates, dry them for 30-45 min with their lids halfway open.
The plates can be stored at 4°C for up to 1 month.
2% agar plate
Dissolve 2.3 g Murashige-Skoog medium, 5 g sucrose, and 0.5 g MES hydrate in 1 L deionized water.
Adjust pH to 5.7 using 1 N KOH.
Add 20 g agar powder and autoclave.
Cool the medium to around 60°C and pour 33 ml into a square Petri dish under a bio-clean bench.
To remove the excess moisture from the plates, dry them for 30-45 min with their lids halfway open.
The plates can be stored at 4°C for up to 1 month.
Hybond-N+ membrane
Cut the Hybond-N+ membranes into squares of approx. 1 cm × 3 cm and place them into a glass Petri dish. Then, autoclave the membrane pieces and dry them in a 60°C drying oven overnight.
0.4% agar for resuspension of sterilized seeds
Dissolve 0.4 g agar powder in 100 ml deionized water and autoclave it with a stir bar. Cool down the autoclaved 0.4% agar to room temperature while stirring, which prevents the medium from jelling.
Filter paper
Place the filter papers into a glass Petri dish, autoclave them, and then dry them in a 60°C drying oven.
Sterilized water
Autoclave deionized water.
Bleach solution
Mix 1 ml bleach with 9 ml sterilized water. This solution must be prepared at the time of use and cannot be stored.
Acknowledgments
The present procedures are derived from Tsutsui et al. (2020). This protocol was used in the previous study published by Notaguchi et al. (2020). This work was supported by the Japan Society for the Promotion of Science Grants-in-Aid for Scientific Research (18KT0040, 18H03950, and 20H03273) and the Canon Foundation (R17-0070) to M.N. We greatly appreciate all the authors of Tsutsui et al. (2020) and Y. Hakamada, M. Hattori, R. Masuda, M. Ishihara, I. Yoshikawa, and A. Yagi for technical support.
Competing interests
The authors declare no conflicts of interest related to this work.
References
- Goldschmidt, E. E. (2014). Plant grafting: new mechanisms, evolutionary implications. Front Plant Sci 5: 727.
- Huang, N. C. and Yu, T. S. (2015). A pin-fasten grafting method provides a non-sterile and highly efficient method for grafting Arabidopsis at diverse developmental stages. Plant Methods 11: 38.
- Kurotani, K., Tabata, R., Kawakatsu, Y., Sugita, R., Okayasu, K., Tanoi, K. and Notaguchi, M. (2020). Autophagy is induced during plant grafting for wound healing. bioRxiv: 2020.02.14.949453.
- Marsch-Martínez, N., Franken, J., Gonzalez-Aguilera, K. L., de Folter, S., Angenent, G. and Alvarez-Buylla, E. R. (2013). An efficient flat-surface collar-free grafting method for Arabidopsis thaliana seedlings. Plant Methods 9(1): 14.
- Notaguchi, M., Daimon, Y., Abe, M. and Araki, T. (2009). Adaptation of a seedling micro-grafting technique to the study of long-distance signaling in flowering of Arabidopsis thaliana. J Plant Res 122(2): 201-214.
- Notaguchi, M., Kurotani, K. I., Sato, Y., Tabata, R., Kawakatsu, Y., Okayasu, K., Sawai, Y., Okada, R., Asahina, M., Ichihashi, Y., Shirasu, K., Suzuki, T., Niwa, M. and Higashiyama, T. (2020). Cell-cell adhesion in plant grafting is facilitated by β-1,4-glucanases. Science 369(6504): 698-702.
- Notaguchi, M. and Okamoto, S. (2015). Dynamics of long-distance signaling via plant vascular tissues. Front Plant Sci 6: 161.
- Shinozaki, D., Notaguchi, M. and Yoshimoto, K. (2020). Importance of non-systemic leaf autophagy for suppression of zinc starvation induced-chlorosis. Plant Signal Behav 15(5): 1746042.
- Thomas, H. R. and Frank, M. H. (2019). Connecting the pieces: uncovering the molecular basis for long-distance communication through plant grafting. New Phytol 223(2): 582-589.
- Tsutsui, H. and Notaguchi, M. (2017). The Use of Grafting to Study Systemic Signaling in Plants. Plant Cell Physiol 58(8): 1291-1301.
- Tsutsui, H., Yanagisawa, N., Kawakatsu, Y., Ikematsu, S., Sawai, Y., Tabata, R., Arata, H., Higashiyama, T. and Notaguchi, M. (2020). Micrografting device for testing systemic signaling in Arabidopsis. Plant J 103(2): 918-929.
- Turnbull, C. G., Booker, J. P. and Leyser, H. M. (2002). Micrografting techniques for testing long-distance signalling in Arabidopsis. Plant J 32(2): 255-262.
- Wang, Y. Q. (2011). Plant grafting and its application in biological research. Chin Sci Bull 56: 3511-3517.
- Yin, H., Yan, B., Sun, J., Jia, P., Zhang, Z., Yan, X., Chai, J., Ren, Z., Zheng, G. and Liu, H. (2012). Graft-union development: a delicate process that involves cell-cell communication between scion and stock for local auxin accumulation. J Exp Bot 63(11): 4219-4232.
Article Information
Copyright
© 2021 The Authors; exclusive licensee Bio-protocol LLC.
How to cite
Readers should cite both the Bio-protocol article and the original research article where this protocol was used:
- Tsutsui, H., Kawakatsu, Y. and Notaguchi, M. (2021). Micrografting in Arabidopsis Using a Silicone Chip. Bio-protocol 11(12): e4053. DOI: 10.21769/BioProtoc.4053.
- Notaguchi, M., Kurotani, K. I., Sato, Y., Tabata, R., Kawakatsu, Y., Okayasu, K., Sawai, Y., Okada, R., Asahina, M., Ichihashi, Y., Shirasu, K., Suzuki, T., Niwa, M. and Higashiyama, T. (2020). Cell-cell adhesion in plant grafting is facilitated by β-1,4-glucanases. Science 369(6504): 698-702.
Category
Plant Science > Plant physiology > Phenotyping
Plant Science > Plant molecular biology > RNA > RNA detection
Biological Sciences > Biological techniques
Do you have any questions about this protocol?
Post your question to gather feedback from the community. We will also invite the authors of this article to respond.