- Protocols

- Articles and Issues
- For Authors
- About
- Become a Reviewer

Immuno-electrophysiology on Neuromuscular Junctions of Drosophila Third Instar Larva

Published: Vol 11, Iss 3, Feb 5, 2021 DOI: 10.21769/BioProtoc.3913 Views: 4193
Reviewed by: Alexandros AlexandratosPradeep Kumar BhaskarFilipa Vaz
Original research article
The authors used this protocol in:

Mar 2020
Advertisement


Protocol Collections
Comprehensive collections of detailed, peer-reviewed protocols focusing on specific topics


Abstract
Alterations in synaptic transmission are critical early events in neuromuscular disorders. However, reliable methodologies to analyze the functional organization of the neuromuscular synapses are still needed. This manuscript provides a detailed protocol to analyze the molecular assembly of the neuromuscular synapses through immune-electrophysiology in Drosophila melanogaster. This technique allows the quantification of the molecular behavior of the neuromuscular synapses by correlating the structural configuration of the synaptic boutons with their electrical activity.
Keywords: Neuromuscular synapsesBackground
The functional organization of the neuromuscular junctions (NMJ) in Drosophila melanogaster third instar larva present prominent advantages to study the molecular mechanisms of synaptic formation and function (Feiguin et al., 2009; Godena et al., 2011; Romano et al., 2014 and 2015; Strah et al., 2020), which appears conserved in other species including humans. In that respect, the anatomical organization of the Drosophila NMJs is made of multiple synaptic boutons, formed at the final arborizations of the motor axons. The differentiation and maintenance of these structures are responsible for the innervation of the skeletal muscles and implicate the coordinated action of different molecules, specialized in the establishment of cell contacts and the machinery required to release, receive and integrate the neurotransmitter signaling. In addition, the powerful genetic tools developed in Drosophila together with the anatomical resolution of the nervous system to individual neurons, provide the rare opportunity to perform genome wide unbiased searches for molecular phenotypes in well distinguish cell tissues. Despite individual protocols to visualize the establishment of the neuromuscular synapses already exist in Drosophila (Sabeva and Bykhovskaia, 2017; Goel et al., 2019), in this manuscript (Figure 1) we provide a precise set of rules to bring together the simultaneous analysis of the molecular and physiological events that take place during the innervation of the skeletal muscles in vivo.
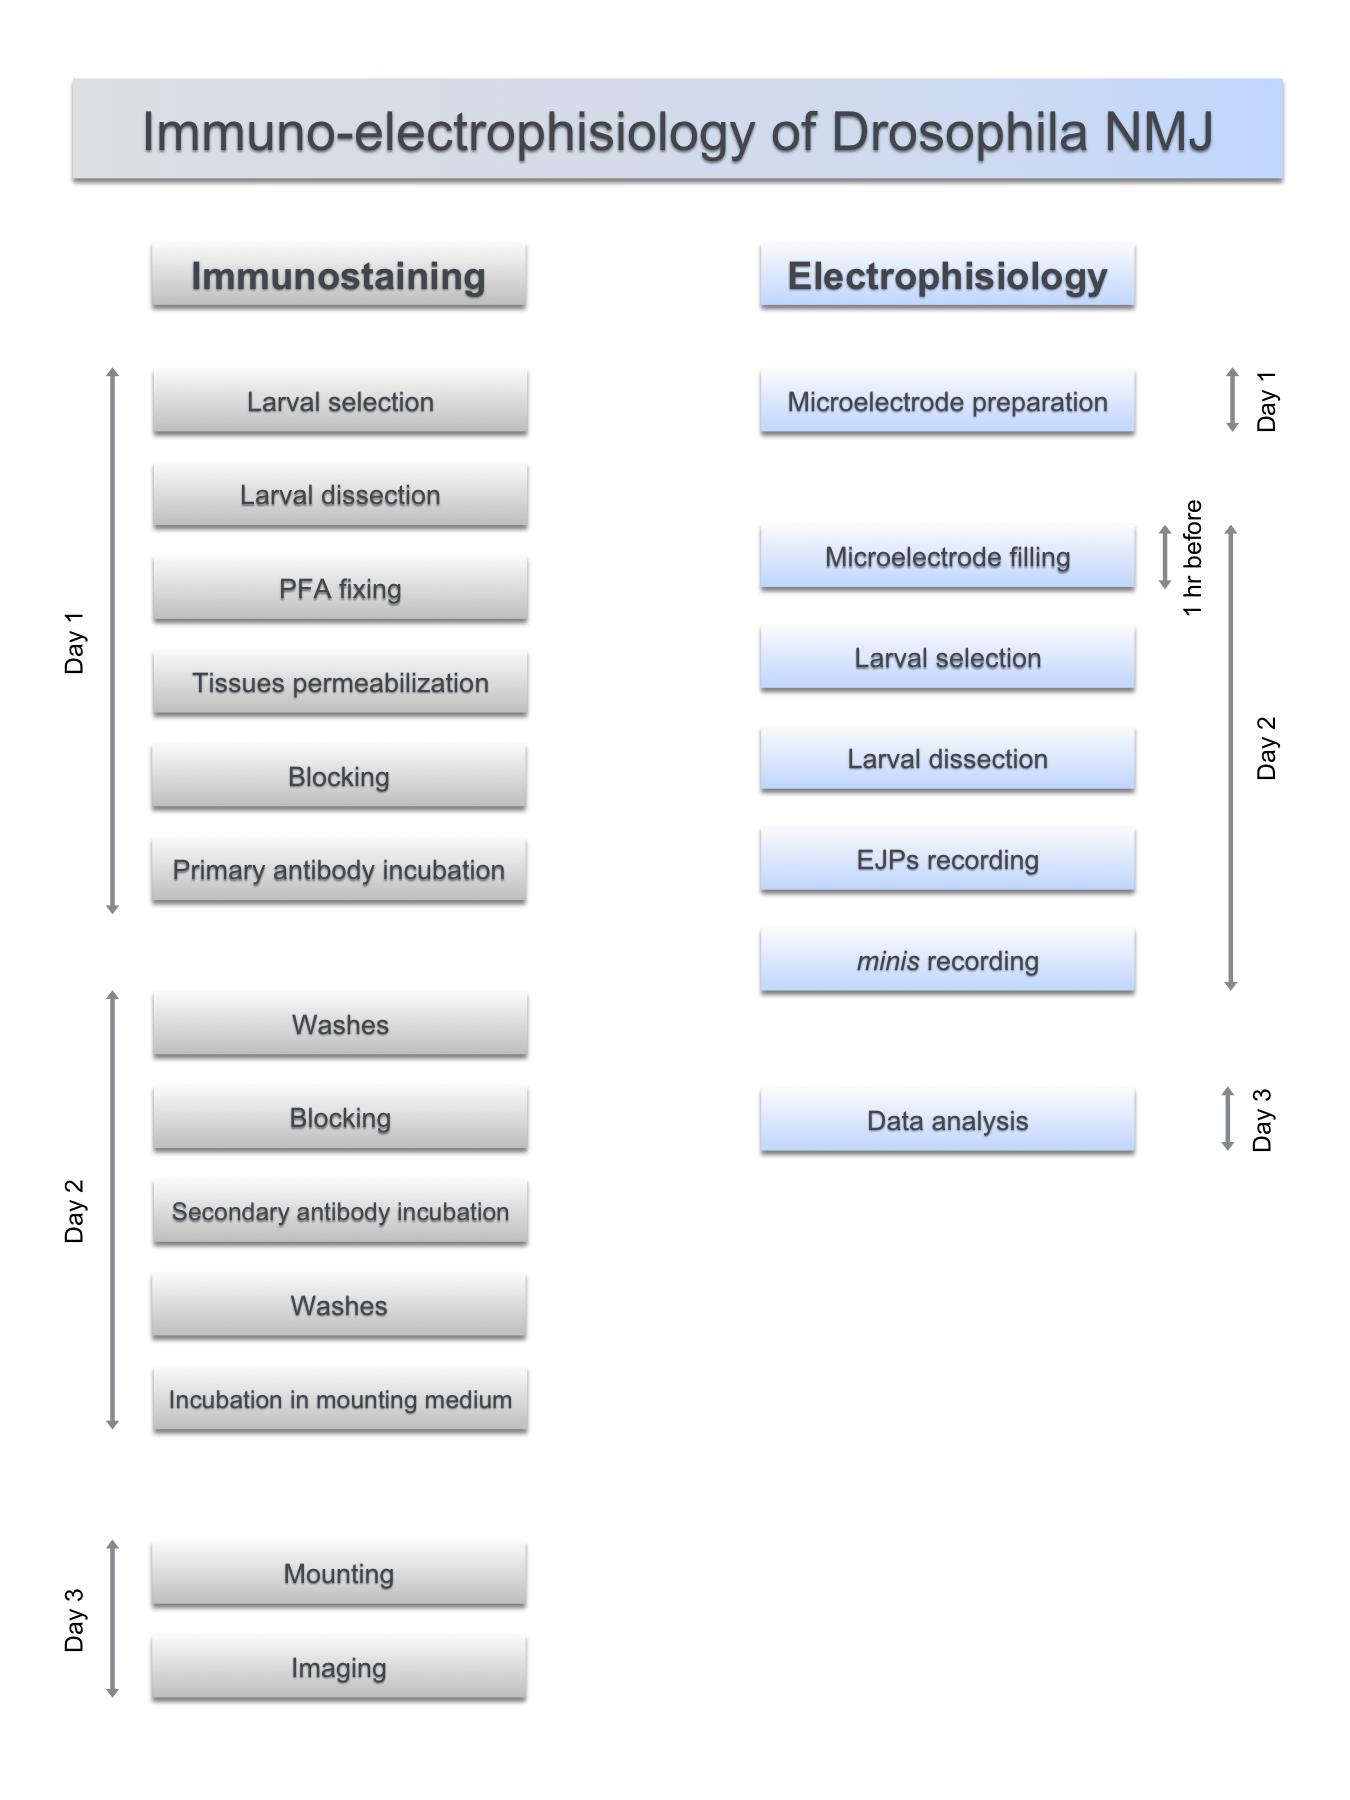
Figure 1. Synchronized steps in the functional analysis of the neuromuscular junctions
Materials and Reagents
Material and Reagents for NMJ immunohistochemistry
0.5 ml tubes (Sarstedt, catalog number: 72.699 )
2.0 ml tubes (Eppendorf, catalog number: 00 30120094 )
Whatmann qualitative filter paper (Sigma-Aldrich, catalog number: WHA1001917 )
Microscope slides Superfrost Plus (Thermo Fisher Scientific, catalog number: J1800AMNT )
Glass cover slips (Electron Microscopy Science, catalog number: 72210-10 )
Polystyrene Petri dish (94 mm, Greiner, catalog number: 633180 )
Small polystyrene dish (35 mm, CytoOne, catalog number: CC7672-3340 )
Drosophila melanogaster third instar larvae
Note: Wild type strains like Canton S or Oregon R or specific lines can be obtained from Bloomington Drosophila Stock Center (https://bdsc.indiana.edu/), from Kyoto stock Center DGRR (https://kyotofly.kit.jp/cgi-bin/stocks/index.cgi), from VDRC (https://stockcenter.vdrc.at/control/main) and from FlyORF (https://www.flyorf.ch/).
0.7% agarose plates to keep selected larvae (tissue culture dishes 60 x 15 mm (Falcon, catalog number: 353004 ), Ultra pure agarose (Thermo Fischer, catalog number: 16500100 ). Plates should be stored, well wrapped in plastic bags in fridge at 4 °C
16% paraformaldheyde (Electron Microscopy Science, catalog number: 15710 ), keep 500 μl aliquots in 2 ml tubes at -20 °C
Tween-20 (Sigma-Aldrich, catalog number: P9416 )
Calcium chloride dihydrate (CaCl2·2H2O) (Sigma-Aldrich, catalog number: C5080 )
HEPES (Sigma-Aldrich, catalog number: H3375 )
HEPES sodium salt (Sigma-Aldrich, catalog number: H7006 )
Magnesium Chloride solution (Sigma-Aldrich, catalog number: M1028 )
Potassium Chloride (KCl) (Sigma-Aldrich, catalog number: P3911 )
Sodium Chloride (NaCl) (Sigma-Aldrich, catalog number: S9888 )
Sodium bicarbonate (NaHCO3) (Sigma-Aldrich, catalog number: S6014 )
Sucrose (Sigma-Aldrich, catalog number: S1888 )
Trehalose (Sigma-Aldrich, catalog number: T9531 )
Normal Goat Serum (VectorLabs, catalog number: S-1000 ), keep aliquoted at -20 °C
AffiniPure Rabbit Anti-Horseradish Peroxidase (Jackson Immunoresearch, catalog number: 323-005-021 )
Cy3-Affinipure Goat Anti-HRP (Jackson Immunoresearch, catalog number: 123-165-021 )
Goat anti-Rabbit IgG (H+L) Cross-Adsorbed Secondary Antibody, Alexa Fluor 555 (Thermo Fisher Scientific, catalog number: A21428 ), store 4 °C aliquoted, light protected
Goat anti-Rabbit IgG (H+L) Cross-Adsorbed Secondary Antibody, Alexa Fluor 488 (Thermo Fisher Scientific, catalog number: A11008 ), store 4 °C aliquoted, light protected
Goat anti-Rabbit IgG (H+L) Cross-Adsorbed Secondary Antibody, Alexa Fluor 647 (Thermo Fisher Scientific, catalog number: A21244 ), store 4 °C aliquoted, light protected
Goat anti-Mouse IgG (H+L) Cross-Adsorbed Secondary Antibody, Alexa Fluor 555 (Thermo Fisher Scientific, catalog number: A21422 ), store 4 °C aliquoted, light protected
Goat anti-Mouse IgG (H+L) Cross-Adsorbed Secondary Antibody, Alexa Fluor 488 (Thermo Fisher Scientific, catalog number: A11001 ), store 4 °C aliquoted, light protected
Goat anti-Mouse IgG (H+L) Cross-Adsorbed Secondary Antibody, Alexa Fluor 647 (Thermo Fisher Scientific, catalog number: A21235 ), store 4 °C aliquoted, light protected
Alexa Fluor Phalloidin 555 (Thermo Fisher Scientific, catalog number: A34055 ), store -20 °C, aliquoted, light protected
Alexa Fluor Phalloidin 350 (Thermo Fisher Scientific, catalog number: A22281 ), store -20 °C, aliquoted, light protected
Alexa Fluor Phalloidin 488 (Thermo Fisher Scientific, catalog number: A12379 ), store -20 °C, aliquoted, light protected
Slow Fade Gold (Thermo Fisher Scientific, catalog number: S36936 ), store -20 °C
Elastomer (Sylgard 184 curing agent elastomer, Down Corning, catalog number: DOWC6341655 )
Charcoal-Darco-100 mesh powder (Aldrich, catalog number: 242276 )
Sylgard dissection plates, both transparent and black (see Recipes)
HL-3-Ca2+ free solution (see Recipes)
4% PFA (see Recipes)
PBS 1× (see Recipes)
PBT (see Recipes)
5% NGS (see Recipes)
Material and Reagents for NMJ electrophysiology
Silver wire (World Precision Instruments, catalog number: AGW2030 )
Flexible needle electrode Microfil (World Precision Instruments, catalog number: MF34G-5 )
Glass capillaries for intracellular microelectrodes (length 100 mm, inner diameter 0.86 mm, outer diameter 1.50 mm; Science Products, catalog number: GB150F-10 )
Glass capillaries for stimulating suction microelectrode (length 100 mm, inner diameter 1.05 mm, outer diameter 1.50 mm; Science Products, catalog number: GB150TF-10 )
Microelectrode holder with pressure port for suction microelectrodes (WPI, catalog number: MEH6SFW )
Microelectrode holder for intracellular microelectrodes (ALA Scientific Instruments, catalog number: BNC-PPH-0P-1.5 )
Iron (III) chloride (FeCl3) (Sigma-Aldrich, catalog number: 451649 )
Silver chloride (AgCl) (Sigma-Aldrich, catalog number: 204382 )
Potassium chloride (KCl) (Sigma-Aldrich, catalog number: P9333 )
Sodium chloride (NaCl) (Sigma-Aldrich, catalog number: S3014 )
Magnesium chloride, standard solution 1 M (MgCl2) (Honeywell International, Fluka, catalog number: 63020 )
Calcium chloride dihydrate (CaCl2·2H2O) (Sigma-Aldrich, catalog number: C5080 )
Hydrogen chloride (HCl) (Sigma-Aldrich, catalog number: H1758 )
Potassium acetate (CH3COOK) (Sigma-Aldrich, catalog number: P3542 )
HEPES (Sigma-Aldrich, catalog number: H3784 )
Threalose (Sigma-Aldrich, catalog number: T9531 )
Sucrose (Sigma-Aldrich, catalog number: S1888 )
Intracellular microelectrode filling solution (see Recipes)
Sylgard dissection plates (see Recipes)
Equipment
Equipment for NMJ Dissection
Stainless Steel Minutien Pins (FST, catalog number: 26002-10 )
One tweezer Dumont n.°5 student standard tip 0.1 × 0.06, for larvae and pin manipulation (FST, catalog number: 91150-20 )
Two tweezers Dumont n.°5 fine forceps tip 0.05 × 0.01 (FST, catalog number: 11254-20) for dissection
Spring Scissor 2.5 mm Blades Straight (FST, catalog number: 15000-08 )
Pipetman Classic P200 (Gilson, catalog number: F123601 )
Pipette Tip 200 (Sarstedt, catalog number: 70.760.002 )
Stereomicroscope for dissection (Leica, catalog number: MZ7.5 )
Goose neck 2 arms (Leica, catalog number: 30130021 )
Fluorescence stereomicroscope with UV light for larval selection if needed (Leica, catalog number: MZ12.5 )
Equipment for NMJ immunohistochemistry
Nutating mixer (LabNet, GyroMini, catalog number: S0500 )
Pipetman Classic P10 (Gilson, catalog number: F144802 )
Pipetman Classic P200 (Gilson, catalog number: F123601 )
Pipetman Classic P1000 (Gilson, catalog number: F123602 )
Pipette Tip 10 (Sarstedt, catalog number: 70.113 0)
Pipette Tip 200 (Sarstedt, catalog number: 70.760.002 )
Pipette Tip 1000 (Sarstedt, catalog number: 70.762.100 )
Confocal laser microscope (Zeiss, model: LSM880 )
Equipment for NMJ electrophysiology
Electrophysiology setup
Antivibration table (Vision IsoStation, Newport, https://www.newport.com.cn/)
Stereomicroscope for the electrophysiology setup (Leica Microsystem, model: Leica MZ125 , numeric aperture 0.8 with plan apochromatic objective 1.6×)
Hydraulic micromanipulator for intracellular recording electrode (NARISHIGE, model: MHW-103 , Three-axis Water Hydraulic Micromanipulator)
Stimulation electrode micromanipulators (Manual Micromanipulator, MARZHAUSER WETZLAR, model: MM 33 )
Faraday cage
Stimulator: S88 stimulator (Grass, Warwick, RI, USA)
Amplifier: intracellular bridge mode amplifier (Npi Electronic, model: BA-01X )
Pipette puller ( P-97 Flaming/Brown Micropipette Puller) (Sutter Instruments, model: P-97 )
A/D interface (National Instruments, model: PCI-6221 ) and computer compatible with the software
PC for online visualization of recorded signals and offline analysis of recorded traces
Software
ImageJ ( Wayne Rasband, NIH, https://imagej.nih.gov/)
Prism (GraphPad, https://www.graphpad.com/scientific-software/prism/)
WinEDR software (http://spider.science.strath.ac.uk/sipbs/software_ses.htm)
Procedure
NMJ immunohistochemistry
Larval selection
Collect crawling third instar larvae (L3) using dissection forceps and place them in a drop of water on a black sylgard plate to clean them from any residual fly-food. Take care to avoid larval damage.
If a selection against a fluorescent balancer should be necessary, transfer the sylgard plate under the fluorescence stereomicroscope and select the larvae of your interest.
Male and female larvae could be separated (on the basis of visible testis in male larvae).
Transfer selected larvae on a 0.7% agarose plate.
Larval dissection for immunohistochemistry
Select one larva and place it on a dry black sylgard plate on which you have already pinned several groups of 6 pins each. Each larva requires 6 pins for its dissection. Transfer sylgard plate under a stereomicroscope.
Larva must be pinned with the dorsal side up, which can be recognized by the presence of the two visible lateral tracheae (left and right) that span the entire longitudinal axis of the dorsal larval region. First, pin the head placing the pin very close to the larval mouth hooks in order to avoid central nervous system damage. Subsequently pin the larva tail gently and slightly stretch the larva (Figure 2-1 and Video 1).
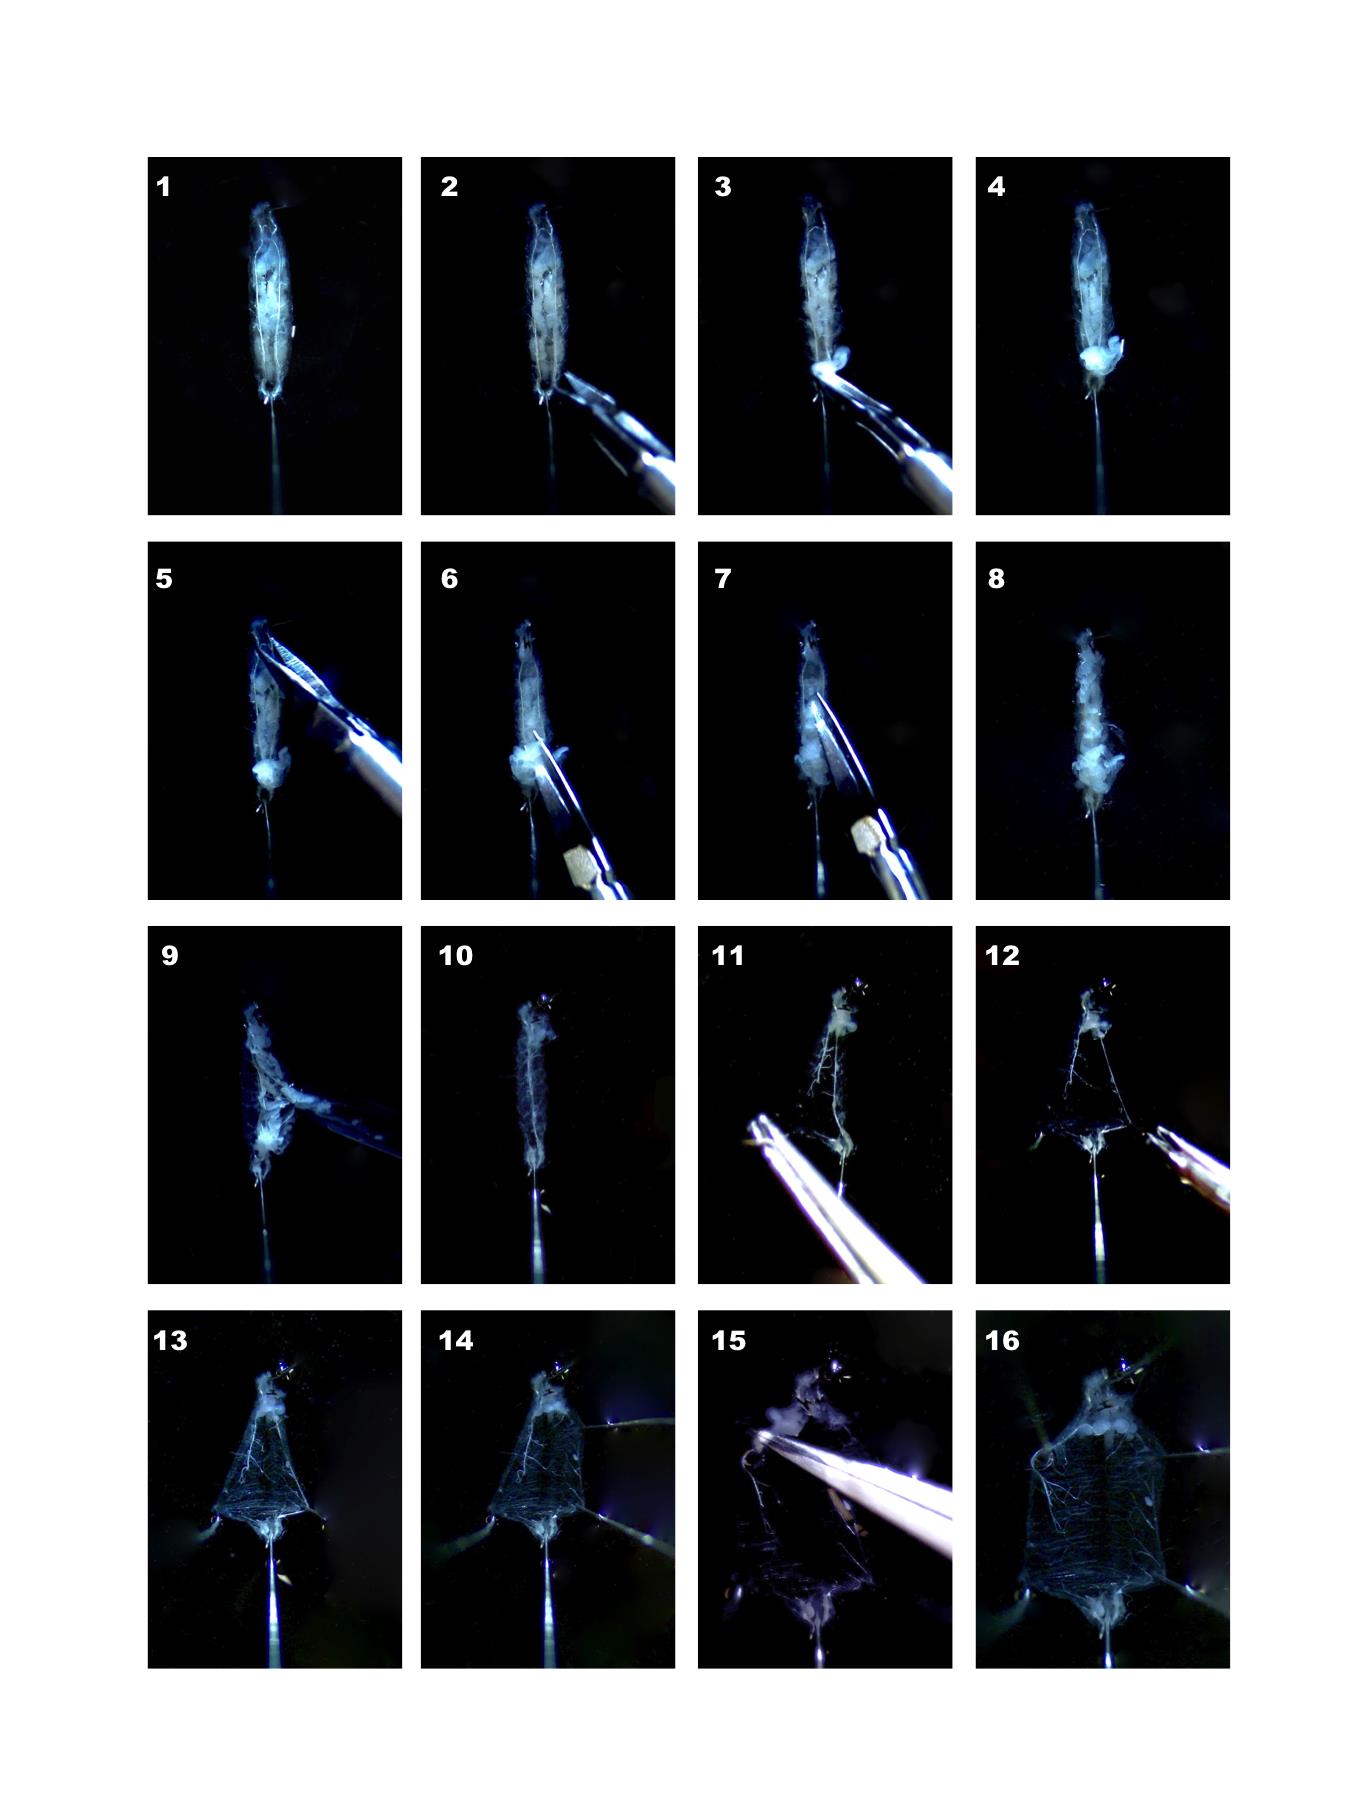
Figure 2. Sequential steps illustrating the dissection of Drosophila melanogaster third instar larvae Video 1. Larval Dissection
Add 40 μl of HL-3-Ca2+ free solution to submerge the larva.
Do a transversal cut in proximity of the tail, enter with a scissor and cut up to the hook (Figure 2, 2-7).
Wash with HL-3-Ca2+ free solution pipetting up and down to remove organs. Use P200 pipette (Figure 2, 8-10).
Pin to open larvae, preferentially in proximity of denticle belts (Figure 2, 11-16), if still some organs are present remove them, taking care to remove the proventriculus and tracheas to avoid floating of the sample during the subsequent step of immunostaining.
Remove HL-3-Ca2+ free solution and dry sample touching its proximity gently with filter paper.
Add 80 μl of 4% PFA solution.
Fix for 20 min.
Remove the 4% PFA solution by using a P200 pipette, remove the pins, and transfer larval fillet to a 0.5 ml tube filled with 400 μl of iced HL-3-Ca2+ free solution. Keep fillet in ice until the end of dissection of all your samples. Do not exceed a 3 h interval of time.
Note: A stereomicroscope with an above lightening may be sufficient for larval dissection, however, the additional lateral lightening using light optic fibers projectors may be more comfortable for some operators.
Immunostaining
Repeat three washes with PBT, of 5 min each, keeping tubes on a nutating mixer at room temperature, to allow complete permeabilization of tissues.
Remove PBT and block nonspecific sites with 30 min incubation of fillets in 400 μl of 5% NGS.
Dilute your primary antibody, as required by supplier company, in 5% NGS. Consider that any sample requires approximately 300 μl of volume, so prepare a unique dilution of your primary antibody to be aliquoted in all your samples. Leave sample on nutating mixer at 4 °C overnight.
Remove primary antibody (you can store it at -20 °C for a second use), and repeat 3 washes of 400 μl each with PBT, at room temperature on nutating mixer.
Before adding the secondary antibody repeat a 30 min blocking with 5% NGS.
In the meantime, dilute the secondary antibody required by your primary one. On our experience, the Alexa here reported works perfectly with a 1:500 dilution in 5% NGS.
Incubate on a nutating mixer at room temperature for 2 h in the dark.
Discard secondary antibody solution and wash larvae fillets with PBT for 15 min. Repeat three times.
Remove all PBT, add 30 μl of Slow Fade Gold solution and keep 4 °C protected from light up to mounting.
Put all larva fillets on a corner of an uncharged microscope slide and gently align one by one on the microscope slide. Try to keep all fillets in the same orientation, ventrally or dorsally attached to the slide, and with hooks in the same direction, this will facilitate confocal acquisitions. Cover with some drops of Slow fade and gently lay a coverslip avoiding bubbles and displacement of larva fillets.
Image the immunohistochemical sample at a confocal microscope.
NMJ electrophysiology
Intracellular and Stimulating Microelectrode preparation
About one hour before the experiment, fill microelectrodes with the intracellular microelectrode filling solution using the flexible needle (see Materials). Keep filled microelectrodes mounted on the specific microelectrode holder, with silver chloride wire bathed inside the microelectrode on one side and connected to Intracellular Amplifier on the other side. Prepare the silver chloride (AgCl) wire by the chemical oxidation of the Ag-coated electrode in 10 mM FeCl3/HCl solution dipping the electrode in the solution for 10 s.
Pull intracellular microelectrodes using the P97 puller from borosilicate glass capillaries (outer diameter: 1.5 mm; inner diameter 0.85 mm) with an inner glass filament which aids microelectrode filling with the intracellular microelectrode filling solution. Puller settings should be adjusted by the experimenter by conveniently changing the different parameters (Velocity, Pulling force, Time, Number of steps, Heating). A good starting approach is to utilize the Puller settings for intracellular microelectrodes provided by the manufacturer, and acquire experience pulling some tens of microelectrodes singularly changing each parameter. Store pulled microelectrodes at room temperature.
Stimulating or "suction" electrodes are prepared according to the above step (b) changing the puller settings in order to obtain a larger tip diameter of about 7-10 μm. Store pulled microelectrodes at room temperature.
At the moment of the experiment, mount suction electrode on the specific holder, and then lower it, using the micromanipulator, into the sylgard plate filled with HL3 solution where the pinned larval body wall was dissected.
When in the HL3 solution, applying gentle negative pressure on the pressure port (use a small syringe connected to the port with a silicone tubing), draw the solution into the suction electrode until the inner silver chloride filament is fully immersed.
Note: A good intracellular microelectrode for larval NMJ preparation should have a resistance of about 15-20 MOhm, which usually corresponds to a tip diameter of about 0.5 μm. Electrode resistance is measured by immersing the microelectrode in the bath and using a specific circuit of an Intracellular amplifier.
Body wall preparation
Collect larvae as previously described for NMJ immunohistochemistry in the step "Larval Selection" and procede with dissection similarly to what has been previously described.
Place selected larvae on a sylgard plate (35 mm) filled with 1 ml of cold (4 °C) HL-3-Ca2+ free solution. The absence of Ca2+ reduces both indirect (nerve evoked activation) and direct activation of larval body wall muscles minimizing larval movements which could interfere with dissection.
Pin larva head and tail to the sylgard coated Petri dish as previously described.
After having pinned head and tail, using a fine forcep, grasp the dorsal larval wall and lift it smoothly in order to facilitate its cut using spring scissors. Inserting one tip of the scissors into the larval dorsal hole, make a longitudinal dorsal firstly towards the larval head and then, towards larval tail. The complete cut of dorsal wall is usually associated with the "spillage" of internal viscera.
Pin, by grasping and holding the edge of the longitudinal dorsal cut in proximity of the tail, both the left and right edges flat to the Petri dish bottom (Figure 2-12). Repeat with two further pins for the right and left edges of the longitudinal dorsal cut in proximity of larval head (Figure 2-14 and 2-15). With 6 pins the opening of the larva is complete leaving the internal viscera accessible.
In the third instar larval body, the central nervous system is placed in a ventral position, and internal viscera are lying dorsally on it. To access the nervous system, therefore, internal viscera (mainly, gut, salivary glands, and the main lateral right and left tracheae) must be removed. This can be achieved by cutting with spring scissors the gut and the right and left tracheae, starting from larval tail. Grasp and hold with fine forceps one of the cut main tracheae, and gently remove (from larval tail towards larval head) the entire internal viscera (gut, salivary gland, and tracheae) cutting the peripheral tracheolae originating from the main tracheae. In proximity of the larval head extremity, particular care should be taken to avoid central nervous system damage. Gut, tracheae, and salivary glands, must be cut around central nervous system, while grasping holding and lifting them with fine forceps.
Once the internal viscera have been removed, complete and ameliorate the dissection by cutting and removing the remained viscera, leaving a clear preparation made by central nervous system (optic lobes and ventral ganglion) segmental peripheral nerves and ventral intact segmental muscle fibers.
Rinse three times the specimen with 1 ml fresh cold HL-3-Ca2+ free solution, and check under stereomicroscope the quality of dissection. An optimal dissected larval body wall preparation should be well transparent, without any sign of muscle damage. Healthy muscle fibers are bright, transparent and clearly striated by focusing at the transmitted light. Damaged fibers are broken, and/or milky and opaque. In a good preparation, segmental fibers pattern should be maintained along almost all entire larval longitudinal axis. Nervous system and segmental nerves should also be undamaged. A careful microscopic inspection of larval body wall preparation to confirm anatomical integrity is a fundamental step for good and reliable electrophysiological recordings. Better to loose time and reduce the number of analyzed animals instead of wasting time in barely reliable electrophysiological recordings.
Electrophysiological recordings
Recording of evoked neurotransmitter release by stimulating segmental nerves
Perform experiments at room temperature (20-22 °C) on body-wall preparations of third instar larvae dissected in HL-3-Ca2+ free solution.
Using fine forceps grasp and hold the central nervous system, while with a spring scissor cut the segmental nerve close to its origin from the ventral ganglion.
Remove the central nervous system (optic lobes and ventral ganglion).
Rinse three times with HL-3-Ca2+ free solution, remove the last wash, and add HL3 solution supplemented of Ca2+ 1 mM final concentration. Incubate at least 10 min before starting electrophysiological recordings.
Transfer the sylgard Petri dish with the pinned larval body wall preparation inside the Faraday cage of your electrophysiology setup.
Place the sylgard Petri dish under the stage of the stereomicroscope and illuminate it from above using a fiber optic projector.
Before focusing the specimen (i.e., with stereomicroscope all the way up), place intracellular microelectrode in the holder of intracellular amplifier headstage.
Note: Electronic equipment is sensitive to static discharges and can be damaged by electrostatic charges. These last can be avoided by touching the grounded Faraday cage when touching amplifier headstage.
Place the suction electrode in the holder connected to the stimulator.
Using the micromanipulators, slowly advance intracellular and suction electrodes close to larval bodywall. Use stereomicroscope to focus on intracellular and suction electrodes while they are slowly positioned close to the larval body wall. When both intracellular and suction electrodes are very close to larval muscles fibers stop their micropositioning.
By using steromicroscope focus and light refraction throughout the specimen, identify A4-6 segmental nerves (Figure 3), place the suction electrode tip close to the cut end of the nerve and draw up the nerve stump in the electrode. An alternative way is to place the tip of the electrode close the nerve trunk and draw up the nerve so that it forms a loop inside the electrode.
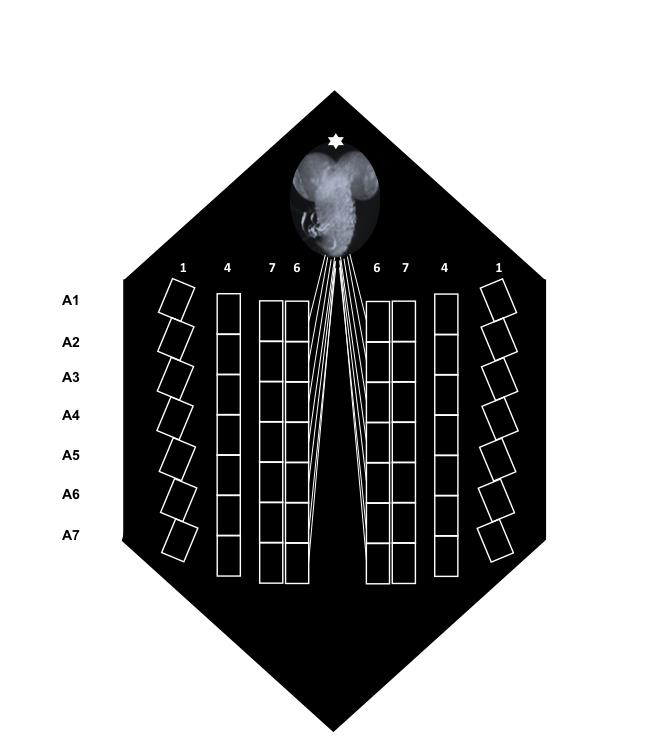
Figure 3. Schematic of a larva fillet immediately after dissection. The location of the abdominal segments (A1-A7) and the position of muscles 1, 4, 6 and 7 are shown. The brain is marked by an asterisk (*).Move slightly backward the suction electrode for a better view of the fibers 6 or 7 of the specific abdominal segment it innervates.
By acting on the micromanipulator, control intracellular microelectrode positioning on the x, y axes, and move forward the microelectrode until very close to fiber 6 or 7 membrane. The close proximity of intracellular microelectrode to muscle fiber membrane is reached when both intracellular electrode tip and muscle fiber are in the same focus. Muscles 6, 7 of abdominal segments A2-A4 were chosen because of their specific type of synapses (type I, glutamatergic [Keshishian et al., 1996]).
Turn on the intracellular amplifier and check microelectrode offset: ground to microelectrode potential should be zero.
Slowly advance microelectrode while checking recorded potential on a PC screen. A sudden drop of recorded potential towards negative values (usually -60/70 mV) indicates that muscle membrane is impaled and microelectrode is in the intracellular milieu.
Muscle fibers with a membrane potential below -60 mV, should be discarded. Membrane potentials of -60 mV or higher, are adjusted to -70 mV, by current injection. In this way, it is not necessary an offline correction for membrane potential of recorded synaptic potentials.
Set the stimulator for a single square wave stimulus.
Stimulate segmental nerve (square wave stimuli, 0.5 ms duration, x1.5 threshold voltage; threshold voltage is the minimum voltage which elicits a synaptic potential) through the suction electrode connected to the Grass S88 stimulator through the SIU.
Apply a single stimulus and check on PC screen it evoked a synaptic potential. Synaptic potentials are recorded as about 30-40 mV amplitude depolarizing potentials (excitatory junctional potentials or EJPs) lasting for about 50 ms. Larval muscle fibers following nerve stimulation do not generate action potentials similarly to mammalian muscle fibers. Hence, it is possible to directly record synaptic potentials without adding any voltage channels blocker. Moreover, muscle length constant is longer than muscle fiber longitudinal length. This biophysical characteristic prevents synaptic potential decay along muscle longitudinal axis. Therefore, synaptic potential amplitude is unchanged close to synaptic boutons and to muscle fiber endings.
Recording of spontaneous neurotransmitter release
Spontaneous synaptic activity is analyzed by recording for a prolonged period of time the miniature excitatory junctional potentials or minis, induced in muscle postsynaptic membrane by the spontaneous fusion with the presynaptic neuronal membrane of one neurotransmitter vesicle. The average amplitude of these minis is about 0.5 mV and their frequency is around 1 Hz.
To record minis follow steps a-i to a-xvi. Because spontaneous synaptic neurotransmitter release is recorded it is not necessary to utilize the suction electrode.
After having impaled muscle fibre and having adjusted membrane potential to -70 mV, record for a period of 120 s membrane potential and minis without any nerve stimulation.
Data analysis
NMJ electrophysiology analysis
Offline analysis of recorded signals
Amplified electrophysiological signals are fed to a PC using an Analog-to-Digital interface, and then visualized and saved using the WinEDR software that can be used also for offline signal analysis.
A basic analysis of recorded EJPs consists in measuring:
Synaptic potential amplitude: Amplitude in mV measured between the resting membrane potential before the onset of stimulus and the peak of the synaptic potential. This is substantially a measure of the number of fused vesicles or the number of postsynaptic receptors (see below, minis).
Maximum depolarization phase: Velocity of depolarization measured in the steepest phase of depolarization. This is a measure of the time and synchrony of vesicles fusion following nerve action potential arrival to the synaptic bouton.
Decay time: Exponential decay of synaptic potential. It is a measure of the function of postsynaptic receptors.
Note: To be mentioned that Matlab (https://it.mathworks.com/products/matlab.html) is also a possible tool for analysis thanks to many different scripts available (electrophysiological tools). As an alternative, it is possible to buy an electrophysiology dedicated software like PClamp (https://www.moleculardevices.com/products/axon-patch-clamp-system/acquisition-and-analysis-software/pclamp-software-suite).
A basic analysis of recorded minis consists in measuring:
Frequency of minis during the entire recorded trace (120 s): This is a measure of spontaneous neurotransmitter release.
Distribution of minis amplitudes: Minis are generated by the fusion of a single vesicle with presynaptic membrane. Hence their amplitudes should be distributed in a gaussian mode close around a mean value. Sometimes two or less frequently three vesicles, fuse together, generating minis which amplitudes are two or three times the value of minis mean amplitude. These multiple integer minis are more frequent when minis frequency is high. Therefore, in these cases, it is possible that minis amplitudes are distributed in a multi gaussian mode, with mean values equal to 1×, 2×, 3× of the minimum mean mini amplitude. The mean minimum minis amplitude (i.e., the amplitude of the postsynaptic potential generated by the fusion of a single vesicle) is extremely important to evaluate EJPs amplitudes (see 1b). Dividing EJPs amplitude by mean minimum minis amplitude gives the number of fused vesicles following nerve stimulation. If mean minimum mini amplitude is similar to controls any EJPs reduction is probably due to a presynaptic alteration. If mean minimum mini amplitude is different to controls, any EJPs reduction is probably consequent to a postsynaptic impairment.
Interval between one mini and the following one: This is a measure of the randomness of these events. The distribution of these intervals should follow a Poisson's distribution.
Notes
Immunohistochemistry
anti-HRP
Antibodies against horseradish peroxidase (HRP) bind to Drosophila neuronal membranes being a specific neuronal marker (Jan and Jan, 1982) Anti HRP, if unconjugated (Jackson Immunoresearch, catalog number: 323-005-021 ), must be added together with your primary antibody (dilution1:150), while the Cy3-conjugated form (Jackson Immunoresearch, catalog number: 123-165-021 ) has to be used as a secondary one (dilution 1:150).
Phalloidin
Phalloidin is a toxic peptide (isolated from the mushroom Amanita phalloides) whose fluorescent conjugated provides convenient probes for actin filaments visualization (Adams and Pringle, 1991). It can be added to your sample during the secondary antibody incubation (dilution 1:50).
Recipes
Sylgard dissection plates
For suitable plate strength use 8.8 g of curing agent for each 100 g of elastomer (Sylgard 184 curing agent elastomer)
Add 1 g of Activated Charcoal-Darco-100mesh to make them black if desired
Pour both large polystirene Petri dish (94 mm) and small polystyrene dish (35 mm)
PBS 1× composition
137 mM NaCl
10 mM Phosphate buffer
2.7 mM KCl, pH 7.4
Autoclave and store at 4 °C
4% PFA
Prepare 2 ml 4% PFA by adding 500 μl of PBS 1× and 1 ml of water to 500 μl of 16% paraformaldheyde
PBT
PBS 1× with 0.1% final concentration of Tween-20
Sterilize with 0.22 μm filter and store at 4 °C
HL-3-Ca2+ free solution
70 mM NaCl
5 mM KCl
20 mM MgCl2
5 mM trehalose
115 mM sucrose
2.5 mM HEPES-HCl
2.5 mM HEPES-NaOH
Bring to pH of 7.2, using NaHCO3
Solution must be freshly prepared
Note: For electrophysiological recordings, 1 mM Ca2+ is added to the solution. Ca2+ is added from a 2 M Ca2+ in deionized water stock solution maintained at 4 °C (Stewart et al., 1994).
5% NGS
Normal Goat Serum diluted in PBT up to a 5% final concentration of serum
Keep 100 μl aliquots of 100% Normal Goat Serum in 2.0 ml tubes at -20 °C and add, at the moment of use, 1,900 μl of PBT
Intracellular microelectrode filling solution
Dilute 1:2 a solution of 3 M KCl and 3 M CH3CO2K dissolved in deionized water (Megighian et al., 2010)
Solution must be freshly prepared
Competing interests
The authors declare that they have no competing interests.
References
- Adams, A. E. and Pringle, J. R. (1991). Staining of actin with fluorochrome-conjugated phalloidin. Methods Enzymol 194: 729-731.
- Feiguin, F., Godena, V. K., Romano, G., D'Ambrogio, A., Klima, R. and Baralle, F. E. (2009). Depletion of TDP-43 affects Drosophila motoneurons terminal synapsis and locomotive behavior. FEBS Lett 583(10): 1586-1592.
- Godena, V. K., Romano, G., Romano, M., Appocher, C., Klima, R., Buratti, E., Baralle, F. E. and Feiguin, F. (2011). TDP-43 regulates Drosophila neuromuscular junctions growth by modulating Futsch/MAP1B levels and synaptic microtubules organization. PLoS One 6(3): e17808.
- Goel, P., Li, X. and Dickman, D. (2019). Estimation of the Readily Releasable Synaptic Vesicle Pool at the Drosophila Larval Neuromuscular Junction. Bio-protocol 9(1): e3127.
- Jan, L. Y. and Jan, Y. N. (1982). Antibodies to horseradish peroxidase as specific neuronal markers in Drosophila and in grasshopper embryos. Proc Natl Acad Sci U S A 79(8): 2700-2704.
- Keshishian, H., Broadie, K., Chiba, A. and Bate, M. (1996). The Drosophila neuromuscular junction: a model system for studying synaptic development and function. Annu Rev Neurosci 19: 545-575.
- Megighian, A., Scorzeto, M., Zanini, D., Pantano, S., Rigoni, M., Benna, C., Rossetto, O., Montecucco, C. and Zordan, M. (2010). Arg206 of SNAP-25 is essential for neuroexocytosis at the Drosophila melanogaster neuromuscular junction. J Cell Sci 123(19): 3276-3283.
- Romano, G., Klima, R., Buratti, E., Verstreken, P., Baralle, F. E. and Feiguin, F. (2014). Chronological requirements of TDP-43 function in synaptic organization and locomotive control. Neurobiol Dis 71: 95-109.
- Romano, G., Appocher, C., Scorzeto, M., Klima, R., Baralle, F.E., Megighian, A. and Feiguin, F. (2015). Glial TDP-43 regulates axon wrapping, GluRIIA clustering and fly motility by autonomous and non-autonomous mechanisms. Hum Mol Genet 24(21): 6134-6145.
- Sabeva, N.S. and Bykhovskaia, M. (2017). FM1-43 Photoconversion and Electron Microscopy Analysis at the Drosophila Neuromuscular Junction. Bio-protocol 7(17): e2523.
- Strah, N., Romano, G., Introna, C., Klima, R., Marzullo, M., Ciapponi, L., Megighian, A., Nizzardo, M. and Feiguin, F. (2020). TDP-43 promotes the formation of neuromuscular synapses through the regulation of Disc-large expression in Drosophila skeletal muscles. BMC Biol 18: 34.
- Stewart, B. A., Atwood, H. L., Renger, J. J., Wang, J. and Wu, C. F. (1994). Improved stability of Drosophila larval neuromuscular preparations in haemolymph-like physiological solutions. J Comp Physiol A 175(2): 179-191.
Article Information
Copyright
© 2021 The Authors; exclusive licensee Bio-protocol LLC.
How to cite
Klima, R., Romano, G., Gbadamos, M., Megighian, A. and Feiguin, F. (2021). Immuno-electrophysiology on Neuromuscular Junctions of Drosophila Third Instar Larva. Bio-protocol 11(3): e3913. DOI: 10.21769/BioProtoc.3913.
Category
Neuroscience > Cellular mechanisms > Synaptic physiology
Cell Biology > Cell imaging > Confocal microscopy
Cell Biology > Cell signaling > Synaptic transmision
Do you have any questions about this protocol?
Post your question to gather feedback from the community. We will also invite the authors of this article to respond.